PromethION 2 Integrated user manual (P2I_9202_v1_revI_23Sep2025)
Protocol
PromethION 2 Integrated user manual V P2I_9202_v1_revI_23Sep2025
This guide will help you install, check and configure your PromethION 2 Integrated.
Our device FAQs are located here.
For Research Use Only.
FOR RESEARCH USE ONLY
Contents
Overview
Installation
- 2. What's in the box
- 3. Installing and powering on the device
- 4. Network settings and connection
- 5. Changing the default password and hostname
- 6. (Advanced) Updating the timezone and setting a local NTP server
- 7. Hardware check
Pre-sequencing checks and sequencing run
After completing a sequencing run
Updating the software
- 13. Updating the software via the terminal
- 14. Updating MinKNOW from the UI using either the integrated screen or an external monitor
Operating system update on PromethION 2i
Troubleshooting
Overview
This guide will help you install, check and configure your PromethION 2 Integrated.
Our device FAQs are located here.
For Research Use Only.
1. Device information
The PromethION 2 Integrated
The PromethION 2 (P2i) is a benchtop device that runs up to two PromethION Flow Cells. Each flow cell is independently addressable, meaning that you can run experiments concurrently or individually. The P2i is a standalone product that includes enterprise-grade compute that performs all data acquisition and basecalling on the device.
The device has an integrated screen for interacting with the sequencing software, MinKNOW. This allows you to start, stop, and monitor sequencing runs as well as access other analysis features in MinKNOW. The device also has connectivity on the rear to plug in an external display, which enables access to the Ubuntu operating system/desktop and to the analysis software, EPI2ME.

Technical specification
| Component | Specification |
|---|---|
| Size and weight | 180 mm x 225 mm x 430 mm, 10.6 kg |
| Mains supply voltage | 100-240 VAC (50/60 Hz) |
| Peak power consumption | 750 W |
| Storage | 15 TB SSD |
| Memory | 64 GB DDR4 |
| CPU/GPU | 1x Intel Core i7 (12-core/20-threads) 1x NVIDIA Ampere-series GPU |
| Operating system | Ubuntu 20.04 LTS |
| Software installed | MinKNOW |
| Environmental conditions | Designed to sequence at +18ºC to +25ºC* |
*Functional range of electronics +5ºC to +40ºC
PromethION 2 Integrated information
2. What's in the box
PromethION 2 Integrated packaging

What's in the box - PromethION 2 Integrated
- 1x PromethION 2 Integrated
- 5x C13 power cables (1x US, 1x UK, 1x EU, 1x CN, 1x AUS) for international use
- 2x Configuration Test Cells (CTCs)
Status dots There are two coloured dots on the integrated display of the device to indicate the flow cell status: A and B, one for each flow cell position. They display the following patterns:
- Status dots are solid white: Device ready, no flow cells inserted.
- Status dots are solid blue: Flow cells inserted.
- Status dots pulse green: Script is running/data acquisition in progress (this includes the hardware check and flow cell check).
- Status dots solid red: Run finished with error. Contact Support if you see this pattern.
- Status dots are solid blue: Script ended successfully.
3. Installing and powering on the device
Recommended laboratory location
- Place the device on a strong, clean laboratory bench.
- Allow at least 30 cm clearance all around the device to ensure the sequencing temperature is stable throughout your sequencing run, resulting in the highest quality data.
- Do not cover any ventilation grilles.
- Carry out sequencing at a room temperature of +18°C to +22°C.
- Ensure that the Ethernet (RJ45) and mains power sockets are in close proximity.
- Ensure that the power socket is easily accessible should you need to disconnect the device in case of an emergency.
Preparing for installation
Before you install the device, make sure you have the following:
- 1x Ethernet cable (cat 5e or greater for max 2.5 Gbps speeds)
- Network access providing:
- IP address through DHCP
- Outbound-only access to the internet over ports 80 and 443
- Firewall permissions for access to AWS eu-west-1 IP ranges listed here, in addition to: 178.79.175.200 and 96.126.99.215
Notes on external display:
If you are using an optional external display for accessing the Ubuntu desktop or EPI2ME, plug in the monitor, keyboard, and mouse, and power on the monitor before switching on the device.
The external display should not be turned off or unplugged while the device is turned on as this will result in a problem with the integrated screen (screensaver/energy saving is fine).
If you plan to use the external display you will need the following:
- 1x monitor (HDMI/DisplayPort compatible)
- 1x appropriate monitor cable
- 1x USB-A wired keyboard
- 1x USB-A wired mouse*
*We recommend using a standard three button wired mouse. You may encounter issues with a non-standard mouse with extra functional buttons.
If you only use the integrated screen, do not plug in the keyboard and mouse, as this will cause the device to boot incorrectly.
Unpack the PromethION 2 Integrated device and place it on the bench where it is to be run.
Ensure there are no flow cells or CTCs inserted into the device.
Attach the cables and peripherals to the ports shown in the diagram in the order described in the following steps.
For first time installation, we recommend using an external monitor (HDMI/DisplayPort compatible), keyboard, and mouse. To be recognised correctly, connect the peripherals before switching on the device. Continued use of the device does not require the monitor, keyboard and mouse, and they can be unplugged if not required.

Connect the external monitor to the HDMI port or Display Port (DP). Only one external monitor is supported.
Connect a mouse and keyboard to the inner-most USB Type A ports.
Plug the Ethernet cable into the Ethernet port.
Plug the P2i AC power adapter into a wall socket and the plug the power cable into the P2i.
Press the power switch up or down to turn on the device.
Once the device has booted, you will see the MinKNOW software load on the integrated screen and a login screen on the external monitor. You will be prompted to enter the username and password for the device. The default username and password is 'prom' for both (also found in the Quick Start Guide). You will then be prompted to update your password. Set a new password using the following criteria:
- Minimum 8 characters
- Must contain a capital letter and a lower case letter
- Must contain a number or special character
- Cannot be a palindrome (e.g. “racecar”)
- Must differ from a previous password by more than 2 characters
We recommend logging into the MinKNOW software using your Community credentials.
To log in, you must be connected to the internet.
From here, you can also change the language in the user interface in the bottom right corner.

You will be prompted to enter your email address and Nanopore password:
If you experience login issues, please visit the Community Support channel (https://community.nanoporetech.com/support) and use Continue as guest for temporary use.
Select the sequencing devices in the Connection Manager to connect to the computer.

You will be taken to the sequencing overview page.

Update MinKNOW
All Oxford Nanopore devices use MinKNOW™ as the primary software. The MinKNOW software carries out several core tasks: data acquisition, real-time analysis and feedback, basecalling, data streaming, controlling the device, and ensuring that the platform chemistry is performing correctly to run the samples. MinKNOW takes the raw data and converts it into reads by recognition of the distinctive change in current that occurs when a DNA strand enters and leaves the pore. MinKNOW then basecalls the reads, and writes out the data into POD5, FAST5 or FASTQ files.
Please update MinKNOW to the latest version when setting up your P2i device for the first time using the instructions in Updating the software via the terminal.
Future updates can also be installed on your device using the integrated screen on the P2i or an external monitor by following the instructions in Updating the software using the integrated screen or an external monitor.
Updates for MinKNOW can be found here: PromethION 2 Integrated (P2i) Software.
4. Network settings and connection
Networking requirements
The P2i supports a maximum transfer speed of 2.5 Gbps using the rear Ethernet port. This connection is used to connect to the local infrastructure. The P2i does not support Wi-Fi.
The Ethernet connection will be used for:
- Sending telemetry* information to Oxford Nanopore Technologies
- Receiving software and firmware updates to the device
- Streaming biological sequence data to your local storage infrastructure
To connect the P2i into the local infrastructure, you need to provide all the appropriate cables.
*Telemetry contains metadata about the settings and conditions of a sequencing run. Nothing specific about the genomic content of individual reads is included - only generic information is logged, such as sequence length and q-score.
Configuring your network
If you want to connect your P2i to a single network, you can use the MinKNOW user interface.
Note: You will need to use an external monitor to configure the network via the Terminal. Plug in and power on the monitor before switching on the P2i. If you plug in the monitor while the P2i is powered on, the device will not recognise the monitor.
To configure your P2i to connect to multiple networks, open a Terminal window and enter:
/opt/ont/mooneye/bin/ont-mooneye-configure-lan
To see help options, run:
sudo /opt/ont/mooneye/bin/ont-mooneye-configure-lan -h
Validate the IP address
You can use the command:
sudo /opt/ont/mooneye/bin/ont-mooneye-configure-lan -v -s
to validate that the IP address has been set correctly using a static or DHCP address.
5. Changing the default password and hostname
Navigate to the host settings to open Device settings.
Click Reset password in the System box.

In the Change Password dialogue box, enter your current password, followed by the new password.

Click Reset Password to confirm password change.
(Advanced) Changing the default hostname
Note: You will need to use an external monitor to update the hostname via the Terminal. Plug in and power on the monitor before switching on the P2i. If you plug in the monitor while the P2i is powered on, the device will not recognise the monitor.
If you need to update the hostname of the device, run the following command and replace the <new_hostname> portion with your desired hostname (omitting the angle bracket characters <>):
sudo -S hostnamectl set-hostname <new_hostname>
Power cycle the device by shutting down with the following command, then press the physical power button to turn the device back on:
sudo shutdown -h now
6. (Advanced) Updating the timezone and setting a local NTP server
To update the timezone:
(Advanced) If you are unable to update the date and time using the UI, please use the command below with an external monitor and keyboard:
/opt/ont/mooneye/bin/ont-mooneye-time-source
To set a local NTP server:
To set the the NTP server to e.g. "ntp.ubuntu.com", enter the following command:
sudo /opt/ont/mooneye/bin/ont-mooneye-time-source -a -v --ntp-server=ntp.ubuntu.com
To verify that the time server is set:
sudo /opt/ont/mooneye/bin/ont-mooneye-time-source -v -s
For more detailed sync information, enter:
sudo timedatectl timesync-status
7. Hardware check
Hardware check
A hardware check must be performed on all new devices or when software has been upgraded.
Load the two PromethION Configuration Test Cells (CTCs) into the flow cell positions.
The two status indicator dots on the P2i integrated display will turn blue when a CTC or flow cell is correctly inserted and recognised.
Close the device lid once the CTCs are loaded.
Correct insertion of PromethION CTCs
Place the CTC flat on the metal plate.
Firmly slide the CTC into the docking port until the gold pins or green board cannot be seen and you hear a click.
Navigate to the start homepage and click 'Hardware check'.

Select one or both of the PromethION positions.
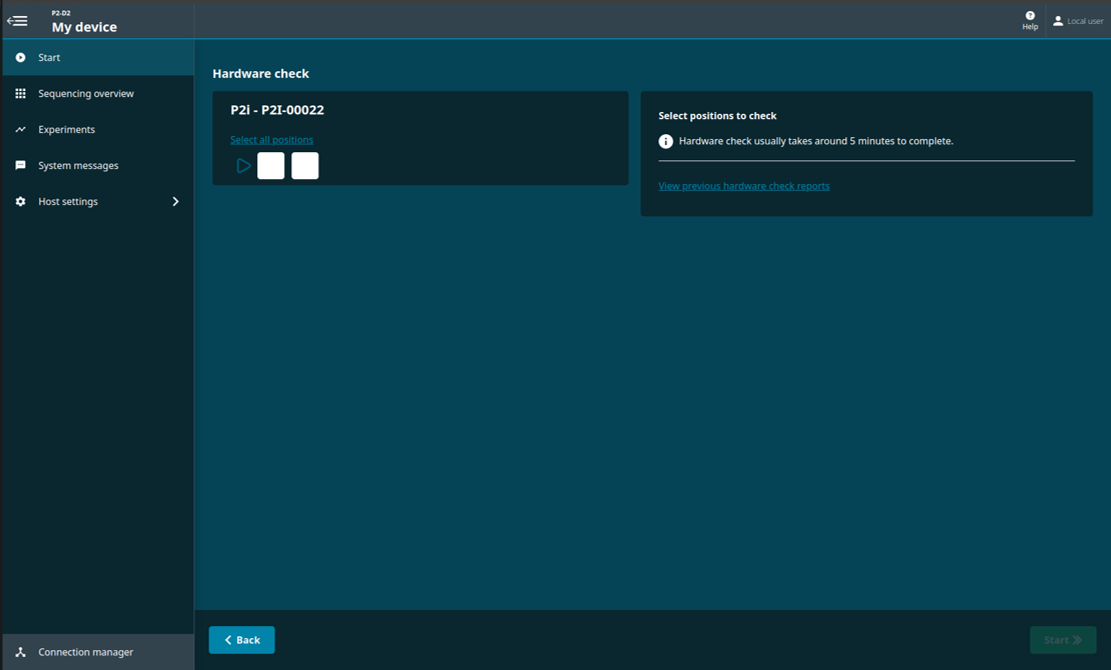
Click 'Start' on the bottom right of the screen for the hardware check to begin.
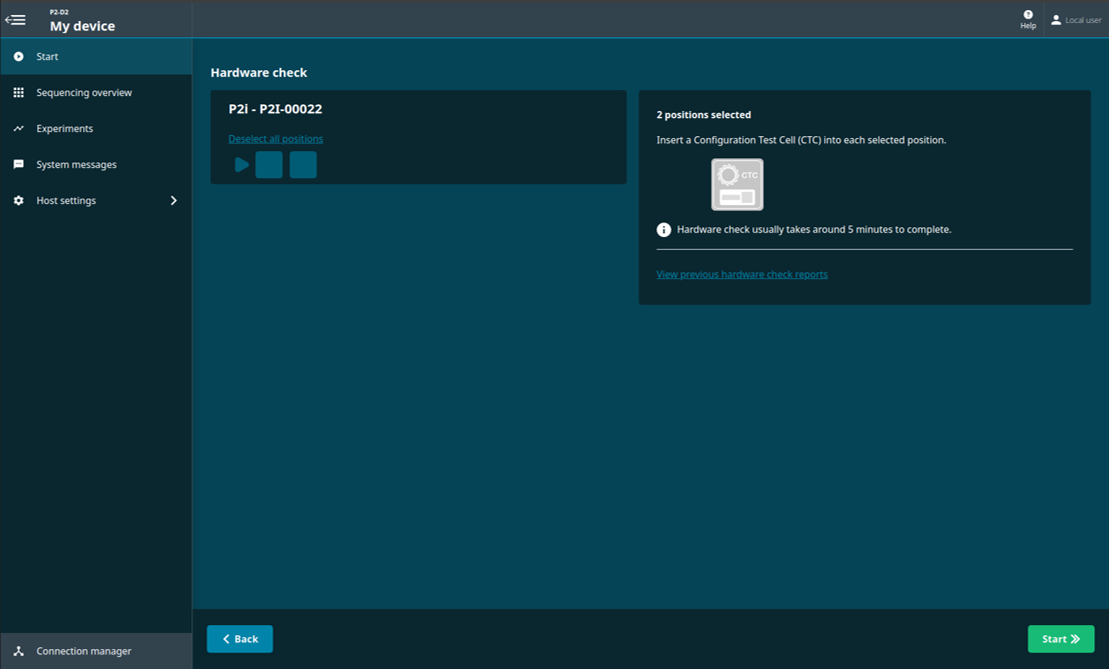
The progress of the hardware check will be displayed.

When the hardware check is complete, you will be notified if the selected position(s) has passed or failed the hardware check.

The 'Sequencing Overview' will show if the device passed or failed the hardware check.
Hardware check passed:
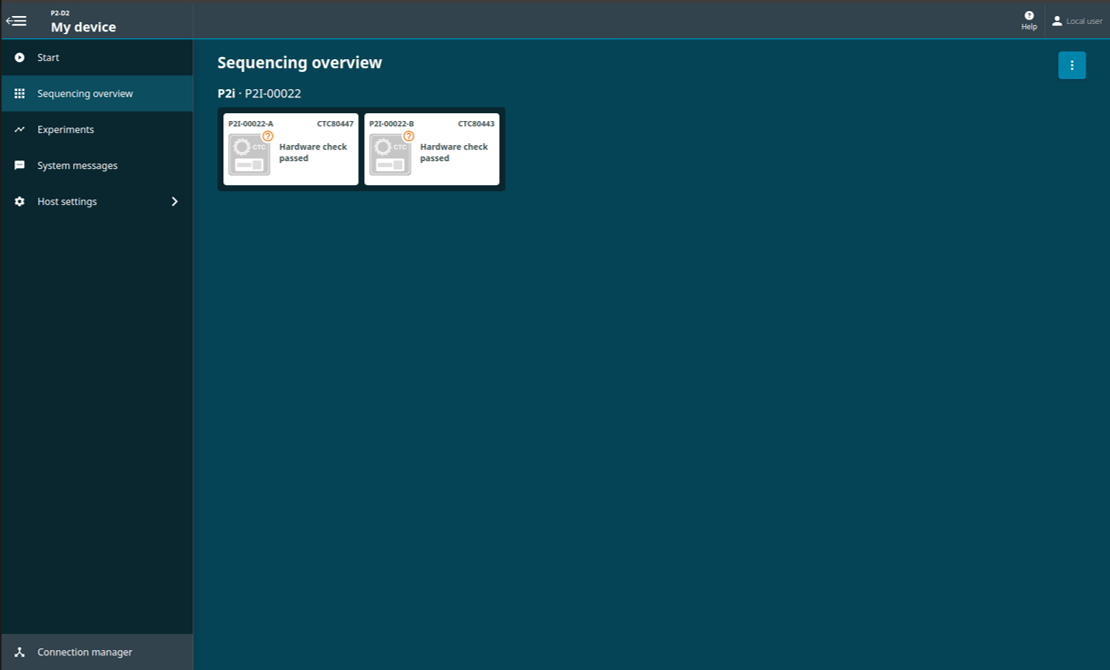
If the hardware check fails, remove and reinsert the CTCs, and run a hardware check again. If the check fails for a second time, please contact Customer Support (online Live Support).
To view the hardware check report, return to 'Hardware check' and click on ‘View previous hardware check reports’.

Select the report(s) for exporting.
A green tick will show on the selected report. Click 'Export' to download the report. 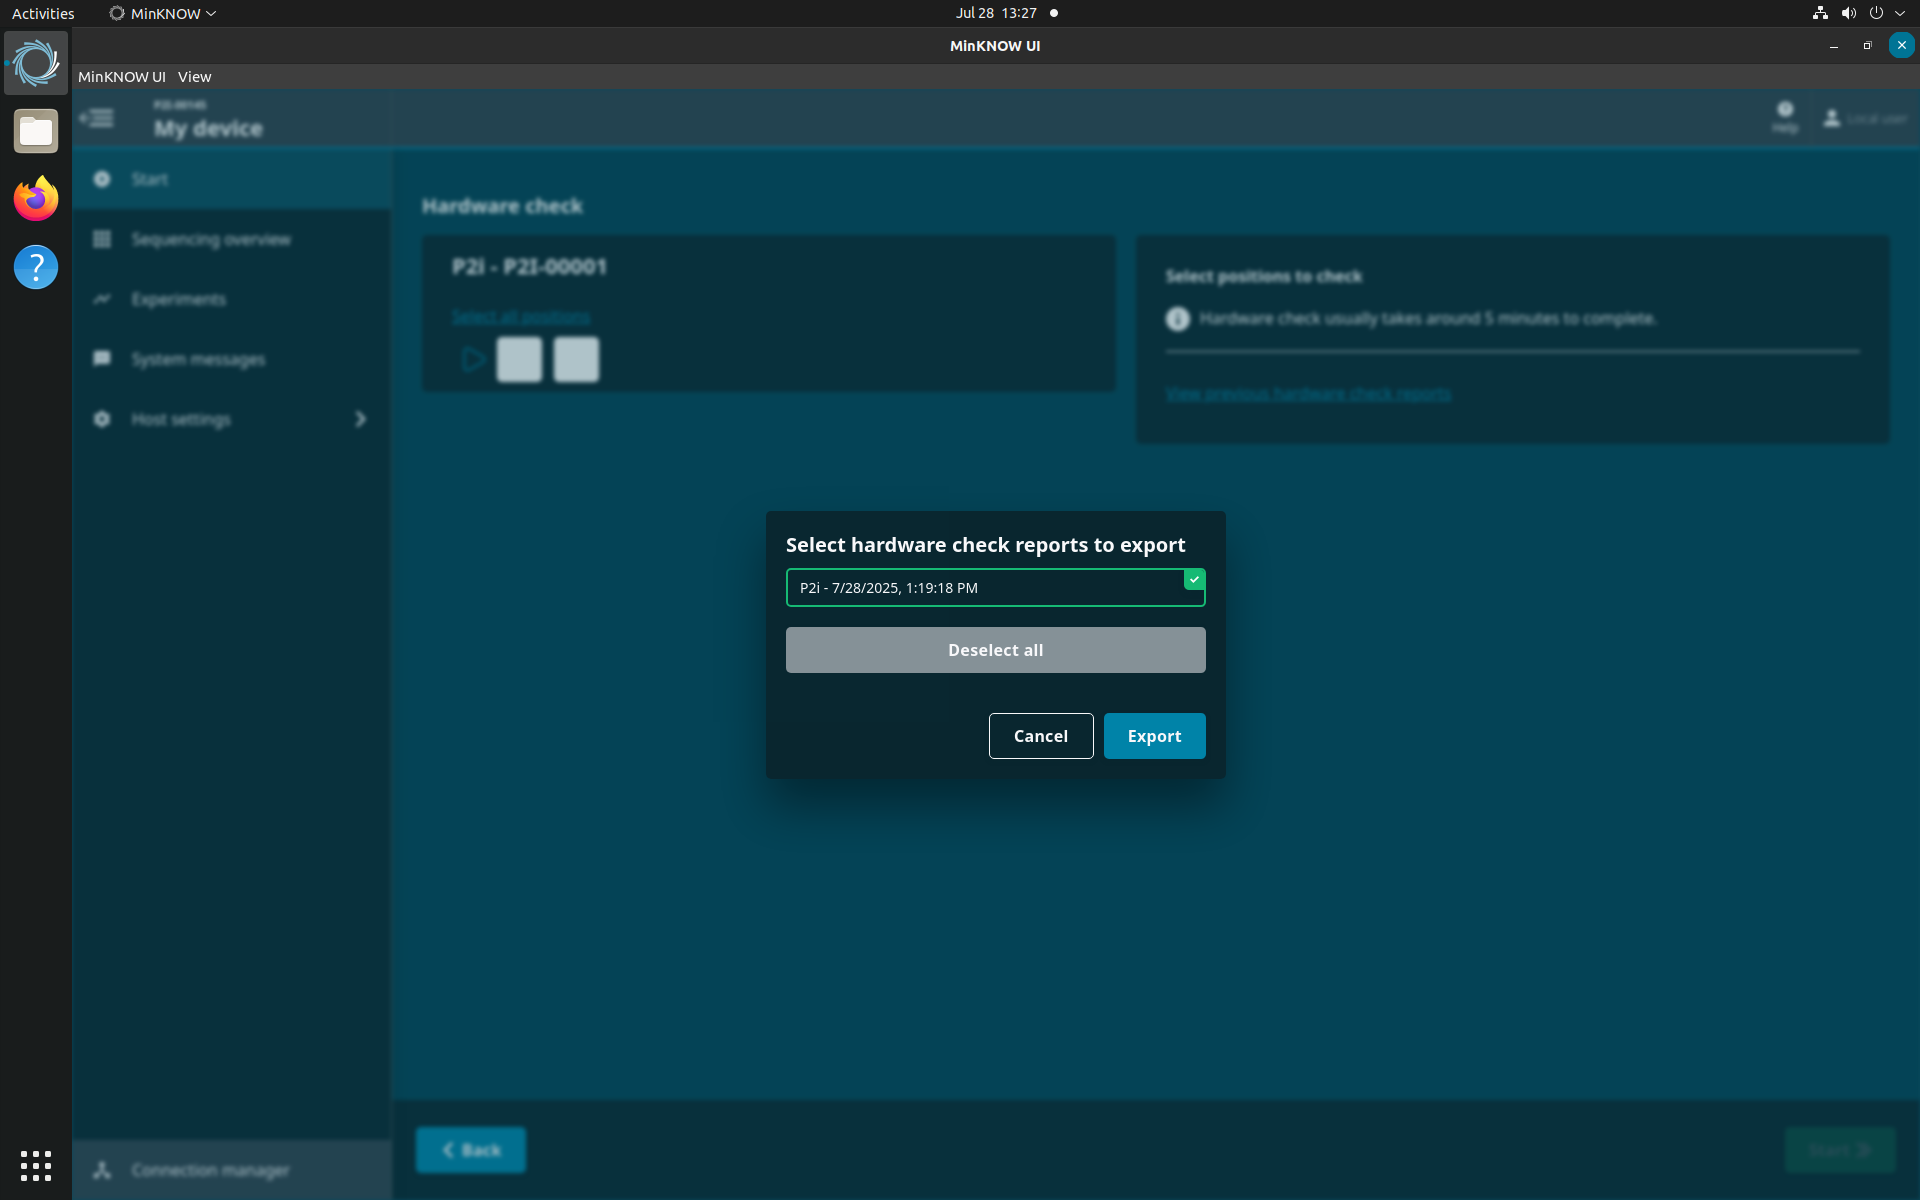
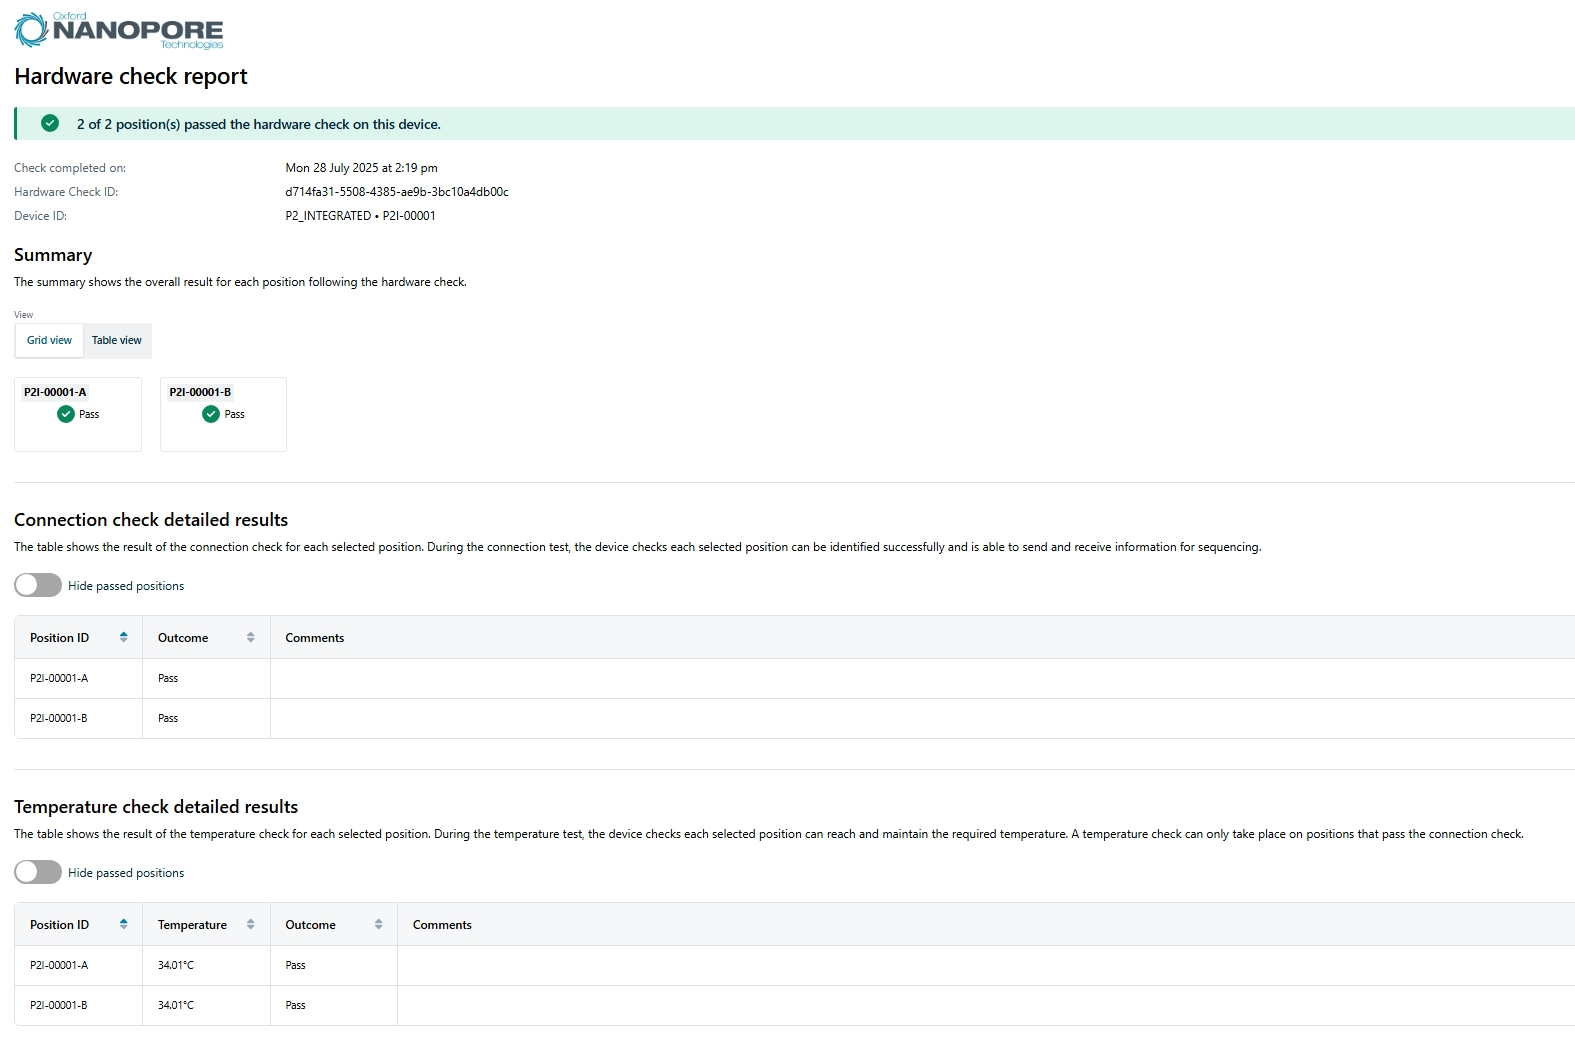
Hardware check report
The hardware check generates a report in HTML format and contains the following information:
- Number of positions that passed/failed the hardware check on the device
- Date and time that the hardware check was completed
- Hardware check ID
- Device ID
Summary shows the overall result for each position following a hardware check.
Connection check detailed results contains information on whether the connection check passed or failed for the selected position with the option to hide passed positions.
Temperature check detailed results contains information on whether the temperature check passed or failed for the selected position with the option to hide passed positions.
An example report is shown below:
Do not leave the CTCs in the flow cell positions when the device is not in use.
Do not leave the CTCs in the PromethION flow cell positions once the device is powered down, and do not insert them into the device until the device is powered on and you are about to begin a Hardware check.
Store the CTCs in dry conditions at room temperature.
8. Flow cell check
Consumables
- PromethION Flow Cells
Equipment
- PromethION 2 Integrated
Flow cell check
We strongly recommend performing a flow cell check before loading a DNA or RNA library to assess the number of pores available.
Oxford Nanopore Technologies will replace any flow cell that falls below the warranty number of active pores within 12 weeks of purchase, provided that you report the results within two days of performing the flow cell check and you have followed the storage recommendations.
| Flow cell | Minimum number of active pores covered by warranty |
|---|---|
| Flongle Flow Cell (FLO-FLG001) | 50 |
| MinION/GridION Flow Cell | 800 |
| PromethION Flow Cell | 5000 |
After taking flow cells out of the fridge, wait 20 minutes before inserting the flow cell into the PromethION for the flow cell to come to room temperature. Condensation can form on the flow cell in humid environments. Inspect the gold connector pins on the top and underside of the flow cell for condensation and wipe off with a lint-free wipe if any is observed. Ensure the heat pad (black pad) is present on the underside of the flow cell.
Load the flow cells to be run into the docking ports of the PromethION.
Correct insertion of PromethION flow cells
Firmly slide the two PromethION Flow Cells into the device, taking care to ensure the dark grey heat pad on the underside of the flow cell is not torn or deformed. Press the flow cell firmly into the loader until a click is heard.
Navigate to the start homepage and click 'Flow cell check'.

When you see the flow cell type and flow cell IDs recognised, click Start to begin.

You will be automatically navigated to the Sequencing Overview page.

Flow cell health indicators
The quality of the flow cell will be shown as one of the three outcomes:
Yellow exclamation mark (Flongle flow cell): The number of sequencing pores is below warranty. Take the flow cell out of the device, re-insert it and run a flow cell check again. If the flow cell is still below warranty, contact support@nanoporetech.com
Green tick (MinION flow cell): The number of sequencing pores is above warranty.
Question mark (PromethION flow cell): A flow cell check has not been run on the flow cell during this MinKNOW session.
![]()
Note: The indicator of quality will only remain visible during a MinKNOW session. Once the MinKNOW session has ended, the status of the flow cell will be erased.
9. Sequencing and monitoring the experiment
For instructions on how to set up a sequencing experiment and how to monitor the progress of the experiment, refer to the MinKNOW protocol in the Nanopore Community.
10. Data management
File manager
Data can be managed and transferred from the file manager tab on the host settings.
Navigate through the tabs to view the data stored:
- Internal tab: Data stored on the connected sequencing device (MinION Mk1C, GridION, PromethION)
- Removable tab: Data stored on a connected removable storage device e.g. USB drive
- Network tab: Data stored on a connected network drive. The network drive must be mounted prior.

To manage data between the internal, removable and network tabs:
Switch the Select toggle on to open the greyed out options Copy, Move, Delete or Rename in the bottom right corner.

Select a folder or file to use the options in the bottom right corner.

To use Move and Delete, select a file and choose an option to either move or delete.
Click either Copy or Move to open a new dialogue box with a list of all the drives accessible to the device.
Note: a USB drive or SD card plugged in will appear under the Devices folder.

Click on a drive to open and navigate through the file directory to choose destination. Click either Copy or Move to confirm action.
To check available storage:
Data generated from sequencing experiments is stored within the ~14 TB "/data" partition of the P2i system.
To view how much storage is available, click on Host settings, then Device settings. The Disk Management window below is an example of a P2i with 3.1 TB of remaining storage.

To remotely access the device as a shared/network drive:
Navigate to device settings and switch the Share toggle on.

A new window will open to create a password for security.

Click Set password, and after a few seconds the share toggle will be active.
Data will now be able to be shared and accessible on different networks.

Note: The image above is an example of sharing on a GridION. On MinION devices, 'minit' will appear and PromethION devices will show 'prom' when active.
To stop sharing, click the toggle to turn off.
Note: The password will be removed and must be reset when sharing is turned back on.
New directories can be created from the device GUI using the New Directory icon.
Click the icon in the bottom right corner to open Create New Directory and type in a directory name. Click Create.

Data transfer and long-term storage
If your P2i runs out of storage during a sequencing run, your experiment will prematurely terminate. Therefore, before beginning an experiment, ensure that you have at least 2 TB of storage per flow cell.
For data transfer and long-term storage, we recommend using a remote server or network-attached storage (NAS). These typically offer a choice of NFS, SMB, or CIFS shares. We recommend using NFS mounts due to the supported Linux user and group permissions. For Windows workstations, use SMB. For Mac OS use either SMB or NFS. To stream data to storage in real-time, a SSD is required due to its high write speed compared to HDD. After initial writing to networked SSD drives, you can move the data to storage with a slower write speed for long-term storage.
The form and volume of data to be stored will depend on your requirements and whether you wish to basecall your sequencing data in the future when more advanced basecalling algorithms are available:
Storing .pod5 or .fast5 with raw read data in will permit re-basecalling of data when new algorithms are released by Oxford Nanopore Technologies. In such cases, new releases of basecallers have enabled significant improvements in basecalling accuracy of existing datasets through re-basecalling. Further, selected Oxford Nanopore and third-party tools use the raw signal information contained within the .fast5 to extract additional information from the raw signal, e.g. calling modified bases, reference-guided SNP calling, or polishing of data.
Retaining only FASTQ files will allow use of standard downstream analysis tools using the DNA/RNA sequence, but no further sequence data can be generated when improvements in basecalling become available.
Oxford Nanopore is unable to provide exact recommendations for storage, as these will be site-specific.
To mount a network drive:
Click on Host settings, then Device settings.
Under Disk management, click Add network drive.

Choose between SMB and NFS, enter the network details, and click Mount SMB/Mount NFS.

To remove the network drive, click Unmount.

Initially, write the data directly to the internal SSD drives. Writing to a networked drive is not currently supported.
11. Shutting down
We do NOT recommend powering down the device via the Terminal.
Using the command below may cause connectivity issues with the sequencing device when the device is restarted.
sudo shutdown -r
Stop your sequencing run through the MinKNOW UI and wait for the sequencing to terminate.
Ensure the device is not performing any tasks and remove any flow cells or Configuration Test Cells from the flow cell positions (if present).
If using an external monitor: click the top right power icon, then Shut down in the pop-up window.
If using the integrated display: on the left hand side navigation pane, click on Host Settings, then Device Settings. In the System section, click Shut down.
Wait for ~20 seconds until the device powers off and the front and rear fans stop spinning.
If you are unable to power off the device, hold down the toggle switch at the rear for approximately eight seconds to force a hard shutdown.
12. Stopping a sequencing run and shutting down
Stop your sequencing run through the MinKNOW UI and wait for the sequencing to terminate.
To stop the experiment during sequencing, click Stop (red button) using the Run controls on the Experiments page.
This is only necessary if you want to stop your run before the end of the set run time.

Confirm to stop experiment by clicking on one of the two options:
- Stop sequencing which will start catch-up basecalling.
- Stop sequencing and basecalling which will stop both sequencing and basecalling immediately.

Once sequencing is complete, generate a run report.
A run report containing information about the sequencing run and performance graphs are automatically generated. To manually generate a run report, click Export run report and select the experiment to export.

For more information about the run report, please see the Run report section in MinKNOW.
Before shutting down the device, check that no sequencing, basecalling, or analysis is running on the device.
Navigate to Device Settings and click 'Shut down'.

Do NOT select 'Reboot'. This will lead to errors in recognising the flow cells when commencing an experiment.
Wait for ~20 seconds until the device powers off and the front and rear fans stop spinning.
If connecting to a device remotely using a computer not directly connected to the device, close down the MinKNOW application window.
13. Updating the software via the terminal
You will need to use an external monitor to update via the Terminal. Plug in and power on the monitor before switching on the P2i. If you plug in the monitor while the P2i is powered on, the device will not recognise the monitor.
Open a terminal window by searching for ‘terminal’ and pressing Enter.
Type or paste the following commands into the terminal and press enter:
sudo apt clean
sudo apt update
sudo apt install ont-p2-release
Switch off the device through the user interface on the Ubuntu desktop. Once the device has powered off and the fans have stopped spinning (after ~20 seconds), turn the device back on again with the toggle switch.
14. Updating MinKNOW from the UI using either the integrated screen or an external monitor
Please note: You will not be able to update MinKNOW on your device if a run is in progress.
If using an external monitor to update via the MinKNOW UI, plug in and power on the monitor before switching on the P2i. If you plug in the monitor while the P2i is powered on, the device will not recognise the monitor.
Open the MinKNOW UI from the integrated screen or the external monitor. The auto-updater will automatically check for updates.
A dialogue box will open when a new update is available.
Select Install update to update the device software automatically.
Updates may be skipped however, we recommend that you update the device as soon as updates are available. Some updates will be mandatory for use of the device and cannot be skipped.

You can also update the device from the Software page of the Host settings.
Navigate to Software in the Host settings to find and install the latest version of MinKNOW.
An Install update will only appear when a new version of the software is available to download.

Select Install update in the installer window to download the new update.
Wait for the software to update; this may take several minutes.
The installer window will notify you when the update is complete.
After the update has completed successfully, fully shut down (not reboot) the device and turn on the device again using the power switch at the rear of the device.
15. (Advanced) Downloading the ISO image and burning it to a USB drive
Overview
The instructions below can be used to create a bootable USB drive that can be used to rebuild the OS on your device.
These instructions are for users who did not receive a USB drive with the ISO image. If you have received a USB drive, proceed to the next step: "How to boot from USB".
We strongly recommend transferring your data to backup storage even if you select an option that keeps the data. This is because ISO rebuilds can be corrupted halfway through (e.g. due to a USB disconnection, power cut etc.).
Download the ISO image from the link below:
Burning the ISO image to a USB drive
Appropriate software for burning the ISO image is:
- Rufus on Windows
Note: The alternate ISO burning tool balenaEtcher does not work for our ISO image. You will need access to a computer running Windows and may need Administrator rights to install the Rufus software.

When burning the ISO image, use the settings below (it must use an EFI/GPT boot):
- Partition scheme: GPT
- Target system: UEFI
The USB drive should have the specification below:
- Must be 64 GB or larger
- USB 3.0 recommended
- UEFI boot option must be used
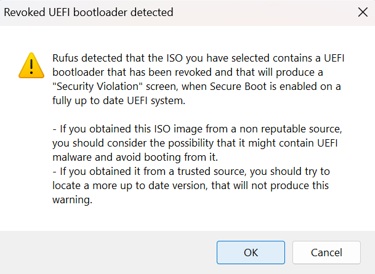
After clicking START, you may see the warning below pop up. Click OK to proceed.
Note: We recommend flashing two USB drives with a different vendor as a backup. Common USB drives can fail to reimage devices with no obvious root cause.
16. How to boot from USB
Power off the PromethION 2 Integrated (P2i).
Ensure the external monitor, keyboard, and mouse are plugged into the correct ports on the rear of the P2i. Consult the Quick Start Guide or the user manual for instructions on how to do this.
Insert the bootable USB into any red USB port (USB 3.0) on the back of the device.
Before powering on the device, prepare to press F11 on the keyboard.
Power on the P2i.
a. Repeatedly press F11 on the keyboard to enter the Boot Menu.
b. Under Please select boot device, use the keyboard arrow keys to select UEFI OS (USB key name) and press Enter.

On the "Platform Rescue & Recovery" screen, highlight “Customer Factory Reset image XX.YY” (XX.YY specifies the image version). Then click "Enter".

This does the following:
- Keeps network configuration
- Keeps hostname
- Keeps data
- Does not clear the metadata or format all the disks
Note: The Standard Installation may take several minutes to load. Only use the other options if instructed to do so by Oxford Nanopore Technologies Technical Support.
Click "Standard Installation".

Note: in some instances, you may see the following screen. If this happens, please contact Support.

You will see an install page with progress bars. The device will reboot several times during the installation, and you may be presented with system messages showing errors. This is expected behaviour, and you can leave the device to complete the installation. The entire process will take ~1 hour to complete.

e.g. first boot screen:

second boot screen:

third boot screen:

Once the rebuild process has completed, the standard login screen will be displayed. Log in using the password: prom

Shut down the device. Once powered down, wait for 60 seconds, then remove the USB.
Power on the device.
Log into the device using the password: prom

Double-click the MinKNOW icon located on the desktop to open the MinKNOW UI.

Log into MinKNOW using your Community credentials.
You will be prompted to enter your email address and Nanopore password:
Check that all flow cell positions are recognised and that the device serial number is correct.
Insert the Configuration Test Cells into the device and perform a hardware check.
Please refer to the hardware check instructions for the P2i.
The ISO restore is now complete.
17. Troubleshooting
On the Help page of host settings, troubleshooting options are available.
Our device FAQs are located here.
To export logs:
- Click Export in the Export Logs section.
When you have successfully exported the logs, you will be notified of where they are located below the button. The logs will be downloaded as a TGZ file in the logs directory.
You can change the location of the logs by using the file manager, where you can easily retrieve them without needing SSH:
- Click on the file next to Logs exported to: in the Export Logs panel. This will open where the logs are located in the File Manager of MinKNOW.
- Use the control panel in the lower right corner of the File Manager to move the log files.

To remove logs and temporary data:
In the "Help" page, click Clean up in the Clean Up Files section and confirm in the in the pop-up.
Note: Run data will not be deleted. Logs and temporary data will be removed.

To repair device issues:
Click Run repair in the troubleshooting section of the Help page and confirm in the pop-up. MinKNOW will attempt to repair the following issues:
- Ensure required directories under "/data" exist and have the correct ownership and permissions
- Ensure required files under "/data" have the correct ownership and permissions
- Ensure the GPU is working at maximum performance
- Ensure that Bluetooth is disabled


