Manual de usuario PromethION 2 Integrated (P2I_9202_v1_revI_23Sep2025)
Protocol
Manual de usuario PromethION 2 Integrated V P2I_9202_v1_revI_23Sep2025
Esta guía le ayudará a instalar, comprobar y configurar el PromethION 2 Integrated. La sección de Preguntas frecuentes se encuentra aquí.
De uso exclusivo en investigación
FOR RESEARCH USE ONLY
Contents
Descripción general
Instalación
- 2. Contenido de la caja
- 3. Instalar y encender el dispositivo
- 4. Configuración de la red y conexión
- 5. Cambiar la contraseña predeterminada y el nombre de servidor
- 6. (Avanzado) Actualizar la zona horaria y establecer un servidor local NTP
- 7. Examinar el equipo
Comprobaciones previas y secuenciación
Tras finalizar el experimento de secuenciación
- 10. Gestión de datos
- 11. Apagar el dispositivo
- 12. Detener un experimento de secuenciación y apagar el dispositivo
Actualizar el programa
- 13. Actualizar el programa a través del Terminal
- 14. Actualizar MinkNOW desde la interfaz gráfica, ya sea en la pantalla integrada como en un monitor externo.
Operating system update on PromethION 2i
- 15. (Avanzado) Descargar la imagen ISO y grabarla en una unidad USB
- 16. Cómo arrancar el dispositivo desde una memoria USB
Resolución de problemas
Descripción general
Esta guía le ayudará a instalar, comprobar y configurar el PromethION 2 Integrated. La sección de Preguntas frecuentes se encuentra aquí.
De uso exclusivo en investigación
1. Información sobre el dispositivo
PromethION 2 Integrated
El PromethION 2 Integrated (P2i) es un dispositivo de sobremesa pequeño, diseñado para secuenciar hasta 2 celdas de flujo PromethION. Cada celda de flujo funciona de manera independiente, por lo que los experimentos se pueden realizar simultánea o individualmente. El P2i es un producto independiente, con un sistema informático integrado de alta gama, que realiza la adquisición de datos e identificación de bases en el dispositivo.
Tiene una pantalla integrada que interactúa con el programa de secuenciación MinKNOW, lo que permite empezar, detener y supervisar experimentos de secuenciación así como acceder a otras funciones de análisis. El dispositivo también dispone de un puerto en la parte trasera para conectar un monitor externo, lo que permite acceder al sistema operativo o escritorio Ubuntu y al programa de análisis EPI2ME.

Ficha técnica
| Elemento | Características técnicas |
|---|---|
| Tamaño y peso | 180 mm (alto) x 225 mm (ancho) x 430 mm (largo); 10,6 kg |
| Tensión de alimentación | 100- 240 V CA (50/60 Hz) |
| Consumo máximo de energía | 750 W |
| Almacenamiento | 15 TB SSD |
| Memoria | 64 GB DDR4 |
| CPU/GPU | 1 Intel Core i7 (12 núcleos/20 hilos) 1 GPU Serie Ampere, de NVIDIA |
| Operating system | Ubuntu 20.04 LTS |
| Programas instalados | MinKNOW |
| Condiciones ambientales | Diseñado para secuenciar a una temperatura de entre 18 °C y 25 °C* |
*Intervalo de funcionamento de aparatos electrónicos entre 5 °C y 40 °C
Información sobre el PromethION 2 Integrated
2. Contenido de la caja
Embalaje del PromethION 2 Integrated

Contenido de la caja - PromethION 2 Integrated
- 1 PromethION 2 Integrated
- 5 cables de alimentación C13 para uso internacional (EE. UU., UK, UE, CAN y AUS)
- 2 Celdas de prueba de configuración (CTC)
Indicadores de funcionamiento Hay dos luces en la pantalla integrada que indican el estado de las celdas de flujo: A y B, una para cada posición, que siguen el siguiente esquema:
- Luces de color blanco: el dispositivo está listo, no hay celdas de flujo insertadas.
- Luces de color azul: hay celdas de flujo insertadas.
- Luces de color verde: script en funcionamiento/adquisición de datos en curso (incluye la comprobación de la celda de flujo y del equipo).
- Luces de color rojo: se ha producido un error en la ejecución. Contacte con el servicio de asistencia técnica si observa este patrón.
- Luces de color azul: el script ha finalizado correctamente.
3. Instalar y encender el dispositivo
Ubicación recomendada en el laboratorio
- Colocar el dispositivo en una superficie firme y limpia.
- Dejar al menos 30 cm de espacio libre alrededor del mismo, para garantizar que la temperatura se mantenga estable durante la secuenciación y proporcione datos de la mejor calidad.
- No cubrir ninguna rejilla de ventilación.
- Realizar la secuenciación a una temperatura ambiente de entre 18 °C y 22 °C.
- Procurar que los cables Ethernet (RJ45) y enchufes estén cerca.
- Intentar que se pueda acceder a los enchufes con facilidad, por si hay una emergencia y es necesario desconectar el aparato con urgencia.
Preparación previa a la instalación
Antes de instalar el dispositivo, se debe disponer de lo siguiente:
- 1 cable Ethernet (CAT 5e o superior con velocidad máxima de 2,5 Gb/s)
- Acceso a la red que proporcione:
- Una dirección IP a través del protocolo DHCP
- Acceso a internet de salida a través de los puertos 80 y 443
- Permisos de cortafuegos para acceder a los rangos de direcciones IP de AWS en la región eu-west-1 enumerados aquí, además de: 178.79.175.200 y 96.126.99.215
Notas sobre el monitor externo:
En caso de utilizar uno para acceder al escritorio de Ubuntu o EPI2ME, conecte primero el monitor, luego el teclado y por último el ratón; encienda primero el monitor antes de encender el dispositivo.
El monitor externo no debe apagarse o desenchufarse mientras el dispositivo esté encendido, ya que crearía problemas con la pantalla integrada (el salvapantallas puede utilizarse).
Si utiliza solo la pantalla integrada, necesitará lo siguiente:
- 1 monitor (compatible con HDMI o DisplayPort)
- 1 cable compatible con el monitor
- 1 teclado con conexión USB-A
- 1 ratón con conexión USB-A
*Recomendamos utilizar un ratón con cable estándar de tres botones. Si se utiliza un ratón que no sea convencional con botones adicionales, es posible que se presenten problemas.
Si solo utiliza la pantalla integrada, no conecte el teclado ni el ratón, ya que provocaría un arranque incorrecto del dispositivo.
Desempaquetar el dispositivo y colócarlo en la mesa donde vaya a utilizarse.
Procurar que no haya celdas de flujo o CTC insertadas en el dispositivo.
Conectar los cables y periféricos a los puertos mostrados en el diagrama, en el orden descrito en los siguientes pasos.
Si se instala por primera vez, recomendamos utilizar un monitor externo (compatible con HDMI o DisplayPort), un teclado y un ratón. Para que el sistema los reconozca correctamente, conecte los periféricos antes de encender el dispositivo. El uso continuado del dispositivo no requiere de monitor, teclado o ratón y se pueden desconectar si no se necesitan.

Conectar el monitor externo al puerto HDMI o DisplayPort. Solo es posible conectar un monitor externo.
Conectar el ratón y el teclado en los puertos USB-A situados al fondo.
Conectar el cable Ethernet en el puerto correspondiente.
Enchufar el adaptador de corriente alterna del P2i a una toma de corriente y el cable de alimentación al P2i.
Pulsar el interruptor de encendido.
Una vez el dispositivo arranque, verá que el programa MinKNOW se carga en la pantalla integrada y que en el monitor externo aparece la pantalla de inicio de sesión. Se le pedirá que introduzca el nombre de usuario y la contraseña del dispositivo. El nombre de usuario y la contraseña predeterminados son "prom" (disponible también en la Guía de inicio rápido). A continuación, se le pedirá que actualice la contraseña. Cree una nueva contraseña siguiendo los siguientes criterios:
- 8 caracteres como mínimo
- Debe contener una mayúscula y una minúscula
- Debe contener un número o carácter especial
- No puede ser un palíndromo (por ejemplo, anilina)
- Debe diferir de cualquier contraseña anterior en almenos 2 caracteres
Recomendamos a los usuarios que inicien sesión en MinKNOW con los datos de acceso de la comunidad Nanopore.
Para iniciar sesión, debe estar conectado a Internet.
En la pantalla inicial, es posible cambiar el idioma de la interfaz en la esquina inferior derecha.

El sistema le pedirá que introduzca su dirección de correo electrónico y contraseña de Nanopore:
Si tiene problemas para iniciar sesión, visite la página de ayuda de la comunidad Nanopore (https://community.nanoporetech.com/support) y elija la opción Continuar como invitado de forma temporal.
Seleccionar el dispositivo de secuenciación en el Gestor de conexiones de MinKNOW.

Accederá al Panel general de secuenciación.

Actualizar MinKNOW
Todos los dispositivos de Oxford Nanopore utilizan MinKNOW™ como programa principal. El programa MinKNOW lleva a cabo varias tareas centrales: adquisición de datos, análisis y retroalimentación en tiempo real, identificación de bases y transmisión de datos, entre otros. Además, gestiona el dispositivo y garantiza que la química de la plataforma funcione correctamente. MinKNOW toma los datos crudos y los convierte en lecturas mediante el reconocimiento del cambio que ocurre en la corriente cuando una cadena de ADN entra y sale del poro. Entonces, MinKNOW identifica las lecturas y escribe los datos en archivos POD5, FAST5 o FASTQ.
Cuando configure el P2i por primera vez, actualice MinKNOW con las instrucciones que encontrará en la sección Actualizar el programa a través del terminal.
También es posible instalar futuras actualizaciones desde la pantalla integrada del P2i o desde un monitor externo, siguiendo las instrucciones del documento Actualizar el programa desde la pantalla integrada o un monitor externo.
Las actualizaciones de MinKNOW se encuentran aquí: Programas PromethION 2 Integrated (P2i).
4. Configuración de la red y conexión
Requisitos de red
El P2i admite una velocidad de transferencia máxima de 2,5 Gb/s mediante el puerto Ethernet trasero. Esta conexión se utiliza para conectar el dispositivo a la infraestructura local. El dispositivo no es compatible con Wi-Fi.
La conexión Ethernet se utilizará para:
- Enviar información de telemetría* a Oxford Nanopore Technologies.
- Recibir actualizaciones del programa y de firmware en el dispositivo.
- Transmitir datos de secuencia biológica a su infraestructura de almacenamiento local.
El usuario deberá proporcionar el cableado necesario para conectar el P2i a la infraestructura local.
*La telemetría contiene metadatos sobre la configuración y las condiciones de los experimentos de secuenciación. No se incluye nada específico sobre el contenido genómico de lecturas individuales; solo se registra información genérica, como la longitud de la secuencia y el índice Q score.
Configurar la red
Si desea conectar el P2i a una única red, utilice la interfaz de usuario de MinKNOW.
Nota: necesitará un monitor externo para configurar la red mediante el Terminal. Conectar y encender el monitor antes de encender el P2i. Si se conecta el monitor mientras el P2i se está encendiendo, el dispositivo no reconocerá el monitor.
Para configurar el P2i de manera que se conecte a varias redes, abra una ventana del Terminal e introduzca:
/opt/ont/mooneye/bin/ont-mooneye-configure-lan
Si desea ver las opciones de ayuda, ejecute:
sudo /opt/ont/mooneye/bin/ont-mooneye-configure-lan -h
Validar la dirección IP
Es posible utilizar el comando:
sudo /opt/ont/mooneye/bin/ont-mooneye-configure-lan -v -s
para comprobar que la dirección IP utilizada —dirección estática o DHCP— se haya configurado correctamente.
5. Cambiar la contraseña predeterminada y el nombre de servidor
Ir a la configuración del servidor para acceder a la Configuración del dispositivo.
En el cuadro Sistema, pulsar en Restablecer la contraseña.

En el cuadro de diálogo Cambiar la contraseña, introducir la contraseña actual, seguida de la nueva contraseña.

Pulsar en Restablecer contraseña.
(Avanzado) Cambiar el nombre del servidor predeterminado
Nota: necesitará un monitor externo para configurar la red mediante el Terminal. Conectar y encender el monitor antes de encender el P2i. Si conecta el monitor antes que el P2i, el dispositivo no reconocerá el monitor.
Para actualizar el nombre del servidor en el dispositivo, ejecute el siguiente comando y reemplace la parte <new_hostname> por el nombre de servidor deseado (omitiendo los corchetes angulares <>):
sudo -S hostnamectl set-hostname <new_hostname>
Apagar el dispositivo con el siguiente comando y a continuación, pulsar el botón de encendido:
sudo shutdown -h now
6. (Avanzado) Actualizar la zona horaria y establecer un servidor local NTP
Actualizar la zona horaria:
(Avanzado) Si no es posible actualizar la fecha y hora a través de la interfaz de usuario, utilice el siguiente comando, con un monitor externo y un teclado:
/opt/ont/mooneye/bin/ont-mooneye-time-source
Establecer un servidor local NTP:
Configurar el servidor NTP en, por ejemplo, "ntp.ubuntu.com", introduciendo el siguiente comando:
sudo /opt/ont/mooneye/bin/ont-mooneye-time-source -a -v --ntp-server=ntp.ubuntu.com
Comprobar que el servidor horario esté configurado:
sudo /opt/ont/mooneye/bin/ont-mooneye-time-source -v -s
Para más información sobre la sincronización, introducir:
sudo timedatectl timesync-status
7. Examinar el equipo
Comprobación del equipo
La comprobación del equipo debe realizarse en todos los dispositivos nuevos y cada vez que se actualice el programa.
Cargar las dos celdas de prueba de configuración PromethION (CTC) en las posiciones de las celdas de flujo.
Las dos luces indicadoras en la pantalla integrada del P2i se volverán azules cuando se inserte una CTC o celda de flujo y el dispositivo la reconozca.
Una vez las CTC estén insertadas, cerrar la tapa del dispositivo.
Cómo insertar correctamente las CTC PromethION
Colocar la CTC apoyándola sobre la placa metálica.
Presionar la celda con firmeza contra la base hasta que las clavijas doradas o la placa verde no se vean y se oiga un clic.
Ir a la página de inicio y pulsar en la opción "Examinar el equipo".

Seleccionar una o las dos posiciones del PromethION.
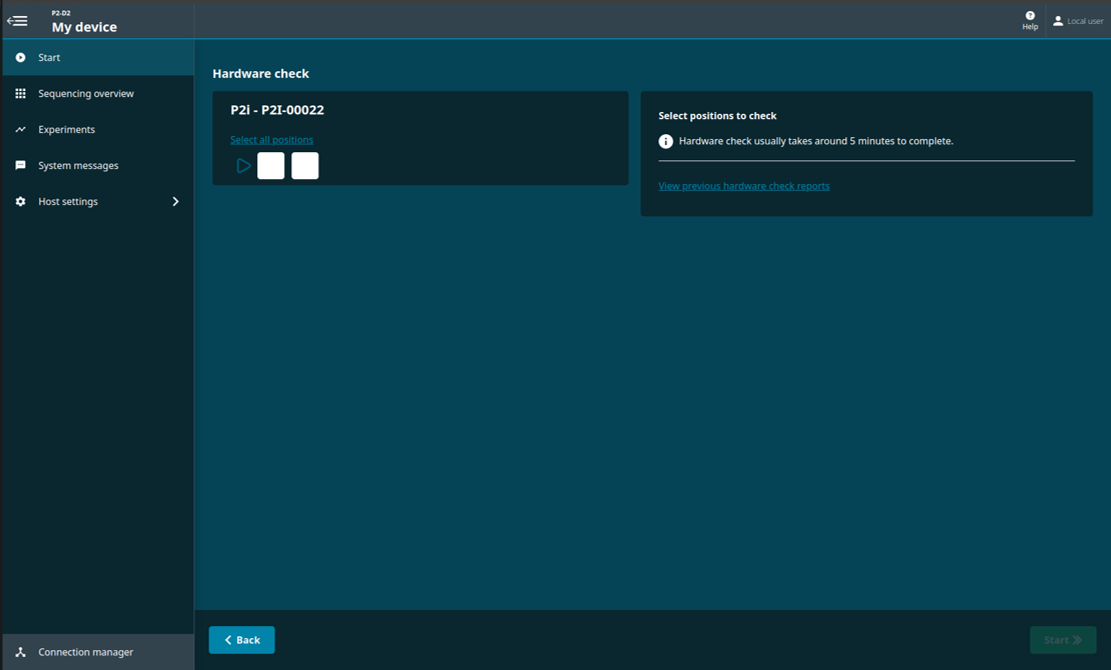
Pulsar "Inicio" en la esquina inferior derecha de la pantalla.
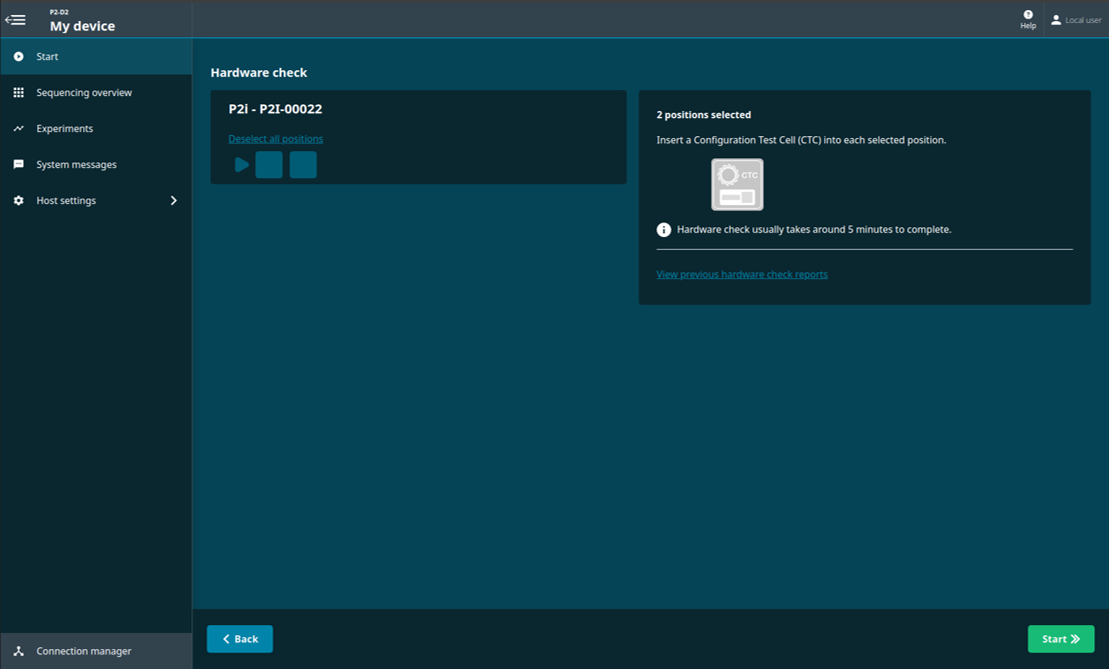
El estado de la comprobación se mostrará en pantalla.

Cuando acabe la comprobación, se le notificará si la(s) posición(es) seleccionada(s) ha(n) superado o no la comprobación.

El "Panel general de secuenciación" mostrará si el dispositivo superó la comprobación.
Comprobación del equipo superada:

Si la comprobación del equipo falla, retire la CTC, vuelva a insertarla e inicie una nueva comprobación. Si falla por segunda vez, contacte con Atención al cliente por el chat Live Support.
Para ver el informe de la comprobación, ir a "Comprobación del equipo" y pulsar "Ver informes anteriores".

Seleccionar el/los informe(s) que se deseen exportar.
Al lado del informe(s) seleccionado aparecerá un icono de verificación verde. Pulsar "Exportar". 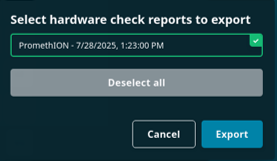
Informe de la comprobación del equipo
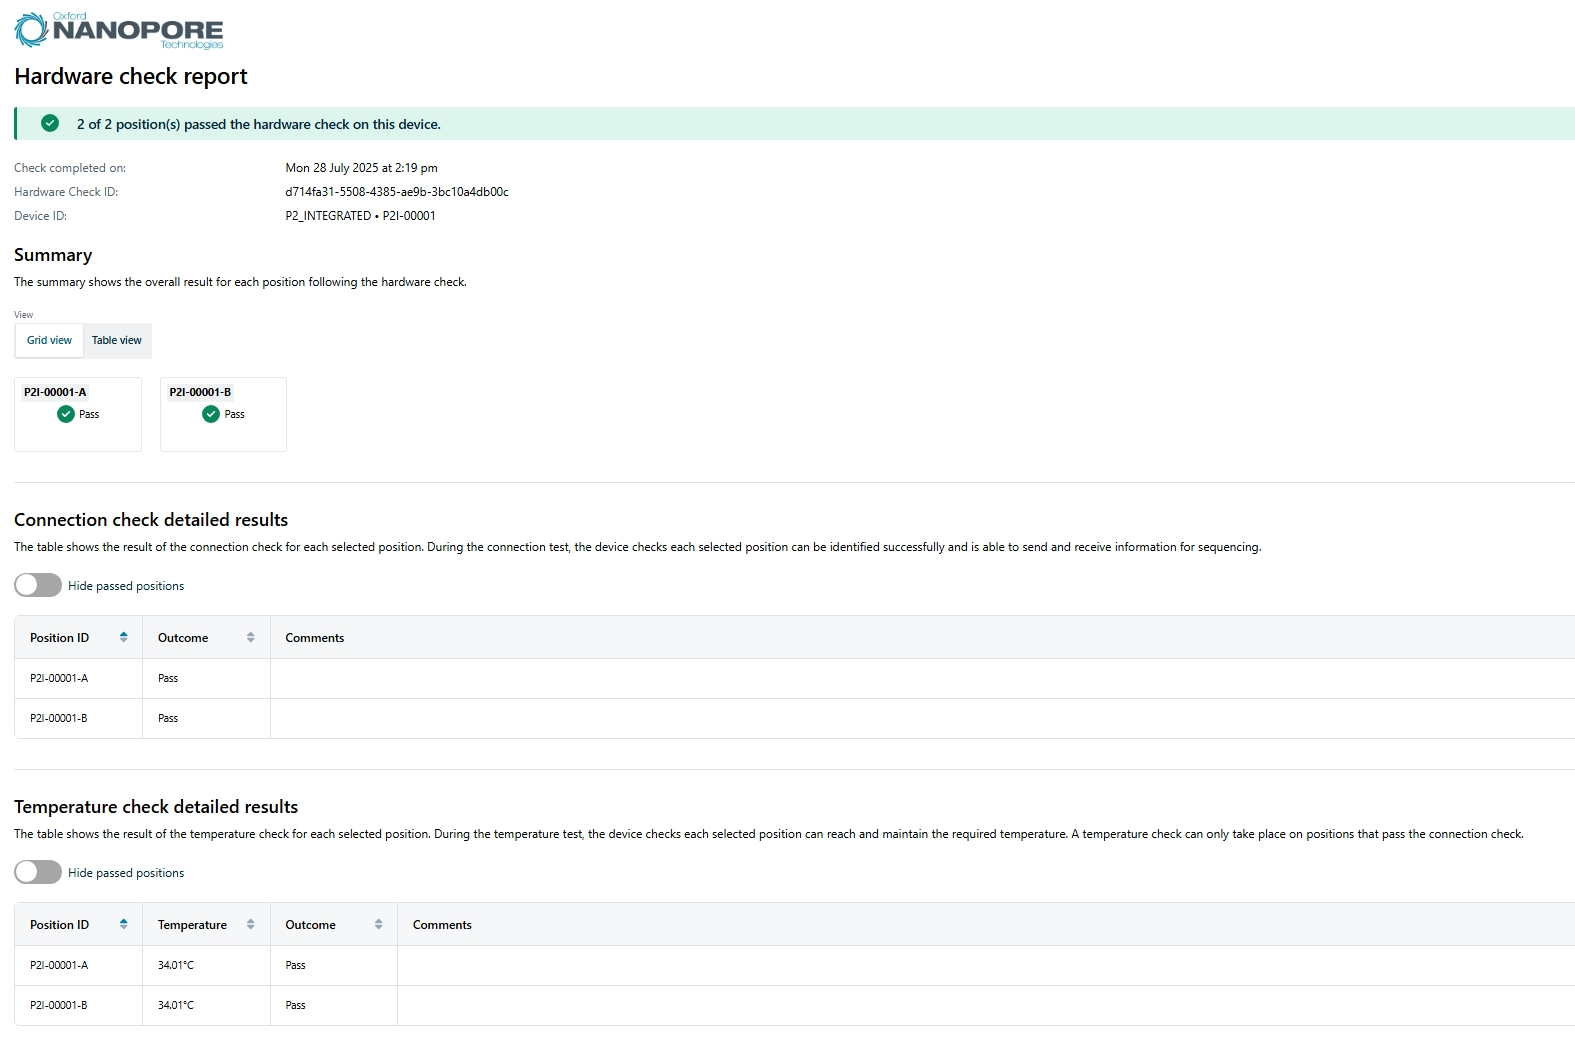
La comprobación del equipo generará un informe en formato HTML con la siguiente información:
- Número de posiciones que hayan superado o no la comprobación
- Fecha y hora de finalización
- Identificador de la comprobación
- Identificador del dispositivo
El resumen muestra el resultado general de cada posición tras la comprobación del equipo.
El resultado de la comprobación de la conexión indica si dicha comprobación se superó o no en la(s) posición(es) seleccionada(s) y da opción de esconder las posiciones aprobadas.
El resultado del control de temperatura indica si se superó o no dicha comprobación en la(s) posición(es) seleccionada(s) y da opción a esconder las posiciones aprobadas.
A continuación, hay un informe de ejemplo:
No dejar las CTC cargadas cuando el dispositivo no esté en uso.
Saque las CTC del dispositivo cuando lo apague y no las inserte hasta después de haberlo encendido, cuando vaya a examinar el equipo.
Guarde las CTC en un lugar seco, a temperatura ambiente.
8. Verificar la celda de flujo
Consumibles
- Celdas de flujo PromethION
Instrumental
- PromethION 2 integrated
Verificar la celda de flujo
Recomendamos examinar la celda de flujo y verificar el número de poros disponible, antes de cargar una biblioteca de ADN o ARN en ella.
Oxford Nanopore Technologies sustituirá cualquier celda de flujo con un número de poros activos inferior al indicado por la garantía —en un plazo de 12 semanas desde la compra— siempre y cuando el resultado se notifique dentro de los dos días siguientes a la verificación y se hayan seguido las instrucciones de almacenamiento.
| Celdas de flujo | Número mínimo de poros activos cubierto por la garantía |
|---|---|
| Flongle (FLO-FLG001) | 50 |
| MinION/GridION | 800 |
| PromethION | 5000 |
Una vez sacadas de la nevera, esperar 20 minutos antes de insertar las celdas de flujo en el dispositivo y así darles tiempo a que estén a temperatura ambiente. En entornos húmedos se puede formar condensación. Inspeccione las clavijas doradas del conector, situadas en la parte superior e inferior de la celda de flujo, en busca de condensación y si la hubiera, límpiela con una toallita sin pelusa. Procure que la almohadilla térmica (color gris oscuro) esté enganchada en la parte posterior.
Cargar las celdas de flujo que se vayan a utilizar en las posiciones del PromethION.
Cómo insertar correctamente las celdas de flujo PromethION
Deslizar con firmeza las celdas de flujo en sus posiciones, sin deformar o torcer la almohadilla térmica, color gris oscuro, que tienen en su parte posterior. Presionar la celda de flujo con firmeza contra la base hasta que se oiga un clic.
Ir a la página de inicio y pulsar en "Verificar celda de flujo".

Cuando aparezca el identificador de la celda de flujo, hacer clic en Iniciar.

Accederá directamente al Panel general de secuenciación.

Indicadores de estado de las celdas de flujo
La calidad de la celda de flujo se mostrará con uno de estos tres valores:
Signo de exclamación amarillo (celda de flujo Flongle - izquierda): El número de poros disponibles está por debajo del nivel cubierto por la garantía. Saque la celda de flujo del dispositivo, vuelva a insertarla e inicie el recuento de nuevo. Si el número sigue siendo inferior al número cubierto por la garantía, póngase en contacto con support@nanoporetech.com.
Marca de verificación verde (celdas de flujo MinION - centro): El número de poros disponibles está por encima de la cantidad cubierta por la garantía.
Signo de interrogación (celdas de flujo PromethION - derecha): Durante esta sesión en MinKNOW, la celda de flujo no se ha verificado.
![]()
Nota: El indicador de estado permanecerá visible solo durante la sesión en MinKNOW. Una vez cerrada, el estado de la celda de flujo desaparecerá.
9. Secuenciación y seguimiento del experimento
Las instrucciones sobre cómo configurar un experimento de secuenciación y supervisar el progreso del mismo se encuentran en el protocolo de MinKNOW, en la comunidad Nanopore.
Antes de realizar un experimento de secuenciación, es necesario purificar la muestra de ADN o ARN y preparar una biblioteca de secuenciación. Encontrará más información sobre la preparación de muestras, en la sección Prepare —en la pestaña Documentación— de la comunidad Nanopore.
Siga este enlace para acceder al protocolo de MinKNOW.
10. Gestión de datos
Gestor de archivos
Los datos se administran y transfieren desde la pestaña Gestor de archivos de la Configuración del servidor.
Los datos almacenados se encuentran en las pestañas situadas en la parte superior:
- Interno: datos almacenados en el dispositivo de secuenciación conectado (MinION Mk1C, GridION, PromethION).
- Extraíble: datos almacenados en un dispositivo de almacenamiento extraíble conectado, por ejemplo, una unidad USB.
- Red: datos almacenados en una unidad de red conectada. La unidad de red debe montarse antes.

Gestión de datos entre las pestañas Interno, Extraíble y Red:
Al activar la opción 'Seleccionar' se habilitarán las opciones atenuadas "Copiar", "Mover", "Eliminar" o "Renombrar" de la esquina inferior derecha.

Las opciones de la esquina inferior derecha se activarán al seleccionar una carpeta o archivo.

Seleccionar primero el archivo, luego Mover o Eliminar, según la acción que se desee realizar.
Al pulsar en "Copiar" o "Mover" se abrirá un cuadro de diálogo con una lista de las unidades a las que tendrá acceso el dispositivo.
Nota: en la carpeta "Dispositivos" aparecerá una unidad USB o una tarjeta SD conectada.

Pulsar en una unidad de disco, navegar a través del directorio de archivos y elegir el destino. Pulsar en una de las opciones "Copiar" o "Mover", según convenga.
Cómo consultar la memoria disponible:
Los datos generados por los experimentos de secuenciación se almacenan en la partición "/data", de ~14 TB, del sistema del P2i.
Para consultar la cantidad de memoria disponible, pulsar en la Configuración del servidor y después en la Configuración del dispositivo. La ventana Gestión de discos a continuación es un P2i con 3,1 TB de memoria restante.

Cómo acceder al dispositivo en remoto desde una unidad de red o unidad compartida:
Ir a la configuración del dispositivo y activar la opción Share/Compartir.

Se abrirá una ventana donde crear la contraseña.

Pulsar en Establecer contraseña y tras unos segundos el interruptor se activará.
Ahora será posible compartir los datos y acceder a ellos desde diferentes redes.

Nota: La imagen de arriba es un ejemplo de uso compartido en un GridION. Cuando estén activos, en los dispositivos MinION, aparecerá 'minit' y en los PromethION aparecerá 'prom'.
Si quiere dejar de compartir, mueva el interruptor a su posición inicial.
Nota: La contraseña se eliminará y debe restablecerse cuando se vuelva a activar el uso compartido.
Es posible crear nuevos directorios desde la interfaz gráfica del dispositivo usando el icono "Nuevo directorio".
Hacer clic en el icono —Crear un nuevo directorio— situado en la esquina inferior derecha y asignarle un nombre. A continuación, pulsar Crear.

Transferencia de datos y almacenamiento a largo plazo
Si el P2i se queda sin memoria durante un experimento de secuenciación, el experimento se detendrá antes de tiempo. Por ello, antes de empezar un experimento, asegúrese de que tiene al menos 2 TB de memoria por celda de flujo.
Para transferir y almacenar datos a largo plazo, recomendamos usar un servidor remoto o almacenamiento conectado a la red (NAS). Suelen ofrecer la posibilidad de elegir entre recursos compartidos NFS, SMB o CIFS. Recomendamos utilizar montajes NFS, debido a los permisos de usuario y grupo de Linux compatibles. En ordenadores Windows, utilizar SMB. En ordenadores Mac OS, utilizar SMB o NFS. Para transmitir datos de almacenamiento en tiempo real, es necesario utilizar SSD ya que tiene una elevada velocidad de escritura, comparado con HDD. Tras la escritura inicial en unidades SSD conectadas, es posible trasladar los datos con una velocidad de escritura más lenta para almacenarlos a largo plazo.
La forma y el volumen de los datos que se almacenen dependerá de sus necesidades y de si desea volver a identificar bases de los datos en el futuro, cuando haya algoritmos más avanzados:
Almacenar archivos .pod5 con datos de lecturas brutas permitirá volver a identificar las bases de esos datos cuando Oxford Nanopore Technologies lance nuevos algoritmos. En algunos casos, nuevas versiones de identificadores de bases han permitido mejorar significativamente la precisión en conjuntos de datos existentes gracias a la reidentificación de bases. Además, tanto las herramientas de terceros como las de Oxford Nanopore usan la información de la señal sin procesar, contenida en el archivo .pod5, para extraer información adicional, por ejemplo la identificación de bases modificadas, la identificación de polimorfismos de un solo nucleótido guiados por la referencia o la limpieza de datos.
Conservar solo los archivos FASTQ permitirá utilizar las herramientas estándar de análisis posterior, utilizando la secuencia de ADN/ARN, pero no se podrán generar más datos cuando aparezcan nuevas versiones de identificador de bases.
Oxford Nanopore no facilita recomendaciones específicas para su almacenamiento, ya que ellas dependerán de cada lugar.
Cómo montar una unidad de red:
Pulsar en Configuración del servidor, después en Configuración del dispositivo.
En Gestión de discos, pulsar en Añadir unidad de red.

Escoger entre SMB y NFS, introducir la información de acceso a la red y pulsar en Montar SMB/NFS.

Si desea eliminar la unidad de red, pulse en Desmontar.

Al principio, escriba los datos directamente en las unidades SSD internas. En este momento, escribir en una unidad de red no es una opción viable.
11. Apagar el dispositivo
NO recomendamos apagar el dispositivo desde el Terminal.
Utilizar el siguiente comando podría crear problemas de conexión con el dispositivo de secuenciación cuando se reinicie el dispositivo.
sudo shutdown -r
Detener el experimento de secuenciación desde MinKNOW UI y esperar a que la secuenciación termine.
Compruebe que el dispositivo no esté realizando ninguna tarea y retire las celdas de flujo o CTC de las posiciones, si hubiera alguna.
Si utiliza un monitor externo: pulsar en el icono de encendido en la parte superior derecha y a continuación pulsar en Apagar en la ventana emergente.
Si utiliza la pantalla integrada: en el menú lateral de la izquierda, pulsar en Configuración del servidor, después en Configuración del dispositivo. En la sección Sistema, pulsar en Apagar.
Esperar unos 20 segundos hasta que el dispositivo se apague y los ventiladores delantero y trasero se paren.
Si el dispositivo no se apaga, mentener pulsado el interruptor de la parte posterior durante unos ocho segundos y ello forzará el apagado.
12. Detener un experimento de secuenciación y apagar el dispositivo
Detener el experimento de secuenciación desde MinKNOW UI y esperar a que la secuenciación termine.
Para detener el experimento, ir a la página Experimentos y pulsar el botón rojo Stop en los controles de ejecución.
Este paso solo es necesario si se desea detener la ejecución antes de que finalice el tiempo establecido.
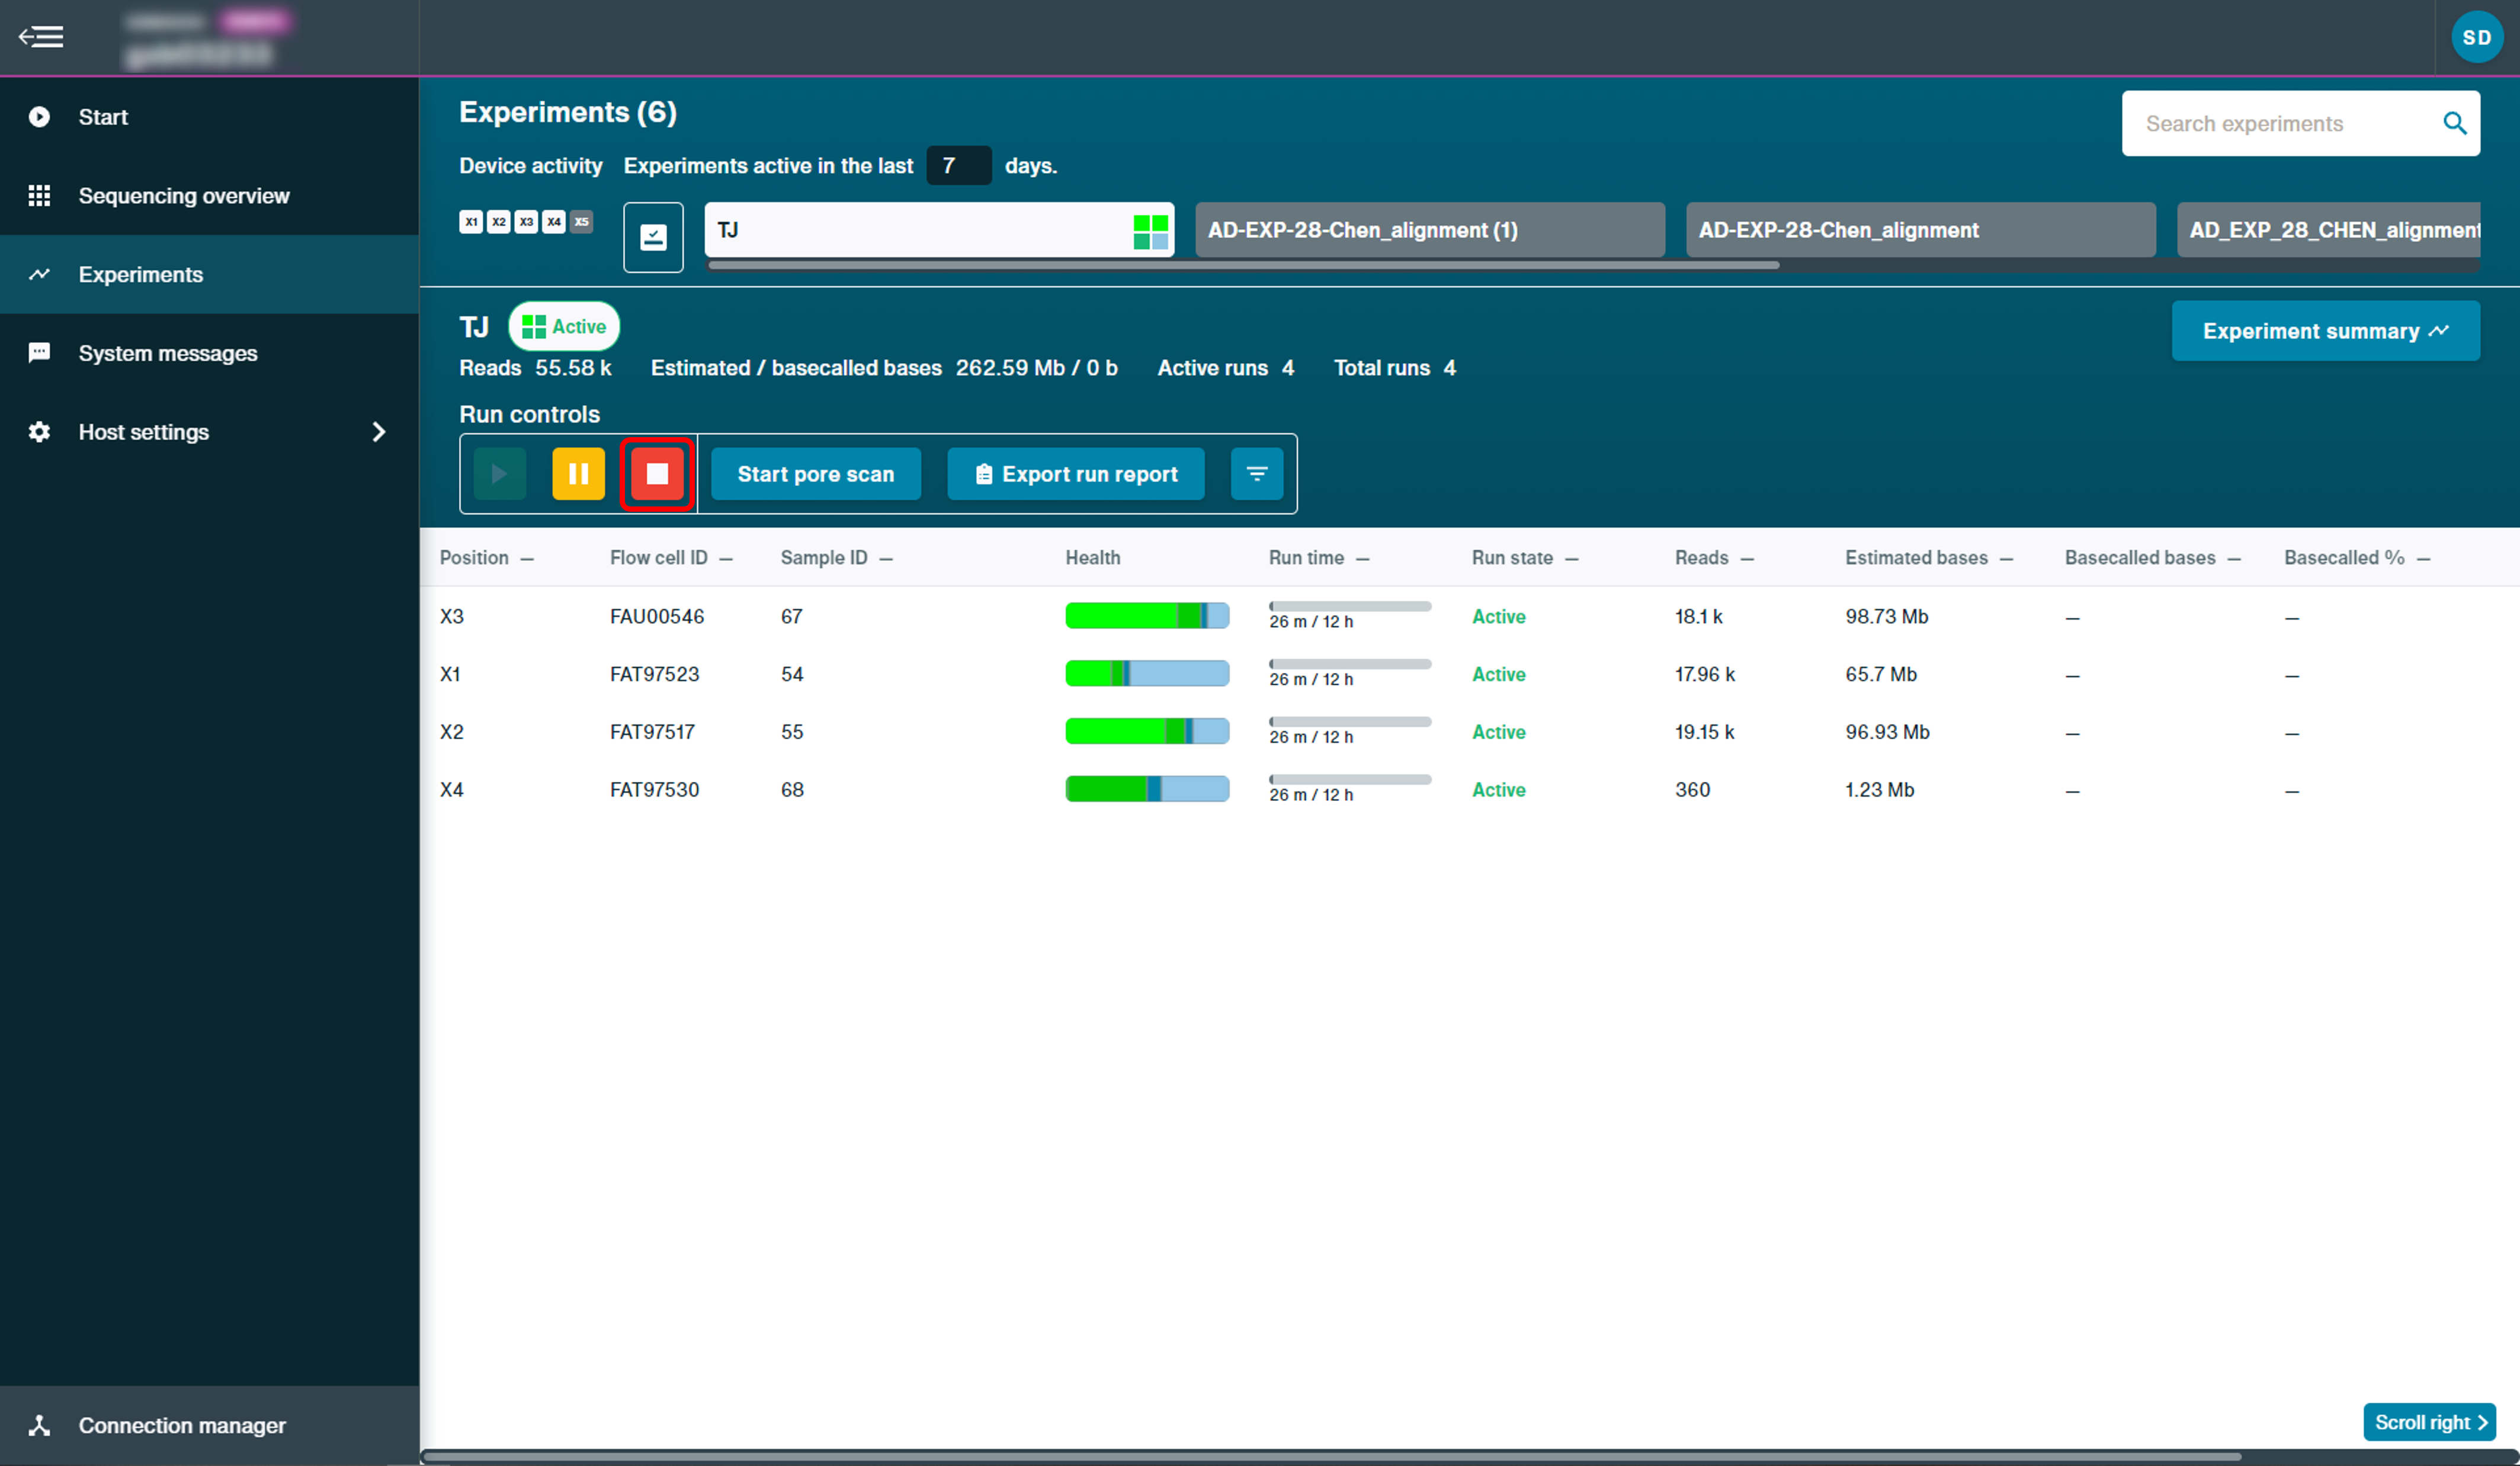
Confirme que desea parar la ejecución mediante una de las siguientes opciones:
- Stop sequencing lo que iniciará la recuperación de identificación de bases.
- Stop sequencing and basecalling lo que detendrá la secuenciación e identificación de bases al momento.

Cuando termine la secuenciación se generará un informe del experimento.
Los informes de los experimento, que incluyen información y gráficos de rendimiento, se generan automáticamente. Para generar un informe de forma manual, pulsar en Exportar informe de ejecución y seleccionar el/los experimento(s) que se deseen exportar.
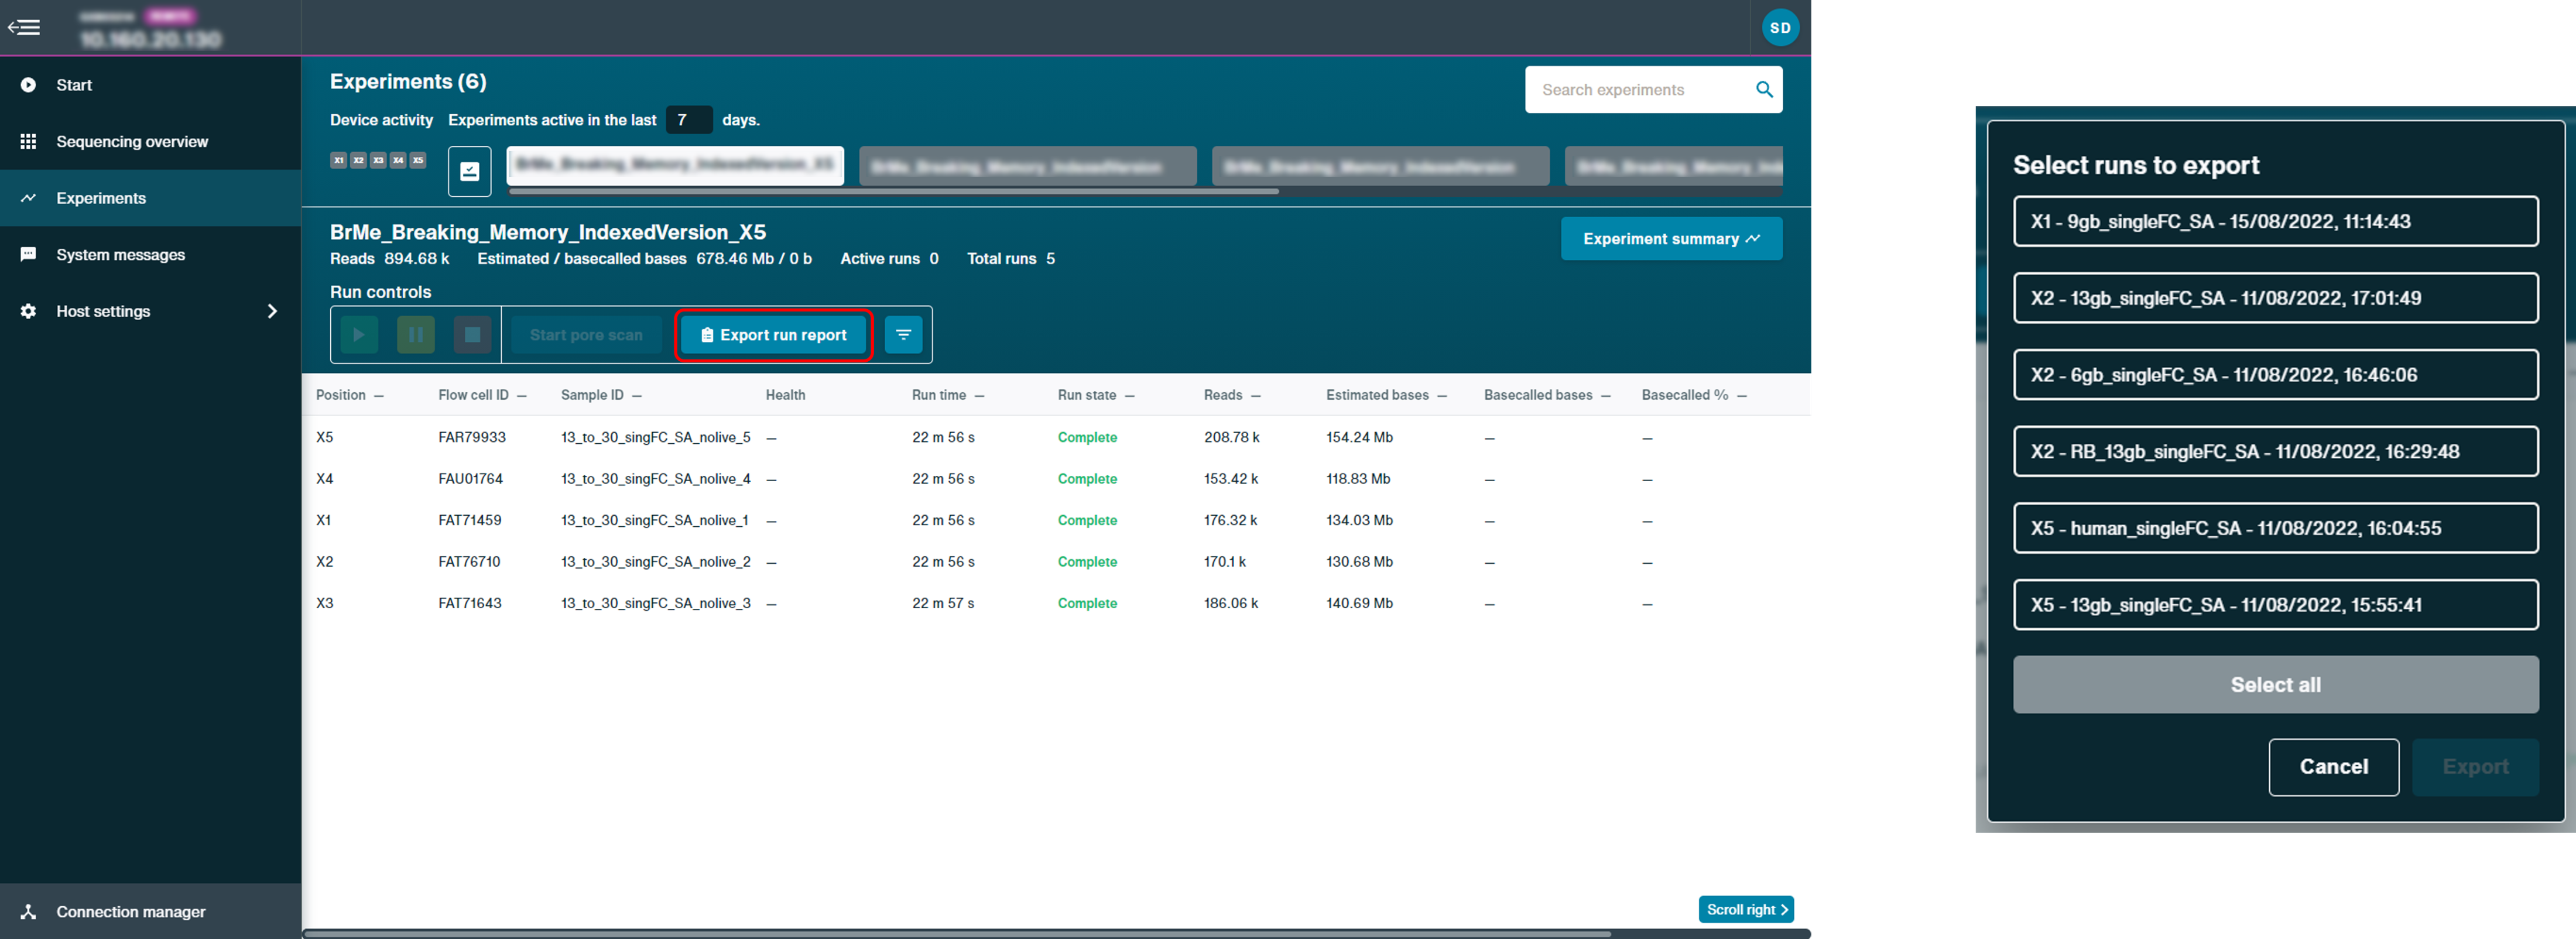
Encontrará más información en la sección Informe de ejecución de MinKNOW.
Antes de apagar el dispositivo, comprobar que no haya ninguna secuenciación, identificación de bases o análisis en curso.
Ir a "Configuración del dispositivo" y pulsar en "Apagar".
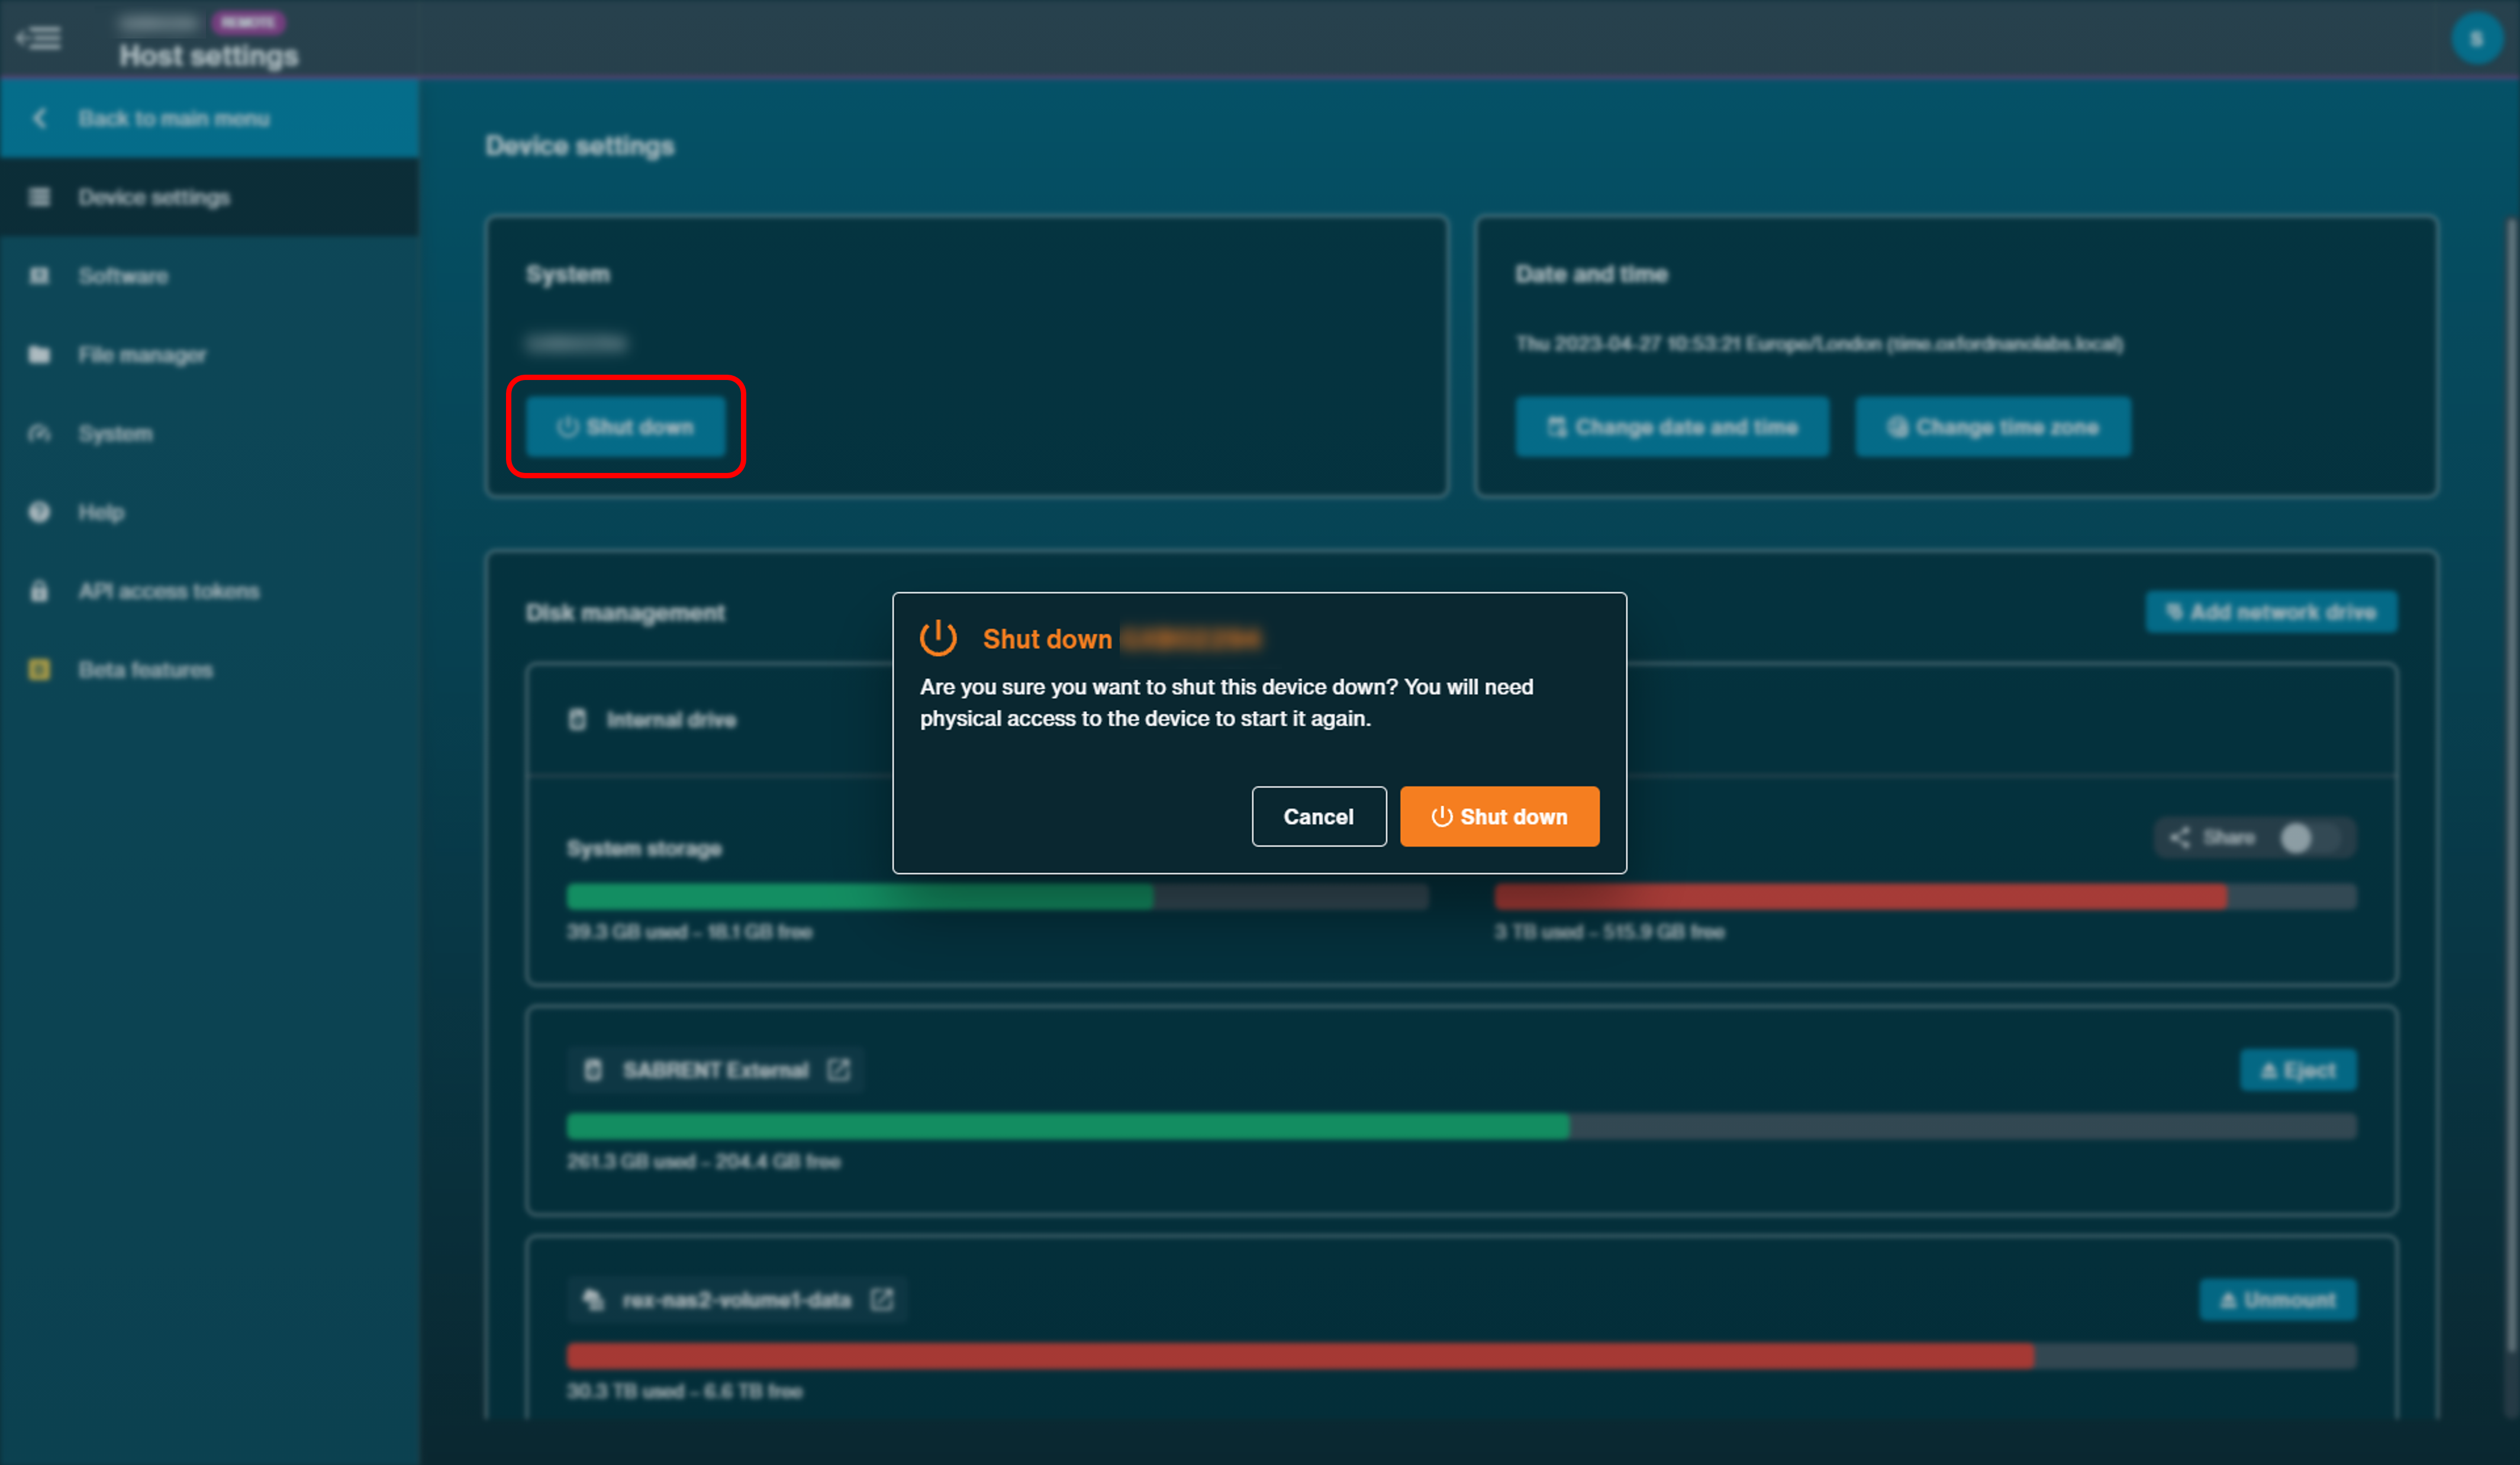
NO seleccione "Reiniciar", ya que al iniciar un experimento se producirán errores en el reconocimiento de celdas de flujo.
Esperar unos 20 segundos hasta que el dispositivo se apague y los ventiladores delantero y trasero se paren.
Si se conecta a un dispositivo a distancia, cierre la ventana de la aplicación MinKNOW.
13. Actualizar el programa a través del Terminal
Necesitará configurar un monitor externo para actualizar el programa mediante el Terminal. Conectar y encender el monitor antes de encender el P2i. Si conecta el monitor antes que el P2i, el dispositivo no reconocerá el monitor.
Buscar "terminal", abrir una ventana y pulsar Aceptar.
Escribir o pegar los siguientes comandos en el terminal y pulsar Aceptar.
sudo apt clean
sudo apt update
sudo apt install ont-p2-release
Apagar el dispositivo a través de la interfaz de usuario en el escritorio Ubuntu. Una vez el dispositivo esté apagado y los ventiladores se hayan detenido (tras 20 segundos aprox.) volver a encender el dispositivo.
14. Actualizar MinkNOW desde la interfaz gráfica, ya sea en la pantalla integrada como en un monitor externo.
Nótese, MinKNOW no se podrá actualizar si hay experimentos en curso.
Si se utiliza un monitor externo para actualizar la interfaz de MinKNOW, conectar y encender el monitor antes de encender el P2i. Si conecta el monitor antes que el P2i, el dispositivo no reconocerá el monitor.
Abrir la interfaz de MinKNOW desde la pantalla integrada o desde el monitor externo; el sistema buscará actualizaciones de manera automática.
Cuando haya actualizaciones disponibles se abrirá un cuadro de diálogo.
Seleccionar Instalar actualización y el programa se actualizará de manera automática.
Es posible omitir algunas actualizaciones; sin embargo, recomendamos actualizar el dispositivo tan pronto como haya nuevas versiones disponibles. Ciertas actualizaciones son esenciales y no se pueden omitir.

También es posible actualizar el dispositivo desde la pestaña Programa de la Configuración del servidor.
Ir a la pestaña Programa, en la Configuración del servidor.
El botón Instalar la actualización solo aparecerá cuando haya una nueva versión disponible.

Seleccionar Instalar actualización en la ventana del instalador.
Esperar a que el programa se actualice; puede tardar varios minutos.
La ventana del instalador avisará cuando la actualización haya finalizado.
Una vez la actualización haya terminado, no reiniciar, apagar completamente el dispositivo y encenderlo desde el interruptor situado en la parte trasera del dispositivo.
15. (Avanzado) Descargar la imagen ISO y grabarla en una unidad USB
Descripción general
Las siguientes instrucciones le ayudarán a crear una unidad USB de arranque que sirva para reconstruir el sistema operativo en su dispositivo.
Estas instrucciones son para los usuarios que no recibieron una unidad USB con imagen ISO. Si ha recibido una unidad USB, pase al siguiente punto: Cómo arrancar el dispositivo desde una memoria USB.
Recomendamos transferir los datos a una copia de seguridad, incluso si se escoge una opción que conserve los datos. Esto se debe a que los archivos ISO pueden corromperse a mitad del proceso (por ejemplo, debido a una desconexión del USB, un corte de electricidad, etc.).
Descargar el archivo ISO en el siguiente enlace:
Grabar el archivo ISO en una unidad USB
El programa adecuado para grabar la imagen ISO es: Rufus (Windows)
Nota: la herramienta de grabación ISO alternativa balenaEtcher no es compatible con nuestra imagen ISO. Necesitará acceso a un ordenador Windows y tal vez derechos de administrador para instalar el programa Rufus.

Al grabar el archivo ISO, utilizar los siguientes ajustes (se debe usar un arranque EFI/GPT):
- Esquema de partición: GPT
- Sistema de destino: UEFI
La unidad USB debe tener las siguientes características:
- Tener 64 GB o más
- USB 3.0 (recomendado)
- Utilizar la opción de arranque UEFI
Tras pulsar INICIO, tal vez aparezca la siguiente advertencia en una ventana emergente. Pulsar OK. 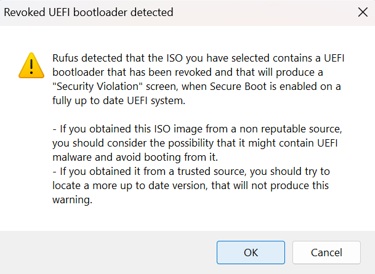
Nota: como medida de seguridad, recomendamos grabar una imagen de disco en dos unidades USB de distintos fabricantes. Con las USB habituales, es posible que se interrumpa la reinstalación de la imagen, sin motivo aparente.
16. Cómo arrancar el dispositivo desde una memoria USB
Apagar el PromethION 2 Integrated (P2i).
Compruebe que el monitor externo, el teclado y el ratón estén conectados en sus correspondientes puertos, en la parte posterior del dispositivo. Las instrucciones están en la Guía de inicio rápido del manual de usuario.
Insertar el USB de arranque en el puerto USB 3.0 con interior azul, situado en la parte posterior del dispositivo.
Antes de encender el dispositivo, prepárese para pulsar F11 en el teclado.
Encender el P2i.
a. Pulse repetidamente F11 en el teclado para acceder al menú de arranque.
b. En la pantalla "Please select boot device"(seleccionar dispositivo de arranque), con ayuda de las flechas del teclado seleccione UEFI OS (nombre del USB) y pulse Intro.

En la pantalla "Platform Rescue & Recovery", procure que la opción "Customer Factory Reset image" esté resaltada. Pulsar "Aceptar".

De este modo se consigue lo siguiente:
- Se mantiene la configuración de red
- Se mantiene el nombre del servidor
- Se mantienen los datos
- No se borran los metadatos ni se formatean todos los discos
Nota: la instalación estándar tal vez tarde varios minutos en cargarse. Pruebe con otras opciones solo si se lo indica el personal del departamento de Asistencia técnica de Oxford Nanopore Technologies.
Pulsar “Instalación estándar”.

Nota: en algunos casos, podría aparecer la siguiente pantalla. Si se da el caso, contacte con el departamento de Asistencia técnica.

Aparecerá una página de instalación con barras de carga. El dispositivo se reiniciará varias veces durante la instalación y es posible que aparezcan mensajes de error en el sistema. Este es el patrón esperado y está bien dejar al dispositivo que complete la instalación. El proceso completo tardará en finalizar 1 h aproximadamente.

primera pantalla de arranque:

segunda pantalla de arranque:

tercera pantalla de arranque:

Una vez finalizado el proceso, se mostrará la pantalla de inicio de sesión. Iniciar sesión con la contraseña "prom".

Apagar el dispositivo. Una vez apagado, esperar 60 s y extraer el USB.
Encender el dispositivo.
Iniciar sesión en el dispositivo con la contraseña "prom".

Pulsar dos veces en el icono de MinKNOW, ubicado en el escritorio.

Iniciar sesión en MinKNOW con los datos de inicio de la comunidad.
Se le pedirá que introduzca su dirección de correo y contraseña:
Comprobar que el dispositivo reconozca las posiciones de las celdas de flujo y que el número de serie del dispositivo sea correcto.
Introducir las celdas de prueba de configuración en el dispositivo y realizar una comprobación del equipo.
Consulte las instrucciones de comprobación del equipo del P2i.
La restauración de la imagen ISO ha finalizado.
17. Resolución de problemas
En la pestaña Ayuda de la página Configuración del servidor hay diversas soluciones a problemas.
La sección de Preguntas frecuentes sobre dispositivos, se encuentra aquí.
Cómo exportar registros:
- En la sección Exportar registros, pulsar en Exportar.
Una vez exportados los registros, debajo del botón aparecerá indicado dónde se encuentran. Los registros se descargarán como un archivo TGZ en el directorio de registros.
Es posible cambiar la ubicación de los registros utilizando el administrador de archivos, donde pueden recuperarse fácilmente sin necesidad de SSH:
- En el panel Exportar registros —situado en la pestaña "Ayuda" de la Configuración del servidor— bajo el botón Exportar dice "Registros exportados a:". Pulsar en la ubicación que sigue a ese enunciado. Esta acción abrirá la ubicación de los registros en el Gestor de archivos de MinKNOW.
- Utilice los botones que aparecerán en la esquina inferior derecha al seleccionar un archivo, para copiar, mover, borrar o cambiar el nombre del mismo.

Eliminar registros y datos temporales:
En la pestaña "Ayuda", en la sección 'Eliminar archivos', pulsar Eliminar y confirmar en la ventana emergente.
Nota: los datos de ejecución no se eliminarán. Se eliminarán los registros y datos temporales.

Solucionar los problemas del dispositivo:
En la página "Ayuda", sección "Resolución de problemas", pulsar en "Reparar problemas" y confirmar en la ventana emergente. MinKNOW intentará reparar los siguientes problemas:
- Comprobar que los directorios requeridos en "/data" existan y tengan la propiedad y los permisos necesarios.
- Comprobar que los archivos necesarios en "/data" tengan la propiedad y los permisos necesarios.
- Comprobar que la GPU funcione al máximo rendimiento.
- Comprobar que el Bluetooth esté desactivado.


