MinKNOW (MKE_1013_v1_revDM_29Oct2025)
Protocol
MinKNOW V MKE_1013_v1_revDM_29Oct2025
Instructions for working with MinKNOW. If using for the first time, please refer to the user manual for your device. For Research Use Only.
FOR RESEARCH USE ONLY
Contents
Quick start guides
- 1. Quick start guides introduction
- 2. MinION Mk1B and MinION Mk1D quick start guide
- 3. MinION Mk1C quick start guide
- 4. GridION quick start guide
- 5. PromethION 24/48 quick start guide
- 6. PromethION 2 Solo quick start guide
Computer requirements for MinKNOW
Downloading and installing MinKNOW
Updating or re-installing MinKNOW
Connecting to device
The Graphical User Interface (GUI)
- 16. Homepage
- 17. Hardware check
- 18. Flow cell check
- 19. Experiments page
- 20. Sample sheet upload
- 21. Save and load sequencing run settings
- 22. Changing default run settings
- 23. Application settings
Host settings
- 24. Overview
- 25. Shutting down
- 26. Rebooting
- 27. System package updates
- 28. Data management
- 29. Remote transfer
- 30. Mount Network Drive
- 31. Tutorials
- 32. Network settings and connection
- 33. Beta features
- 34. Troubleshooting your device
Starting a sequencing run
- 35. Introduction to local basecalling
- 36. Starting a sequencing run with Flongle
- 37. Starting a sequencing run on MinION Mk1B/Mk1D
- 38. Starting a sequencing run on MinION Mk1C
- 39. Starting a sequencing run on GridION
- 40. Starting a sequencing run on PromethION 24 and 48
- 41. Starting a sequencing run on PromethION 2 Solo
- 42. Starting a sequencing run on PromethION P2i
Monitoring and troubleshooting your sequencing run
- 43. Refuelling your flow cell
- 44. Checks and monitoring
- 45. Troubleshooting your run from the pore activity plots
- 46. Recovering interrupted runs
Completing a MinKNOW run
- 47. Completion of a sequencing protocol script
- 48. Run report
- 49. Closing MinKNOW and shutting down a MinION Mk1B/Mk1D
- 50. Closing MinKNOW and shutting down on GridION
- 51. Closing MinKNOW and shutting down on PromethION
Post-run analysis
Overview
Instructions for working with MinKNOW. If using for the first time, please refer to the user manual for your device. For Research Use Only.
1. Quick start guides introduction
Introduction
MinKNOW controls all Oxford Nanopore sequencing devices, performing several core tasks, including data acquisition, real-time analysis, basecalling, and data streaming.
In this section, we will outline how to set up your device for the first time for sequencing using our MinKNOW software.
2. MinION Mk1B and MinION Mk1D quick start guide
The MinION Mk1B and MinION Mk1D
The MinION Mk1B and MinION Mk1D are pocket-sized, portable devices for biological analysis of DNA or RNA samples. The MinION Mk1D is the successor to MInION Mk1B, with improved thermal dissipation capabilities significantly enhancing sequencing performance, enabling highly accurate real-time sequencing in an even wider range of environments than MinION Mk1B. Both devices can be used with MinION Flow Cells, as well as the Flongle Adapter and flow cells. The device is plugged into a computer and is operated by MinKNOW, which controls the device and flow cells, collects the sequencing data, and performs basecalling.
Below is a quick start guide to set up a new device for sequencing library samples. For further details on using these devices, please refer to the MinION Mk1B user manual or MinION Mk1D user manual.
Download and install the MinKNOW software.
Download the MinKNOW Software for the MinION Mk1B/D and the PromethION 2 Solo (P2 Solo) Devices from the Software Downloads page and extract the .zip files. Follow the installation prompts to install the software.
Set up your MinION Mk1B/Mk1D with a host computer.
Connect your device to the host computer via the USB cable provided, as instructed in the user manual. Please refer to MinION Mk1B Computer requirements or MinION Mk1D Computer requirements for further information.
Log into MinKNOW.
Double-click on the MinKNOW icon on your desktop.
Click on Log in with your Nanopore account.
Enter your email address and Nanopore password.
The Connection Manager will open, and your device will be the card in the top left corner.
Click on the My device card to access and control it.

Tutorials
These are available to help you get started and run your experiments as easily as possible.
When you open the MinKNOW software for the first time, the tutorials will navigate you through the graphical user interface (GUI). Click Continue tutorial to follow or click the ⁞ to skip.

Perform a hardware check.
A hardware check must be completed on your new device or after software has been updated.
- Open the MinION Mk1B/Mk1D and slide your Configuration Test Cell (CTC) under the clip. Gently press down onto the CTC until it clicks into place. To check a Flongle Adapter, insert an empty adapter instead of a CTC.
2 Close the device lid.
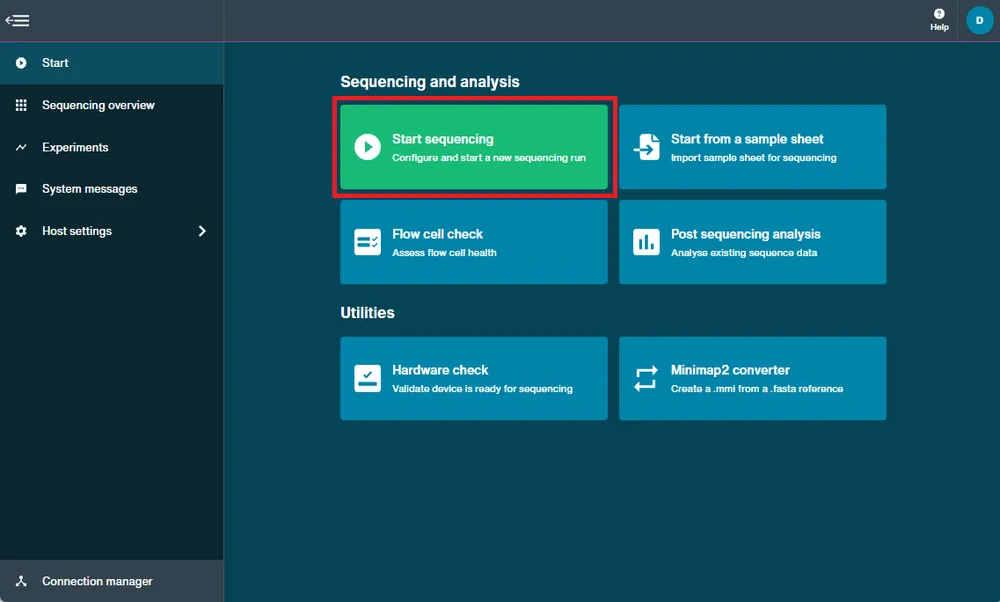
Navigate to the Start tab and click Hardware check.
Click Start. The hardware check will complete after approximately 1 minute.
After the hardware check has finished, remove the CTC and store in dry conditions.

Perform a flow cell check.
A flow cell check must be carried out prior to starting a sequencing experiment to assess the number of active pores available in your flow cell. For further information about flow cell warranty is available in the Flow cell check section.
Open the device and slide your flow cell under the clip. Firmly press down on the flow cell. For Flongle, slide the Flongle Adapter under the clip and insert a Flongle Flow Cell.
Navigate to the Start page and click Flow Cell Check.
MinKNOW will recognise the MinION Flow Cell type and IDs. Note: For Flongle, fill in the flow cell ID manually.
Click Start and the flow cell check will begin.

Set up a sequencing run.
Prime and load your flow cell with DNA or RNA library by following a library prep protocol and set up a sequencing run, as follows:
Navigate to the Start page and click Start Sequencing.
In the Positions tab, fill in the experiment name, sample ID, and select the flow cell type. Click Continue to kit selection. Note: For Flongle, fill in the flow cell ID manually.
Select the kit and any expansion(s) used to prepare the library. Click Continue to run options.
Specify the sequencing run length and minimum read length or keep the default settings. Click Continue to analysis.
Choose your basecaller model and select any available barcoding and alignment options or keep the default settings. Click Continue to output.
Specify your output data location, format and filtering options or keep the default settings. Click Continue to final review.
Click Start.
For further details, please see the Starting a sequencing run section for your device in the MinKNOW protocol.
3. MinION Mk1C quick start guide
The MinION Mk1C
This device combines the real-time, rapid, portable sequencing of a MinION Mk1B/Mk1D with a Graphical Processing Unit (GPU) and a high-resolution screen. It can be used with MinION Flow Cells, as well as the Flongle Adapter and flow cells. The device is operated by the MinKNOW software that controls the device, experimental scripts, and performs basecalling.
Below is a quick start guide to set up a new device and to start sequencing your library samples. For further details using this device, please see the MinION Mk1C User Manual.
Set up the MinION Mk1C device.
Connect the AC/DC adapter to a power source and connect the MinION Mk1C.
Switch the power source on and press the power button on the device.
For the first time, users will be taken through the onboarding process to set up the device. Through this process, you will:
- Connect your device to the internet (Ethernet recommended)
- Log into your MinKNOW account using your Community credentials
- Configure local network access to your device
- Perform a hardware check
Check the time and date of your device.
Verify the time and data of your device is correct to successfully establish a network connection.
Navigate to Device settings in the host settings.
Check the time and date.
Click Change data and time and set the time using custom date/time.

Reset the default password.
The device is shipped with a default password minit that must be reset.
Navigate to Device settings in the host settings.
Click Reset password to open the Change password dialogue box.
Enter the current password, followed by the new password.
Click Reset password to confirm the password change.

Tutorials
These are available to help you get started and run your experiments as easily as possible.
When you open the MinKNOW software for the first time, the tutorials will navigate you through the graphical user interface (GUI). Click Continue tutorial to follow or click the ⁞ to skip.

Perform a hardware check.
A hardware check must be performed on new devices or when software has been updated.
Open the MinION Mk1C and slide the CTC under the clip. Gently press down onto the CTC until it clicks into place. To check a Flongle Adapter, insert an empty adapter instead of a CTC.
Close the device lid.
Navigate to the Start page and click Hardware check.
Click Start. The hardware check will complete after approximately 1 minute.
After the hardware check has finished, remove the CTC and store in dry conditions.

Perform a flow cell check.
A flow cell check must be carried out prior to starting a sequencing experiment to assess the number of active pores available in your flow cell. For further information about flow cell warranty is available in the Flow cell check section.
Open the device and slide your flow cell under the clip. Firmly press down on the flow cell. For Flongle, slide the Flongle Adapter under the clip and insert a Flongle Flow Cell.
Navigate to the Start page and click Flow Cell Check.
MinKNOW will recognise the MinION Flow Cell type and IDs. Note: For Flongle, fill in the flow cell ID manually.
Click Start and the flow cell check will begin.

Set up a sequencing run.
Prime and load your flow cell with DNA or RNA library by following a library prep protocol and set up a sequencing run, as follows:
Navigate to the Start page and click Start Sequencing.
In the Positions tab, fill in the experiment name, sample ID, and select the flow cell type. Click Continue to kit selection. Note: For Flongle, fill in the flow cell ID manually.
Select the kit and any expansion(s) used to prepare the library. Click Continue to run options.
Specify the sequencing run length and minimum read length or keep the default settings. Click Continue to analysis.
Choose your basecaller model and select any available barcoding and alignment options or keep the default settings. Click Continue to output.
Specify your output data location, format and filtering options or keep the default settings. Click Continue to final review.
Click Start.
For further details, please see the Starting a sequencing run section for your device in the MinKNOW protocol.

4. GridION quick start guide
The GridION
This is a compact benchtop system offering on-demand sequencing with integrated real-time data processing. Up to five MinION or Flongle Flow Cells can be run individually or concurrently, offering a cost-effective access to long-read, real-time nanopore sequencing. The device is operated by the MinKNOW software, which controls the device, experimental scripts, and performs basecalling.
Below is a quick start guide to set up a new device and to start sequencing your library samples. For further details using this device, please see the GridION User Manual.
Install the GridION device.
Unpack the device in an appropriate laboratory location and attach all the required cables to the device, including the:
- Ethernet
- HDMI or DisplayPort to monitor
- USB for a keyboard
- USB for a mouse
- C13 cable
Ensure the device is connected to a protective earth mains supply and turn the power source on and press the power button on the device. A blue light will appear in the middle of the button.
Log into MinKNOW.
Double-click on the MinKNOW icon on your desktop.
Click on Log in with your Nanopore account.
Enter your email address and Nanopore password.
The Connection Manager will open, and your device will be the card in the top left corner.
Click on the My device card to access and control it.

Tutorials
These are available to help you get started and run your experiments as easily as possible.
When you open the MinKNOW software for the first time, the tutorials will navigate you through the graphical user interface (GUI). Click Continue tutorial to follow or click the ⁞ to skip.

Configure your GridION.
To connect your GridION to a single network, use the user interface. A device can be connected to multiple networks which will require a script to be used. For more information, please see the GridION User Manual.
Validate your IP address to ensure it has been correctly set using a static or DHCP address using the command ifconfig.
Check the time and date of your device.
Verify the time and data of your device is correct to successfully establish a network connection.
Navigate to Device settings in the host settings.
Check the time and date.
Click Change data and time and set the time using custom date/time.

Reset the default password.
The device is shipped with a default password grid that must be reset.
Navigate to Device settings in the host settings.
Click Reset password to open the Change password dialogue box.
Enter the current password, followed by the new password.
Click Reset password to confirm the password change.

Perform a hardware check.
A hardware check must be perfomed on new devices or after software has been updated.
Open the GridION and slide a CTC under the clip for each position. Gently press down onto the CTC until it clicks into place. To check a Flongle Adapter, insert an empty adapter instead of a CTC.
The LEDs above the flow cell position will be blue when initialising and will turn green when they are ready.
Close the device lid.
Navigate to the Start page and click Hardware check.
Click Select all available positions.
Click Start. The hardware check will complete after approximately 1 minute.
After the hardware check has finished, remove the CTCs and store in dry conditions.

Perform a flow cell check.
A flow cell check must be carried out prior to starting a sequencing experiment to assess the number of active pores available in your flow cell. For further information about flow cell warranty is available in the Flow cell check section.
Open the device and slide your flow cell under the clip. Firmly press down on the flow cell. For Flongle, slide the Flongle Adapter under the clip and insert a Flongle Flow Cell.
Navigate to the Start page and click Flow Cell Check.
MinKNOW will recognise the MinION Flow Cell type and IDs. Note: For Flongle, fill in the flow cell ID manually.
Click Start and the flow cell check will begin.

Set up a sequencing run.
Prime and load your flow cell with DNA or RNA library by following a library prep protocol and set up a sequencing run, as follows:
Navigate to the Start page and click Start Sequencing.
In the Positions tab, fill in the experiment name, sample ID, and select the flow cell type. Click Continue to kit selection. Note: For Flongle, fill in the flow cell ID manually.
Select the kit and any expansion(s) used to prepare the library. Click Continue to run options.
Specify the sequencing run length and minimum read length or keep the default settings. Click Continue to analysis.
Choose your basecaller model and select any available barcoding and alignment options or keep the default settings. Click Continue to output.
Specify your output data location, format and filtering options or keep the default settings. Click Continue to final review.
Click Start.
For further details, please see the Starting a sequencing run section for your device in the MinKNOW protocol.

5. PromethION 24/48 quick start guide
The PromethION 24 and 48
This is a benchtop device designed to run up to 24 (for P24) or 48 (for P48) flow cells. Each flow cell is independently addressable, meaning that experiments can be run concurrently or individually. The integrated compute in the PromethION enables real-time data streaming and analysis. The device is operated by the MinKNOW software that controls the device, experimental scripts, and performs basecalling.
Below is a quick start guide to set up a new device and to start sequencing your library samples. For further details using this device, please see the PromethION 24/48 User Manual.
Install the PromethION device.
Unpack the device and place the Sequencing Unit and the Data Acquisition Unit within 2 meters of each other.
Connect the following cables:
- Connect either the copper or fibre cables to the data acquisition unit.
- Connect the PCIe and USB cables between the sequencing and data acquisition units
- Connect the peripheral devices (e.g. monitor, mouse, keyboard) to the appropriate ports.
- Connect the two C13 cables to both units.
Turn on the power at the mains supply and turn on the sequencing unit, wait three minutes and turn on the data acquisition unit.
Validate your IP address to ensure it has been correctly set using a static or DHCP address using the command
ifconfig.
Log into MinKNOW.
Double-click on the MinKNOW icon on your desktop.
Click on Log in with your Nanopore account.
Enter your email address and Nanopore password.
The Connection Manager will open, and your device will be the card in the top left corner.
Click on the My device card to access and control it.

Tutorials
These are available to help you get started and run your experiments as easily as possible.
When you open the MinKNOW software for the first time, the tutorials will navigate you through the graphical user interface (GUI). Click Continue tutorial to follow or click the ⁞ to skip.

Check the time and date of your device.
Verify the time and data of your device is correct to successfully establish a network connection.
Navigate to Device settings in the host settings.
Check the time and date.
Click Change data and time and set the time using custom date/time.

Reset the default password.
The device is shipped with a default password prom that must be reset.
Navigate to Device settings in the host settings.
Click Reset password to open the Change password dialogue box.
Enter the current password, followed by the new password.
Click Reset password to confirm the password change.

Perform a hardware check.
A hardware check must be performed on new devices or after a software update.
Open the PromethION and insert the CTCs into all positions. The LED adjacent to the flow cell will be blue when initialising and will turn green when it is ready.
Close the device lid.
Navigate to the Start page and click Hardware check.
Click Select all available positions.
Click Start. The hardware check will complete after approximately 1 minute.
After the hardware check has finished, remove the CTCs and store in dry conditions.

Perform a flow cell check.
A flow cell check must be carried out prior to starting a sequencing experiment to assess the number of active pores available in your flow cell. For further information about flow cell warranty is available in the Flow cell check section.
Open the device and insert your flow cell.
Navigate to the Start page and click Flow Cell Check.
MinKNOW will recognise the PromethION Flow Cell type and ID.
Click Start and the flow cell check will begin.

Set up a sequencing run.
Prime and load your flow cell with DNA or RNA library by following a library prep protocol and set-up a sequencing run, as follows:
Navigate to the Start page and click Start Sequencing.
In the Positions tab, fill in the experiment name, sample ID, and select the flow cell type and position(s). Click Continue to kit selection.
Select the kit and any expansion(s) used to prepare the library. Click Continue to run options.
Specify the sequencing run length and minimum read length or keep the default settings. Click Continue to analysis.
Choose your basecaller model and select any available barcoding and alignment options or keep the default settings. Click Continue to output.
Specify your output data location, format and filtering options or keep the default settings. Click Continue to final review.
Click Start.
For further details, please see the Starting a sequencing run section for your device in the MinKNOW protocol.

6. PromethION 2 Solo quick start guide
The PromethION 2 Solo
This is a small benchtop device designed to run up to two flow cells. Each flow cell is independently addressable, meaning that experiments can be run concurrently or individually. The PromethION 2 Solo plugs into a GridION Mk1 or user compute for real-time data streaming and analysis. The device is operated by the MinKNOW software that controls the device, experimental scripts, and performs basecalling.
Below is a quick start guide to set up a new device and to start sequencing your library samples. For further details using this device, please see the PromethION 2 Solo User Manual.
Install the P2 Solo with a GridION.
Place the P2 Solo and GridION on a laboratory bench.
Check the GridION serial number is greater than GXB002xxx on the back of the device.
Download and install the PromethION 2 Solo software from the Software Downloads page on the Community. For Linux, install the software via the Terminal. For more information, see the PromethION 2 Solo User Manual.
Connect the P2 Solo AC power adapter into a mains supply and connect it to the P2 Solo.
Connect the USB Type-C cable to the GridION and the P2 Solo.
Turn on the power switch on the GridION and wait 60 seconds.
Install the P2 Solo with a workstation/laptop.
Place the P2 Solo on a laboratory bench.
Download and install the PromethION 2 Solo software from the Software Downloads page on the Community. For Linux, install the software via the Terminal. For more information, see the PromethION 2 Solo User Manual.
Connect the P2 Solo AC power adapter into a mains supply and connect it to the P2 Solo.
Connect the USB Type-C cable to the workstation/laptop and the P2 Solo.
Log into MinKNOW.
Double-click on the MinKNOW icon on your desktop.
Click on Log in with your Nanopore account.
Enter your email address and Nanopore password.
The Connection Manager will open, and your device will be the card in the top left corner.
Click on the My device card to access and control it.

Tutorials
These are available to help you get started and run your experiments as easily as possible.
When you open the MinKNOW software for the first time, the tutorials will navigate you through the graphical user interface (GUI). Click Continue tutorial to follow or click the ⁞ to skip.

Configure your GridION.
For your P2 Solo connected to a GridION, the network will need to be configured. To connect your GridION to a single network, use the user interface. A device can be connected to multiple networks which will require a script to be used.
Validate your IP address to ensure it has been correctly set using a static or DHCP address using the command ifconfig.
Perform a hardware check.
A hardware check must be performed on new devices and after software updates.
Open the P2 Solo and slide the CTC into each position. Note: Ensure you are using the CTCs provided with the P2 Solo device only.
Close the device lid.
Navigate to the Start page and click Hardware check.
Click Select all available positions.
Click Start. The hardware check will complete after approximately 1 minute.
After the hardware check has completed, remove the CTCs and store in dry conditions.

Perform a flow cell check.
A flow cell check must be carried out prior to starting a sequencing experiment to assess the number of active pores available in your flow cell. For further information about flow cell warranty is available in the Flow cell check section.
Open the device and insert your flow cell.
Navigate to the Start page and click Flow Cell Check.
MinKNOW will recognise the PromethION Flow Cell type and ID.
Click Start and the flow cell check will begin.

Set up a sequencing run.
Prime and load your flow cell with DNA or RNA library by following a library prep protocol and set-up a sequencing run, as follows:
Navigate to the Start page and click Start Sequencing.
In the Positions tab, fill in the experiment name, sample ID, and select the flow cell type and position(s). Click Continue to kit selection.
Select the kit and any expansion(s) used to prepare the library. Click Continue to run options.
Specify the sequencing run length and minimum read length or keep the default settings. Click Continue to analysis.
Choose your basecaller model and select any available barcoding and alignment options or keep the default settings. Click Continue to output.
Specify your output data location, format and filtering options or keep the default settings. Click Continue to final review.
Click Start.
For further details, please see the Starting a sequencing run section for your device in the MinKNOW protocol.

7. Computer requirements
8. Installing MinKNOW on Windows
Download and installation
This part of the configuration will introduce the MinKNOW software and explain how to download and install it. There are three items to take particular note of:
- If anti-virus software stops the installation, contact your IT department
- The MinKNOW downloads as a .zip file and all files need to be extracted before proceeding with installation
- Data generated from the MinKNOW software needs to be stored on the SSD drive, and care should be taken to ensure the data location is set to the SSD during installation
If help is needed during installation, please refer to the Support area in the Community.
Download MinKNOW
- Download MinKNOW software from the Downloads page on the Community
- Follow the on-screen instructions
- Contact the local IT administrators if there are any issues with permissions for installation
Extract the .zip files.
- Check that the Oxford Nanopore wheel icon is next to MinKNOW Stand-alone NC Windows [version number].zip
- Click on MinKNOW Stand-alone NC Windows [version number].zip
Follow the installation prompts.
At the Installation Options screen, click 'Next' to accept default installation options.
In the Choose Data Location dialogue box, check that you are happy with the location of the sequencing reads data to change to the required SSD location and click on Install.
In the Choose Data Location dialogue box, check that the read location is C:\data. If you prefer a different destination, enter the path in the box. Continue the download by clicking on Install.

Progression of installation
A dialogue box will open and shows progression of the installation.

When installation is complete, click on 'Close' to see MinKNOW successfully installed.
Navigate to the MinKNOW icon on the desktop.
The presence of the MinKNOW icon on the desktop indicates that this step has been successfully completed.
If you have a proxy server and would like to set up MinKNOW using a proxy, follow the instructions below.
Open the user_conf file:
C:\ProgramFiles\OxfordNanopore\MinKNOW\conf\user_conf
And edit the following portion of the file:
"proxy": {
"cereal_class_version": 0,
"use_system_settings": true,
"auto_detect": true,
"auto_config_script": "",
"https_proxy": "",
"proxy_bypass": ""
Edit the https_proxy setting, which should be in the style of:
scheme://[username:password@]host:port or "http://domain\\username:password@host:port", where "scheme" is one of https, socks, socks4 or socks5.
9. Installing MinKNOW on macOS
Download MinKNOW
1. Download MinKNOW software from the Downloads page on the Community. 2. Once MinKNOW has downloaded, navigate to the folder in Applications and launch the MinKNOW.pkg installer.

3. Follow the on-screen instructions.

4. Provide a fingerprint or password as required.


5. Once the installation is complete, exit the installer.
Navigate to the MinKNOW icon in the Applications folder.
The presence of the MinKNOW icon in the Applications folder indicates that this step has been successfully completed.
Set the directory where the read files will be saved:
Open a command line and type:
sudo /Applications/MinKNOW.app/Contents/Resources/bin/config_editor --conf user --file /Applications/MinKNOW.app/Contents/Resources/conf/user_conf --set "output_dirs.base=/where the files will be saved"
Add the full path to the location where you would like the read files saved in the place of "where the read files will be saved".
If you have a proxy server and would like to set up MinKNOW using a proxy, follow the instructions below.
Open the user_conf file:
/Applications/MinKNOW.app/Contents/Resources/conf/user_conf
And edit the following portion of the file:
"proxy": {
"cereal_class_version": 0,
"use_system_settings": true,
"auto_detect": true,
"auto_config_script": "",
"https_proxy": "",
"proxy_bypass": ""
Edit the https_proxy setting, which should be in the style of:
scheme://[username:password@]host:port or "http://domain\\username:password@host:port", where "scheme" is one of https, socks, socks4 or socks5.
10. Installing MinKNOW on Linux
To add the Oxford Nanopore apt repository, run the command below on a terminal window:
For Ubuntu 24:
sudo apt update
sudo apt install wget
wget -O- https://cdn.oxfordnanoportal.com/apt/ont-repo.pub | sudo tee /etc/apt/keyrings/nanoporetech.asc > /dev/null
echo -e "Types: deb\nURIs: http://cdn.oxfordnanoportal.com/apt\nSuites: noble-stable\nComponents: non-free\nSigned-By: /etc/apt/keyrings/nanoporetech.asc" | sudo tee /etc/apt/sources.list.d/nanoporetech.sources
For Ubuntu 22:
sudo apt update
sudo apt install wget
wget -O- https://cdn.oxfordnanoportal.com/apt/ont-repo.pub | sudo apt-key add -
echo "deb http://cdn.oxfordnanoportal.com/apt jammy-stable non-free" | sudo tee /etc/apt/sources.list.d/nanoporetech.sources.list
For Ubuntu 20:
sudo apt update
sudo apt install wget
wget -O- https://cdn.oxfordnanoportal.com/apt/ont-repo.pub | sudo apt-key add -
echo "deb http://cdn.oxfordnanoportal.com/apt focal-stable non-free" | sudo tee /etc/apt/sources.list.d/nanoporetech.sources.list
Install MinKNOW using the command:
sudo apt update
sudo apt install ont-standalone-minknow-release
Open the MinKNOW GUI from the applications list.
Default installation directories
For the MinKNOW software: /opt/ont/minknow
For the MinKNOW user interface: /opt/ont/minknow-ui
Location of the reads folder:
The reads folder is in /var/lib/minknow/data
Location of the log files:
The MinKNOW logs are located in /var/log/minknow The Dorado basecaller logs are located in /var/log/dorado
If you have a proxy server and would like to set up MinKNOW using a proxy, follow the instructions below.
Open the user_conf file:
/opt/ONT/MinKNOW/conf/user_conf
And edit the following portion of the file:
"proxy": {
"cereal_class_version": 0,
"use_system_settings": true,
"auto_detect": true,
"auto_config_script": "",
"https_proxy": "",
"proxy_bypass": ""
Edit the https_proxy setting, which should be in the style of:
scheme://[username:password@]host:port or "http://domain\\username:password@host:port", where "scheme" is one of https, socks, socks4 or socks5.
11. Updating MinKNOW for Windows and macOS
MinKNOW updates
Availability of updates to the MinKNOW software are indicated via the MinKNOW host settings or as a pop-up when first opening the software. The user should follow the on-screen instructions to install the new versions.
The details of the update will be communicated in Nanopore Community announcements.
We strongly recommend users to update as soon as reasonably possible after the release has been made available.
Note: Users will not be able to update their device if connected remotely or if a run is in progress.
Securing custom scripts prior to updating MinKNOW
If you have created custom scripts in MinKNOW, care should be taken to store them securely so they are not overwritten during software updates.
Please also be aware that the script structure can change between MinKNOW versions; custom scripts written for one version may not be compatible with the next.
Upon opening MinKNOW, a dialogue box will open when a new update is available.
Select Get Update to update the device software automatically.
Updates may be skipped. However, we recommend to update the device as soon as updates are available. Some updates will be mandatory to use the device and are unable to be skipped.

Note: For MinION Mk1B/Mk1D, clicking Get Update will open the Software Downloads page on the connected computer for you to download the updated MinION software.
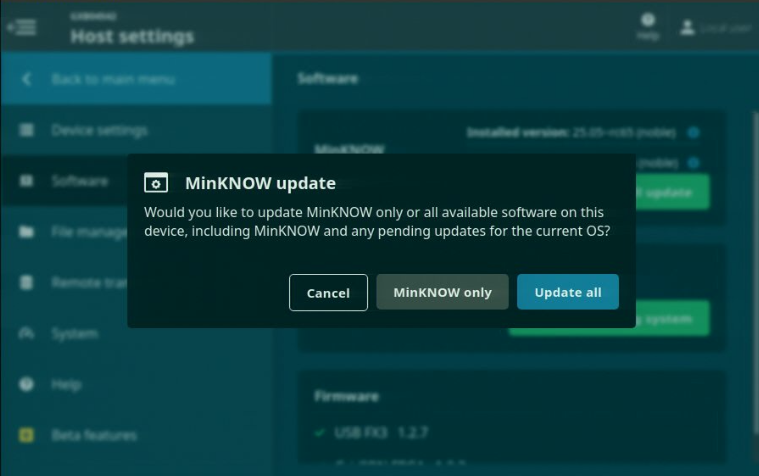
A pop-up window will give you the option to additionally update system packages. Select 'MinKNOW only' or 'Update all' to proceed.
You can also update the device from the Software page of the Host settings.
To update MinKNOW, click Install update in the MinKNOW panel.

A pop-up window will give you the option to additionally update system packages. Select 'MinKNOW only' or 'Update all' to proceed.
Re-installing MinKNOW
In some cases (e.g. if there is a problem with the version of MinKNOW that you are using), it may be necessary to re-install the software. To do this, first do a full uninstall of the current version by following the instructions in the Support article: How to uninstall MinKNOW Software for the MinION Mk1B, Mk1D and P2 Solo Devices.
12. Updating MinKNOW for Linux
To update MinKNOW to a new version:
sudo apt clean
sudo apt update
sudo apt install ont-standalone-minknow-release
The latest version of MinKNOW will be installed. Once these commands have completed successfully without errors, reboot the device:
sudo reboot
Re-installing MinKNOW
In some cases (e.g. if there is a problem with the version of MinKNOW that you are using), it may be necessary to re-install the software. To do this, first do a full uninstall of the current version by following the instructions in the Support article: How to uninstall MinKNOW Software for the MinION Mk1B, Mk1D and P2 Solo Devices.
If required, older versions of MinKNOW can be installed on Linux systems using the ONT Software Downgrade application.
To request this application, please contact Technical Support via email (support@nanoporetech.com) or via Live Support in the Nanopore Community.
13. Login and logout
We recommend logging into the MinKNOW software using your Community credentials.
To log in, you must be connected to the internet.
From here, you can also change the language in the user interface in the bottom right corner.

You will be prompted to enter your email address and Nanopore password:
If you experience login issues, please visit the Community Support channel (https://community.nanoporetech.com/support) and use Continue as guest for temporary use.
To log out of the MinKNOW software:
- Click the button in the top right corner, labelled with your initials or 'Guest' and click Logout.

Guest login
The guest account can be used for individuals without a Nanopore Community login without limitations to any processes when connected locally to a device.
However, when remotely connected, guest account accessibility depending on how remote access availablility is set up in Device security settings.
14. Connection Manager
The Connection Manager enables you to connect to your devices.
MinKNOW can be accessed directly on the device or from another computer that remotely connects to the device used for sequencing, and summarises the states of the flow cells in the device.
- Blue tag: direct connection
- Purple tag: remote connection
Click Add host and enter the IP or hostname of a device to add it to the connection manager for remote access.

To interact with a device, click on the device you want to access from the Connection Manager.
You will be navigated to the Sequencing Overview page of the device where the flow cell states are displayed.
This example shows a Flongle Flow Cell inserted in a MinION Mk1C device. 
You can now navigate through MinKNOW, start a new sequencing experiment, perform post-run analysis, or view previously run experiments on the device.
15. Device security settings
Sequencing data is sensitive, and keeping it on your computer may expose you to data security issues and GDPR breaches. You are responsible for the security of your device. Ensure that there are no file sharing services or applications open on the firewall, and perform regular virus checks on your computer.
We do not recommend running your sequencing device and the MinKNOW software on an untrusted network when remote access is enabled.
Some examples of untrusted networks are:
- Coffee shops
- University networks with uncontrolled access from different departments
- Company networks with guests on the Wi-Fi
Device security settings can be accessed when directly connected to a device. To change security settings, follow the instructions below. Note: These features are not available on standalone MinKNOW installations.
Open 'Host settings' when directly connected to a device.
Navigate to the 'Device settings'. Security settings options are located in 'Security'.
The firewall can be enabled to block remote connections to the device. Remote user permissions can be set to require remote users to log in with a Nanopore account.

16. Homepage
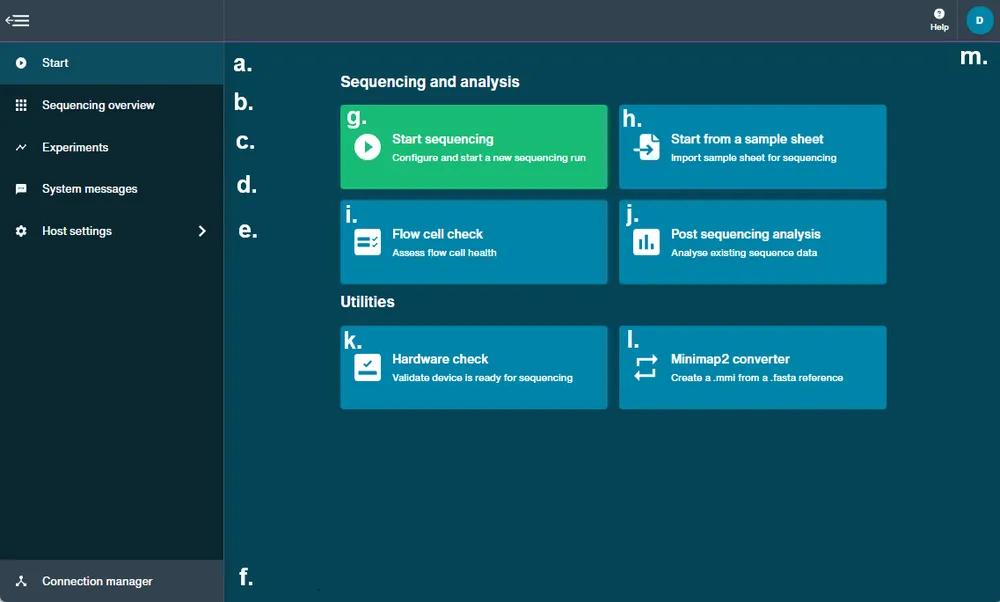
Homepage overview
The MinKNOW Homepage enables you to navigate to:
a. The Start homepage
b. Sequencing overview of connected flow cells
c. Recent and current experiments
d. System messages
e. Host settings
f. Connection manager to connect with other available devices g. Start sequencing experiment
h. Start from a sample sheet
i. Flow cell check
j. Post sequencing analysis
k.Hardware check
l. Minimap2 converter to generate .mmi from .fasta file
m. Guest/user initials for application settings and logout
Sequencing Overview
This page displays the inserted flow cell state and progress of a current sequencing experiment, including pausing, pore scan and basecalling.
Flow cell with no checks:
This example is on a GridION device. 
Sequencing states: These examples are on a GridION device.
Pore scan:

Flow cell health after the first pore scan:

Run paused:

Basecalling catch up post-sequencing:

Click the flow cell to open the quick view of the current experiment. 
Experiments page overview
The experiments page displays summary information for all experiments and device check data. You can control runs and see real-time information from sequencing flow cells.
All previous runs can be viewed here by altering the number of days available in "Experiments active in the last ... days".

System Messages
All device reports and messages are displayed here.

17. Hardware check
Hardware check
A hardware check must be performed on all new devices or when software has been updated. This uses the Configuration Test Cell(s) (CTC), that come pre-inserted into your device in place of flow cells.
Note: If using a Flongle Flow Cell, we recommend regularly checking the Flongle adapter by inserting the empty adapter and completing a hardware check. For checking the device or flow cell position, use a MinION CTC, even if a Flongle Flow Cell will be used for sequencing.
Insert a Configuration Test Cell (CTC) into the device.
Ensure CTCs are inserted correctly. If testing Flongle adapters, ensure they are empty.
Navigate to the start homepage and click 'Hardware check'.
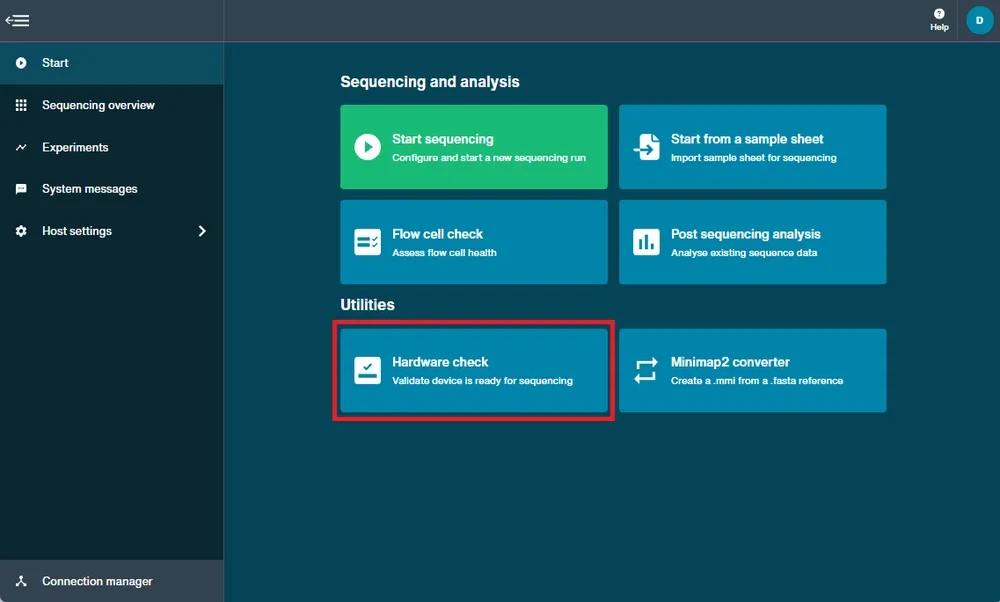
The positions available for hardware check will be displayed.
- For devices with only one position, proceed to the next step.
- For devices with multiple positions, first select the hardware positions to check.
- Flongle adapters and MinION positions must be checked separately.
- GridION devices with an attached P2 Solo (and therefore PromethION positions) must be checked separately.
The example below shows a the MinION device with a Flongle adapter.
Note: To check the Flongle adapter, insert the empty adapter. To check device or position, insert just a MinION CTC - the Flongle adapter is not needed.
The next example shows a GridION device. The position(s) with a CTC inserted must be selected to proceed.

Click 'Start' to begin the check.

The progress of the hardware check will be displayed.

When the hardware check is complete, the number of positions which passed or failed the hardware check will be displayed.

For more information, return to the Hardware check page and click View previous hardware check reports and select which reports to export.
These reports will be downloaded to the system. 
The sequencing overview screen will show if the hardware passed or failed the hardware check.

Hardware check report
The hardware check generates a report in HTML format and contains the following information:
- Number of positions that passed/failed the hardware check
- Date and time that the hardware check was completed
- Hardware check ID
- Device ID
Summary shows the overall result for each position following the hardware check.
Connection check detailed results contains information on whether the connection check passed or failed with the option to hide passed positions
Temperature check detailed results contains information on whether the temperature check passed or failed, with the option to hide passed positions. Note that the temperature check is not included in the hardware check on MinION Mk1B devices.
An example report is shown below: 


If the hardware check fails, remove and reinsert the CTC, and run a hardware check again. If the check fails for a second time, please contact Technical Support via email (support@nanoporetech.com) or via Live Support in the Nanopore Community.
18. Flow cell check
Flow cell check
We strongly recommend performing a flow cell check before loading a DNA or RNA library to assess the number of pores available.
Oxford Nanopore Technologies will replace any flow cell that falls below the warranty number of active pores within 12 weeks of purchase, provided that you report the results within two days of performing the flow cell check and you have followed the storage recommendations.
| Flow cell | Minimum number of active pores covered by warranty |
|---|---|
| Flongle Flow Cell (FLO-FLG001) | 50 |
| MinION/GridION Flow Cell | 800 |
| PromethION Flow Cell | 5000 |
Navigate to the start homepage and click 'Flow cell check'.
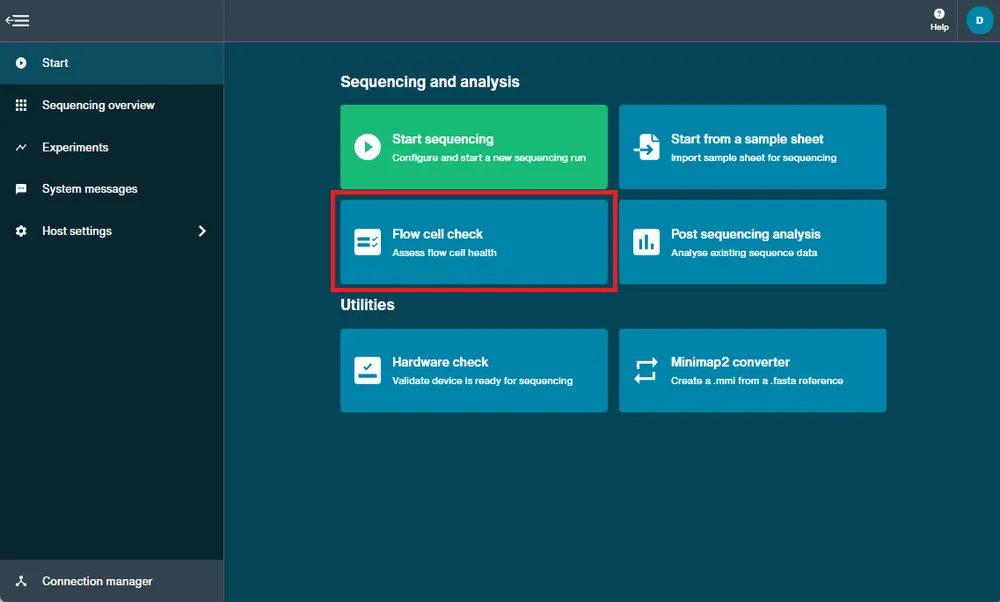
When you see the flow cell type and the flow cell ID is recognised, click 'Start' to begin.
This example is on a GridION device:
Note: For Flongle, the flow cell ID must be filled in manually. 
For Flongle, flow cell ID is not automatically assigned in MinKNOW. It is imperative the flow cell ID is entered in the correct format: ABC123 i.e. ([A-Z] x 3 [0-9] x 3).
The ID is case sensitive with no spaces. The MinKNOW software will not allow you to proceed until the flow cell ID has been entered correctly.
The user will be notified in the bottom right corner of the GUI if any information entered is in the wrong format or missing.
The Flongle flow cell ID is shown in the blue box below:

You will be automatically navigated to the Sequencing Overview page.
During a flow cell check, a loading bar will appear underneath the flow cell to indicate the progress of bringing the flow cell up to temperature before another loading bar appears for the flow cell checking process.
This example is a MinION Flow Cell. 
Flow cell health indicators
The quality of the flow cell will be shown as one of the three outcomes on the Sequencing Overview page:
Yellow exclamation mark: The number of sequencing pores is below warranty.
Green tick: The number of sequencing pores is above warranty and ready for sequencing.
Question mark: A flow cell check has not been run on the flow cell during this MinKNOW session.

Note: the indicator of quality will only remain visible during the MinKNOW session when testing occurred. Once the sequencing device has been re-started, the status of the flow cell will be erased.
19. Experiments page
Experiments page
The experiments page displays summary information for all sequencing flow cells and device checks carried out on the device.
Previous runs can be viewed on the UI at the top of the screen and the number of days to view the last active experiments can be altered by typing in a different integer. 
From this page, you can control specific runs and identify real-time information, including flow cell health and reads.
- Run statistics: The total number of reads, estimated and basecalled bases across an experiment, and number of active and total runs
- Run time: The duration of the experiment
- Run state: The current state of the sequencing run; 'Active', 'Basecalling', 'Complete', 'Stopped with error'
- Health: The current flow cell health
The white panel displays a summary of sequencing experiments and the blue panel displays status information of a specific run.
Example of experiments page on GridION: 
For more status information of a specific run, click the run to open the quick view, including current temperature and voltage. In the example below, the run in position X3 was clicked to open the quick view. 
Live sequencing graph configuration
Page configuration allows you to choose which graphs to generate in the quick view of an experiment.
To open page configuration, click on a run in the white panel to open the quick view and select the highlighted button to choose which graphs to display.

Tabs:
- Default: Default graphs available
- All: All graphs available
- Custom: Users can move graphs from 'Available pages' to 'Your pages' to display a custom order of graphs in the GUI. On this page, you can also choose graph order. Click the graph and drag, then click Save.

Graphs
Click on the specific run to open the experiment details and view the graphs. Use the arrows to navigate between the graphs.

For more information about the graphs, refer to Checks and monitoring.
Pausing
Sequencing experiments can be paused by selecting and pausing a single or all flow cell positions.
Pausing works by dropping the voltage potential over the membrane to 0 mV to maintain a safe environment to add components, such as more DNA/RNA library or nucleases for a flow cell wash. Data acquisition will continue during this period, as this prevents sequencing data from being lost.
To pause, click Pause in the run controls to open a dialogue box and select which flow cell position(s) to pause and click Pause.

Triggering a pore scan
The pore scan is used to assess the quality of the four wells in each channel to select the best performing pores. A new pore scan can be triggered every time a sequencing experiment is resumed after a pause (e.g. for a flow cell wash), or if the number of sequencing pores has significantly dropped during an experiment.
Navigate to the Experiments page, open a specific run, and click Start pore scan in the run controls. Confirm the flow cell to be scanned and click Start pore scan.

20. Sample sheet upload
For GridION and PromethION experiments, or when multiple MinION Mk1B/Mk1D or MinION Mk1C devices are running simultaneously, it may be preferred to upload sample names and corresponding flow cell positions from a CSV file, rather than manually.
The sample sheet may describe flow cells being run at one or more than one position. The columns available are as follows, though some are optional:
| Column title | Description | Notes |
|---|---|---|
| flow_cell_id | Defines the flow cell ID which applies to the sample sheet row. | Used to identify which positions to apply values to in MinKNOW. This is optional if position_id is specified |
| position_id | Defines the flow cell position which applies to the sample sheet row. | Used to identify which position to apply values to in MinKNOW. This is optional if flow_cell_id is specified. |
| sample_id | Defines the sample ID to be applied in the run | An individual position can only have one sample_id assigned to it when starting a run. This is optional. |
| experiment_id | Defines the experiment ID to be applied | Each row in the sample sheet must contain the same experiment_id value for the sample sheet to only have a single experiment_id value defined overall. All entries in each row will be validated. |
| flow_cell_product_code | Defines the product code of the flow cell | Used to find the correct sequencing script to start the run |
| kit | Defines the kit and any expansion kits used with the sample | Used to find the correct sequencing script to start the run. The sample sheet must contain only one sequencing kit, but expansion kits are not limited. If expansion kits are additionally defined, they should be separated by a space: e.g. SQK-LSK109 EXP-NBD104 EXP-NBD114Note: Ensure the correct format of the kit name is used, converting any full stops in the kit name to a dash. For example, the Rapid Barcoding Kit V14 96 (SQK-RBK114.96) format in the sample sheet would be SQK-RBK114-96. |
For experiments that involve barcoding, an alias is associated with each barcode (or pair of barcodes where appropriate). Additional columns are available for barcoding runs:
| Column title | Description | Notes |
|---|---|---|
| alias | User-specified string which applies a given label to a specific barcode or barcode pair. | The alias cannot be an existing barcode folder name e.g. 'unclassified', 'classified' and 'mixed' are not allowed. The alias must be between 1 and 40 characters. The character set needs to match the following format: /^([0-9a-zA-Z-_] and only contain the following characters: numbers, upper/lower-case letters, dashes, and underscores. |
| type | One of the options: test_sample, positive_control, negative_control, no_template_control | This is optional. |
One or two columns define the barcode or barcode pair. The exact form is dependent on whether single or dual barcoding is being used.
Single barcoding: the sample sheet contains one barcoding arrangement column:
| Column title | Description | Notes |
|---|---|---|
| barcode | The barcode identifier for the row e.g. barcode01 |
Dual barcoding: the sample sheet contains two barcoding arrangement columns:
| Column title | Description | Notes |
|---|---|---|
| internal_barcode | The internal barcode identifier for the row, e.g. internal01. | |
| external_barcode | The external barcode identifier for the row, e.g. external01. |
Column titles are defined within the first row of the sample sheet. These must be defined in lowercase using the column title values listed above.
Sample sheet validation occurs against the device configuration and between rows in the sample sheet to ensure validity when the sample sheet is loaded. Validation and importing the sample sheet requires all the flow cells to be used in the experiment. Be careful to ensure the correct flow cells and positions are used.
Below is an example sample sheet CSV file for using the Native Barcoding Expansion 96 (EXP-NBD196) with the Ligation Sequencing Kit (SQK-LSK109) on a GridION device for a single position.

Navigate to the Start page.
Click Start from a sample sheet.
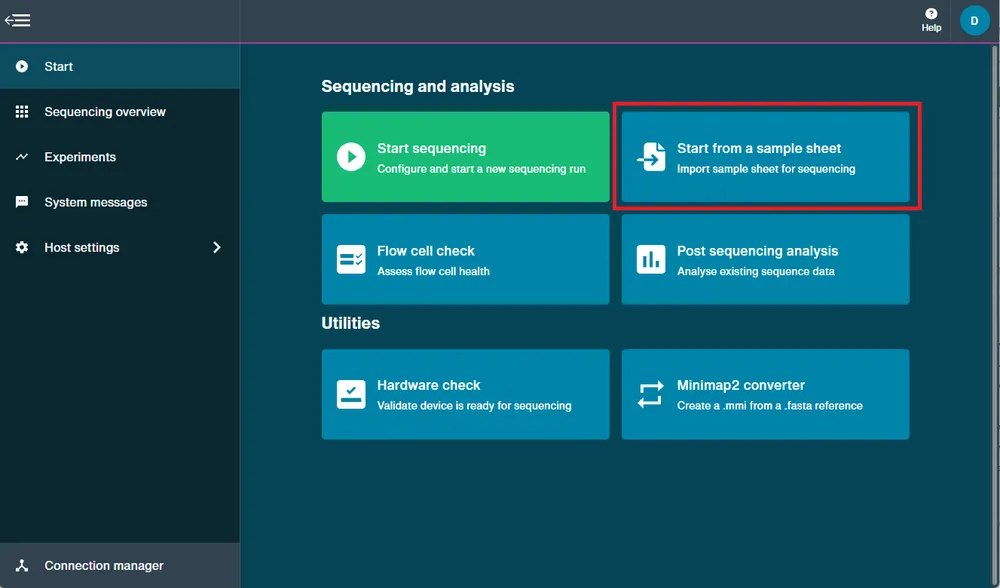
Select and upload the CSV file.

If any errors are indicated in the sample sheet, these should be fixed in the CSV file. Following this, upload the CSV file as in step 3.
Once the sample sheet is uploaded with no errors, click Continue.

Instructions on selecting sequencing parameters and starting a run can be found in the Starting a sequencing run section
21. Save and load sequencing run settings
Sequencing run template
Sequencing parameters can be saved as a template in MinKNOW at the review stage for users who regularly use the same parameters and to save set-up time. The template can be loaded when setting up a new sequencing run with sample sheet but can be reviewed and edited before starting the run.
Set up a sequencing run on MinKNOW as outlined in the Sample sheet upload section.
On the Run configuration page, click Save configuration before starting the sequencing run.

Fill in the template name and click save.

To use the saved template on a new sequencing run, click Load configuration on the Run configuration page.

Select a previously saved configuration and click Load. Saved configurations in the list can be deleted by clicking Delete.
To transfer a configuration file between devices, it can be exported to a JSON file by clicking Export, or imported by clicking Import.

Review the sequencing parameters on the review tab and start the run by clicking Start.

Users can also join an existing experiment that has been previously run on the device:
- Fill in the experiment name and select flow cell position.
- Choose the same flow cell type as used in the previous experiment.
- Click Join existing.
- Select the previous experiment to run and click Join.
- The previous experiment parameters will load with the experiment name.
- Fill in the sample ID(s) and review settings in the "Review" tab and start the run.
Note: Joining an existing experiment is only possible if it was created within the last 30 days and uses the same software version and flow cell type.

Sequencing parameters using a JSON file (for MinKNOW versions 24.06 and earlier):
Alongside a CSV file containing the sample information, users can also upload a JSON file containing the sequencing parameters for their experiments rather than inputting the information manually.
A JSON file in the correct format, containing all default settings, can be exported from MinKNOW and altered:
Run options tab:
"runLengthHours": 72,(Run length. This must be an integer)"enrichDepleteAdaptiveSamplingEnabled": false,"enrichDepleteAdaptiveSamplingRefFile": null,"adaptiveSamplingChannelStart": 1,"adaptiveSamplingChannelEnd": 512,"enrichDepleteAdaptiveSamplingBedFile": null,"shouldEnrichAdaptiveSamplingRef": true,"barcodeBalancingEnabled": false,"barcodeBalancingCustomBarcodes": false,"barcodeBalancingBarcodeSelection": null,"minReadLength": 200,(Read length selection. This can be 20, 200 or 1000)"activeChannelSelection": true,"muxScanPeriod": 1.5,"groupChangePeriod": 16,"reservedPores": true,
Analysis tab:
"basecallingEnabled": true,(Basecalling can be switched on/off as true/false)"modifiedBasecallingEnabled": false,"barcodingEnabled": true,(Barcoding can be switched on/off as true/false)"basecallModel": "dna_r9.4.1_450bps_hac.cfg",(Basecalling model depends on the flow cell and kit combinations. Make sure that the basecall model is stated as a ".cfg")"modifiedBasecallingContext": "","trimBarcodesEnabled": true,(Trim barcodes can be switched on/off as true/false)"requireBarcodesBothEnds": false,(Requirement to have barcodes on both ends can be switched on/off as true/false)"detectMidStrandBarcodes": false,(Detect mid read barcodes on/off as true/false)"overrideMidBarcodingScore": false,(Override mid barcoding score can be switched on/off as true/false)"overrideBarcodingScore": false,(Override barcode score can be switched on/off as true/false)"minBarcodingScore": 60,(Selection of barcode score. This can be an integer between 40 to 100)"minBarcodingScoreMid": 50,(Selection of mid barcode score. This can be an integer between 40 to 100)"alignmentRefFile": null,"alignmentBedFile": null,
Output tab:
"dataOutputLocationType": 0,"offloadOrOutputLocationNavParams": "path": "/data/.""fastQEnabled": true,(FASTQ files can be switched on/off as true/false)"fastQReadsPerFile": 4000,(Number of reads per file. This is an integer)"fastQDataCompression": true,(FASTQ compression can be switched on/off as true/false)"fast5Enabled": true,(FAST5 files can be switched on/off as true/false)"fast5ReadsPerFile": 4000,(Number of reads per file. This is an integer)"fast5DataCompression": "vbz_compress",(Compression type. This can be"vbz_compress"or"zlib_compress")"selectedRawOutput": "fast5","pod5Enabled": false,"pod5ReadsPerFile": 4000,"bamEnabled": false,"bamWriteMultiple": true,"readFilteringEnabled": true,"readFilteringMinQscore": 9,"readFilteringMinReadlength": null,"readFilteringMaxReadlength": null,"readSplittingEnabled": false,"overrideMinReadSplittingScore": false,"minReadSplittingScore": 58,"bulkFileEnabled": false,"bulkFileRaw": "1-512","bulkFileEvents": "1-512","bulkFileReadTable": "1-512","bulkFileRawEnabled": false,"bulkFileEventsEnabled": true,"bulkFileReadTableEnabled": true
22. Changing default run settings
The default run settings can be changed by creating a JSON configuration file (run_config.json) in the MinKNOW support files. This file can contain a list of settings which will be applied as default settings when starting a run.
To generate a default configuration file, begin the steps for starting a sequencing run and adjust to any settings you would like applied by default on the Run configuration page.
Click Save configuration at the bottom of the Run configuration page.
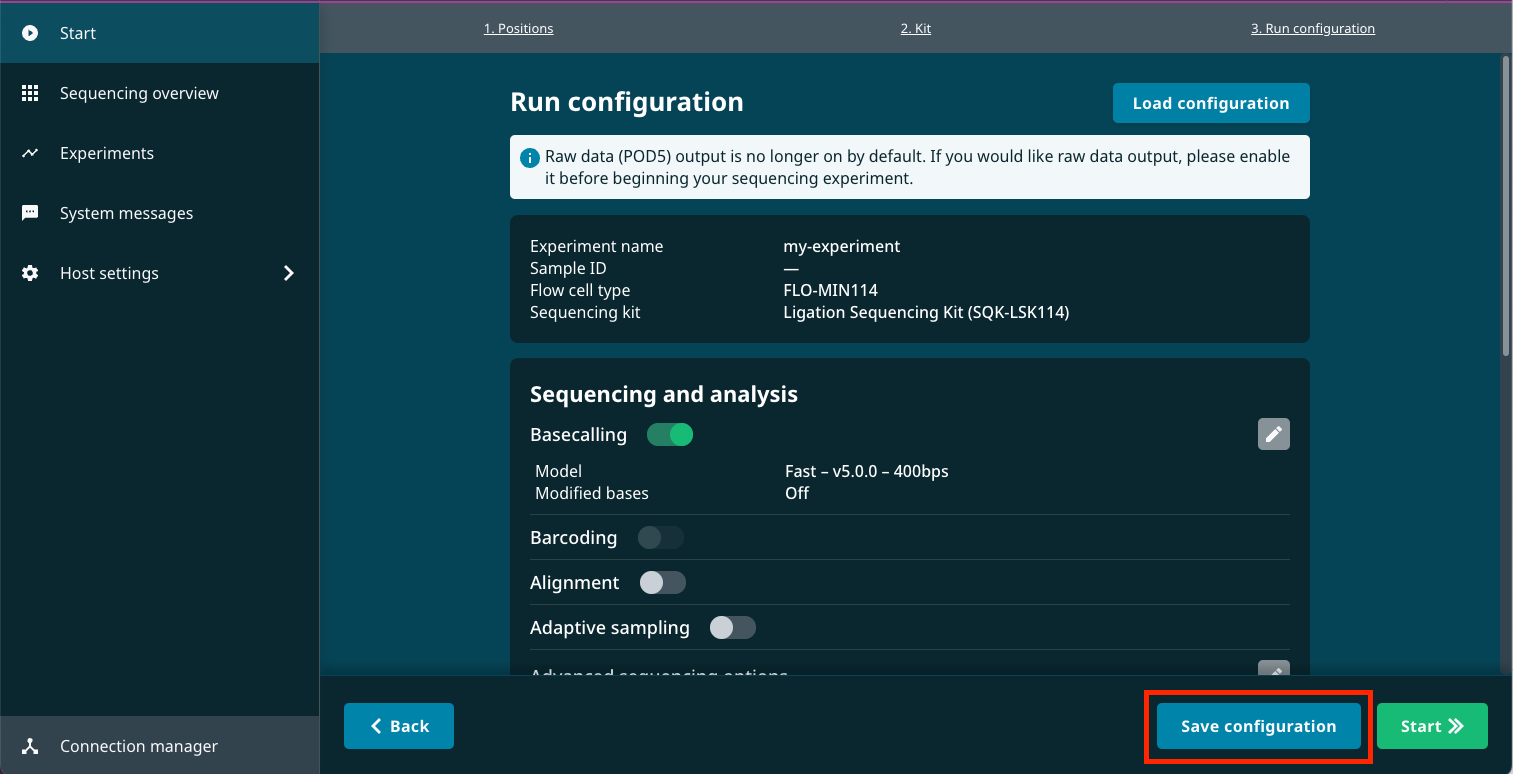
Enter a name for your configuration preset and click Save.
Click Load configuration at the top of the Run configuration page.
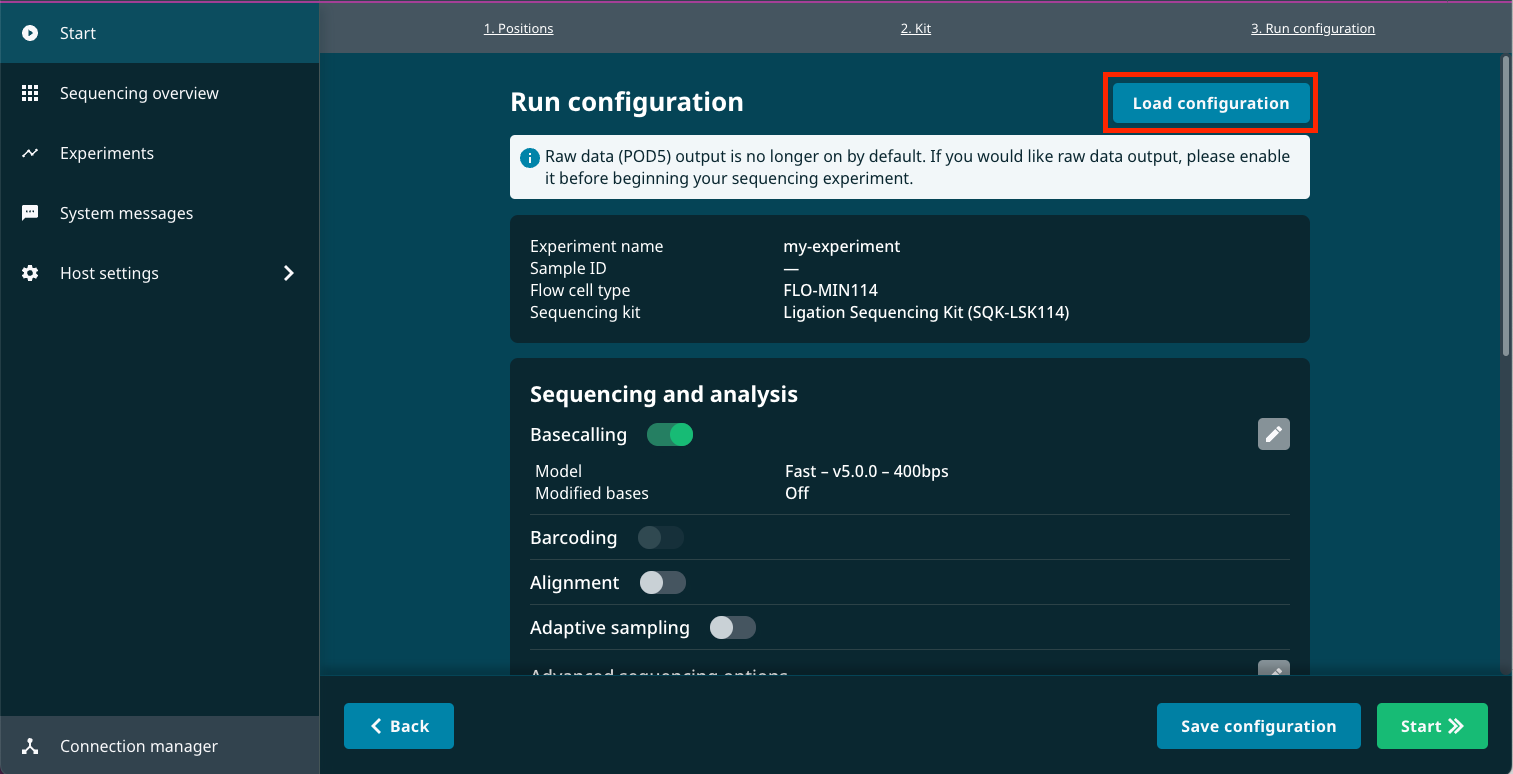
Select the configuration preset you just created and click Export.
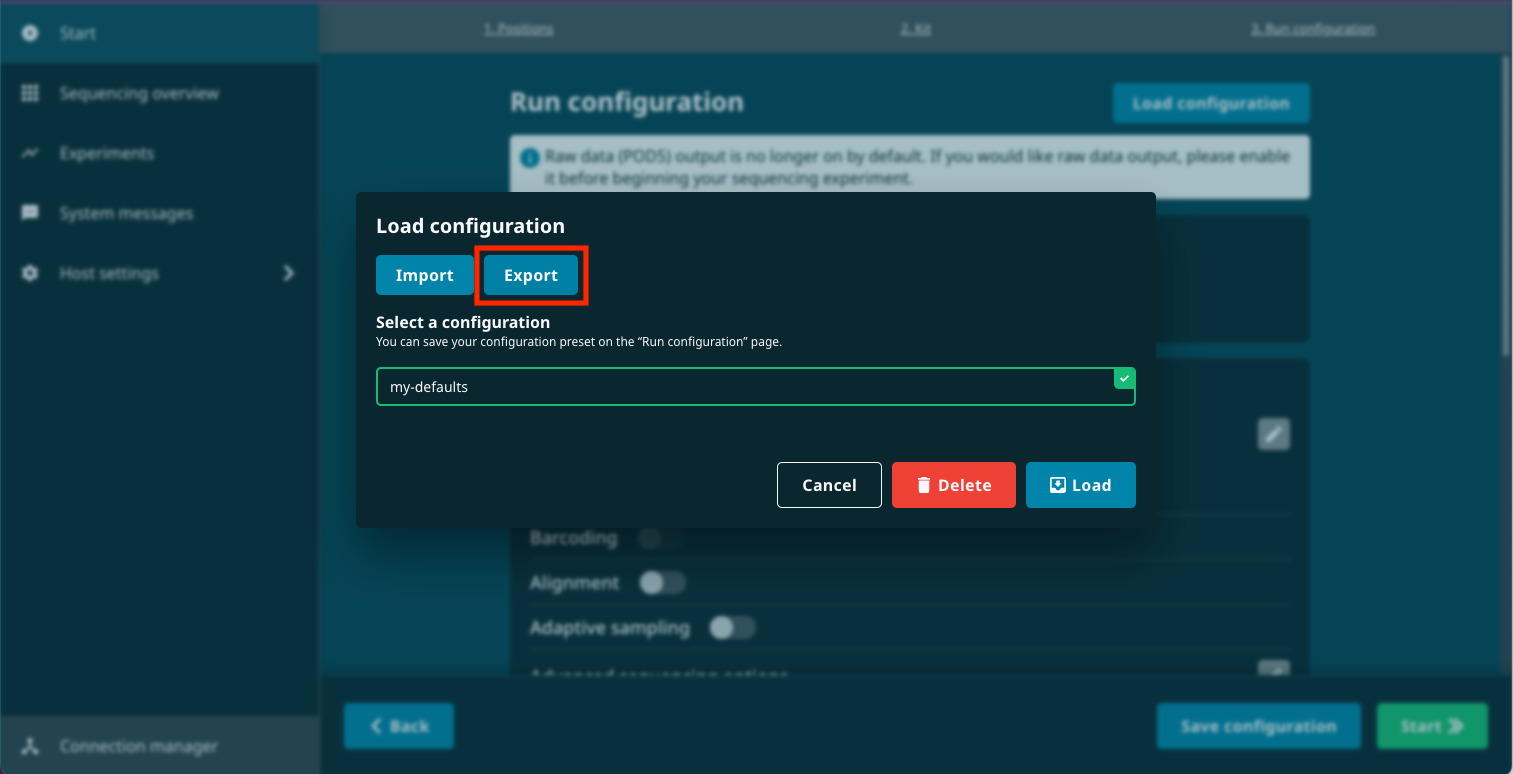
Save the run_config.json file to a location on your hard drive.
Open the file in a text editor.
Identify the lines in the script which correspond to the settings you would like to define as defaults. Delete all other lines in the script, ensuring that the left brace symbol ({) remains as the first line, and the right brace symbol (}) remains as the last line.
For example, if the only default setting you wish to adjust is to enable output of raw reads in POD5 format, the run_config.json file would contain the following:
{

"pod5Enabled": true

}
Save the run_config.json file.
Move the file to the location where it can be accessed by MinKNOW.
This varies depending on the operating system being used:
macOS: /Users/
/Library/Application Support/minknow Windows: C:\Users<username>\AppData\Roaming\minknow
Linux: /home/
/.config/minknow
When starting a run, a notification will be displayed at the bottom of the screen if a run_config.json file is found the modified default settings have been applied.
Error messages will be displayed if there are issues with the file format or if it contains unexpected keys or values.
23. Application settings
Application settings contains the tutorials, account/login settings and MinKNOW GUI information.
Navigate to application settings from clicking the initials in the top right corner of the GUI.
The Application settings are available on the Connection manager as well as the device homepage.
Below is an example from the Connection manager: 
Tutorials
Tutorials are available here; they are also presented when logging into MinKNOW for the first time. You can use Recap to view a specific tutorial or use Reset tutorial state to go through all the tutorials again on opening the UI.

Account settings
Navigate here to logout from MinKNOW.
User email address used for login is displayed here, unless logged in as a guest.

App information
The installed version of the MinKNOW GUI is available here.
Click Reload to refresh the GUI.

Language settings
To select your language, navigate to the language tab:

24. Overview
Features of the Host settings
The Host settings have several features to co-ordinate the device. From this area, users are provided with information on system parameters, such as storage, date/time and IP address.
To navigate to this area, click 'Host settings' in the side panel.

Use the side panel to navigate through the host settings option. Depending on the device, different options are available. Below is a full list of the options available in the host settings:
Device Settings: The devices can be shut down and rebooted from this page, and settings for the time and date can be altered. Disk space can be managed and peripherals may also be added and ejected from here.
Software: Users are able to download the latest software updates from this page. The option to update will only appear when an update is available.
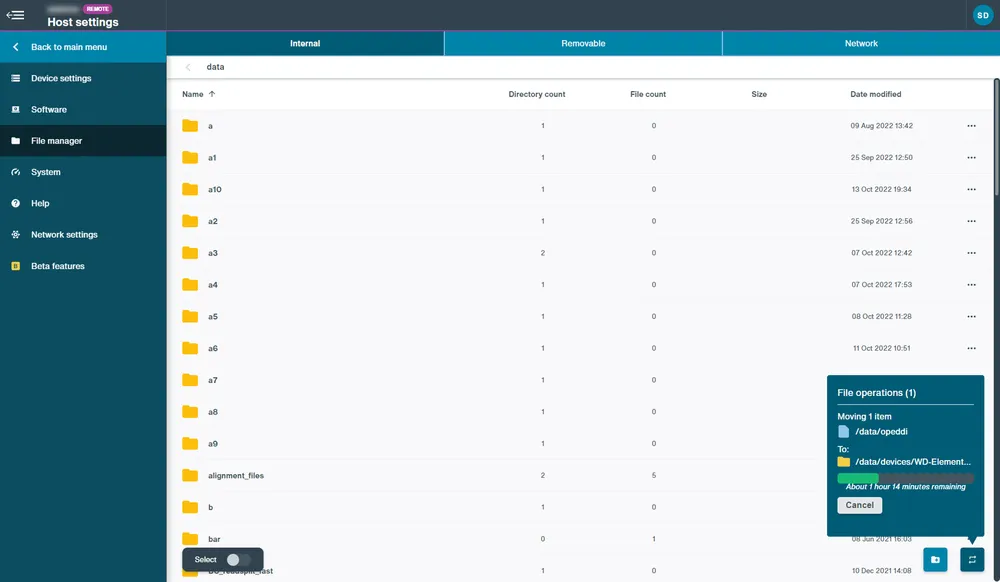
File Manager: Stored data on the device can be managed and transferred.
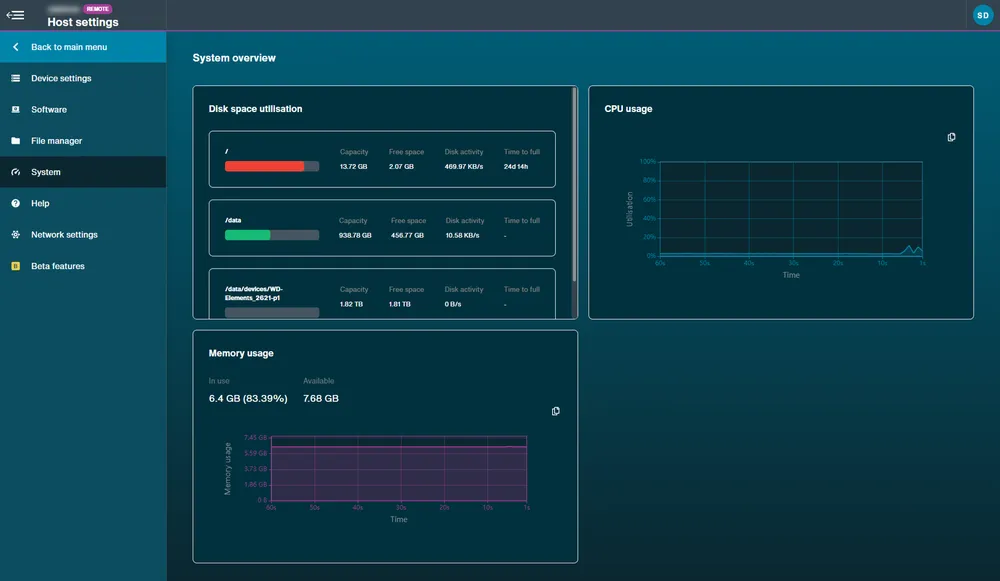
System: Overview showing disk space utilisation, CPU and memory usage.
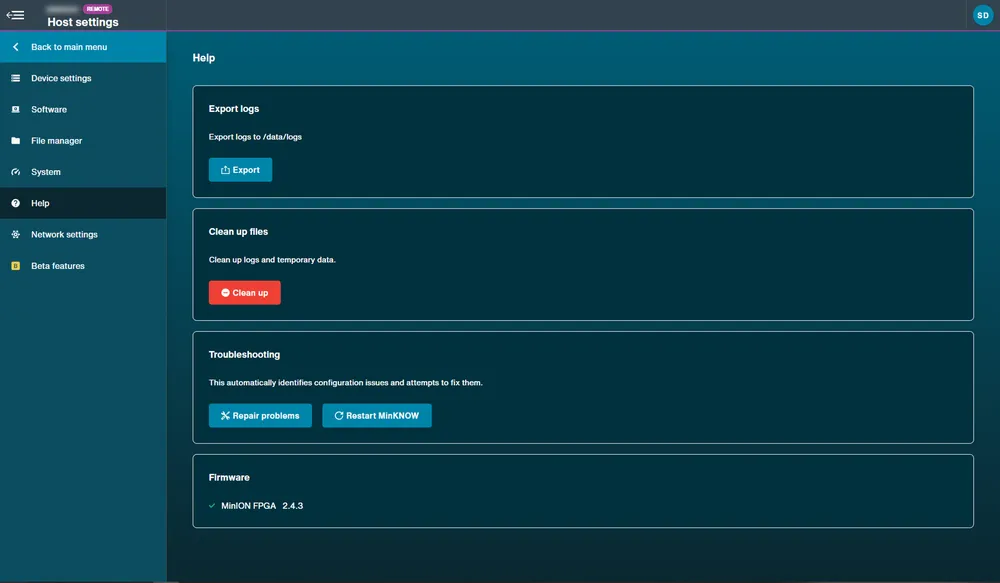
Help: Device logs can be exported using the Export Logs function. Logs and temporary data can also be cleared by using the Clean up function. If troubleshooting of the device is required, a Repair problems function is available as well as a MinKNOW restart option.
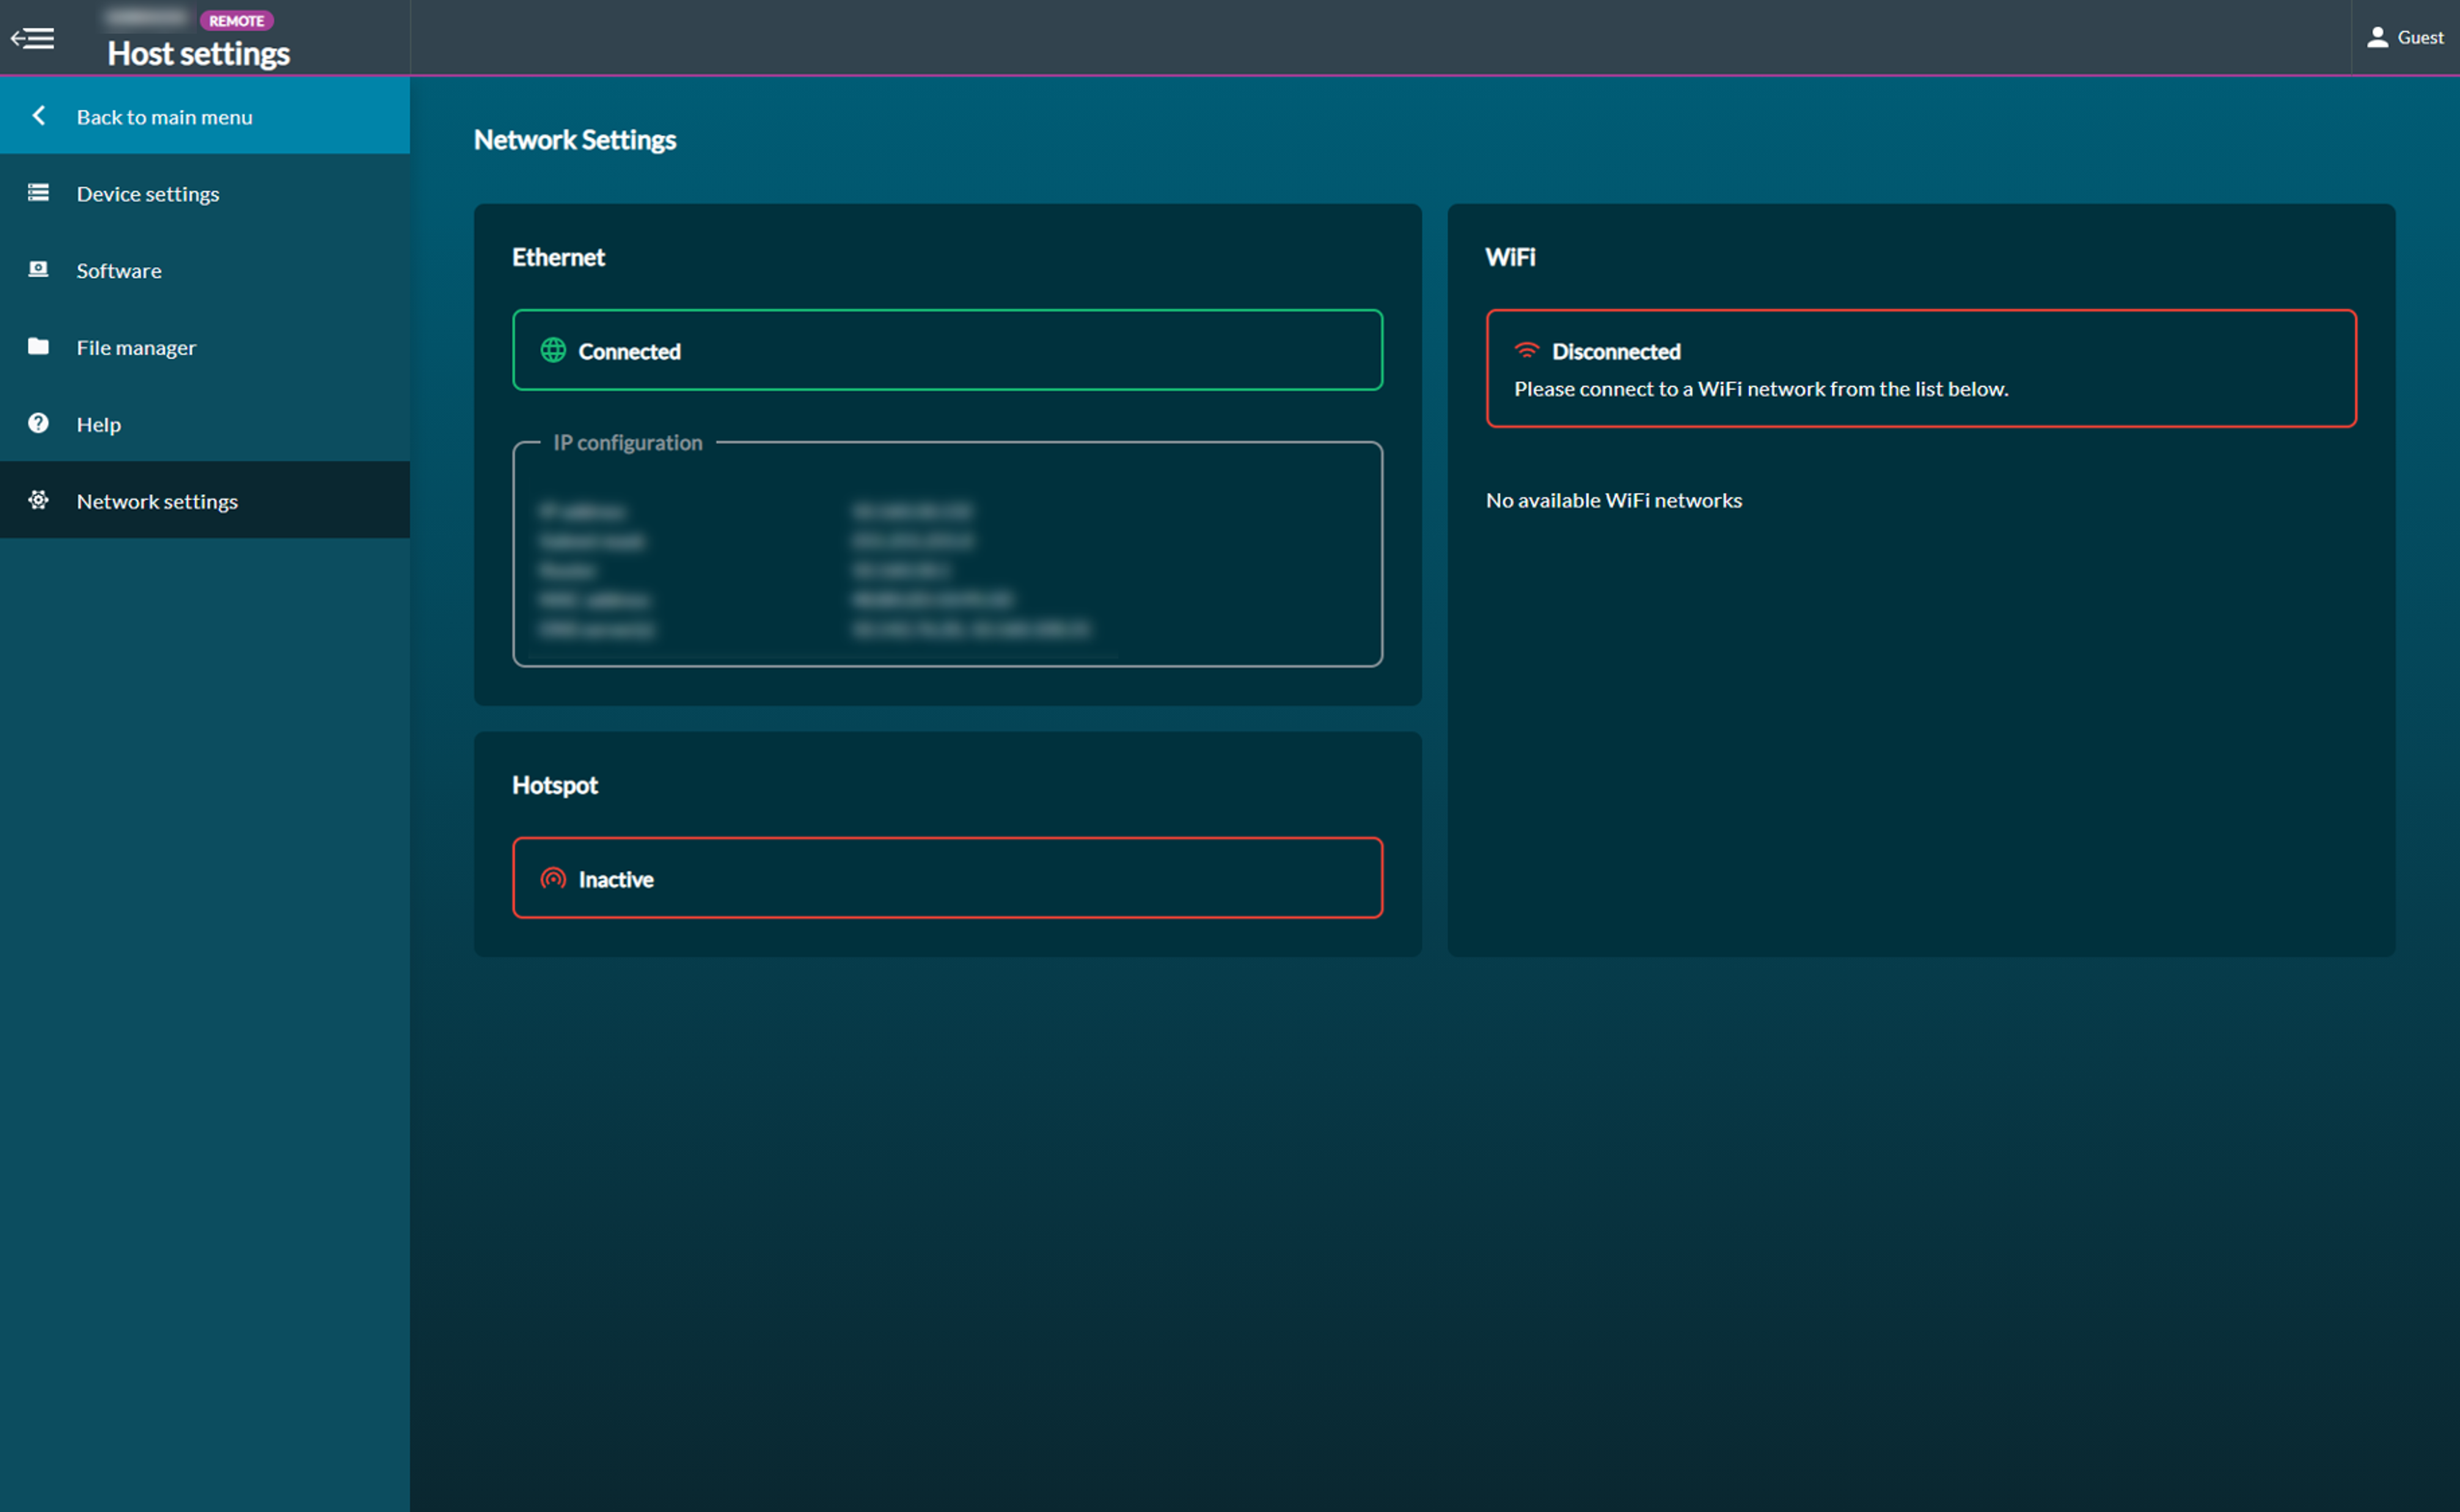
Network settings: Ethernet and WiFi settings are available here with the option to hotspot the device to connect to a larger screen.
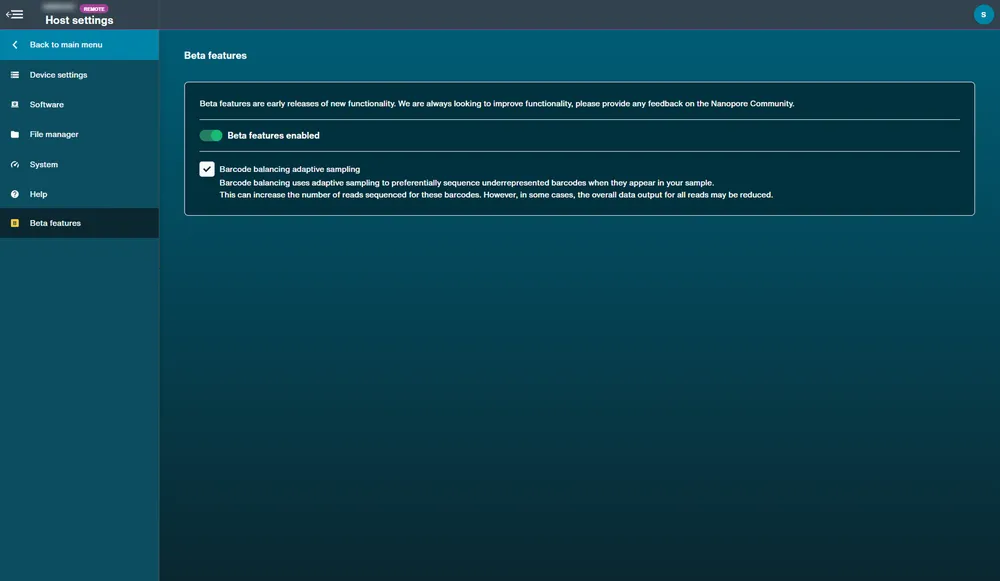
Beta features: An overview of the beta features available on the device. Either individual or all beta functions can be disabled from here.
Click Back to main menu to leave host settings. 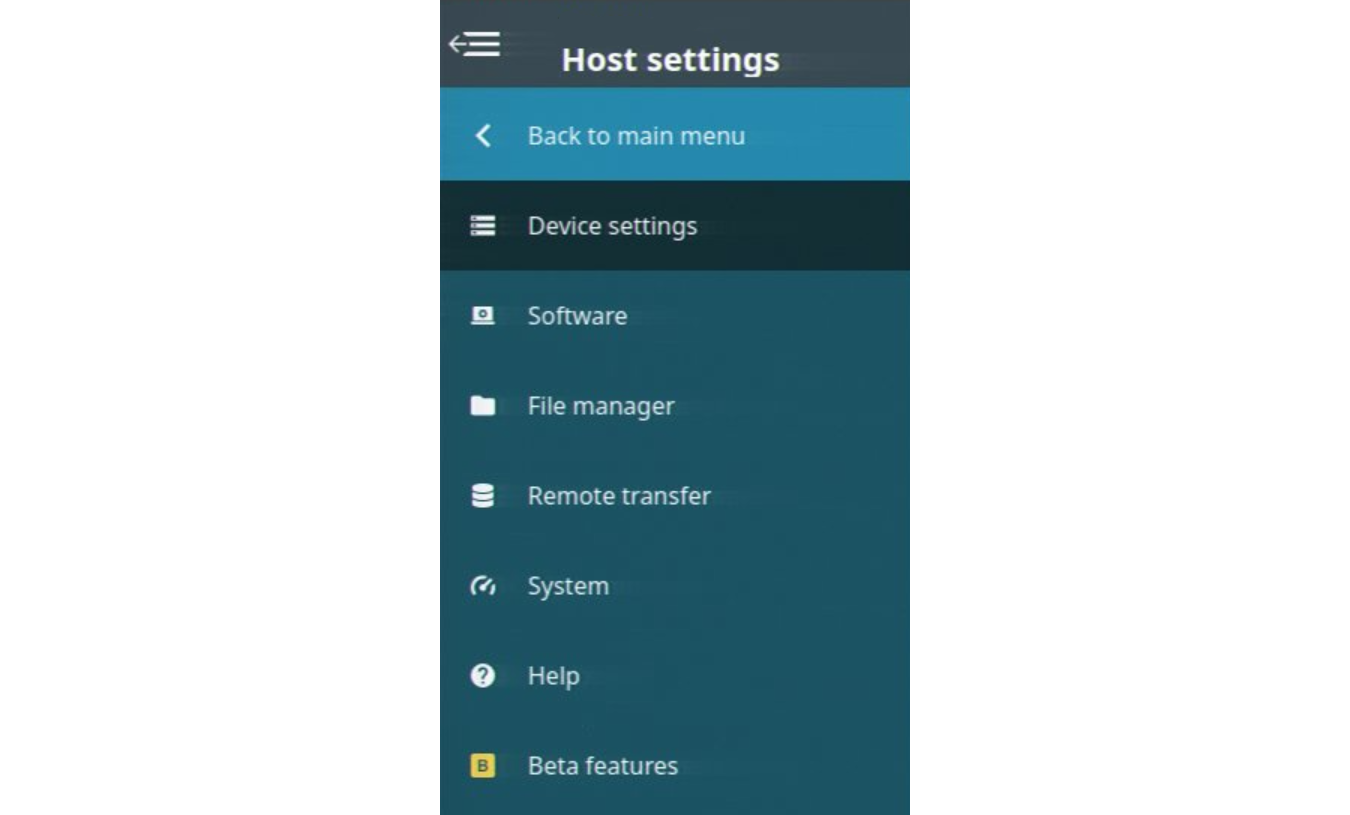
Host settings pages
- Device settings: Unavailable on MinION Mk1B/Mk1D.
View from remotely accessed device: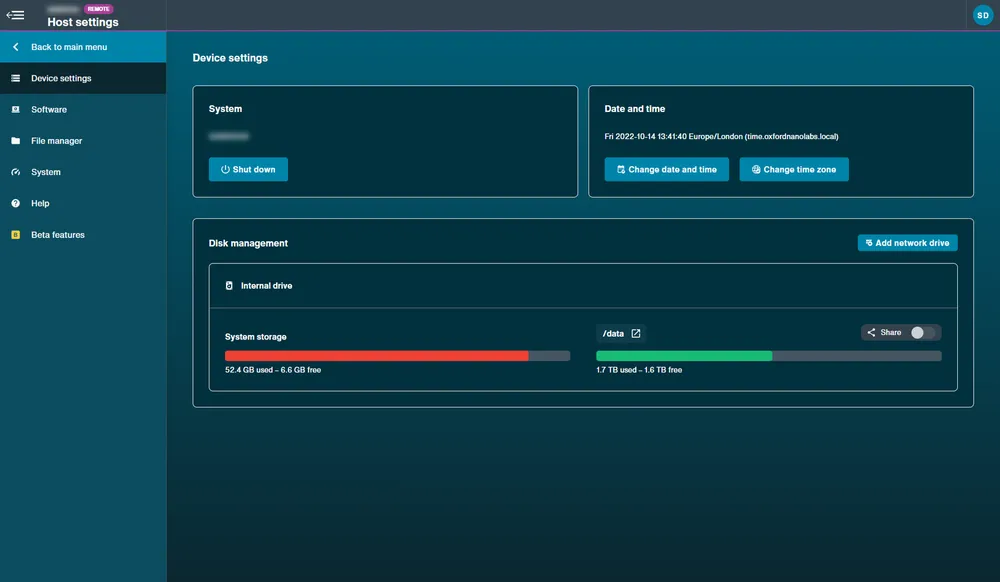
View directly accessed device: 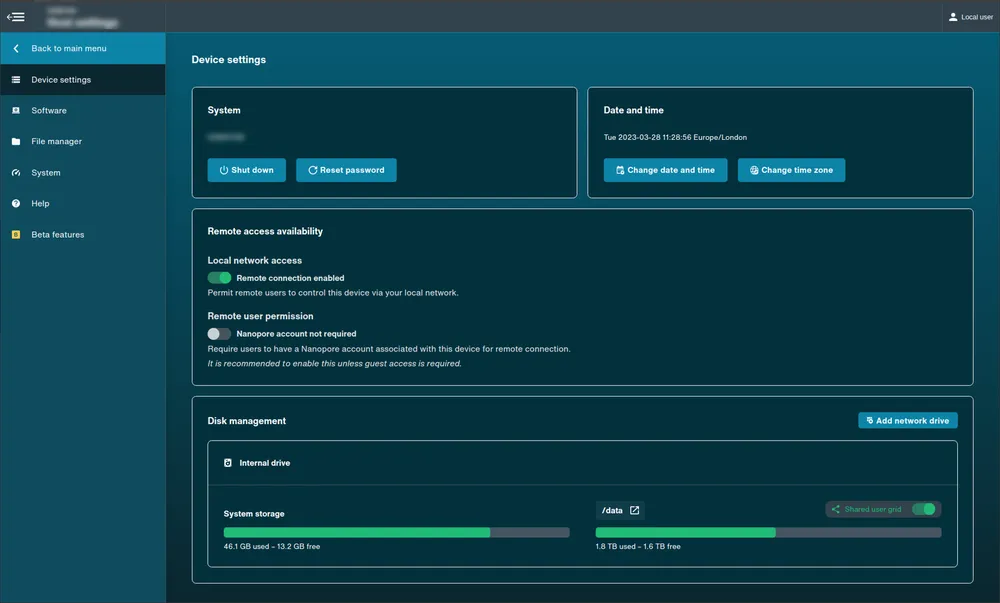
Software: Available on all devices.
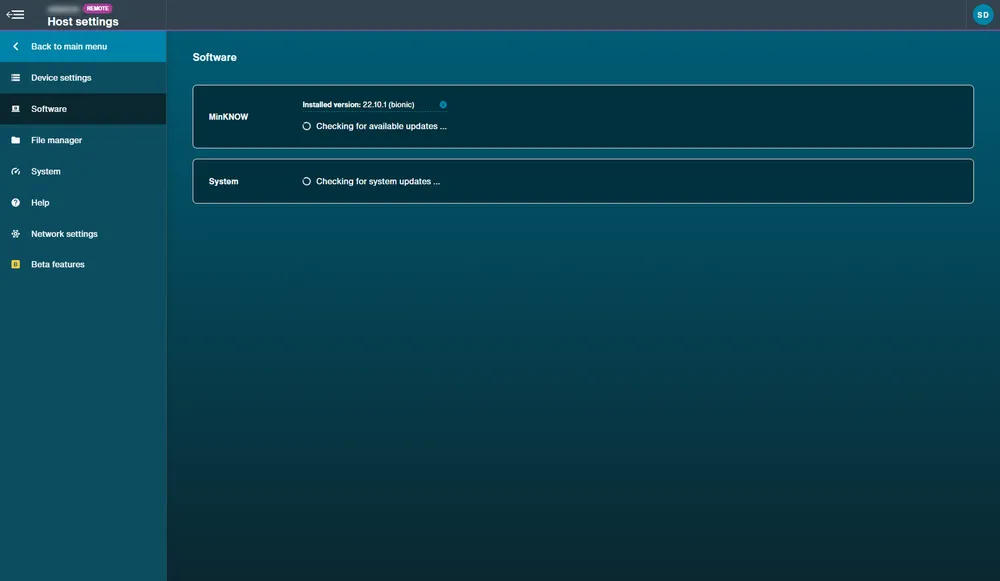
File manager: Unavailable on MinION Mk1B/Mk1D.
System manager: Unavailable on MinION Mk1B/Mk1D.
Help: Available on all devices.
Network settings: Available on MinION Mk1C and MinIT.
Beta features: Available on all device.
25. Shutting down
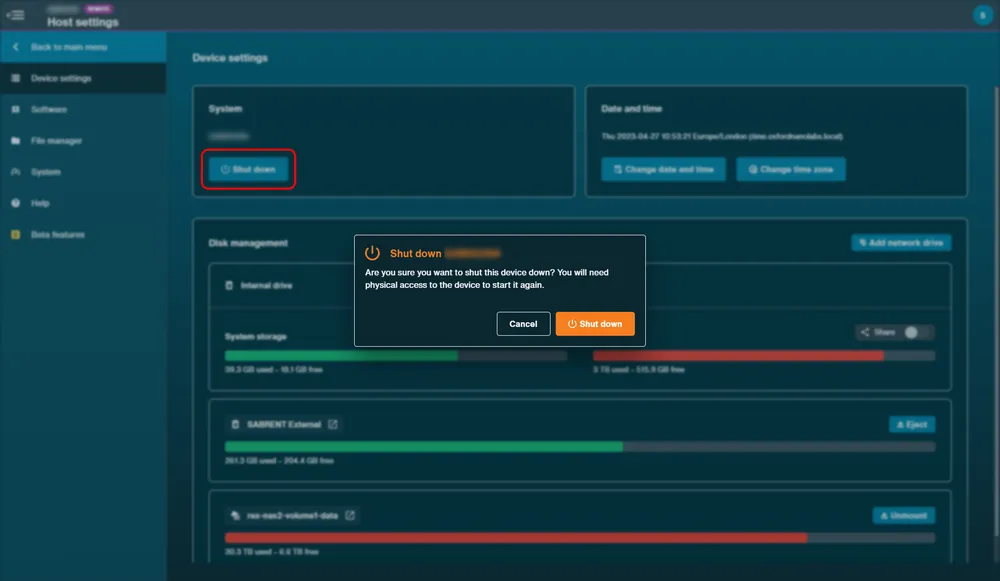
Navigate to the Device settings and click "Shut down".
Click Shut Down in the pop-up to confirm.
26. Rebooting
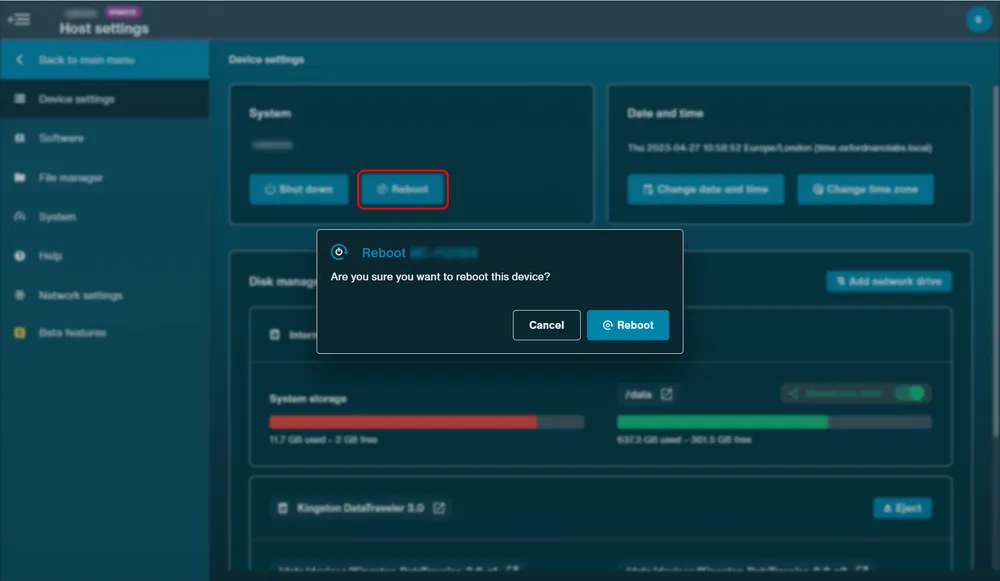
Navigate to Device settings and click "Reboot".
Click "Reboot" in the pop up to confirm.
Note: Reboot is unavailable on GridION but the software can be restarted.
To restart MinKNOW on GridION, navigate to 'Help' in the host settings and click "Restart MinKNOW".

27. System package updates
System package updates
System package updates for your device can be performed through the MinKNOW UI.
Availability of system package updates are indicated via the MinKNOW host settings in the Software tab.
System package updates will not affect sequencing accuracy or quality.
We recommend that your device is updated with the the most recent system packages.
However, having out-of-date system packages will not impact sequencing accuracy or quality.
Perform system package updates at your discretion and in accordance with your IT policies.
Note: Users will not be able to update their device if connected remotely or if a run is in progress.
Navigate to the software tab in host settings.
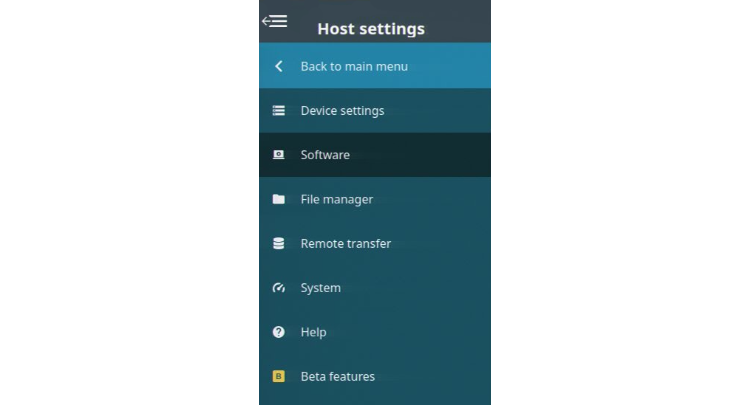
In the Operating system panel, click "Update operating system".

The system package update can be monitored via the progress bar.

Once the update completes successfully, power cycle your device to complete installation.

In event of a system package update failiure, an error message will appear.
The error message contains copyable details that you can use to assist with tech support.

If you see some system packages remain after a system update, please update MinKNOW and the number should return to zero.

For more information on updating MinKNOW visit the Updating MinKNOW for Windows and macOS or Updating MinKNOW for Linux sections of this document.
28. Data management
File manager
Data can be managed and transferred from the file manager tab on the host settings. Note: Data management and transfer functions are not available on standalone installations.
Navigate through the tabs to view the data stored:
- Internal tab: Data stored on the connected sequencing device (MinION Mk1C, GridION, PromethION)
- Removable tab: Data stored on a connected removable storage device e.g. USB drive
- Network tab: Data stored on a connected network drive. The network drive must be mounted prior.

To remotely access the device as a shared/network drive:
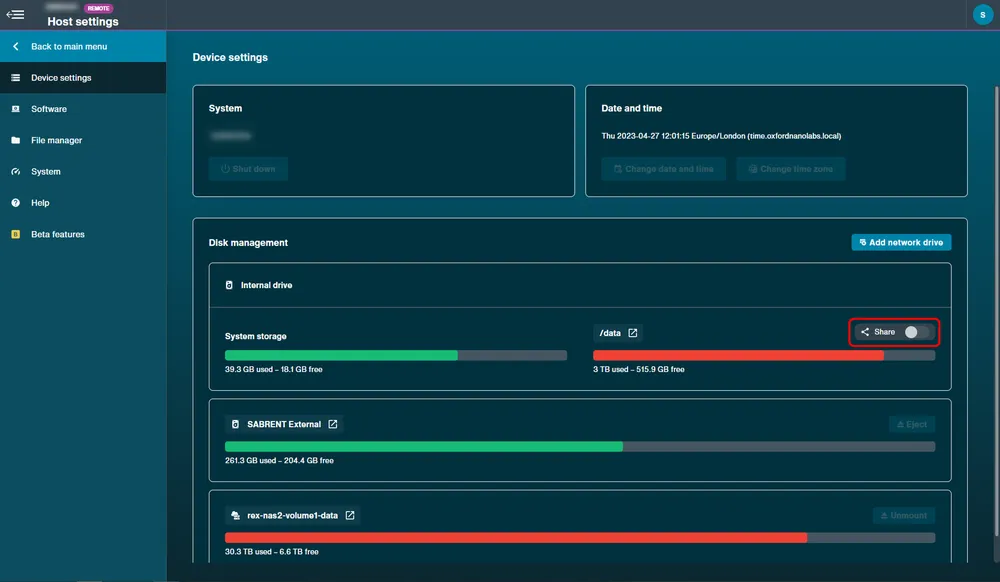
Navigate to device settings and switch the Share toggle on.
A new window will open to create a password for security.
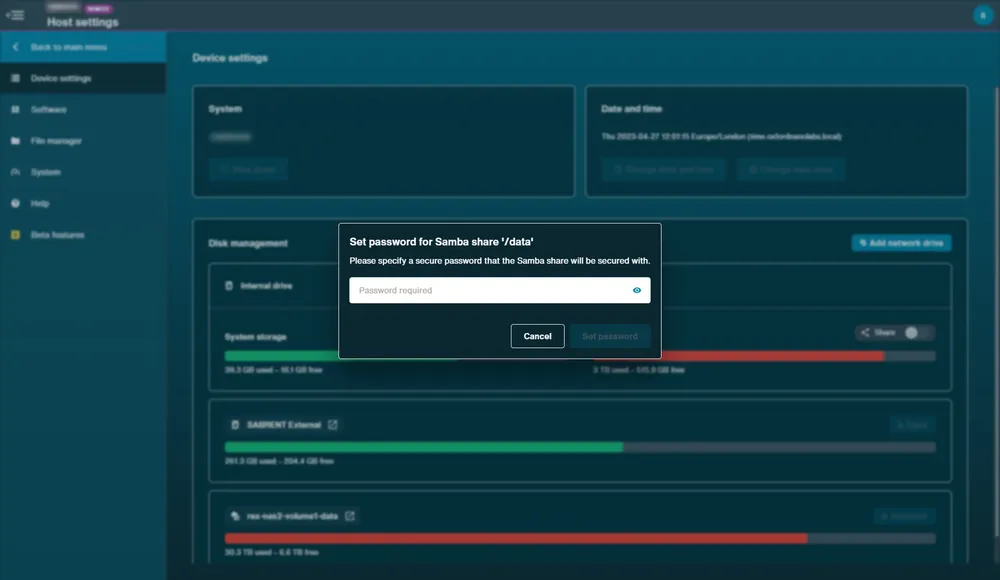
Click Set password, and after a few seconds the share toggle will be active.
Data will now be able to be shared and accessible on different networks.

Note: The image above is an example of sharing on a GridION. On MinION devices, 'minit' will appear and PromethION devices will show 'prom' when active.
To stop sharing, click the toggle to turn off.
Note: The password will be removed and must be reset when sharing is turned back on.
To manage data between the internal, removable and network tabs:
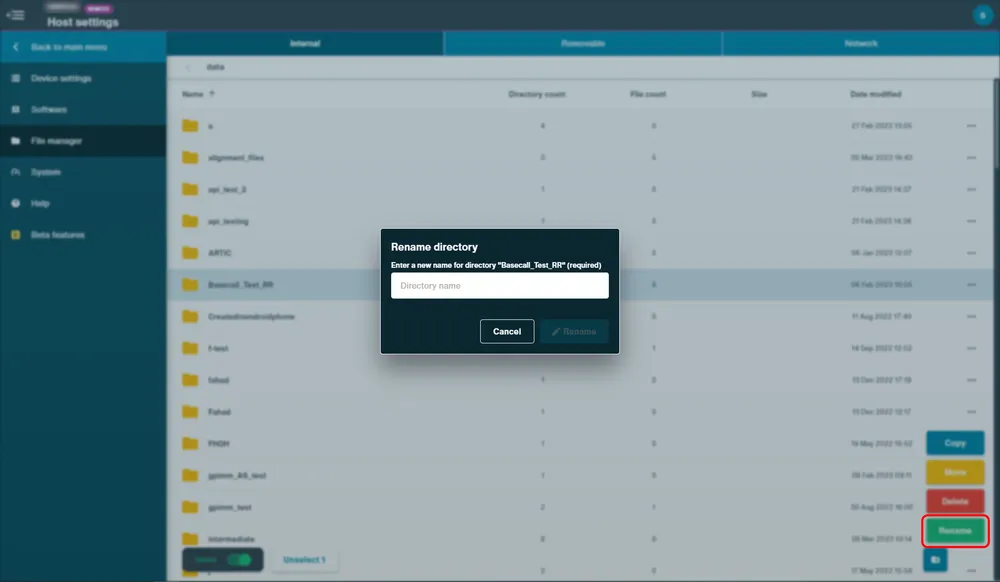
Switch the Select toggle on to open the greyed out options Copy, Move, Delete or Rename in the bottom right corner.

Select a folder or file to use the options in the bottom right corner.

Click either Copy or Move to open a new dialogue box with a list of all the drives accessible to the device.
Note: a USB drive or SD card plugged in will appear under the Devices folder.

Click on a drive to open and navigate through the file directory to choose destination. Click either Copy or Move to confirm action.
To use the delete function, select a file or folder, and click "Delete" and confirm action in the pop up.
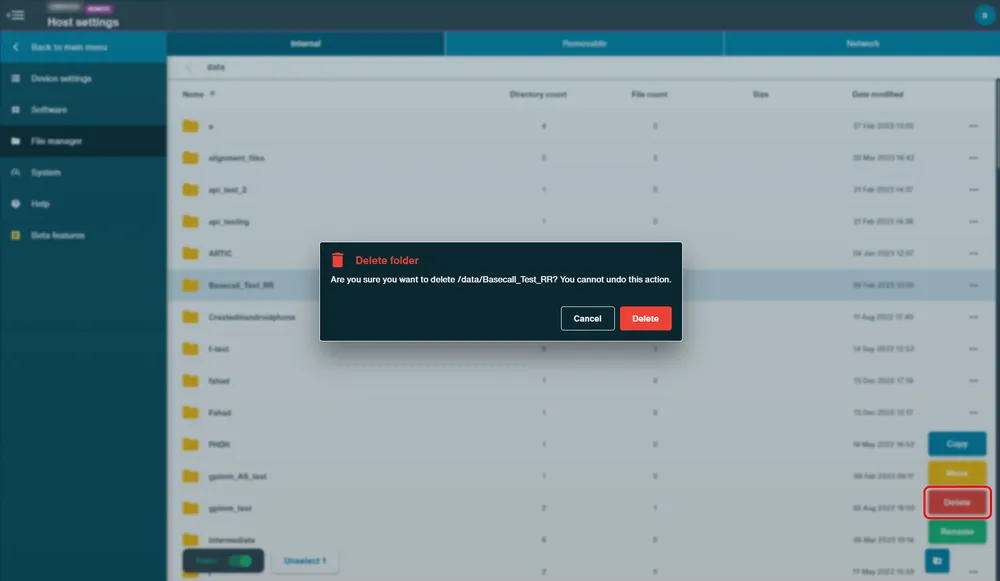
To use the rename function, select a file or folder, and click "Rename" and type in the new name and confirm in the pop up.
Compatible disk formats:
SD and USB on MinION Mk1C supports DOS FAT, Windows 95 FAT, xFAT, and Linux ext(2|3|4).
New directories can be created from the device GUI using the New Directory icon.
Click the icon in the bottom right corner to open Create New Directory and type in a directory name. Click Create.

Disk management
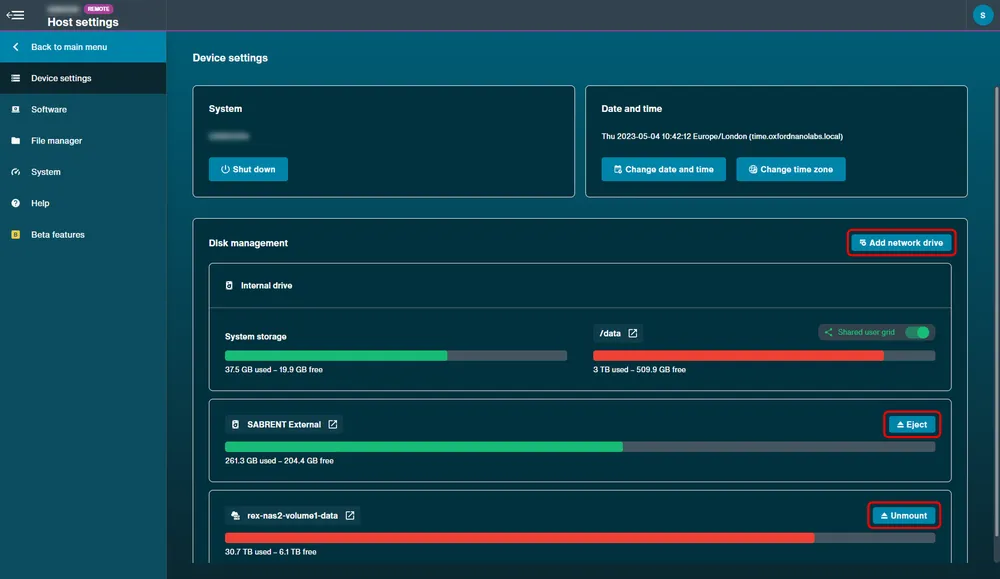
Navigate to Device Settings to view available disk space on the device. Any peripherals plugged in, including USB, can be ejected using the Eject option.
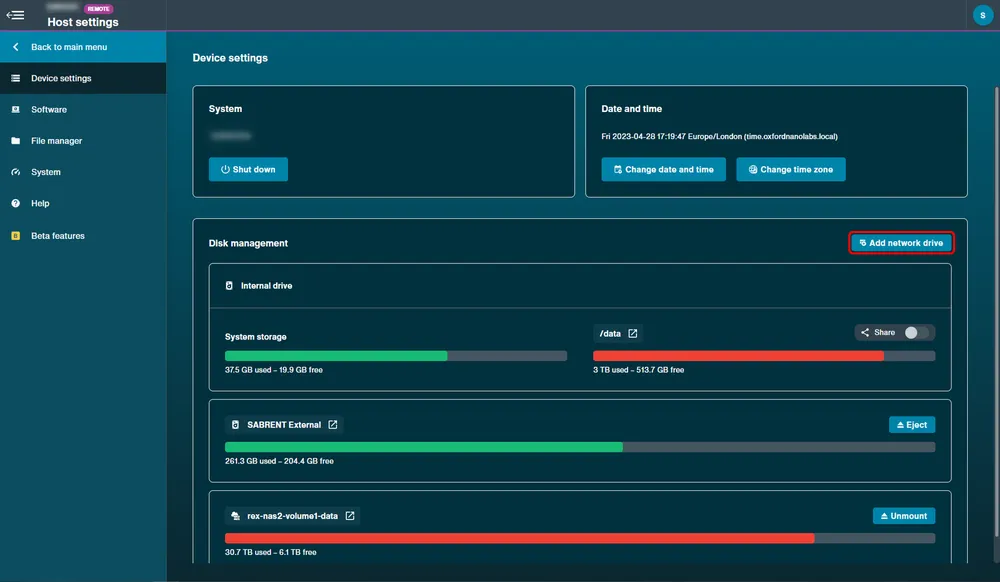
A network drive can also be connected to the device by selecting Add Network Drive and filling in the required credentials for connecting using a Samba (SMB) server or a Network File System (NFS).
Automated POD5 file recovery
MinKNOW automatically attempts to recover sequencing data after a power loss or software interruption. When the system restarts, any recoverable .pod5 or .pod5.tmp files are restored and moved to a pod5_recovered folder within the protocol directory.
If recovery is successful, a readme file is added to this folder listing the recovered files.
When recovery completes, MinKNOW displays a notification in the system messages tab:
- Recovery successful: Data have been recovered, and the file location is shown.
- Recovery unsuccessful: Recovery was attempted, but no data could be restored.
This process runs automatically and requires no user action. If MinKNOW is not open when recovery completes, the notification will not appear.
29. Remote transfer
Remote transfer
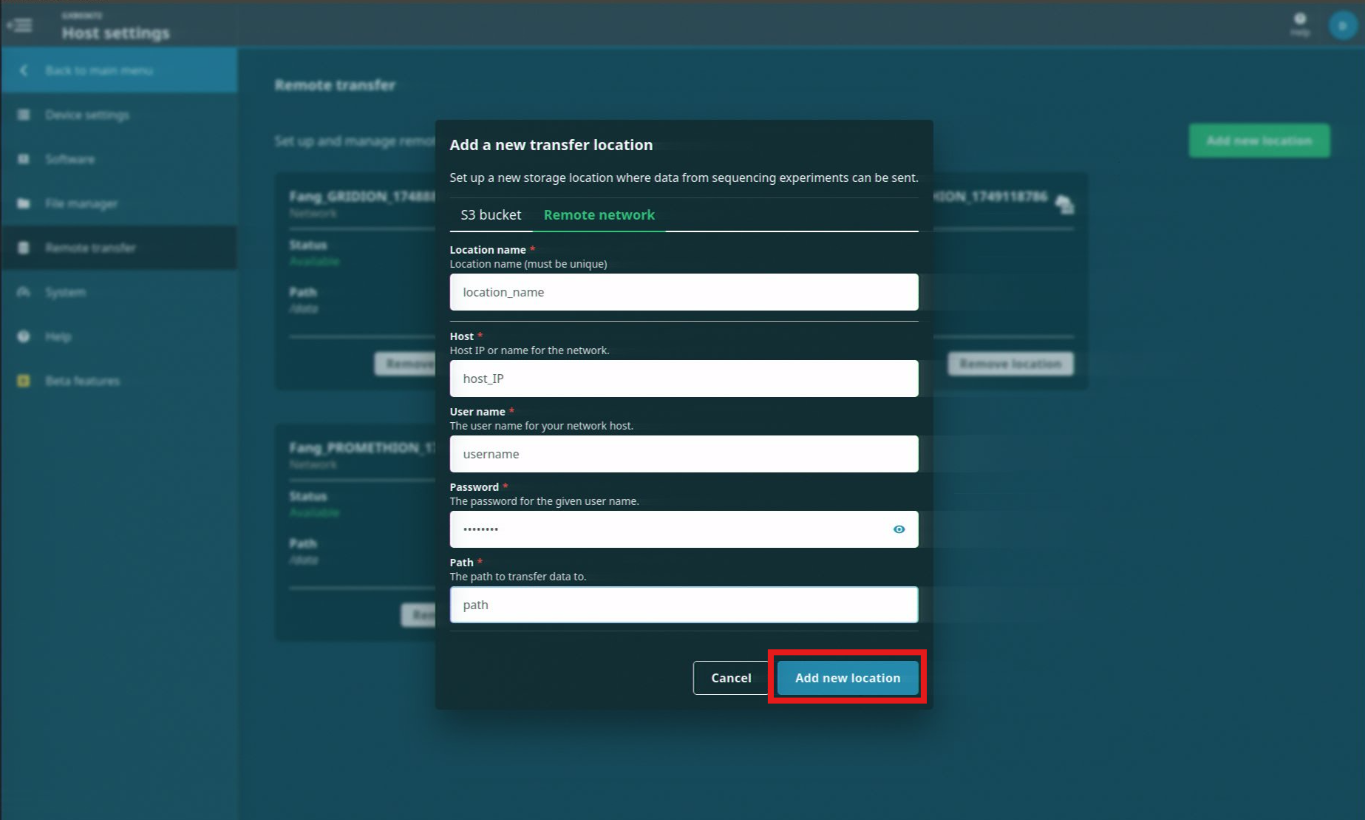
The Remote transfer feature allows you to set up and manage remote storage locations where data from sequencing experiments can be sent.
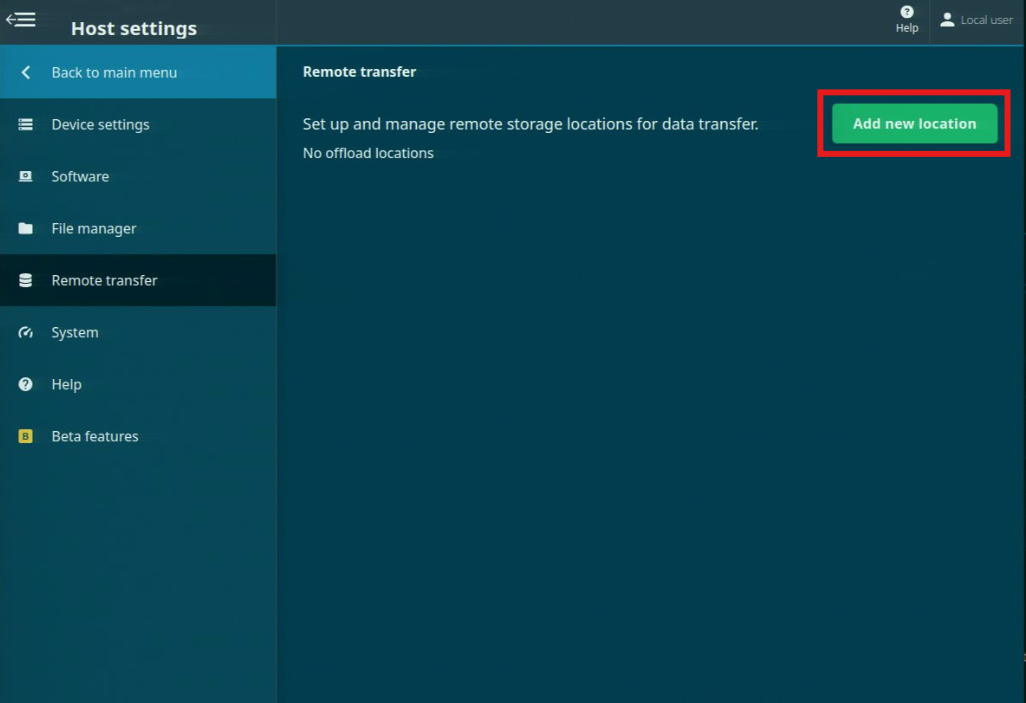
Navigate to the Remote transfer page under Host settings.
To set up a remote transfer location, click 'Add new location'
Select either the S3 bucket or Remote network tabs and enter the information for your remote storage location.
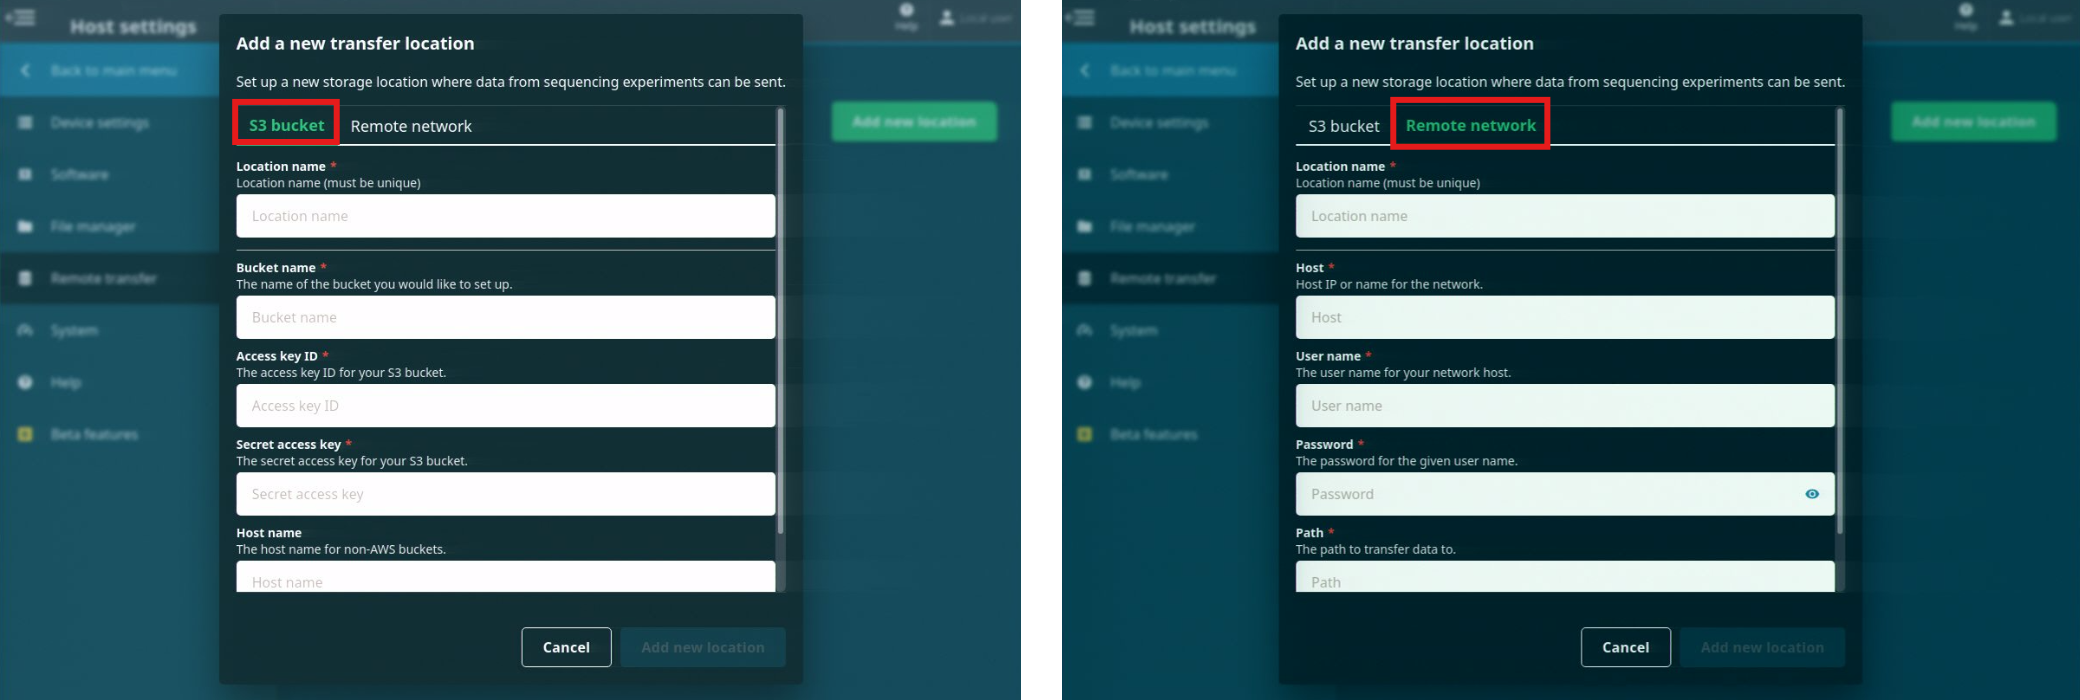
When the information has been entered, click 'Add new location'
30. Mount Network Drive
Network drives
Network drives for data storage can be mounted from either the Device Settings or the File Manager in the Network tab:
Device Settings:
File Manager:
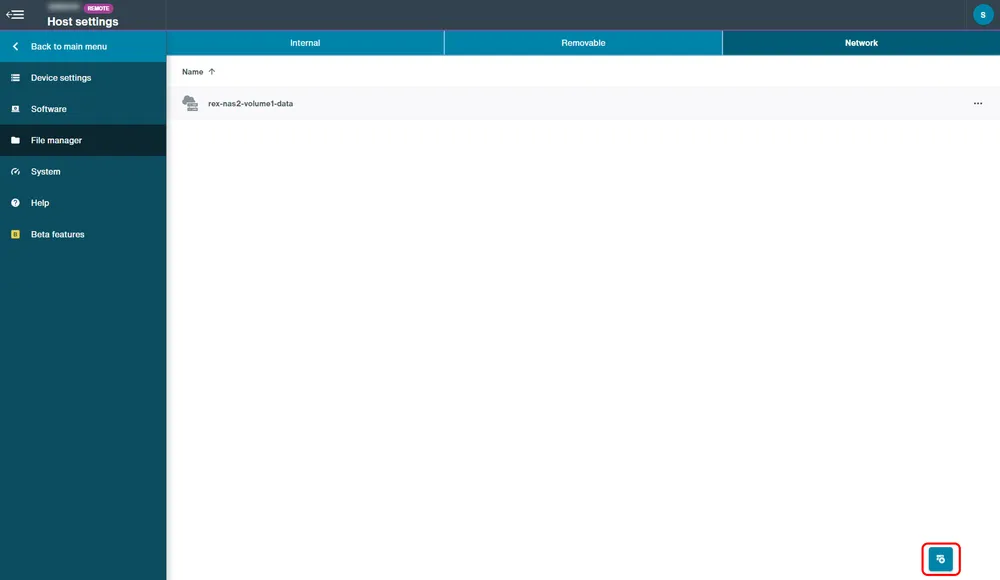
Click "Add network drive".
A modal will open. Click either SMB (Samba) or NFS (Network File System) shares.
Use SMB for connecting to a shared drive on a Windows server, and NFS for Linux. If your shared drive is on a macOS machine or NAS (Network-Attached Storage), you can use either SMB or NFS.
SMB: 
NFS: 
To mount SMB shares:
- Enter the host name or IP address of the SMB share. This is acquired from your network admin.
- Enter the drive on the network host that the user wants to share. Take note to start with a '/'. E.g.
/data. - The 'Mount Point' field will auto-populate with the host name and path to the network share. However, you can customise this. In the file manager, it will appear as:
/data/network/mt-111111-datafor example. - Add a username.
- (Optional) Enter a password.
- (Optional) Enter a domain name.
- Click Mount.

Providing the settings were correct, the mounted drive will be added to the 'Disk Management' overview. The user will be able to:
- View the space information for the drive
- Unmount the network drive
- A link to jump to the mount point inside the file manager
To mount NFS shares:
- Enter the host name or IP address of the NFS share. Obtain this from your network admin.
- Enter the drive on the network host that the user wants to share. Take note to start with a '/'. E.g.
/data. - The 'Mount Point' field will auto-populate with the host name and path to the network share. However, you can customise this. In the file manager, it will appear as:
/data/network/mt-111111-datafor example. - Click Mount.

Providing the settings were correct, the mounted drive will be added to the 'Disk Management' overview. You will be able to:
- View the space information for the drive
- Unmount the network drive
- A link to jump to the mount point inside the file manager
31. Tutorials
Tutorials
On opening the MinKNOW software, the tutorials will start to navigate you through the user interface.
Skip tutorials
Tutorials may be skipped if you are familiar with the user interface.
To skip tutorials, select the three dots and choose to either skip all tutorials or just a section.

Review tutorials
Tutorials can be reviewed again by selecting Reset tutorial state in the Tutorials panel of Application Settings.

32. Network settings and connection
Network settings display internet connectivity information. The MinION Mk1C can be connected via Ethernet or Wi-Fi.
Both options are supported, however if Ethernet is available, we recommend using Ethernet because the connection will likely be quicker and more reliable.
Ethernet
To connect using Ethernet:
- Connect a Ethernet cable to the device
- Navigate to network settings in host settings to confirm connection. IP configuration information will appear when connected.

Wi-Fi
To connect using Wi-Fi, navigate to network settings and toggle Wi-Fi on. Select a network from the Available Networks panel to connect to the internet.

Select Advanced to open Advanced Wi-Fi Configurations. From here, all available networks can be viewed, connected or removed.

Please note that Wi-Fi connections with captive portals (a web page that the user is required to view and enter login details before access is granted) cannot be used with the MinION Mk1C.
Configuring static IP address
The static IP address can be configured through MinKNOW UI for both WiFI and Ethernet. Below is an example for Ethernet.
- Click Edit in "IP configuration" to open "Edit the IP address configuration" dialogue box.

- Select either DHCP or Static tab and click Confirm to save.

- Once the IP address configuration has changed successfully, click Finish to close the dialogue box.

Hotspot can be activated to allow users to connect to a larger screen.
This can be used to connect to the MinION Mk1C in places where there is no network infrastructure, e.g. in the field. To enable hotspot, select the toggle to ON. When active, the device hotspot name will be displayed.

Hotspot configs can be edited to select a channel if required for congested networks where there may be competition for channels.
- Navigate to the network settings
- For hotspot, select the toggle to ON
- Click 'Configure hotspot'
- Select channel using the dropdown menu
- Enter new password
- Click 'Confirm'
The hotspot should be confirmed as specified in the hotspot configs.

To connect the MinION Mk1C Wi-Fi router to a Windows device:
- Locate the MinION Mk1C ID on the underside label of the device:

- Click on the MinION Mk1C ID under the Wi-Fi Connections Panel in the Control Panel or the options in the right side of the Task Bar
Login with the Security Key: WarmButterflyWings98

- Access the MinION Mk1C by the File Explorer: Go to \\mc-XXXXXX (XXXXXX is the MinION Mk1C ID) in the Address Bar. You will be prompted for the network credentials on connecting to the MinION Mk1C through File Explorer.
To connect the MinION Mk1C router to a macOS device:
- Locate the MinION Mk1C ID on the underside label of the device:

- Click on the Wi-Fi icon on the right of Menu bar at the top of the screen:

Identify the MC-XXXXXX ID in the Network Name under Network Panel (the final option under the Wi-Fi icon), which is show in the window below (left)‡. Selecting the MinION Mk1C ID and clicking Apply will present the Wi-Fi login pop-up. Use the password credentials shown below.
Login with the Password: WarmButterflyWings98

- Access the MinION Mk1C by the Network browser: Search for Network using Finder. Click on Server in the tab to lower left of the Search bar.
MC-XXXXXX (XXXXXX is the MinION Mk1C ID) will be displayed as a server option. Click the MC-XXXXXX icon, click Connect as under the Search bar and enter the network credentials.

‡ When connecting to your device by SSH, it can be addressed in three different ways:
- Using DNS
- Using mDNS
- Using its IP address directly
In most organisations, central DNS servers are used. If your device is using a 'static' IP configuration, your IT department will have to create a DNS entry for it manually. If your device is using a dynamic (DHCP) IP configuration, the DNS entry will often be created automatically. To SSH into your device using DNS, set the hostname in your client to the device's hostname, e.g. MC-112345.
If DNS is not provided by your organisation or your broadband router, try using mDNS. When your device is connected to a network, it announces its presence to all other nearby devices such as your laptop or PC. If your laptop or PC is configured to recognise these announcements, you can SSH into your device using mDNS by setting the hostname in your client to the device's hostname followed by ".local", e.g. MC-112345.local.
If the above methods are not successful, use the devices IP address directly. The MinKNOW UI shows the IP addresses for each interface in the Settings - Network page. If your device has LAN and Wi-Fi interfaces, each will have a different IP address. To SSH into your device using its IP address, set the hostname in your client to the IP address, e.g. 10.20.30.41.
To connect the MinION Mk1C router to a Linux device:
- Locate the MinION Mk1C ID on the underside label of the device:

- Click on the Wi-Fi icon on the right of Menu bar at the top of the screen.

Identify and click on the MC-XXXXXX ID under the Wi-Fi network options icon (shown above). Enter the Wi-Fi password (shown below) in the pop-up Wi-Fi Network Authentication window:
Login with the Password: WarmButterflyWings98

The following window will be presented when you have connected to the MinION Mk1C Wi-Fi router.

- Access the MinION Mk1C using the Linux File Browser and enter the server address.
Open the File Browser (this can be found using the Search tool). Select Connect to server on the bottom of the list in the left panel. You will need to enter:
smb://mc-110013
33. Beta features
Beta feature availability
For devices with beta features available, users can choose to have beta features enabled or disabled on their device. By default, these features will be enabled and highlighted in the UI with a yellow "beta" badge.
To disable the beta features:
- Navigate to Beta features in the host setting.
- To disable all beta features and enable the "Beta features enabled" switch.
- To disable an individual feature, uncheck the tick box for the for the specific beta feature.
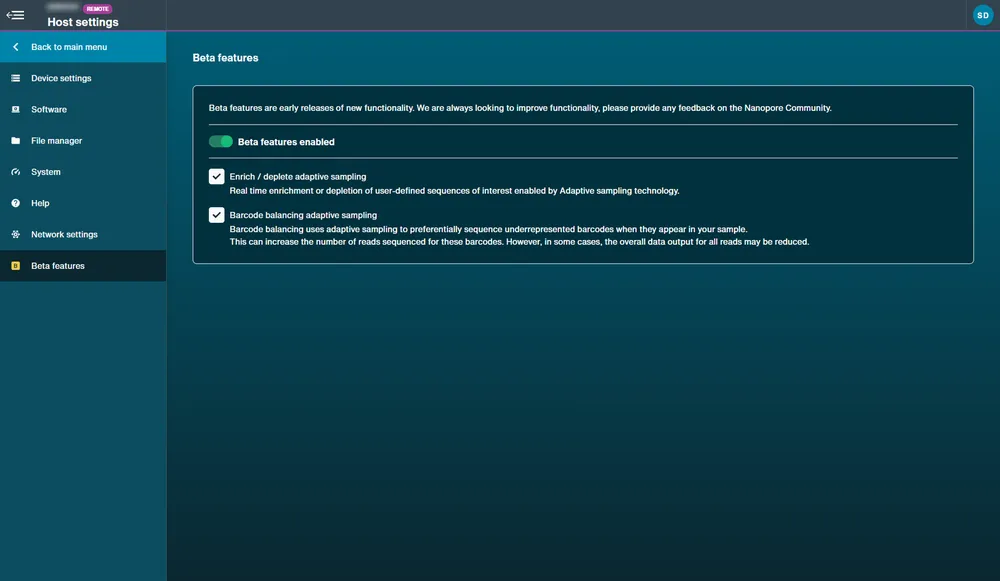
34. Troubleshooting your device
If there are any issues associated with your device or sequencing, please contact Technical Services.
To find our most common FAQs, please see the support section for MinKNOW here.
In most cases where troubleshooting is required, we recommend exporting your logs and sending them to Technical Services.
Help feature and support link from MinKNOW.
The Nanopore support hub can also be accessed directly from your MinKNOW UI.
In the top right of MinKNOW you will see the "Help" option:

Clicking this option will bring you to a page with a link and a QR code:

On larger devices such as the GridION and PromethION 24/48, and devices such as the MinION Mk1B/Mk1D and P2 Solo, clicking the link will directly bring you to the Nanopore support page.
On devices such as the P2 Integrated and MinION Mk1C, you will be able to scan the QR code with another device, or type in the shortened URL on another device to quickly reach the support hub.
To export logs:
For the PromethION 24/48, PromethION 2i, GridION and PromethION 2 Solo connected to a GridION:
- Click Export in the Export Logs section.
When you have successfully exported the logs, you will be notified of where they are located below the button. The logs will be downloaded as a TGZ file in the logs directory.
You can change the location of the logs by using the file manager, where you can easily retrieve them without needing SSH:
- Click on the file next to Logs exported to: in the Export Logs panel. This will open where the logs are located in the File Manager of MinKNOW.
- Use the control panel in the lower right corner of the File Manager to move the log files.

If the PromethION 2 Solo is connected to a stand-alone computer
Log files for each sequencing experiment can be found in:
Windows: C:\data\logs
macOS: /private/var/log/MinKNOW
Linux: /var/log/minknow
To remove logs and temporary data:
In the "Help" page, click Clean up in the Clean Up Files section and confirm in the in the pop-up.
Note: Run data will not be deleted. Logs and temporary data will be removed.

To repair device issues:
Click Run repair in the troubleshooting section of the Help page and confirm in the pop-up. MinKNOW will attempt to repair the following issues:
- Ensure required directories under "/data" exist and have the correct ownership and permissions
- Ensure required files under "/data" have the correct ownership and permissions
- Ensure the GPU is working at maximum performance
- Ensure that Bluetooth is disabled

35. Introduction to local basecalling
Introduction to live basecalling in MinKNOW
For MinION Mk1B/Mk1D, Flongle on MinION Mk1B/Mk1D, and PromethION 2 Solo, the MinKNOW software presents an option to basecall reads on the local computer. The basecalling is carried out live, as the read files are generated during a sequencing experiment.
Basecalling results are displayed in real-time in the MinKNOW user interface, and data is written out in the BAM or FASTQ file format.

Fast, High Accuracy and Super Accurate models and compatibilities
The MinKNOW basecallers offer three different basecalling models: a Fast model, a High accuracy (HAC) model, and Super accurate (SUP) model.
The Fast model is designed to keep up with data generation on Oxford Nanopore devices (MinION Mk1C, GridION, PromethION). The HAC model provides a higher raw read accuracy than the Fast model and is more computationally-intensive. The Super accurate model has an even higher raw read accuracy, and is even more intensive than the HAC model.
For more information about basecalling accuracy, see the Accuracy page on the Oxford Nanopore website.
A comparison of the speed of the models is provided in the table below:
The number of keep-up flow cells assumes a 30 Gbase flow cell output in 72 hours for MinION and GridION, and 100 Gbase output in 72 hours for PromethION. These benchmarks were carried out on 30 kb human DNA.
36. Starting a sequencing run with Flongle
Click 'Start Sequencing' on the Start page to set up the sequencing parameters for your experiment.

Type in the experiment name, sample ID and choose flow cell type from the drop down menu. Fill in flow cell ID in the correct format: ABC123
Ensure the experiment name and sample ID do not contain any personally identifiable information.
Note: If sample ID is not filled in, there will be no sample ID in the folder name structure.
To use previously saved settings, please see the "Save sequencing run settings" page of this protocol.
Select Continue to move to the Kit Selection page.

For Flongle, flow cell ID is not automatically assigned in MinKNOW. It is imperative the flow cell ID is entered in the correct format: ABC123 i.e. ([A-Z] x 3 [0-9] x 3).
The ID is case sensitive with no spaces. The MinKNOW software will not allow you to proceed until the flow cell ID has been entered correctly.
The user will be notified in the bottom right corner of the GUI if any information entered is in the wrong format or missing.
The Flongle flow cell ID is shown in the blue box below:

Select the kit and expansion(s) used to prepare the library.
One sequencing kit can be selected as well as one or more expansions. If a sequencing kit does not have any associated expansions, no expansion options will appear.
The filter options may be used to find the kit used. For example, click DNA to filter for DNA sequencing kits.
For control runs, click the Control checkbox to show control experiments available for the kits. This will automatically set the sequencing parameters for a control run. Note: The default run length is set to 6 hours for control experiments.
Click Continue to navigate to the run configuration page.

Default sequencing parameters
Click Continue to proceed to the run configuration page.
Default sequencing parameters will be pre-set.
For the majority of users and applications, we recommend keeping the default sequencing parameters unless you have a specific need to change them.
Experiment overview
At the top of the run configuration page you will see an overview of your experiment set-up and identifiers inlcuding:
- Experiment name: defined by user.
- Positions: Flow cell position(s) being used in the sequencing experiment, and the associated sample IDs for the position(s).
Note: If using multiple flow cells, click "show details" to open a window displaying all the positions used and the associated sample IDs. - Flow cell type: automatically detected by the MinKNOW software.
- Sequencing kit: the sequencing kit used for DNA/RNA library preparation, user-defined.

Choose your basecalling options:
The basecalling option is on by default to perform real-time basecalling. This can be switched off and basecalling performed post-sequencing.
Note: If basecalling is disabled, barcoding and alignment will not be performed during sequencing. In this case, raw reads will be enabled automatically.
Modified bases are disabled by default. These can be switched on to call base modifications including 5mC, 5hmC, and 6mA.
To specify your basecall model and modified bases, click the Edit icon to open basecalling options dialogue box.


Basecall models
Basecalling models can be selected at two stages in the MinKNOW software:
- Real-time basecalling: A basecalling model can be selected when setting up a sequencing run on the "Run configuration" page of MinKNOW. This enables basecalling of the sequencing run in real-time.
- Post-run basecalling: Basecalling can be set up post-sequencing run on MinKNOW. Instructions can be found in the "Post-run basecalling" section of this protocol.
Dorado is the basecaller server in MinKNOW which provides multiple models for basecalling nanopore data.
There are three options for model selection in the drop down menu:
1. High-accuracy basecalling (HAC) - The HAC model is our default basecalling model and is recommended for most applications, including high-throughput projects focusing on variant analysis. It is able to keep up with a high-throughput sequencing experiment on a GridION or PromethION.
2. Super-accurate basecalling (SUP) - The SUP model is more computationally intensive than the HAC model and achieves the highest single-read accuracy. Recommended for de novo assembly projects and low-frequency variant analysis (e.g. somatic variation and single-cell applications).
3. Fast basecalling - This model is recommended for quick, real-time insights on sequencing data when compute resources are limited.
Note: GPU devices will basecall in near real-time; CPU devices, like a standard laptop for MinION Mk1B/Mk1D, will not maintain real-time basecalling.
Choose your barcoding options:
Barcoding options are only available when a barcoding sequencing kit or expansion has been selected. Barcoding can be switched off and performed post-sequencing.

To specify the barcoding options, click the Edit icon to open the barcoding options dialogue box. From here, barcode trimming and custom barcode selection can be defined.
By default, barcoding trimming is off. This can be enabled to remove barcodes from demultiplexed reads. Please note, some primer sequences may also be trimmed together with the barcodes.
By default, custom barcode selection is off. This can be enabled to only select for specified barcodes used in your library preparation for the current sequencing run.
Note: Specifying barcodes must be entered as:
- Individual numbers.
- Numbers separated by commas.
- Range of numbers separated by a dash.
- A combination of numbers and ranges, separated by commas.

Some sequencing kits place barcodes on both ends of the read. By default, the barcode both ends feature is off. If this feature is enabled, the barcode will only classified if a barcode above the minimum barcode score is present at both ends of the basecalled read.

Note: For barcoding to be performed during sequencing, basecalling must be enabled.
Choose your alignment options:
By default, alignment is turned off.

To use alignment during sequencing, upload an alignment reference file as a .fasta or .mmi file. We recommend uploading a reference locally on bacterial-sized genomes. Uploading a file can take a few minutes and is compute-dependent.
For standalone installations of MinKNOW, we recommend uploading the reference file to the following locations depending on which operating system is being used:
- Windows:
C:\data\ - Mac:
/Library/MinKNOW/data/ - Ubuntu
/var/lib/MinKNOW/data/
A reference file can contain multiple entries in the same file (e.g. multiple chromosomes) and alignment hits from these files are used to populate the alignment graphs which can be viewed on the GUI.
A BED file can also be uploaded alongside the reference when there is a specific interest in a particular region of the reference (e.g. specific gene in a chromosome). Alignment hits from BED files will be highlighted in the sequencing .txt file generated in the data folder. Click Edit options to open a dialogue box to upload a BED file.

BED files will be validated upon upload. If there is an error in the validation of the file, an error message will show linking to a web page with guidance on correcting the validation errors. 
Note: For alignment to be performed during sequencing, basecalling must be enabled.
Choose your adaptive sampling options:
By default, adaptive sampling is turned off.

Enabling adaptive sampling will allow you to enrich or deplete specific sequences from your aligned sequencing data.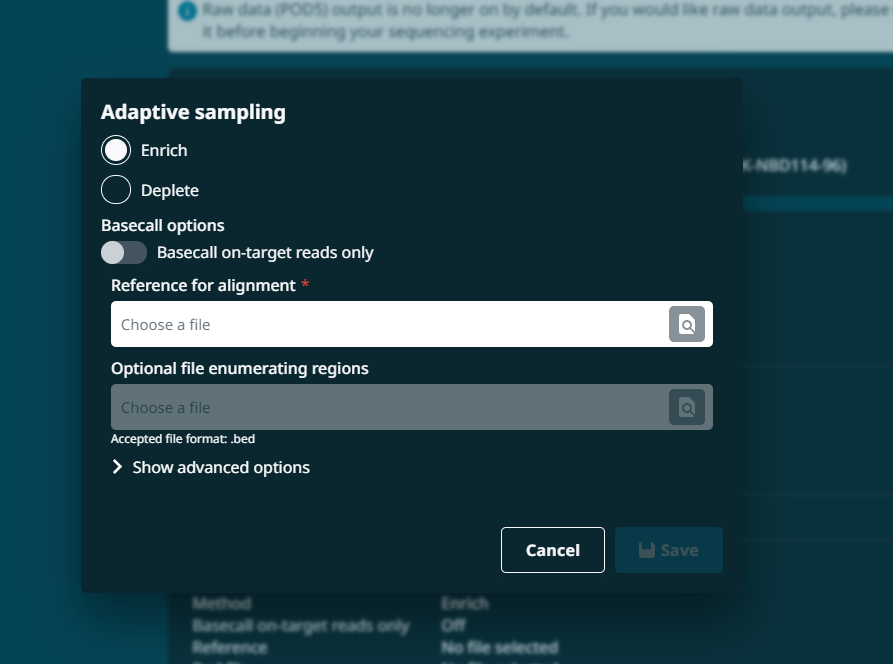
By default, all adaptive sampling reads, whether they are accepted or rejected, will be basecalled. If you would like to only basecall on-target reads and not rejected reads, set the Basecally on-target reads only toggle to On. If you enable raw data generation, rejected reads will still be written out but not basecalled.
More information on this feature can be found in our Adaptive sampling documentation.
Advanced User Options

Time between pore scans: The time between pore scans can be altered using this feature.
Reserved pore: The reserve pore feature prioritises consistency and accuracy over immediacy by reserving wells where voltages have dropped until later in the run, such that other wells can catch up. Switch off this feature to fully front-load sequence data acquisition.

Set up the data targets for your experiment:
This feature allows you to set up the rules to define when a sequencing run will stop. If multiple rules are set up, the first rule met will stop the run.
Click the Edit icon to open the options.

Run limit
This rule must be defined based on run time length in hours or when a flow cell is end of life and has no more sequencing pores available.
Use the drop-down menu to choose:
- "Time equals" and hours
- or "Flow cell is" which will automatically be set as "End of life".

Flow cell data target
This rule can be used to define a target amount of data to reach before a sequencing run is stopped. This can be specified for either estimated or basecalled bases and your data target will be available to view on the experiment graphs to allow you to monitor data progress.
Please note, basecalling must keep up with data output in real-time. If the device or basecall model will not keep up and reach the target output before the run limit rule is met, we recommend using the "Estimated bases" option. However, if your experiment will not reach the target data before the end of the experiment as defined by the run limit rule, you will be warned by the UI.
Use the drop-down menu to select for "Estimated bases equal" or "Basecalled bases equal" and input the value in either Gb or Mb. Alternatively, select "Coverage equals", "Barcode coverage equals", “Total read count equals” or “All barcode read counts equal“.
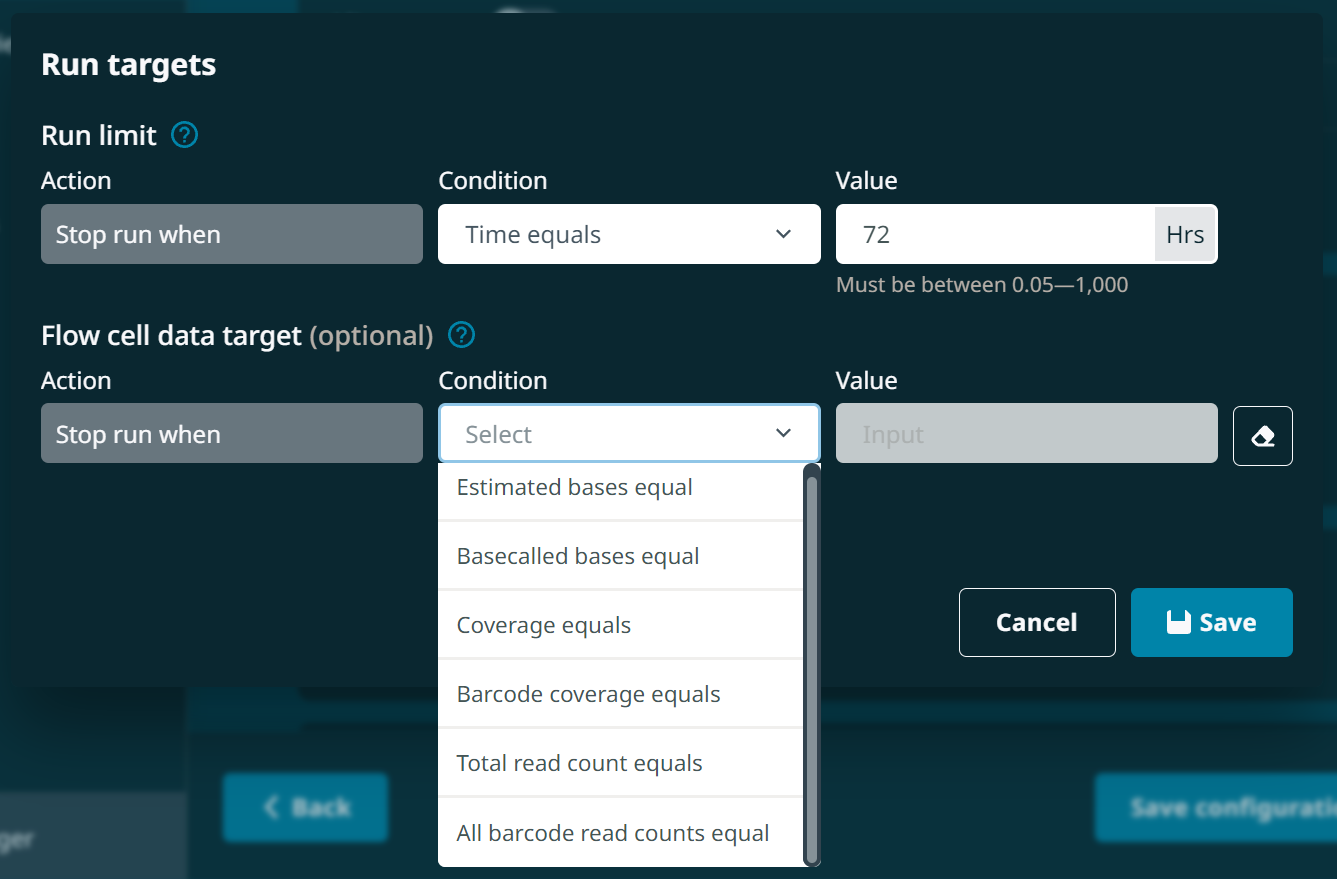
The “Barcode coverage equals” rule replaces the barcode balancing beta feature. This feature uses adaptive sampling to reject barcodes that have already reached the specified coverage threshold, allowing the barcodes that have not yet reached the coverage target to be sequenced preferentially. The sequencing run will then continue until the specified barcode coverage is reached across all barcodes. If the run does not achieve this coverage, it will stop when the other run limit target (either time-based or flow cell end of life) is reached.
Select the output options:
The output section provides variables for data output including file name, location and format.
Click the Edit icon to open the options.

Output settings:
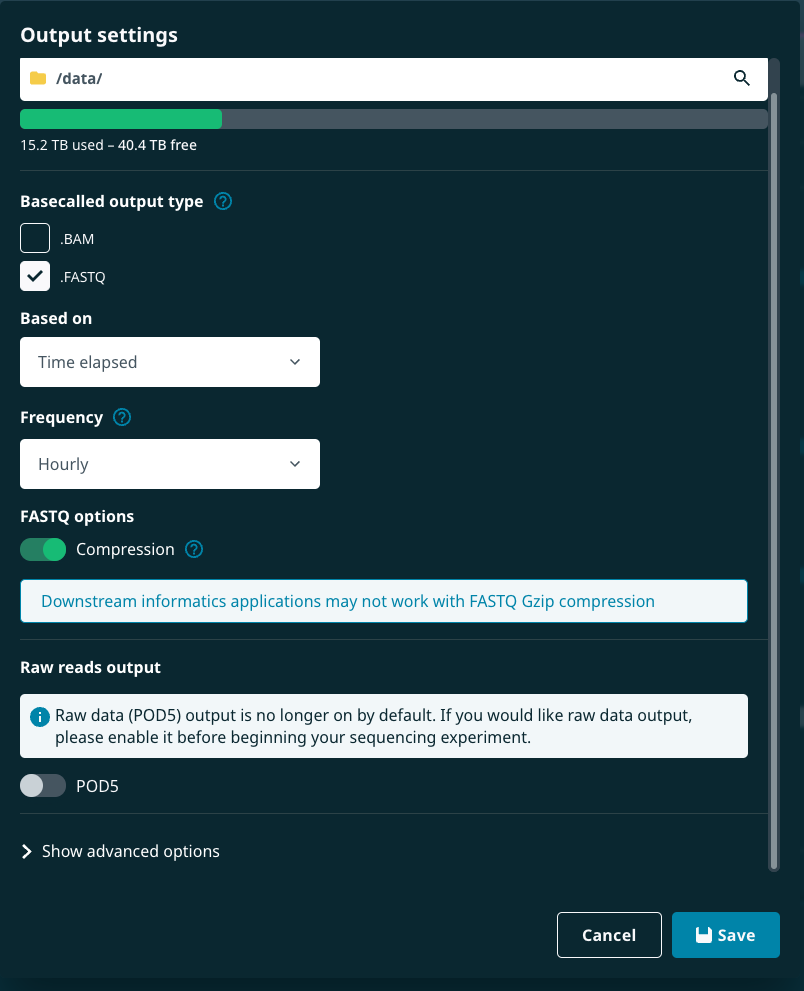
Data saved as:
Check the name of the output file for the data.
Output location:
Confirm the location for the output data file. Click the file path name to open a pop-up to alter file path or create a new file.
Click Choose location on the pop-up to confirm new file location.
Output location storage capacity:
A bar indicator is displayed below the selected data output file location. This bar will display red when the disk space used reaches more than 80% of the total available disk space. Otherwise, the bar will display green. Below the bar, you can see how much drive space is available.

Basecalled output options:
Confirm output file type and file compression using the checkboxes.
Note: Below, reads per file can be changed for both raw reads and basecalled reads, but take note:
- Fewer reads per file: reads become more quickly available. However, too few reads per file means MinKNOW may not keep up with writing out files in real-time.
- More reads per file: reduces the number of files especially for amplicon/cDNA experiments that produce a large number of reads. Some downstream analysis tools may have an upper limit on the uploaded file size.
Basecalled output type:
Output file type can be selected between .FASTQ or .BAM files. The .FASTQ will be on as default if basecalling in real-time.
File output frequency can be adjusted for basecalled files based on two options:
| Based on time elapsed | Based on number of reads |
|---|---|
| Basecalled files can be produced: · every 1 minute (many small files) · every 10 minutes (many small files) · hourly (fewer larger files) · at the end of the run (single large file). | Basecalled files can be produced for specified read thresholds (number of reads). |
For barcoding runs, basecalled reads are split into files by barcode by default.
Gzip compression of FASTQ files is on by default of basecalled reads. Note: FASTQ Gzip files may prevent some downstream informatics applications.
Raw reads output options:
Raw reads: Raw reads output can be saved as POD5 files. This feature is disabled by default.
Note: Raw reads become enabled automatically if basecalling is disabled.
When raw reads are enabled, the default file output is POD5. This Nanopore-developed file format stores sequencing data efficiently, writes data quickly, uses less compute, and produces smaller raw data files. POD5 output generates files hourly.
Note: Support for FAST5 output has been discontinued from software version 25.09 onwards.
We recommend keeping the default settings.
Raw reads split by barcode: Raw read files generated in the POD5 format can now be split by barcode (if using one of our barcoding sequencing kits.
Please note, this feature is turned off by default.
Advanced User Options
Option to turn bulk file saving either on or off.
Note: This will result in much larger file sizes due to additional information about the run, which is used for debugging.

Choose the filtering options:
Filtering options can be used to determine which reads are classed into pass or fail files. These options may also be used to determine which predefined reads, read lengths and Qscore during basecalling can be split out in some live graphs.
Click the Edit icon to open the filtering options:

Use the GUI to alter Qscore and to define minimum and maximum readlength for a pass read, if required.

Click 'Start' to run the experiment.

You will be automatically navigated to the Sequencing Overview when sequencing starts.
From here, you will see a progress bar below the flow cell to show the progression of the sequencing script.
In some cases, the device will take a few minutes before starting a sequencing run if an alignment reference file is used. A progress bar will show the progress before sequencing begins.
Flow cell health will be displayed after the first pore scan.

Click on the flow cell to open the quick view and check the number of active pores. The first pore scan should report a similar number of active pores (within 10-15%) to that reported in the flow cell check.
Below are recommended troubleshooting tips if there are unexpected differences in pore numbers:
- If there is a significant reduction in active pores in the first pore scan, restart MinKNOW.
- If the numbers are still significantly different, close down the host computer and reboot.
- When the numbers are similar to those reported at the end of the flow cell check, restart the experiment. There is no need to load any additional library after the restart.
To stop the experiment during sequencing, click "Stop" using the run controls on the experiments page.
This is only necessary if you want to stop your run before the end of the set run time.

Confirm to stop experiment by clicking:
- Stop sequencing which will start catch-up basecalling
- or Stop sequencing and basecalling which will stop both sequencing and basecalling immediately.

Once sequencing is complete, generate a run report.
A run report containing information about the sequencing run and performance graphs can be generated manually by clicking Export run report and selecting which experiment to export to html.
Run reports are automatically generated for Flongle running on MinION Mk1C and MinION Mk1B/Mk1D running on Linux. However, for MinION Mk1B running on Windows or Mac, the run reports need to be manually generated.
For more information about the run report, please see the Run report section of this document.
A pore activity CSV file is also generated for every run.
The report and CSV files are saved to the same folder as the FASTQ read files e.g. :\data\experiment\sample_ID\ for MinION Mk1B.

MinKNOW fallback folder
If writing out reads to your specified location fails (e.g. if the disk becomes full, or the connection is disrupted), the experiment will continue, and the reads will be written into a fallback folder:
Windows POD5 files: C:\data\reads\fallback (with the standard run data name sample ID as a folder) FASTQ files: C:\data\reads\fastq_fallback (with the standard run data name sample ID as a folder)
macOS: POD5 files: /Library/MinKNOW/data/fallback FASTQ files: /Library/MinKNOW/data/fastq_fallback
Linux: POD5 files: /var/lib/MinKNOW/data/fallback FASTQ files: /var/lib/MinKNOW/data/fastq_fallback
37. Starting a sequencing run on MinION Mk1B/Mk1D
Click 'Start Sequencing' on the Start page to set up the sequencing parameters for your experiment.

Type in the experiment name, sample ID and choose flow cell type from the drop down menu.
Ensure the experiment name and sample ID does not contain any personally identifiable information.
Note: If sample ID is not filled in, there will be no sample ID in the folder structure.
To use previously saved settings, please see the "Save sequencing run settings" page of this protocol.
Select Continue to move to the Kit Selection page.

Select the kit and expansion(s) used to prepare the library.
One sequencing kit can be selected as well as one or more expansions. If a sequencing kit does not have any associated expansions, no expansion options will appear.
The filter options may be used to find the kit used. For example, click DNA to filter for DNA sequencing kits.
For control runs, click the Control checkbox to show control experiments available for the kits. This will automatically set the sequencing parameters for a control run. Note: The default run length is set to 6 hours for control experiments.
Click Continue to navigate to the run configuration page.

Default sequencing parameters
Click Continue to proceed to the run configuration page.
Default sequencing parameters will be pre-set.
For the majority of users and applications, we recommend keeping the default sequencing parameters unless you have a specific need to change them.
Experiment overview
At the top of the run configuration page you will see an overview of your experiment set-up and identifiers inlcuding:
- Experiment name: defined by user.
- Positions: Flow cell position(s) being used in the sequencing experiment, and the associated sample IDs for the position(s).
Note: If using multiple flow cells, click "show details" to open a window displaying all the positions used and the associated sample IDs. - Flow cell type: automatically detected by the MinKNOW software.
- Sequencing kit: the sequencing kit used for DNA/RNA library preparation, user-defined.

Choose your basecalling options:
The basecalling option is on by default to perform real-time basecalling. This can be switched off and basecalling performed post-sequencing.
Note: If basecalling is disabled, barcoding and alignment will not be performed during sequencing. In this case, raw reads will be enabled automatically.
Modified bases are disabled by default. These can be switched on to call base modifications including 5mC, 5hmC, and 6mA.
To specify your basecall model and modified bases, click the Edit icon to open basecalling options dialogue box.


When setting up an RNA sequencing run, you can choose the modified bases you wish to call, and also select an option for Poly(A) tail length estimation (these are off by default).

Basecall models
Basecalling models can be selected at two stages in the MinKNOW software:
- Real-time basecalling: A basecalling model can be selected when setting up a sequencing run on the "Run configuration" page of MinKNOW. This enables basecalling of the sequencing run in real-time.
- Post-run basecalling: Basecalling can be set up post-sequencing run on MinKNOW. Instructions can be found in the "Post-run basecalling" section of this protocol.
Dorado is the basecaller server in MinKNOW which provides multiple models for basecalling nanopore data.
There are three options for model selection in the drop down menu:
1. High-accuracy basecalling (HAC) - The HAC model is our default basecalling model and is recommended for most applications, including high-throughput projects focusing on variant analysis. It is able to keep up with a high-throughput sequencing experiment on a GridION or PromethION.
2. Super-accurate basecalling (SUP) - The SUP model is more computationally intensive than the HAC model and achieves the highest single-read accuracy. Recommended for de novo assembly projects and low-frequency variant analysis (e.g. somatic variation and single-cell applications).
3. Fast basecalling - This model is recommended for quick, real-time insights on sequencing data when compute resources are limited.
Note: GPU devices will basecall in near real-time; CPU devices, like a standard laptop for MinION Mk1B/Mk1D, will not maintain real-time basecalling.
Choose your barcoding options:
Barcoding options are only available when a barcoding sequencing kit or expansion has been selected. Barcoding can be switched off and performed post-sequencing.

To specify the barcoding options, click the Edit icon to open the barcoding options dialogue box. From here, barcode trimming and custom barcode selection can be defined.
By default, barcoding trimming is off. This can be enabled to remove barcodes from demultiplexed reads. Please note, some primer sequences may also be trimmed together with the barcodes.
By default, custom barcode selection is off. This can be enabled to only select for specified barcodes used in your library preparation for the current sequencing run.
Note: Specifying barcodes must be entered as:
- Individual numbers.
- Numbers separated by commas.
- Range of numbers separated by a dash.
- A combination of numbers and ranges, separated by commas.

Some sequencing kits place barcodes on both ends of the read. By default, the barcode both ends feature is off. If this feature is enabled, the barcode will only classified if a barcode above the minimum barcode score is present at both ends of the basecalled read.

Note: For barcoding to be performed during sequencing, basecalling must be enabled.
Choose your alignment options:
By default, alignment is turned off.

To use alignment during sequencing, upload an alignment reference file as a .fasta or .mmi file. We recommend uploading a reference locally on bacterial-sized genomes. Uploading a file can take a few minutes and is compute-dependent.
For standalone installations of MinKNOW, we recommend uploading the reference file to the following locations depending on which operating system is being used:
- Windows:
C:\data\ - Mac:
/Library/MinKNOW/data/ - Ubuntu
/var/lib/MinKNOW/data/
A reference file can contain multiple entries in the same file (e.g. multiple chromosomes) and alignment hits from these files are used to populate the alignment graphs which can be viewed on the GUI.
A BED file can also be uploaded alongside the reference when there is a specific interest in a particular region of the reference (e.g. specific gene in a chromosome). Alignment hits from BED files will be highlighted in the sequencing .txt file generated in the data folder. Click Edit options to open a dialogue box to upload a BED file.

BED files will be validated upon upload. If there is an error in the validation of the file, an error message will show linking to a web page with guidance on correcting the validation errors. 
Note: For alignment to be performed during sequencing, basecalling must be enabled.
Choose your adaptive sampling options:
By default, adaptive sampling is turned off.

Enabling adaptive sampling will allow you to enrich or deplete specific sequences from your aligned sequencing data.
By default, all adaptive sampling reads, whether they are accepted or rejected, will be basecalled. If you would like to only basecall on-target reads and not rejected reads, set the Basecally on-target reads only toggle to On. If you enable raw data generation, rejected reads will still be written out but not basecalled.
More information on this feature can be found in our Adaptive sampling documentation.
Advanced User Options

Time between pore scans: The time between pore scans can be altered using this feature.
Reserved pore: The reserve pore feature prioritises consistency and accuracy over immediacy by reserving wells where voltages have dropped until later in the run, such that other wells can catch up. Switch off this feature to fully front-load sequence data acquisition.

Set up the data targets for your experiment:
This feature allows you to set up the rules to define when a sequencing run will stop. If multiple rules are set up, the first rule met will stop the run.
Click the Edit icon to open the options.

Run limit
This rule must be defined based on run time length in hours or when a flow cell is end of life and has no more sequencing pores available.
Use the drop-down menu to choose:
- "Time equals" and hours
- or "Flow cell is" which will automatically be set as "End of life".

Flow cell data target
This rule can be used to define a target amount of data to reach before a sequencing run is stopped. This can be specified for either estimated or basecalled bases and your data target will be available to view on the experiment graphs to allow you to monitor data progress.
Please note, basecalling must keep up with data output in real-time. If the device or basecall model will not keep up and reach the target output before the run limit rule is met, we recommend using the "Estimated bases" option. However, if your experiment will not reach the target data before the end of the experiment as defined by the run limit rule, you will be warned by the UI.
Use the drop-down menu to select for "Estimated bases equal" or "Basecalled bases equal" and input the value in either Gb or Mb. Alternatively, select "Coverage equals", "Barcode coverage equals", “Total read count equals” or “All barcode read counts equal“.

The “Barcode coverage equals” rule replaces the barcode balancing beta feature. This feature uses adaptive sampling to reject barcodes that have already reached the specified coverage threshold, allowing the barcodes that have not yet reached the coverage target to be sequenced preferentially. The sequencing run will then continue until the specified barcode coverage is reached across all barcodes. If the run does not achieve this coverage, it will stop when the other run limit target (either time-based or flow cell end of life) is reached.
Select the output options:
The output section provides variables for data output including file name, location and format.
Click the Edit icon to open the options.

Output settings:

Data saved as:
Check the name of the output file for the data.
Output location:
Confirm the location for the output data file. Click the file path name to open a pop-up to alter file path or create a new file.
Click Choose location on the pop-up to confirm new file location.
Output location storage capacity:
A bar indicator is displayed below the selected data output file location. This bar will display red when the disk space used reaches more than 80% of the total available disk space. Otherwise, the bar will display green. Below the bar, you can see how much drive space is available.

Basecalled output options:
Confirm output file type and file compression using the checkboxes.
Note: Below, reads per file can be changed for both raw reads and basecalled reads, but take note:
- Fewer reads per file: reads become more quickly available. However, too few reads per file means MinKNOW may not keep up with writing out files in real-time.
- More reads per file: reduces the number of files especially for amplicon/cDNA experiments that produce a large number of reads. Some downstream analysis tools may have an upper limit on the uploaded file size.
Basecalled output type:
Output file type can be selected between .FASTQ or .BAM files. The .FASTQ will be on as default if basecalling in real-time.
File output frequency can be adjusted for basecalled files based on two options:
| Based on time elapsed | Based on number of reads |
|---|---|
| Basecalled files can be produced: · every 1 minute (many small files) · every 10 minutes (many small files) · hourly (fewer larger files) · at the end of the run (single large file). | Basecalled files can be produced for specified read thresholds (number of reads). |
For barcoding runs, basecalled reads are split into files by barcode by default.
Gzip compression of FASTQ files is on by default of basecalled reads. Note: FASTQ Gzip files may prevent some downstream informatics applications.
Raw reads output options:
Raw reads: Raw reads output can be saved as POD5. This feature is disabled by default.
Note: Raw reads become enabled automatically if basecalling is disabled.
When raw reads are enabled, the default file output is POD5. This is a Nanopore-developed file format that stores Nanopore data efficiently, writes data faster, uses less compute and produces smaller raw data files. POD5 output generates files hourly.
Note: Support for FAST5 output has been discontinued from software version 25.09 onwards.
We recommend keeping the default settings.
Raw reads split by barcode: Raw read files generated in the POD5 format can now be split by barcode (if using one of our barcoding sequencing kits.
Please note, this feature is turned off by default.
Advanced User Options
Option to turn bulk file saving either on or off.
Note: This will result in much larger file sizes due to additional information about the run, which is used for debugging.

Choose the filtering options:
Filtering options can be used to determine which reads are classed into pass or fail files. These options may also be used to determine which predefined reads, read lengths and Qscore during basecalling can be split out in some live graphs.
Click the Edit icon to open the filtering options:

Use the GUI to alter Qscore and to define minimum and maximum readlength for a pass read, if required.

Click 'Start' to run the experiment.

You will be automatically navigated to the Sequencing Overview when sequencing starts.
From here, you will see a progress bar below the flow cell to show the progression of the sequencing script.
In some cases, the device will take a few minutes before starting a sequencing run if an alignment reference file is used. A progress bar will show the progress before sequencing begins.
Flow cell health will be displayed after the first pore scan.

Click on the flow cell to open the quick view and check the number of active pores. The first pore scan should report a similar number of active pores (within 10-15%) to that reported in the flow cell check.
Below are recommended troubleshooting tips if there are unexpected differences in pore numbers:
- If there is a significant reduction in active pores in the first pore scan, restart MinKNOW.
- If the numbers are still significantly different, close down the host computer and reboot.
- When the numbers are similar to those reported at the end of the flow cell check, restart the experiment. There is no need to load any additional library after the restart.
To stop the experiment during sequencing, click "Stop" using the run controls on the experiments page.
This is only necessary if you want to stop your run before the end of the set run time.

Confirm to stop experiment by clicking:
- Stop sequencing which will start catch-up basecalling
- or Stop sequencing and basecalling which will stop both sequencing and basecalling immediately.

Once sequencing is complete, generate a run report.
A run report containing information about the sequencing run and performance graphs can be generated manually by clicking Export run report and selecting which experiment to export to html.
Run reports are automatically generated for MinION Mk1B/Mk1D running on Linux. However, for MinION Mk1B running on Windows or Mac, the run reports need to be manually generated.
For more information about the run report, please see the Run report section of this document.
A pore activity CSV file is also generated for every run.
The report and CSV files are saved to the same folder as the FASTQ read files e.g. :\data\experiment\sample_ID\ for MinION Mk1B.

MinKNOW fallback folder
If writing out reads to your specified location fails (e.g. if the disk becomes full, or the connection is disrupted), the experiment will continue, and the reads will be written into a fallback folder:
Windows POD5 files: C:\data\reads\fallback (with the standard run data name sample ID as a folder) FASTQ files: C:\data\reads\fastq_fallback (with the standard run data name sample ID as a folder)
macOS: POD5 files: /Library/MinKNOW/data/fallback FASTQ files: /Library/MinKNOW/data/fastq_fallback
Linux: POD5 files: /var/lib/MinKNOW/data/fallback FASTQ files: /var/lib/MinKNOW/data/fastq_fallback
38. Starting a sequencing run on MinION Mk1C
There are two versions of the MinKNOW GUI on the MinION Mk1C
The MinKNOW GUI on the device:
The version of the Graphical User Interface (GUI) described in this document is the touch-screen configurable GUI.
The MinKNOW GUI via Wi-Fi or Ethernet connection from a laptop:
The GUI presented on the laptop when connected to the MinION Mk1C is the same as MinION Mk1B/Mk1D desktop MinKNOW GUI. See the MinION Mk1C user guide for how to use the Wi-Fi or wired connection from a device to the MinION Mk1C version of the MinKNOW GUI.
Click the 'Start Sequencing' option on the Start homepage to choose the running parameters for your experiment.

Type in experiment name, sample ID and choose flow cell type from the drop down menu.
Ensure the experiment name and sample ID does not contain any personally identifiable information.
Note: If sample ID is not filled in, there will be no sample ID in the folder structure.
To use previously saved settings, please see the "Save sequencing run settings" page of this protocol.
Select Continue to move to the Kit Selection page.

Select the kit and expansion(s) used to prepare the library.
One sequencing kit can be selected as well as one or more expansions. If a sequencing kit does not have any associated expansions, no expansion options will appear.
The filter options may be used to find the kit used. For example, click DNA to filter for DNA sequencing kits.
For control runs, click the Control checkbox to show control experiments available for the kits. This will automatically set the sequencing parameters for a control run. Note: The default run length is set to 6 hours for control experiments.
Click Continue to navigate to the run configuration page.

Default sequencing parameters
Click Continue to proceed to the run configuration page.
Default sequencing parameters will be pre-set.
For the majority of users and applications, we recommend keeping the default sequencing parameters unless you have a specific need to change them.
Experiment overview
At the top of the run configuration page you will see an overview of your experiment set-up and identifiers inlcuding:
- Experiment name: defined by user.
- Positions: Flow cell position(s) being used in the sequencing experiment, and the associated sample IDs for the position(s).
Note: If using multiple flow cells, click "show details" to open a window displaying all the positions used and the associated sample IDs. - Flow cell type: automatically detected by the MinKNOW software.
- Sequencing kit: the sequencing kit used for DNA/RNA library preparation, user-defined.

Choose your basecalling options:
The basecalling option is on by default to perform real-time basecalling. This can be switched off and basecalling performed post-sequencing.
Modified bases are disabled by default. These can be switched on to call base modifications including 5mC, 5hmC, and 6mA.
To specify your basecall model and modified bases, click the Edit icon to open basecalling options dialogue box.


When setting up an RNA sequencing run, you can choose the modified bases you wish to call, and also select an option for Poly(A) tail length estimation (these are off by default).

Basecall models
Basecalling models can be selected at two stages in the MinKNOW software:
- Real-time basecalling: A basecalling model can be selected when setting up a sequencing run on the "Run configuration" page of MinKNOW. This enables basecalling of the sequencing run in real-time.
- Post-run basecalling: Basecalling can be set up post-sequencing run on MinKNOW. Instructions can be found in the "Post-run basecalling" section of this protocol.
Dorado is the basecaller server in MinKNOW which provides multiple models for basecalling nanopore data.
There are three options for model selection in the drop down menu:
1. High-accuracy basecalling (HAC) - The HAC model is our default basecalling model and is recommended for most applications, including high-throughput projects focusing on variant analysis. It is able to keep up with a high-throughput sequencing experiment on a GridION or PromethION.
2. Super-accurate basecalling (SUP) - The SUP model is more computationally intensive than the HAC model and achieves the highest single-read accuracy. Recommended for de novo assembly projects and low-frequency variant analysis (e.g. somatic variation and single-cell applications).
3. Fast basecalling - This model is recommended for quick, real-time insights on sequencing data when compute resources are limited.
Note: GPU devices will basecall in near real-time; CPU devices, like a standard laptop for MinION Mk1B/Mk1D, will not maintain real-time basecalling.
Choose your barcoding options:
Barcoding options are only available when a barcoding sequencing kit or expansion has been selected. Barcoding can be switched off and performed post-sequencing.

To specify the barcoding options, click the Edit icon to open the barcoding options dialogue box. From here, barcode trimming and custom barcode selection can be defined.
By default, barcoding trimming is off. This can be enabled to remove barcodes from demultiplexed reads. Please note, some primer sequences may also be trimmed together with the barcodes.
By default, custom barcode selection is off. This can be enabled to only select for specified barcodes used in your library preparation for the current sequencing run.
Note: Specifying barcodes must be entered as:
- Individual numbers.
- Numbers separated by commas.
- Range of numbers separated by a dash.
- A combination of numbers and ranges, separated by commas.

Some sequencing kits place barcodes on both ends of the read. By default, the barcode both ends feature is off. If this feature is enabled, the barcode will only classified if a barcode above the minimum barcode score is present at both ends of the basecalled read.

Note: For barcoding to be performed during sequencing, basecalling must be enabled.
Choose your alignment options:
By default, alignment is turned off.

To use alignment during sequencing, upload an alignment reference file as a .fasta or .mmi file. We recommend uploading a reference locally on bacterial-sized genomes. Uploading a file can take a few minutes and is compute-dependent.
For standalone installations of MinKNOW, we recommend uploading the reference file to the following locations depending on which operating system is being used:
- Windows:
C:\data\ - Mac:
/Library/MinKNOW/data/ - Ubuntu
/var/lib/MinKNOW/data/
A reference file can contain multiple entries in the same file (e.g. multiple chromosomes) and alignment hits from these files are used to populate the alignment graphs which can be viewed on the GUI.
A BED file can also be uploaded alongside the reference when there is a specific interest in a particular region of the reference (e.g. specific gene in a chromosome). Alignment hits from BED files will be highlighted in the sequencing .txt file generated in the data folder. Click Edit options to open a dialogue box to upload a BED file.

BED files will be validated upon upload. If there is an error in the validation of the file, an error message will show linking to a web page with guidance on correcting the validation errors. 
Note: For alignment to be performed during sequencing, basecalling must be enabled.
Choose your adaptive sampling options:
By default, adaptive sampling is turned off.

Enabling adaptive sampling will allow you to enrich or deplete specific sequences from your aligned sequencing data. For our barcoding kits, the barcode balancing feature is also available using adaptive sampling through the "beta" features in MinKNOW. 
By default, all adaptive sampling reads, whether they are accepted or rejected, will be basecalled. If you would like to only basecall on-target reads and not rejected reads, set the Basecally on-target reads only toggle to On. If you enable raw data generation, rejected reads will still be written out but not basecalled.
More information on this feature can be found in our Adaptive sampling documentation.
Advanced User Options

Time between pore scans: The time between pore scans can be altered using this feature.
Reserved pore: The reserve pore feature prioritises consistency and accuracy over immediacy by reserving wells where voltages have dropped until later in the run, such that other wells can catch up. Switch off this feature to fully front-load sequence data acquisition.

Set up the data targets for your experiment:
This feature allows you to set up the rules to define when a sequencing run will stop. If multiple rules are set up, the first rule met will stop the run.
Click the Edit icon to open the options.

Run limit
This rule must be defined based on run time length in hours or when a flow cell is end of life and has no more sequencing pores available.
Use the drop-down menu to choose:
- "Time equals" and hours
- or "Flow cell is" which will automatically be set as "End of life".

Flow cell data target
This rule can be used to define a target amount of data to reach before a sequencing run is stopped. This can be specified for either estimated or basecalled bases and your data target will be available to view on the experiment graphs to allow you to monitor data progress.
Please note, basecalling must keep up with data output in real-time. If the device or basecall model will not keep up and reach the target output before the run limit rule is met, we recommend using the "Estimated bases" option. However, if your experiment will not reach the target data before the end of the experiment as defined by the run limit rule, you will be warned by the UI.
Use the drop-down menu to select for "Estimated bases equal" or "Basecalled bases equal" and input the value in either Gb or Mb.

Select the output options:
The output section provides variables for data output including file name, location and format.
Click the Edit icon to open the options.

Output settings:

Data saved as:
Check the name of the output file for the data.
Output location:
Confirm the location for the output data file. Click the file path name to open a pop-up to alter file path or create a new file.
Click Choose location on the pop-up to confirm new file location.
Output location storage capacity:
A bar indicator is displayed below the selected data output file location. This bar will display red when the disk space used reaches more than 80% of the total available disk space. Otherwise, the bar will display green. Below the bar, you can see how much drive space is available.

Basecalled output options:
Confirm output file type and file compression using the checkboxes.
Note: Below, reads per file can be changed for both raw reads and basecalled reads, but take note:
- Fewer reads per file: reads become more quickly available. However, too few reads per file means MinKNOW may not keep up with writing out files in real-time.
- More reads per file: reduces the number of files especially for amplicon/cDNA experiments that produce a large number of reads. Some downstream analysis tools may have an upper limit on the uploaded file size.
Basecalled output type:
Output file type can be selected between FASTQ or BAM files. The FASTQ will be on as default if basecalling in real-time.
File output frequency can be adjusted for basecalled files based on two options:
| Based on time elapsed | Based on number of reads |
|---|---|
| Basecalled files can be produced: · every 1 minute (many small files) · every 10 minutes (many small files) · hourly (fewer larger files) · at the end of the run (single large file). | Basecalled files can be produced for specified read thresholds (number of reads). |
For barcoding runs, basecalled reads are split into files by barcode by default.
Gzip compression of FASTQ files is on by default of basecalled reads. Note: FASTQ Gzip files may prevent some downstream informatics applications.
Raw reads output options:
Raw reads: Raw reads output can be saved as POD5 files. This feature is disabled by default.
When raw reads are enabled, the default file output is POD5. This Nanopore-developed file format stores sequencing data efficiently, writes data quickly, uses less compute, and produces smaller raw data files. POD5 output generates files hourly.
We recommend keeping the default settings.
Raw reads split by barcode: Raw read files generated in the POD5 format can be split by barcode (if using one of our barcoding sequencing kits.
Please note, this feature is turned off by default.
Advanced User Options
Option to turn bulk file saving either on or off.
Note: This will result in much larger file sizes due to additional information about the run, which is used for debugging.

Choose the filtering options:
Filtering options can be used to determine which reads are classed into pass or fail files. These options may also be used to determine which predefined reads, read lengths and Qscore during basecalling can be split out in some live graphs.
Click the Edit icon to open the filtering options:

Use the GUI to alter Qscore and to define minimum and maximum readlength for a pass read, if required.

Click 'Start' to run the experiment.

You will be automatically navigated to the Sequencing Overview when sequencing starts.
From here, you can see a progress bar below the flow cell to show the progression of the sequencing script.
In some cases, the device will take a few minutes before starting a sequencing run if an alignment reference file is used. A progress bar will show the progress before sequencing begins.
Flow cell health will be displayed after the first pore scan.

Click on the flow cell to open the quick view and check the number of active pores. The first pore scan should report a similar number of active pores (within 10-15%) to that reported in the flow cell check.
Below are recommended troubleshooting tips if there are unexpected differences in pore numbers:
- If there is a significant reduction in active pores in the first pore scan, restart MinKNOW.
- If the numbers are still significantly different, close down the host computer and reboot.
- When the numbers are similar to those reported at the end of the flow cell check, restart the experiment. There is no need to load any additional library after the restart.
To stop the experiment, click 'Stop' on the experiments page.
This is only necessary if you want to stop your run before the end of the set run time.

Confirm to stop experiment by clicking:
- Stop sequencing which will start catch-up basecalling
- or Stop sequencing and basecalling which will stop both sequencing and basecalling immediately.

Once sequencing is complete, generate a run report.
A run report containing information about the sequencing run and performance graphs are automatically generated but can be generated manually by clicking Export run report and selecting which experiment to export to html.
For more information about the run report, please see the Run report section of this document.
A pore activity CSV file is also generated for every run.
The report and CSV files are saved to the same folder as the FASTQ read files e.g. :\data\experiment\sample_ID\ for MinION Mk1B.

MinKNOW fallback folder
If writing out reads to your specified location fails (e.g. if the disk becomes full, or the connection is disrupted), the experiment will continue, and the reads will be written into a fallback folder:
Windows POD5 files: C:\data\reads\fallback (with the standard run data name sample ID as a folder)
FASTQ files: C:\data\reads\fastq_fallback (with the standard run data name sample ID as a folder)
macOS: POD5 files: /Library/MinKNOW/data/fallback
FASTQ files: /Library/MinKNOW/data/fastq_fallback
Linux: POD5 files: /var/lib/MinKNOW/data/fallback
FASTQ files: /var/lib/MinKNOW/data/fastq_fallback
39. Starting a sequencing run on GridION
Click 'Start Sequencing' on the Start page to set up the sequencing parameters for your experiment.

When running multiple flow cells simultaneously, it may be preferred to upload sample names and corresponding flow cell positions from a CSV file, rather than manually.
Please see Sample sheet upload for instructions.
Type in the experiment name and sample ID and choose flow cell type from the drop down menu.
Ensure the experiment name and sample ID does not contain any personally identifiable information.
Note: If sample ID is not filled in, there will be no sample ID in the folder structure.
Select Continue to move to the Kit Selection page.

Select the kit and expansion(s) used to prepare the library.
One sequencing kit can be selected as well as one or more expansions. If a sequencing kit does not have any associated expansions, no expansion options will appear.
The filter options may be used to find the kit used. For example, click DNA to filter for DNA sequencing kits.
For control runs, click the Control checkbox to show control experiments available for the kits. This will automatically set the sequencing parameters for a control run. Note: The default run length is set to 6 hours for control experiments.
Click Continue to navigate to the run configuration page.

Default sequencing parameters
Click Continue to proceed to the run configuration page.
Default sequencing parameters will be pre-set.
For the majority of users and applications, we recommend keeping the default sequencing parameters unless you have a specific need to change them.
Experiment overview
At the top of the run configuration page you will see an overview of your experiment set-up and identifiers inlcuding:
- Experiment name: defined by user.
- Positions: Flow cell position(s) being used in the sequencing experiment, and the associated sample IDs for the position(s).
Note: If using multiple flow cells, click "show details" to open a window displaying all the positions used and the associated sample IDs. - Flow cell type: automatically detected by the MinKNOW software.
- Sequencing kit: the sequencing kit used for DNA/RNA library preparation, user-defined.

Choose your basecalling options:
The basecalling option is on by default to perform real-time basecalling. This can be switched off and basecalling performed post-sequencing.
Note: If basecalling is disabled, barcoding and alignment will not be performed during sequencing. In this case, raw reads will be enabled automatically.
Modified bases are disabled by default. These can be switched on to call base modifications including 5mC, 5hmC, and 6mA.
To specify your basecall model and modified bases, click the Edit icon to open basecalling options dialogue box.


When setting up an RNA sequencing run, you can choose the modified bases you wish to call, and also select an option for Poly(A) tail length estimation (these are off by default).

Basecall models
Basecalling models can be selected at two stages in the MinKNOW software:
- Real-time basecalling: A basecalling model can be selected when setting up a sequencing run on the "Run configuration" page of MinKNOW. This enables basecalling of the sequencing run in real-time.
- Post-run basecalling: Basecalling can be set up post-sequencing run on MinKNOW. Instructions can be found in the "Post-run basecalling" section of this protocol.
Dorado is the basecaller server in MinKNOW which provides multiple models for basecalling nanopore data.
There are three options for model selection in the drop down menu:
1. High-accuracy basecalling (HAC) - The HAC model is our default basecalling model and is recommended for most applications, including high-throughput projects focusing on variant analysis. It is able to keep up with a high-throughput sequencing experiment on a GridION or PromethION.
2. Super-accurate basecalling (SUP) - The SUP model is more computationally intensive than the HAC model and achieves the highest single-read accuracy. Recommended for de novo assembly projects and low-frequency variant analysis (e.g. somatic variation and single-cell applications).
3. Fast basecalling - This model is recommended for quick, real-time insights on sequencing data when compute resources are limited.
Note: GPU devices will basecall in near real-time; CPU devices, like a standard laptop for MinION Mk1B/Mk1D, will not maintain real-time basecalling.
Choose your barcoding options:
Barcoding options are only available when a barcoding sequencing kit or expansion has been selected. Barcoding can be switched off and performed post-sequencing.

To specify the barcoding options, click the Edit icon to open the barcoding options dialogue box. From here, barcode trimming and custom barcode selection can be defined.
By default, barcoding trimming is off. This can be enabled to remove barcodes from demultiplexed reads. Please note, some primer sequences may also be trimmed together with the barcodes.
By default, custom barcode selection is off. This can be enabled to only select for specified barcodes used in your library preparation for the current sequencing run.
Note: Specifying barcodes must be entered as:
- Individual numbers.
- Numbers separated by commas.
- Range of numbers separated by a dash.
- A combination of numbers and ranges, separated by commas.

Some sequencing kits place barcodes on both ends of the read. By default, the barcode both ends feature is off. If this feature is enabled, the barcode will only classified if a barcode above the minimum barcode score is present at both ends of the basecalled read.

Note: For barcoding to be performed during sequencing, basecalling must be enabled.
Choose your alignment options:
Alignment is turned off by default.

To use alignment during sequencing, upload an alignment reference file as a .fasta or .mmi file. We recommend uploading a reference locally on bacterial-sized genomes. Uploading a file can take a few minutes and is compute-dependent.
We recommend uploading the reference file to /data/ .
A reference file can contain multiple entries in the same file (e.g. multiple chromosomes) and alignment hits from these files are used to populate the alignment graphs which can be viewed on the GUI.
A BED file can also be uploaded alongside the reference when there is a specific interest in a particular region of the reference (e.g. specific gene in a chromosome). Alignment hits from BED files will be highlighted in the sequencing .txt file generated in the data folder. Click Edit options to open a dialogue box to upload a BED file.

BED files will be validated upon upload. If there is an error in the validation of the file, an error message will show linking to a web page with guidance on correcting the validation errors. 
Note: For alignment to be performed during sequencing, basecalling must be enabled.
Choose your adaptive sampling options:
By default, adaptive sampling is turned off.

Enabling adaptive sampling will allow you to enrich or deplete specific sequences from your aligned sequencing data.
By default, all adaptive sampling reads, whether they are accepted or rejected, will be basecalled. If you would like to only basecall on-target reads and not rejected reads, set the Basecally on-target reads only toggle to On. If you enable raw data generation, rejected reads will still be written out but not basecalled.
More information on this feature can be found in our Adaptive sampling documentation.
Advanced User Options

Time between pore scans: The time between pore scans can be altered using this feature.
Reserved pore: The reserve pore feature prioritises consistency and accuracy over immediacy by reserving wells where voltages have dropped until later in the run, such that other wells can catch up. Switch off this feature to fully front-load sequence data acquisition.

Set up the data targets for your experiment:
This feature allows you to set up the rules to define when a sequencing run will stop. If multiple rules are set up, the first rule met will stop the run.
Click the Edit icon to open the options.

Run limit
This rule must be defined based on run time length in hours or when a flow cell is end of life and has no more sequencing pores available.
Use the drop-down menu to choose:
- "Time equals" and hours
- or "Flow cell is" which will automatically be set as "End of life".

Flow cell data target
This rule can be used to define a target amount of data to reach before a sequencing run is stopped. This can be specified for either estimated or basecalled bases and your data target will be available to view on the experiment graphs to allow you to monitor data progress.
Please note, basecalling must keep up with data output in real-time. If the device or basecall model will not keep up and reach the target output before the run limit rule is met, we recommend using the "Estimated bases" option. However, if your experiment will not reach the target data before the end of the experiment as defined by the run limit rule, you will be warned by the UI.
Use the drop-down menu to select for "Estimated bases equal" or "Basecalled bases equal" and input the value in either Gb or Mb. Alternatively, select "Coverage equals", "Barcode coverage equals", “Total read count equals” or “All barcode read counts equal“.

The “Barcode coverage equals” rule replaces the barcode balancing beta feature. This feature uses adaptive sampling to reject barcodes that have already reached the specified coverage threshold, allowing the barcodes that have not yet reached the coverage target to be sequenced preferentially. The sequencing run will then continue until the specified barcode coverage is reached across all barcodes. If the run does not achieve this coverage, it will stop when the other run limit target (either time-based or flow cell end of life) is reached.
Choose your analysis workflow options:
By default, the analysis workflow option is turned off.

To enable this feature, switch the Workflow toggle on. Select a workflow to add to your experiment and click 'Select workflow' to continue.

From the Review workflow settings window, you can select from the Workflow options and import Human genome reference files. To use the Methylation sub-workflow, Modified base calls must be enabled.

Input options are limited in comparison to the EPI2ME desktop application. The desktop version should be used to access advanced options. It is recommended that only one workflow is run at a time. The workflow outputs a VCF file which will be saved to the experiment directory. When the workflow is complete, a link to the workflow report will appear in the MinKNOW experiments page.
Select the output options:
The output section provides variables for data output including file name, location and format.
Click the Edit icon to open the options.

Output settings:

Data saved as:
Check the name of the output file for the data.
Output location:
Confirm the location for the output data file. Click the file path name to open a pop-up to alter file path or create a new file.
Click Choose location on the pop-up to confirm new file location.
Output location storage capacity:
A bar indicator is displayed below the selected data output file location. This bar will display red when the disk space used reaches more than 80% of the total available disk space. Otherwise, the bar will display green. Below the bar, you can see how much drive space is available.

Basecalled output options:
Confirm output file type and file compression using the checkboxes.
Note: Below, reads per file can be changed for both raw reads and basecalled reads, but take note:
- Fewer reads per file: reads become more quickly available. However, too few reads per file means MinKNOW may not keep up with writing out files in real-time.
- More reads per file: reduces the number of files especially for amplicon/cDNA experiments that produce a large number of reads. Some downstream analysis tools may have an upper limit on the uploaded file size.
Basecalled output type:
Output file type can be selected between .FASTQ or .BAM files. The .FASTQ will be on as default if basecalling in real-time.
File output frequency can be adjusted for basecalled files based on two options:
| Based on time elapsed | Based on number of reads |
|---|---|
| Basecalled files can be produced: · every 1 minute (many small files) · every 10 minutes (many small files) · hourly (fewer larger files) · at the end of the run (single large file). | Basecalled files can be produced for specified read thresholds (number of reads). |
For barcoding runs, basecalled reads are split into files by barcode by default.
Gzip compression of FASTQ files is on by default of basecalled reads. Note: FASTQ Gzip files may prevent some downstream informatics applications.
Raw reads output options:
Raw reads: Raw reads output can be saved as POD5 files. This feature is disabled by default.
Note: Raw reads become enabled automatically if basecalling is disabled.
When raw reads are enabled, the default file output is POD5. This Nanopore-developed file format stores sequencing data efficiently, writes data quickly, uses less compute, and produces smaller raw data files. POD5 output generates files hourly.
Note: Support for FAST5 output has been discontinued from software version 25.09 onwards.
We recommend keeping the default settings.
Raw reads split by barcode: Raw read files generated in the POD5 format can now be split by barcode (if using one of our barcoding sequencing kits.
Please note, this feature is turned off by default.
Data pooling:
This option is only available when two or more flow cells are being run simultaneously.
To enable data pooling, set the Combine all run output toggle to On under the Data pooling heading in the Output settings window.
Note: The Join experiment function cannot be used with data pooling runs. In order to combine multiple flow cells into one output folder, all flow cells must be started at the same time with the data pooling option selected during run setup.
Advanced User Options
Option to turn bulk file saving either on or off.
Note: This will result in much larger file sizes due to additional information about the run, which is used for debugging.

Choose the filtering options:
Filtering options can be used to determine which reads are classed into pass or fail files. These options may also be used to determine which predefined reads, read lengths and Qscore during basecalling can be split out in some live graphs.
Click the Edit icon to open the filtering options:

Use the GUI to alter Qscore and to define minimum and maximum readlength for a pass read, if required.

Click 'Start' to run the experiment.

You will be automatically navigated to the Sequencing Overview when sequencing starts.
From here, you can see a progress bar below the flow cell to show the progression of the sequencing script.
In some cases, the device will take a few minutes before starting a sequencing run if an alignment reference file is used. A progress bar will show the progress before sequencing begins.
Flow cell health will be displayed after the first pore scan.

Click on the flow cell to open the quick view and check the number of active pores. The first pore scan should report a similar number of active pores (within 10-15%) to that reported in the flow cell check.
Below are recommended troubleshooting tips if there are unexpected differences in pore numbers:
- If there is a significant reduction in active pores in the first pore scan, restart MinKNOW.
- If the numbers are still significantly different, close down the host computer and reboot.
- When the numbers are similar to those reported at the end of the flow cell check, restart the experiment. There is no need to load any additional library after the restart.
To stop the experiment during sequencing, click "Stop" using the run controls on the experiments page.
This is only necessary if you want to stop your run before the end of the set run time.

Confirm to stop experiment by clicking:
- Stop sequencing which will start catch-up basecalling
- or Stop sequencing and basecalling which will stop both sequencing and basecalling immediately.

Once sequencing is complete, generate a run report.
A run report containing information about the sequencing run and performance graphs are automatically generated. To manually generate a run report, click Export run report and selecting which experiment to export to html.
For more information about the run report, please see the Run report section of this document.
A pore activity CSV file is also generated for every run.
The report and CSV files are saved to the same folder as the FASTQ read files e.g. :\data\experiment\sample_ID\ for MinION Mk1B.

MinKNOW fallback folder
If writing out reads to your specified location fails (e.g. if the disk becomes full, or the connection is disrupted), the experiment will continue, and the reads will be written into a fallback folder:
Windows POD5 files: C:\data\reads\fallback (with the standard run data name sample ID as a folder) FASTQ files: C:\data\reads\fastq_fallback (with the standard run data name sample ID as a folder)
macOS: POD5 files: /Library/MinKNOW/data/fallback FASTQ files: /Library/MinKNOW/data/fastq_fallback
Linux: POD5 files: /var/lib/MinKNOW/data/fallback FASTQ files: /var/lib/MinKNOW/data/fastq_fallback
40. Starting a sequencing run on PromethION 24 and 48
Click 'Start Sequencing' on the Start page to set up the sequencing parameters for your experiment.

When running multiple flow cells simultaneously, it may be preferred to upload sample names and corresponding flow cell positions from a CSV file, rather than manually.
Please see Sample sheet upload for instructions.
Type in the experiment name, sample ID and choose flow cell type from the drop down menu.
Select Continue to move to the Kit Selection page.
Ensure the experiment name and sample ID does not contain any personally identifiable information.
To use previously saved settings, please see the "Save sequencing run settings" page of this protocol.
Use "Select all available" to select all the connected flow cells or use the diagram above to select specific flow cells for an experiment.
Note: If sample ID is not filled in, there will be no sample ID in the folder structure.

Select the kit and expansion(s) used to prepare the library.
One sequencing kit can be selected as well as one or more expansions. If a sequencing kit does not have any associated expansions, no expansion options will appear.
The filter options may be used to find the kit used. For example, click DNA to filter for DNA sequencing kits.
For control runs, click the Control checkbox to show control experiments available for the kits. This will automatically set the sequencing parameters for a control run. Note: The default run length is set to 6 hours for control experiments.
Click Continue to navigate to the run configuration page.

Default sequencing parameters
Click Continue to proceed to the run configuration page.
Default sequencing parameters will be pre-set.
For the majority of users and applications, we recommend keeping the default sequencing parameters unless you have a specific need to change them.
Experiment overview
At the top of the run configuration page you will see an overview of your experiment set-up and identifiers inlcuding:
- Experiment name: defined by user.
- Positions: Flow cell position(s) being used in the sequencing experiment, and the associated sample IDs for the position(s).
Note: If using multiple flow cells, click "show details" to open a window displaying all the positions used and the associated sample IDs. - Flow cell type: automatically detected by the MinKNOW software.
- Sequencing kit: the sequencing kit used for DNA/RNA library preparation, user-defined.

Choose your basecalling options:
The basecalling option is on by default to perform real-time basecalling. This can be switched off and basecalling performed post-sequencing.
Note: If basecalling is disabled, barcoding and alignment will not be performed during sequencing. In this case, raw reads will be enabled automatically.
Modified bases are disabled by default. These can be switched on to call base modifications including 5mC, 5hmC, and 6mA.
To specify your basecall model and modified bases, click the Edit icon to open basecalling options dialogue box.


When setting up an RNA sequencing run, you can choose the modified bases you wish to call, and also select an option for Poly(A) tail length estimation (these are off by default).

Basecall models
Basecalling models can be selected at two stages in the MinKNOW software:
- Real-time basecalling: A basecalling model can be selected when setting up a sequencing run on the "Run configuration" page of MinKNOW. This enables basecalling of the sequencing run in real-time.
- Post-run basecalling: Basecalling can be set up post-sequencing run on MinKNOW. Instructions can be found in the "Post-run basecalling" section of this protocol.
Dorado is the basecaller server in MinKNOW which provides multiple models for basecalling nanopore data.
There are three options for model selection in the drop down menu:
1. High-accuracy basecalling (HAC) - The HAC model is our default basecalling model and is recommended for most applications, including high-throughput projects focusing on variant analysis. It is able to keep up with a high-throughput sequencing experiment on a GridION or PromethION.
2. Super-accurate basecalling (SUP) - The SUP model is more computationally intensive than the HAC model and achieves the highest single-read accuracy. Recommended for de novo assembly projects and low-frequency variant analysis (e.g. somatic variation and single-cell applications).
3. Fast basecalling - This model is recommended for quick, real-time insights on sequencing data when compute resources are limited.
Note: GPU devices will basecall in near real-time; CPU devices, like a standard laptop for MinION Mk1B/Mk1D, will not maintain real-time basecalling.
Choose your barcoding options:
Barcoding options are only available when a barcoding sequencing kit or expansion has been selected. Barcoding can be switched off and performed post-sequencing.

To specify the barcoding options, click the Edit icon to open the barcoding options dialogue box. From here, barcode trimming and custom barcode selection can be defined.
By default, barcoding trimming is off. This can be enabled to remove barcodes from demultiplexed reads. Please note, some primer sequences may also be trimmed together with the barcodes.
By default, custom barcode selection is off. This can be enabled to only select for specified barcodes used in your library preparation for the current sequencing run.
Note: Specifying barcodes must be entered as:
- Individual numbers.
- Numbers separated by commas.
- Range of numbers separated by a dash.
- A combination of numbers and ranges, separated by commas.

Some sequencing kits place barcodes on both ends of the read. By default, the barcode both ends feature is off. If this feature is enabled, the barcode will only classified if a barcode above the minimum barcode score is present at both ends of the basecalled read.

Note: For barcoding to be performed during sequencing, basecalling must be enabled.
Choose your alignment options:
By default, alignment is turned off.

To use alignment during sequencing, upload an alignment reference file as a .fasta or .mmi file. We recommend uploading a reference locally on bacterial-sized genomes. Uploading a file can take a few minutes and is compute-dependent.
We recommend uploading the reference file to /data/ .
A reference file can contain multiple entries in the same file (e.g. multiple chromosomes) and alignment hits from these files are used to populate the alignment graphs which can be viewed on the GUI.
A BED file can also be uploaded alongside the reference when there is a specific interest in a particular region of the reference (e.g. specific gene in a chromosome). Alignment hits from BED files will be highlighted in the sequencing .txt file generated in the data folder. Click Edit options to open a dialogue box to upload a BED file.

BED files will be validated upon upload. If there is an error in the validation of the file, an error message will show linking to a web page with guidance on correcting the validation errors. 
Note: For alignment to be performed during sequencing, basecalling must be enabled.
Choose your adaptive sampling options:
By default, adaptive sampling is turned off.

Enabling adaptive sampling will allow you to enrich or deplete specific sequences from your aligned sequencing data.
By default, all adaptive sampling reads, whether they are accepted or rejected, will be basecalled. If you would like to only basecall on-target reads and not rejected reads, set the Basecally on-target reads only toggle to On. If you enable raw data generation, rejected reads will still be written out but not basecalled.
More information on this feature can be found in our Adaptive sampling documentation.
Advanced User Options

Time between pore scans: The time between pore scans can be altered using this feature.
Reserved pore: The reserve pore feature prioritises consistency and accuracy over immediacy by reserving wells where voltages have dropped until later in the run, such that other wells can catch up. Switch off this feature to fully front-load sequence data acquisition.

Set up the data targets for your experiment:
This feature allows you to set up the rules to define when a sequencing run will stop. If multiple rules are set up, the first rule met will stop the run.
Click the Edit icon to open the options.

Run limit
This rule must be defined based on run time length in hours or when a flow cell is end of life and has no more sequencing pores available.
Use the drop-down menu to choose:
- "Time equals" and hours
- or "Flow cell is" which will automatically be set as "End of life".

Flow cell data target
This rule can be used to define a target amount of data to reach before a sequencing run is stopped. This can be specified for either estimated or basecalled bases and your data target will be available to view on the experiment graphs to allow you to monitor data progress.
Please note, basecalling must keep up with data output in real-time. If the device or basecall model will not keep up and reach the target output before the run limit rule is met, we recommend using the "Estimated bases" option. However, if your experiment will not reach the target data before the end of the experiment as defined by the run limit rule, you will be warned by the UI.
Use the drop-down menu to select for "Estimated bases equal" or "Basecalled bases equal" and input the value in either Gb or Mb. Alternatively, select "Coverage equals", "Barcode coverage equals", “Total read count equals” or “All barcode read counts equal“.

The “Barcode coverage equals” rule replaces the barcode balancing beta feature. This feature uses adaptive sampling to reject barcodes that have already reached the specified coverage threshold, allowing the barcodes that have not yet reached the coverage target to be sequenced preferentially. The sequencing run will then continue until the specified barcode coverage is reached across all barcodes. If the run does not achieve this coverage, it will stop when the other run limit target (either time-based or flow cell end of life) is reached.
Choose your analysis workflow options:
By default, the analysis workflow option is turned off.

To enable this feature, switch the Workflow toggle on. Select a workflow to add to your experiment and click 'Select workflow' to continue.

From the Review workflow settings window, you can select from the Workflow options and import Human genome reference files. To use the Methylation sub-workflow, Modified base calls must be enabled.

Input options are limited in comparison to the EPI2ME desktop application. The desktop version should be used to access advanced options. It is recommended that only one workflow is run at a time. The workflow outputs a VCF file which will be saved to the experiment directory. When the workflow is complete, a link to the workflow report will appear in the MinKNOW experiments page.
Select the output options:
The output section provides variables for data output including file name, location and format.
Click the Edit icon to open the options.

Output settings:

Data saved as:
Check the name of the output file for the data.
Output location:
Confirm the location for the output data file. Click the file path name to open a pop-up to alter file path or create a new file.
Click Choose location on the pop-up to confirm new file location.
Output location storage capacity:
A bar indicator is displayed below the selected data output file location. This bar will display red when the disk space used reaches more than 80% of the total available disk space. Otherwise, the bar will display green. Below the bar, you can see how much drive space is available.

Basecalled output options:
Confirm output file type and file compression using the checkboxes.
Note: Below, reads per file can be changed for both raw reads and basecalled reads, but take note:
- Fewer reads per file: reads become more quickly available. However, too few reads per file means MinKNOW may not keep up with writing out files in real-time.
- More reads per file: reduces the number of files especially for amplicon/cDNA experiments that produce a large number of reads. Some downstream analysis tools may have an upper limit on the uploaded file size.
Basecalled output type:
Output file type can be selected between .FASTQ or .BAM files. The .FASTQ will be on as default if basecalling in real-time.
File output frequency can be adjusted for basecalled files based on two options:
| Based on time elapsed | Based on number of reads |
|---|---|
| Basecalled files can be produced: · every 1 minute (many small files) · every 10 minutes (many small files) · hourly (fewer larger files) · at the end of the run (single large file). | Basecalled files can be produced for specified read thresholds (number of reads). |
For barcoding runs, basecalled reads are split into files by barcode by default.
Gzip compression of FASTQ files is on by default of basecalled reads. Note: FASTQ Gzip files may prevent some downstream informatics applications.
Raw reads output options:
Raw reads: Raw reads output can be saved as POD5. This feature is disabled by default.
Note: Raw reads become enabled automatically if basecalling is disabled.
When raw reads are enabled, the default file output is POD5. This Nanopore-developed file format stores sequencing data efficiently, writes data quickly, uses less compute, and produces smaller raw data files. POD5 output generates files hourly.
Note: Support for FAST5 output has been discontinued from software version 25.09 onwards.
We recommend keeping the default settings.
Raw reads split by barcode: Raw read files generated in the POD5 format can now be split by barcode (if using one of our barcoding sequencing kits.
Please note, this feature is turned off by default.
Data pooling:
This option is only available when two or more flow cells are being run simultaneously.
To enable data pooling, set the Combine all run output toggle to On under the Data pooling heading in the Output settings window.
Note: The Join experiment function cannot be used with data pooling runs. In order to combine multiple flow cells into one output folder, all flow cells must be started at the same time with the data pooling option selected during run setup.
Advanced User Options
Option to turn bulk file saving either on or off.
Note: This will result in much larger file sizes due to additional information about the run, which is used for debugging.

Choose the filtering options:
Filtering options can be used to determine which reads are classed into pass or fail files. These options may also be used to determine which predefined reads, read lengths and Qscore during basecalling can be split out in some live graphs.
Click the Edit icon to open the filtering options:

Use the GUI to alter Qscore and to define minimum and maximum readlength for a pass read, if required.

Click 'Start' to run the experiment.

You will be automatically navigated to the Sequencing Overview when sequencing starts.
From here, you can see a progress bar below each flow cell to show progression of the sequencing script.
In some cases, the device will take a few minutes before starting a sequencing run if an alignment reference file is used. A progress bar will show the progress before sequencing begins.
Flow cell health will be displayed after the first channel scan.

Click on the flow cell to open the quick view and check the number of active pores. The first pore scan should report a similar number of active pores (within 10-15%) to that reported in the flow cell check.
Below are recommended troubleshooting tips if there are unexpected differences in pore numbers:
- If there is a significant reduction in active pores in the first pore scan, restart MinKNOW.
- If the numbers are still significantly different, close down the host computer and reboot.
- When the numbers are similar to those reported at the end of the flow cell check, restart the experiment. There is no need to load any additional library after the restart.
To stop the experiment during sequencing, click "Stop" using the run controls on the experiments page.
This is only necessary if you want to stop your run before the end of the set run time.

Confirm to stop experiment by clicking:
- Stop sequencing which will start catch-up basecalling
- or Stop sequencing and basecalling which will stop both sequencing and basecalling immediately.

Once sequencing is complete, generate a run report.
A run report containing information about the sequencing run and performance graphs are automatically generated but can be generated manually by clicking Export run report and selecting which experiment to export to html.
For more information about the run report, please see the Run report section of this document.
A pore activity CSV file is also generated for every run.
The report and CSV files are saved to the same folder as the FASTQ read files e.g. :\data\experiment\sample_ID\ for MinION Mk1B.

MinKNOW fallback folder
If writing out reads to your specified location fails (e.g. if the disk becomes full, or the connection is disrupted), the experiment will continue, and the reads will be written into a fallback folder:
Windows .POD5 files: C:\data\reads\fallback (with the standard run data name sample ID as a folder) FASTQ files: C:\data\reads\fastq_fallback (with the standard run data name sample ID as a folder)
macOS: .POD5 files: /Library/MinKNOW/data/fallback FASTQ files: /Library/MinKNOW/data/fastq_fallback
Linux: .POD5 files: /var/lib/MinKNOW/data/fallback FASTQ files: /var/lib/MinKNOW/data/fastq_fallback
41. Starting a sequencing run on PromethION 2 Solo
Click 'Start Sequencing' on the Start page to set up the sequencing parameters for your experiment.

When running multiple flow cells simultaneously, it may be preferred to upload sample names and corresponding flow cell positions from a CSV file, rather than manually.
Please see Sample sheet upload for instructions.
Type in the experiment name, sample ID and choose flow cell type from the drop down menu.
Select Continue to move to the Kit Selection page.
Ensure the experiment name and sample ID does not contain any personally identifiable information.
To use previously saved settings, please see the "Save sequencing run settings" page of this protocol.
Use "Select all available" to select all the connected flow cells or use the diagram above to select specific flow cells for an experiment.
Note: If sample ID is not filled in, there will be no sample ID in the folder structure.

Select the kit and expansion(s) used to prepare the library.
One sequencing kit can be selected as well as one or more expansions. If a sequencing kit does not have any associated expansions, no expansion options will appear.
The filter options may be used to find the kit used. For example, click DNA to filter for DNA sequencing kits.
For control runs, click the Control checkbox to show control experiments available for the kits. This will automatically set the sequencing parameters for a control run. Note: The default run length is set to 6 hours for control experiments.
Click Continue to navigate to the run configuration page.

Default sequencing parameters
Click Continue to proceed to the run configuration page.
Default sequencing parameters will be pre-set.
For the majority of users and applications, we recommend keeping the default sequencing parameters unless you have a specific need to change them.
Experiment overview
At the top of the run configuration page you will see an overview of your experiment set-up and identifiers inlcuding:
- Experiment name: defined by user.
- Positions: Flow cell position(s) being used in the sequencing experiment, and the associated sample IDs for the position(s).
Note: If using multiple flow cells, click "show details" to open a window displaying all the positions used and the associated sample IDs. - Flow cell type: automatically detected by the MinKNOW software.
- Sequencing kit: the sequencing kit used for DNA/RNA library preparation, user-defined.

Choose your basecalling options:
The basecalling option is on by default to perform real-time basecalling. This can be switched off and basecalling performed post-sequencing.
Note: If basecalling is disabled, barcoding and alignment will not be performed during sequencing.
Modified bases are disabled by default. These can be switched on to call base modifications including 5mC, 5hmC, and 6mA.
To specify your basecall model and modified bases, click the Edit icon to open basecalling options dialogue box.


When setting up an RNA sequencing run, you can choose the modified bases you wish to call, and also select an option for Poly(A) tail length estimation (these are off by default).

Basecall models
Basecalling models can be selected at two stages in the MinKNOW software:
- Real-time basecalling: A basecalling model can be selected when setting up a sequencing run on the "Run configuration" page of MinKNOW. This enables basecalling of the sequencing run in real-time.
- Post-run basecalling: Basecalling can be set up post-sequencing run on MinKNOW. Instructions can be found in the "Post-run basecalling" section of this protocol.
Dorado is the basecaller server in MinKNOW which provides multiple models for basecalling nanopore data.
There are three options for model selection in the drop down menu:
1. High-accuracy basecalling (HAC) - The HAC model is our default basecalling model and is recommended for most applications, including high-throughput projects focusing on variant analysis. It is able to keep up with a high-throughput sequencing experiment on a GridION or PromethION.
2. Super-accurate basecalling (SUP) - The SUP model is more computationally intensive than the HAC model and achieves the highest single-read accuracy. Recommended for de novo assembly projects and low-frequency variant analysis (e.g. somatic variation and single-cell applications).
3. Fast basecalling - This model is recommended for quick, real-time insights on sequencing data when compute resources are limited.
Note: GPU devices will basecall in near real-time; CPU devices, like a standard laptop for MinION Mk1B/Mk1D, will not maintain real-time basecalling.
Choose your barcoding options:
Barcoding options are only available when a barcoding sequencing kit or expansion has been selected. Barcoding can be switched off and performed post-sequencing.

To specify the barcoding options, click the Edit icon to open the barcoding options dialogue box. From here, barcode trimming and custom barcode selection can be defined.
By default, barcoding trimming is off. This can be enabled to remove barcodes from demultiplexed reads. Please note, some primer sequences may also be trimmed together with the barcodes.
By default, custom barcode selection is off. This can be enabled to only select for specified barcodes used in your library preparation for the current sequencing run.
Note: Specifying barcodes must be entered as:
- Individual numbers.
- Numbers separated by commas.
- Range of numbers separated by a dash.
- A combination of numbers and ranges, separated by commas.

Some sequencing kits place barcodes on both ends of the read. By default, the barcode both ends feature is off. If this feature is enabled, the barcode will only classified if a barcode above the minimum barcode score is present at both ends of the basecalled read.

Note: For barcoding to be performed during sequencing, basecalling must be enabled.
Choose your alignment options:
By default, alignment is turned off.

To use alignment during sequencing, upload an alignment reference file as a .fasta or .mmi file. We recommend uploading a reference locally on bacterial-sized genomes. Uploading a file can take a few minutes and is compute-dependent.
For standalone installations of MinKNOW, we recommend uploading the reference file to the following locations depending on which operating system is being used:
- Windows:
C:\data\ - Mac:
/Library/MinKNOW/data/ - Ubuntu
/var/lib/MinKNOW/data/
A reference file can contain multiple entries in the same file (e.g. multiple chromosomes) and alignment hits from these files are used to populate the alignment graphs which can be viewed on the GUI.
A BED file can also be uploaded alongside the reference when there is a specific interest in a particular region of the reference (e.g. specific gene in a chromosome). Alignment hits from BED files will be highlighted in the sequencing .txt file generated in the data folder. Click Edit options to open a dialogue box to upload a BED file.

BED files will be validated upon upload. If there is an error in the validation of the file, an error message will show linking to a web page with guidance on correcting the validation errors. 
Note: For alignment to be performed during sequencing, basecalling must be enabled.
Choose your adaptive sampling options:
By default, adaptive sampling is turned off.

Enabling adaptive sampling will allow you to enrich or deplete specific sequences from your aligned sequencing data.
By default, all adaptive sampling reads, whether they are accepted or rejected, will be basecalled. If you would like to only basecall on-target reads and not rejected reads, set the Basecally on-target reads only toggle to On. If you enable raw data generation, rejected reads will still be written out but not basecalled.
More information on this feature can be found in our Adaptive sampling documentation.
Advanced User Options

Time between pore scans: The time between pore scans can be altered using this feature.
Reserved pore: The reserve pore feature prioritises consistency and accuracy over immediacy by reserving wells where voltages have dropped until later in the run, such that other wells can catch up. Switch off this feature to fully front-load sequence data acquisition.

Set up the data targets for your experiment:
This feature allows you to set up the rules to define when a sequencing run will stop. If multiple rules are set up, the first rule met will stop the run.
Click the Edit icon to open the options.

Run limit
This rule must be defined based on run time length in hours or when a flow cell is end of life and has no more sequencing pores available.
Use the drop-down menu to choose:
- "Time equals" and hours
- or "Flow cell is" which will automatically be set as "End of life".

Flow cell data target
This rule can be used to define a target amount of data to reach before a sequencing run is stopped. This can be specified for either estimated or basecalled bases and your data target will be available to view on the experiment graphs to allow you to monitor data progress.
Please note, basecalling must keep up with data output in real-time. If the device or basecall model will not keep up and reach the target output before the run limit rule is met, we recommend using the "Estimated bases" option. However, if your experiment will not reach the target data before the end of the experiment as defined by the run limit rule, you will be warned by the UI.
Use the drop-down menu to select for "Estimated bases equal" or "Basecalled bases equal" and input the value in either Gb or Mb. Alternatively, select "Coverage equals", "Barcode coverage equals", “Total read count equals” or “All barcode read counts equal“.

The “Barcode coverage equals” rule replaces the barcode balancing beta feature. This feature uses adaptive sampling to reject barcodes that have already reached the specified coverage threshold, allowing the barcodes that have not yet reached the coverage target to be sequenced preferentially. The sequencing run will then continue until the specified barcode coverage is reached across all barcodes. If the run does not achieve this coverage, it will stop when the other run limit target (either time-based or flow cell end of life) is reached.
Select the output options:
The output section provides variables for data output including file name, location and format.
Click the Edit icon to open the options.

Output settings:

Data saved as:
Check the name of the output file for the data.
Output location:
Confirm the location for the output data file. Click the file path name to open a pop-up to alter file path or create a new file.
Click Choose location on the pop-up to confirm new file location.
Output location storage capacity:
A bar indicator is displayed below the selected data output file location. This bar will display red when the disk space used reaches more than 80% of the total available disk space. Otherwise, the bar will display green. Below the bar, you can see how much drive space is available.

Basecalled output options:
Confirm output file type and file compression using the checkboxes.
Note: Below, reads per file can be changed for both raw reads and basecalled reads, but take note:
- Fewer reads per file: reads become more quickly available. However, too few reads per file means MinKNOW may not keep up with writing out files in real-time.
- More reads per file: reduces the number of files especially for amplicon/cDNA experiments that produce a large number of reads. Some downstream analysis tools may have an upper limit on the uploaded file size.
Basecalled output type:
Output file type can be selected between .FASTQ or .BAM files. The .FASTQ will be on as default if basecalling in real-time.
File output frequency can be adjusted for basecalled files based on two options:
| Based on time elapsed | Based on number of reads |
|---|---|
| Basecalled files can be produced: · every 1 minute (many small files) · every 10 minutes (many small files) · hourly (fewer larger files) · at the end of the run (single large file). | Basecalled files can be produced for specified read thresholds (number of reads). |
For barcoding runs, basecalled reads are split into files by barcode by default.
Gzip compression of FASTQ files is on by default of basecalled reads. Note: FASTQ Gzip files may prevent some downstream informatics applications.
Raw reads output options:
Raw reads: Raw reads output can be saved as POD5. This feature is disabled by default.
Note: Raw reads become enabled automatically if basecalling is disabled.
When raw reads are enabled, the default file output is POD5. This Nanopore-developed file format stores sequencing data efficiently, writes data quickly, uses less compute, and produces smaller raw data files. POD5 output generates files hourly.
Note: Support for FAST5 output has been discontinued from software version 25.09 onwards.
We recommend keeping the default settings.
Raw reads split by barcode: Raw read files generated in the POD5 format can now be split by barcode (if using one of our barcoding sequencing kits.
Please note, this feature is turned off by default.
Data pooling:
This option is only available when two or more flow cells are being run simultaneously.
To enable data pooling, set the Combine all run output toggle to On under the Data pooling heading in the Output settings window.
Note: The Join experiment function cannot be used with data pooling runs. In order to combine multiple flow cells into one output folder, all flow cells must be started at the same time with the data pooling option selected during run setup.
Advanced User Options
Option to turn bulk file saving either on or off.
Note: This will result in much larger file sizes due to additional information about the run, which is used for debugging.

Choose the filtering options:
Filtering options can be used to determine which reads are classed into pass or fail files. These options may also be used to determine which predefined reads, read lengths and Qscore during basecalling can be split out in some live graphs.
Click the Edit icon to open the filtering options:

Use the GUI to alter Qscore and to define minimum and maximum readlength for a pass read, if required.

Click 'Start' to run the experiment.

You will be automatically navigated to the Sequencing Overview when sequencing starts.
From here, you can see a progress bar below the flow cell to show the progression of the sequencing script.
In some cases, the device will take a few minutes before starting a sequencing run if an alignment reference file is used. A progress bar will show the progress before sequencing begins.
Flow cell health will be displayed after the first pore scan.

Click on the flow cell to open the quick view and check the number of active pores. The first pore scan should report a similar number of active pores (within 10-15%) to that reported in the flow cell check.
Below are recommended troubleshooting tips if there are unexpected differences in pore numbers:
- If there is a significant reduction in active pores in the first pore scan, restart MinKNOW.
- If the numbers are still significantly different, close down the host computer and reboot.
- When the numbers are similar to those reported at the end of the flow cell check, restart the experiment. There is no need to load any additional library after the restart.
To stop the experiment during sequencing, click "Stop" using the run controls on the experiments page.
This is only necessary if you want to stop your run before the end of the set run time.

Confirm to stop experiment by clicking:
- Stop sequencing which will start catch-up basecalling
- or Stop sequencing and basecalling which will stop both sequencing and basecalling immediately.

Once sequencing is complete, generate a run report.
A run report containing information about the sequencing run and performance graphs are automatically generated. To manually generate a run report, click Export run report and selecting which experiment to export to html.
For more information about the run report, please see the Run report section of this document.
A pore activity CSV file is also generated for every run.
The report and CSV files are saved to the same folder as the FASTQ read files e.g. :\data\experiment\sample_ID\ for MinION Mk1B.

MinKNOW fallback folder
If writing out reads to your specified location fails (e.g. if the disk becomes full, or the connection is disrupted), the experiment will continue, and the reads will be written into a fallback folder:
Windows POD5 files: C:\data\reads\fallback (with the standard run data name sample ID as a folder) FASTQ files: C:\data\reads\fastq_fallback (with the standard run data name sample ID as a folder)
macOS: POD5 files: /Library/MinKNOW/data/fallback FASTQ files: /Library/MinKNOW/data/fastq_fallback
Linux: POD5 files: /var/lib/MinKNOW/data/fallback FASTQ files: /var/lib/MinKNOW/data/fastq_fallback
42. Starting a sequencing run on PromethION P2i
Click 'Start Sequencing' on the Start page to set up the sequencing parameters for your experiment.

When running multiple flow cells simultaneously, it may be preferred to upload sample names and corresponding flow cell positions from a CSV file, rather than manually.
Please see Sample sheet upload for instructions.
Type in the experiment name, sample ID and choose flow cell type from the drop down menu.
Select Continue to move to the Kit Selection page.
Ensure the experiment name and sample ID does not contain any personally identifiable information.
To use previously saved settings, please see the "Save sequencing run settings" page of this protocol.
Use "Select all available" to select all the connected flow cells or use the diagram above to select specific flow cells for an experiment.
Note: If sample ID is not filled in, there will be no sample ID in the folder structure.

Select the kit and expansion(s) used to prepare the library.
One sequencing kit can be selected as well as one or more expansions. If a sequencing kit does not have any associated expansions, no expansion options will appear.
The filter options may be used to find the kit used. For example, click DNA to filter for DNA sequencing kits.
For control runs, click the Control checkbox to show control experiments available for the kits. This will automatically set the sequencing parameters for a control run. Note: The default run length is set to 6 hours for control experiments.
Click Continue to navigate to the run configuration page.

Default sequencing parameters
Click Continue to proceed to the run configuration page.
Default sequencing parameters will be pre-set.
For the majority of users and applications, we recommend keeping the default sequencing parameters unless you have a specific need to change them.
Experiment overview
At the top of the run configuration page you will see an overview of your experiment set-up and identifiers inlcuding:
- Experiment name: defined by user.
- Positions: Flow cell position(s) being used in the sequencing experiment, and the associated sample IDs for the position(s).
Note: If using multiple flow cells, click "show details" to open a window displaying all the positions used and the associated sample IDs. - Flow cell type: automatically detected by the MinKNOW software.
- Sequencing kit: the sequencing kit used for DNA/RNA library preparation, user-defined.

Choose your basecalling options:
The basecalling option is on by default to perform real-time basecalling. This can be switched off and basecalling performed post-sequencing.
Note: If basecalling is disabled, barcoding and alignment will not be performed during sequencing.
Modified bases are disabled by default. These can be switched on to call base modifications including 5mC, 5hmC, and 6mA.
To specify your basecall model and modified bases, click the Edit icon to open basecalling options dialogue box.


When setting up an RNA sequencing run, you can choose the modified bases you wish to call, and also select an option for Poly(A) tail length estimation (these are off by default).

Basecall models
Basecalling models can be selected at two stages in the MinKNOW software:
- Real-time basecalling: A basecalling model can be selected when setting up a sequencing run on the "Run configuration" page of MinKNOW. This enables basecalling of the sequencing run in real-time.
- Post-run basecalling: Basecalling can be set up post-sequencing run on MinKNOW. Instructions can be found in the "Post-run basecalling" section of this protocol.
Dorado is the basecaller server in MinKNOW which provides multiple models for basecalling nanopore data.
There are three options for model selection in the drop down menu:
1. High-accuracy basecalling (HAC) - The HAC model is our default basecalling model and is recommended for most applications, including high-throughput projects focusing on variant analysis. It is able to keep up with a high-throughput sequencing experiment on a GridION or PromethION.
2. Super-accurate basecalling (SUP) - The SUP model is more computationally intensive than the HAC model and achieves the highest single-read accuracy. Recommended for de novo assembly projects and low-frequency variant analysis (e.g. somatic variation and single-cell applications).
3. Fast basecalling - This model is recommended for quick, real-time insights on sequencing data when compute resources are limited.
Note: GPU devices will basecall in near real-time; CPU devices, like a standard laptop for MinION Mk1B/Mk1D, will not maintain real-time basecalling.
Choose your barcoding options:
Barcoding options are only available when a barcoding sequencing kit or expansion has been selected. Barcoding can be switched off and performed post-sequencing.

To specify the barcoding options, click the Edit icon to open the barcoding options dialogue box. From here, barcode trimming and custom barcode selection can be defined.
By default, barcoding trimming is off. This can be enabled to remove barcodes from demultiplexed reads. Please note, some primer sequences may also be trimmed together with the barcodes.
By default, custom barcode selection is off. This can be enabled to only select for specified barcodes used in your library preparation for the current sequencing run.
Note: Specifying barcodes must be entered as:
- Individual numbers.
- Numbers separated by commas.
- Range of numbers separated by a dash.
- A combination of numbers and ranges, separated by commas.

Some sequencing kits place barcodes on both ends of the read. By default, the barcode both ends feature is off. If this feature is enabled, the barcode will only classified if a barcode above the minimum barcode score is present at both ends of the basecalled read.

Note: For barcoding to be performed during sequencing, basecalling must be enabled.
Choose your alignment options:
By default, alignment is turned off.

To use alignment during sequencing, upload an alignment reference file as a .fasta or .mmi file. We recommend uploading a reference locally on bacterial-sized genomes. Uploading a file can take a few minutes and is compute-dependent.
We recommend uploading the reference file to /data/ .
A reference file can contain multiple entries in the same file (e.g. multiple chromosomes) and alignment hits from these files are used to populate the alignment graphs which can be viewed on the GUI.
A BED file can also be uploaded alongside the reference when there is a specific interest in a particular region of the reference (e.g. specific gene in a chromosome). Alignment hits from BED files will be highlighted in the sequencing .txt file generated in the data folder. Click Edit options to open a dialogue box to upload a BED file.

BED files will be validated upon upload. If there is an error in the validation of the file, an error message will show linking to a web page with guidance on correcting the validation errors. 
Note: For alignment to be performed during sequencing, basecalling must be enabled.
Choose your adaptive sampling options:
By default, adaptive sampling is turned off.

Enabling adaptive sampling will allow you to enrich or deplete specific sequences from your aligned sequencing data.
By default, all adaptive sampling reads, whether they are accepted or rejected, will be basecalled. If you would like to only basecall on-target reads and not rejected reads, set the Basecally on-target reads only toggle to On. If you enable raw data generation, rejected reads will still be written out but not basecalled.
More information on this feature can be found in our Adaptive sampling documentation.
Advanced User Options

Time between pore scans: The time between pore scans can be altered using this feature.
Reserved pore: The reserve pore feature prioritises consistency and accuracy over immediacy by reserving wells where voltages have dropped until later in the run, such that other wells can catch up. Switch off this feature to fully front-load sequence data acquisition.

Set up the data targets for your experiment:
This feature allows you to set up the rules to define when a sequencing run will stop. If multiple rules are set up, the first rule met will stop the run.
Click the Edit icon to open the options.

Run limit
This rule must be defined based on run time length in hours or when a flow cell is end of life and has no more sequencing pores available.
Use the drop-down menu to choose:
- "Time equals" and hours
- or "Flow cell is" which will automatically be set as "End of life".

Flow cell data target
This rule can be used to define a target amount of data to reach before a sequencing run is stopped. This can be specified for either estimated or basecalled bases and your data target will be available to view on the experiment graphs to allow you to monitor data progress.
Please note, basecalling must keep up with data output in real-time. If the device or basecall model will not keep up and reach the target output before the run limit rule is met, we recommend using the "Estimated bases" option. However, if your experiment will not reach the target data before the end of the experiment as defined by the run limit rule, you will be warned by the UI.
Use the drop-down menu to select for "Estimated bases equal" or "Basecalled bases equal" and input the value in either Gb or Mb. Alternatively, select "Coverage equals", "Barcode coverage equals", “Total read count equals” or “All barcode read counts equal“.

The “Barcode coverage equals” rule replaces the barcode balancing beta feature. This feature uses adaptive sampling to reject barcodes that have already reached the specified coverage threshold, allowing the barcodes that have not yet reached the coverage target to be sequenced preferentially. The sequencing run will then continue until the specified barcode coverage is reached across all barcodes. If the run does not achieve this coverage, it will stop when the other run limit target (either time-based or flow cell end of life) is reached.
Select the output options:
The output section provides variables for data output including file name, location and format.
Click the Edit icon to open the options.

Output settings:

Data saved as:
Check the name of the output file for the data.
Output location:
Confirm the location for the output data file. Click the file path name to open a pop-up to alter file path or create a new file.
Click Choose location on the pop-up to confirm new file location.
Output location storage capacity:
A bar indicator is displayed below the selected data output file location. This bar will display red when the disk space used reaches more than 80% of the total available disk space. Otherwise, the bar will display green. Below the bar, you can see how much drive space is available.

Basecalled output options:
Confirm output file type and file compression using the checkboxes.
Note: Below, reads per file can be changed for both raw reads and basecalled reads, but take note:
- Fewer reads per file: reads become more quickly available. However, too few reads per file means MinKNOW may not keep up with writing out files in real-time.
- More reads per file: reduces the number of files especially for amplicon/cDNA experiments that produce a large number of reads. Some downstream analysis tools may have an upper limit on the uploaded file size.
Basecalled output type:
Output file type can be selected between .FASTQ or .BAM files. The .FASTQ will be on as default if basecalling in real-time.
File output frequency can be adjusted for basecalled files based on two options:
| Based on time elapsed | Based on number of reads |
|---|---|
| Basecalled files can be produced: · every 1 minute (many small files) · every 10 minutes (many small files) · hourly (fewer larger files) · at the end of the run (single large file). | Basecalled files can be produced for specified read thresholds (number of reads). |
For barcoding runs, basecalled reads are split into files by barcode by default.
Gzip compression of FASTQ files is on by default of basecalled reads. Note: FASTQ Gzip files may prevent some downstream informatics applications.
Raw reads output options:
Raw reads: Raw reads output can be saved as POD5 files. This feature is disabled by default.
Note: Raw reads become enabled automatically if basecalling is disabled.
When raw reads are enabled, the default file output is POD5. This Nanopore-developed file format stores sequencing data efficiently, writes data quickly, uses less compute, and produces smaller raw data files. POD5 output generates files hourly.
Note: Support for FAST5 output has been discontinued from software version 25.09 onwards.
We recommend keeping the default settings.
Raw reads split by barcode: Raw read files generated in the POD5 format can now be split by barcode (if using one of our barcoding sequencing kits.
Please note, this feature is turned off by default.
Data pooling:
This option is only available when two or more flow cells are being run simultaneously.
To enable data pooling, set the Combine all run output toggle to On under the Data pooling heading in the Output settings window.
Note: The Join experiment function cannot be used with data pooling runs. In order to combine multiple flow cells into one output folder, all flow cells must be started at the same time with the data pooling option selected during run setup.
Advanced User Options
Option to turn bulk file saving either on or off.
Note: This will result in much larger file sizes due to additional information about the run, which is used for debugging.

Choose the filtering options:
Filtering options can be used to determine which reads are classed into pass or fail files. These options may also be used to determine which predefined reads, read lengths and Qscore during basecalling can be split out in some live graphs.
Click the Edit icon to open the filtering options:

Use the GUI to alter Qscore and to define minimum and maximum readlength for a pass read, if required.

Click 'Start' to run the experiment.

You will be automatically navigated to the Sequencing Overview when sequencing starts.
From here, you can see a progress bar below the flow cell to show the progression of the sequencing script.
In some cases, the device will take a few minutes before starting a sequencing run if an alignment reference file is used. A progress bar will show the progress before sequencing begins.
Flow cell health will be displayed after the first pore scan.

Click on the flow cell to open the quick view and check the number of active pores. The first pore scan should report a similar number of active pores (within 10-15%) to that reported in the flow cell check.
Below are recommended troubleshooting tips if there are unexpected differences in pore numbers:
- If there is a significant reduction in active pores in the first pore scan, restart MinKNOW.
- If the numbers are still significantly different, close down the host computer and reboot.
- When the numbers are similar to those reported at the end of the flow cell check, restart the experiment. There is no need to load any additional library after the restart.
To stop the experiment during sequencing, click "Stop" using the run controls on the experiments page.
This is only necessary if you want to stop your run before the end of the set run time.

Confirm to stop experiment by clicking:
- Stop sequencing which will start catch-up basecalling
- or Stop sequencing and basecalling which will stop both sequencing and basecalling immediately.

Once sequencing is complete, generate a run report.
A run report containing information about the sequencing run and performance graphs are automatically generated. To manually generate a run report, click Export run report and selecting which experiment to export to html.
For more information about the run report, please see the Run report section of this document.
A pore activity CSV file is also generated for every run.
The report and CSV files are saved to the same folder as the FASTQ read files e.g. :\data\experiment\sample_ID\ for MinION Mk1B.

MinKNOW fallback folder
If writing out reads to your specified location fails (e.g. if the disk becomes full, or the connection is disrupted), the experiment will continue, and the reads will be written into a fallback folder:
Windows POD5 files: C:\data\reads\fallback (with the standard run data name sample ID as a folder) FASTQ files: C:\data\reads\fastq_fallback (with the standard run data name sample ID as a folder)
macOS: POD5 files: /Library/MinKNOW/data/fallback FASTQ files: /Library/MinKNOW/data/fastq_fallback
Linux: POD5 files: /var/lib/MinKNOW/data/fallback FASTQ files: /var/lib/MinKNOW/data/fastq_fallback
43. Refuelling your flow cell
Refuelling: general advice
Note: This is only relevant for our Kit 9 chemistry.
Refuelling is the replenishment of motor fuel in the sequencing experiment through the addition of Flush Buffer (FB) from the Flow Cell Priming Kit (EXP-FLP002). The translocation speed graph in MinKNOW can indicate whether it is necessary to top up fuel. Volumes and processes of refuelling are specific to the flow cell type. Please follow the instructions relevant to your flow cell type e.g. Flongle™, MinION™ or PromethION™.
When to refuel
If the DNA translocation speed drops below 300 bases per second, you may start to see a reduction in quality of data reflected in the Qscore. We therefore recommend topping up the flow cell with fuel, using the Flush Buffer (FB) from the Flow Cell Priming Kit. Please follow the instructions below if you wish to top up the fuel during an experiment.
Please consult the 'Priming and loading the [SpotON/Flongle/PromethION] flow cell' step from the relevant library preparation protocol for instructions on adding solutions to the flow cell type that will be used.
Refuelling a Flongle™ flow cell
Remove one tube of FB from the freezer and thaw by bringing to room temperature
Pause the experiment on the GridION position/on the MinION Mk1B/Mk1D on which the flow cell is being refuelled:
a. Navigate to Experiments and open the experiment running b. Click Pause c. A dialogue box will open. Choose the flow cell to pause and click Pause to confirm

- Pull back the seal tab to reveal the sample port
- Pass 30 µl of FB through sample port
- Reseal the tab, ensuring the drain ports are covered
- Unpause the experiment on the relevant GridION position/on the MinION Mk1B/Mk1D by clicking Resume
- (optional) Click Start pore scan to pick a new set of the best channels for the remainder of the sequencing experiment
Refuelling a MinION™/GridION™ flow cell
Instructions for refuelling a MinION/GridION flow cell:
Remove one tube of Flush Buffer (FB) from the freezer and thaw by bringing to room temperature
Pause the experiment on the GridION position/on the MinION Mk1B/Mk1D on which the flow cell is being refuelled:
a. Navigate to Experiments and select the experiment running b. Click Pause c. A dialogue box will open. Choose the flow cell to pause and click Pause to confirm

After opening the priming port, check for a small bubble under the cover. Draw back a small volume to remove the bubble (a few µl):
a. Set a P1000 pipette to 200 µl b. Insert the tip into the priming port c. Turn the wheel until the dial shows 220-230 µl, or until you can see a small volume of buffer entering the pipette tip
Visually check that there is continuous buffer from the priming port across the sensor array.
Complete the flow cell refuelling:
- Load 250 µl of the FB into the flow cell via the priming port (i.e. not the SpotON port), avoiding the introduction of air bubbles
- Close the priming port and replace the MinION Mk1B/Mk1D or GridION lid
- Unpause the experiment on the relevant GridION position/on the MinION Mk1B/Mk1D by clicking Resume
- (optional) Click Start pore scan and choose your flow cell, to pick a new set of the best channels for the remainder of the sequencing experiment

Refuelling a PromethION™ flow cell
Remove one tube of FB from the freezer and thaw by bringing to room temperature
Open the valve to reveal the inlet port
Pause the experiment on the relevant PromethION Flow Cell position(s) that will be refuelled:
a. Navigate to Experiments and open the experiment running b. Click Pause c. A dialogue box will open. Choose the flow cell to pause and click Pause to confirm

- Set a P1000 pipette to 200 µl
- Insert the tip into the inlet port
- Turn the wheel until the dial shows 220-230 µl, or until you can see a small volume of buffer entering the pipette tip.
- Using a P1000 pipette, load 250 µl of the FB into the inlet port of the flow cell, avoiding the introduction of air bubbles
- Close the valve
- Incubate the flow cell with the added FB for 3 mins
- Unpause the experiment on the relevant PromethION Flow Cell position(s) after this process is complete by clicking Resume
- (optional) Click Start pore scan and choose your flow cell, to pick a new set of the best channels for the remainder of the sequencing experiment

The outcome and benefits of refuelling
Translocation speed and Qscore over time
Below is a graph that shows what is expected for translocation speed after the addition of FB to the flow cell in a previous version of MinKNOW.
As the speed drops below 300 bases per second, the Qscore begins to decline for the reads processed through the nanopores at this speed. After refuelling at the 17.5 hour mark, the speed begins to increase and returns to an improved rate (~400 bases per second), which is similar to the speed at the start of the experiment. After the addition of fuel, the quality of the data increases and returns to Qscores equivalent to those seen at the start of the run.

Refuelling multiple times in a run
You can refuel a sequencing run multiple times over an experiment. When you should refuel will depend on when the translocation speed drops below 300 bases per second on the speed graph in the MinKNOW GUI for Kit 9 (e.g. SQK-LSK109). Kit 14 (e.g. SQK-LSK114) adapter contains fuel fix technology, enabling users to run long experiments without the need for fuel addition.
Warning - overloading the flow cell when refuelling
If you refuel your flow cell multiple times, the waste reservoir of the flow cell will gradually fill up with buffer.
The array and waste reservoir of the below platforms (Flongle, MinION/GridION, PromethION) will take the following fluid loads:
- priming mix
- a library
- one refuel - for Flongle
- three refuels - for MinION/GridION
- four refuels - for PromethION
44. Checks and monitoring
During the sequencing experiment, you can check various flow cell health and performance parameters that are shown in the MinKNOW GUI. Each parameter is described in more detail in this section.
Flow cell health
During a sequencing experiment, the MinKNOW Sequencing Overview page shows a flow cell icon with coloured bars. The bars represent the combined health of all pores in a flow cell, and indicate how well the flow cell is performing. The colours are:
- Light green: sequencing
- Dark green: open pore
- Dark blue: pore recovering
- Light blue: pore inactive
This information is identical to the last bar of the pore activity plot (described later).
a) Flongle/MinION/GridION flow cell health b) PromethION flow cell health

Experiment summary information
The Experiments page displays summary information for all sequencing flow cells and device checks carried out on the device.
From this page, the user is able to control specific runs and identify real-time information including flow cell health and reads, giving users real-time feedback for sequencing flow cells.
- Read count: The total number of reads across the experiment.
- Estimated bases: The number of estimated bases to be basecalled from the experiment
- Basecalled bases: The number of basecalled bases from the experiment.
- Total run time: The duration of the experiment.
- Temperature: The heatsink temperature of the selected position, which for sequencing should reach 34°C with Kit 9-11, 30°C with Kit 12 or 35°C on Flongle. For Kit 14, sequencing temperature is approximately 36°C.

As the MinKNOW script progresses, you can check the following:
- Number of active pores
- Heatsink temperature
- Development of the read histogram
- Pore occupancy
- Local basecalling report
Channel states
The channel states pannel gives an overview of the states the flow cell pores are in to give the user an idea of how well the sequencing run is performing in real time. A good library will be indicated by a higher proportion of light green channels in "Sequencing" than are in "Pore available". The combination of "Sequencing" and "Pore available" indicates the number of active pores at any point in time. A low proportion of "Sequencing" channels will reduce the output of the run.

Clicking on the Show Detailed button reveals a more detailed array of channel states:
- Sequencing: Pore currently sequencing.
- Pore Available: Pore available for sequencing.
- Adapter: Pore currently sequencing adapter.
- Active feedback: Channel ejecting analyte.
- No pore: No pore detected in channel.
- Multiple: Multiple pores detected. Unavailable for sequencing.
- Unavailable: Pore unavailable for sequencing.
- Unclassified: Pore status unknown.
- Saturated: The channel has switched off due to current levels exceeding hardware limitations.
- Out of range-high: Current is positive but unavailable for sequencing.
- Out of range-low: Current is negative but unavailable for sequencing.
- Zero: Pore currently unavailable for sequencings.
Pore activity plots
The pore activity plot summarises the channel states over time. Each bar shows the sum of all channel activity in a particular amount of time. This time bucket defaults to 1 minute, and scales to 5 minutes automatically after 48 minutes. However, bucket size can be adjusted in the "Bucket size" box in Display Settings.
The graph populates over time, and can be used as a way to assess the quality of your sequencing experiment, and make an early decision whether to continue with the experiment or to stop the run.

To see the more detailed view of channel states, click Show detailed.
- Sequencing: Pore currently sequencing.
- Adapter: Pore currently sequencing adapter.
- Pore available: Pore available for sequencing.
- Unavailable: Pore unavailable for sequencing.
- Active feedback: Channel ejecting analyte.
- No pore: No pore detected in channel.
- Out of range-high: Current is positive but unavailable for sequencing.
- Out of range-low: Current is negative but unavailable for sequencing.
- Multiple: Multiple pores detected. Unavailable for sequencing.
- Saturated: The channel has switched off as current level exceed hardware limitations.
- Zero: Pore currently unavailable for sequencing.
- Channel disabled: Channel is disabled and awaiting another pore scan.
Read length histogram
The cumulative histogram shows reads compared to bases. Use the options below to choose the axis legends:
- Y-axis: Estimated bases or basecalled bases
- X-axis: Read length or read counts
Read count - this shows the number of reads vs read length. This enables you to understand how the read lengths vary in number and size.
Read length - this shows the total number of bases vs the read length.
The N50 value is presented (only for the whole set of passed reads) in the top left corner of the histogram.
 Each histogram's X-axis (read length) can be zoomed in using the scaled bar under the histogram. Use Reset to refocus the zoom bar and histogram for the entire 'passed read' dataset.
  You can see the number of bases by hovering over the bar in question.
Reads that are outliers in terms of length can be removed from the graph by ticking the Hide outliers box below the histogram.
Select Split by read end reason to view split reads and hover over for further information. This is useful for adaptive sampling which is further explained in the Adaptive Sampling info sheet.
- Device changed MUX/Pore scan initiated: The strand ended because there was a scheduled pore scan that interrupted the read.
- Read completed: The strand ended naturally as it passed through the pore.
- Read blocked: The strand ended because it was deemed of low quality and purposefully rejected.
- Adaptive sampling voltage reversal/Adaptive sampling rejection: The strand was rejected by adaptive sampling because it did not align to the target sequence when enriching, or the strand matched to the target sequence when depleting.
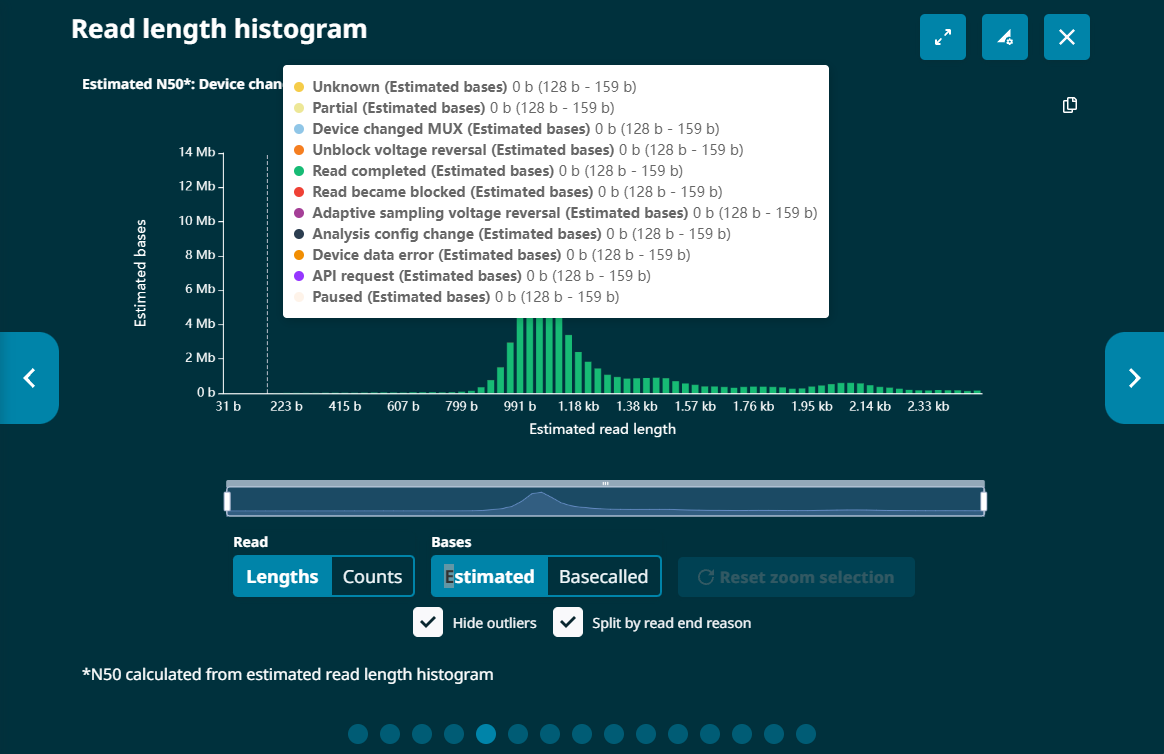
Cumulative output
The cumulative output graph shows:
- the number of bases that have been sequenced and basecalled

- the number of reads that have been sequenced and basecalled; and whether the reads have passed of failed the quality filters

Cumulative output of multiple flow cells
If there are multiple flow cells running under the same experiment name, you will see the Experiment view. This gives output information on all assigned flow cells, plus a running cumulative total of bases or reads sequenced.
The cumulative output graph shows the running total number of Gbases sequenced by the GridION. 
The output generated by each flow cell to make the total cumulative output can be represented by individual output plots.
Both graphs can be switched between in the MinKNOW GUI. Reads, bases (estimated or basecalled) depending on the name, sample ID or flow cell ID can be selected to tailor the output graph, as required.
Temperature and Bias Voltage graph
Temperature vs time graph
The temperature graph gives a real-time representation of the heatsink temperature of the flow cell. If the temperature reading drifts out of the target zone, please consult Technical Services, otherwise the quality of your data may be compromised.
Please note, for our kits using Kit 14 chemistry, there will be some temperature fluctation at the beginning of the run due to speed normalisation. 
Bias voltage vs time graph
The bias voltage graph provides the running voltage in real-time. MinKNOW will automatically adjust the applied voltage and will naturally drift to lower voltages as the electrochemistry in the flow cell is depleted. This graph is useful for running a flow cell multiple times.
If you set the voltage for a subsequent run as the final running voltage of the previous run, then MinKNOW will find it easier to identify the appropriate running voltage.
You will notice drops in the voltage at regular intervals and these will correspond to the channel scans that are defaulted to occur every one and a half hours. Here, each channel will be scanned to look for its availability for sequencing. The common voltage is reversed before and after each channel assessment for clearer results. 
Translocation speed and quality score graphs
Note: These graphs are only present if Basecalling is turned on.
Translocation speed vs time
The translocation graph gives a real-time representation of the speed at which DNA/RNA strands pass through the pore. If the translocation speed drops below this window, data quality and output may be compromised as strands take longer to move through the pore.
Please note, translocation speed will be dependent on the kit chemistry used.

Quality score vs time
The Quality score graph gives a live representation of the median strand Q-score over time. 
Modal quality score graph is available across the run. This graph presents both the spread of quality scores and the modal quality score across the run, and the minimum quality score set. 
Q score histogram
This graph shows the distribution of Q scores for simplex bases over time, indicating the number of passed and failed bases. You can zoom in along the X-axis to view specific score ranges.

Barcode read counts
The Barcode Read Counts graph shows the breakdown of barcoded reads, if barcoding was used for the experiment. The default view only shows reads that have passed the quality score filters. However, selecting the Display failed box will show all reads. 
The X-axis of the histogram also has a zoom function using the scaled bar underneath. Use Reset to refocus the zoom bar and graph.
Note that there is a small amount of cross-talk between barcodes. Some barcoded reads may appear on the graph even if the barcode in question was not used for the experiment.
Note: This graph is only present if barcoded is turned on.
Alignment hits
The alignment hits graph will populate when alignment and basecalling is set-up to run during sequencing. This bar graph shows the number of reads and bases that align to each of the entries in the user reference .fasta file or minimap index file. An entry in the reference file will only appear on the graph once a single read has aligned to it.

The X-axis of the histogram also has a zoom function using the scaled bar underneath. Use the Reset to refocus the zoom bar and graph.
A target alignment hits view is also available in the same graph by clicking Alignment coverage. This is populated by the .BED targets if a .BED file is supplied with the alignment reference.

Alignment Q accuracy histogram
The Alignment Q accuracy histogram will populate when alignment and basecalling is set-up to run during sequencing, displaying alignment accuracy.
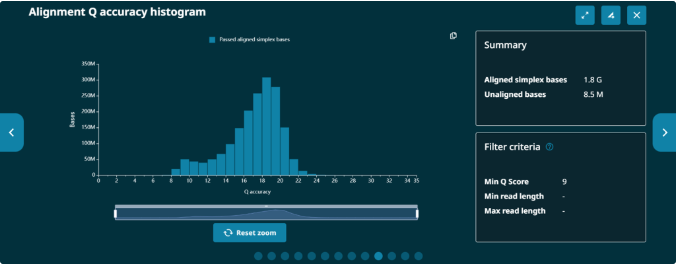
Alignment and barcode heatmap
The alignment and barcode heatmap is only available when alignment and demultiplexing is performed with basecalling during sequencing. The heatmap graph shows the alignment hits split per barcode. The colour gradient shows bases and reads which are the more popular barcode and alignment hit combinations. Use the options below to view reads or bases and the slide bar above to focus on specific regions.

Note: These graphs are only present if barcoding and alignment are both turned on.
Traceviewer
The Traceviewer displays the current levels from individual channels. By default, it is set to show 10 channels. This number can be changed through the selection boxes beneath the viewer. Additional parameters that can be altered:
- Time: The length of time plotted on one screen
- Maximum: The highest current level to be shown on the y axis
Please note that viewing a high number of channels in the traceviewer may impact the speed at which the GUI is able to function.
Pore scan
As the sequencing protocol starts, a pore scan begins before the sequencing. There are four groups of active pores, and the pore scan allows MinKNOW to pick the best-performing pores in each group, maximising the data output in the initial stages of the run. The software also instantly switches to a new channel in the group if a channel is in the “Saturated” state, or after ~5 minutes if a channel is “Recovering”.

End of sequencing protocol script.
The length of the sequencing scripts are indicated during script selection, e.g. 72 Hr. However, if live basecalling is selected, a minimum-spec laptop may not keep up with the speed of data acquisition, and not all reads will be basecalled by the end of the experiment. The reads that had not finished being basecalled during the experiment will continue to be basecalled in Catch-Up mode.
The reads from the experiment will be found in the location set during experiment set-up in MinKNOW. The read file structure is described here. If the Desktop Agent is running simultaneously to MinKNOW, the full report will also be available. If it is being run at different times, the reads will be present in the data/reads folder ready to be processed.
45. Troubleshooting your run from the pore activity plots
Pore activity plot introduction
The pore activity plot feature in the MinKNOW software can be used to judge the quality of your experiment. The pore activity plot shows the distribution of channel states over time, grouped by time chunks, or 'buckets'. The basic view shows the five main channel states: Sequencing, Pore, Recovering, Inactive, and Unclassified. Clicking the "More" button shows a more detailed breakdown of channel states.
It is recommended to observe the pore activity plot populating over the first 30 min-1 hr of the sequencing run. By this time, the channel state distribution will give an indication whether the DNA/RNA library is of a good quality, and whether the flow cell is performing well.
If Active Channel Selection is enabled during the run, the software instantly switches to a new channel in the group if a channel is in the “Saturated” or “Multiple” state, or after ~5 minutes if a channel is “Recovering”. This feature maximises the number of channels sequencing at the start of the experiment, however this may also result in an artificially high number of "Sequencing" or "Pore" channels in the pore activity plot. For this reason, we recommend referring to the pore scan plot, which shows the true distribution of channel states at the point of the most recent pore scan.
Good library
A good quality library will result in most of the pores being in the "Sequencing" state, and very few in "Pore", "Recovering" or "Inactive". A library that looks like this is likely to give a good sequencing output.

Channel blocking
Under certain conditions (usually the presence of contaminants in the library), pores may become blocked and therefore unable to sequence. This manifests itself as a build-up of "Unavailable" pores over time.

Recommendation:
- If, despite the channel blocking, the library is still producing a sufficient number reads to answer your biological question, you can carry on with the sequencing experiment.
- Otherwise, stop the sequencing run in MinKNOW. Then wash out the library from the flow cell using the instructions for the Flow Cell Wash Kit. Then prepare another library and load it on the flow cell.
Osmotic imbalance
If the plot shows a high number of "Inactive" channels building up over time, this could indicate that the channels or membranes have been damaged, for example by air bubbles, osmotic imbalance, or the presence of detergents or surfactants in the library.
Pore activity: 
Pore scan: 
Recommendation:
- Check the channel panel: if the Inactive channels are all grouped in one part of the flow cell, this could indicate an air bubble that has been introduced during flow cell flushing or library loading. If the remaining channels are still sequencing, it is possible to carry on with the run. Do not try to move the air bubble, as this can damage even more channels.

If the Inactive channels are distributed throughout the flow cell:
- Check that the heat tape on the underside of the flow cell is intact.
- Make sure that the input DNA is in either TE buffer or nuclease-free water, and that the buffer contains no detergents or surfactants.
- Make a new batch of flow cell priming buffer (a mixture of Flush Buffer/Flow Cell Flush and Flush Tether/Flow Cell Tether). Flush the flow cell with the mixture and load the library again.
Low pore occupancy
If there was insufficient starting material, or some sample has been lost during library prep, or the sequencing adapters did not ligate well to the strand ends, the plot will show a high ratio of "Pore available" to "Sequencing" states, meaning that only a limited number of pores are sequencing at any one time.

Recommendation:
- Check the amount of DNA/RNA in your prepared library, for example by using the Qubit fluorometer. We recommend preparing a fresh library and reloading your flow cell with the recommended loading input from the relevant protocol
- If your library is at a low concentration, prepare the library again using a higher amount of starting material.
- Ensure you are adding the flush tether to your priming mix during flow cell priming and loading before adding your library.
- For ligation-based protocols, ensure you are following the protocol to ligate the sequencing adapter correctly and performing any clean-up steps after adapter ligation with short or long fragment buffer rather than ethanol.
RNA pore activity
For RNA in particular, the expanded channels view may show a large proportion of pores sequencing Adapter. This happens because RNA strands are usually shorter than DNA, and the adapter takes up a larger proportion of the strand. Additionally, the RNA sequencing chemistry is optimised for sequencing RNA, whereas the adapter is DNA, and is processed slower. As long as the 'basic' pore activity plot view shows the majority of pores in "Sequencing", a high proportion of Adapter should not be a problem.

46. Recovering interrupted runs
Sequencing runs can be recovered following certain unexpected interruption including low disk space, unsafe secondary temperature, or flow cell disconnection. When these events occur, a message will appear describing the reason for the pause to help you identify and resolve the issue.
Low disk space
1. When disk space on the host system becomes critically low, MinKNOW automatically pauses the sequencing run and displays a message indicating that the experiment has been paused due to low disk space.
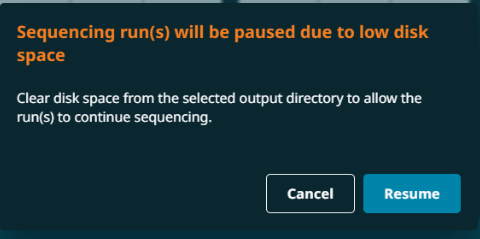
2. Clear disk space in the output directory by moving or deleting files.
3. Once disk space has been restored, click Resume. If you choose to cancel the run, you can stop the run. MinKNOW will record that it was stopped due to insufficient disk space.
Flow cell disconnection
If a flow cell is disconnected during a run, the experiment will be automatically paused, and attempt to reconnect. When the flow cell is reinserted or communication is restored, the run will resume automatically. No manual intervention is required beyond ensuring the flow cell is properly connected.
If the flow cell remains disconnected, the run remains paused until the issue is resolved. For Flongle adapters, a disconnection will end the experiment with a clear error message.
47. Completion of a sequencing protocol script
Catch-up notifications
Catch-up basecalling is carried out either after the sequencing run completes (e.g. after 72 hours), or if the run is manually terminated. To manually terminate a run, select sequencing flow cells and click Stop.

A pop-up window will appear: 
A progress bar is displayed during catch-up basecalling on the Sequencing Overview and Experiments pages.
Please note that in the current version of MinKNOW, stopping your experiment and stopping basecalling through the GUI when ONLY FASTQ output is selected leads to queued reads being discarded. We are working on a fix.
CSV files output by MinKNOW
The data used by MinKNOW to generate the pore activity and Cumulative Output plots are output as CSV files. These files are in the run-specific folder in the reports directory (e.g. \data\reports on Windows).
Using the data in the CSV files, users can recreate pore activity and Cumulative Output graphs themselves in Excel by adding the various pore states to the 'Legend Entries (series)' panel:

Below are definitions of the columns in the output CSV file from MinKNOW:
| Column title | Description |
|---|---|
| Experiment time (minutes) | Time in minutes from the beginning of the sequencing run. |
| Reads | Cumulative number of reads basecalled since the beginning of the sequencing run. |
| Basecalled reads passed | Cumulative number of reads basecalled since the beginning of the sequencing run with a Qscore above the filter threshold. |
| Basecalled reads failed | Cumulative number of reads basecalled since the beginning of the sequencing run with a Qscore below the filter threshold. |
| Basecalled reads skipped | Cumulative number of reads that have not been basecalled since the beginning of the sequencing run. |
| Selected raw samples | Raw analog-to-digital converter (ADC) samples that have been identified by MinKNOW as part of a read. |
| Selected events | Measure MinKNOW uses to estimate bases and distinct from events used in basecalling. |
| Estimated bases | Number of (MinKNOW) events multiplied by some fixed factor defined per chemistry. |
| Basecalled bases | Number of estimated bases that have been in all selected reads above. |
| Basecalled samples | Number of basecalled bases that have been in all selected reads above. |
Acquisition termination file for LIMS
Customers using LIMS will receive a summary file once data acquisition and file writing has completed. The file is named final_summary.txt, and is written out to the output directory.
An example of the file contents is shown below:
instrument=PCT0009
position=1-A5-D5
flow_cell_id=PAD15520
sample_id=Chinese_NA24631
protocol_group_id=JB_47x_P48005_270319
protocol=4a37d56a62b6425a2af4d01d4970c7b5cc7b7c80
protocol_run_id=2a4ccaa1-8aaf-4872-a1f3-773a686d64de
acquisition_run_id=7eeaea330d1fe2ec43583072bbe21288254bef1b
started=2019-03-27T17:23:55.542284+00:00
acquisition_stopped=2019-03-28T09:58:37.505691+00:00
processing_stopped=2019-03-28T09:58:37.505788+00:00
basecalling_enabled=1
sequencing_summary_file=sequencing_summary/PCT0009_20190327_172337_PAD15520_promethion_sequencing_run_Chinese_NA24631_sequencing_summary.txt
fast5_files_in_final_dest=1606
fast5_files_in_fallback=0
fastq_files_in_final_dest=1197
fastq_files_in_fallback=0
48. Run report
Run reports overview
Run reports contain information about the sequencing run and include performance graphs. These graphs are automatically generated at the end of a run but can be manually generated by clicking Export run report and selecting which experiment to export to html.
The run report includes the run summary and configuration, sequence output, run health, and run log. This html report is interactive, allowing users to jump to the information they need and hide other details they do not require. Troubleshooting suggestions are also available throughout the report, with links to further information available on the Community.
Run summary
This is an overview of the sequencing run, including output and baseacalling results along with the duration of the run.

During a run: When a run report has been generated during a run, the elapsed time will show in the progress bar, along with:
- The estimated time until flow cell end of life (if selected)
- The estimated time until the data target condition will be met and if the flow cell will reach the target during the run time or flow cell life (if selected). A warning will appear under the progress bar if the data target will not be met.
If a run report was generated when a sequencing run is paused, the run status will only display "PAUSED" with no progress bar or estimations.

After a run: When a run report is generated after a sequencing run has completed, the duration of the run will be displayed, along with:
- The run status confirming the flow cell end of life condition was met and completed progress bar.
- The run status confirming the data target was met and a partially filled progress bar reaching the data target. If the data target was not met, a warning will appear under the completed progress bar.
Note: The relevant run until parameters must be defined during the sequencing run set up for these status reports to appear on the run report.
Run configuration
A detailed overview of the settings selected for the sequencing run and data output, including the software versions used to sequence the data. We have also included further information about the modified bases and basecalling models chosen, barcode balancing settings, expansion kits used and read splitting preferences selected.
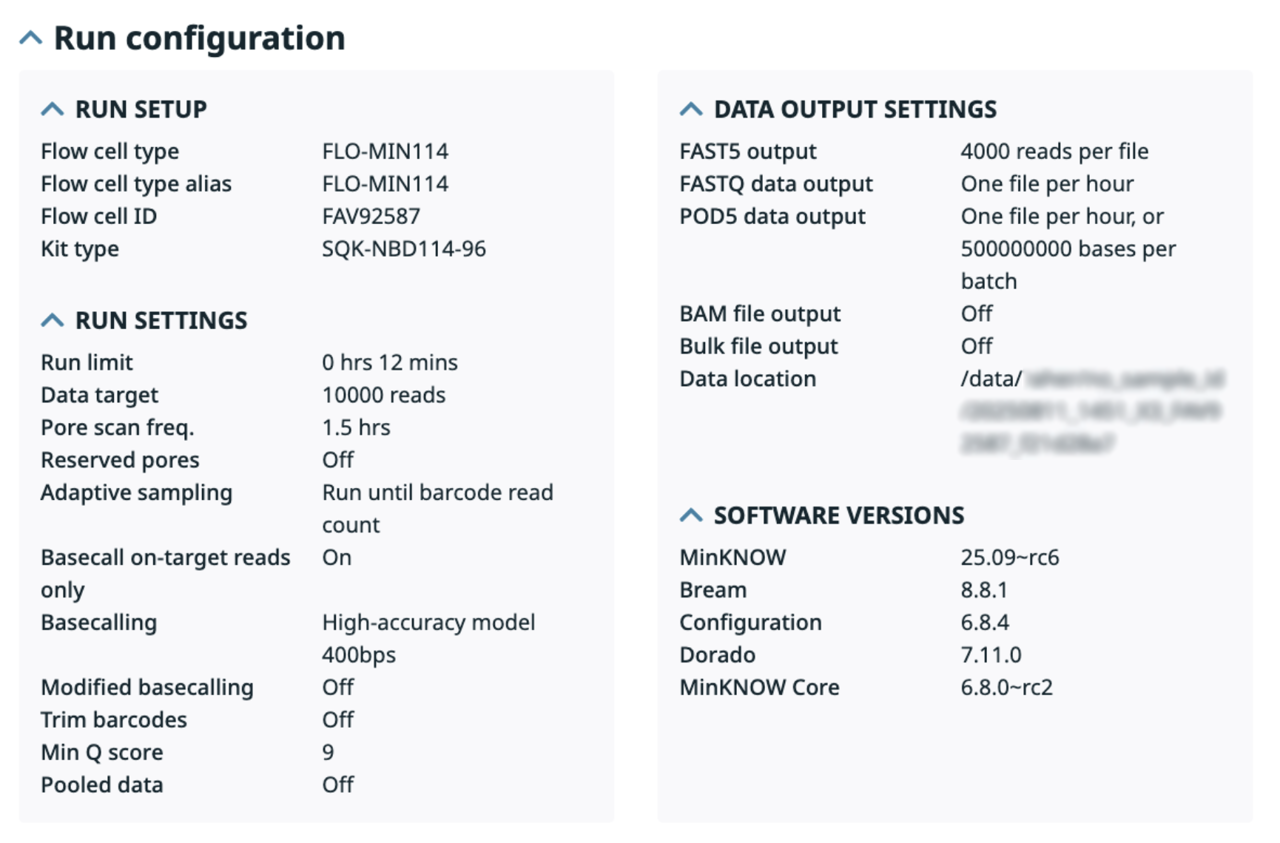
Sequence output
This section includes a more detailed view of the sequencing output, such as read lengths, barcodes detected and quality score.
Read lengths The total number of bases against the read length are displayed in this graph. Any outliers displayed in a table below, displaying read length and aggregated reads. 
Barcodes Barcodes detected are displayed in a searchable table which can be exported as a .CSV file. Two graphs for bases and reads are available to view and displays total number of reads/bases above a Qscore of 9. Passed and failed data is also displayed and can be sorted by barcode.
Detected barcodes: 
Bases graph: 
Reads graph: 
Cumulative output Total output of the bases and reads sequenced during the experiment are outlined in the graphs here. 
Quality score Quality score (Qscore) of your sequencing run is displayed here, with the minimum value set on MinKNOW during run set up. 
Alignment If an alignment file was supplied and alignment turned on during run set-up, the Reference alignment and Bed regions sections will be displayed with tables that can be exported as CSV files.
Reference alignment: This table will display the specified reference sequence and the number of reads, bases and coverage percentage.
Bed region: This table will display the specified reference sequence with the coordinates of the specific target within the reference sequence as well as the number of reads, bases and coverage percentage.

Run health
This provides a detailed view of the pore activity and pore scan results throughout the run, along with graphs displaying the translocation speed and temperature.
Pore activity states:
- No pore from scan: No pore detected in channel
- Sequencing: Pore currently sequencing
- Adapter: Pore currently sequencing adapter
- Pore available: Pore available for sequencing
- Unavailable: Pore unavailable for sequencing
- Active feedback: Channel ejecting analyte
- Out of range-high: Current is positive but unavailable for sequencing
- Multiple: Multiple pores detected. Unavailable for sequencing
- Saturated: The channel has switched off as current levels exceed hardware limitations
- Out of range-low: Current is negative but unavailable for sequencing
- Zero: Pore currently unavailable for sequencing
- Channel disabled: Channel is disabled and awaiting another pore scan

Pore scan states:
- Pore available: Pore in channel available for sequencing
- Reserved pore: Pore in reserve, will return to available when required
- Unavailable: Pore inhibited from sequencing
- Saturated: Possible contamination in the sample
- Zero: No current is passing through this pore, possibly due to bubbles on the membrane
- Inactive: Pore no longer suitable for sequencing


Run log
The run log includes system messages sent during the sequencing run regarding errors, warning, and any events.

49. Closing MinKNOW and shutting down a MinION Mk1B/Mk1D
Ensure that the flow cell is not running an experiment.

Close MinKNOW by closing down the GUI.
Disconnect the MinION Mk1B/Mk1D.
50. Closing MinKNOW and shutting down on GridION
Shutting down your GridION
The GridION's computer requires a stepwise, processed shut down, otherwise you may face problems e.g. when recognising flow cells.
Follow the instructions in this section to ensure you do not face errors with your GridION from incorrectly shutting down your device.
Ensure none of the flow cells are running an experiment.
 An indication no experiments are running is the lack of an experiment status bar beneath individual flow cells.
Navigate to Device Settings and click 'Shutdown'.

Turn off the device at the mains supply, if you are using mains power.
If connecting to a device remotely using a computer not directly connected to the device, close down the MinKNOW application window.
51. Closing MinKNOW and shutting down on PromethION
Shutting down your PromethION
The PromethION's computer requires a stepwise, processed shutdown, otherwise you may face problems e.g. when recognising flow cells.
Follow the instruction in this section to ensure you do not face errors with your PromethION from incorrectly shutting down your device.
Ensure none of the flow cells are running an experiment.
An indication no experiments are running is the lack of an experiment status bar beneath individual flow cells.

Navigate to Device Settings and click 'Shutdown'.

Do NOT select 'Reboot'. This will lead to errors in recognising the flow cells when commencing an experiment.
Once the screen goes blank, turn off the sequencing module and tower via the switch at the rear of the device.
If connecting to a device remotely using a computer not directly connected to the device, close down the MinKNOW application window.
52. Post-run basecalling
Basecalling overview
A user can basecall and demultiplex their data directly in MinKNOW after a sequencing experiment has finished to avoid having to use command-line tools, or to reanalyse old data using the latest basecalling models. Reads can also be aligned against a reference post-sequencing.
Note: Both barcoding and alignment can be run on FASTQ or POD5 reads when coupled with basecalling.
Click 'Post sequencing analysis' on the start page.
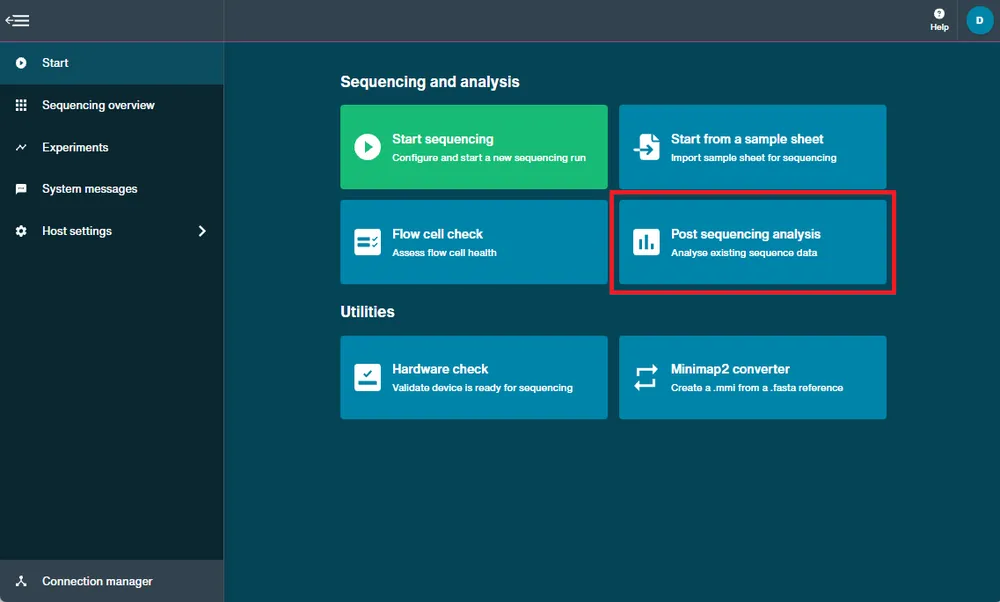
Click 'Basecalling' to open the post-run basecalling set-up options.

Select input folder containing the files to basecall from a previous run.
Select whether you want to process reads in sub-directories.
If your chosen read input folder contains sub-directories with POD5 files, you can choose whether to basecall files in these sub-directories by enabling this option.

Select output folder and file type.
By default, MinKNOW will create a /basecalled folder in /data. You can set a different folder in which to save the basecalled reads. Note: This must be a sub-folder of /data directory.
By default, output FASTQ files will be compressed using Gzip. This feature can be toggled off by the user.

Choose basecalling model from the drop-down menu.
Set-up the configuration of your basecalling run using the drop-down menus:
- In the run setting, select the parameters used to initially sequence the data.
- In the basecalling settings, select the basecall model used to process raw signal, and whether to use modified basecalling.
Once all the parameters have been selected, the basecalling configuration will be displayed in the lower panel.

Given the recent improvements to basecalling accuracy, Q-score cut-off for reads put into the "pass" folder has been increased to:
- Fast basecalling model >8
- High accuracy (HAC) model >9
- Super accurate (SUP) model >10
When sequencing RNA, you can choose the modified bases you wish to call, and also select an option for Poly(A) tail length estimation (these are off by default).

Select any barcoding kits used for the run from the drop-down menu.
MinKNOW will write out basecalled reads into barcode-specific folders and enable demultiplexing during basecalling.
Users are able to choose specific settings, including trimming barcodes and barcoding both ends (available for specific barcoding kits).

Select to use alignment and import a reference sequence in a FASTA file.
We currently only recommend uploading an alignment reference locally for bacterial-sized genomes. Upload can take a few minutes and is compute dependent.
A reference file must by uploaded as a FASTA file that can contain multiple entries in the same file (e.g. multiple chromosomes).
However, a .bed file may also be uploaded alongside the reference FASTA file. The BED file option can be used when the user is interested in a particular region of the reference (e.g. specific gene in the chromosome). Alignment generates FASTQ output files when performed with basecalling.

Click 'Start' to begin post-run basecalling.

53. Post-run barcoding
Barcoding overview
A user can barcode their data directly in MinKNOW after a sequencing experiment has finished, using FASTQ data.
Click 'Barcoding' in the analysis menu to open the post-run barcoding set-up options.

Select the input folder containing the FASTQ data to barcode from a previous run.
Select whether you want to process FASTQ reads in sub-directories.
If your chosen read input folder contains sub-directories with FASTQ files, you can choose whether to barcode FASTQ files in these sub-directories by switching this option on.
Note: Data can only be saved to the /data folder.

Choose output folder for the post-run barcoded data.
By default, MinKNOW will create a /barcoding folder in /data/. You can set a different folder which to save the barcoded reads. Note: This must be a sub-folder of /data directory.
You can also select your output file formats to be generated as .BAM or .FASTQ.

Select any barcoding kits used for the run from the drop down menu.
MinKNOW will write out basecalled reads into barcode-specific folders and enable demultiplexing during basecalling.
Users are able to choose specific settings, including trimming barcodes and barcoding both ends (available for specific barcoding kits).

Click 'Start' to begin post-run barcoding.

54. Post-run alignment
Alignment overview
A user can align their data directly in MinKNOW after a sequencing experiment has finished, using a FASTQ file from a previous run.
The reference file of bacterial-sized genomes must be uploaded locally as a FASTA file. Alignment hits from these files are used to populate the alignment graphs.
A BED file may also be uploaded alongside the reference FASTA file when the user is interested in a particular region of the reference (e.g. specific gene in the chromosome). The BED file alignment hits will be highlighted in the sequencing .txt file generated in the data folder.
When alignment is run independently from basecalling, BAM files are generated.
Click 'Post sequencing analysis' on the start page.

Click 'Alignment' to open the post-run analysis set-up options.

Select the input file containing the FASTQ data to carry out alignment from a previous run.
Select whether you want to process FASTQ reads in sub-directories.
If your chosen read input folder contains sub-directories with FASTQ files, you can choose whether or not to align FASTQ files in these sub-directories by switching this option on.
Note: Data can only be saved to the /data folder.

Choose the output folder for the post-run aligned data.
By default, MinKNOW will create an /alignment/ folder in /data/. You can set a different folder which to save the aligned reads. Note: This must be a sub-folder of /data directory.

Select the alignment reference to carry out the post-run alignment.
The alignment reference must either be a FASTA file.
However, there is also the option to use a BED file alignment reference as well.

Click 'Start' to begin post-run alignment.


