Direct RNA sequencing - barcoding (SQK-DRB004.24) (DRB_9230_v4_revB_21Sept2026)


MinION: Protocol
Direct RNA sequencing - barcoding (SQK-DRB004.24) V DRB_9230_v4_revB_21Sept2026
This protocol:
- Is for multiplex sequencing of native RNA
- Can be used with enriched poly(A)+ enriched RNA samples or poly(A)-tailed IVT transcript samples as your starting input material
- Requires no fragmentation
- Is optimised for multiplexing 4–8 poly(A)+ enriched RNA samples, or 12-24 poly(A)-tailed IVT transcript samples.
- Takes approximately ~360 minutes for library preparation
- Is only compatible with RNA flow cells
For Research Use Only
FOR RESEARCH USE ONLY.
Contents
Introduction to the protocol
Library preparation
- 3. Reverse Transcription Barcode (RTB) ligation
- 4. Reverse transcription
- 5. Excess barcode inactivation
- 6. Sequencing adapter ligation
- 7. Priming and loading the MinION/GridION Flow Cell
Sequencing and data analysis
Troubleshooting
Overview
This protocol:
- Is for multiplex sequencing of native RNA
- Can be used with enriched poly(A)+ enriched RNA samples or poly(A)-tailed IVT transcript samples as your starting input material
- Requires no fragmentation
- Is optimised for multiplexing 4–8 poly(A)+ enriched RNA samples, or 12-24 poly(A)-tailed IVT transcript samples.
- Takes approximately ~360 minutes for library preparation
- Is only compatible with RNA flow cells
For Research Use Only
1. Overview of the protocol
Improved strand classification for Direct RNA sequencing in MinKNOW 26.01.
MinKNOW 26.01 has updated RNA strand classification rules, resulting in improved sequencing performance and more accurate reporting in the MinKNOW UI and sequencing run reports.
What is changing?
In older versions of MinKNOW (25.09 or earlier), blocked pores - particularly common in "blocky" samples - could be misclassified as active strands, resulting in:
- Reduced Q-scores over the course of a run.
- Pore scans incorrectly reporting high pore occupancy later in the sequencing run.
- Blocked pores not being efficiently ejected, limiting sequencing output.
The release of MinKNOW 26.01 corrects this behaviour by accurately classifying blocked pores.
How does this impact me?
- Pore scans will more accurately reflect true pore availability.
- Blocked pores will be ejected more effectively.
- Sequencing performance may improve in some runs.
The improvements listed above will impact all sequencing runs, but will be especially noticeable on "blocky" samples. Users sequencing "non-blocky" samples will likely notice minimal or no noticeable change.
Please note: you may observe a decrease in the reported pore occupancy in the MinKNOW UI and MinKNOW reports. We emphasise that this is a measurement correction, with no performance regression.
Additional information for the MinKNOW 26.01 update can be found in the release notes:
Please ensure you always use the most recent version of this protocol.
Direct RNA Barcoding Kit features
This kit is highly recommended for:
- Multiplexing up to 24 native RNA samples
- Exploring attributes of native RNA, such as modified bases
- Removing RT or PCR bias
- Transcripts that are difficult to reverse transcribe
Introduction to the Direct RNA Barcoding protocol
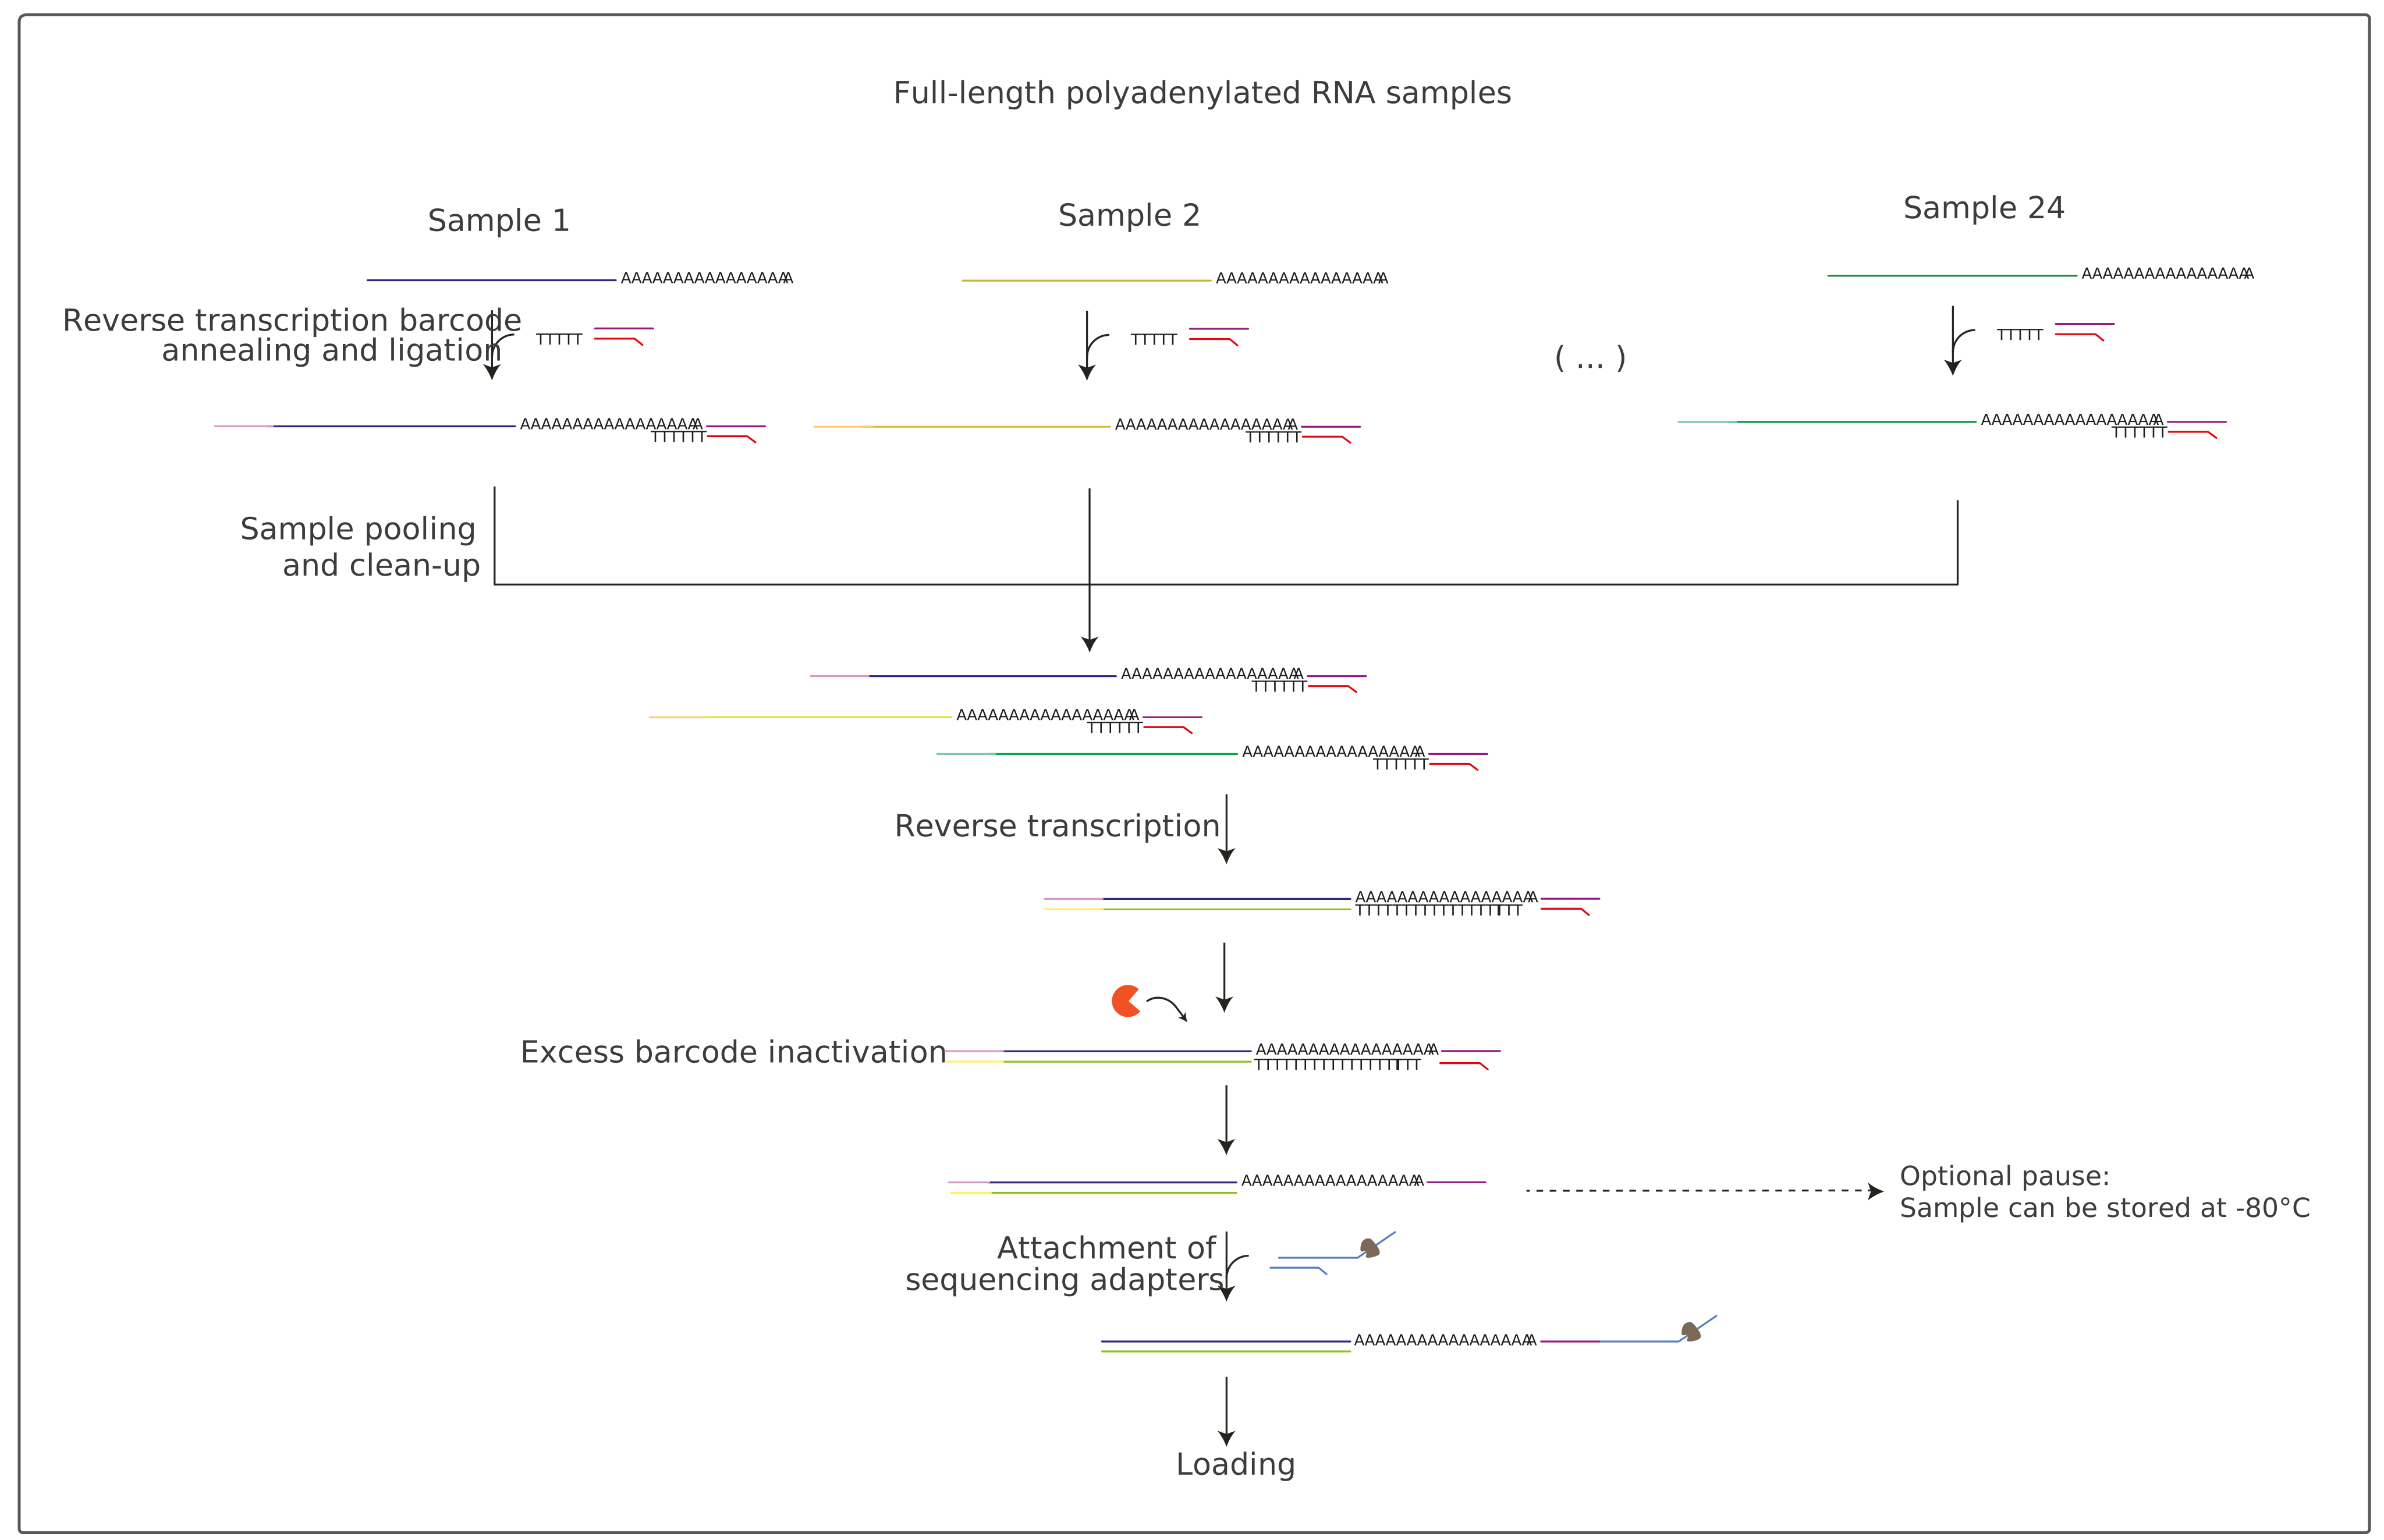
This protocol describes how to carry out multiplex sequencing of native RNA using the Direct RNA Barcoding Kit 24 (SQK-DRB004.24). Starting from poly(A)+ enriched RNA or from poly(A)-tailed IVT transcripts, reverse transcription barcodes are ligated to your samples, and your samples are pooled together. The barcoded samples are then reverse transcribed to perform first-strand synthesis, providing stability to the native RNA strand. A USER digestion reaction is performed to digest the overhangs from the excess Reverse Transcription Barcodes, preventing barcode cross-contamination. Sequencing adapters are then attached to the RNA-cDNA hybrid for sequencing on either MinION™/GridION™ or PromethION™ Flow Cells RNA (FLO-MIN004RA or FLO-PRO004RA respectively). Please note, the complementary cDNA strand is not sequenced, but improves the RNA sequencing output.
A control experiment following this method and using the RNA Control Strand (RCS) as your sample input can be completed first to become familiar with the technology.
Steps in the sequencing workflow:
Prepare for your experiment
You will need to:
- Extract your RNA, and check its length, quantity and purity. The quality checks performed during the protocol are essential in ensuring experimental success.
Note: Please ensure your extracted RNA concentration is sufficient to enable 450 fmol of RNA in 5 µl per sample input.
Tip: If using the NEBNext® High Input Poly(A) mRNA Isolation Module, we suggest reducing the elution volume of your sample to 7 µl to increase the concentration. This will allow sufficient volume for 1 µl to be used in the fragment analyser, 1 µl for quantification, and 5 µl to be taken forward for library preparation.
Note: The quantity of RNA required will vary depending on your RNA length. We suggest using a tool like the NEBioCalculator or equivalent to calculate the correct input mass for your sample(s).
- Perform poly(A)+ selection or transcript enrichment on your RNA samples.
- Ensure you have your sequencing kit, the correct equipment and third-party reagents.
- Download the software for acquiring and analysing your data.
- Check your flow cell(s) to ensure it has sufficient pores for a good sequencing run.
Library preparation
The Table below is an overview of the steps required in the library preparation, including timings and stopping points.
| Library preparation | Process | Time | Stop option |
|---|---|---|---|
| Reverse Transcription Barcode ligation | Ligate the Reverse Transcription Barcodes, quench the reaction with EDTA, pool your samples together and perform a sample clean-up | ~90 minutes | No pause at this stage. |
| Reverse transcription | Perform first-strand synthesis of the RNA for stability, and perform a sample clean-up | ~90 minutes | No pause at this stage. |
| Excess barcode inactivation | Perform USER digestion reaction to digest the overhangs from the excess Reverse Transcription Barcodes (RTB), and perform a sample clean-up | ~90 minutes | At this stage the RT-RNA can be stored at -80°C for later use. |
| Sequencing Adapter ligation and clean-up | Attach the sequencing adapters to the RNA-cDNA hybrid ends | ~90 minutes | We strongly recommend sequencing your library as soon as it is adapted. |
| Priming and loading the flow cell | Prime the flow cell and load the prepared library for sequencing | 10 minutes |
Sequencing and analysis
You will need to:
- Start a sequencing run using the MinKNOW™ software, which will collect raw data from the device and basecall the reads.
Direct RNA Barcoding Kit sample and multiplexing considerations
The number of samples you can multiplex will depend on the required sample output and coverage for your application. Please consider the total output you will obtain from a flow cell and adjust the number of samples accordingly.
We recommend starting from the following options:
- For poly(A)+ enriched RNA inputs we recommend multiplexing 4–8 samples.
- For poly(A)-tailed IVT transcript inputs we recommend multiplexing 12 samples, potentially increasing up to 24 samples depending on size and coverage requirements.
We do not recommend sequencing poly(A)+ enriched RNA inputs and poly(A)-tailed IVT transcript inputs on the same sequencing experiment.
Please note, the Direct RNA Barcoding Kit 24 (SQK-DRB004.24) has not been optimised for total RNA samples. Performance using total RNA cannot be guaranteed and will likely see reduced sequencing outputs.
Unlike DNA, RNA is translocated through the nanopore in the 3'-5' direction. However, the basecalling algorithms automatically flip the data, and the reads are displayed 5'-3'.
Compatibility of this protocol
This protocol should only be used in combination with:
- Direct RNA Barcoding Kit 24 (SQK-DRB004.24)
- Direct RNA Auxiliary Vials (EXP-DRA004)
- MinION/GridION Flow Cell RNA (FLO-MIN004RA)
- MinION™ Mk1D - MinION Mk1D IT requirements
- GridION™ - GridION IT requirements
2. Equipment and consumables
Materials
- Direct RNA Barcoding Kit 24 (SQK-DRB004.24)
- 450 fmol of poly(A)+ enriched RNA sample(s), or 450 fmol of poly(A)-tailed IVT transcript RNA sample(s)
Consumables
- MinION/GridION Flow Cells RNA (FLO-MIN004RA) or PromethION Flow Cells RNA (FLO-PRO004RA)
- T3 DNA Ligase (NEB, M0317)
- Induro® Reverse Transcriptase and 5x Induro® RT Reaction Buffer (NEB, M0681)
- Murine RNase Inhibitor (NEB, M0314)
- USER (Uracil-Specific Excision Reagent) Enzyme (NEB, M5505L)
- Agencourt RNAClean XP beads (Beckman Coulter®, A63987)
- 10 mM dNTP solution (e.g. NEB N0447)
- 5M NaCl, RNase-free (ThermoFisher, 10609823 or equivalent)
- NEBNext High Input Poly(A) mRNA Isolation Module (NEB, E3370)
- Nuclease-free water (e.g. Thermo Scientific, AM9937)
- Qubit™ RNA HS Assay Kit (ThermoFisher, Q32852)
- Qubit™ dsDNA HS Assay Kit (ThermoFisher, Q32851)
- Qubit™ Assay Tubes (Invitrogen, Q32856)
- 0.2 ml thin-walled PCR tubes or 0.2 ml 96-well PCR plate
- 1.5 ml Eppendorf DNA LoBind tubes
- PCR plate seals
Equipment
- MinION, GridION or PromethION device
- MinION/GridION Flow Cell Light Shield or PromethION Flow Cell Light Shield
- Vortex mixer
- Microfuge
- Hula mixer (gentle rotator mixer)
- Magnetic separation rack, suitable for 1.5 ml Eppendorf tubes
- Eppendorf 5424 centrifuge (or equivalent)
- Ice bucket with ice
- Timer
- Thermal cycler
- Qubit™ fluorometer (or equivalent for QC check)
- P1000 pipette and tips
- P200 pipette and tips
- P100 pipette and tips
- P20 pipette and tips
- P10 pipette and tips
- P2 pipette and tips
For this protocol, you will need ~450 fmol of poly(A)+ enriched RNA, or ~450 fmol of poly(A)-tailed IVT transcript RNA in 5 μl.
Note: Please ensure your extracted RNA concentration is sufficient to enable 450 fmol of RNA in 5 µl per sample input.
Tip: If using the NEBNext® High Input Poly(A) mRNA Isolation Module, we suggest reducing the elution volume of your sample to 7 µl to increase the concentration. This will allow sufficient volume for 1 µl to be used in the fragment analyser, 1 µl for quantification, and 5 µl to be taken forward for library preparation.
The quantity of RNA required will vary depending on your RNA length. It is possible to start the protocol from a lower sample input, however this will likely yield a lower output.
We suggest using a tool like the NEBioCalculator or equivalent to calculate the correct input mass for your sample(s).
Please note: This method has not been validated for total RNA inputs. Using total RNA as your starting material can lead to variable results, lower yields, and decreased sequencing outputs.
Input RNA
It is important that the input RNA meets the quantity and quality requirements. Using too little or too much RNA, or RNA of poor quality (e.g. fragmented or containing chemical contaminants) can affect your library preparation.
For instructions on how to perform quality control of your RNA sample, please read the Input DNA/RNA QC protocol.
For further information on using RNA as input, please read the links below.
These documents can also be found in the DNA/RNA Handling page.
We recommend using the NEBNext® High Input Poly(A) mRNA Isolation Module (E3370S) to isolate your poly(A)+ RNA samples. Alternative methods may be suitable, but these have not been tested by our internal teams.
Third-party reagents
We have validated and recommend the use of all the third-party reagents for this protocol. Alternatives have not been tested by Oxford Nanopore Technologies.
For all third-party reagents, we recommend following the manufacturer's instructions to prepare the reagents for use.
Check your flow cell
We highly recommend that you check the number of pores in your flow cell prior to starting a sequencing experiment. This should be done within 12 weeks of purchasing your MinION/GridION or PromethION Flow Cells RNA. Oxford Nanopore Technologies will replace any unused flow cell with fewer than the number of pores listed in the Table below, when the result is reported within two days of performing the flow cell check, and when the storage recommendations have been followed. To perform the flow cell check, please follow the instructions in the Flow Cell Check document.
| Flow cell | Minimum number of active pores covered by warranty |
|---|---|
| MinION/GridION Flow Cell RNA | 800 |
| PromethION Flow Cell RNA | 5000 |
Direct RNA Barcoding Kit 24 (SQK-DRB004.24) contents:
The Direct RNA Barcoding Kit 24 contains 24 unique barcodes and sufficient reagents for up to 6 library preparation reactions.
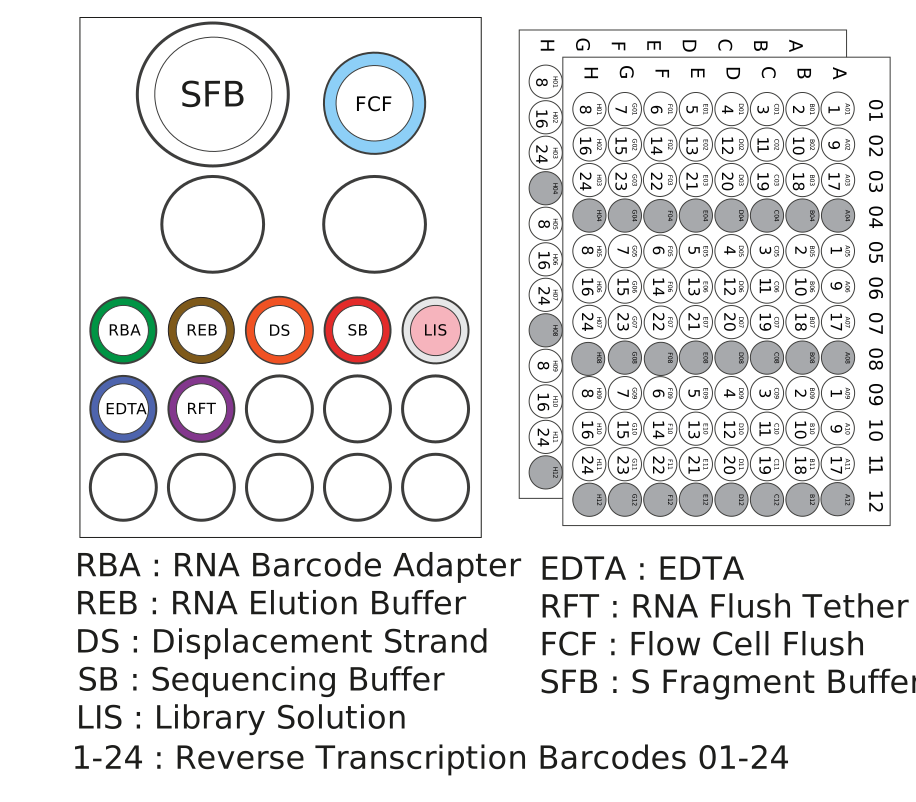
| Name | Acronym | Cap colour | No. of vials | Fill volume per vial (µl) |
|---|---|---|---|---|
| RNA Barcode Adapter | RBA | Green | 1 | 45 |
| RNA Elution Buffer | REB | Brown | 1 | 300 |
| Displacement Strand | DS | Orange | 1 | 10 |
| Sequencing Buffer | SB | Red | 1 | 700 |
| Library Solution | LIS | White cap, pink label | 1 | 600 |
| EDTA | EDTA | Blue | 1 | 700 |
| RNA Flush Tether | RFT | Purple | 1 | 200 |
| S Fragment Buffer | SFB | Clear bottle | 1 | 13,000 |
| Flow Cell Flush | FCF | Clear cap, light blue label | 1 | 8,000 |
| Reverse Transcription Barcode plate | RTB01-24 | - | 2 plates, 3 sets of barcodes per plate | 5 µl per well |
3. Reverse Transcription Barcode (RTB) ligation
Materials
- 450 fmol of poly(A)+ enriched RNA sample(s), or 450 fmol of poly(A)-tailed IVT transcript RNA sample(s)
- Reverse Transcription Barcode (RTB)
- EDTA (EDTA)
- Short Fragment Buffer (SFB)
Consumables
- T3 DNA Ligase (NEB, M0317)
- Agencourt RNAClean XP beads (Beckman Coulter®, A63987)
- Nuclease-free water (e.g. Thermo Scientific, AM9937)
- 0.2 ml thin-walled PCR tubes or 0.2 ml 96-well PCR plate
- 1.5 ml Eppendorf DNA LoBind tubes
Equipment
- Vortex mixer
- Microfuge
- Thermal cycler
- Hula mixer (gentle rotator mixer)
- Magnetic separation rack
- Ice bucket with ice
- P1000 pipette and tips
- P200 pipette and tips
- P100 pipette and tips
- P20 pipette and tips
- P10 pipette and tips
- P2 pipette and tips
Perform a flow cell check
We recommend performing a flow cell check before starting your library preparation to ensure you have a flow cell with sufficient pores for a good sequencing run.
To perform a flow cell check, please follow the instructions in the flow cell check document.
Prepare the reagents acording to the table below:
| Reagent | 1. Thaw at room temperature | 2. Mixing method | 3. Briefly spin down | 4. Store on ice until use |
|---|---|---|---|---|
| T3 DNA Ligase | Not frozen, place directly on ice. | Do not vortex. | ✓ | ✓ |
| StickTogether™ DNA Ligase Buffer | ✓ | Mix by vortexing | ✓ | ✓ |
| EDTA | ✓ | Mix by vortexing | ✓ | ✓ |
| Short Fragment Buffer (SFB) | ✓ | Mix by vortexing | ✓ | ✓ |
| Reverse Transcription Barcodes (RTB) | ✓ | Mix using a plate shaker, by thoroughly flicking the wells, or by individually pipetting the wells you plan on using | ✓ | ✓ |
Note: The StickTogether DNA Ligase Buffer may have a little precipitate. Allow the buffer to come to room temperature and then pipette the buffer up and down several times to break up the precipitate, followed by vortexing the tube for several seconds to ensure the reagent is thoroughly mixed.
The wells of the Reverse Transcription Barcode (RTB) plate are intended for single use only. Please ensure your barcode well is sealed before use, and do not reuse the barcode well once pierced/opened.
Direct RNA Barcoding Kit sample and multiplexing considerations
The number of samples you can multiplex will depend on the required sample output and coverage for your application. Please consider the total output you will obtain from a flow cell and adjust the number of samples accordingly.
We recommend starting from the following options:
- For poly(A)+ enriched RNA inputs we recommend multiplexing 4–8 samples.
- For poly(A)-tailed IVT transcript inputs we recommend multiplexing 12 samples, potentially increasing up to 24 samples depending on size and coverage requirements.
We do not recommend sequencing poly(A)+ enriched RNA inputs and poly(A)-tailed IVT transcript inputs on the same sequencing experiment.
Please note, the Direct RNA Barcoding Kit 24 (SQK-DRB004.24) has not been optimised for total RNA samples. Performance using total RNA cannot be guaranteed and will likely see reduced sequencing outputs.
Select a unique Reverse Transcription Barcode (RTB) for each sample to be run together on the same flow cell.
Please note: Up to 24 samples can be barcoded and combined in one experiment. Only use one barcode per sample.
Prepare the RNA in nuclease-free water as follows:
- Transfer ~450 fmol of poly(A)+ enriched RNA or poly(A)-tailed IVT transcript sample into a separate 0.2 ml thin-walled PCR tube or separate wells on a PCR plate.
- Adjust the volume of each sample to 5 μl with nuclease-free water.
- Mix thoroughly by flicking the tube or by gently pipette mixing to avoid unwanted shearing.
- Spin down briefly in a microfuge.
In the 0.2 ml PCR-tubes or a 96-well plate containing your RNA samples, add the reagents in the following order per well:
| Reagent | Volume |
|---|---|
| RNA sample (from previous step) | 5 µl |
| StickTogether Ligase Buffer (2x) | 7.5 µl |
| Reverse Transcription Barcode (RTB) | 1 µl |
| T3 DNA Ligase | 1.5 µl |
| Total | 15 µl |
Thoroughly mix the reaction by flicking and briefly spinning down.
Incubate the reaction(s) for 20 minutes at 25°C using a thermal cycler.
Remove the reaction(s) from the thermal cylcer.
Add 1 µl of EDTA (EDTA) to each sample, mix by flicking ensuring the reaction is homogenised, and briefly spin down the samples.
EDTA is added at this step to stop the ligation reaction before sample pooling.
Note: If this reaction is not performed, you will increase the likelihood of barcode cross-contamination.
Incubate the reaction(s) for 5 minutes at room temperature.
Briefly spin down your samples, and pool all the Reverse Transcription Barcoded samples in a clean 1.5 ml Eppendorf DNA LoBind tube.
Resuspend the RNAClean XP beads by vortexing.
Add 1X volume of the RNAClean XP beads to the pooled samples, and mix by flicking.
Follow the table below for volume guidance depending on the number of samples multiplexed:
| Number of samples multiplexed | Volume of samples pooled | Volume of beads added to samples | Total final volume in tube |
|---|---|---|---|
| 4 | 64 µl | 64 µl | 128 µl |
| 6 | 96 µl | 96 µl | 192 µl |
| 8 | 128 µl | 128 µl | 256 µl |
| 12 | 192 µl | 192 µl | 384 µl |
| 24 | 384 µl | 384 µl | 768 µl |
Incubate on a Hula mixer (rotator mixer) for 10 minutes at room temperature.
Briefly vortex the Short Fragment Buffer (SFB).
Remove your pooled samples from the Hula mixer, briefly spin down, and pellet on a magnet for 5–10 minutes. Keep the tube on the magnetic rack until the eluate is clear and colourless, and pipette off the supernatant.
Tip: ~10 µl of the supernatant can be left behind to avoid dislodging the beads.
Wash the beads using 500 µl of Short Fragment Buffer (SFB). Flick the beads to resuspend, spin down, then return the sample to the magnetic rack and allow the beads to pellet for at least 5 minutes, until the buffer is clear. Remove the buffer using a pipette and discard.
Spin down and place the tube back on the magnetic rack. Pipette off any residual buffer using a P20 pipette.
Allow the pellet to dry for ~30 seconds, but do not dry the pellet to the point of cracking.
Remove the tube from the magnetic rack and resuspend the pellet in nuclease-free water following the guidance below. Mix by gently flicking tube and briefly spin down.
Follow the table below for volume guidance depending on the number of samples multiplexed:
| Number of samples multiplexed | Volume of nuclease-free water used in the elution |
|---|---|
| 1–8 | 28 µl |
| 9–16 | 56 µl |
| 17–24 | 84 µl |
Incubate the elution for 10 minutes at room temperature.
Pellet the beads on a magnetic rack for 5 minutes, until the eluate is clear and colourless
Remove and retain the full volume of eluate into a clean 1.5 ml Eppendorf DNA LoBind tube.
Take forward the Reverse Transcription Barcode adapted RNA samples to the reverse transcription step.
4. Reverse transcription
Materials
- Reverse Transcription Barcode adapted RNA samples
- Short Fragment Buffer (SFB)
Consumables
- Induro® Reverse Transcriptase and 5x Induro® RT Reaction Buffer (NEB, M0681)
- 10 mM dNTP solution (e.g. NEB N0447)
- Murine RNase Inhibitor (NEB, M0314)
- Agencourt RNAClean XP beads (Beckman Coulter®, A63987)
- Nuclease-free water (e.g. Thermo Scientific, AM9937)
- 0.2 ml thin-walled PCR tubes
- 1.5 ml Eppendorf DNA LoBind tubes
Equipment
- Vortex mixer
- Microfuge
- Thermal cycler
- Hula mixer (gentle rotator mixer)
- Magnetic separation rack
- Ice bucket with ice
- P1000 pipette and tips
- P200 pipette and tips
- P100 pipette and tips
- P20 pipette and tips
- P10 pipette and tips
- P2 pipette and tips
Prepare the reagents acording to the table below:
| Reagent | 1. Thaw at room temperature | 2. Briefly spin down | 3. Mix well by pipetting | 4. Store on ice until use |
|---|---|---|---|---|
| Induro RT Buffer (5x) | ✓ | ✓ | ✓ | ✓ |
| 10 mM dNTP solution | ✓ | ✓ | ✓ | ✓ |
| Murine RNase Inhibitor | ✓ | ✓ | ✓ | ✓ |
| Induro Reverse Transcriptase | ✓ | ✓ | ✓ | ✓ |
| Short Fragment Buffer (SFB) | ✓ | ✓ | ✓ | Not required |
The reverse transcription reaction is performed in split reactions when multiplexing >8 samples to ensure optimal sample-to-reagent ratios.
Please follow the guidance in the steps below.
In a clean 0.2 ml PCR tube, prepare the reverse transcription reagent master mix as follows:
| Reagent | Volume for up to 8 samples, performed in 1 reaction | Volume for 9–16 samples, performed in 2 reactions | Volume for 17–24 samples, performed in 3 reactions |
|---|---|---|---|
| Induro RT Buffer (5x) | 8 µl | 16 µl | 24 µl |
| 10 mM dNTP solution | 2 µl | 4 µl | 6 µl |
| Murine RNase Inhibitor | 0.4 µl | 0.8 µl | 1.2 µl |
| Total volume | 10.4 µl | 20.8 µl | 31.2 µl |
Mix well by pipetting and briefly spin down.
In a clean 0.2 ml PCR tube(s), prepare the reverse transcription reaction as follows:
| Reagent | Volume for up to 8 samples, performed in 1 reaction | Volume for 9–16 samples, performed in 2 reactions | Volume for 17–24 samples, performed in 3 reactions |
|---|---|---|---|
| Volume of pooled barcoded samples per reaction | 28 µl | 28 µl | 28 µl |
| Reverse transcription master mix (from previous step) | 10.4 µl | 10.4 µl | 10.4 µl |
| Total volume per reaction | 38.4 µl | 38.4 µl | 38.4 µl |
| Total number of reactions | 1 | 2 | 3 |
To each reverse transcription reaction add 2 µl of Induro Reverse Transcriptase. Mix gently by pipetting until the sample is thoroughly mixed.
Please note, you will have a different number of reactions depending on the number of samples multiplexed.
- For up to 8 samples, 1 reaction
- For 9–16 samples, 2 reactions
- For 17–24 samples, 3 reactions
Incubate reaction(s) in a thermal cycler for 30 minutes at 60°C followed by 10 minutes at 70°C.
Transfer your samples into a clean 1.5 mL Eppendorf LoBind DNA tube.
Note: Pool all your reaction(s) into the same tube if you are running more than 8 barcodes and have split the reverse transcription reaction.
| Number of samples | Number of reactions pooled | Final pooled volume |
|---|---|---|
| 1–8 samples | 1 | 40.4 µl |
| 9–16 samples | 2 | 80.8 µl |
| 17–24 samples | 3 | 121.2 µl |
Resuspend the RNAClean XP beads by vortexing.
Add 1.5X volume of the RNAClean XP beads to the pooled samples, and mix by flicking.
Incubate on a Hula mixer (rotator mixer) for 10 minutes at room temperature.
Briefly vortex the Short Fragment Buffer (SFB).
Remove your pooled samples from the Hula mixer, briefly spin down, and pellet on a magnet for 5-10 minutes. Keep the tube on the magnetic rack until the eluate is clear and colourless, and pipette off the supernatant.
Tip: ~10 µl of the supernatant can be left behind to avoid dislodging the beads.
Wash the beads using 150 µl of Short Fragment Buffer (SFB). Flick the beads to resuspend, spin down, then return the sample to the magnetic rack and allow the beads to pellet. Remove the buffer using a pipette and discard.
Spin down and place the tube back on the magnetic rack. Pipette off any residual buffer using a P20 pipette.
Allow the pellet to dry for ~30 seconds, but do not dry the pellet to the point of cracking.
Remove the tube from the magnetic rack and resuspend the pellet in 41 µl of nuclease-free water. Mix by gently flicking tube and briefly spin down.
Incubate the elution for 10 minutes at room temperature.
Pellet the beads on a magnetic rack for 5 minutes, until the eluate is clear and colourless
Remove and retain the full volume of eluate into a clean 1.5 ml Eppendorf DNA LoBind tube.
Quantify 1 µl of eluted sample using a Qubit fluorometer and the Qubit dsDNA HS kit.
- Expected recovery for poly(A)+ enriched RNA samples: 400–600 ng in a 4-plex prep.
- Expected recovery for poly(A)-tailed IVT transcripts: 800–1000 ng in a 12-plex prep.
- Expected recovery for poly(A)-tailed IVT transcripts: 1600–2000 ng in a 24-plex prep.
Take forward your reverse transcribed samples to the excess barcode inactivation step.
5. Excess barcode inactivation
Materials
- Reverse transcribed RNA samples
- Short Fragment Buffer (SFB)
Consumables
- rCutSmart™ Buffer (NEB, B6004S)
- USER (Uracil-Specific Excision Reagent) Enzyme (NEB, M5505L)
- Agencourt RNAClean XP beads (Beckman Coulter®, A63987)
- Nuclease-free water (e.g. Thermo Scientific, AM9937)
- 0.2 ml thin-walled PCR tubes
- 1.5 ml Eppendorf DNA LoBind tubes
- Qubit™ RNA HS Assay Kit (ThermoFisher, Q32852)
- Qubit™ dsDNA HS Assay Kit (ThermoFisher, Q32851)
- Qubit™ Assay Tubes (Invitrogen, Q32856)
Equipment
- Vortex mixer
- Microfuge
- Hula mixer (gentle rotator mixer)
- Magnetic separation rack
- Qubit™ fluorometer (or equivalent for QC check)
- Ice bucket with ice
- P1000 pipette and tips
- P200 pipette and tips
- P100 pipette and tips
- P20 pipette and tips
- P10 pipette and tips
- P2 pipette and tips
- Eppendorf 5424 centrifuge (or equivalent)
- Thermomixer or heat block
Prepare the reagents acording to the table below:
| Reagent | 1. Thaw at room temperature | 2. Briefly spin down | 3. Mix well by pipetting | 4. Store on ice until use |
|---|---|---|---|---|
| rCutSmart buffer | ✓ | ✓ | ✓ | Not required |
| USER enzyme | Not frozen | ✓ | ✓ | ✓ |
| Short Fragment Buffer (SFB) | ✓ | ✓ | ✓ | Not required |
Set up the reaction in the tube containing your reverse transcribed samples:
Optional: The reaction can be set up in the same 1.5 ml Eppendorf tube from the previous step. But if your thermal cycler or heat block is only suitable for 0.2 ml PCR tubes, you can transfer the samples and set up the reaction in the consumable suitable for your equipment.
| Reagent | Volume |
|---|---|
| Reverse transcribed RNA samples (from previous step) | 40 µl |
| rCutSmart buffer | 5 µl |
| USER enzyme | 5 µl |
| Total | 50 µl |
Incubate the reaction for 30 minutes at 37°C.
Optional: Once the incubation is completed, if you have performed the reaction in a 0.2 ml PCR tube we suggest transferring the full volume back to a clean 1.5 ml Eppendorf LoBind tube for the clean-up steps.
Resuspend the RNAClean XP beads by vortexing.
Add 75 µl of the RNAClean XP beads to the sample tube, and mix by flicking.
Incubate on a Hula mixer (rotator mixer) for 10 minutes at room temperature.
Briefly vortex the Short Fragment Buffer (SFB).
Remove your pooled samples from the Hula mixer, briefly spin down, and pellet on a magnet for 5-10 minutes. Keep the tube on the magnetic rack until the eluate is clear and colourless, and pipette off the supernatant.
Tip: ~10 µl of the supernatant can be left behind to avoid dislodging the beads.
Wash the beads with 150 µl of Short Fragment Buffer (SFB). Flick the beads to fully resuspend the pellet, spin down, then return the sample to the magnetic rack and allow the beads to pellet. Remove the buffer using a pipette and discard.
Note: Leave behind ~10 µl of supernatant, to avoid dislodging the beads.
Repeat the previous step.
Spin down and place the tube back on the magnetic rack. Pipette off any residual buffer.
Allow to dry for ~30 seconds, but do not dry the pellet to the point of cracking.
Remove the tube from the magnetic rack and resuspend the pellet in 21 µl nuclease-free water by gently flicking.
Incubate for 10 minutes at room temperature.
Pellet the beads on a magnetic rack for 5 minutes, until the eluate is clear and colourless.
Remove and retain 21 µl of eluate into a clean 1.5 ml Eppendorf DNA LoBind tube.
Quantify 1 µl of eluted sample using a Qubit fluorometer and the Qubit dsDNA HS kit.
- Expected recovery for poly(A)+ enriched RNA samples: 300–500 ng in a 4-plex prep.
- Expected recovery for poly(A)-tailed IVT transcripts: 450–650 ng in a 12-plex prep.
- Expected recovery for poly(A)-tailed IVT transcripts: 900–1300 ng in a 24-plex prep.
Please note: You may not be carrying forward the full amount of your RNA sample into the final sequencing adapter ligation step. Please follow the recommendations in the steps below for optimal reaction efficiency and flow cell loading occupancy to maximise output.
The excess prepared RNA library from this stage can be stored at -80°C as a checkpoint.
Take forward your prepared samples to the sequencing adapter ligation step.
Pause option: At this stage the samples can be stored overnight at -80°C.
6. Sequencing adapter ligation
Materials
- Reverse transcribed and sacrificial strand digested RNA samples
- RNA Barcode Adapter (RBA)
- RNA Elution Buffer (REB)
- Short Fragment Buffer (SFB)
- Displacement Strand (DS)
Consumables
- T3 DNA Ligase (NEB, M0317)
- 5M NaCl, RNase-free (ThermoFisher, 10609823 or equivalent)
- Agencourt RNAClean XP beads (Beckman Coulter®, A63987)
- Nuclease-free water (e.g. Thermo Scientific, AM9937)
- 1.5 ml Eppendorf DNA LoBind tubes
- Qubit™ dsDNA HS Assay Kit (ThermoFisher, Q32851)
- Qubit™ Assay Tubes (Invitrogen, Q32856)
Equipment
- Vortex mixer
- Microfuge
- Thermal cycler
- Thermomixer or heat block
- Hula mixer (gentle rotator mixer)
- Magnetic separation rack
- Qubit™ fluorometer (or equivalent for QC check)
- Ice bucket with ice
- P1000 pipette and tips
- P200 pipette and tips
- P100 pipette and tips
- P20 pipette and tips
- P10 pipette and tips
- P2 pipette and tips
- Eppendorf 5424 centrifuge (or equivalent)
Prepare the reagents acording to the table below:
| Reagent | 1. Thaw at room temperature | 2. Briefly spin down | 3. Mix well by pipetting | 4. Store on ice until use |
|---|---|---|---|---|
| StickTogether Ligase Buffer | ✓ | ✓ | ✓ | ✓ |
| T3 DNA Ligase | Not frozen | ✓ | ✓ | ✓ |
| RNA Barcode Adapter (RBA) | Not frozen | ✓ | ✓ | ✓ |
| Short Fragment Buffer (SFB) | ✓ | ✓ | ✓ | Not required |
| RNA Elution Buffer (REB) | ✓ | ✓ | ✓ | Not required |
| Displacement Strand (DS) | ✓ | ✓ | ✓ | ✓ |
Please note the RNA library input into sequenicng adapter ligation is recommended based on the optimal performance results from our internal testing.
- For poly(A) enriched RNA samples, our internal input testing was performed on ~2.4 kb poly(A) selected UHRR.
- For poly(A) tailed IVT transcript samples, our internal input testing was performed on 1–1.2 kb IVT transcripts.
We recommend following the input guidance below for your initial experiments. Further input optimisation may be beneficial for samples of different lengths.
In a 1.5 ml Eppendorf DNA LoBind tube, prepare your RNA library as follows:
1. Take forward 400 fmol of your RNA library.
The molarity can be calculated based on your RNA sample input length(s) and the quantification performed at the end of the excess barcode inactivation step. We suggest using a tool like the NEBioCalculator or equivalent to calculate the correct input mass for your sample(s).
2. Make up the volume of your RNA library to 20 µl with nuclease-free water.
In the 1.5 ml Eppendorf DNA LoBind tube containing your RNA library, combine the reagents in the following order for the sequencing adapter ligation:
| Reagent | Volume |
|---|---|
| RNA samples (already in tube from previous step) | 20 µl |
| StickTogether Ligase Buffer | 30 µl |
| RNA Barcode Adapter (RBA) | 6 µl |
| T3 DNA Ligase | 4 µl |
| Total | 60 µl |
Mix by pipetting.
Incubate the reaction for 30 minutes at 25°C using a heat block or thermal cycler.
In a clean 1.5 ml Eppendorf DNA LoBind tube, prepare 1.4 M NaCl for your sample as follows and mix thoroughly by pipetting:
| Reagent | Volume |
|---|---|
| 5M NaCl | 14 µl |
| Nuclease-free water | 36 µl |
| Total volume of 1.4M NaCl | 50 µl |
Add 40 µl of the prepared 1.4M NaCl to your sequencing adapter ligated sample library.
Resuspend the stock of Agencourt RNAClean XP beads by vortexing.
Add 36 µl of resuspended Agencourt RNAClean XP beads to each reaction and mix by pipetting.
Incubate on a Hula mixer (rotator mixer) for 10 minutes at room temperature.
Briefly vortex the Short Fragment Buffer (SFB).
Remove your pooled samples from the Hula mixer, briefly spin down, and pellet on a magnet for 5-10 minutes. Keep the tube on the magnetic rack until the eluate is clear and colourless, and pipette off the supernatant.
Tip: ~10 µl of the supernatant can be left behind to avoid dislodging the beads.
Wash the beads with 150 µl of Short Fragment Buffer (SFB). Flick the beads to fully resuspend the pellet, spin down, then return the sample to the magnetic rack and allow the beads to pellet (for at least 5–10 minutes). Remove the buffer using a pipette and discard.
Note: Leave behind ~10 µl of supernatant, to avoid dislodging the beads.
Repeat the previous step.
Spin down and place the tube back on the magnetic rack. Pipette off any residual buffer.
Allow to dry for ~30 seconds, but do not dry the pellet to the point of cracking.
Remove the tube from the magnetic rack and resuspend the pellet in 13 µl RNA Elution Buffer (REB) by gently flicking the tube. Incubate for 10 minutes at room temperature.
Pellet the beads on a magnetic rack for 5 minutes, until the eluate is clear and colourless.
Remove and retain 13 µl of eluate into a clean 1.5 ml Eppendorf DNA LoBind tube.
Quantify 1 µl of your RNA library on a Qubit™ fluorometer using the Qubit™ dsDNA HS assay.
- Expected recovery for sequencing adapter ligation: 200–250 ng.
We recommend taking forward and loading the full volume of your sequencing adapter-ligated RNA library on your flow cell.
Please note: If you are observing a recovery <150 ng at this stage, your recovery might have been sub-optimal and you may observe lower than expected pore occupancy and sequencing output. Please proceed with caution, or revert back to any retained excess sample from the excess barcode inactivation step check-point.
The Displacement Strand (DS) added below greatly reduces any free sequencing adapter found in your RNA library.
This greatly improves pore occupancy and output on your flow cell.
Add 1 µl of Displacement Strand (DS) to your RNA library. Incubate for at least 5 minutes at room temperature.
Your RNA library is now ready for loading into the flow cell.
The RNA library must be sequenced immediately and cannot be stored for later use.
7. Priming and loading the MinION/GridION Flow Cell
Materials
- Library Solution (LIS)
- Sequencing Buffer (SB)
- RNA Flush Tether (RFT)
- Flow Cell Flush (FCF)
Consumables
- MinION/GridION Flow Cell RNA (FLO-MIN004RA)
- 1.5 ml Eppendorf DNA LoBind tubes
Equipment
- MinION or GridION device
- MinION/GridION Flow Cell Light Shield
- Vortex mixer
- Microfuge
- P1000 pipette and tips
- P200 pipette and tips
- P100 pipette and tips
- P20 pipette and tips
Please note, this kit is only compatible with RNA flow cells (FLO-MIN004RA).
Take the flow cell out of the fridge and leave it at room temperature for 20 minutes. This will improve visibility of the array during priming and sample loading.
Priming and loading a flow cell
We recommend that you watch the Priming and loading a flow cell video, before your first run.
Thaw the Sequencing Buffer (SB), Library Solution (LIS), RNA Flush Tether (RFT) and Flow Cell Flush (FCF) at room temperature. Mix by vortexing and spin down where applicable.
To prepare the flow cell priming mix, combine the following reagents in a clean 1.5 ml Eppendorf DNA LoBind tube. Mix by vortexing and spin down.
| Reagent | Volume per flow cell |
|---|---|
| RNA Flush Tether (RFT) | 30 µl |
| Flow Cell Flush (FCF) | 1,170 µl |
| Total | 1,200 µl |
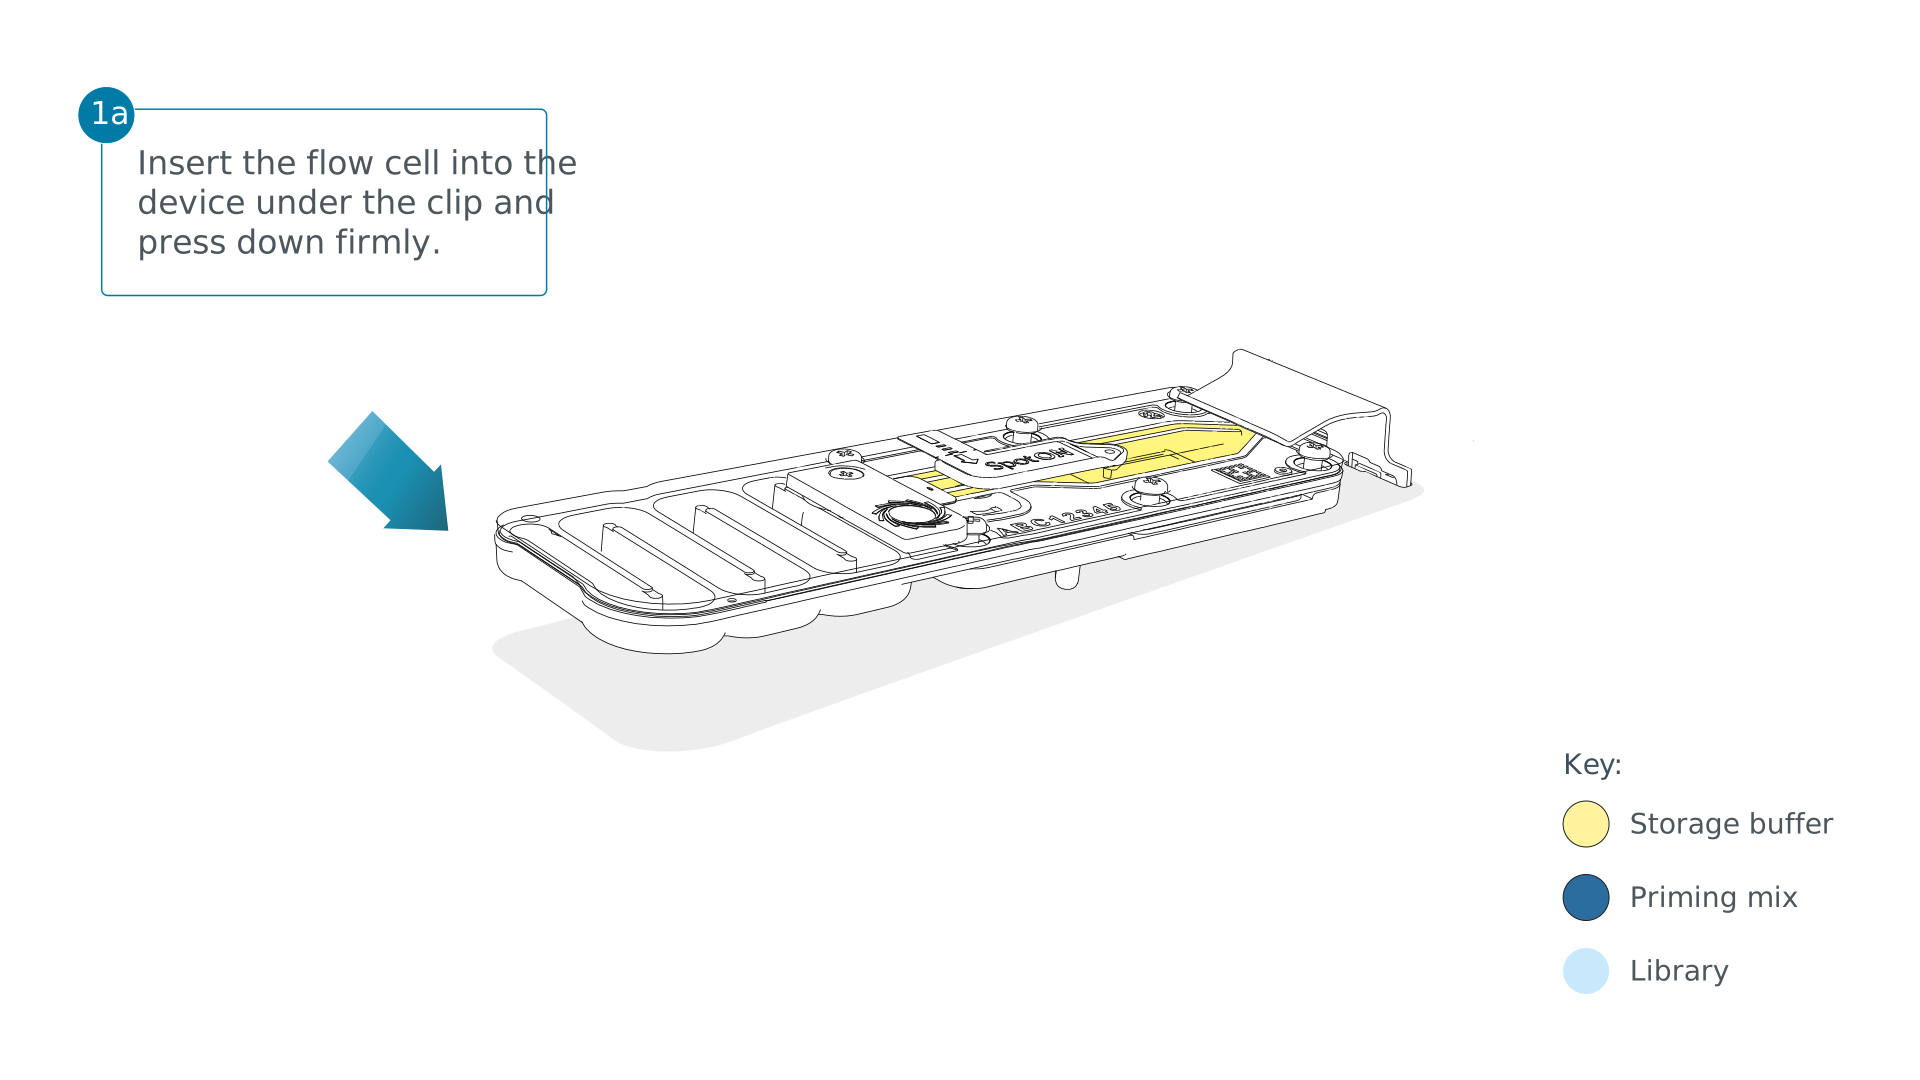
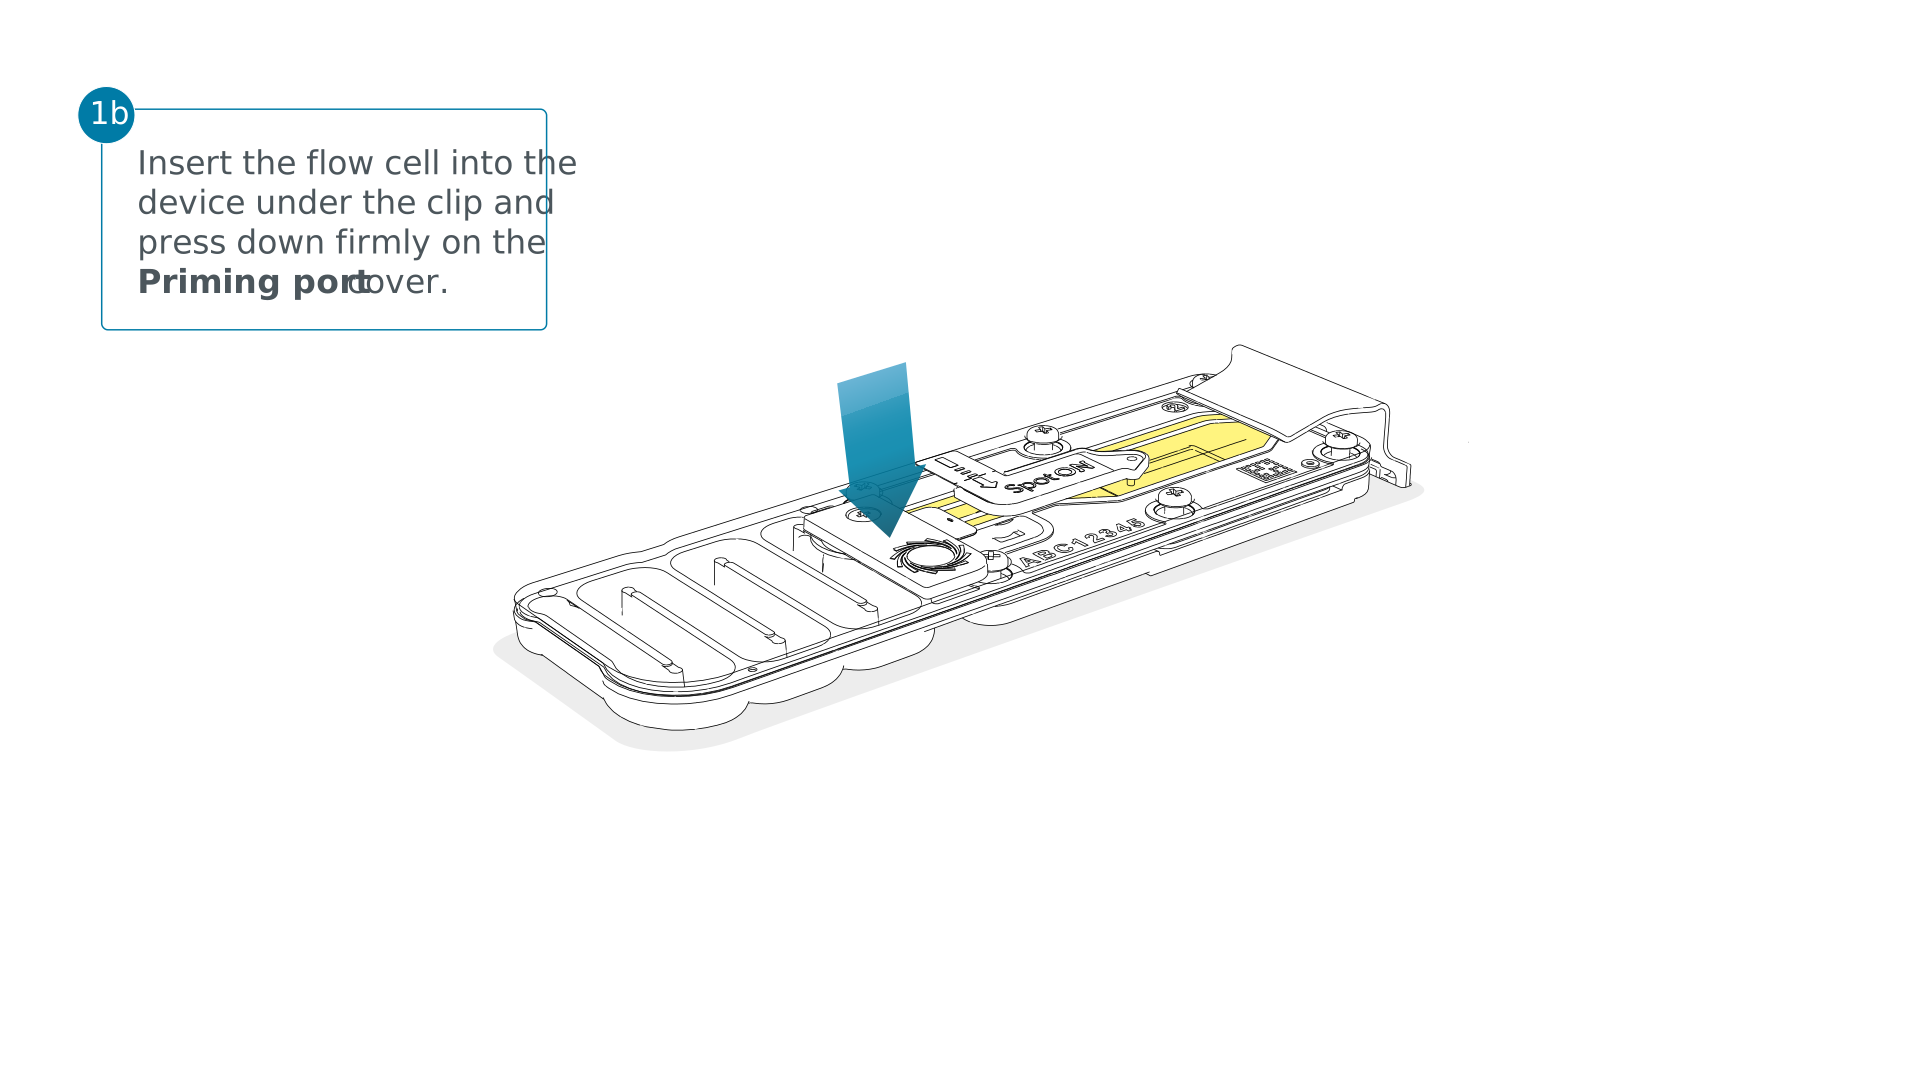
Open the MinION or GridION device lid and slide the flow cell under the clip. Press down firmly on the priming port cover to ensure correct thermal and electrical contact.
Complete a flow cell check to assess the number of pores available before loading the library.
This step can be omitted if the flow cell has been checked previously.
See the flow cell check document for more information.
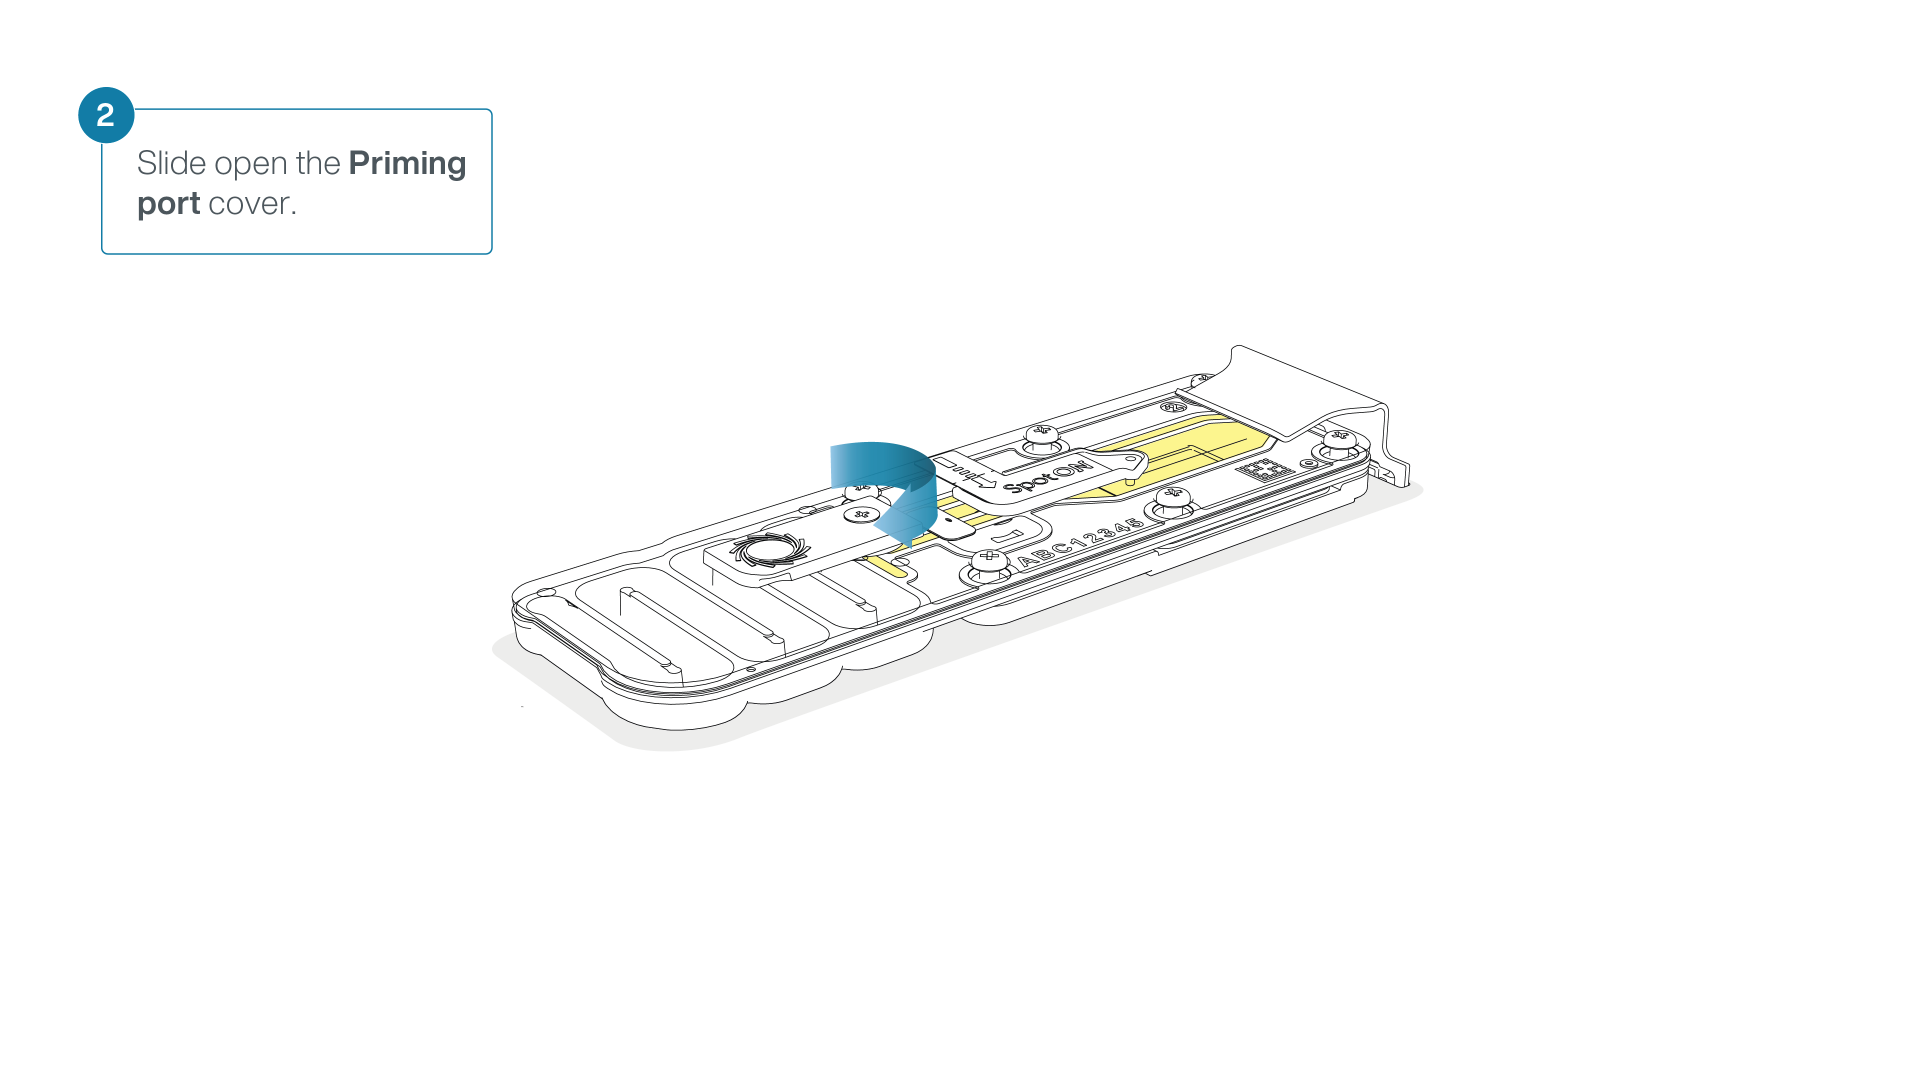
Slide the flow cell priming port cover clockwise to open the priming port.
Take care when drawing back buffer from the flow cell. Do not remove more than 20-30 µl, and make sure that the array of pores are covered by buffer at all times. Introducing air bubbles into the array can irreversibly damage the pores.
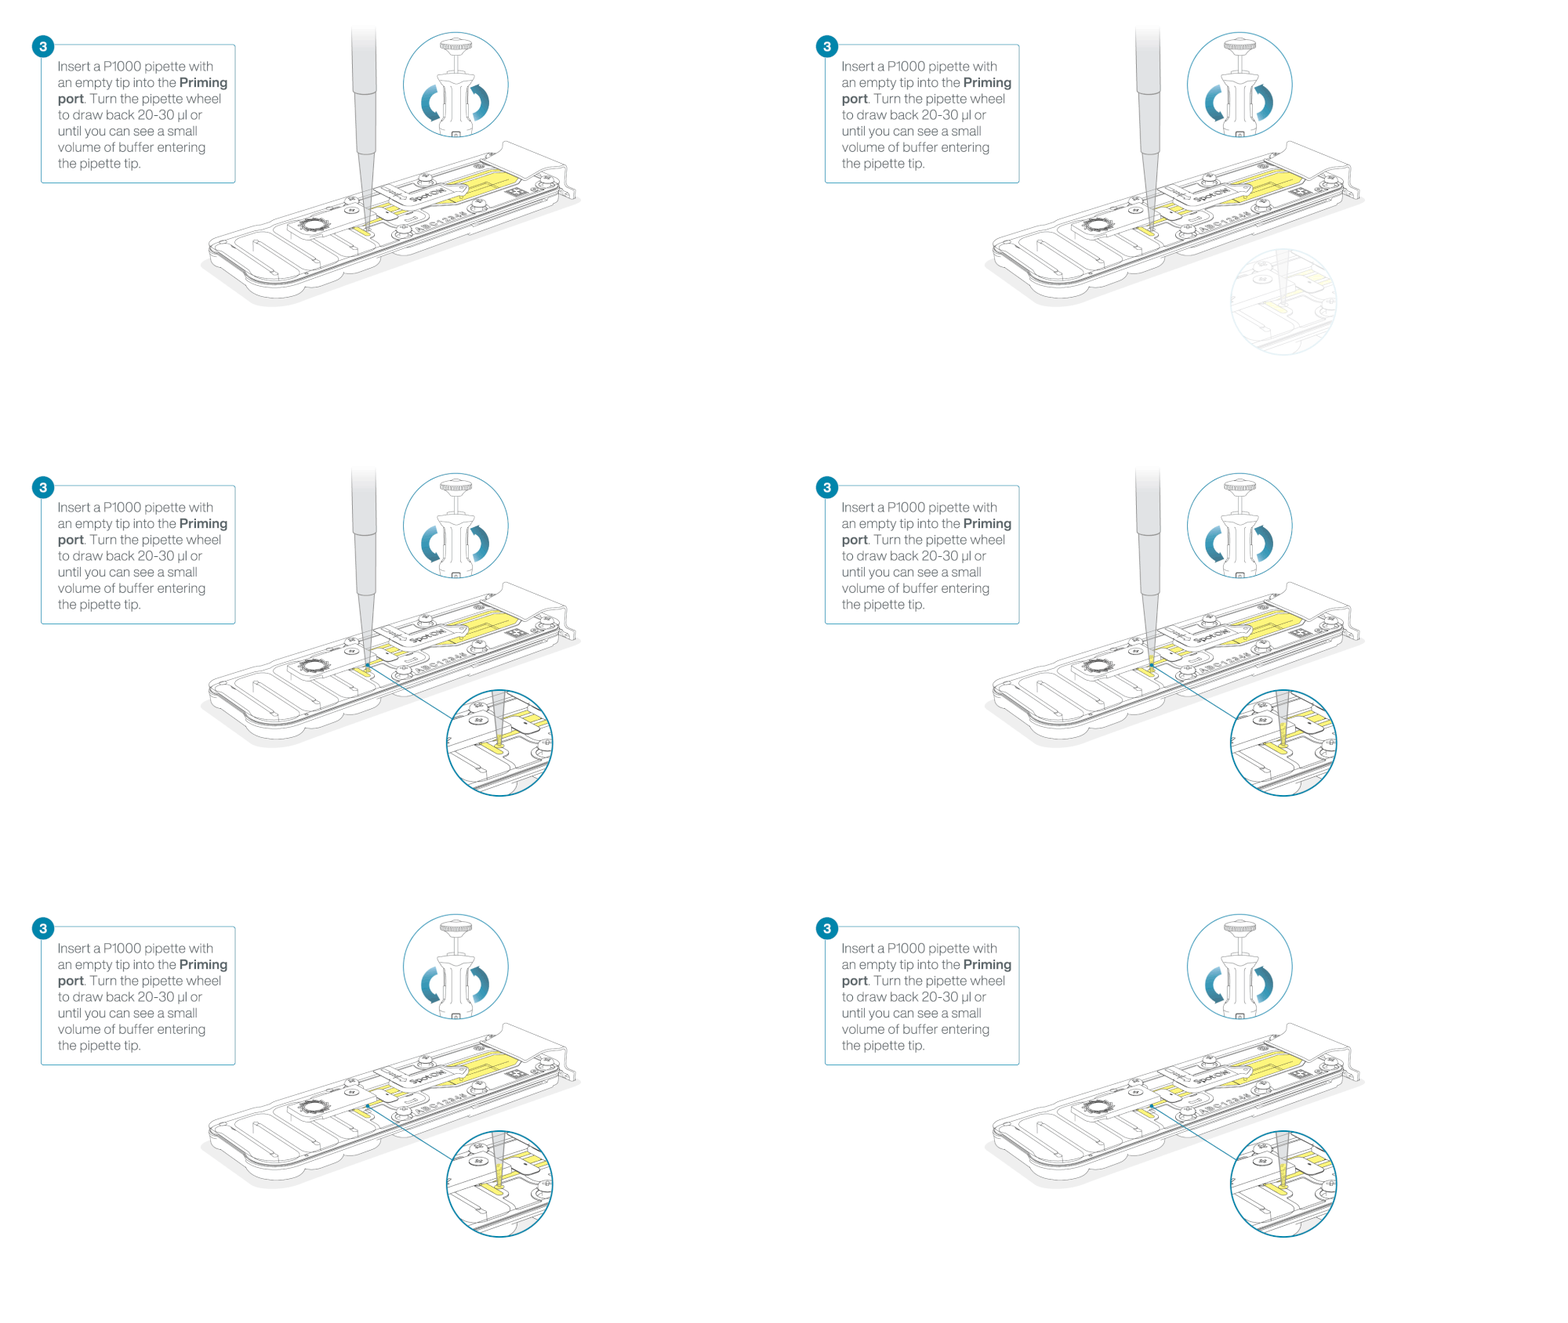
After opening the priming port, check for small air bubbles under the cover. Draw back a small volume to remove any bubbles:
- Set a P1000 pipette with tip to 200 µl.
- Insert the tip into the priming port.
- Turn the wheel until the dial shows 220-230 µl and draw back 20-30 µl, or until you can see a small volume of buffer entering the pipette tip.
Note: Visually check that there is continuous buffer from the priming port across the sensor array.
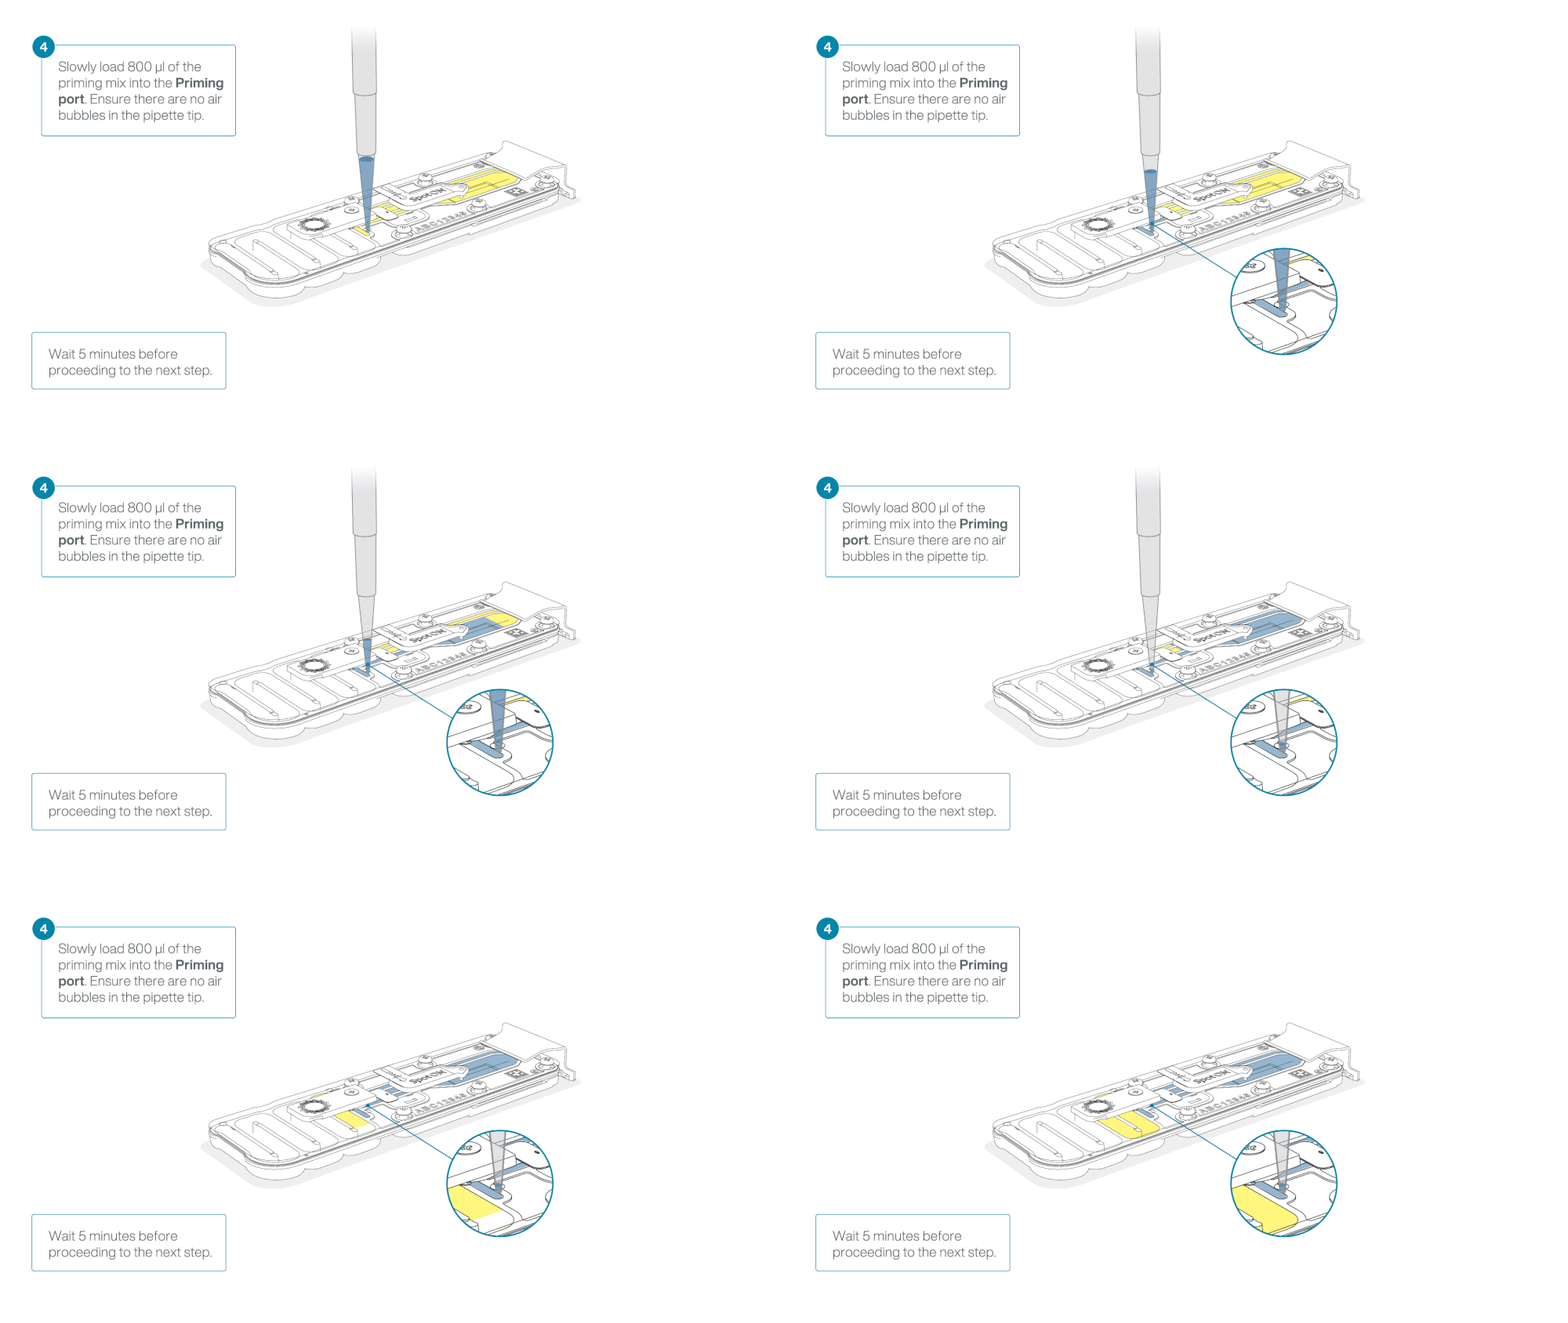
Load 800 µl of the priming mix into the flow cell via the priming port, avoiding the introduction of air bubbles. Wait for five minutes. During this time, prepare the library for loading by following the steps below.
In a clean 1.5 ml Eppendorf DNA LoBind tube, prepare the library for loading as follows:
| Reagent | Volume per flow cell |
|---|---|
| Sequencing Buffer (SB) | 37.5 µl |
| Library Solution (LIS) | 25.5 µl |
| Full volume of RNA library | ~12 µl |
| Total | 75 µl |
Complete the flow cell priming:
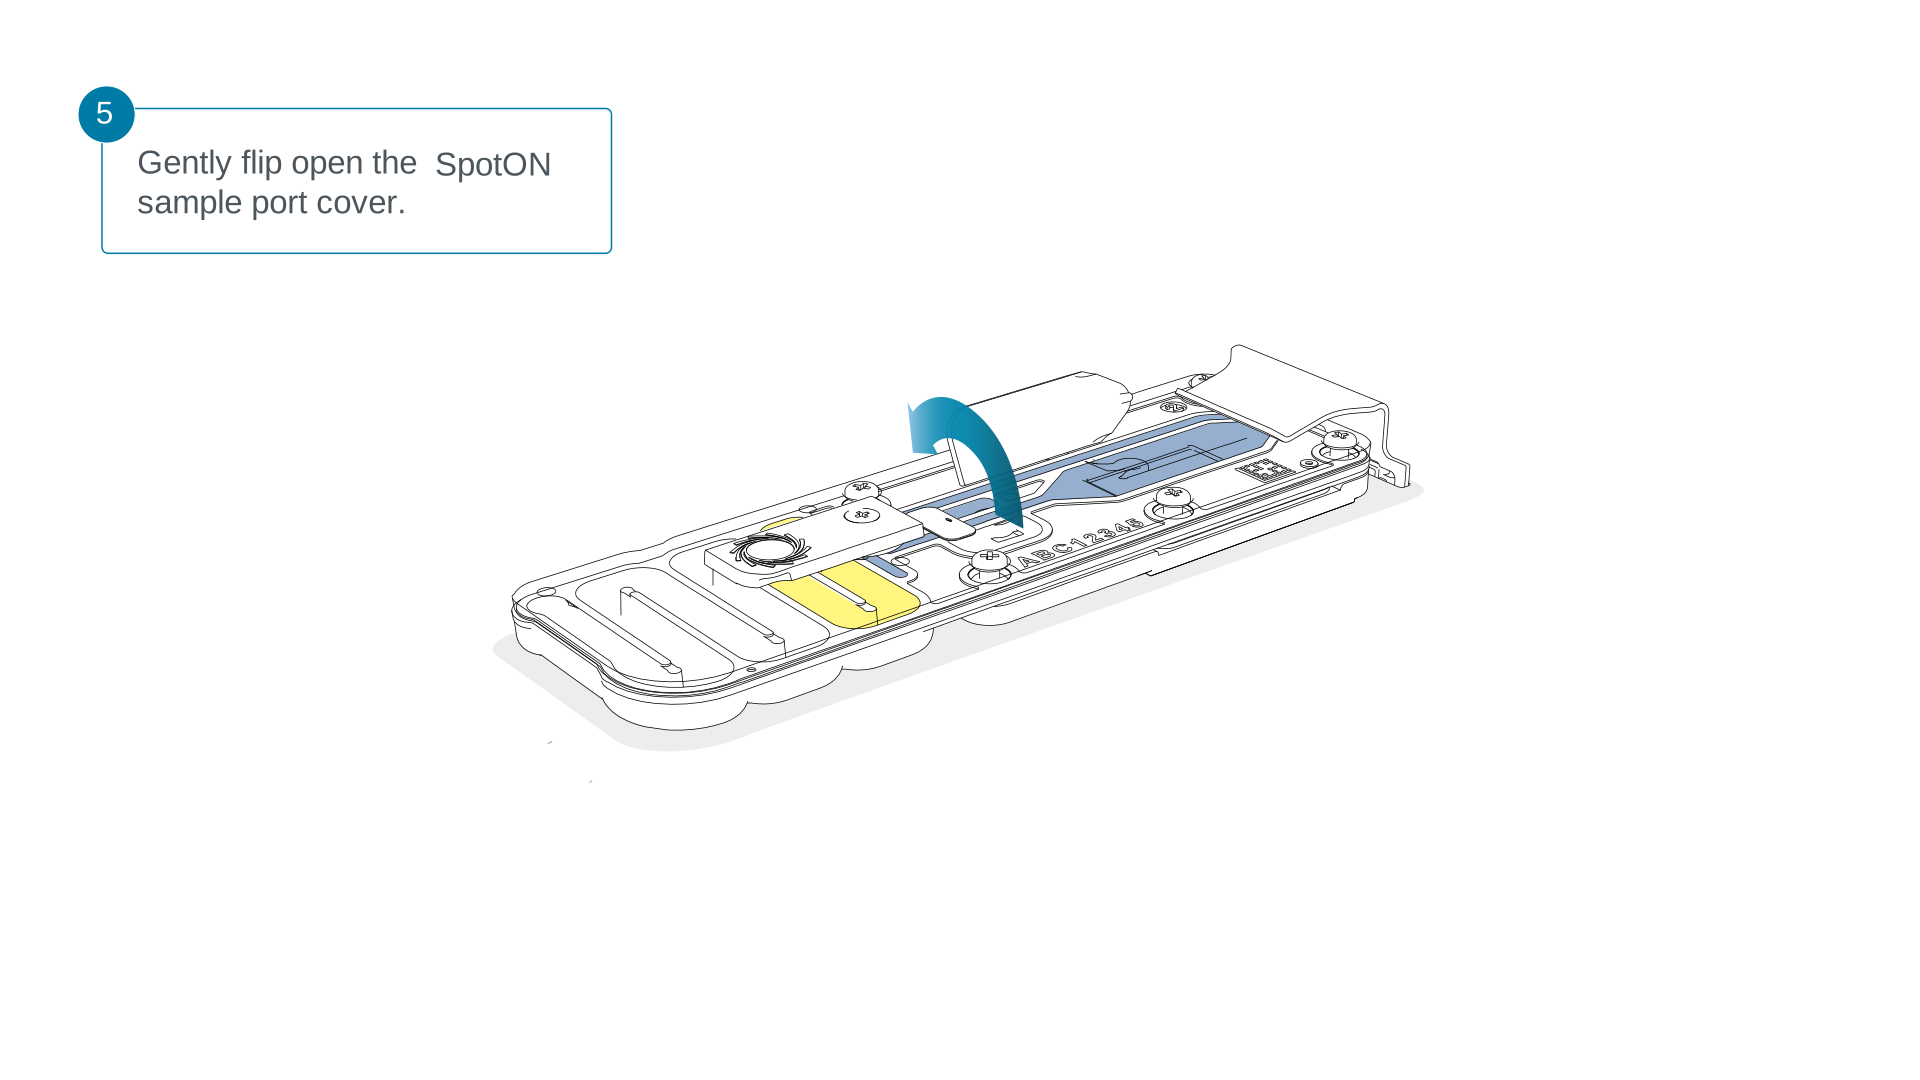
- Gently lift the SpotON sample port cover to make the SpotON sample port accessible.
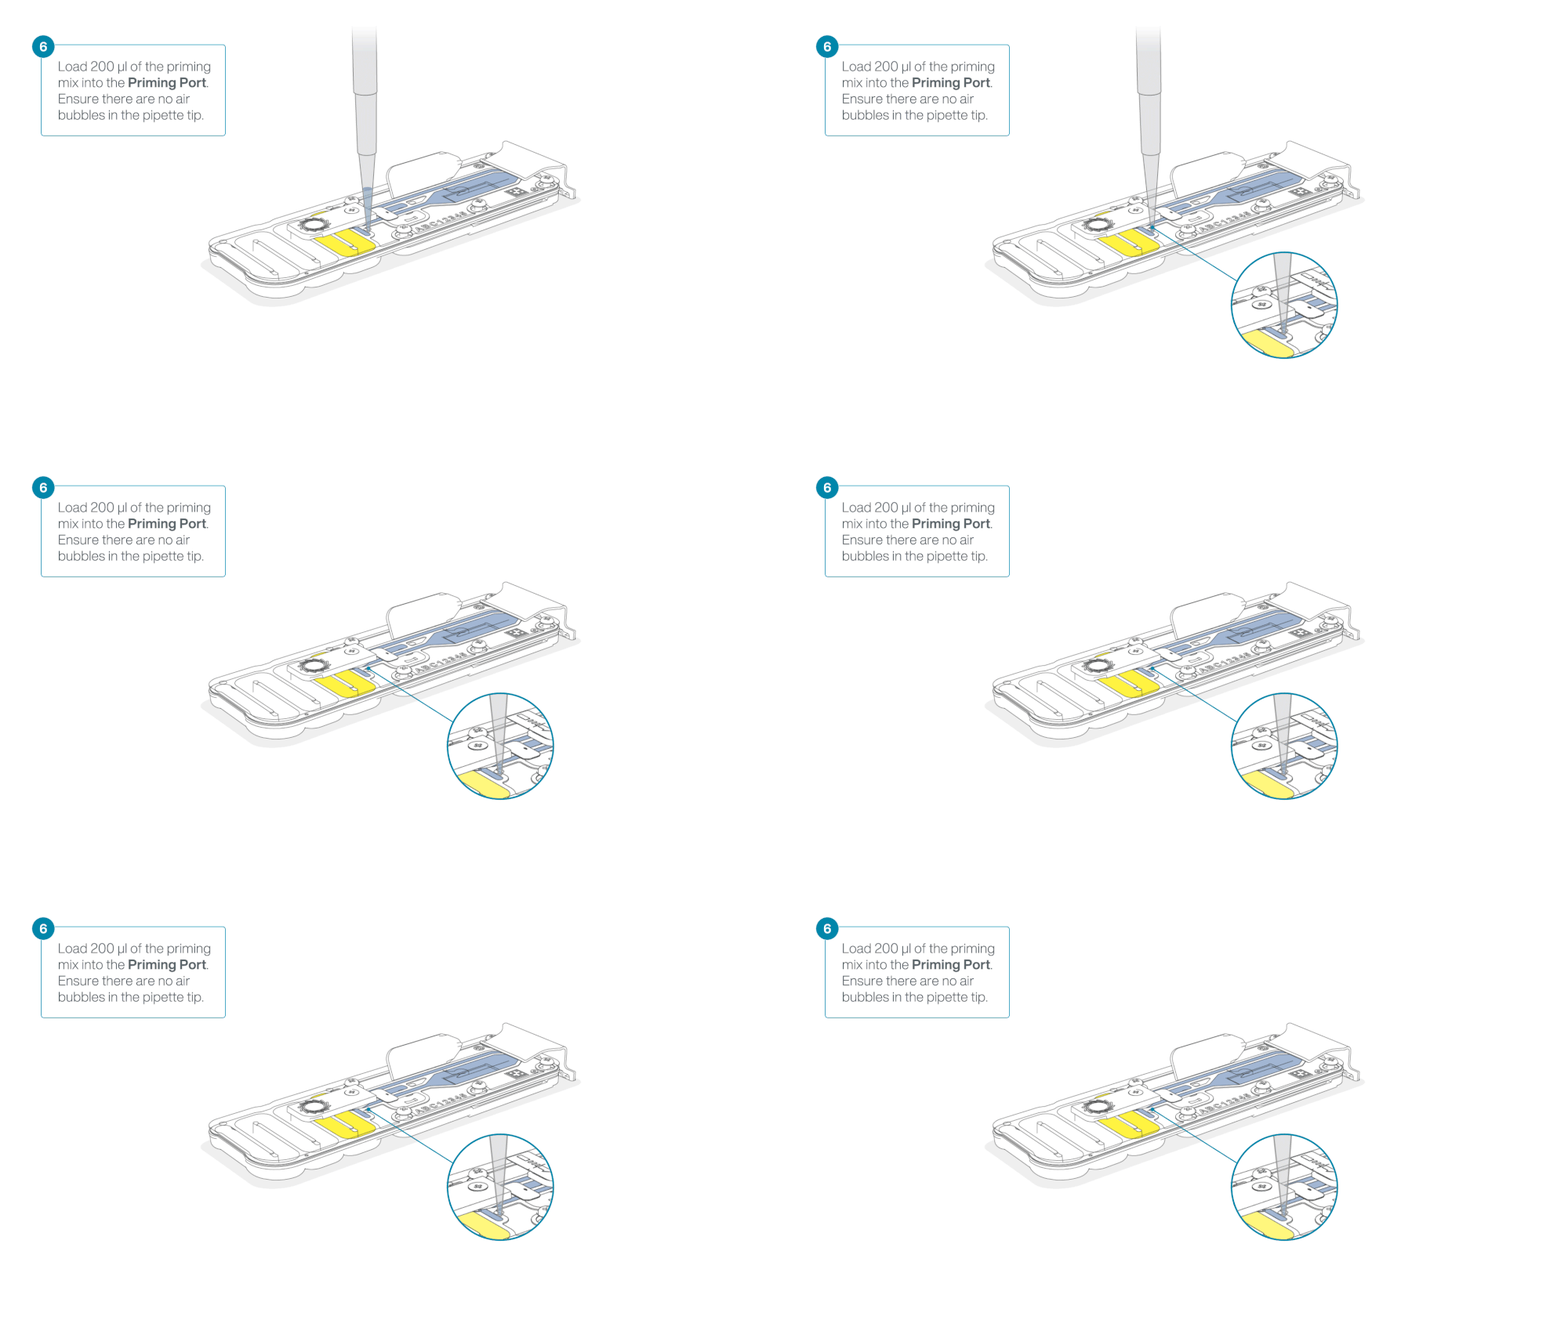
- Load 200 µl of the priming mix into the flow cell priming port (not the SpotON sample port), avoiding the introduction of air bubbles.
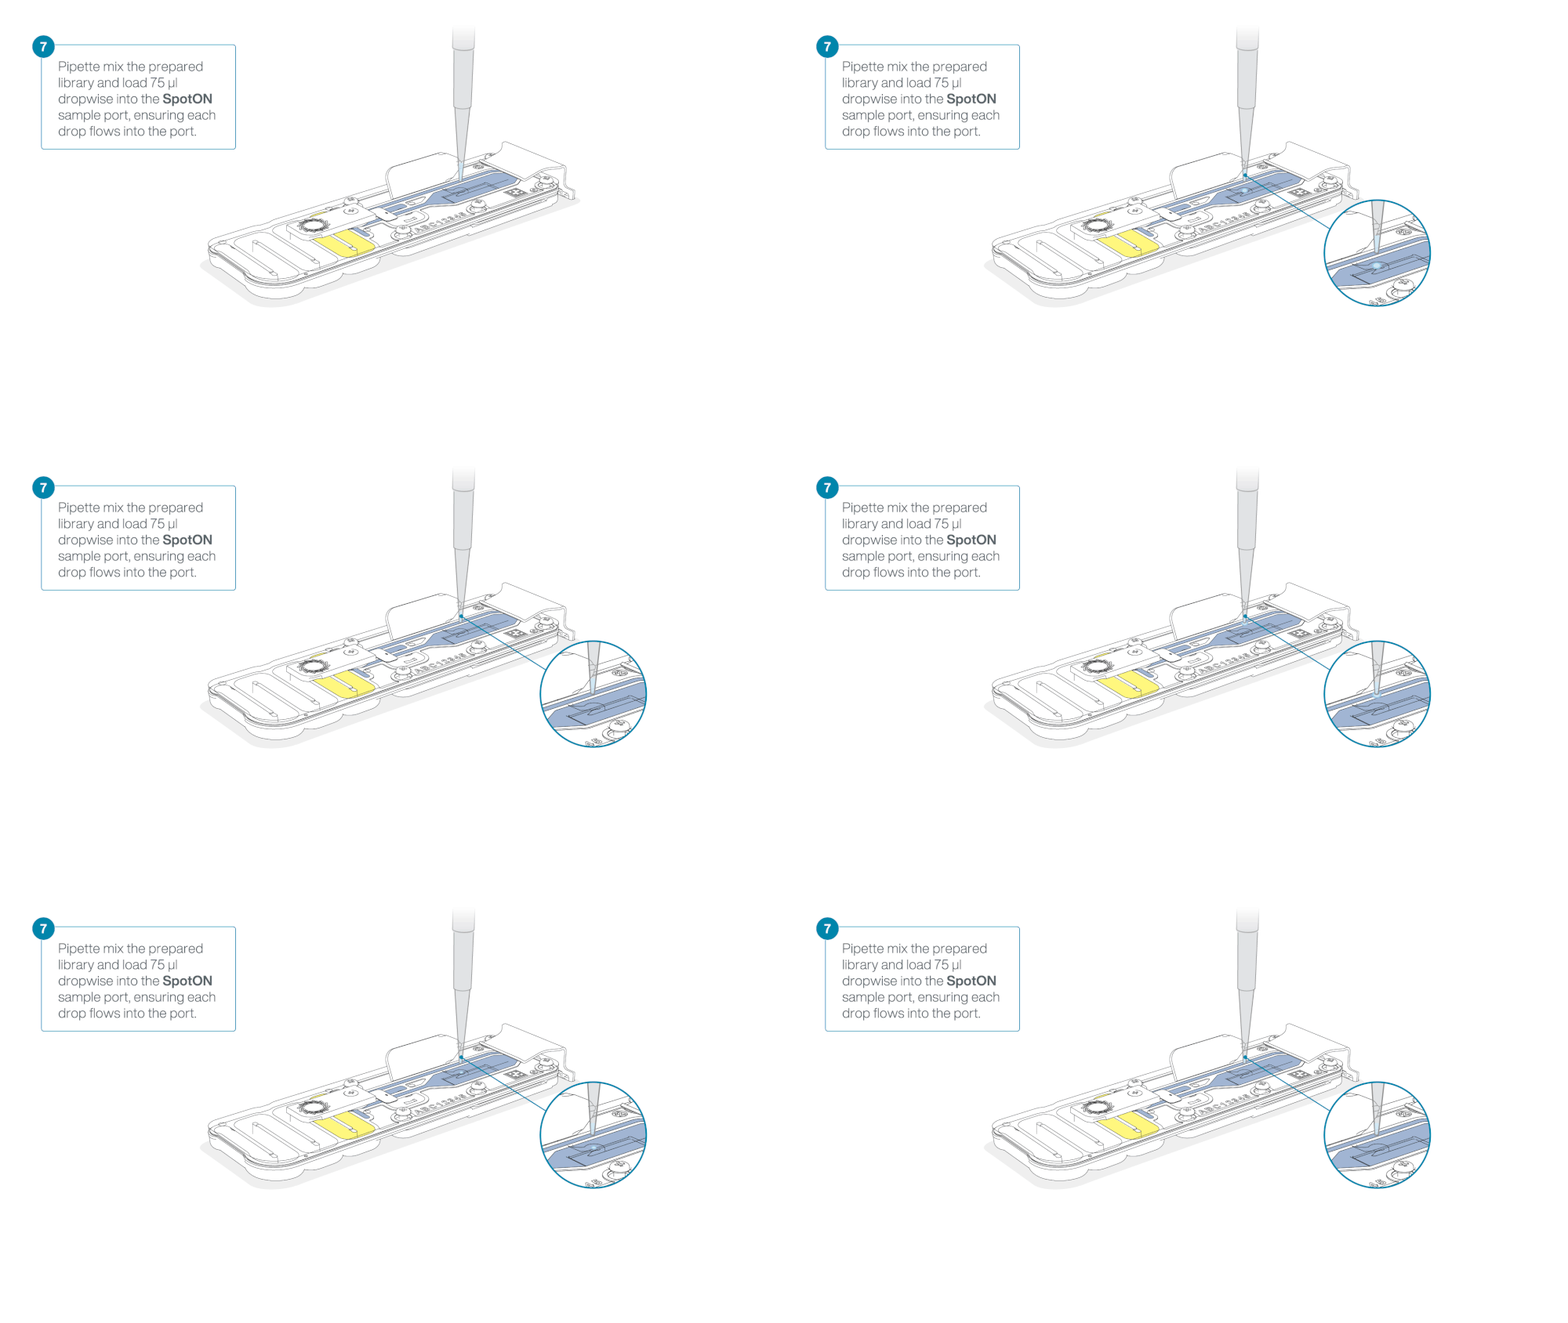
Mix the prepared library by gently pipetting up and down, just prior to loading.
Add 75 μl of the prepared library to the flow cell via the SpotON sample port in a dropwise fashion. Ensure each drop flows into the port before adding the next.
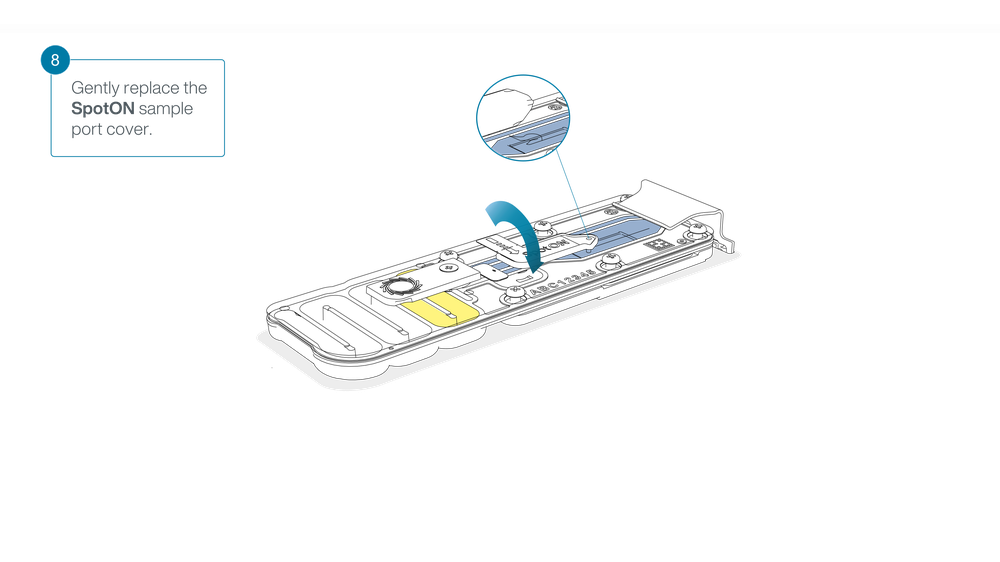
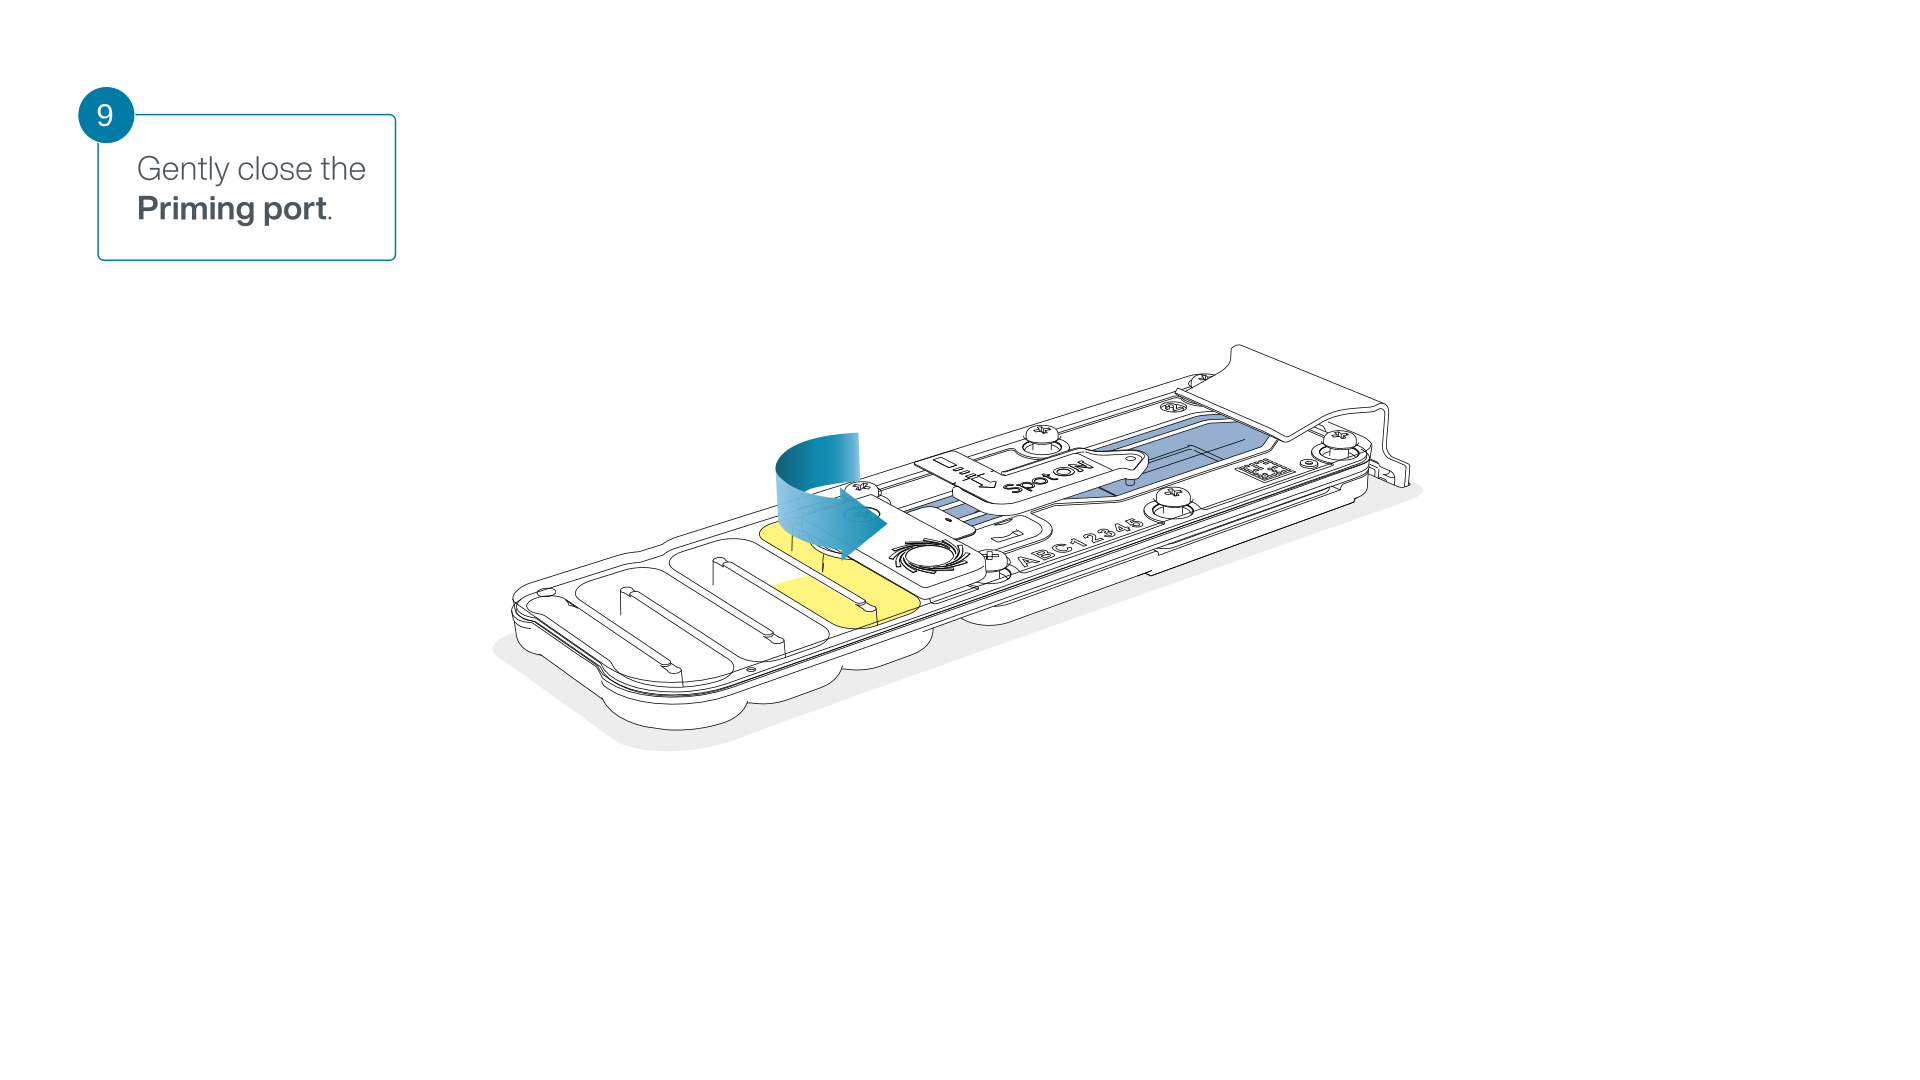
Gently replace the SpotON sample port cover, making sure the bung enters the SpotON port, and gently close the priming port.
For optimal sequencing output, install the light shield on your flow cell as soon as the library has been loaded.
We recommend leaving the light shield on the flow cell after the library is loaded, including during any washing and reloading steps. The shield can be removed when the library has been removed from the flow cell.
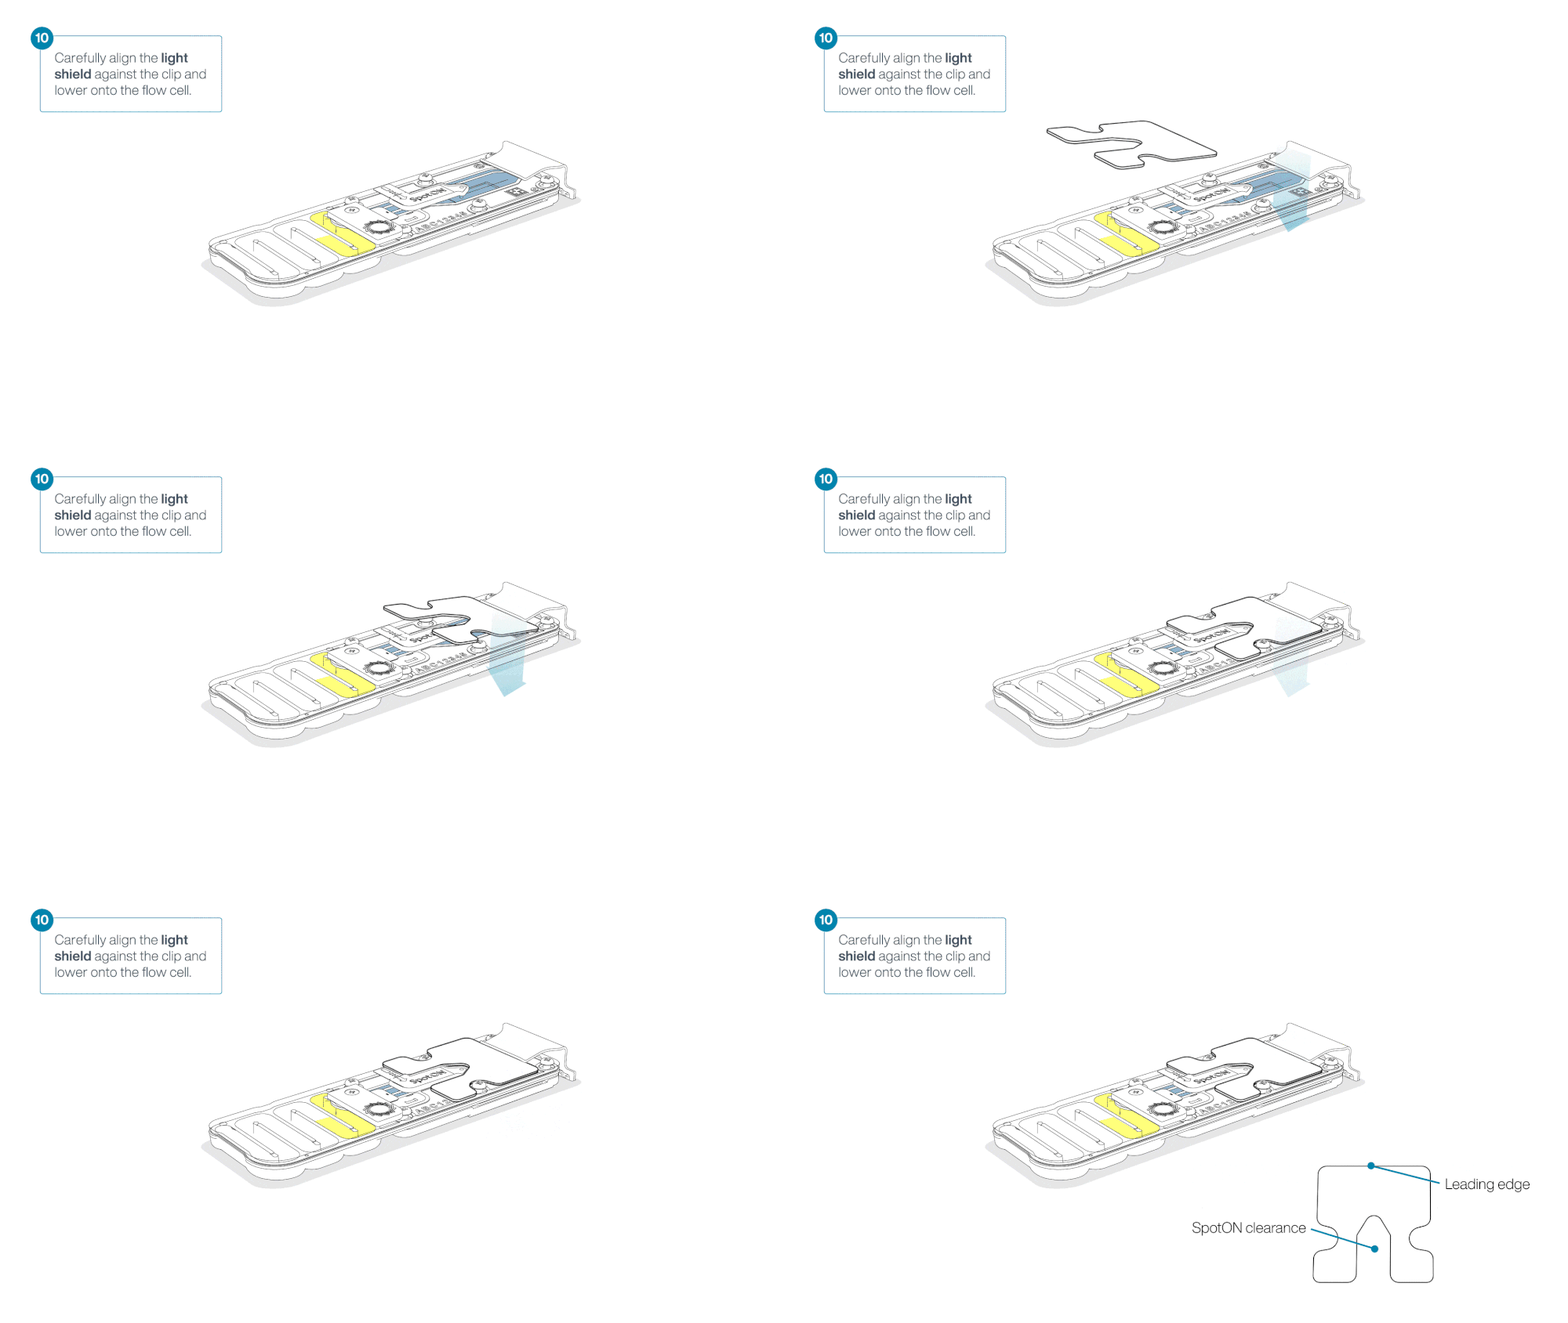
Place the light shield onto the flow cell, as follows:
Carefully place the leading edge of the light shield against the clip. Note: Do not force the light shield underneath the clip.
Gently lower the light shield onto the flow cell. The light shield should sit around the SpotON cover, covering the entire top section of the flow cell.
The MinION Flow Cell Light Shield is not secured to the flow cell. Therefore, careful handling is required after installation.
Close the device lid and set up a sequencing run on MinKNOW.
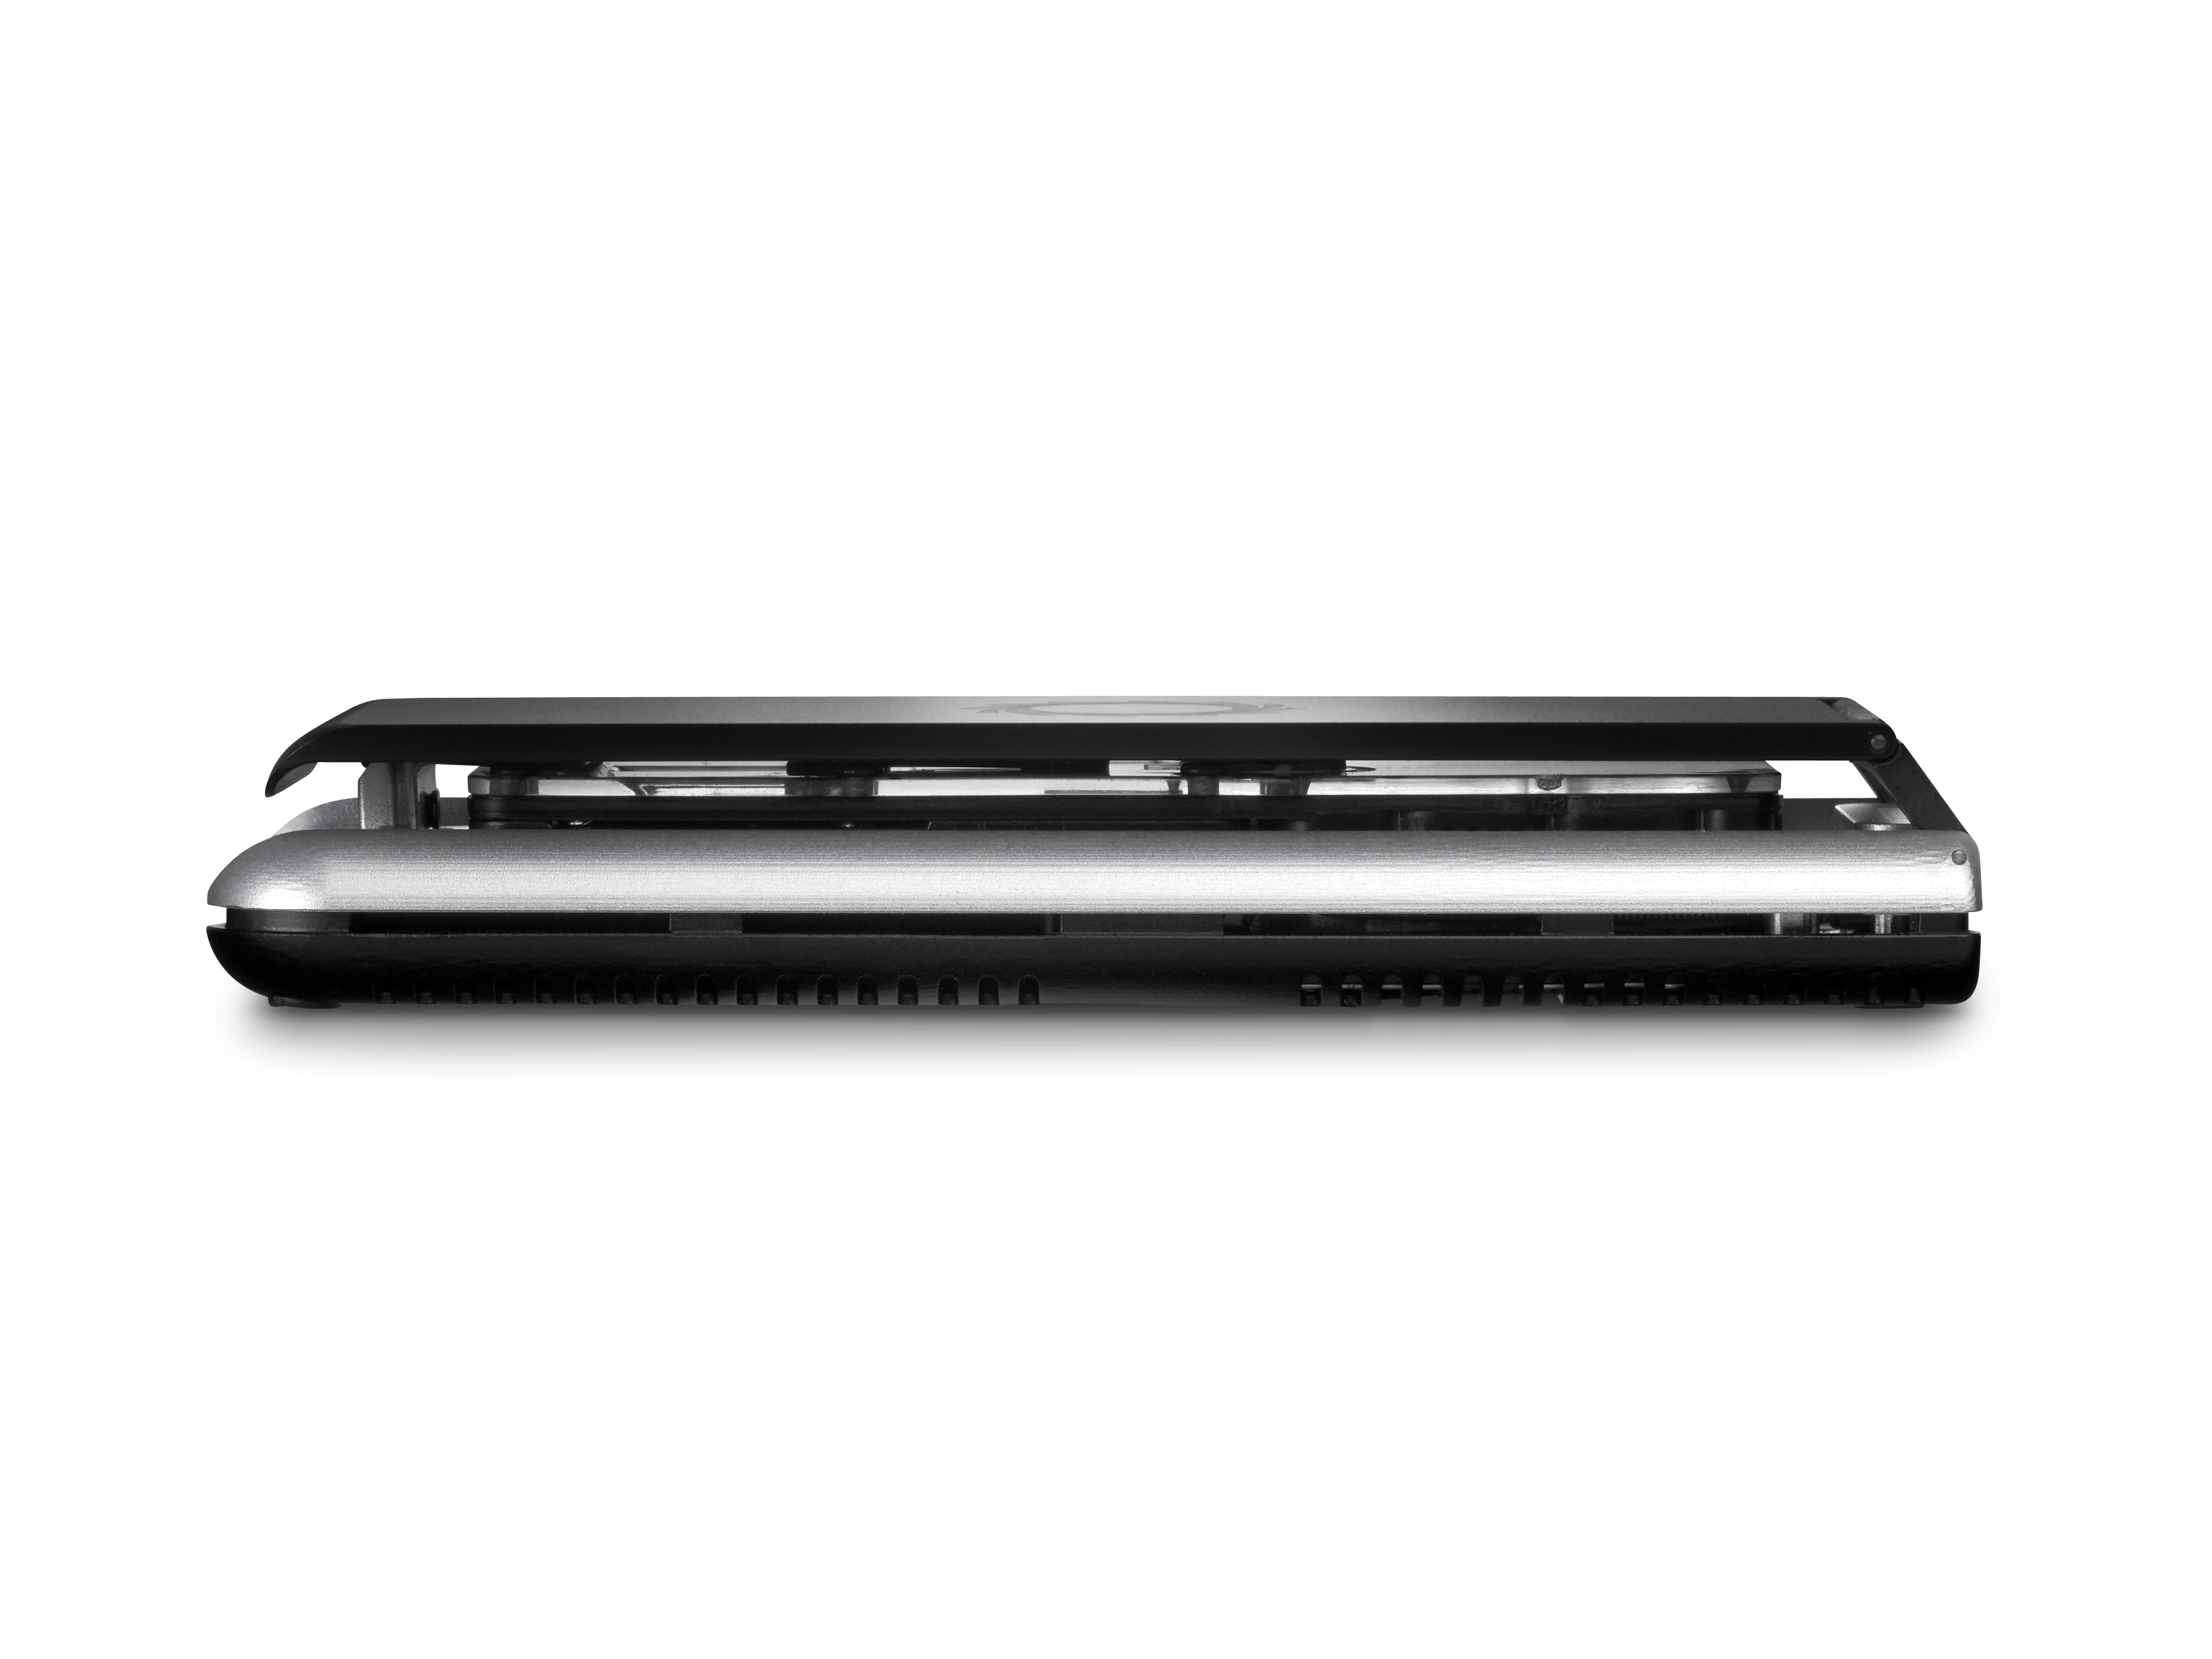
When a flow cell is inserted into the MinION Mk1D, the device lid will sit on top of the flow cell, leaving a small gap around the sides. This is normal and has no impact on the performance of the device.
Please refer to this FAQ regarding the device lid.
8. Data acquisition and basecalling
How to start sequencing
Once you have loaded your flow cell, the sequencing run can be started on MinKNOW, our sequencing software that controls the device, data acquisition and real-time basecalling. For more detailed information on setting up and using MinKNOW, please see the MinKNOW protocol.
MinKNOW can be used and set up to sequence in multiple ways:
- On a computer either directly or remotely connected to a sequencing device.
- Directly on a GridION or PromethION 24/48 sequencing device.
For more information on using MinKNOW on a sequencing device, please see the device user manuals:
To start a sequencing run on MinKNOW:
1. Navigate to the start page and click Start sequencing.
2. Fill in your experiment details, such as name and flow cell position and sample ID.
3. Select the Direct RNA Barcoding Kit 24 (SQK-DRB004.24) on the Kit selection page.
4. Configure the sequencing and output parameters for your sequencing run or keep to the default settings on the Run configuration tab.
Note: If basecalling was turned off when a sequencing run was set up, basecalling can be performed post-run on MinKNOW. For more information, please see the MinKNOW protocol.
Note: Run settings will have POD5 file generation OFF by default. If you would like to look into RNA modifications using Dorado in your downstream analysis, please ensure you turn ON the POD5 setting in the run configuration setup.
5. Click Start to initiate the sequencing run.
Data analysis after sequencing
After sequencing has completed on MinKNOW, the flow cell can be reused or returned, as outlined in the Flow cell reuse and returns section.
After sequencing and basecalling, the data can be analysed. For further information about options for basecalling and post-basecalling analysis, please refer to the Data Analysis document.
In the Downstream analysis section, we outline further options for analysing your data.
9. Flow cell reuse and returns
Our Flow Cell Wash Kit (EXP-WSH004 or EXP-WSH004-XL) are not currently compatible with the Direct RNA Barcoding Kit 24 (SQK-DRB004.24).
We have not validated the use of the Flow Cell Wash Kit (EXP-WSH004 or EXP-WSH004-XL) with our new Direct RNA Barcoding Kit 24 (SQK-DRB004.24), and therefore do not recommend or support use of these products in conjunction.
Please follow the returns procedure to send the flow cell back to Oxford Nanopore afetr you have used your flow cell.
Instructions for returning flow cells can be found here.
If you encounter issues or have questions about your sequencing experiment, please refer to the Troubleshooting Section in this protocol.
10. Downstream analysis
Post-basecalling analysis
There are several options for further analysing your basecalled data:
EPI2ME workflows
For in-depth data analysis, Oxford Nanopore Technologies offers a range of bioinformatics tutorials and workflows available in EPI2ME. The platform provides a vehicle where workflows deposited in GitHub by our Research and Applications teams can be showcased with descriptive texts, functional bioinformatics code and example data.
Research analysis tools
The Research division at Oxford Nanopore Technologies has created a number of analysis tools, which are available in the Oxford Nanopore GitHub repository. The tools are aimed at advanced users, and contain instructions for how to install and run the software. They are provided as-is, with minimal support.
Community-developed analysis tools
If a data analysis method for your research question is not provided in any of the resources above, please refer to the resource centre and search for bioinformatics tools for your application. Numerous members of the Nanopore Community have developed their own tools and pipelines for analysing nanopore sequencing data, most of which are available on GitHub. Please be aware that these tools are not supported by Oxford Nanopore Technologies, and are not guaranteed to be compatible with the latest chemistry/software configuration.
11. Issues during RNA extraction and library preparation
Below is a list of the most commonly encountered issues, with some suggested causes and solutions.
We also have an FAQ section available on the Nanopore Community Support section.
If you have tried our suggested solutions and the issue still persists, please contact Technical Support via email (support@nanoporetech.com) or via LiveChat in the Nanopore Community.
Low sample quality
| Observation | Possible cause | Comments and actions |
|---|---|---|
| Low RNA integrity (RNA integrity number <9.5 RIN, or the rRNA band is shown as a smear on the gel) | The RNA degraded during extraction | Try a different RNA extraction method. For more info on RIN, please see the RNA Integrity Number document. Further information can be found in the DNA/RNA Handling page. |
| RNA has a shorter than expected fragment length | The RNA degraded during extraction | Try a different RNA extraction method. For more info on RIN, please see the RNA Integrity Number document. Further information can be found in the DNA/RNA Handling page. We recommend working in an RNase-free environment, and to keep your lab equipment RNase-free when working with RNA. |
12. Issues during an RNA sequencing run
Below is a list of the most commonly encountered issues, with some suggested causes and solutions.
We also have an FAQ section available on the Nanopore Community Support section.
If you have tried our suggested solutions and the issue still persists, please contact Technical Support via email (support@nanoporetech.com) or via LiveChat in the Nanopore Community.
Fewer pores at the start of sequencing than after Flow Cell Check
| Observation | Possible cause | Comments and actions |
|---|---|---|
| MinKNOW reported a lower number of pores at the start of sequencing than the number reported by the Flow Cell Check | An air bubble was introduced into the nanopore array | After the Flow Cell Check it is essential to remove any air bubbles near the priming port before priming the flow cell. If not removed, the air bubble can travel to the nanopore array and irreversibly damage the nanopores that have been exposed to air. The best practice to prevent this from happening is demonstrated in videos for how to load a MinION Flow Cell and how to load a PromethION Flow Cell. |
| MinKNOW reported a lower number of pores at the start of sequencing than the number reported by the Flow Cell Check | The flow cell is not correctly inserted into the device | Stop the sequencing run, remove the flow cell from the sequencing device and insert it again, checking that the flow cell is firmly seated in the device and that it has reached the target temperature. If applicable, try a different position on the device (GridION/PromethION). |
| MinKNOW reported a lower number of pores at the start of sequencing than the number reported by the Flow Cell Check | Contaminations in the library damaged or blocked the pores | The pore count during the Flow Cell Check is performed using the QC molecules present in the flow cell storage buffer. At the start of sequencing, the library itself is used to estimate the number of active pores. Because of this, variability of about 10% in the number of pores is expected. A significantly lower pore count reported at the start of sequencing can be due to contaminants in the library that have damaged the membranes or blocked the pores. Alternative RNA extraction or purification methods may be needed to improve the purity of the input material. The effects of contaminants are shown in the Contaminants Know-how piece. Please try an alternative extraction method that does not result in contaminant carryover. |
MinKNOW script failed
| Observation | Possible cause | Comments and actions |
|---|---|---|
| MinKNOW shows "Script failed" | Restart the computer and then restart MinKNOW. If the issue persists, please collect the MinKNOW log files and contact Technical Support. If you do not have another sequencing device available, we recommend storing the flow cell and the loaded library at 4°C and contact Technical Support for further storage guidance. |
Pore occupancy below 40%
| Observation | Possible cause | Comments and actions |
|---|---|---|
| Pore occupancy <40% | Not enough library was loaded on the flow cell | Ensure you load the recommended amount of good quality library in the relevant library prep protocol onto your flow cell. Please quantify the library before loading and calculate mols using tools like the NEBio Calculator, choosing "RNA ss: mass to moles" |
| Pore occupancy close to 0 | No tether on the flow cell | Tethers are adding during flow cell priming (FCT tube). Make sure Flow Cell Tether (FCT) was added to Flow Cell Flush (FCF) before priming. |
Large proportion of inactive pores
| Observation | Possible cause | Comments and actions |
|---|---|---|
| Large proportion of inactive/unavailable pores (shown as light blue in the channels panel and pore activity plot. Pores or membranes are irreversibly damaged) | Air bubbles have been introduced into the flow cell | Air bubbles introduced through flow cell priming and library loading can irreversibly damage the pores. Watch the how to load a MinION Flow Cell or how to load a PromethION Flow Cell videos for best practice. |
| Large proportion of inactive/unavailable pores | Contaminants are present in the sample | The effects of contaminants are shown in the Contaminants Know-how piece. Please try an alternative extraction method that does not result in contaminant carryover. |
Temperature fluctuation
| Observation | Possible cause | Comments and actions |
|---|---|---|
| Temperature fluctuation | The flow cell has lost contact with the device | Check that there is a heat pad covering the metal plate on the back of the flow cell. Re-insert the flow cell and press it down to make sure the connector pins are firmly in contact with the device. If the problem persists, please contact Technical Services. |
Failed to reach target temperature
| Observation | Possible cause | Comments and actions |
|---|---|---|
| MinKNOW shows "Failed to reach target temperature" | The instrument was placed in a location that is colder than normal room temperature, or a location with poor ventilation (which leads to the flow cells overheating) | MinKNOW has a default timeframe for the flow cell to reach the target temperature. Once the timeframe is exceeded, an error message will appear and the sequencing experiment will continue. However, sequencing at an incorrect temperature may lead to a decrease in throughput and lower q-scores. Please adjust the location of the sequencing device to ensure that it is placed at room temperature with good ventilation, then re-start the process in MinKNOW. Please refer to this link for more information on MinION temperature control. |
Last updated: 9/21/2026
Document options