High Throughput Barcoding sequencing (SQK-HTB114.96) (HTB_9238_v114_revA_02Sep2026)


PromethION: Protocol
High Throughput Barcoding sequencing (SQK-HTB114.96) V HTB_9238_v114_revA_02Sep2026
This document describes the high throughput barcoding method of native genomic DNA libraries.
The protocol:
- Requires the High Throughput Barcoding Kit 96 V14 (SQK-HTB114.96)
- Is PCR-free
- Uses up to 96 barcodes
- Splits individual genomes across multiple flow cells to balance sequencing performance
- Allows analysis of native DNA
- Is compatible with PromethION Flow Cells (FLO-PRO114M)
FOR RESEARCH USE ONLY.
Contents
Introduction to the protocol
Sample preparation
Library preparation
Sample QC and barocde abundance sequencing
Normalisation and sequencing
- 9. Barcode normalisation and sample pooling for sequencing
- 10. Priming and loading the PromethION Flow Cell
- 11. Washing and reloading the PromethION Flow Cells
Sequencing and data analysis
Troubleshooting
Overview
This document describes the high throughput barcoding method of native genomic DNA libraries.
The protocol:
- Requires the High Throughput Barcoding Kit 96 V14 (SQK-HTB114.96)
- Is PCR-free
- Uses up to 96 barcodes
- Splits individual genomes across multiple flow cells to balance sequencing performance
- Allows analysis of native DNA
- Is compatible with PromethION Flow Cells (FLO-PRO114M)
1. Overview of the protocol
Introduction to the High Throughput Barcoding Kit 96 V14 protocol
This protocol describes how to carry out high throughput barcoding of genomic DNA (gDNA) using the High Throughput Barcoding Kit 96 V14 (SQK-HTB114.96). There are 96 unique barcodes available, enabling the indexing of up to 96 different samples and the splitting of these across multiple flow cells in one sequencing experiment. This approach balances sequencing performance across flow cells and generates consistent output yields across your samples.
This protocol produces libraries from extracted human gDNA with a read N50 ~15 kb and generates 30x coverage of the genome.
Please note that this kit and method are only recommended for users with a high sample throughput. The product is only available via closed early access. If you believe you may benefit from this product, please contact your Oxford Nanopore Technologies representative.
Steps in the sequencing workflow:
Prepare for your experiment
You will need to:
- Extract your DNA, and check its length, quantity and purity. The quality checks performed during the protocol are essential in ensuring experimental success.
- Ensure you have your sequencing kit, the correct equipment and third-party reagents.
- Download the software for acquiring and analysing your data.
- Check all your flow cells to ensure they have enough pores for good sequencing runs.
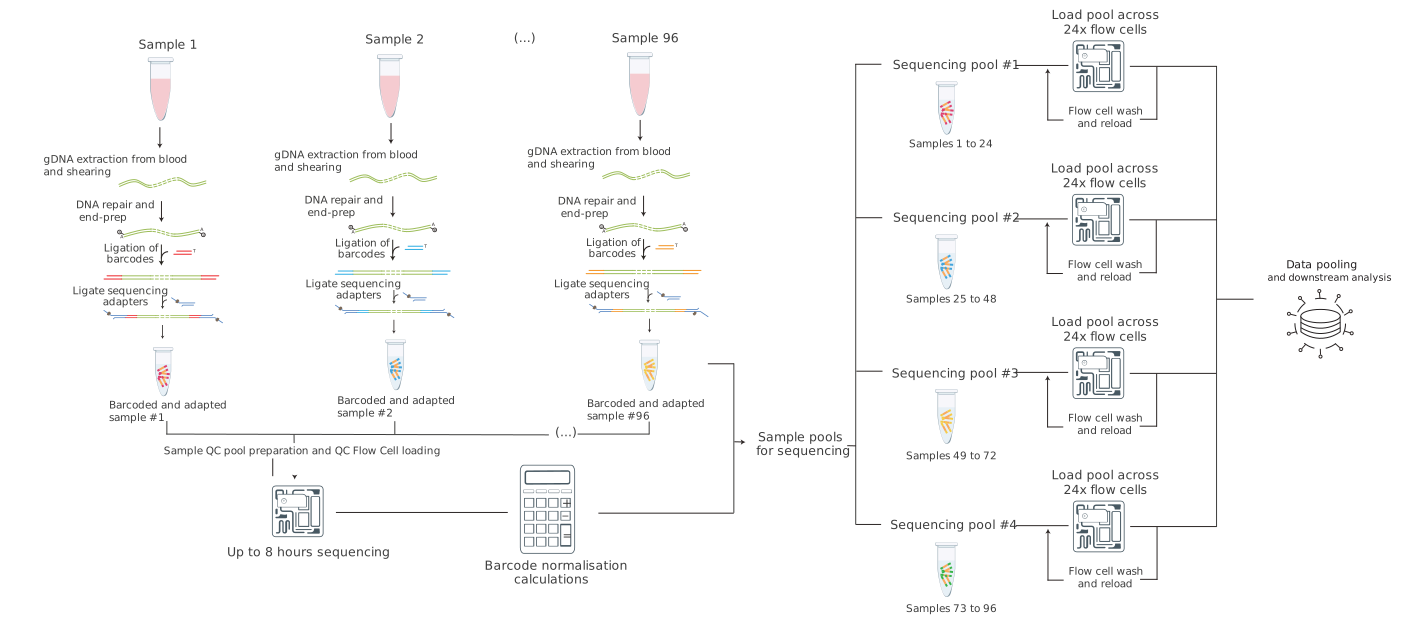
Sample preparation
Extract the gDNA from your sample and fragment your gDNA.
In this protocol, we outline a method for extraction of gDNA from human blood using the Chemagic™ 360-D, and DNA shearing using the Cole-Parmer HG-600 Geno/Grinder 2010 High-Throughput Homogenizer.
Alternative methods for gDNA extraction and shearing may be available using a range of input types, equipment and consumables. Please note, alternative methods will need to be validated for use with the library preparation method outlined in this protocol, and performance may vary.
Check the length, quantity and purity of your extracted material. The quality checks performed during the protocol are essential in ensuring experimental success.
Library preparation, sample QC, normalisation and sequencing
The table below is an overview of the steps required in the library preparation, including timings and stopping points.
| Library preparation | Process | Time | Stop option |
|---|---|---|---|
| DNA repair and end-prep | Repair the gDNA, and prepare the DNA ends for barcode attachment | 210 minutes | 4°C overnight |
| Barcode ligation | Ligate the native barcodes to the DNA ends for each of your samples | 120 minutes | 4°C overnight |
| Adapter ligation and clean-up | Ligate sequencing adapters to the DNA ends of each of your samples | 120 minutes | 4°C for short-term storage or for repeated use, such as for reloading your flow cell –80°C for long-term storage |
| Sample QC pool preparation | Take forward and pool a small volume for each of your samples to the QC sample pool | 30 minutes | 4°C for short-term storage or for repeated use, such as for reloading your flow cell –80°C for long-term storage |
| Priming and loading the QC flow cell | Prime the QC flow cell, and load your QC sample pool library into the flow cell | 10 minutes hands-on time Up to 8 hours sequencing time | |
| Barcode normalisation and sample pooling for sequencing | Input your sample details and the data from your QC sequencing run into the library pooling calculator spreadsheet. Using the outputs from the library pooling calculator, pool your samples into groups for your sequencing experiment. | 60 minutes | |
| Priming and loading the sequencing flow cells | Prime the flow cells, and load your DNA library pools into the flow cells | ~ 45 – 60 minutes per 24 samples ~ 240 minutes for 96 samples | |
| Washing and reloading the flow cells | Pause your sequencing run. Wash your flow cells with nuclease to unblock pores. Prime the flow cell and reload the prepared library to continue sequencing. | ~ 240 minutes |
Sequencing
You will need to:
- Start a sequencing run using the MinKNOW software, which will collect raw data from the device and convert it into basecalled reads.
- Demultiplex and collate barcoded reads in MinKNOW, choosing the SQK-HTB114.96 kit option.
- (Optional) Start the EPI2ME software and select a workflow for further analysis (e.g. wf-human-variation).
- (Optional) Alternatively, external tools can be used to further analyse and explore your data.
Compatibility of this protocol
This protocol should only be used in combination with:
- High Throughput Barcoding Kit 96 V14 (SQK-HTB114.96)
- R10.4.1 flow cells (FLO-PRO114M)
- Flow Cell Wash Kit (EXP-WSH004) or Flow Cell Wash Kit XL (EXP-WSH004-XL)
- PromethION 24/48 with an A-series DAU - PromethION IT requirements document
2. Equipment and consumables
Materials
- High Throughput Barcoding Kit 96 V14 (SQK-HTB114.96)
- (For sample preparation) 400 µl of human whole blood in K2 EDTA per sample
- (For library preparation) 1.2 µg gDNA per sample, sheared to ~15 kbp
- Flow Cell Wash Kit XL (EXP-WSH004-XL)
Consumables
- PromethION Flow Cell R10.4.1 (Oxford Nanopore, FLO-PRO114M)
- Chemagic BBS DNA Kit H96 (IVD-1091)
- TE Buffer (Invitrogen, 12090015)
- NEBNext® FFPE Repair Mix (NEB, M6630)
- NEBNext® Ultra II End repair/dA-tailing Module (NEB, E7546)
- NEB Blunt/TA Ligase Master Mix (NEB, M0367)
- Salt-T4® DNA Ligase (NEB, M0467)
- Ethanol, 100% (e.g. Fisher, 16606002)
- Nuclease-free water (e.g. Thermo Scientific, AM9937)
- Rigid 96-well PCR plates, 200 µL minimum volume per well (e.g. Hard-Shell 96-Well PCR Plate, low profile, thin wall, skirted, BIO-RAD, HSP9601)
- Adhesive PCR plate seals (e.g. ThermoFisher, AB0558)
- (ALTERNATIVE TO PCR PLATES) 0.2 ml 8-strip PCR tubes (e.g. AB0452, Thermo Scientific)
- Reagent reservoirs (e.g. Thermo Scientific, 10141873)
- 1.5 ml Eppendorf DNA LoBind tubes
- 2 ml Eppendorf DNA LoBind tubes
- Qubit™ Assay Tubes (Invitrogen, Q32856)
- Qubit 1x dsDNA BR Assay Kit (ThermoFisher, Q33265)
- Qubit™ dsDNA HS Assay Kit (ThermoFisher, Q32851)
- Quant-iT dsDNA BR Assay kit (Q33130, Thermo Scientific)
Equipment
- Chemagic™ 360-D instrument (2024-0010)
- Chemagic 96 Rod Head Set (CMG-370)
- Cole-Parmer HG-600 Geno/Grinder 2010 High-Throughput Homogenizer
- Thermal cycler
- Plate shaker with temperature control (Eppendorf ThermoMixer C, or equivalent)
- Sample mixer (ThermoFisher HulaMixer or equivalent)
- Microplate centrifuge
- Magnetic separation rack suitable for 96-well plates (e.g. Magnum FLX® with Solid-Core™ Technology, A000400)
- Vortex mixer
- Microfuge
- Multichannel pipette and tips
- P1000 pipette and tips
- P200 pipette and tips
- P100 pipette and tips
- P20 pipette and tips
- P10 pipette and tips
- P2 pipette and tips
- Timer
- Ice bucket with ice
- Qubit™ fluorometer (or equivalent for QC check)
- Qubit fluorometer plate reader (or equivalent for QC check)
- PromethION 24/48 device
- PromethION Flow Cell Light Shields
Optional equipment
- Agilent Femto Pulse System (or equivalent for read length QC)
- Agilent Genomic DNA 165 kb Analysis Kit (Agilent, FP-1002-0275)
The above list of materials, consumables, and equipment is for the extraction method in the sample preparation section, as well as the library preparation section of the protocol. If you have pre-extracted sample(s), you will only require the materials for the library preparation section of this protocol.
For this protocol, the following inputs are required:
Input requirements per sample for the extraction method:
- 400 µl of human blood in EDTA K2 vacuum tube per sample
Input requirements per sample for the gDNA shearing:
- At least 1.3 µg gDNA per sample
Input requirements per sample for the library preparation:
- 1.2 µg gDNA per sample, sheared to ~15 kbp
Input DNA
How to QC your input DNA
It is important that the input DNA meets the quantity and quality requirements. Using too little or too much DNA, or DNA of poor quality (e.g. highly fragmented or containing RNA or chemical contaminants) can affect your library preparation.
For instructions on how to perform quality control of your DNA sample, please read the Input DNA/RNA QC protocol.
Chemical contaminants
Depending on how the DNA is extracted from the raw sample, certain chemical contaminants may remain in the purified DNA, which can affect library preparation efficiency and sequencing quality. Read more about contaminants on the Contaminants page of the Community.
Third-party reagents
We have validated and recommend the use of all the third-party reagents used in this protocol. Alternatives have not been tested by Oxford Nanopore Technologies.
For all third-party reagents, we recommend following the manufacturer's instructions to prepare the reagents for use.
NEB reagent usage
Find below guidance for the required volumes for the 3rd party reagents used in this method and the corresponding number of vials required per preparation. Please note, the number of vials suggested below will include excess volumes that may be used in subsequent experiments.
| Reagent | Volume per sample (including excess) | Volume for 96 samples (including excess) | Number of vials required per prep of 96 samples |
|---|---|---|---|
| NEBNext FFPE DNA Repair Mix (NEB, M6630LVIAL) | 2 µl (+ 0.2 µl) | 192 µl (+ 19.2 µl) | 2 |
| NEBNext FFPE DNA Repair Buffer (NEB, E6622AAVIAL) | 3.5 µl (+ 0.35 µl) | 336 µl (+ 33.6 µl) | 1 |
| NEBNext Ultra II End Prep Enzyme Mix (NEB, E7646AAVIAL) | 3 µl (+ 0.3 µl) | 288 µl (+ 28.8 µl) | 2 |
| NEBNext Ultra II End Prep Reaction Buffer (NEB, E7647AAVIAL) | 3.5 µl (+ 0.35 µl) | 336 µl (+ 33.6 µl) | 1 |
| NEB Blunt/TA Ligase Master Mix (NEB, M0367LVIAL) | 20 µl | 1,920 µl | 2 |
| Salt-T4® DNA Ligase (NEB, M0467LVIAL) | 5 µl | 480 µl | 3 |
Check your flow cells
We highly recommend that you check the number of pores in your flow cells prior to starting a sequencing experiment. This should be done within 12 weeks of purchasing your PromethION Flow Cells. Oxford Nanopore Technologies will replace any unused flow cell with fewer than the number of pores listed in the Table below, when the result is reported within two days of performing the flow cell check, and when the storage recommendations have been followed. To do the flow cell check, please follow the instructions in the Flow Cell Check document.
| Flow cell | Minimum number of active pores covered by warranty |
|---|---|
| PromethION Flow Cell | 5000 |
The Native Adapter (NA) used in this kit and protocol is not interchangeable with other sequencing adapters.
High Throughput Barcoding Kit 96 V14 (SQK-HTB114.96) contents
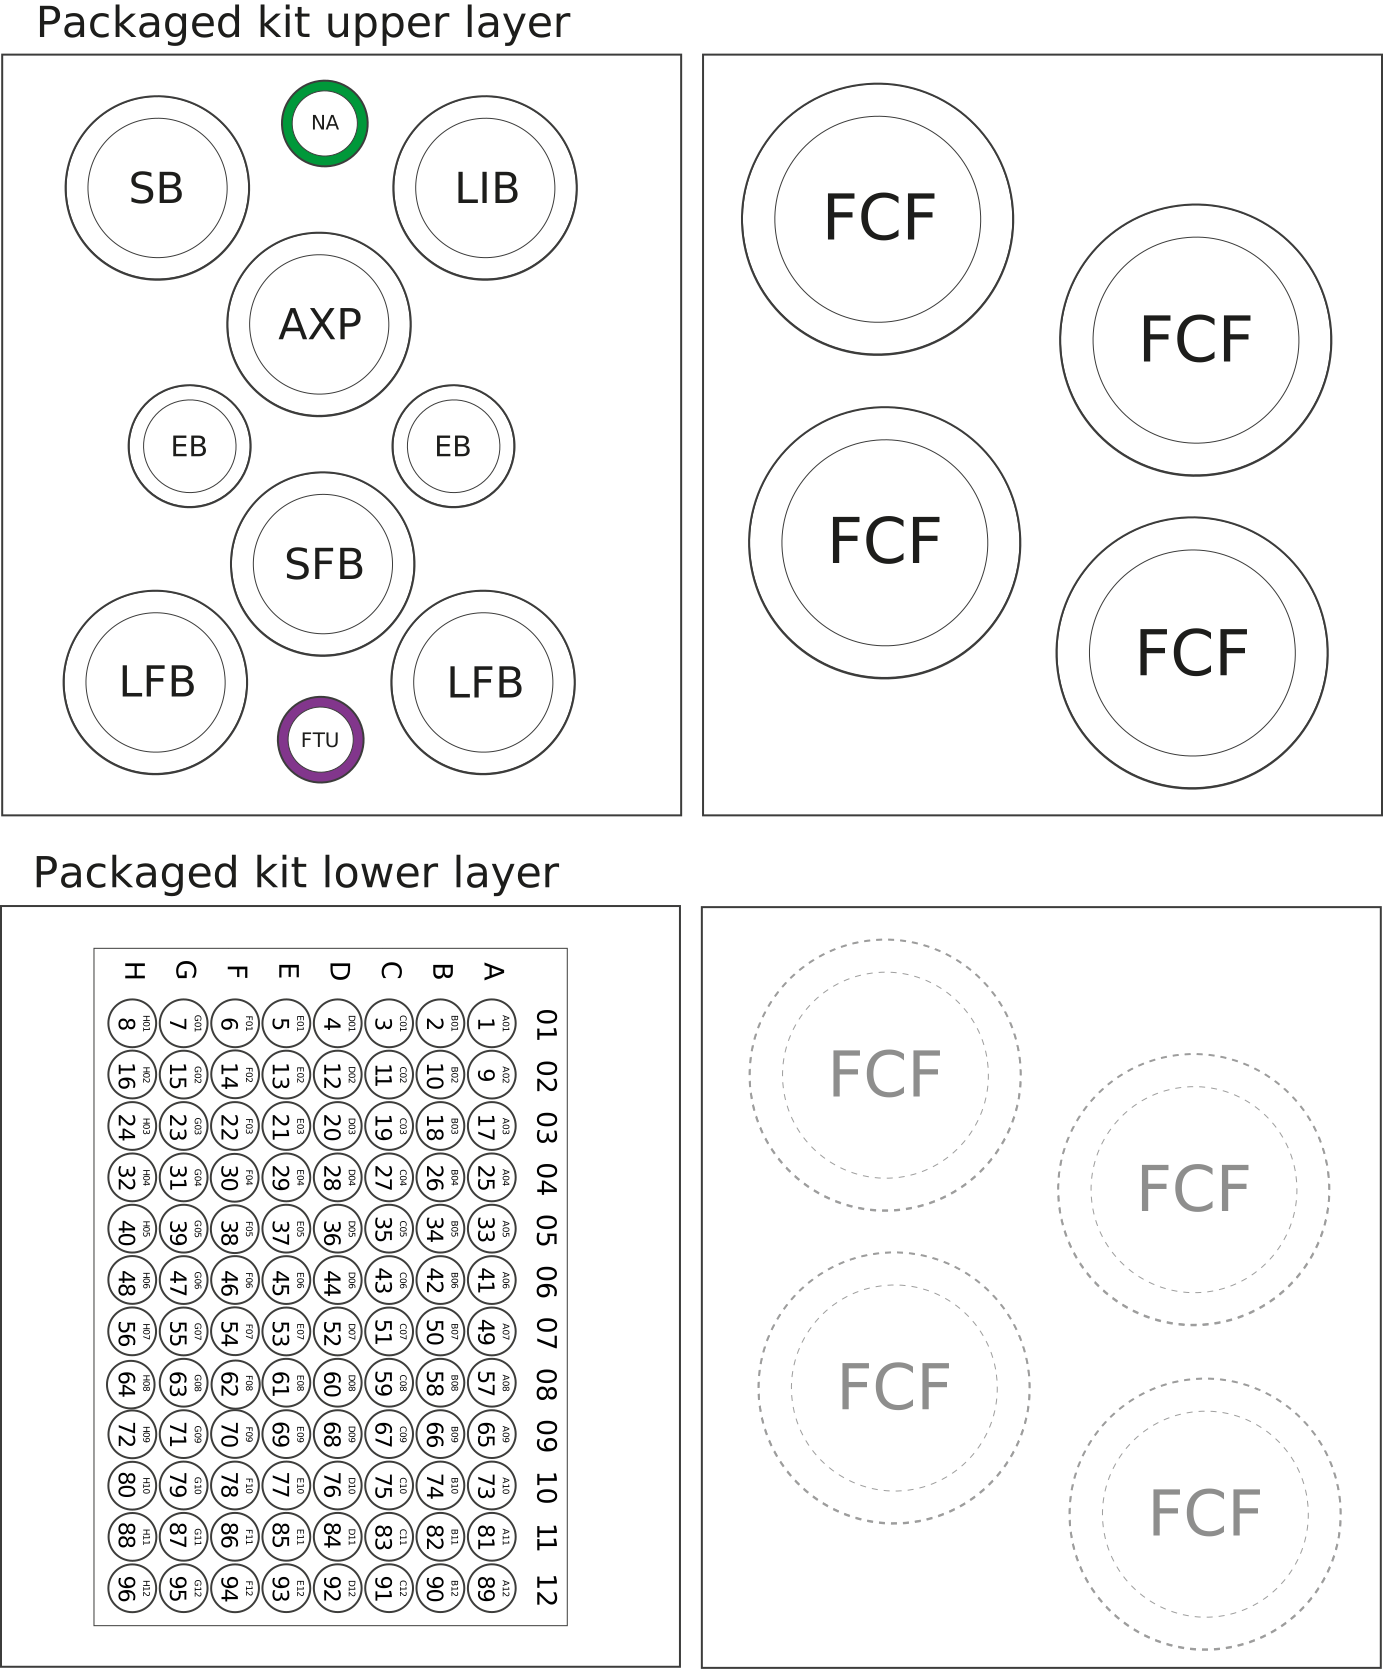
| Name | Acronym | Cap colour | No. of vials | Fill volume per vial (µl) |
|---|---|---|---|---|
| Native Adapter | NA | Green | 1 | 320 |
| Flush Tether UL | FTU | Purple | 1 | 700 |
| L Fragment Buffer | LFB | Clear | 2 | 23,000 |
| S Fragment Buffer | SFB | Clear | 1 | 25,000 |
| AMPure XP Beads | AXP | Clear | 1 | 25,000 |
| Sequencing Buffer | SB | Clear | 1 | 24,000 |
| Library Beads | LIB | Clear | 1 | 16,000 |
| Elution Buffer | EB | Clear | 2 | 10,000 |
| Flow Cell Flush | FCF | Clear | 4 | 65,000 |
| Native Barcode plate | NB01-96 | - | 1 plate | 8 µl per well |
Note: This product contains AMPure XP reagent manufactured by Beckman Coulter, Inc. and can be stored at -20°C with the kit without detriment to reagent stability.
3. Extraction of gDNA from 400 µl of human blood
Materials
- (For sample preparation) 400 µl of human whole blood in K2 EDTA per sample
Consumables
- Chemagic BBS DNA Kit H96 (IVD-1091)
- Nuclease-free water (e.g. ThermoFisher, AM9937)
- Freshly prepared 70% ethanol in nuclease-free water
- 15 ml Falcon tubes
- 1.5 ml Eppendorf DNA LoBind tubes
- Qubit™ dsDNA BR Assay Kit (Invitrogen, Q32850)
- Qubit™ Assay Tubes (Invitrogen, Q32856)
- Agilent Genomic DNA 165 kb Analysis Kit (Agilent, FP-1002-0275)
Equipment
- Chemagic™ 360-D instrument (2024-0010)
- Chemagic 96 Rod Head Set (CMG-370)
- Vortex mixer
- Microfuge
- Qubit fluorometer plate reader (or equivalent for QC check)
- Ice bucket with ice
- Timer
- Wide-bore pipette tips
- P1000 pipette and tips
- P200 pipette and tips
- P20 pipette and tips
- P10 pipette and tips
- P2 pipette and tips
Optional equipment
- Agilent Femto Pulse System (or equivalent for read length QC)
- Agilent Genomic DNA 165 kb Analysis Kit (Agilent, FP-1002-0275)
Ensure you are using the reagents from the extraction kit at this stage in the method.
The Elution Buffer 7 used in the sample preparation is from the Chemagic BSS DNA Kit, not the Elution Buffer supplied in the SQK-HTB114.96 kit and used for the library preparation.
Extract your gDNA according to the extraction kit manufacturers documentation.
For instructions on how to perform blood extraction using a Chemagic 360-D, see pages 21 – 28 in the Revvity instructions for use document.
- Elute your extracted gDNA using 100 µl of Elution Buffer 7 per sample.
Optional: If struggling with sample viscosity or incomplete resuspension during elution, incubate your samples at 50°C on a thermomixer with gentle agitation 300 RPM to ensure homogeneous resuspension.
Quantify your samples using a plate reader and the Quant-iT dsDNA BR Assay Kit prior to proceeding to the concentration normalisation.
Note: Approximately 5–12 µg of gDNA is expected following sample extraction.
Expected Qubit measurements of 50–120 ng/μl.
If your Qubit measurements are not consistent, this could indicate that the DNA has not been homogeneously resuspended.
If this occurs, we recommend increasing the incubation time, allowing more time for the DNA pellet to solubilise.
Your extracted gDNA can also be analysed using Femto Pulse (Agilent) to check the size and quality.
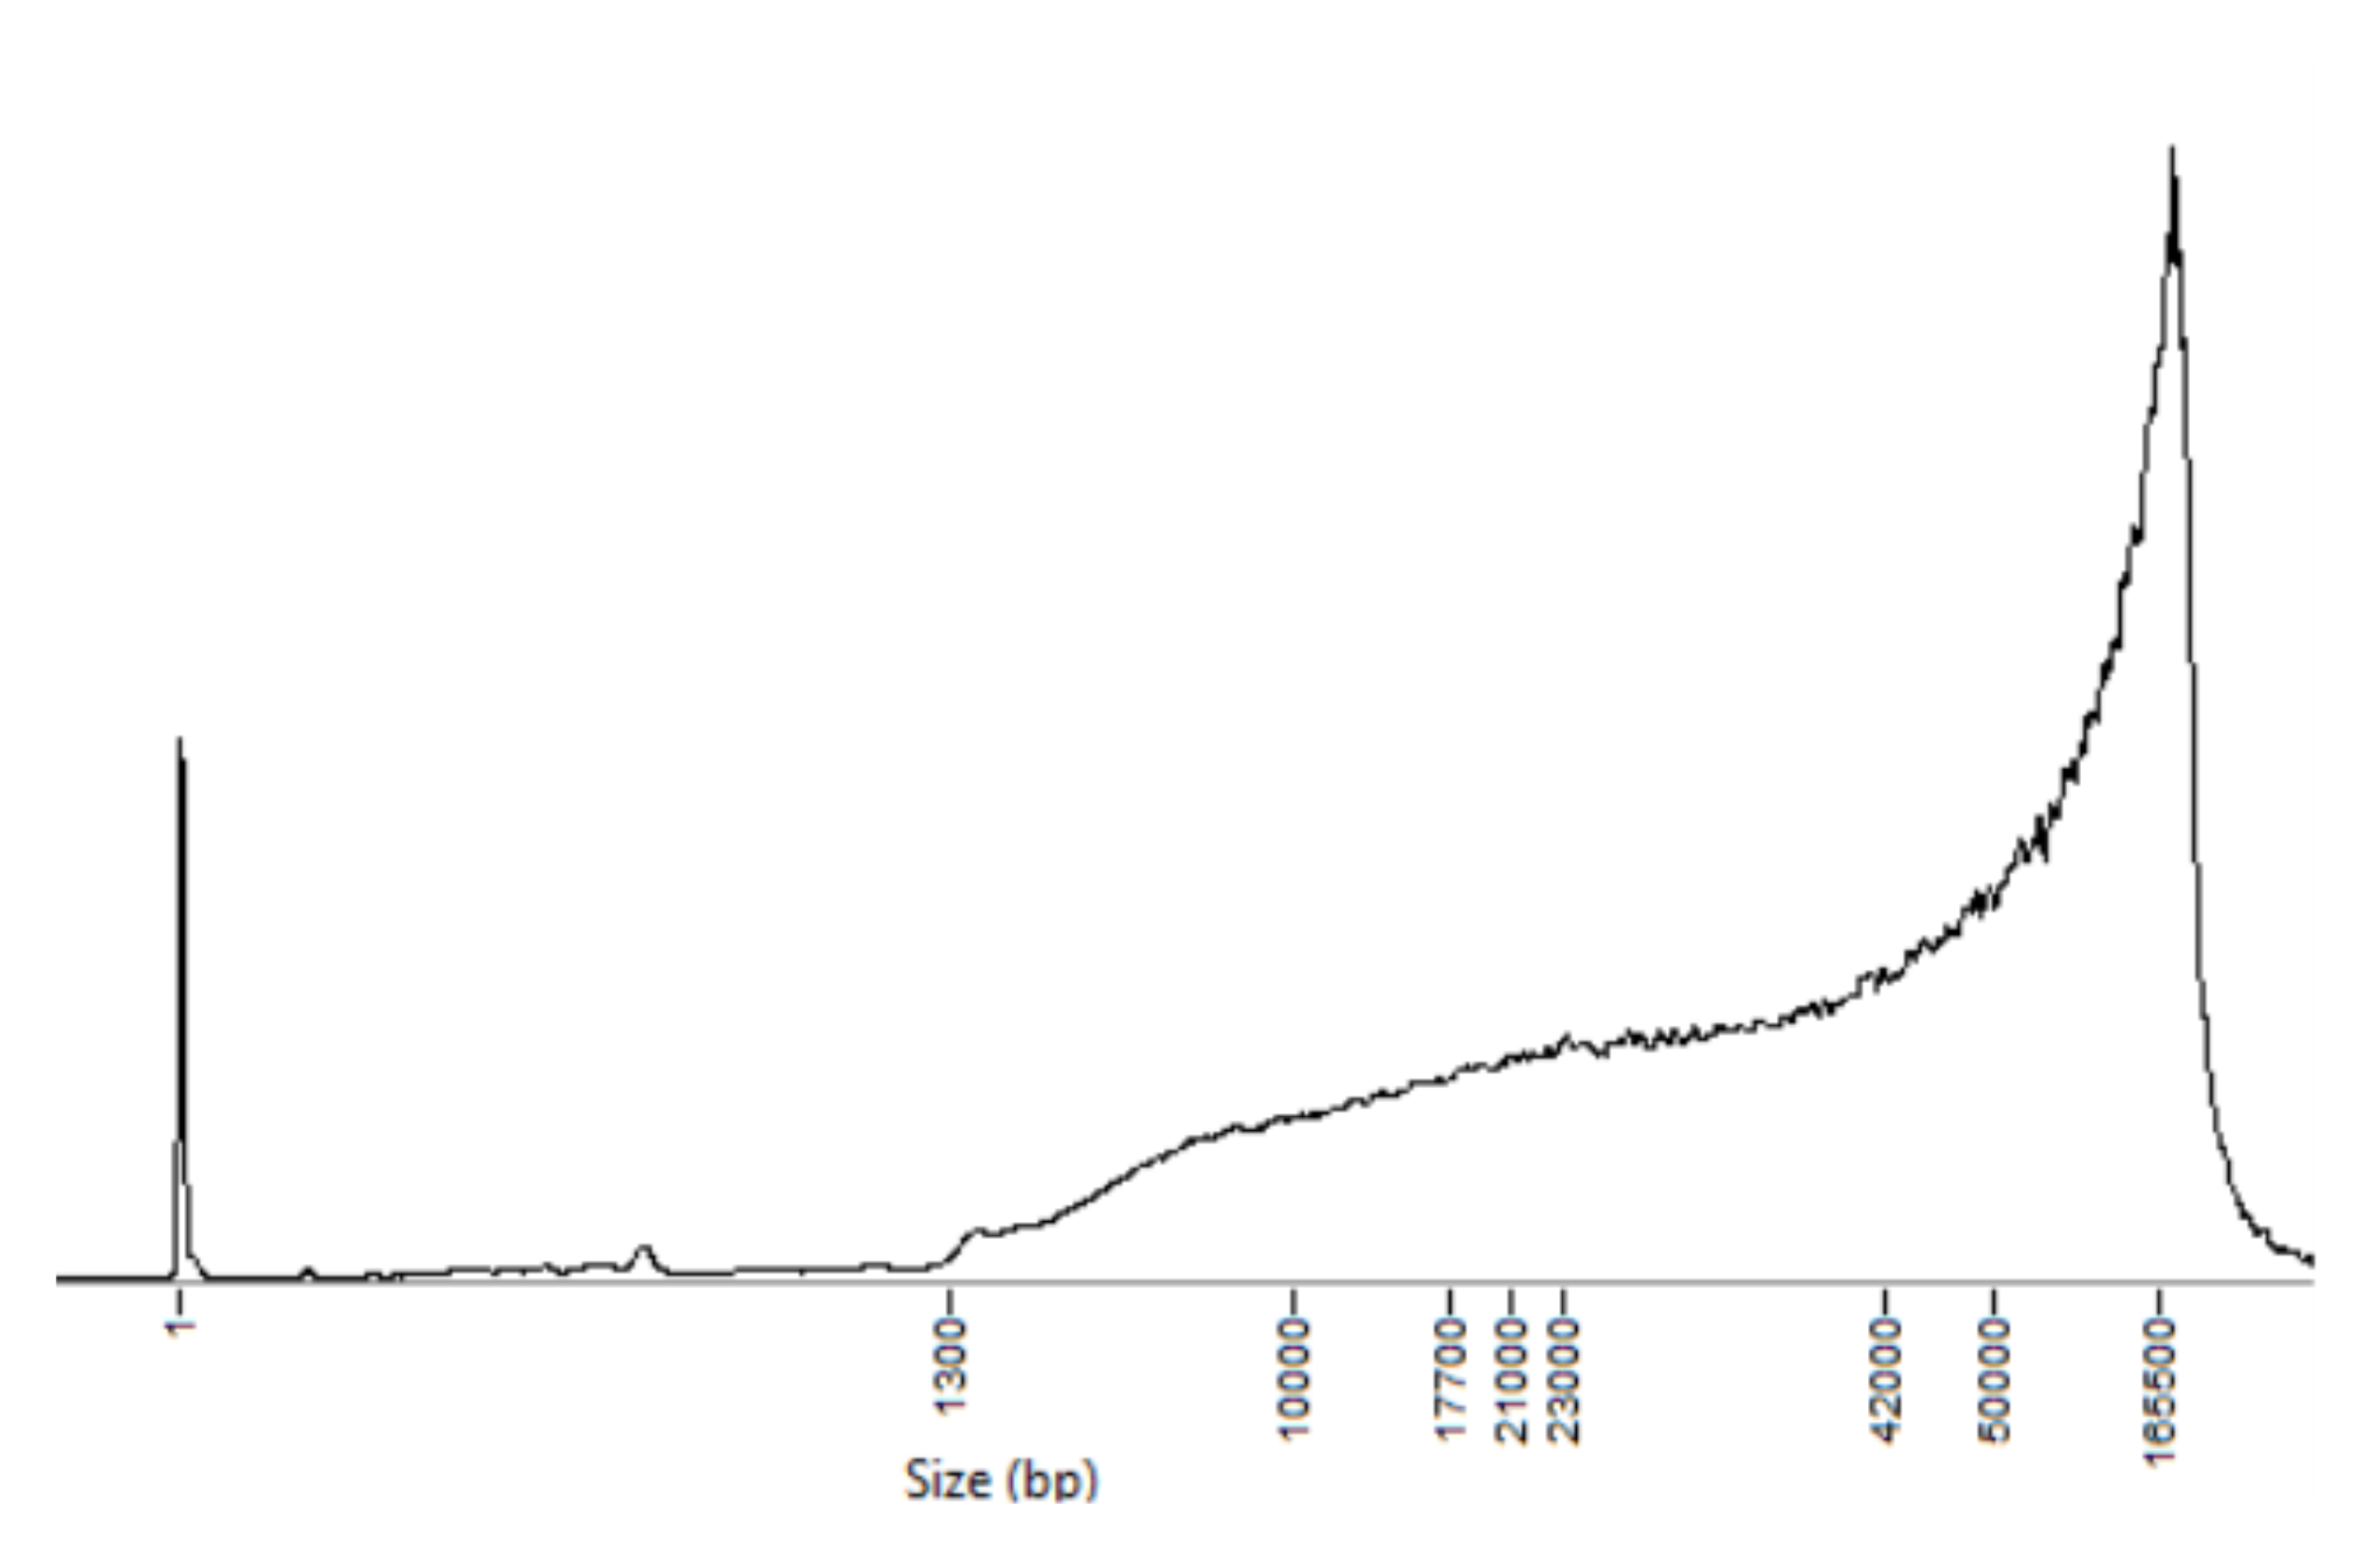
Example fragment length profile of gDNA extracted from human blood using the Chemagic BBS DNA Kit H96.
Take your extracted gDNA forward into the gDNA shearing step of this protocol. Alternatively, your sample can be stored at 4°C overnight.
4. gDNA shearing using the Geno/Grinder
Materials
- 1.3 µg of extracted gDNA per sample
Consumables
- Hard-Shell 96-Well PCR plates, low profile, thin wall, skirted (BIO-RAD, HSP9621)
- Adhesive PCR plate seals (e.g. ThermoFisher, AB0558)
- TE Buffer (Invitrogen, 12090015)
- Quant-iT dsDNA BR Assay kit (Q33130, Thermo Scientific)
- Qubit Assay Tubes (e.g. ThermoFisher Q32856 or equivalent)
- Agilent Genomic DNA 165 kb Analysis Kit (Agilent, FP-1002-0275)
Equipment
- Cole-Parmer HG-600 Geno/Grinder 2010 High-Throughput Homogenizer
- 96 well plate compatible microcentrifuge (e.g. Eppendorf, 5430)
- Microfuge
- Ice bucket with ice
- Timer
- Wide-bore pipette tips
- P1000 pipette and tips
- P200 pipette and tips
- P20 pipette and tips
- P10 pipette and tips
- P2 pipette and tips
- Qubit fluorometer plate reader (or equivalent for QC check)
- Agilent Femto Pulse System (or equivalent for read length QC)
Optional equipment
- Agilent Femto Pulse System (or equivalent for read length QC)
- Agilent Genomic DNA 165 kb Analysis Kit (Agilent, FP-1002-0275)
Dilute each of your extracted human blood gDNA samples using TE Buffer to a final concentration of 25 ng/μl.
Aliquot 53 µl (equivalent to 1.3 µg) of each of your diluted gDNA samples into a separate well of a 96-well plate.
Seal the plate completely with a PCR plate seal.
This plate serves as the sample shearing plate.
Prepare a 96-well plate as a balance plate by filling wells with equivalent volume of TE Buffer in the exact number and positions corresponding to the shearing plate.
Seal the plate completely with a PCR plate seal.
Position the balance plate opposite the shearing plate as a mirror image in the Geno/Grinder.
Secure both plates tightly using the adjustable clamp.
Setup the shearing parameters on the Geno/Grinder device as follows:
| Geno/Grinder setting | |
|---|---|
| Shearing speed | 1600 spm |
| Time | 5 minutes |
| Cycles | 1 |
Begin the shearing of DNA using the Geno/Grinder.
Assess the fragmented gDNA for fragment size using Femto Pulse (Agilent).
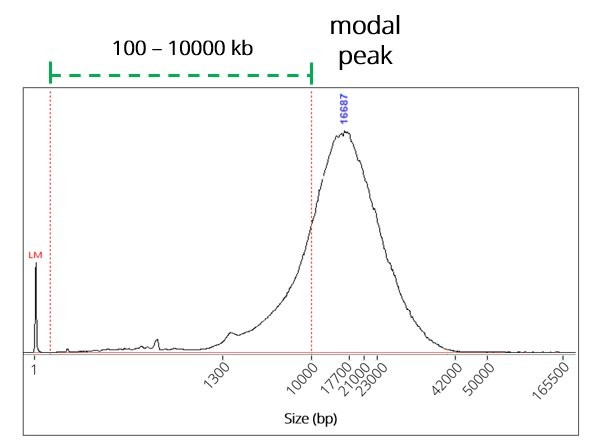
Example of a ~15kb N50 fragmented Chemagic gDNA trace in ProSize, showing the smear analysis lines (red) displaying the FP signal <10kb.
QC metrics guidance
The Geno/Grinder fragmentation reduces the fragment length profile to a size centred around approximately 15 kb.
During development and testing, 97% of samples prepared for 15kb protocols met the recommended 15kb Femto Pulse QC pass criteria (unimodal peak 11–25 kb and <36% of total DNA mass below 10 kb). Among samples meeting these criteria, 90% achieved the target read-length N50 of 13–19 kb. For samples outside the QC pass criteria, 96% did not achieve the target read N50.
Quantify your samples using a plate reader and the Quant-iT dsDNA BR Assay Kit.
Take your fragmented gDNA forward into the library preparation section of this protocol. Alternatively, your sample can be stored at 4°C overnight.
5. DNA repair and end-prep
Materials
- 1.2 µg gDNA per sample, sheared to ~15 kbp
- AMPure XP Beads (AXP)
Consumables
- NEBNext® FFPE DNA Repair Mix (NEB, M6630)
- NEBNext® Ultra™ II End Repair/dA-Tailing Module (NEB, E7546)
- 1.5 ml Eppendorf DNA LoBind tubes
- Rigid 96-well PCR plates, 200 µL minimum volume per well (e.g. Hard-Shell 96-Well PCR Plate, low profile, thin wall, skirted, BIO-RAD, HSP9601)
- Ethanol, 100% (e.g. Fisher, 16606002)
- Nuclease-free water (e.g. Thermo Scientific, AM9937)
- Reagent reservoirs (e.g. Thermo Scientific, 10141873)
Equipment
- P1000 pipette and tips
- P200 pipette and tips
- P100 pipette and tips
- P20 pipette and tips
- P10 pipette and tips
- P2 pipette and tips
- Multichannel pipette and tips
- Plate shaker with temperature control (Eppendorf ThermoMixer C, or equivalent)
- Magnetic separation rack suitable for 96-well plates
- Vortex mixer
- Thermal cycler
- Microfuge
- Microplate centrifuge
- Ice bucket with ice
Prepare the NEB reagents in accordance with manufacturer’s instructions, and place on ice.
For optimal performance, NEB recommend the following:
Thaw all reagents on ice.
Flick and/or invert the reagent tubes to ensure they are well mixed.
Note: Do not vortex the FFPE DNA Repair Mix or Ultra II End Prep Enzyme Mix.Always spin down tubes before opening for the first time each day.
The Ultra II End Prep Reaction Buffer and FFPE DNA Repair Buffer may have a little precipitate. Allow the mixtures to come to room temperature and pipette the buffer up and down several times to break up the precipitate, followed by vortexing the tube for 30 seconds to solubilise any precipitate.
Note: It is important the buffers are mixed well by vortexing.The FFPE DNA Repair Buffer may have a yellow tinge and is fine to use if yellow.
Do not vortex the NEBNext FFPE DNA Repair Mix or NEBNext Ultra II End Prep Enzyme Mix.
It is important that the NEBNext FFPE DNA Repair Buffer and NEBNext Ultra II End Prep Reaction Buffer are mixed well by vortexing.
Check for any visible precipitate; vortexing for at least 30 seconds may be required to solubilise any precipitate.
We recommend making up a master mix of the End Prep and DNA Repair reagents for your total number of samples.
We recommend adding some excess volume (~10%) when preparing your master mix for multiple samples to account for pipetting volume loss.
| Reagent | Volume per sample (+ excess) | Volume for 96 samples (+ excess) |
|---|---|---|
| NEBNext FFPE DNA Repair Buffer | 3.5 µl (+ 0.35 µl) | 336 µl (+ 33.6 µl) |
| NEBNext Ultra II End Prep Reaction Buffer | 3.5 µl (+ 0.35 µl) | 336 µl (+ 33.6 µl) |
| NEBNext FFPE DNA Repair Mix | 2 µl (+ 0.2 µl) | 192 µl (+ 19.2 µl) |
| NEBNext Ultra II End Prep Enzyme Mix | 3 µl (+ 0.3 µl) | 288 µl (+ 28.8 µl) |
| Total volume | 12 µl (+ 1.2 µl) | 1,152 µl (+ 115.2 µl) |
Ensure the master mix is fully mixed by pipetting full volume ten times. Do not vortex the mix.
Tip: The prepared master mix can be evenly aliquoted into an 8-tube strip, enabling the use of multichannel pipettes to dispense into your sample plate.
For each sample, set up the following end-prep/FFPE-repair reaction in a separate well of a 96-well PCR plate, and mix well by pipetting ten times (full volume). Seal the plate.
| Reagent | Volume per sample |
|---|---|
| 1.2 µg extracted gDNA sheared to 15 kb | 48 µl |
| Master Mix (from previous step) | 12 µl |
| Total volume | 60 µl |
Using a thermal cycler, incubate at 20°C for 20 minutes and 65°C for 5 minutes.
During the incubation, allow the AMPure XP Beads (AXP) to come to room temperature. Resuspend the AMPure XP Beads (AXP) by vortexing immediately before use.
The remaining AMPure XP Beads (AXP) can be stored at 4°C following thawing.
Consider post-thaw storage of this component at 4°C to avoid having to rethaw the component for your subsequent sequencing runs. Freeze/thawing wont affect performance, but thawing large volumes may be time-consuming.
Remove the sample plate from the thermal cycler and briefly centrifuge.
Add 60 µl of AMPure XP Beads (AXP) to sample each reaction and mix well by pipetting (ten full-volume pipette mixes). Re-seal the plate.
Place your sample plate in a bench-top shaker capable of accommodating PCR plates and agitate at 350 rpm for 20 minutes at room temperature.
Prepare sufficient fresh 80% ethanol with nuclease-free water for all of your samples.
Allow enough for 200 µl of fresh 80% ethanol per sample.
Briefly centrifuge your sample plate, then place onto a suitable plate magnet and pellet the beads for at least 3 minutes or until the supernatant is clear and colourless (whichever is longer). Keep the samples on the magnet and aspirate the supernatant by pipetting, taking care not to aspirate any beads.
Keeping the samples on the magnet, wash the beads by adding 70 µl of the freshly prepared 80% ethanol without disturbing the pellets. Remove the ethanol using a pipette and discard.
Repeat the previous step.
Briefly centrifuge the sample plate, then place back onto the magnet for the beads to pellet. Remove any residual ethanol by pipetting, taking care not to aspirate any beads.
Remove the plate from the magnetic rack and resuspend each bead pellet in 20 µl nuclease-free water. Seal the plate.
Agitate the sample plate in a bench-top shaker at 350 rpm for 15 minutes at room temperature, followed by an additional 15-minute agitation at 37°C.
Return sample plate to magnet and pellet beads for at least 3 minutes or until the respective eluates are clear and colourless (whichever is longer).
Transfer 18 µl of each eluate to separate wells of a clean 96-well PCR plate.
Take care not to disturb the pelleted beads.
Dispose of the bead-containing plate.
Take forward the end-prepped DNA into the barcode ligation step. However, you may store the samples at 4°C overnight.
6. Barcode and adapter ligation
Materials
- End-prepped DNA samples (from previous step)
- Native Barcodes (NB01-NB96)
- Native Adapter (NA)
- AMPure XP Beads (AXP)
- L Fragment Buffer (LFB)
- Elution Buffer (EB)
Consumables
- NEB Blunt/TA Ligase Master Mix (NEB, M0367)
- Salt-T4® DNA Ligase (NEB, M0467)
- Nuclease-free water (e.g. Thermo Scientific, AM9937)
- Rigid 96-well PCR plates, 200 µL minimum volume per well (e.g. Hard-Shell 96-Well PCR Plate, low profile, thin wall, skirted, BIO-RAD, HSP9601)
- Adhesive PCR plate seals (e.g. ThermoFisher, AB0558)
- Qubit™ Assay Tubes (Invitrogen, Q32856)
- Qubit™ dsDNA HS Assay Kit (ThermoFisher, Q32851)
Equipment
- Plate shaker with temperature control (Eppendorf ThermoMixer C, or equivalent)
- Magnetic separation rack suitable for 96-well plates
- Vortex mixer
- Microfuge
- Ice bucket with ice
- Multichannel pipette and tips
- P1000 pipette and tips
- P200 pipette and tips
- P100 pipette and tips
- P20 pipette and tips
- P10 pipette and tips
- P2 pipette and tips
- Qubit™ fluorometer (or equivalent for QC check)
Prepare the NEB Blunt/TA Ligase Master Mix and Salt-T4 DNA Ligase according to the manufacturers instructions, and place on ice.
- Thaw the reagent at room temperature.
- Spin down the reagent tube for 5 seconds.
- Ensure the reagent is fully mixed by performing 10 full volume pipette mixes.
Note: Do NOT vortex the Blunt/TA master mix or the Salt T4-DNA Ligase.
Thaw the AMPure XP Beads (AXP) at room temperature and mix by vortexing. Keep the beads at room temperature.
Thaw the L Fragment Buffer (LFB) at room temperature and mix by vortexing. Place on ice.
Thaw the Elution Buffer (EB) at room temperature and mix by vortexing. Place on ice.
Thaw the Native Barcodes (NB01-96) required for your number of samples at room temperature, and briefly centrifuge to make sure all liquid collects at the bottom of each well.
The wells of the barcoding plate are intended for single use only. Please ensure your barcode well is sealed before use, and do not reuse the barcode well once pierced/opened.
Mix the Native Barcodes well by pipetting before use, then add 2 µl of distinct Native Barcode to each well from your eluted sample plate (from previous step).
Add 20 µl of Blunt/TA Master Mix to each well from your eluted sample plate (from previous step). Mix well by pipetting, and seal the plate.
Incubate for 30 minutes at room temperature.
Spin down the Native Adapter (NA), pipette mix and place on ice.
Add 2 µl of Native Adapter (NA) and 5 µl of Salt T4 DNA Ligase to each well of your sample plate. Mix thoroughly by pipetting, seal the plate and spin down briefly.
Incubate for 20 minutes at room temperature.
During the incubation, allow the AMPure XP Beads (AXP) to come to room temperature. Resuspend the AMPure XP Beads (AXP) by vortexing immediately before use.
Add 20 µl of AMPure XP Beads (AXP) to sample each reaction and mix well by pipetting (ten full-volume pipette mixes). Re-seal the plate.
Agitate the sample plate on a plate shaker at 350 rpm at room temperature for 20 minutes.
During the incubation, allow the L Fragment Buffer (LFB) and Elution Buffer (EB) to come to room temperature.
Briefly centrifuge your sample plate, then place onto a suitable plate magnet and pellet the beads for at least 3 minutes or until the supernatant is clear and colourless (whichever is longer). Keep the samples on the magnet and aspirate the supernatant by pipetting, taking care not to aspirate any beads.
Perform a sample clean-up by following the steps below:
- Remove the sample plate from the magnet and resuspend each sample pellet in 120 µl L Fragment Buffer (LFB) by pipetting.
- Return samples to the magnet and pellet the beads on the magnet for at least 3 minutes or until the supernatant is clear and colourless (whichever is longer).
- Keep the samples on the magnet and aspirate the supernatant, taking care not to aspirate any beads.
Repeat the previous steps two more times, for a total of three L Fragment Buffer (LFB) washes and resuspensions.
Carefully remove any residual supernatant by pipetting.
Resuspend each sample bead pellet in 80 µl Elution Buffer (EB). Seal your sample plate.
Agitate the samples on a plate shaker at 350 rpm at room temperature for 15 minutes followed by an additional 15 minutes' agitation at 37°C.
Return sample plate to magnet and pellet beads for at least 3 minutes or until the respective eluates are clear and colourless (whichever is longer).
Transfer 78 µl of each eluate to separate wells of a clean 96-well PCR plate.
Take care not to disturb the pelleted beads.
Dispose of the bead-containing plate.
Quantify 1 µl of each eluted sample using a Qubit fluorometer.
Expected recovery ~550 ng (approximately 50%) per sample.
Take forward the barcoded and adapted samples to the QC pool preparation step. However, you may store the sample at 4°C overnight.
7. Sample QC pool preparation
Materials
- Barcoded and adapted samples (from previous step)
Consumables
- 1.5 ml Eppendorf DNA LoBind tubes
- Qubit™ Assay Tubes (Invitrogen, Q32856)
- Qubit™ dsDNA HS Assay Kit (ThermoFisher, Q32851)
Equipment
- Vortex mixer
- Microfuge
- Ice bucket with ice
- Multichannel pipette and tips
- P1000 pipette and tips
- P200 pipette and tips
- P100 pipette and tips
- P20 pipette and tips
- P10 pipette and tips
- P2 pipette and tips
- Qubit™ fluorometer (or equivalent for QC check)
Into a clean 1.5 ml Eppendorf DNA LoBind tube, pool 5 µL from each of your barcoded and adapted samples and mix well by pipetting (10 times, full-volume).
Quantify 1 µl of the QC Pool using Qubit (or equivalent) in at least triplicate.
Keep a note of the quantification measurements.
8. Priming and loading the QC PromethION Flow Cell
Materials
- Flow Cell Flush (FCF)
- Flush Tether UL (FTU)
- Library Beads (LIB)
- Sequencing Buffer (SB)
Consumables
- PromethION Flow Cells
- 1.5 ml Eppendorf DNA LoBind tubes
Equipment
- PromethION device
- PromethION Flow Cell Light Shield
- P1000 pipette and tips
- P200 pipette and tips
- P20 pipette and tips
After taking the flow cell out of the fridge, wait 20 minutes for the flow cell to reach room temperature, before inserting it into the PromethION. Condensation can form on the flow cell in humid environments. Inspect the gold connector pins on the top and underside of the flow cell for condensation and wipe off with a lint-free wipe if any is observed. Ensure the heat pad (black pad) is present on the underside of the flow cell.
Fully thaw the Sequencing Buffer (SB), Library Beads (LIB), Flush Tether UL (FTU) and Flow Cell Flush (FCF) at room temperature before mixing by vortexing. Then spin down where possible, and store on ice.
Prepare the flow cell priming mix in a suitable tube for the number of flow cells to flush. Once combined, mix well by briefly vortexing.
| Reagent | Volume per flow cell |
|---|---|
| Flow Cell Flush (FCF) | 1197 µl |
| Flush Tether UL (FTU) | 3 µl |
| Total volume | 1,200 µl |
The remaining Flow Cell Flush (FCF) can be stored for up to 48 hours at 4°C.
Consider post-thaw storage of this component at 4°C to avoid having to rethaw the component for your subsequent sequencing runs. Freeze/thawing will not affect performance, but thawing large volumes may be time-consuming.
For the PromethION 24/48, load the flow cell(s) into the docking ports:
- Line up the flow cell with the connector horizontally and vertically before smoothly inserting into position.
- Press down firmly onto the flow cell and ensure the latch engages and clicks into place.
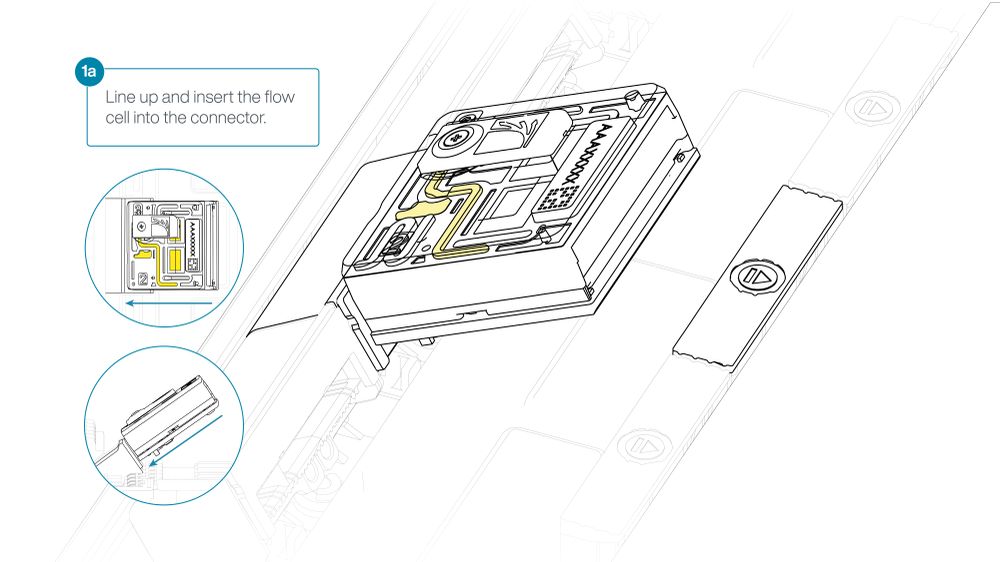
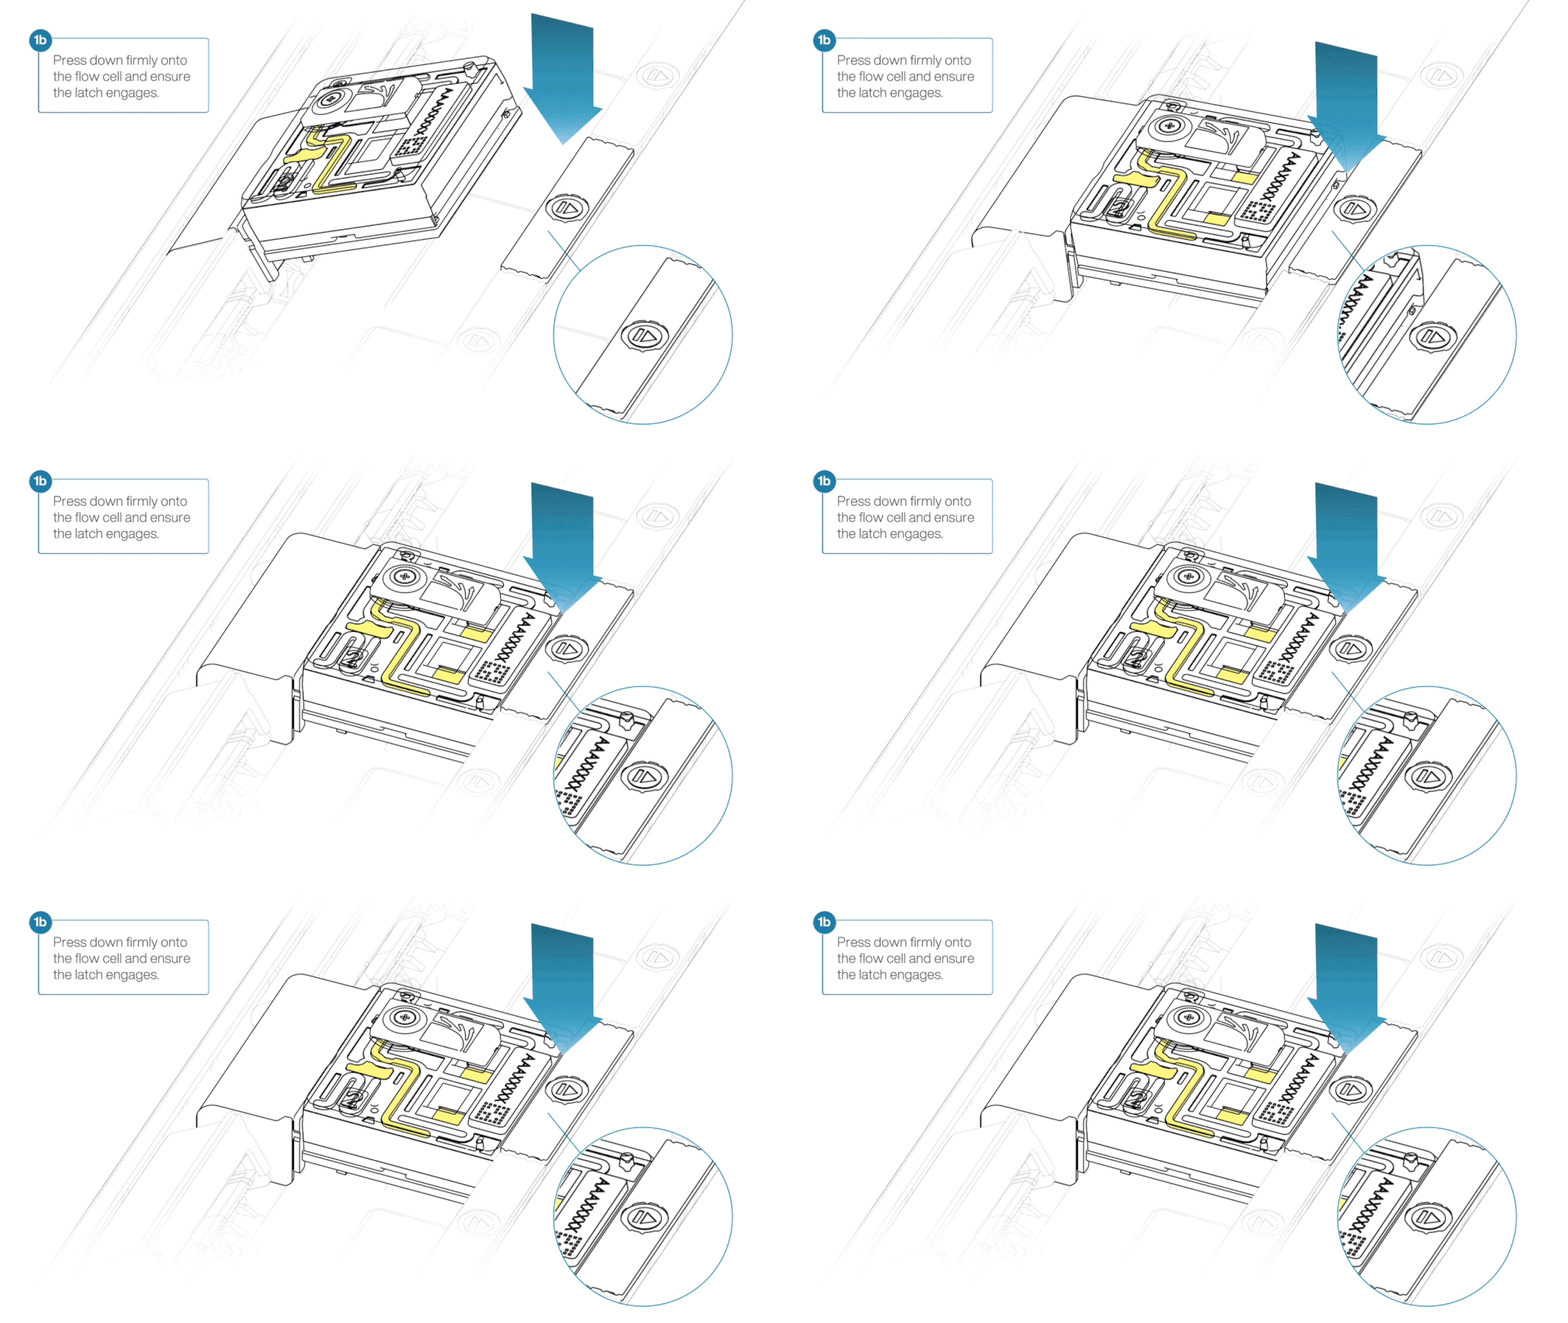
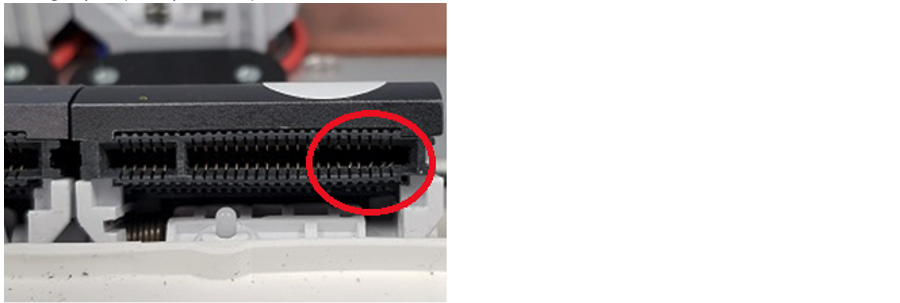
Insertion of the flow cells at the wrong angle can cause damage to the pins on the PromethION and affect your sequencing results. If you find the pins on a PromethION position are damaged, please contact support@nanoporetech.com for assistance.
Complete a flow cell check to assess the number of pores available before loading the library.
This step can be omitted if the flow cell has been checked previously.
See the flow cell check document for more information.
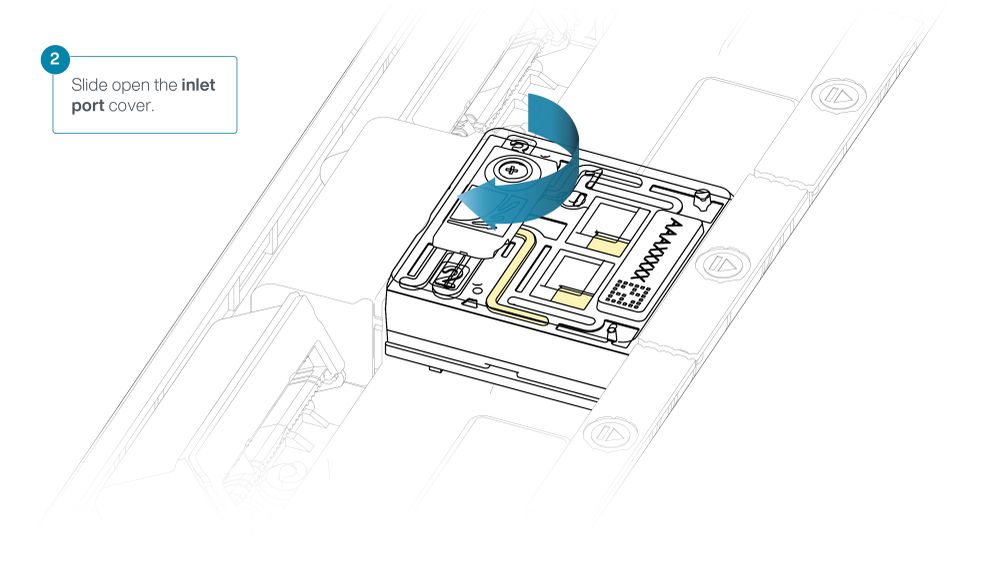
Slide the inlet port cover clockwise to open.
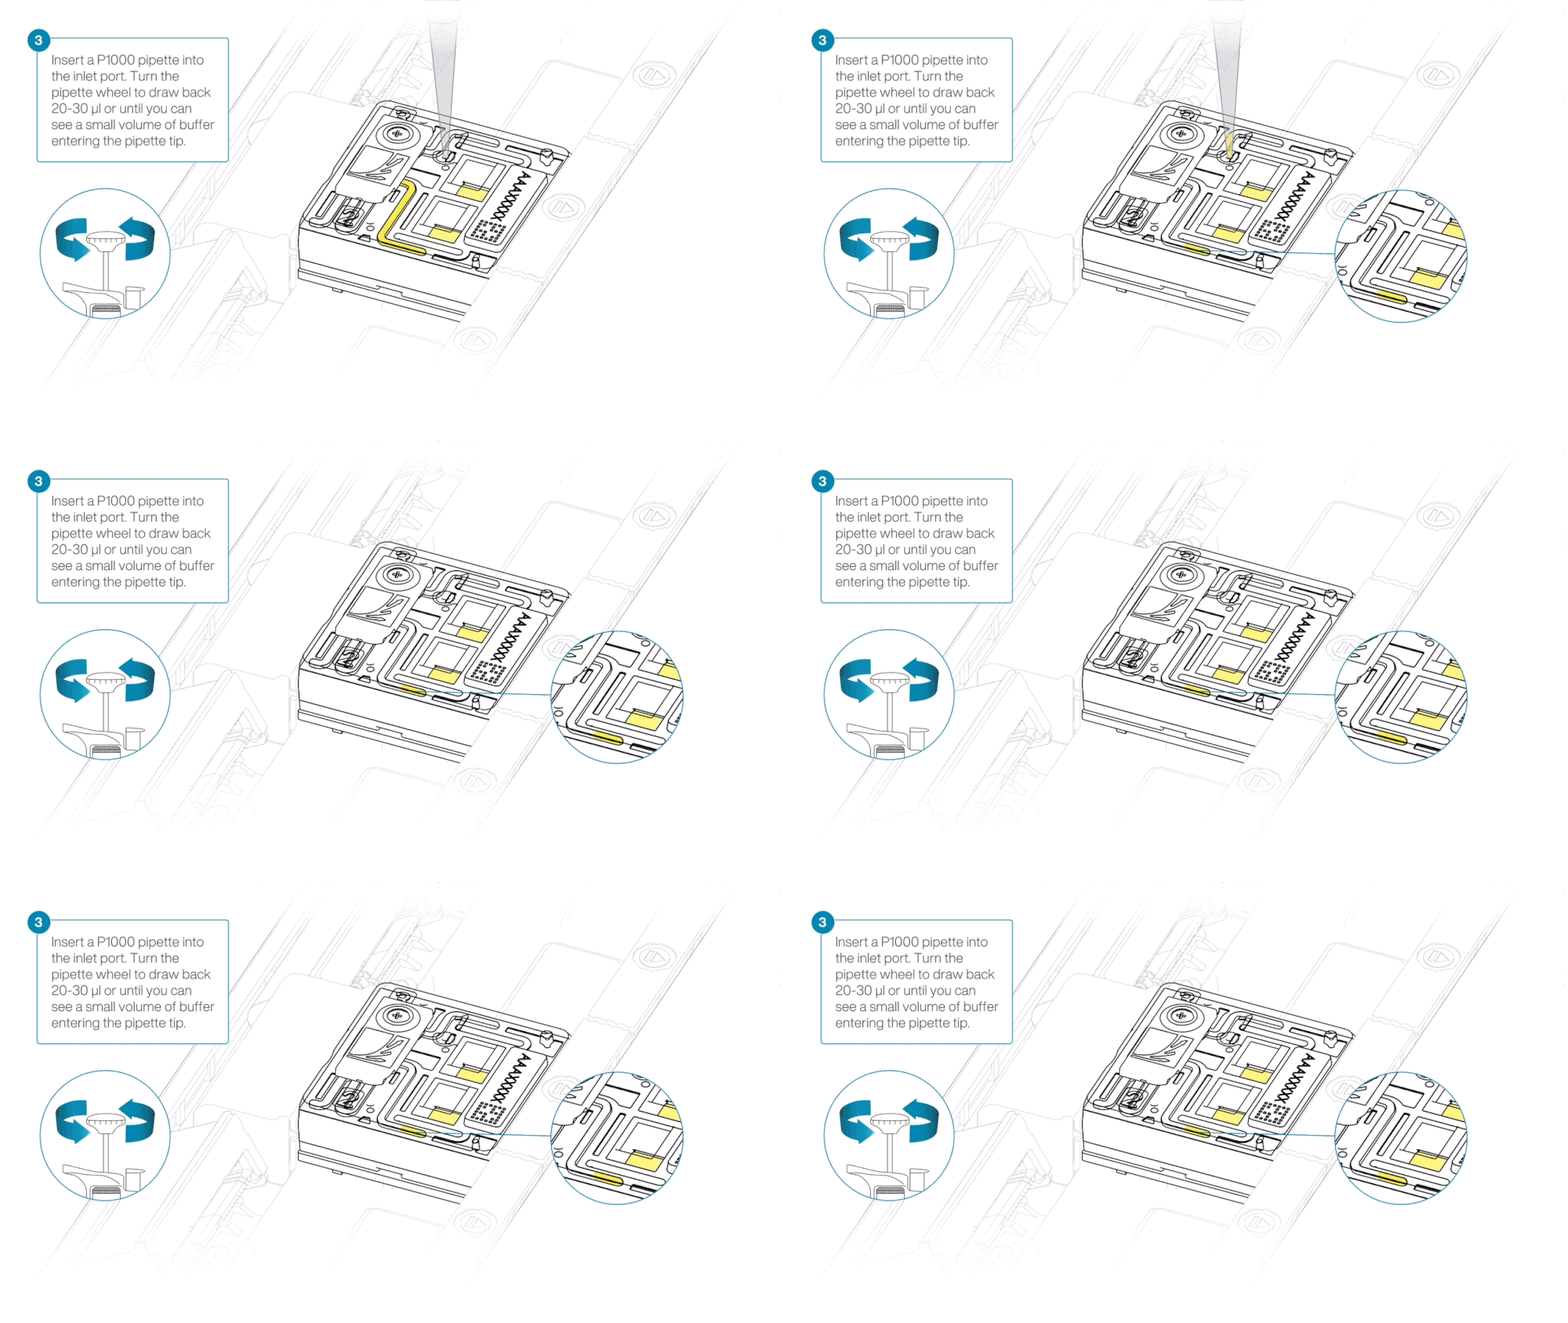
Take care when drawing back buffer from the flow cell. Do not remove more than 20-30 µl, and make sure that the array of pores are covered by buffer at all times. Introducing air bubbles into the array can irreversibly damage pores.
After opening the inlet port, draw back a small volume to remove any air bubbles:
- Set a P1000 pipette tip to 200 µl.
- Insert the tip into the inlet port.
- Turn the wheel until the dial shows 220-230 µl, or until you see a small volume of buffer entering the pipette tip.
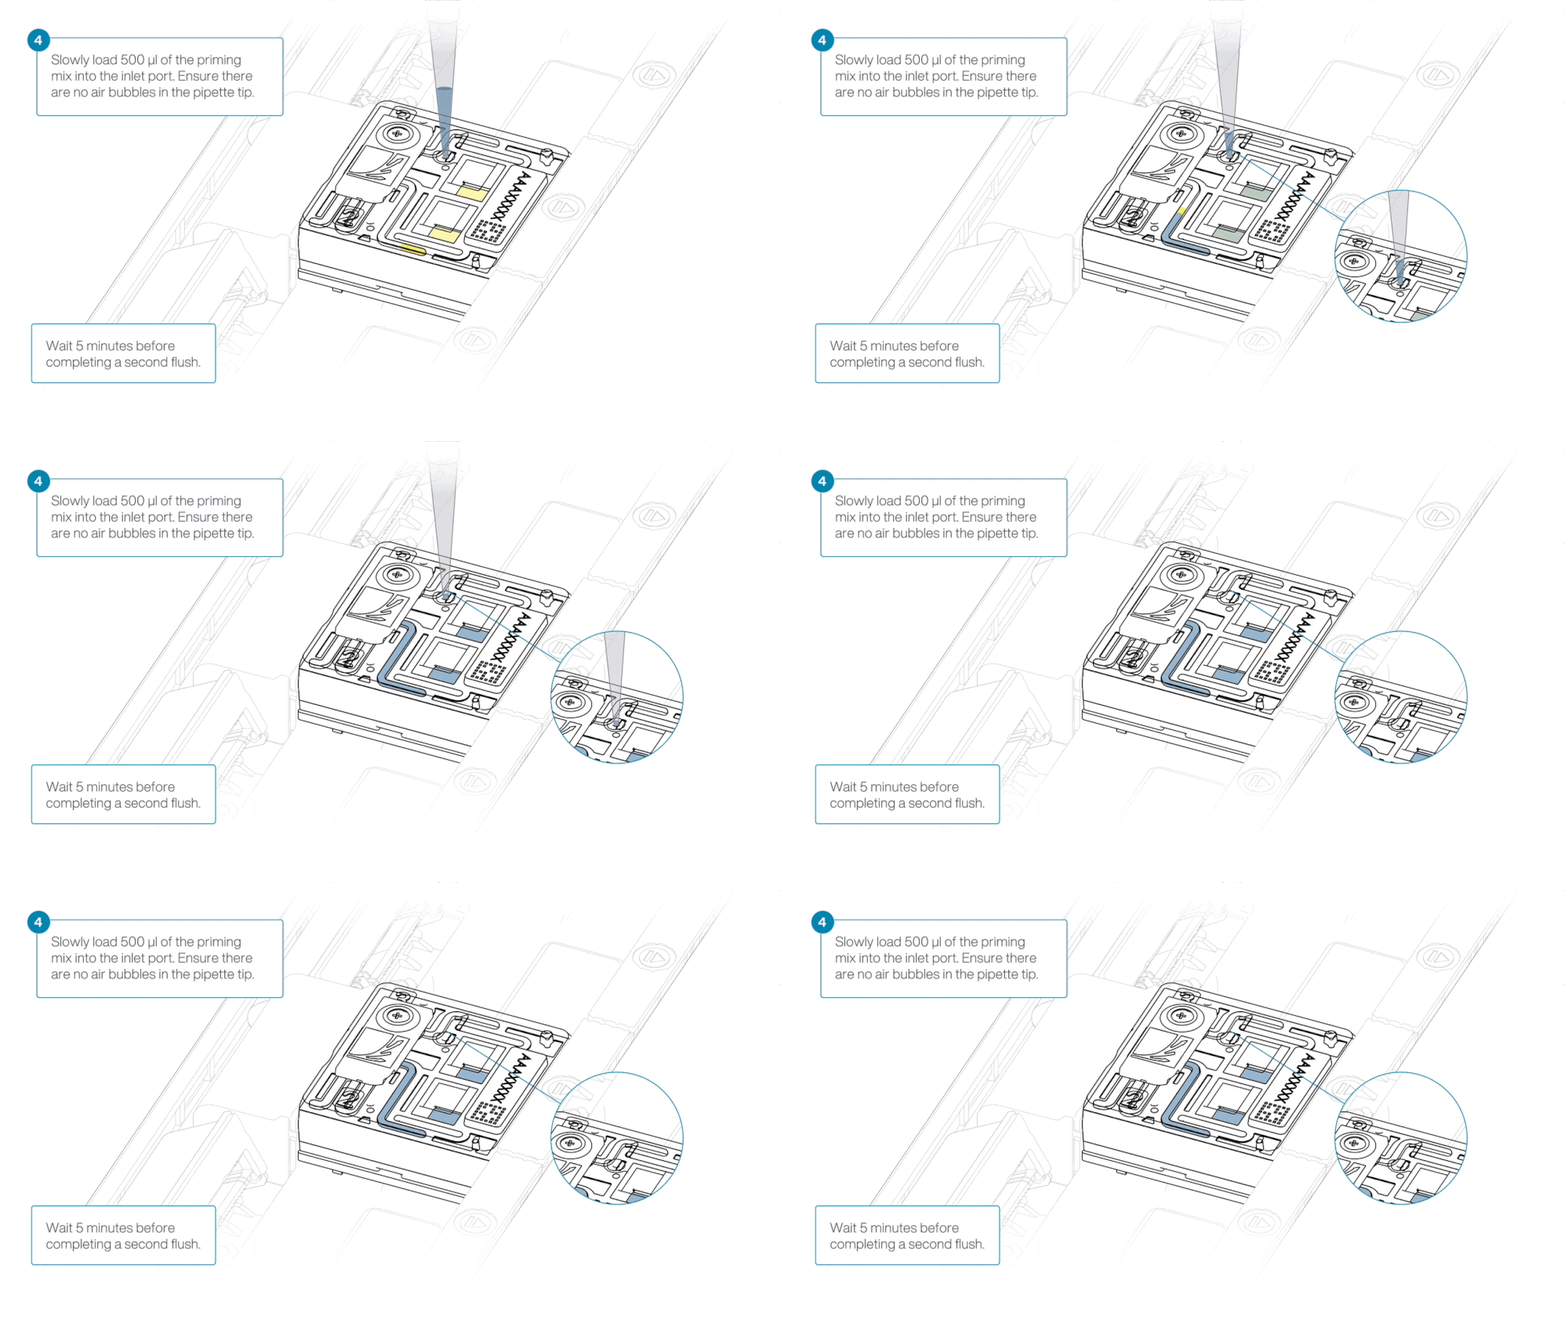
Load 500 µl of the priming mix into the flow cell via the inlet port, avoiding the introduction of air bubbles. Wait five minutes. During this time, prepare the library for loading using the next steps in the protocol.
Thoroughly mix the contents of the Library Beads (LIB) by pipetting.
The Library Beads (LIB) tube contains a suspension of beads. These beads settle very quickly. It is vital that they are mixed immediately before use.
We recommend using the Library Beads (LIB) for most sequencing experiments. However, the Library Solution (LIS) is available for more viscous libraries.
In a new 1.5 ml Eppendorf DNA LoBind tube, prepare the sample QC pool library for loading as follows:
| Reagent | Volume per flow cell |
|---|---|
| Sequencing Buffer (SB) | 100 µl |
| Library Beads (LIB) thoroughly mixed before use | 68 µl |
| Sample QC pool | 32 µl |
| Total | 200 µl |
Note: Library loading volume has been increased to improve array coverage.
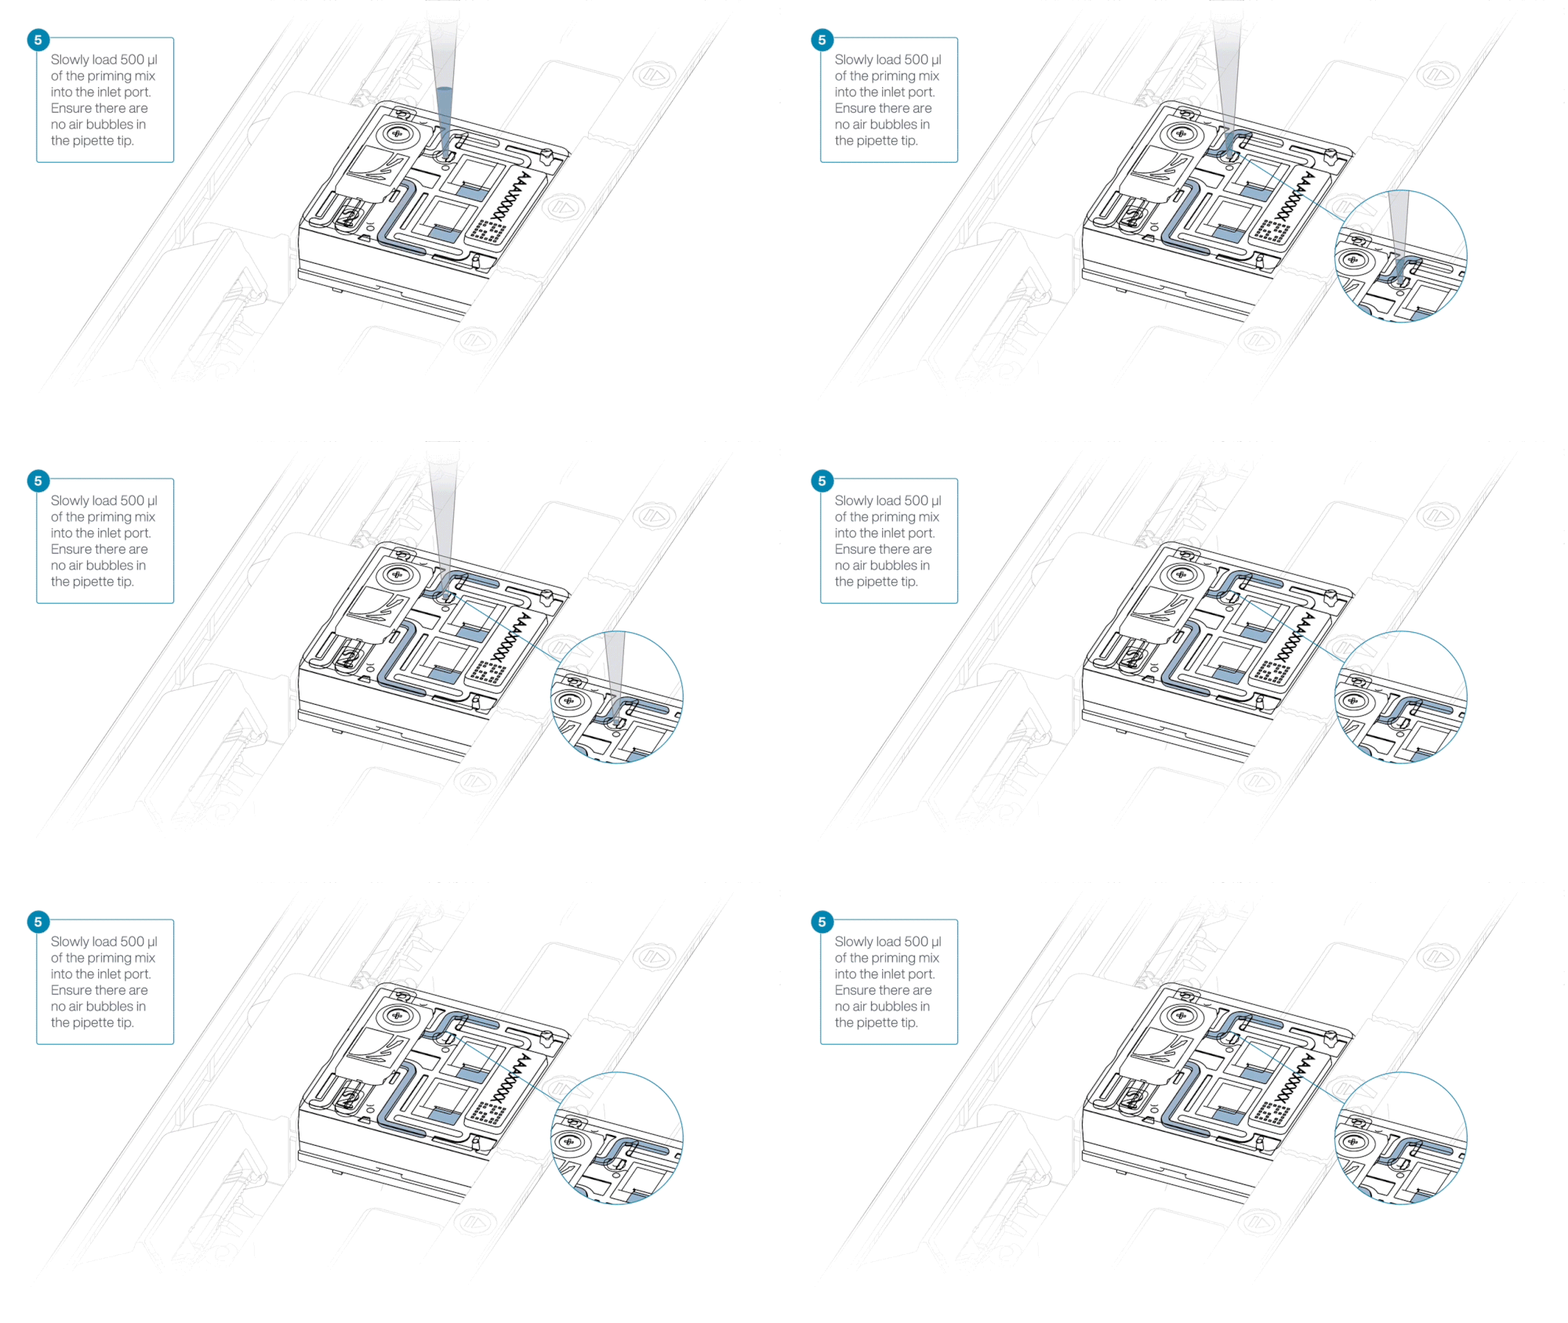
Complete the flow cell priming by slowly loading 500 µl of the priming mix into the inlet port.
Mix the prepared library gently by pipetting up and down just prior to loading.
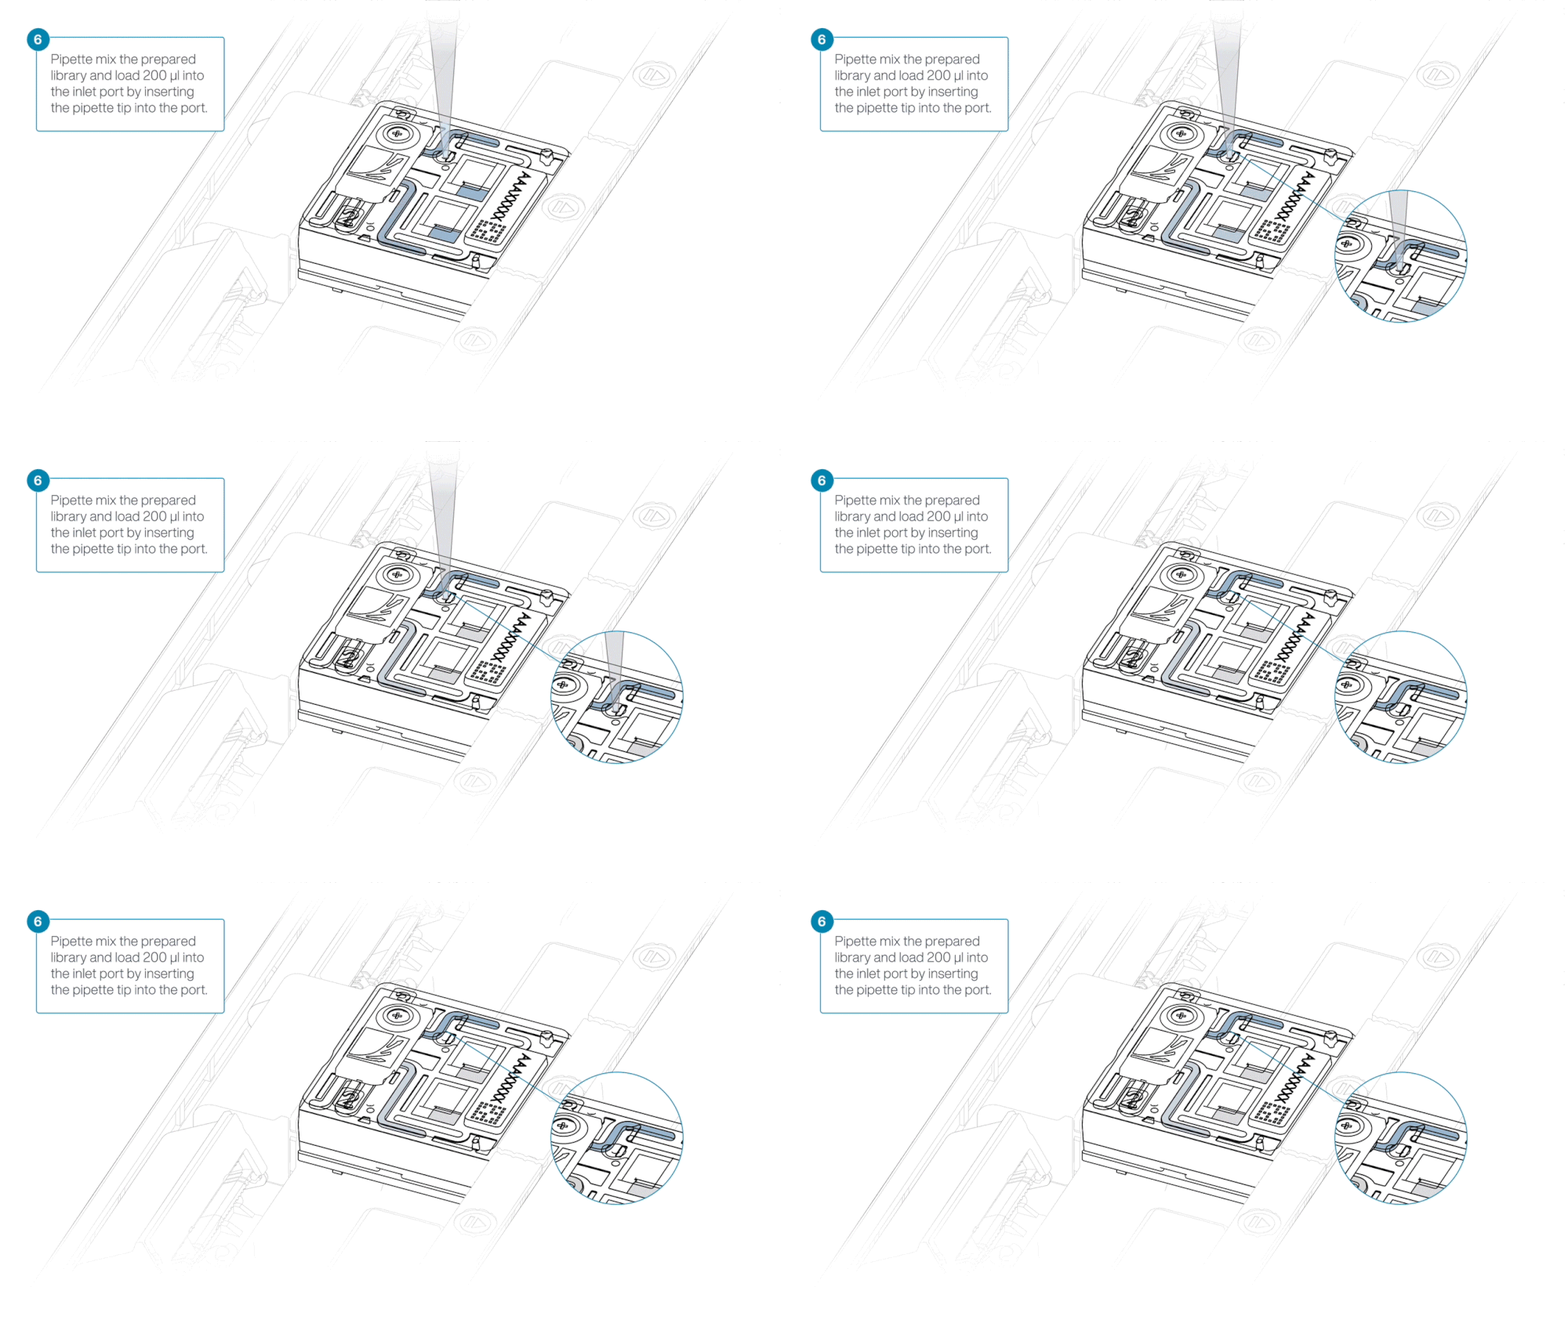
Load 200 µl of library into the inlet port using a P1000 pipette.
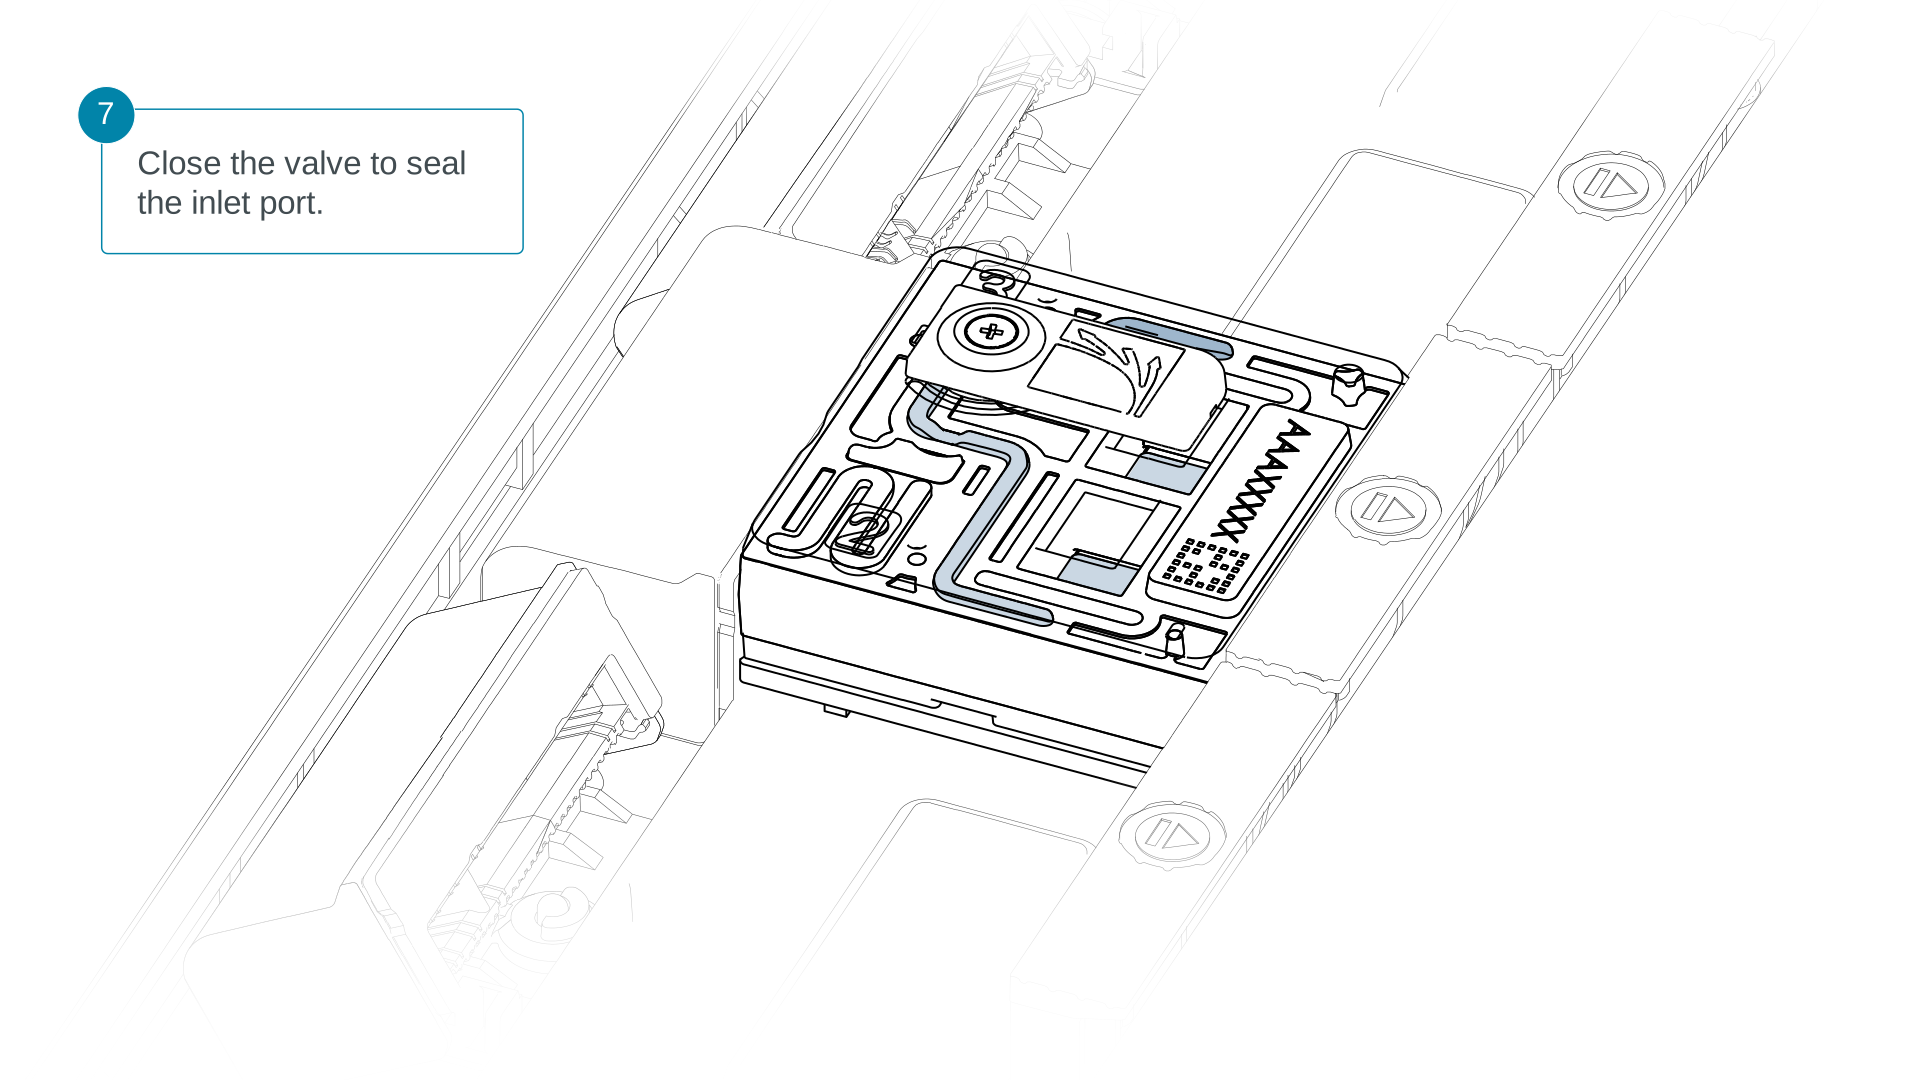
Close the valve to seal the inlet port.
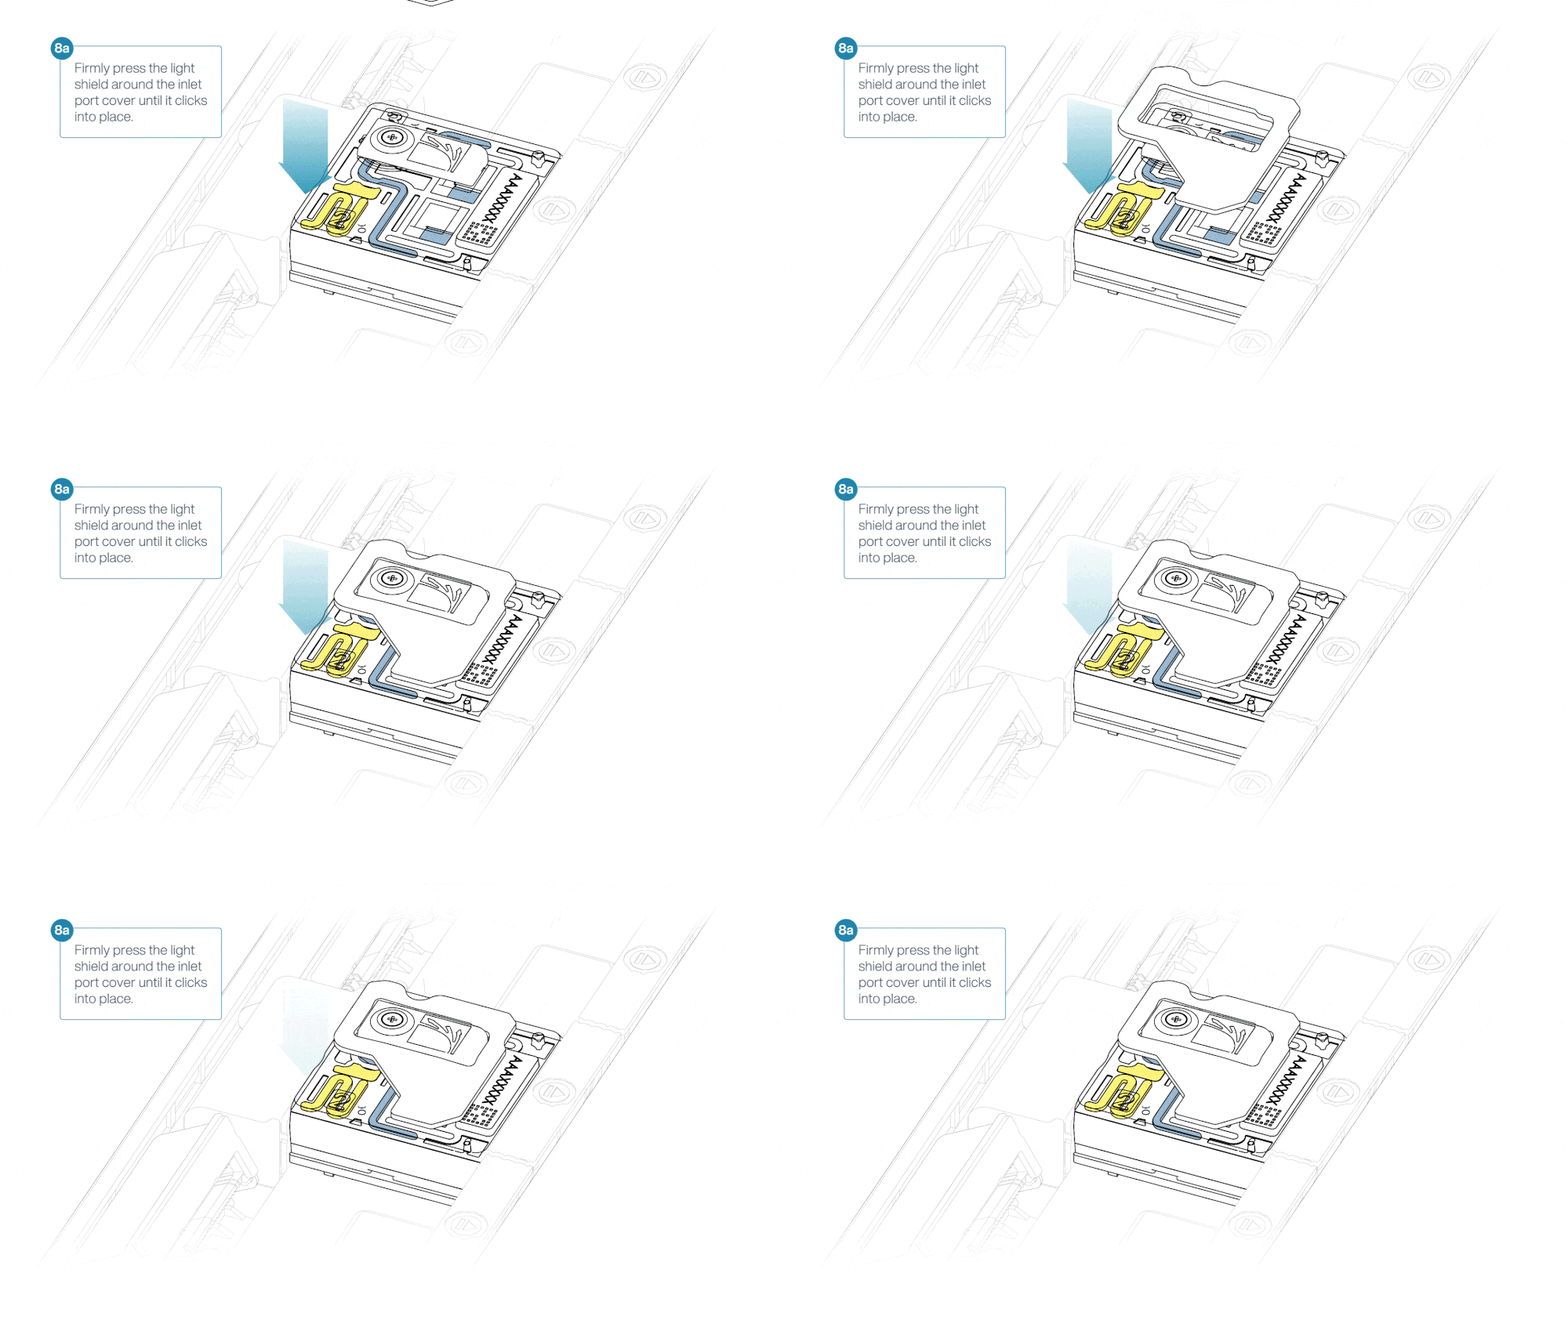
For optimal sequencing output, install the light shield on your flow cell as soon as the library has been loaded.
We recommend leaving the light shield on the flow cell when library is loaded, including during any washing and reloading steps. The shield can be removed when the library has been removed from the flow cell.
If the light shield has been removed from the flow cell, install the light shield as follows:
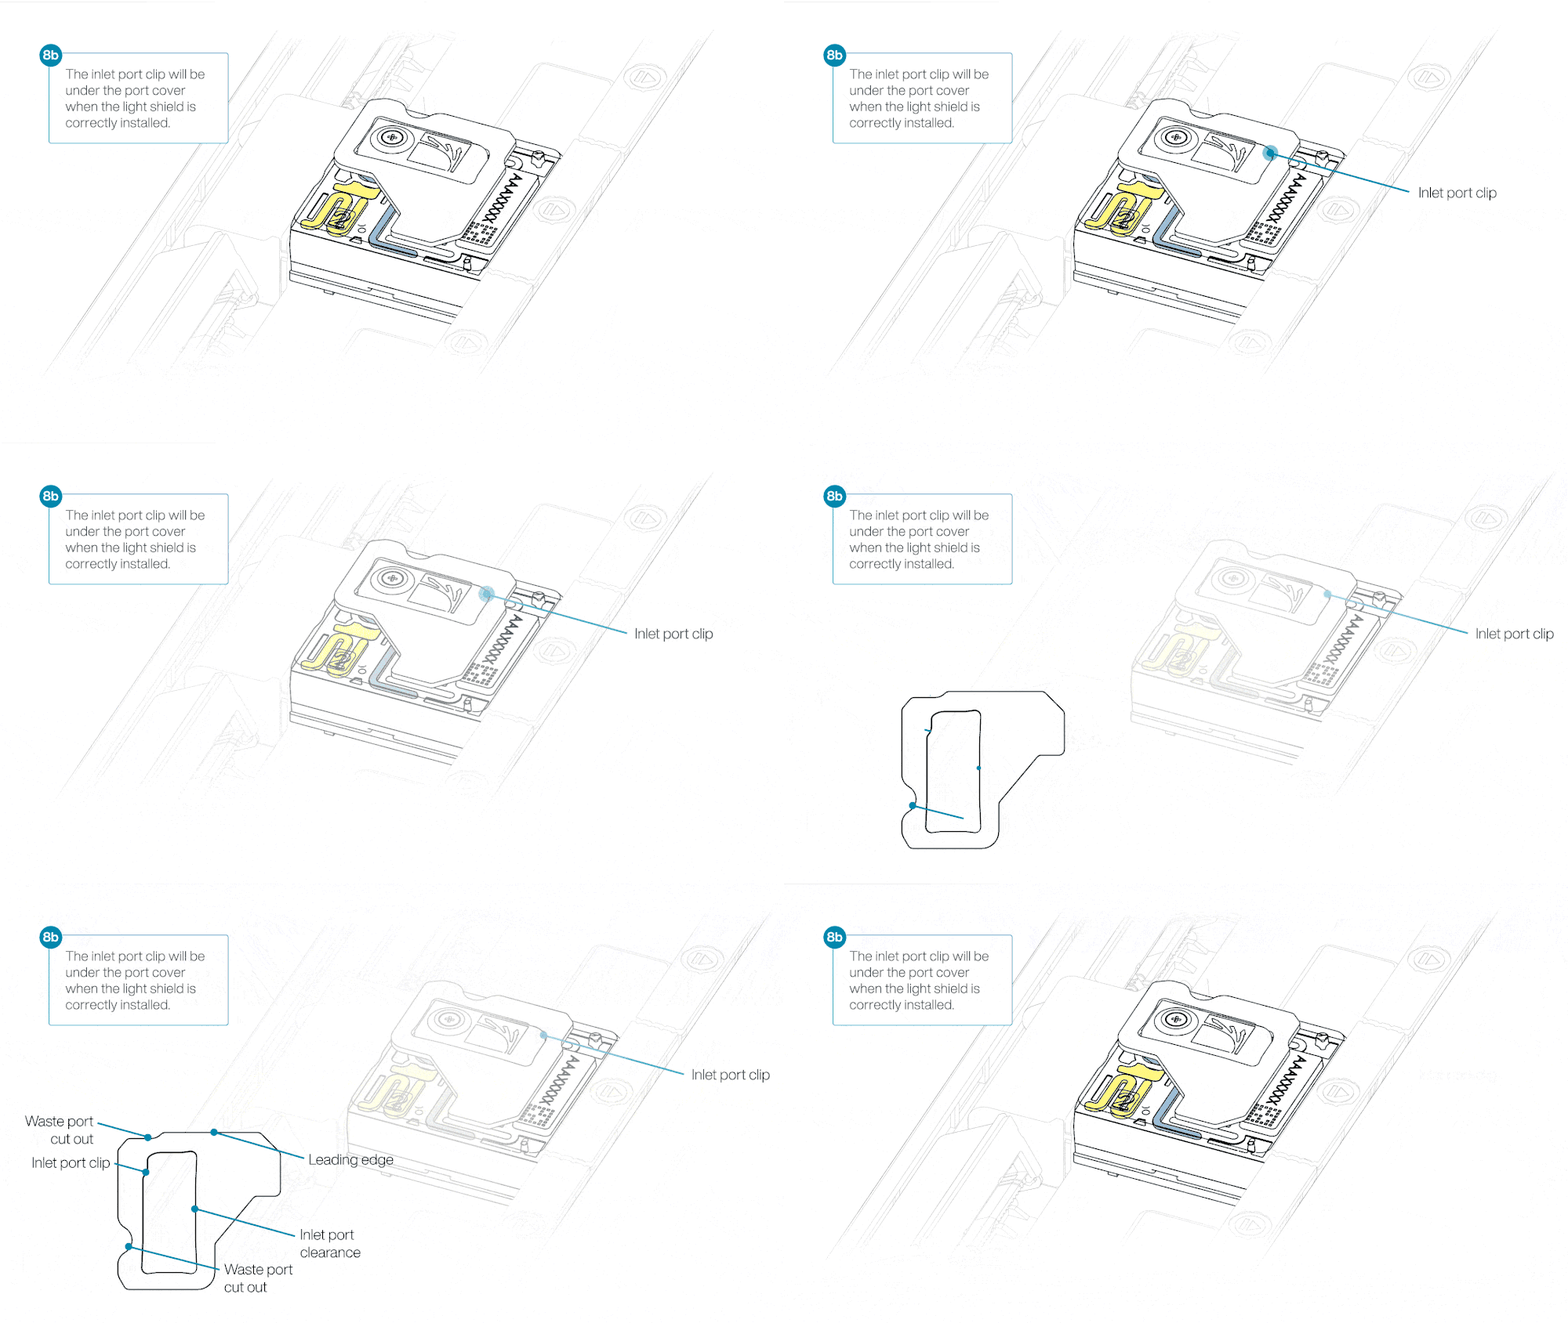
- Align the inlet port cut out of the light shield with the inlet port cover on the flow cell. The leading edge of the light shield should sit above the flow cell ID.
- Firmly press the light shield around the inlet port cover. The inlet port clip will click into place underneath the inlet port cover.
Close the PromethION lid when ready to start a sequencing run on MinKNOW using the following settings:
- Sequencing kit = SQK-HTB114.96
- Sequencing time = 8 hours
- Basecaller = HAC
- Demultiplexing = ON
- Pod5 = OFF
- FastQ = OFF
9. Barcode normalisation and sample pooling for sequencing
Materials
- Barcoded and adapted samples (from previous step)
Consumables
- 1.5 ml Eppendorf DNA LoBind tubes
- Qubit™ Assay Tubes (Invitrogen, Q32856)
- Qubit™ dsDNA HS Assay Kit (ThermoFisher, Q32851)
Equipment
- Vortex mixer
- Microfuge
- Ice bucket with ice
- Multichannel pipette and tips
- P1000 pipette and tips
- P200 pipette and tips
- P100 pipette and tips
- P20 pipette and tips
- P10 pipette and tips
- P2 pipette and tips
- Qubit™ fluorometer (or equivalent for QC check)
We recommend performing a flow cell check across all your flow cells to assess the number of pores available before carrying out the library pool groups.
This step can be omitted if the flow cell has been checked previously.
See the flow cell check document for more information.
This method uses the sequencing data from the sample QC pool run to optimise barcode balancing in your sequencing runs. The data is processed using a library pooling calculator spreadsheet.
Download the library pooling calculator spreadsheet using the link below:
Library pooling calculator spreadsheet
Fill in the “Sample Details” tab of the library pooling calculator spreadsheet.
Importantly, ensure that respective barcodes are correctly assigned to corresponding wells of sample-containing 96-well PCR plate.
Download the final run report from the sample QC pool sequencing run.
In the sequencing run report, navigate to the "Barcodes" section and export the CSV file.
From the exported CSV file, copy the “Barcode”, “Total bases (Mb)” and “Passed bases (%)” columns.
Paste the copied columns from the CSV file into the denoted sections within the “Output ranking” tab of the library pooling calculator spreadsheet.
The samples are automatically ranked from the highest to the lowest facilitating splitting into four groups (“pooling groups”) of descending output.
Navigate to the "Pooling calculations" tab of the library pooling calculator.
1. Enter the flow cell type that you will use for sequencing:
- For PromethION Flow Cells enter the product code FLO-PRO114M
2. Enter the QC Pool Concentration measurement obtained during the "Sample QC Pool preparation" step.
The volumes for each sample to be pooled, and the required volume of Elution Buffer (EB) needed, will display on this tab.
Amounts of each barcoded sample within a Pooling Group are combined to create a sample pool that will result in balanced output per sample during subsequent sequencing.
To calculate volumes per sample needed, the respective output values from the highest and lowest output samples are first considered:
If the ratio between the two is equal to or less than 1.2, the "Pooling Group" is considered well balanced enough to simply pool equal volumes (64 µl of each sample is the default, but this can be adjusted as long as enough volume for flow cell loading is achieved).
If the ratio is greater than 1.2, bespoke volumes are needed, which are calculated by the spreadsheet. In this scenario, the volume of the lowest-represented sample is fixed, and volumes of all other samples are calculated accordingly to match the predicted output of that initial sample. Elution Buffer (EB) is then added to top up the pool to the required volume to support loading onto the desired number of flow cells.
If required, omit any samples and adjust the amount of Elution Buffer (EB) required accordingly.
The amount of any Elution Buffer (EB) to add to a pooled group is indicated in the library pooling calculator. A minimum value is stated in order to bring the total volume of the pool to 5% over the total volume needed for the required number of flow cell loads.
Please note, the highest concentration of Pooled Groups tested during kit verification was 11.25 ng/µl (equating to ~360 ng of library per flow cell load). The predicted Pooled Group concentration value is indicated on the library pooling calculator. If the value obtained is above 11.25 ng/µl, increase the amount of Elution Buffer needed (“EB to add” cell).
It should also be noted that a minimum of 100 ng of pooled library per flow cell load is recommended, equating to a final Pooled Group concentration of 3.125 ng/µl (as 32 µl of the Pooled Group is used per load). If the lowest‑output sample(s) within a group is/are particularly low, the subsequent pooling of lower volumes of all other samples could result in a final concentration below this lower limit.
If the predicted Pooled Group concentration value is lower than 3.125 ng/µl, it becomes necessary to omit the lowest-performing sample from the pool. To do this:
- Change the respective “Omit sample?” entry from “N” (No) to “Y” (Yes).
- Continue to omit the lowest-performing sample within a group in this way until the Pooled Group concentration reaches at least 3.125 ng/µl.
Conditional formatting within the library pooling calculator is in place to guide the process of forming the Pooled Group at the correct concentration:
- An amber value indicates that more Elution Buffer may be needed as the concentration rises above the verified range.
- A red value indicates that sample omission is required.
Omission of samples from a pooled group automatically adjusts the default number of flow cells needed for the experiment, and the total volume of library required is adjusted accordingly. For the PromethION Flow Cell (FLO-PRO114M) the number of flow cells to be used must match the number of samples that pass the QC step.
The "Manual Pooling Template" tab in the library pooling calculator summarises the volumes of samples/Elution Buffer (EB) for each Pooled Group.
Please ensure the information filled out in the library pooling calculator is correct before proceeding with sample pooling.
Note: The number of samples per pooled group should not exceed 24 samples.
Additionally, please ensure you have selected the correct flow cell type for your use-case, as this will affect pooling volumes: FLO-PRO114M or FLO-PRO114P.
Using the volumes outlined in the library pooling calculator, generate your sequencing sample pooled groups.
In separate clean 1.5 ml Eppendorf DNA LoBind tubes combine the indicated volumes of barcoded and adapted samples, and Elution Buffer (EB), for the separate pooled groups.
Ensure the pooled groups are well mixed by pipetting ten times at full volume.
Please ensure you store all samples at 4°C when not in use and between sequencing runs.
10. Priming and loading the PromethION Flow Cell
Materials
- Flow Cell Flush (FCF)
- Flush Tether UL (FTU)
- Library Beads (LIB)
- Sequencing Buffer (SB)
Consumables
- PromethION Flow Cells
- 1.5 ml Eppendorf DNA LoBind tubes
Equipment
- PromethION device
- PromethION Flow Cell Light Shield
- P1000 pipette and tips
- P200 pipette and tips
- P20 pipette and tips
When loading multiple flow cells please ensure your prepared and/or combined reagents are regularly mixed.
We strongly recommend thoroughly mixing the Priming mix and the prepared Pooled Groups with their respective reagents before each use, and in regular intervals during the flow cell loading steps to ensure all components are homogeneous, resulting in even flow cell loading and optimal sequencing conditions.
The number of flow cells needed for sequencing is indicated through the use of library pooling calculator and the associated notes above.
In summary, 96 samples are run across:
- 96x FLO-PRO114M flow cells (split across four groups of 24 flow cells, with each group sequencing a separate Pooled Group).
Note: Flow cells sequencing each "Pooled Group" should all be run on the same PromethION device.
Remove the appropriate number of PromethION Flow Cells (FLO-PRO114M) from the fridge.
After taking the flow cell out of the fridge, wait 20 minutes for the flow cell to reach room temperature, before inserting it into the PromethION. Condensation can form on the flow cell in humid environments. Inspect the gold connector pins on the top and underside of the flow cell for condensation and wipe off with a lint-free wipe if any is observed. Ensure the heat pad (black pad) is present on the underside of the flow cell.
Thaw the Sequencing Buffer (SB), Library Beads (LIB), Flush Tether UL (FTU) and Flow Cell Flush (FCF) at room temperature before mixing by vortexing. Then spin down where possible, and store on ice.
If already stored at 4°C from the running of the QC flow cell, briefly spin down the regents and store on ice.
Prepare the flow cell priming mix in a suitable tube for the number of flow cells to flush. Once combined, mix well by briefly vortexing.
| Reagent | Volume per flow cell |
|---|---|
| Flow Cell Flush (FCF) | 1197 µl |
| Flush Tether UL (FTU) | 3 µl |
| Total volume | 1,200 µl |
Note: these volumes include an excess. For preparing a master mix, these volumes can be scaled by the number of flow cells to be loaded.
For the PromethION 24/48, load the flow cell(s) into the docking ports:
- Line up the flow cell with the connector horizontally and vertically before smoothly inserting into position.
- Press down firmly onto the flow cell and ensure the latch engages and clicks into place.
Insertion of the flow cells at the wrong angle can cause damage to the pins on the PromethION and affect your sequencing results. If you find the pins on a PromethION position are damaged, please contact support@nanoporetech.com for assistance.
Slide the inlet port cover clockwise to open.
Take care when drawing back buffer from the flow cell. Do not remove more than 20-30 µl, and make sure that the array of pores are covered by buffer at all times. Introducing air bubbles into the array can irreversibly damage pores.
After opening the inlet port, draw back a small volume to remove any air bubbles:
- Set a P1000 pipette tip to 200 µl.
- Insert the tip into the inlet port.
- Turn the wheel until the dial shows 220-230 µl, or until you see a small volume of buffer entering the pipette tip.
Load 500 µl of the priming mix into the flow cell via the inlet port, avoiding the introduction of air bubbles. Wait five minutes. During this time, prepare the library for loading using the next steps in the protocol.
Thoroughly mix the contents of the Library Beads (LIB) by pipetting.
The Library Beads (LIB) tube contains a suspension of beads. These beads settle very quickly. It is vital that they are mixed immediately before use.
We recommend using the Library Beads (LIB) for most sequencing experiments. However, the Library Solution (LIS) is available for more viscous libraries.
For each flow cell to be loaded with a particular Pooled Group, combine the following in a new 1.5 ml Eppendorf DNA LoBind tube:
| Reagent | Volume per flow cell |
|---|---|
| Sequencing Buffer (SB) | 100 µl |
| Library Beads (LIB) thoroughly mixed before use | 68 µl |
| Pooled Group | 32 µl |
| Total | 200 µl |
Complete the flow cell priming by slowly loading 500 µl of the priming mix into the inlet port.
Mix the prepared library gently by pipetting up and down just prior to loading.
Load 200 µl of library into the inlet port using a P1000 pipette.
Close the valve to seal the inlet port.
For optimal sequencing output, install the light shield on your flow cell as soon as the library has been loaded.
We recommend leaving the light shield on the flow cell when library is loaded, including during any washing and reloading steps. The shield can be removed when the library has been removed from the flow cell.
If the light shield has been removed from the flow cell, install the light shield as follows:
- Align the inlet port cut out of the light shield with the inlet port cover on the flow cell. The leading edge of the light shield should sit above the flow cell ID.
- Firmly press the light shield around the inlet port cover. The inlet port clip will click into place underneath the inlet port cover.
Close the PromethION lid when ready to start a sequencing run on MinKNOW using the following settings:
- Sequencing kit = SQK-HTB114.96
- Sequencing time = 72 hours
- Basecaller = HAC
- Demultiplexing = ON
- Pod5 = OFF
- FastQ = ON
- Data Pooling = ON
Reminder: If using the PromethION Flow Cell (FLO-PRO114M), washing and reloading your flow cells with fresh library will be required to maintain high data acquisition after ~40 hours of sequencing.
Follow the instructions in the washing and reloading a PromethION Flow Cell section of this protocol.
11. Washing and reloading the PromethION Flow Cells
Materials
- Flow Cell Wash Kit XL (EXP-WSH004-XL)
Consumables
- 1.5 ml Eppendorf DNA LoBind tubes
Equipment
- P1000 pipette and tips
- P20 pipette and tips
- Ice bucket with ice
- Vortex mixer
When loading multiple flow cells please ensure your prepared and/or combined reagents are regularly mixed.
We strongly recommend thoroughly mixing the Wash mix, the Priming mix and the prepared Pooled Groups with their respective reagents before each use, and in regular intervals during the flow cell loading steps to ensure all components are homogeneous, resulting in even flow cell loading and optimal sequencing conditions.
Washing and reloading the flow cell after ~40 hours of sequencing is required for PromethION Flow Cells (FLO-PRO114M).
The PromethION Flow Cells (FLO-PRO114M are washed after ~40 hours of sequencing to restore pores to ensure efficient data acquisition.
- This washing procedure aims to remove most of the initial library and unblock the pores to prepare the flow cell for the loading of a subsequent library.
- Data acquisition in MinKNOW should be paused during the wash procedure and library loading.
- After the flow cell has been washed, the Pooled Group library can be loaded.
Washing and reloading a PromethION Flow Cell video
This video will show you how to wash a flow cell after a sequencing run and how to load a new library.
We recommend keeping the light shield on the flow cell during washing if a second library will be loaded straight away.
If the flow cell is to be washed and stored, the light shield can be removed.
Place sufficient tubes of Wash Mix (WMX) on ice for all your flow cells. Do not vortex the tube.
Thaw sufficient Wash Diluent (DIL) at room temperature for all your flow cells.
Mix the contents of Wash Diluent (DIL) thoroughly by vortexing, then spin down briefly and place on ice.
Prepare the following Flow Cell Wash Mix for all of your flow cells:
| Reagent | Volume per flow cell |
|---|---|
| Wash Mix (WMX) | 2 μl |
| Wash Diluent (DIL) | 398 μl |
| Total | 400 μl |
Mix well by pipetting, and place on ice. Do not vortex the tube.
Pause the sequencing experiment in MinKNOW, and leave the flow cell in the device.
It is vital that the inlet port is closed before removing waste to prevent air from being drawn across the sensor array area, which would lead to a significant loss of sequencing channels.
Remove waste buffer, as follows:
- Close the inlet port.
- Insert a P1000 pipette into a waste port and remove the waste buffer.
Note: As both the inlet port is closed, no fluid should leave the sensor array area.
Slide the inlet port cover clockwise to open the inlet port.
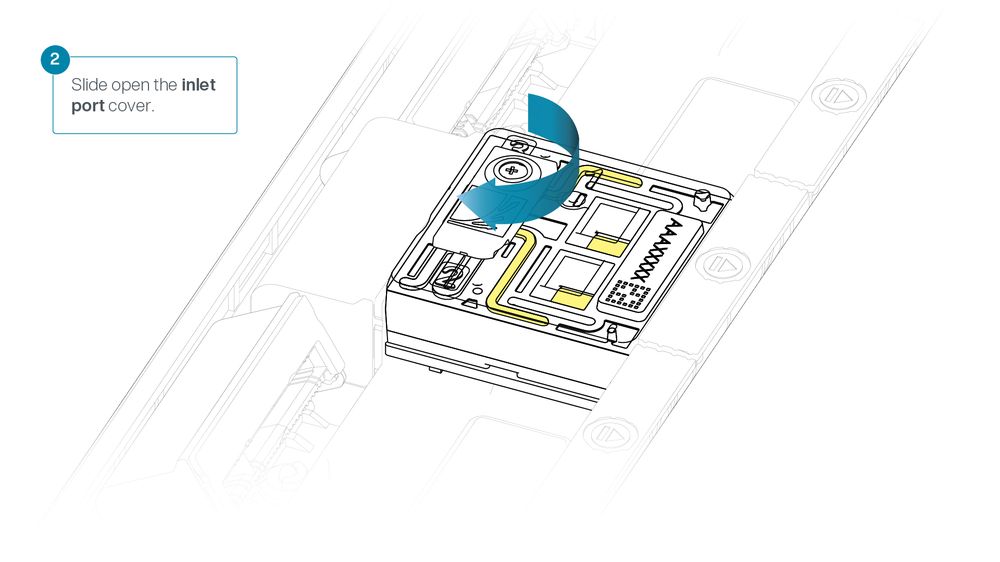
Take care when drawing back buffer from the flow cell. Do not remove more than 20-30 µl, and make sure that the array of pores are covered by buffer at all times. Introducing air bubbles into the array can irreversibly damage pores.
After opening the inlet port, check for a small air bubble under the cover. Draw back a small volume to remove any bubbles:
- Set a P1000 pipette to 200 µl
- Insert the tip into the inlet port
- Turn the wheel until the dial shows 220-230 µl, or until you can see a small volume of buffer entering the pipette tip.
Slowly load 200 µl of the prepared flow cell wash mix into the inlet port, as follows:
- Using a P1000 pipette, take 200 µl of the flow cell wash mix
- Insert the pipette tip into the inlet port, ensuring there are no bubbles in the tip
- Slowly twist the pipette wheel down to load the flow cell (if possible with your pipette) or push down the plunger very slowly, leaving a small volume of buffer in the pipette tip.
- Set a timer for a 5 minute incubation.
Once the 5 minute incubation time is complete, carefully load the remaining 200 µl of the prepared flow cell wash mix into the inlet port, as follows:
- Using a P1000 pipette, take 200 µl of the flow cell wash mix
- Insert the pipette tip into the inlet port, ensuring there are no bubbles in the tip
- Slowly twist the pipette wheel down to load the flow cell (if possible with your pipette) or push down the plunger very slowly, leaving a small volume of buffer in the pipette tip.
Close the inlet port and wait for 1 hour.
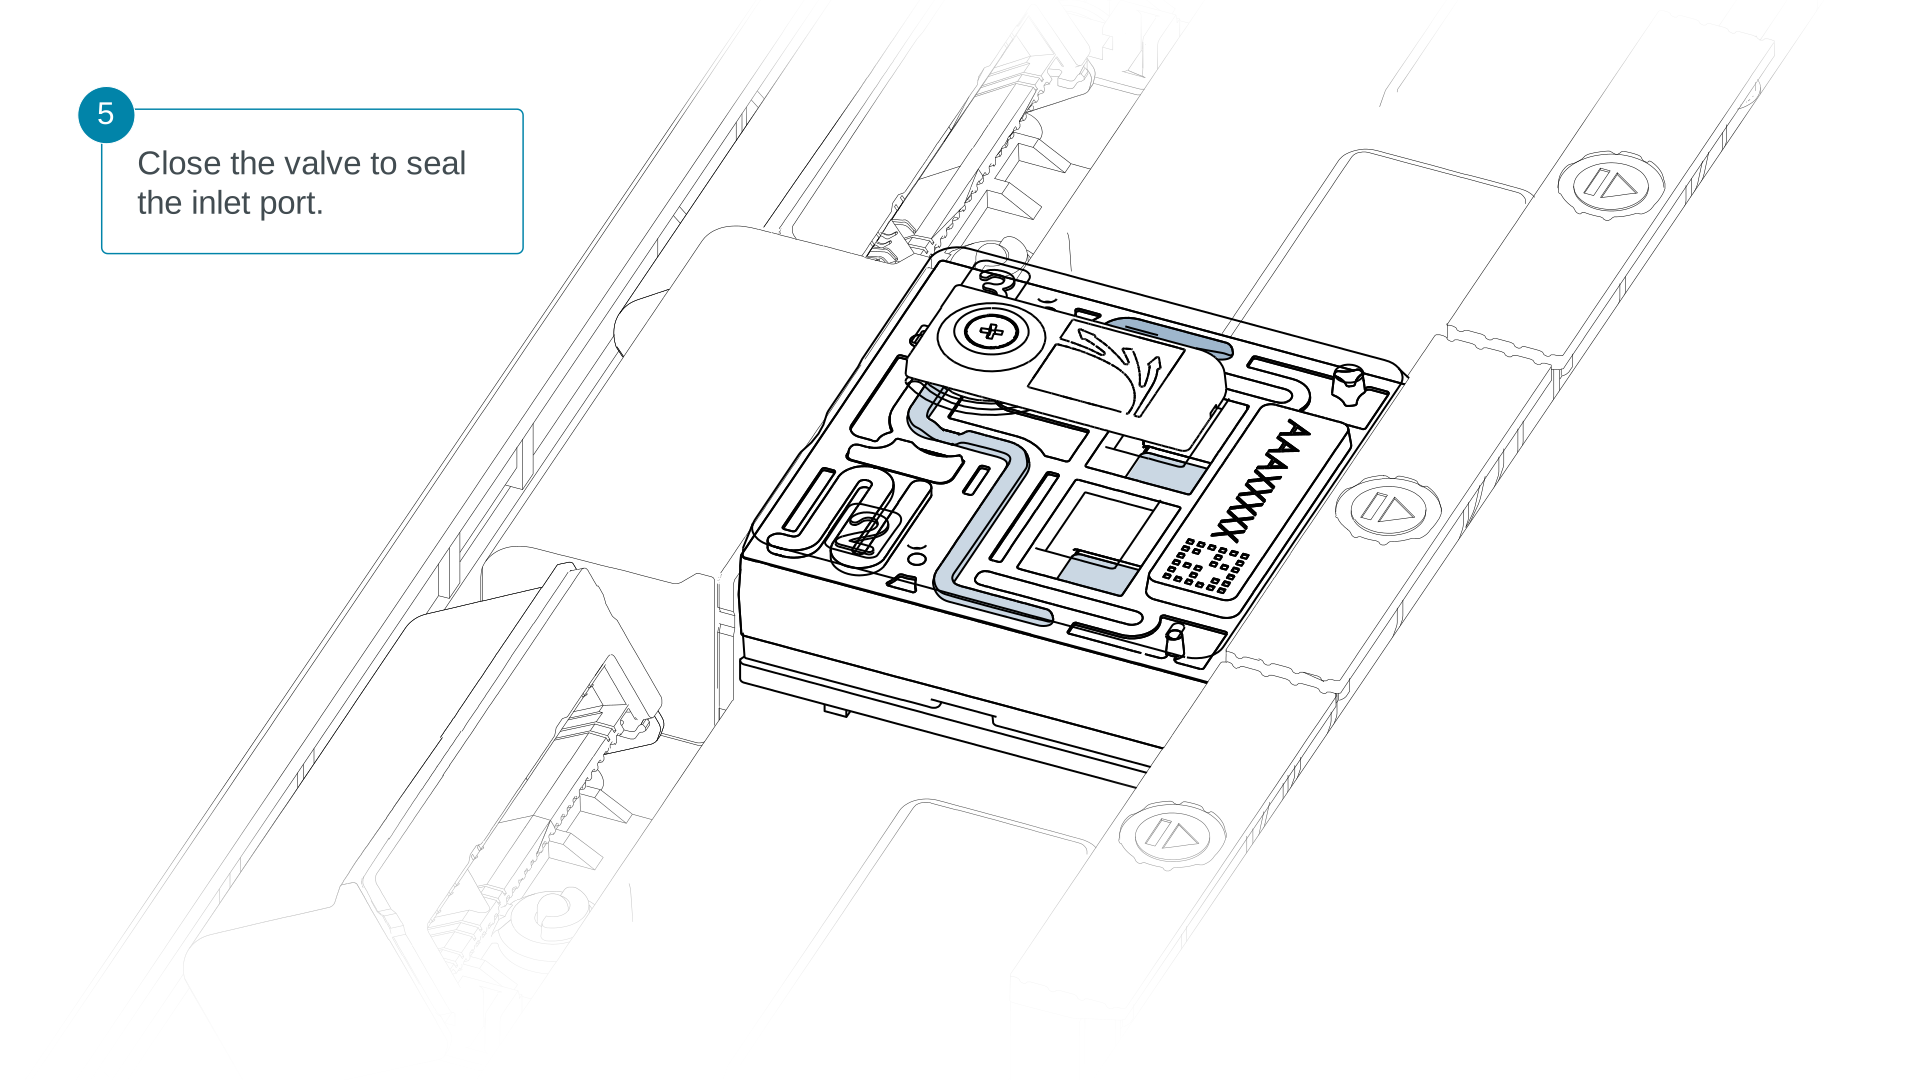
It is vital that the inlet port is closed before removing waste to prevent air from being drawn across the sensor array area, which would lead to a significant loss of sequencing channels.
Remove the waste buffer, as follows:
- Ensure the inlet port is closed.
- Insert a P1000 pipette into a waste port and remove the waste buffer
Note: As the inlet port is closed, no fluid should leave the sensor array area.
The buffers used in this process are incompatible with conducting a Flow Cell Check step prior to loading the subsequent library. However, number of available pores will be reported after the next pore scan.
Thaw the Sequencing Buffer (SB), Library Beads (LIB), Flush Tether UL (FTU) and Flow Cell Flush (FCF) at room temperature before mixing by vortexing. Then spin down and store on ice.
If already stored at 4°C from the running of the QC flow cell, briefly spin down the regents and store on ice.
Prepare the flow cell priming mix in a suitable tube for the number of flow cells to flush. Once combined, mix well by briefly vortexing.
| Reagent | Volume per flow cell |
|---|---|
| Flow Cell Flush (FCF) | 1197 µl |
| Flush Tether UL (FTU) | 3 µl |
| Total volume | 1,200 µl |
Note: these volumes include an excess. For preparing a master mix, these volumes can be scaled by the number of flow cells to be loaded.
Slide the inlet port cover clockwise to open.
Take care when drawing back buffer from the flow cell. Do not remove more than 20-30 µl, and make sure that the array of pores are covered by buffer at all times. Introducing air bubbles into the array can irreversibly damage pores.
After opening the inlet port, draw back a small volume to remove any air bubbles:
- Set a P1000 pipette tip to 200 µl.
- Insert the tip into the inlet port.
- Turn the wheel until the dial shows 220-230 µl, or until you see a small volume of buffer entering the pipette tip.
Slowly load 500 µl of the priming mix into the inlet port, as follows:
- Using a P1000 pipette, take 500 µl of the priming mix
- Insert the pipette tip into the priming port, ensuring there are no bubbles in the tip
- Slowly twist the pipette wheel down to load the flow cell (if possible with your pipette) or push down the plunger very slowly, leaving a small volume of buffer in the pipette tip.
It is vital to wait five minutes between the priming mix flushes to ensure effective removal of the nuclease.
Close the inlet port and wait five minutes.
During this time, prepare the library for loading using the next steps in the protocol.
Thoroughly mix the contents of the Library Beads (LIB) by pipetting.
The Library Beads (LIB) tube contains a suspension of beads. These beads settle very quickly. It is vital that they are mixed immediately before use.
We recommend using the Library Beads (LIB) for most sequencing experiments. However, the Library Solution (LIS) is available for more viscous libraries.
For each flow cell to be loaded with a particular Pooled Group, combine the following in a new 1.5 ml Eppendorf DNA LoBind tube:
| Reagent | Volume per flow cell |
|---|---|
| Sequencing Buffer (SB) | 100 µl |
| Library Beads (LIB) thoroughly mixed before use | 68 µl |
| Pooled Group | 32 µl |
| Total | 200 µl |
It is vital that the inlet port is closed before removing waste to prevent air from being drawn across the sensor array area, which would lead to a significant loss of sequencing channels.
Remove the waste buffer, as follows:
- Ensure the inlet port is closed.
- Insert a P1000 pipette into a waste port and remove the waste buffer
Note: As the inlet port is closed, no fluid should leave the sensor array area.
Slide the inlet port cover clockwise to open.
Take care when drawing back buffer from the flow cell. Do not remove more than 20-30 µl, and make sure that the array of pores are covered by buffer at all times. Introducing air bubbles into the array can irreversibly damage pores.
After opening the inlet port, draw back a small volume to remove any air bubbles:
- Set a P1000 pipette tip to 200 µl.
- Insert the tip into the inlet port.
- Turn the wheel until the dial shows 220-230 µl, or until you see a small volume of buffer entering the pipette tip.
Slowly load 500 µl of the priming mix into the inlet port, as follows:
- Using a P1000 pipette, take 500 µl of the priming mix
- Insert the pipette tip into the priming port, ensuring there are no bubbles in the tip
- Slowly twist the pipette wheel down to load the flow cell (if possible with your pipette) or push down the plunger very slowly, leaving a small volume of buffer in the pipette tip.
It is vital that the inlet port is closed before removing waste to prevent air from being drawn across the sensor array area, which would lead to a significant loss of sequencing channels.
Remove waste buffer, as follows:
- Close the inlet port.
- Insert a P1000 pipette into a waste port and remove the waste buffer.
Note: As both the inlet port is closed, no fluid should leave the sensor array area.
Slide the inlet port cover clockwise to open.
Take care when drawing back buffer from the flow cell. Do not remove more than 20-30 µl, and make sure that the array of pores are covered by buffer at all times. Introducing air bubbles into the array can irreversibly damage pores.
After opening the inlet port, draw back a small volume to remove any air bubbles:
- Set a P1000 pipette tip to 200 µl.
- Insert the tip into the inlet port.
- Turn the wheel until the dial shows 220-230 µl, or until you see a small volume of buffer entering the pipette tip.
Mix the prepared library gently by pipetting up and down just prior to loading.
Load 200 µl of library into the inlet port using a P1000 pipette.
Close the valve to seal the inlet port.
For optimal sequencing output, install the light shield on your flow cell as soon as the library has been loaded.
We recommend leaving the light shield on the flow cell when library is loaded, including during any washing and reloading steps. The shield can be removed when the library has been removed from the flow cell.
If the light shield has been removed from the flow cell, install the light shield as follows:
- Align the inlet port cut out of the light shield with the inlet port cover on the flow cell. The leading edge of the light shield should sit above the flow cell ID.
- Firmly press the light shield around the inlet port cover. The inlet port clip will click into place underneath the inlet port cover.
Close the PromethION lid, and resume sequening for all your flow cells when ready on MinKNOW.
12. Data acquisition and basecalling
How to start sequencing
Once you have loaded your flow cell, the sequencing run can be started on MinKNOW, our sequencing software that controls the device, data acquisition and real-time basecalling. For more detailed information on setting up and using MinKNOW, please see the MinKNOW protocol.
MinKNOW can be used and set up to sequence in multiple ways:
- On a computer either directly or remotely connected to a sequencing device.
- Directly on a PromethION 24/48 sequencing device.
For more information on using MinKNOW on a sequencing device, please see the device user manuals:
To start a sequencing run on MinKNOW:
1. Navigate to the start page and click Start sequencing.
2. Fill in your experiment details, such as name and flow cell position and sample ID.
3. Select the High Throughput Barcoding Kit 96 V14 (SQK-HTB114.96) on the Kit page.
4. Configure the sequencing and output parameters for your sequencing run:
- Sequencing kit = SQK-HTB114.96
- Sequencing time = 72 hours
- Basecaller = HAC
- Demultiplexing = ON
- Pod5 = OFF
- FastQ = ON
- Data Pooling = ON
5. Click Start to initiate the sequencing run.
Data analysis after sequencing
After sequencing has completed on MinKNOW, the flow cell can be reused or returned, as outlined in the Flow cell reuse and returns section.
After sequencing and basecalling, the data can be analysed. For further information about options for basecalling and post-basecalling analysis, please refer to the Data Analysis document.
In the Downstream analysis section, we outline further options for analysing your data.
13. Flow cell reuse and returns
We do not recommend washing and reusing your flow cells for this method.
Re-using these flow cells for subsequent sequencing experiments will result in insufficient data generation for analysis.
Follow the returns procedure to send back flow cells to Oxford Nanopore for recycling.
Instructions for returning flow cells can be found here.
If you encounter issues or have questions about your sequencing experiment, please refer to the Troubleshooting Guide that can be found in the online version of this protocol.
14. Downstream analysis
Post-basecalling analysis
There are several options for further analysing your basecalled data:
EPI2ME workflows
For in-depth data analysis, Oxford Nanopore Technologies offers a range of bioinformatics tutorials and workflows available in EPI2ME, which are available in the EPI2ME section of the Community. The platform provides a vehicle where workflows deposited in GitHub by our Research and Applications teams can be showcased with descriptive texts, functional bioinformatics code and example data.
Research analysis tools
Oxford Nanopore Technologies' Research division has created a number of analysis tools, that are available in the Oxford Nanopore GitHub repository. The tools are aimed at advanced users, and contain instructions for how to install and run the software. They are provided as-is, with minimal support.
Community-developed analysis tools
If a data analysis method for your research question is not provided in any of the resources above, please refer to the resource centre and search for bioinformatics tools for your application. Numerous members of the Nanopore Community have developed their own tools and pipelines for analysing nanopore sequencing data, most of which are available on GitHub. Please be aware that these tools are not supported by Oxford Nanopore Technologies, and are not guaranteed to be compatible with the latest chemistry/software configuration.
15. Issues during DNA extraction and library preparation
Below is a list of the most commonly encountered issues, with some suggested causes and solutions.
We also have an FAQ section available on the Nanopore Community Support section.
If you have tried our suggested solutions and the issue still persists, please contact Technical Support via email (support@nanoporetech.com) or via LiveChat in the Nanopore Community.
Low sample quality
| Observation | Possible cause | Comments and actions |
|---|---|---|
| Low DNA purity (Nanodrop reading for DNA OD 260/280 is <1.8 and OD 260/230 is <2.0–2.2) | The DNA extraction method does not provide the required purity | The effects of contaminants are shown in the Contaminants Know-how piece. Please try an alternative extraction method that does not result in contaminant carryover. Consider performing an additional AMPure bead clean-up step. |
Low DNA recovery after AMPure bead clean-up
| Observation | Possible cause | Comments and actions |
|---|---|---|
| Low recovery | DNA loss due to a lower than intended AMPure beads-to-sample ratio | 1. AMPure beads settle quickly, so ensure they are well resuspended before adding them to the sample. 2. When the AMPure beads-to-sample ratio is lower than 0.4:1, DNA fragments of any size will be lost during the clean-up. |
| Low recovery | DNA fragments are shorter than expected | The lower the AMPure beads-to-sample ratio, the more stringent the selection against short fragments. Please always determine the input DNA length on an agarose gel (or other gel electrophoresis methods) and then calculate the appropriate amount of AMPure beads to use. 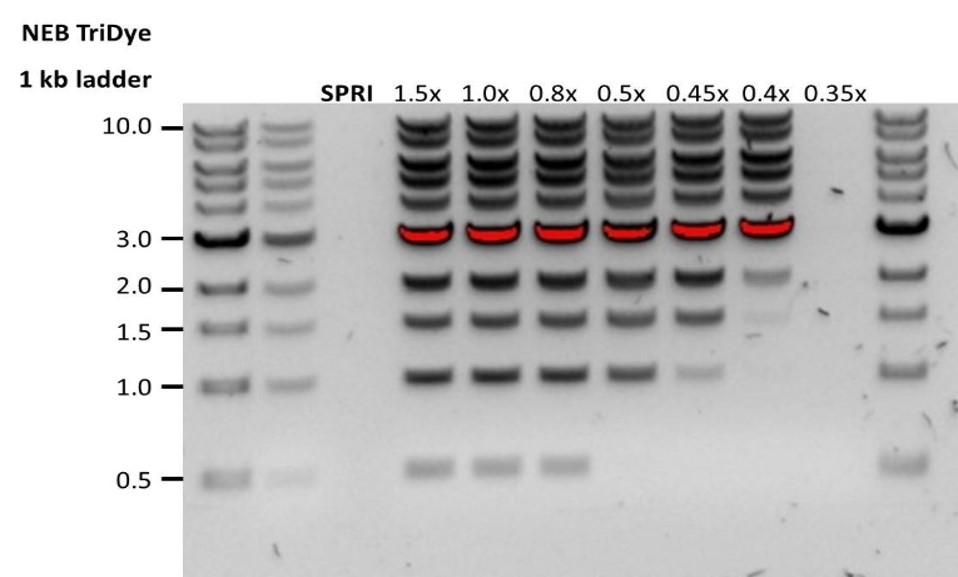 |
| Low recovery after end-prep | The wash step used ethanol <70% | DNA will be eluted from the beads when using ethanol <70%. Make sure to use the correct percentage. |
16. Issues during the sequencing run
Below is a list of the most commonly encountered issues, with some suggested causes and solutions.
We also have an FAQ section available on the Nanopore Community Support section.
If you have tried our suggested solutions and the issue still persists, please contact Technical Support via email (support@nanoporetech.com) or via LiveChat in the Nanopore Community.
Fewer pores at the start of sequencing than after Flow Cell Check
| Observation | Possible cause | Comments and actions |
|---|---|---|
| MinKNOW reported a lower number of pores at the start of sequencing than the number reported by the Flow Cell Check | An air bubble was introduced into the nanopore array | After the Flow Cell Check it is essential to remove any air bubbles near the priming port before priming the flow cell. If not removed, the air bubble can travel to the nanopore array and irreversibly damage the nanopores that have been exposed to air. The best practice to prevent this from happening is demonstrated in this video for how to load a PromethION Flow Cell. |
| MinKNOW reported a lower number of pores at the start of sequencing than the number reported by the Flow Cell Check | The flow cell is not correctly inserted into the device | Stop the sequencing run, remove the flow cell from the sequencing device and insert it again, checking that the flow cell is firmly seated in the device and that it has reached the target temperature. If applicable, try a different position on the device (GridION/PromethION). |
| MinKNOW reported a lower number of pores at the start of sequencing than the number reported by the Flow Cell Check | Contaminations in the library damaged or blocked the pores | The pore count during the Flow Cell Check is performed using the QC DNA molecules present in the flow cell storage buffer. At the start of sequencing, the library itself is used to estimate the number of active pores. Because of this, variability of about 10% in the number of pores is expected. A significantly lower pore count reported at the start of sequencing can be due to contaminants in the library that have damaged the membranes or blocked the pores. Alternative DNA/RNA extraction or purification methods may be needed to improve the purity of the input material. The effects of contaminants are shown in the Contaminants Know-how piece. Please try an alternative extraction method that does not result in contaminant carryover. |
MinKNOW script failed
| Observation | Possible cause | Comments and actions |
|---|---|---|
| MinKNOW shows "Script failed" | Restart the computer and then restart MinKNOW. If the issue persists, please collect the MinKNOW log files and contact Technical Support. If you do not have another sequencing device available, we recommend storing the flow cell and the loaded library at 4°C and contact Technical Support for further storage guidance. |
Pore occupancy below 40%
| Observation | Possible cause | Comments and actions |
|---|---|---|
| Pore occupancy <40% | Not enough library was loaded on the flow cell | Follow the guidance outlined in the method for flow cell loadng qunatities to ensure high pore occupancy on your flow cell. |
| Pore occupancy close to 0 | The sequencing adapters did not ligate to the DNA | Make sure to use the reagents outlined in the method, and use the correct amount of each reagent. A Lambda control library can be prepared to test the integrity of the third-party reagents. |
| Pore occupancy close to 0 | Ethanol was used instead of LFB at the wash step after sequencing adapter ligation | Ethanol can denature the motor protein on the sequencing adapters. Make sure the LFB buffer was used after ligation of sequencing adapters. |
| Pore occupancy close to 0 | No tether on the flow cell | Tethers are adding during flow cell priming (FTU tube). Make sure FTU was added to FCF before priming. |
Shorter than expected read length
| Observation | Possible cause | Comments and actions |
|---|---|---|
| Shorter than expected read length | Unwanted fragmentation of DNA sample | Read length reflects input DNA fragment length. Input DNA can be fragmented during extraction and library prep. 1. Please review the Extraction Methods in the Nanopore Community for best practice for extraction. 2. Visualise the input DNA fragment length distribution on an agarose gel before proceeding to the library prep. 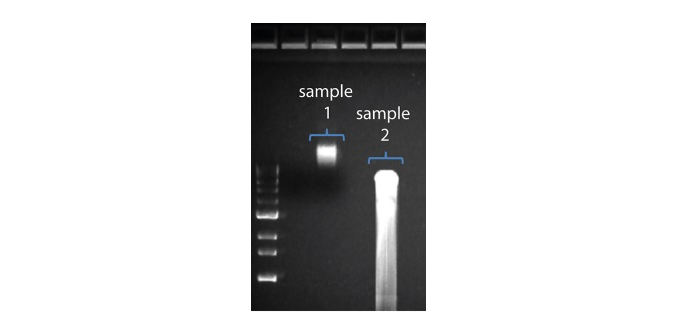 In the image above, Sample 1 is of high molecular weight, whereas Sample 2 has been fragmented. In the image above, Sample 1 is of high molecular weight, whereas Sample 2 has been fragmented.3. During library prep, avoid pipetting and vortexing when mixing reagents. Flicking or inverting the tube is sufficient. |
Large proportion of unavailable pores
| Observation | Possible cause | Comments and actions |
|---|---|---|
Large proportion of unavailable pores (shown as blue in the channels panel and pore activity plot) 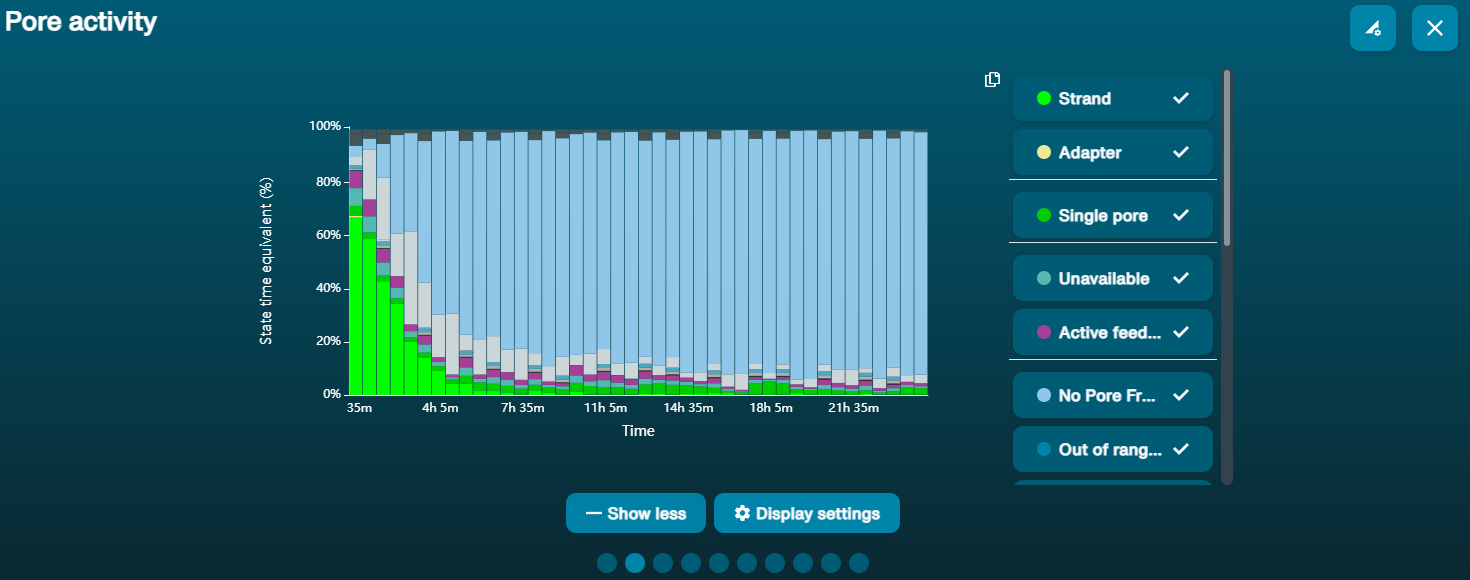 The pore activity plot above shows an increasing proportion of "unavailable" pores over time. The pore activity plot above shows an increasing proportion of "unavailable" pores over time. | Contaminants are present in the sample | Some contaminants can be cleared from the pores by the unblocking function built into MinKNOW. If this is successful, the pore status will change to "sequencing pore". If the portion of unavailable pores stays large or increases: A nuclease flush using the Flow Cell Wash Kit (EXP-WSH004) can be performed. |
Large proportion of inactive pores
| Observation | Possible cause | Comments and actions |
|---|---|---|
| Large proportion of inactive/unavailable pores (shown as light blue in the channels panel and pore activity plot. Pores or membranes are irreversibly damaged) | Air bubbles have been introduced into the flow cell | Air bubbles introduced through flow cell priming and library loading can irreversibly damage the pores. Watch the how to load a PromethION Flow Cell video for best practice. |
| Large proportion of inactive/unavailable pores | Contaminants are present in the sample | The effects of contaminants are shown in the Contaminants Know-how piece. Please try an alternative extraction method that does not result in contaminant carryover. |
Temperature fluctuation
| Observation | Possible cause | Comments and actions |
|---|---|---|
| Temperature fluctuation | The flow cell has lost contact with the device | Check that there is a heat pad covering the metal plate on the back of the flow cell. Re-insert the flow cell and press it down to make sure the connector pins are firmly in contact with the device. If the problem persists, please contact Technical Services. |
Failed to reach target temperature
| Observation | Possible cause | Comments and actions |
|---|---|---|
| MinKNOW shows "Failed to reach target temperature" | The instrument was placed in a location that is colder than normal room temperature, or a location with poor ventilation (which leads to the flow cells overheating) | MinKNOW has a default timeframe for the flow cell to reach the target temperature. Once the timeframe is exceeded, an error message will appear and the sequencing experiment will continue. However, sequencing at an incorrect temperature may lead to a decrease in throughput and lower q-scores. Please adjust the location of the sequencing device to ensure that it is placed at room temperature with good ventilation, then re-start the process in MinKNOW. |
Last updated: 9/8/2026
Document options