Restriction Enzyme Pore-C protocol

Extraction Method
Restriction Enzyme Pore-C protocol
FOR RESEARCH USE ONLY.
Contents
Introduction
Materials
Method
- 1. Day 1: 50 minutes hands-on time, 2.5 hour procedure time + overnight
- 2. Day 2: 10 minutes hands-on time, 6 hour procedure time + overnight
- 3. Proximity ligation B with chemical denaturation
- 4. Day 3: 40 minutes hands-on time, 110 minutes procedure time, optional overnight step
Library preparation
Sequencing experiment
Change log
Introduction
The restriction enzyme Pore-C (RE-Pore-C) protocol is intended for the manipulation of cell suspensions to capture three-dimensional interactions of DNA within chromatin. It is to be used in conjunction with the supported Pore-C sample preparation protocols for animal and insect samples. Any samples prepared following the sample preparation protocols may be used as input. We strongly recommend reading the Restriction Enzyme Pore-C info sheet prior to starting this protocol to choose the appropriate restriction enzyme, the sequencing kit for library preparation and information regarding sample input. This protocol has been developed based on research by Oxford Nanopore Technologies and published literature:
Belaghzal, H., Dekker, J. and Gibcus, J. H. (2017) Hi-C 2.0: an optimized Hi-C procedure for high-resolution genome-wide mapping of chromosome conformation, Methods, 123, pp. 56–65. doi: 10.1016/j.ymeth.2017.04.004.HI-C
Belton, J.-M. et al. (2012) Hi-C: a comprehensive technique to capture the conformation of genomes, Methods, 58(3), pp. 1–16. doi: 10.1016/j.ymeth.2012.05.001.Hi-C
Comet, I. et al. (2011) A chromatin insulator driving three-dimensional Polycomb response element (PRE) contacts and Polycomb association with the chromatin fiber, Proceedings of the National Academy of Sciences, 108(6), pp. 2294–2299. doi: 10.1073/pnas.1002059108.
Gavrilov, A. A., Golov, A. K. and Razin, S. V. (2013) Actual Ligation Frequencies in the Chromosome Conformation Capture Procedure, PLoS ONE, 8(3) , pp. 1–6. doi: 10.1371/journal.pone.0060403.
Kadota, M. et al. (2019) Multifaceted Hi-C benchmarking: what makes a difference in chromosome-scale genome scaffolding?, bioRxiv, p. 659623. doi: 10.1101/659623.
Lieberman-Aiden, E. et al. (2009) Comprehensive mapping of long range interactions reveals folding principles of the human genome, Science, 326, pp. 289–293
Nagano, T. et al. (2015) Comparison of Hi-C results using in-solution versus in-nucleus ligation, Genome Biology, 16(1), pp. 1–13. doi: 10.1186/s13059 015-0753-7.
Sati, S. and Cavalli, G. (2017) Chromosome conformation capture technologies and their impact in understanding genome function, Chromosoma, 126(1), pp. 33–44. doi: 10.1007/s00412-016-0593-6.
Ulahannan, N. et al. (2019) Nanopore sequencing of DNA concatemers reveals higher-order features of chromatin structure, bioRxiv, p. 833590; doi: 10.1101/833590.
Materials
- Prepared sample
- Recombinant Albumin at 20 μg/μl (NEB, B9200S)
- An appropriate restriction enzyme and associated buffer; for example NlaIII restriction enzyme (or equivalent) at 10 U/μl (NEB, R0125L) and CutSmart reaction buffer
- 0.5 M EDTA, pH 8
- Formaldehyde at 36.5% v/v (Sigma, F8775)
- Pure ethanol
- Glycine (Sigma, 50046-250G)
- IGEPAL CA-630 (Sigma, I8896-50ML)
- 5 M NaCl (Sigma, 71386)
- 10X phosphate-buffered saline (PBS) pH 7.4
- Phenol:chloroform:isoamyl alcohol in a 25:24:1 ratio, saturated with 10 mM Tris.HCl pH 8.0, 1 mM EDTA (Sigma P3803-400ML)
- Protease Inhibitor Cocktail (Sigma, P8340)
- Proteinase K at 20 μg/μl (NEB, P8107S)
- SDS at 10% v/v (Fisher, 10265153)
- 3 M sodium acetate, pH 5.5
- T4 DNA Ligase 400,000 U/ml (NEB M0202S/L)
- 1 M Tris-HCl pH 8.0
- ECOSURF™ EH-9 (Sigma, STS0006) or Triton X-100 (Sigma, X100)
- Tween-20 at 20% v/v
- Qubit dsDNA HS Assay Kit (ThermoFisher Q32851)
- Liquid nitrogen
- 1.5 ml Eppendorf DNA LoBind tubes
- 2 ml Eppendorf DNA LoBind tubes
- 5 ml centrifuge tubes
- 50 ml Falcon tubes
- Ziplock bags
- Centrifuge and rotor for 15 ml Falcon tubes
- Ice bucket with ice
- –80°C freezer storage
- Vortex
- Microfuge
- Microfuge rotor for 5 ml tubes
- Microfuge rotor for 2 ml tubes
- Thermomixer with temperature control and rotation
- Class I hood with active charcoal filter
- Qubit fluorometer (or equivalent for QC check)
- Agilent Bioanalyzer (or equivalent)
Method
Day 1: 50 minutes hands-on time, 2.5 hour procedure time + overnight
A suspension of approximately 10 million cells is required as input. Cell pellets may be obtained from fresh cell culture or frozen stocks thawed on ice.
If using adherent cells, proceed with the crosslinking steps below, but crosslink the adhered cells in the culture flask. Ensure to increase the volumes of the crosslinking and quenching solutions as required for the size of the culture flask. Harvest the adherent cells once crosslinking is complete.
Samples prepared following the supported Pore-C sample preparation protocols may also be used as input, following the recommendations below:
- Peripheral blood mononucleocytes (PBMCs): a PBMC pellet harvested from ~5 ml of fresh whole blood is recommended.
- Mammalian tissue: ~50–100 mg of cryo-ground animal tissue is recommended.
- Insect material: ~50–100 mg of cryo-ground insect material is recommended.
- C. elegans material: ~1 ml of cryo-ground worm powder is recommended.
Prepare 1 ml of 2.5 M glycine filtered through a 0.2 μm filter and store at room temperature.
Prepare 200 ml filtered 1X PBS and chill at 4°C.
Pre-cool a centrifuge to 4°C. Caution: 1% formaldehyde solution is a biological hazard. Formaldehyde crosslinks DNA and is a mutagen. It must be handled with caution, and vessels containing the solution should only be uncapped in a class I hood.
Prepare the formaldehyde solution as follows: Transfer 10 ml of 1X PBS into a 50 ml Falcon tube. Using a 15 ml Falcon tube is not recommended. Inside a class I hood, with double gloves, add 291 μl of 36.5% formaldehyde to the 10 ml 1X PBS aliquot to a final concentration of 1% formaldehyde in ~10.3 ml. Mix by gentle inversion, and open the tube to allow gases to escape, then close the tube. Check that no formaldehyde residue has remained on the gloves, Falcon tube, or pipette. Remove the outer gloves and discard them in a biohazard bag in the hood. Remove the 1% formaldehyde 1X PBS solution from the hood. Store the tube with formaldehyde inside a zip lock bag at 4°C prior to use.
On ice, resuspend a cell suspension of approximately 10 million cells in 10 ml of chilled 1X PBS. Alternatively, if processing a sample prepared by following a Pore-C sample preparation (excluding plant samples), make up the recommended sample input to 10 ml of chilled 1X PBS and proceed to the next step.
Centrifuge the sample at 300 g at 4°C for 5 minutes.
Aspirate and discard the supernatant, then add 10 ml of chilled 1X PBS to the pellet. Resuspend the pellet by gently pipetting up and down using a wide-bore pipette tip.
Centrifuge the sample at 300 g at 4°C for 5 minutes.
Check the 2.5 M glycine solution has not precipitated before crosslinking the sample. Dissolve precipitates with heat and vortexing if required.
Inside a class I hood, with double gloves, aspirate and discard the supernatant.
Add 1 ml of the previously prepared 1% formaldehyde solution 1X PBS to the pellet. Resuspend the pellet by gently pipetting up and down using a wide-bore pipette tip.
Once resuspended, add a further 9 ml of the 1% formaldehyde solution in 1X PBS. Mix gently by pipetting up and down, using a wide-bore pipette tip.
Critical Step: Incubate at room temperature for exactly 10 minutes to crosslink the sample. The incubated solution should be mixed by gentle agitation every few minutes. Note: It is unlikely that extended incubation times will improve the quality of Pore-C data, but it may have a detrimental impact on the efficiency of de-crosslinking the DNA later in the protocol.
Inside the hood with double gloves, quench the formaldehyde by adding 527 μl of 2.5 M glycine to the sample suspension for a final concentration of 1% w/v glycine (125 mM) in ~10.5 ml. Mix gently by pipetting up and down, using a wide-bore pipette tip.
Incubate at room temperature for 5 minutes, then chill on ice for a further 10 minutes with regular, gentle agitation.
Centrifuge the crosslinked sample suspension at 300 g at 4°C for 5 minutes.
Continuing in the class I hood, aspirate and discard the supernatant. Add 10 ml of chilled 1X PBS to the tube.
Centrifuge the sample at 500 g at 4°C for 5 min.
Continuing in the class I hood, aspirate and discard the supernatant, and add 1 ml of chilled 1X PBS to the pellet. Mix gently by pipetting up and down using a wide-bore pipette tip.
Split the resuspended sample into 2x 500 μl aliquots in 2 ml Eppendorf tubes. Note: 2 ml Eppendorf tubes are required for a compact sample pellet. Do not use 1.5 ml tubes.
Wash the previous sample tube with a further 1 ml of 1X PBS, and split this between the two aliquots in 2 ml tubes. Note: The rest of the protocol can be continued outside of the class I hood.
Centrifuge the samples at 500 g at 4°C for 5 min. Aspirate and discard the supernatant.
Optional Step: We advise continuing with a freshly crosslinked sample pellet. However, if you intend to store samples for later use, you can snap-freeze the aliquots in liquid nitrogen. Store frozen sample pellets at –80°C and use within one year. Caution: Do not proceed any further unless it is possible to complete the remainder of the protocol consecutively without interruption. It is not advisable to incubate any step longer than stated in this protocol. Doing so may be detrimental to Pore-C data quality and sequencing performance.
Pre-cool a microfuge to 4°C and set a thermomixer to 65°C.
Prepare 600 μl of 1.5X digestion reaction buffer compatible with the restriction enzyme that will subsequently be used; for example, CutSmart buffer for NlaIII. Keep the prepared buffer on ice.
To make the permeabilisation solution, add the components below to a 1.5 ml Eppendorf DNA LoBind tube in the following order. Keep the prepared permeabilisation solution on ice at 4°C until ready to use.
| Component | Stock | Final | Volume |
|---|---|---|---|
| Tris HCl | 1 M | 10 mM | 5μl |
| NaCl | 5 M | 10 mM | 1 μl |
| IGEPAL CA-630 | 10 % | 0.2 % | 10 μl |
| Nuclease-free water | - | - | 484 μl |
| Total | - | - | 500 μl |
Proceed with a single crosslinked sample pellet (e.g. an aliquot of ~5 million cells). Note: If processing multiple pellets, treat each pellet separately. Do not pool multiple pellets into a single reaction.
Thaw the protease inhibitor cocktail until no ice remains.
Add 50 μl of protease inhibitor cocktail to 500 μl of permeabilisation solution at 4°C.
Add 550 μl protease inhibitor cocktail-permeabilisation solution to the sample pellet. Resuspend the pellet by gently pipetting up and down, using a wide-bore pipette tip.
Incubate on ice for 15 minutes and mix by regular, gentle inversion.
Centrifuge the sample at 500 g at 4°C for 10 minutes.
Critical Step: Following centrifugation, the pellet will be delicate. Carefully aspirate and discard as much of the supernatant as possible without disturbing the pellet.
Resuspend the pellet in 200 μl of the prepared chilled 1.5X digestion reaction buffer by gently pipetting up and down, using a wide-bore pipette tip.
Centrifuge the sample at 500 g at 4°C for 5 minutes. Aspirate and discard the supernatant.
Resuspend the pellet in 300 μl of the prepared chilled 1.5X digestion reaction buffer by gently pipetting up and down, using a wide-bore pipette tip.
To denature the chromatin, add 33.5 μl 1% SDS directly to the sample suspension to a final concentration of 0.1% SDS and a total volume of 333.5 μl. Mix gently by pipetting up and down using a wide-bore pipette tip. Note: The SDS may precipitate at this point; this will not impact the experiment so proceed to the next step.
Incubate the sample suspension in a thermomixer at 300 rpm at 65°C for 10 minutes.
Remove the tube from the thermomixer and immediately put on ice.
Set the thermomixer to 37°C.
Add 37.5 μl of 10% (v/v) ECOSURF™ EH-9 directly to the cell suspension for a final concentration of 1% ECOSURF™ EH-9 (total volume of 371 μl). Mix gently by pipetting with a wide-bore pipette tip. Alternatively, 10% (v/v) Triton X-100 may be used.
Incubate the tube on ice for 10 minutes. Note: The SDS may precipitate at this point. This will not impact the experiment so proceed to the next step.
Add the following reagents to the sample suspension and invert 3-4 times to mix. This example uses NlaIII. However, please consult the accompanying Restriction Enzyme Pore-C info sheet on how to select an appropriate restriction enzyme that matches your sample, genome and interrogation strategy.
Component Stock Final Volume Permeablised cells - - 371 μl NEB NlaIII 10 U/μl 1 U/μl 45 μl Nuclease-free water - - 34 μl Total - - 450 μl Incubate the tube in a thermomixer at 37°C for 18 hours with periodic <1000 rpm rotation for <30 seconds every 15 minutes. This will prevent condensation inside the lid.
Day 2: 10 minutes hands-on time, 6 hour procedure time + overnight
Depending on the restriction enzyme selected for the previous in situ digestion, follow one of the appropriate ligation reactions below until step 5, before continuing with the rest of the protocol for day 2.
Do not attempt both ligation reactions using a single Pore-C extraction.
The proximity ligation reaction protocol selected will depend on the restriction enzyme used. If in situ digestion was carried out using a restriction enzyme that can be heat-denatured at <65°C, then proceed with proximity ligation A with heat denaturation. If the in situ digestion was carried out using an enzyme that cannot be heat-denatured at <65°C, then proceed with proximity ligation B with chemical denaturation. It is not advisable to attempt heat denaturation at temperatures >65°C, as this may result in unintended crosslink reversal prior to proximity ligation.
Caution: There may be aggregated debris visible in the sample suspension. Do not homogenise these aggregates as it may lead to unintended DNA fragmentation and increased trans-chromosomal Pore-C contacts.
Proximity ligation A with heat denaturation
Set the thermomixer to 65°C.
Heat-denature the restriction enzyme by incubating the sample suspension in the thermomixer at 65°C with 300 rpm rotation for 20 minutes. Allow the reaction to cool to room temperature.
Set the thermomixer to 16°C.
Set up the proximity ligation reaction according to the table below, adding reagents directly to the sample suspension in the following order. Mix gently by pipetting up and down, using a wide-bore pipette tip.
| Component | Stock | Final | Volume |
|---|---|---|---|
| Digestion reaction (from Day 1) | - | - | 450 μl |
| Nuclease-free water | - | - | 395 μl |
| NEB ligase buffer | 10X | 1X | 100 μl |
| Recombinant albumin | 20 μg/μl | 0.1 μg/μl | 5 μl |
| T4 DNA ligase | 400 U/μl | 20 U/μl | 50 μl |
| Total | - | - | 1000 μl |
- Incubate the sample suspension in a thermomixer at 16°C for 6 hours, with periodic <1000 rpm rotation for <30 seconds every 15 minutes. This prevents condensation inside the lid. Then proceed to step 6. Note: Prolonged ligation may increase trans-chromosomal contacts in the Pore-C data.
Proximity ligation B with chemical denaturation
Set the thermomixer to 65°C.
Chemically denature the restriction enzyme by adding 50 μl of 1% SDS directly to the sample suspension to a final concentration of 0.1% SDS and a total volume of 500 μl. Mix gently by pipetting up and down, using a wide-bore pipette tip. Incubate in a thermomixer at 300 rpm at 65°C for 20 minutes. Allow the reaction to cool to room temperature.
Set the thermomixer to 16°C.
Set up the proximity ligation reaction according to the table below, adding reagents directly to the sample suspension in the following order. Mix the tube contents by gentle inversion after every addition.
| Component | Stock | Final | Volume |
|---|---|---|---|
| Digestion reaction (from Day 1) with 0.1% SDS | - | - | 500 μl |
| Nuclease-free water | - | - | 165 μl |
| ECOSURF™ EH-9 | 5.7% (v/v) | 1% | 175 μl |
| NEB ligase buffer | 10X | 1X | 100 μl |
| Recombinant albumin | 20 μg/μl | 0.1 μg/μl | 5 μl |
| T4 DNA ligase | 400 U/μl | 20 U/μl | 50 μl |
| Total | - | - | 1000 μl |
- Incubate the sample suspension in a thermomixer at 16°C for 6 hours, with periodic <1000 rpm rotation for <30 seconds every 15 minutes; this prevents condensation inside the lid. Then proceed to step 6. Note: Prolonged ligation may increase trans-chromosomal contacts in the Pore-C data.
Once your chosen proximity ligation step has been completed, proceed with the rest of the protocol for Day 2 (below).
Set the thermomixer to 56°C.
Add the reagents to the previous ligation reaction in the following order to make up the protein degradation reaction. Mix the sample gently by inverting the tube 3–4 times.
| Component | Stock | Final | Volume |
|---|---|---|---|
| Ligation reaction (from Proximity ligation) | - | - | 1000 μl |
| Nuclease-free water | - | - | 300 μl |
| Tween-20 | 20% | 5% | 500 μl |
| SDS | 10% | 0.5% | 100 μl |
| Proteinase K | 20 μg/μl | 1 μg/μl | 100 μl |
| Total | - | - | 2000 μl |
- Incubate the sample suspension in a thermomixer at 56°C for 18 hours with periodic <1000 rpm rotation for <30 seconds every 15 minutes to prevent condensation inside the lid. Note: Incubation at 56°C compromises enzyme activity over a prolonged incubation. It is not advisable to incubate at higher temperatures as enzyme activity will reduce over time.
Day 3: 40 minutes hands-on time, 110 minutes procedure time, optional overnight step
Pre-cool the centrifuge to 15°C.
Place the sample on ice until cool, then transfer the entire volume to a 5 ml centrifuge tube.
Rinse the original tube with a further 200 μl of nuclease-free water and add this to the same 5 ml centrifuge tube for a total sample volume of ~2200 μl.
Add an equal volume of chilled phenol:chloroform:isoamyl alcohol 25:24:1 saturated with 10 mM Tris.HCl pH 8.0, 1 mM EDTA, adjusting this volume as needed to match that of the sample. Mix by gently inverting the tube for 5 minutes to achieve a homogeneous emulsion.
Centrifuge the sample at 16,000 g at 15°C for 15 minutes.
Incubate the sample on ice for 2 minutes until the organic phase becomes cloudy; this will strengthen the integrity of the interphase layer. Note: If the protein degradation has been successful, the interphase layer will be very thin and clear. Caution: Do not remove the interphase layer in the next step.
Transfer the aqueous phase to a fresh 5 ml centrifuge tube for each aliquot and make note of the recovered volume (expect ~2000 μl).
Transfer half of the recovered aqueous phase to a second 5 ml centrifuge tube to create two equal aliquots.
For each aliquot, add 0.02 volumes of 5 M NaCl (0.1 M final) and 0.1 volumes of 3 M sodium acetate pH 5.5 (0.3 M final), relative to the volume of the recovered aqueous phase of the aliquot. Mix by gently inverting the tube. Note: The solution will likely turn cloudy and then become clear once again.
For each aliquot, add three volumes of 100% ethanol relative to the volume of the recovered aqueous phase. Mix by gently inverting the tube. Note: The solution will likely turn cloudy and then become clear once again.
Precipitate at –80°C for >1 hour or overnight at –20°C, if possible.
Pre-cool a centrifuge to 4°C.
Centrifuge the sample at 16,000 g at 4°C for 30 minutes.
Aspirate and discard the supernatant, then wash the pellet with 4 ml of 80% ethanol.
Centrifuge the sample at 16,000 g at 4°C for 5 minutes.
Aspirate and discard the supernatant, then wash the pellet with 2 ml of 70% ethanol.
Centrifuge the sample at 16,000 g at 4°C for 5 minutes.
Aspirate and discard the supernatant. Briefly spin down the tube and aspirate any residual supernatant. Allow the pellet to air-dry for 5 minutes. Note: After the DNA pellet has air-dried, it may loosen from the tube.
Carefully resuspend each aliquot in 75 μl of TE buffer. Incubate for 5 minutes at room temperature, mixing by gently inverting the tube every few minutes.
Briefly spin down the tubes, then transfer and pool all aliquots together into a 1.5 ml Eppendorf DNA LoBind tube.
Quantify DNA concentration by using the Qubit dsDNA HS Assay Kit. Ensure a 1/10 dilution is used, as the Qubit reading will be affected by high salt concentration. Note: The expected yield is ~7 μg per 10 million cells input for cell culture. Yields for other sample types may be reduced.
Store the sample at 4°C until ready to begin the library preparation.
Optional Step: Analyse ~100 ng of the final DNA extract on an Agilent Bioanalyser 12,000 bp chip for average fragment size.
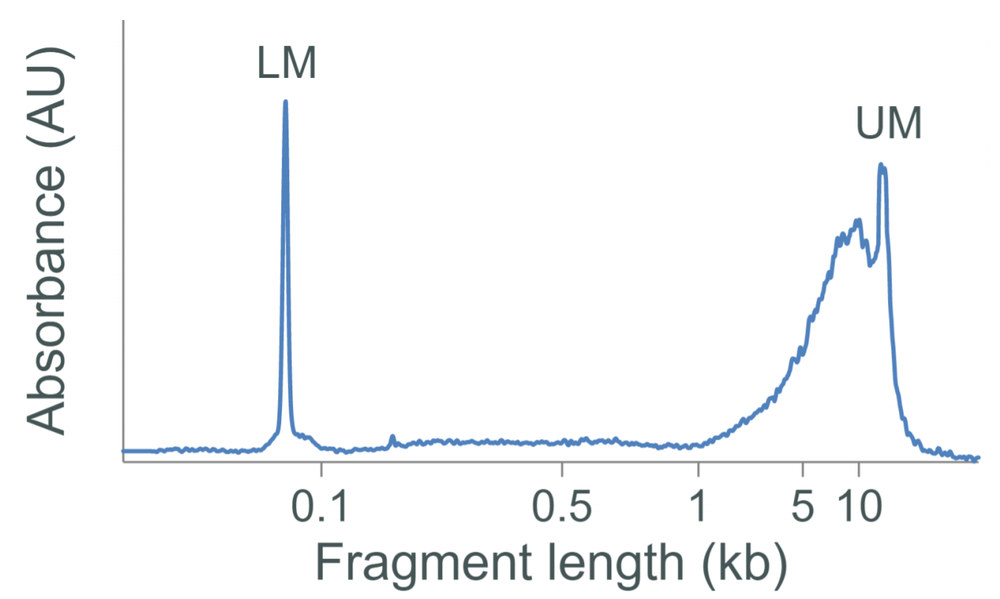
Figure 1. Example Agilent trace of NlaIII digest Pore-C extract without size selection.
Library preparation
Please refer to the library preparation section of the Restriction Enzyme Pore-C info sheet for guidance on which kit to choose.
Sequencing experiment
When starting your sequencing experiment in MinKNOW, choose the SQK-PRC109 kit under Kit Selection.

Figure 2. Select SQK-PRC109 in the Kit Selection tab in MinKNOW when setting up the sequencing run.
Change log
| Version | Change |
|---|---|
| v5, 2nd March 2022 | Updated Day 3 step 9 with the correct volume of NaCl and concentration |
| v4, 25th March 2021 | Updated materials to include "ECOSURF™ EH-9 (Sigma, STS0006) or Triton X-100 (Sigma, X100)”. Updated step 43 to include ECOSURF™ EH-9instead of Triton X-100. Updated Proximity ligation B with chemical denaturation table to include updated information for ECOSURF™ EH-9 as a replacement for Triton X-100. |
| v3, 28th July 2020 | Added figure 2 |
| v2, 24th July 2020 | Updated formatting and added sample prep information |


