24-hour genome: end-to-end workflow from blood to analysis (24HG_9228_v114_revB_08Dec2025)
PromethION: Protocol
24-hour genome: end-to-end workflow from blood to analysis V 24HG_9228_v114_revB_08Dec2025
This document describes an end-to-end, ultra-rapid genome sequencing protocol for blood samples. It includes preparation of genomic DNA (gDNA) from blood, sequencing and basecalling with a PromethION™ device, secondary analysis using the wf-human-variation workflow in EPI2ME™, and tertiary analysis via third party analytics platforms Fabric or Geneyx. Ultimately, this end-to-end workflow will enable you to go from sample-to-answer in ~24 hours.
This protocol:
- Uses gDNA extracted from human blood samples
- Requires DNA fragmentation
- Uses the Ligation Sequencing Kit V14 (SQK-LSK114)
- Is compatible with R10.4.1 flow cells
For Research Use Only
FOR RESEARCH USE ONLY
Contents
Introduction to this protocol
Sample preparation
Library preparation
- 5. DNA repair and end-prep
- 6. Adapter ligation and clean-up
- 7. Priming and loading the PromethION Flow Cells
Sequencing and data analysis
Troubleshooting
Overview
This document describes an end-to-end, ultra-rapid genome sequencing protocol for blood samples. It includes preparation of genomic DNA (gDNA) from blood, sequencing and basecalling with a PromethION™ device, secondary analysis using the wf-human-variation workflow in EPI2ME™, and tertiary analysis via third party analytics platforms Fabric or Geneyx. Ultimately, this end-to-end workflow will enable you to go from sample-to-answer in ~24 hours.
This protocol:
- Uses gDNA extracted from human blood samples
- Requires DNA fragmentation
- Uses the Ligation Sequencing Kit V14 (SQK-LSK114)
- Is compatible with R10.4.1 flow cells
For Research Use Only
1. Overview of the protocol
This is an Open Early Access protocol.
For more information about our Early Access programmes, please refer to this article on product release phases.
Please ensure you always use the most recent version of the protocol.
This protocol aims to rapidly produce libraries with a read N50 of ~30 kb and generate ≥30x coverage of the genome, thereby providing sufficient data to robustly call small and large variants, as well as information on methylation and phasing.
Briefly, genomic DNA is extracted from 500 μl of whole blood samples using the Puregene Blood Kit (Qiagen) and sheared with Megaruptor® 3 (Diagenode). The sheared DNA is then prepared using our Ligation Sequencing Kit V14 (SQK-LSK114) and sequenced across three PromethION™ Flow Cells on a PromethION 24 (P24) or PromethION 48 (P48) device. Sequencing typically runs for 13–16 hours to generate sufficient coverage. At the end of the sequencing, basecalled data is combined into a monolithic BAM file, ready for analysis with the wf-human-variation workflow in EPI2ME. Subsequent VCF files can be imported into either Fabric or Geneyx for a range of tertiary analyses.
Detailed instructions for setting up the sequencing run on MinKNOW™ using the human variation workflow, and importing sequencing data are also included in this protocol.
Steps in the workflow:
The Table below is an overview of the steps required in the workflow, including timings for the processing of samples, and stopping points:
| Steps in the workflow | Process | Time | Stop option |
|---|---|---|---|
| Sample preparation | Extract gDNA from blood samples. Fragment the gDNA. | ~105 minutes ~45 minutes | At this stage, the extracted gDNA or fragmented gDNA can be stored at –20°C for later use. |
| Library preparation | DNA repair and end-prep - repair the DNA and prepare the DNA ends for adapter attachment. Adapter ligation and clean-up - attach the sequencing adapters to the DNA ends. | ~35 minutes ~50 minutes | 4°C overnight We recommend sequencing your library as soon as it is adapted. The DNA library can be stored at 4°C for short-term storage or for repeated use (such as re-loading your flow cell). DNA library can be stored at -80°C for long-term storage. |
| Sequencing | Prime the flow cell and load the prepared library for sequencing. | ~10 minutes per flow cell (3 flow cells per sample) |
Prepare for your experiment
You will need to:
- Have the correct consumables, kits, and equipment for DNA extraction, fragmentation, and sequencing. This will include third-party reagents.
- Download the software for acquiring and analysing your data.
- Check your flow cell has sufficient pores for a good sequencing run.
Sample preparation
You will need to:
- Use the recommended protocol to extract genomic DNA (gDNA) from human blood samples, and fragment the gDNA.
- Check the quantity, purity, and length of your extracted material. The quality checks performed during sample preparation are essential in ensuring experimental success.
Library preparation
The Table above outlines the processes involved in library preparation. The quality checks performed during library preparation are essential in ensuring experimental success.
Sequencing and analysis
You will need to:
- Start a sequencing run using the MinKNOW™ software which will collect raw data from the device and convert it into basecalled reads.
- Analyse data using the wf-human-variation workflow from EPI2ME.
Compatibility of this protocol
This protocol should only be used in combination with the following consumables and devices from Oxford Nanopore:
- Ligation Sequencing Kit V14 (SQK-LSK114)
- PromethION Flow Cells R10.4.1 (FLO-PRO114M)
- Sequencing Auxiliary Vials V14 (EXP-AUX003)
- Flow Cell Wash Kit (EXP-WSH004)
- PromethION™ 24/48 - PromethION IT requirements
Note: The SQK-LSK114 Kit will allow you to library prep and sequence two gDNA samples. Purchase of the EXP-AUX003 will allow you to library prep and sequence two further samples when using the SQK-LSK114 Kit.
2. Equipment and consumables
Materials
- Human whole blood
- Ligation Sequencing Kit V14 (Oxford Nanopore, SQK-LSK114)
- Sequencing Auxiliary Vials V14 (EXP-AUX003) if required
Consumables
- Puregene Blood Kit (Qiagen, 158023 or 158026)
- Proteinase K, 20 mg/ml or 800 units/ml (e.g. Proteinase K, Molecular Biology Grade (NEB, P8107S))
- Qubit™ dsDNA Broad Range Quantitation Assay (ThermoFisher, Q32850)
- Qubit™ dsDNA High Sensitivity Quantitation Assay (ThermoFisher, Q32851)
- Qubit™ Assay Tubes (ThermoFisher, Q32856)
- Megaruptor 3 Shearing Kit (Diagenode, E07010003)
- Absolute ethanol
- Isopropanol, 100% (Fisher Scientific, 10723124)
- TE buffer (10 mM Tris, 1 mM EDTA, pH 8) (Fisher Scientific, 10224683)
- Nuclease-free water (e.g. ThermoFisher, AM9937)
- Femto Pulse gDNA 165 kb Analysis Kit (Agilent Technologies, FP-1002-0275)
- 1x Phosphate Buffered Saline (PBS)
- NEBNext® FFPE DNA Repair Mix (NEB, M6630)
- NEBNext® FFPE DNA Repair v2 Module (NEB, E7360)
- NEBNext® Ultra™ II End Repair/dA-Tailing Module (NEB, E7546)
- Salt-T4® DNA Ligase (NEB, M0467)
- PromethION Flow Cell R10.4.1 (Oxford Nanopore, FLO-PRO114M)
- 2 ml Eppendorf DNA LoBind tubes
- 1.5 ml Eppendorf DNA LoBind tubes
- 0.2 ml thin-walled PCR tubes
Equipment
- PromethION 24/48 device
- PromethION Flow Cell Light Shield
- Megaruptor® 3 (Diagenode, B06010003)
- Qubit™ Flex Fluorometer (ThermoFisher)
- Femto Pulse System (Agilent Technologies) or equivalent
- HulaMixer™ (gentle rotator mixer)
- Magnetic separation rack, suitable for 1.5 ml Eppendorf tubes
- Thermal cycler
- Benchtop microcentrifuge for 0.2 ml, 1.5 ml, and 2 ml tubes
- Microfuge
- Heat block
- Incubator or water bath set at 37°C and 50°C
- Vortex mixer
- Ice bucket with ice
- Pipettes and tips (standard and low retention with wide bore)
Input DNA
For this workflow, we recommend extracting gDNA from 500 μl of whole blood using the Puregene Blood Kit (Qiagen) in the sample preparation step.
Other DNA extraction protocols are available but have not been tested by Oxford Nanopore.
For the library preparation protocol, you will need ~2.7 µg of fragmented gDNA from each sample.
Third-party reagents
We have validated and recommend the use of all the third-party reagents used in this protocol. Alternatives have not been tested by Oxford Nanopore. For all third-party reagents, we recommend following the manufacturer's instructions to prepare the reagents for use.
Check your flow cell
We highly recommend that you check the number of pores in your flow cells prior to starting a sequencing experiment. This should be carried out within 12 weeks of purchasing your PromethION Flow Cells. Oxford Nanopore will replace any unused flow cell with fewer than the number of pores listed in the Table below, when the result is reported within two days of performing the flow cell check, and when the storage recommendations have been followed. To perform the flow cell check, please follow the instructions in the Flow Cell Check document.
| Flow cell | Minimum number of active pores covered by warranty |
|---|---|
| PromethION Flow Cell | 5,000 |
3. DNA extraction from whole blood
Materials
- 500 µl of blood in a EDTA K2 vacuum tube
Consumables
- Puregene Blood Kit (Qiagen, 158023)
- Proteinase K, 20 mg/ml or 800 units/ml (e.g. Proteinase K, Molecular Biology Grade (NEB, P8107S))
- Qubit™ dsDNA Broad Range Quantitation Assay (ThermoFisher, Q32850)
- Qubit™ Assay Tubes (ThermoFisher, Q32856)
- 1x Phosphate Buffered Saline (PBS)
- TE buffer (10 mM Tris, 1 mM EDTA, pH 8) (Fisher Scientific, 10224683)
- Isopropanol, 100% (Fisher Scientific, 10723124)
- Absolute ethanol
- Nuclease-free water (e.g. ThermoFisher, AM9937)
- 2 ml Eppendorf DNA LoBind tubes
Equipment
- HulaMixer™ (gentle rotator mixer)
- Benchtop microcentrifuge for 1.5 ml, and 2 ml tubes
- Incubator or water bath set at 37°C and 50°C
- Qubit™ Flex Fluorometer (ThermoFisher)
- Vortex mixer
- Ice bucket with ice
- Pipettes and tips (standard and low retention with wide bore)
This section describes DNA extraction from 500 µl of whole blood per sample.
Mix the blood sample in the EDTA K2 collection tube on a HulaMixer for 5 minutes.
Dispense 1.5 ml RBC Lysis Solution into a 2 ml Eppendorf tube.
Mix the blood well by inverting the EDTA K2 collection tube. Then transfer 500 μl of the blood sample into the tube containing the RBC Lysis Solution.
Mix by inverting the tube 10 times.
Incubate for 5 minutes at room temperature (+15°C to +25°C). Invert at least once during the incubation period.
Centrifuge for 2 minutes at 2,000 x g to pellet the white blood cells.
Carefully remove and discard the supernatant, leaving approximately 100 µl of the residual liquid and the white blood cell pellet.
The supernatant can be removed by pouring the volume out into a biohazard waste container,
Gently flick the tube and/or pipette mix using a wide bore tip until the pellet is no longer visible and is fully resuspended in the residual liquid. Then gently spin down.
Note: The pellet should be completely dispersed. This facilitates the cell lysis in the next step.
Add 500 μl of 1x PBS and mix by inverting the tube 10 times.
Centrifuge at 16,000 x g for 15 seconds.
Carefully discard the supernatant by pouring the volume out into a biohazard waste container. Then gently tap the top of the tube on absorbant material to remove as much liquid as possible.
Gently flick the tube and/or pipette mix using a wide bore tip until the pellet is no longer visible and is fully resuspended in the residual liquid. Then gently spin down.
Add 150 μl of Cell Lysis Solution.
Then add 20 μl of Proteinase K. Pipette mix gently 10–15 times with a wide bore pipette tip to lyse the cells and homogenise the solution.
Incubate the reaction at 37°C for 20 minutes.
Transfer the reaction to ice and incubate for 3 minutes to quickly cool the sample.
Add 50 μl of Protein Precipitation Solution to the sample. Pulse vortex the tube twice for 5 seconds at full speed.
Note: Vortexing for the full duration is essential for complete and effective precipitation of proteins. Do not reduce the time, as inadequate mixing may compromise results.
Place the sample back on ice for 1 minute.
Centrifuge the sample for 1 minute at 13,000 x g.
Note: The precipitated protein should form a tight, reddish-brown pellet. If the protein pellet is not tight, incubate the tube on ice for 5 minutes and repeat the centrifugation.
Pipette 200 μl of isopropanol into a clean 2 ml Eppendorf tube.
Carefully pour the supernatant from the sample tube into the 2 ml Eppendorf tube containing the isopropanol.
Gently mix the tube by inverting 50 times until the DNA is visible as threads or a clump.
Centrifuge the tube for 1 minute at 13,000 x g.
Note: The DNA should be visible as a small white pellet.
Carefully remove and discard the supernatant and drain the tube by inverting onto a clean piece of absorbent paper. Ensure the DNA pellet is undisturbed and remains in the tube.
The supernatant can be removed by pipetting or by pouring the volume out onto an absorbent material. Take care as the pellet might be loose and easily dislodged.
Freshly prepare 200 µl of 80% ethanol in nuclease-free water.
Add 150 μl of freshly prepared 80% ethanol to the sample tube. Gently invert the tube several times to wash the DNA pellet.
Centrifuge the sample tube for 1 minute at 13,000 x g.
Carefully remove and discard the supernatant using a pipette. Ensure the DNA pellet is undisturbed and remains in the tube.
Open the sample tube lid and air dry the pellet for 1 minute.
Note: Do not dry the pellet to the point of cracking.
Add 100 μl of TE buffer (10 mM Tris, 1 mM EDTA, pH 8) to the tube containing the sample pellet. Gently resuspend the pellet by flicking.
Incubate the sample for 1 hour at 50°C and pipette mix the sample every 10 minutes using a 200 μl wide bore tip.
The DNA pellet may take some time to solubilise, so ensure the solution is homogenous before quantifying.
Quantify the sample in triplicate using the Qubit dsDNA Broad Range Assay Kit. Ensure the replicate Qubit measurements are consistent before continuing to the next step.
Note: If your Qubit measurements are not consistent, this could indicate that the DNA has not been homogeneously resuspended. If this occurs, we recommend increasing the incubation time, allowing more time for the DNA pellet to solubilise.
The expected Qubit measurements should be within the range of 50–150 ng/μl.
Take forward 3 µg of extracted gDNA per sample into the fragmentation section.
4. Fragmentation of extracted DNA
Materials
- 3 µg of extracted gDNA per sample
Consumables
- Megaruptor 3 Shearing Kit (Diagenode, E07010003)
- Nuclease-free water (e.g. ThermoFisher, AM9937)
- Qubit™ dsDNA Broad Range Quantitation Assay (ThermoFisher, Q32850)
- Qubit™ Assay Tubes (ThermoFisher, Q32856)
- Femto Pulse gDNA 165 kb Analysis Kit (Agilent Technologies, FP-1002-0275)
- 1.5 ml Eppendorf DNA LoBind tubes
Equipment
- Megaruptor® 3 (Diagenode, B06010003)
- Qubit™ Flex Fluorometer (ThermoFisher)
- Femto Pulse System (Agilent Technologies) or equivalent
- Microfuge
- Pipettes and tips
Prepare the DNA in nuclease-free water.
- Transfer 3 µg of extracted gDNA into a clean Megaruptor 3 shearing tube.
- Adjust the volume to 90 μl with nuclease-free water.
- Mix thoroughly by pipetting up and down, or by flicking the tube.
Spin down briefly in a microfuge.
Transfer the sample tube to the Megaruptor 3, balancing the instrument appropriately according to the manufacturer’s instructions.
Set up the shearing parameters on the Megaruptor 3 device as follows:
| Megaruptor 3 setting | |
|---|---|
| Shearing speed | 26 |
| Sample volume | 90 µl |
| Sample concentration | ~33.3 ng/µl |
Begin shearing the DNA using the Megaruptor 3.
Quantify the sample using the Qubit dsDNA Broad Range Assay Kit.
The expected Qubit measurements should be ~33.3 ng/μl.
Assess the fragmented gDNA for fragment size using the Femto Pulse System (Agilent).
Take forward the Megaruptor fragmented gDNA into the library preparation section.
5. DNA repair and end-prep
Materials
- 80 µl of fragmented gDNA from previous section
- AMPure XP Beads (AXP from the Ligation Sequencing Kit V14)
Consumables
- NEBNext® Ultra™ II End Repair/dA-Tailing Module (NEB, E7546)
- NEBNext® FFPE DNA Repair v2 Module (NEB, E7360)
- NEBNext® FFPE DNA Repair Mix (NEB, M6630)
- Qubit™ dsDNA High Sensitivity Quantitation Assay (ThermoFisher, Q32851)
- Qubit™ Assay Tubes (ThermoFisher, Q32856)
- Absolute ethanol
- Nuclease-free water (e.g. ThermoFisher, AM9937)
- 1.5 ml Eppendorf DNA LoBind tubes
- 0.2 ml thin-walled PCR tubes
Equipment
- Benchtop microcentrifuge for 0.2 ml, 1.5 ml, and 2 ml tubes
- Thermal cycler
- HulaMixer™ (gentle rotator mixer)
- Magnetic separation rack, suitable for 1.5 ml Eppendorf tubes
- Qubit™ Flex Fluorometer (ThermoFisher)
- Microfuge
- Vortex mixer
- Ice bucket with ice
- Pipettes and tips
Check your flow cells
We recommend performing a flow cell check before starting your library prep to ensure you have flow cells with sufficient pores for a good sequencing run.
To perform a flow cell check, please follow the instructions in the flow cell check document.
Prepare the NEBNext FFPE DNA Repair Mix, NEBNext FFPE Repair Buffer v2, and NEBNext Ultra II End Repair/dA-Tailing Module reagents in accordance with the manufacturer’s instructions, and place on ice.
For optimal performance, NEB recommend the following:
- Thaw all reagents on ice.
- Always spin down the tubes before opening for the first time each day.
- The FFPE DNA Repair Buffer v2 may have a little precipitate. Allow the mixture to come to room temperature and pipette the buffer up and down several times to break up the precipitate, followed by vortexing the tube for 30 seconds to solubilise any precipitate.
- Flick and/or invert the reagent tubes to ensure they are well mixed.
Note:
- Do not vortex the FFPE DNA Repair Mix or Ultra II End Prep Enzyme Mix.
- The FFPE DNA Repair Buffer v2 may have a yellow tinge and is fine to use if yellow.
Prepare the DNA in nuclease-free water:
Transfer 80 μl of Megaruptor fragmented gDNA into a 0.2 ml thin-walled PCR tube.
If you have less than 80 μl, adjust the volume to 80 μl with nuclease-free water.
Mix thoroughly by pipetting up and down, or by flicking the tube.
Spin down briefly in a microfuge.
In the 0.2 ml thin-walled PCR tube containing the gDNA, mix in the following:
| Reagent | Volume |
|---|---|
| gDNA from the previous step | 80 µl |
| NEBNext FFPE DNA Repair Buffer v2 | 11.7 µl |
| NEBNext FFPE DNA Repair Mix | 3.3 µl |
| Ultra II End Prep Enzyme Mix | 5 µl |
| Total | 100 µl |
Note: This method uses the NEBNext FFPE DNA Repair Buffer v2 alongside the standard NEBNext FFPE DNA Repair Mix.
Thoroughly mix the reaction by gently pipetting 10–20 times and briefly spinning down.
Using a thermal cycler, incubate the reaction at 20°C for 5 minutes, then 65°C for 5 minutes, and hold at 4°C.
Resuspend the AMPure XP Beads (AXP) by vortexing.
Spin down and transfer the DNA sample to a clean 1.5 ml Eppendorf DNA LoBind tube.
Add 100 µl of resuspended AMPure XP Beads (AXP) to each end-prep reaction and mix by flicking the tube.
Incubate on a HulaMixer (rotator mixer) for 5 minutes at room temperature.
Freshly prepare 600 μl of 80% ethanol in nuclease-free water for each sample.
Spin down the sample and pellet on a magnetic rack for 10 minutes until the supernatant is clear and colourless. Keep the tube on the magnetic rack, and pipette off the supernatant.
Keeping the tube on the magnetic rack, wash the beads with 250 µl of freshly prepared 80% ethanol without disturbing the pellet. Remove the ethanol using a pipette and discard.
Repeat the previous step.
Spin down and place the tube back on the magnetic rack. Pipette off any residual ethanol. Allow the pellet to dry for ~30 seconds, but do not dry the pellet to the point of cracking.
Remove the tube from the magnetic rack and resuspend the pellet in 61 µl nuclease-free water by gently pipetting up and down or by flicking the tube. Incubate for 2 minutes at room temperature.
Pellet the beads on the magnetic rack for at least 1 minute, until the eluate is clear and colourless.
Remove and retain 61 µl of eluate into a clean 1.5 ml Eppendorf DNA LoBind tube.
Quantify 1 µl of eluted sample using a Qubit fluorometer.
The expected DNA recovery should be between 1.5–2.5 µg.
Take forward the repaired and end-prepped DNA into the adapter ligation section.
6. Adapter ligation and clean-up
Materials
- Reagents from the Ligation Sequencing Kit V14 (SQK-LSK114):
- Ligation Adapter (LA)
- Ligation Buffer (LNB)
- Long Fragment Buffer (LFB)
- AMPure XP Beads (AXP)
- Elution Buffer (EB)
Consumables
- Salt-T4® DNA Ligase (NEB, M0467)
- Qubit™ dsDNA High Sensitivity Quantitation Assay (ThermoFisher, Q32851)
- Qubit™ Assay Tubes (Invitrogen, Q32856)
- 1.5 ml Eppendorf DNA LoBind tubes
Equipment
- Benchtop microcentrifuge for 1.5 ml, and 2 ml tubes
- HulaMixer™ (gentle rotator mixer)
- Magnetic separation rack, suitable for 1.5 ml Eppendorf tubes
- Qubit™ Flex Fluorometer (ThermoFisher)
- Microfuge
- Vortex mixer
- Heat block
- Ice bucket with ice
- Pipettes and tips
Spin down the Ligation Adapter (LA) and Salt-T4® DNA Ligase, and place on ice.
Thaw the Ligation Buffer (LNB) at room temperature, spin down and mix by pipetting. Due to its viscosity, vortexing this buffer is ineffective. Place on ice immediately after thawing and mixing.
Thaw the Elution Buffer (EB) and Long Fragment Buffer (LFB) at room temperature and mix by vortexing. Then spin down and place on ice.
In a 1.5 ml Eppendorf DNA LoBind tube, mix in the following order:
| Reagent | Volume |
|---|---|
| DNA sample from the previous section | 60 µl |
| Ligation Buffer (LNB) | 25 µl |
| Salt-T4® DNA Ligase | 10 µl |
| Ligation Adapter (LA) | 5 µl |
| Total | 100 µl |
Thoroughly mix the reaction by gently pipetting 10–20 times and briefly spinning down.
Incubate the reaction for 10 minutes at room temperature.
Resuspend the AMPure XP Beads (AXP) by vortexing.
Add 40 µl of resuspended AMPure XP Beads (AXP) to the reaction and mix by flicking the tube.
Incubate on a HulaMixer (rotator mixer) for 5 minutes at room temperature.
Spin down the sample and pellet on a magnetic rack. Keep the tube on the magnetic rack, and pipette off the supernatant when clear and colourless.
Wash the beads by adding 250 μl Long Fragment Buffer (LFB). Flick the beads to resuspend, then spin down and return the tube to the magnetic rack. Allow the beads to pellet for at least 5 minutes. Then remove the supernatant using a pipette and discard.
Note: Take care when removing the supernatant as the viscosity of the buffer can contribute to the loss of beads from the pellet.
Repeat the previous step.
Spin down and place the tube back on the magnetic rack. Pipette off any residual supernatant. Allow the pellet to dry for ~30 seconds, but do not dry the pellet to the point of cracking.
Remove the tube from the magnetic rack and resuspend the pellet in 97 µl Elution Buffer (EB). Spin down and incubate the sample for 10 minutes at 37°C.
Pellet the beads on the magnetic rack for 10 minutes, until the eluate is clear and colourless.
Remove and retain 97 µl of eluate containing the DNA library into a clean 1.5 ml Eppendorf DNA LoBind tube.
Dispose of the pelleted beads.
Quantify 1 µl of eluted sample using a Qubit fluorometer.
The expected recovery should be between 1.2–1.8 µg of adapter ligated library in a volume of 96 µl.
The prepared library is used for loading into the flow cells. Store the library on ice or at 4°C until ready to load.
Library storage recommendations
We recommend storing libraries in Eppendorf DNA LoBind tubes at 4°C for short-term storage or repeated use, e.g. re-loading flow cells between washes. For single use and long-term storage of more than 3 months, we recommend storing libraries at -80°C in Eppendorf DNA LoBind tubes.
7. Priming and loading the PromethION Flow Cells
Materials
- Reagents from Ligation Sequencing Kit V14 (SQK-LSK114) or Sequencing Auxiliary Vials V14 (EXP-AUX003):
- Sequencing Buffer (SB)
- Library Beads (LIB)
- Flow Cell Tether (FCT)
- Flow Cell Flush (FCF)
Consumables
- PromethION Flow Cells
- 5 ml Eppendorf tubes
- 1.5 ml Eppendorf DNA LoBind tubes
Equipment
- PromethION 24/48 device
- PromethION Flow Cell Light Shields
- Centrifuge
- Microfuge
- Vortex mixer
- Ice bucket with ice
- Pipettes and tips
This Ligation Sequencing Kit V14 is only compatible with R10.4.1 flow cells (FLO-PRO114M).
Priming and loading a flow cell
We recommend that you watch the how to load a PromethION Flow Cell video, before your first run.
After taking the flow cells out of the fridge, wait 20 minutes for the flow cells to reach room temperature before inserting them into the PromethION. Condensation can form on the flow cells in humid environments. Inspect the gold connector pins on the top and underside of the flow cells for condensation and wipe off with a lint-free wipe if any is observed. Ensure the heat pads (black pads) are present on the underside of the flow cells.
Thaw the Sequencing Buffer (SB), Library Beads (LIB), Flow Cell Tether (FCT), and Flow Cell Flush (FCF) at room temperature, before mixing by vortexing. Then spin down and store on ice.
To prepare the flow cell priming mix, combine the Flow Cell Tether (FCT), and Flow Cell Flush (FCF), as directed below. Before combining, mix each component well by vortexing at room temperature.
In a clean suitable tube, combine the following reagents for 3 flow cells:
| Reagent | Volume for 3 flow cells |
|---|---|
| Flow Cell Flush (FCF) | 3,510 µl |
| Flow Cell Tether (FCT) | 90 µl |
| Total volume | 3,600 µl |
Prepare a separate priming mix for each sample (i.e. one 3,600 µl mix for each set of 3 flow cells).
For the PromethION 24/48, load each flow cell into the docking port as follows:
- Line up the flow cell with the connector horizontally and vertically before smoothly inserting into position.
- Press down firmly onto the flow cell and ensure the latch engages and clicks into place.


Insertion of the flow cells at the wrong angle can cause damage to the pins on the PromethION and affect your sequencing results. If you find the pins on a PromethION position are damaged, please contact support@nanoporetech.com for assistance.

Complete a flow cell check to assess the number of pores available before loading the library.
This step can be omitted if the flow cells have been checked previously.
Refer to the flow cell check document for more information.
Slide the inlet port cover clockwise to open.

Take care when drawing back buffer from the flow cell. Do not remove more than 20-30 µl, and make sure that the array of pores are covered by buffer at all times. Introducing air bubbles into the array can irreversibly damage pores.
After opening the inlet port, draw back a small volume to remove any air bubbles:
- Set a P1000 pipette with tip to 200 µl.
- Insert the tip into the inlet port.
- Turn the wheel until the dial shows 220-230 µl, or until you see a small volume of buffer entering the pipette tip.

Load 500 µl of the priming mix into each flow cell via the inlet port, avoiding the introduction of air bubbles. Wait 5 minutes. During this time, prepare the library for loading using the next steps in the protocol.

Thoroughly mix the contents of the Library Beads (LIB) by pipetting.
The Library Beads (LIB) tube contains a suspension of beads. These beads settle very quickly. It is vital that they are mixed immediately before use.
In a new 1.5 ml Eppendorf DNA LoBind tube, prepare the library for loading as follows:
| Reagent | Volume for 3 flow cells |
|---|---|
| Sequencing Buffer (SB) | 300 µl |
| Library Beads (LIB) thoroughly mixed before use | 204 µl |
| DNA library | 96 µl |
| Total | 600 µl |
The prepared library is used for loading into the 3 flow cells, a loading of 200 µl into each flow cell. Store the library on ice or at 4°C until ready to load.
Complete the flow cell priming by slowly loading a further 500 µl of the priming mix into the inlet port of each flow cell.

Mix the prepared library gently by pipetting up and down just prior to loading.
Using a P1000 pipette, load 200 µl of library into the inlet port of each of the three PromethION Flow Cells which were primed.

Close the valves to seal the inlet ports.
For optimal sequencing output, install the light shields on the flow cells as soon as the library is loaded.
We recommend leaving the light shields on the flow cells after the library is loaded, including during any washing and reloading steps. The shields can be removed when the library has been removed from the flow cells.
If the light shields have been removed from the flow cells, reinstall the light shields as follows:
- Align the inlet port cut out of the light shield with the inlet port cover on the flow cell. The leading edge of the light shield should sit above the flow cell ID.
- Firmly press the light shield around the inlet port cover. The inlet port clip will click into place underneath the inlet port cover.


Close the PromethION lid when ready to start a sequencing run in MinKNOW.
After loading your flow cells, wait a minimum of 10 minutes before initiating any experiments on the PromethION. This will help to increase the sequencing output.
For instructions on setting up your sequencing run, please refer to the Data acquisition and basecalling section of this protocol.
8. Data acquisition and basecalling
Once you have loaded your flow cells, the sequencing run can be started in MinKNOW, the Oxford Nanopore sequencing software that controls the device, data acquisition, and real-time basecalling.
If you do not already have the hg38 reference available on your PromethION device, you can perform the one-time only instructions below in a terminal window, to download the reference and save it to the appropriate directory.
You must generate a BAM file from your sequencing run as this is the required input for the wf-human-variation workflow. Basecalling should be performed using the high-accuracy (HAC) model, with modified basecalling of 5mC and 5hmC in CpG context enabled. The alignment reference should be hg38.
One-time only instructions to download the reference and save it to the appropriate directory.
Open a terminal window:
- Ctrl + Alt + T
Download the reference:
Uncompress:
- gunzip GCA_000001405.15_GRCh38_no_alt_analysis_set.fna.gz
Move it to the references directory:
- mv GCA_000001405.15_GRCh38_no_alt_analysis_set.fna ~/data/reference
Run setup
For trio workflows, set up and run the sequencing separately for each sample (proband + parents), using 3 flow cells per sample. Each sample should be run with its own sample ID and experiment setup.
The steps below demonstrate how to set up your sequencing run in the MinKNOW UI.
Navigate to the start page and click Start sequencing.
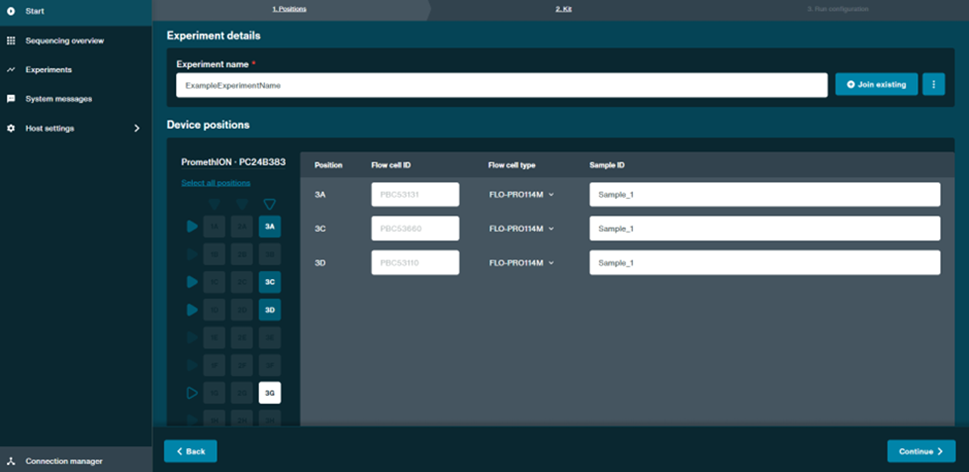
Under the Positions tab, select the positions of the flow cells to be run. Enter an Experiment name and Sample ID.
It is important for later steps in the analysis that you give an identical Sample ID to all the flow cells that are running the same sample.
- Once the required details have been entered, click Continue at the bottom right of the window.
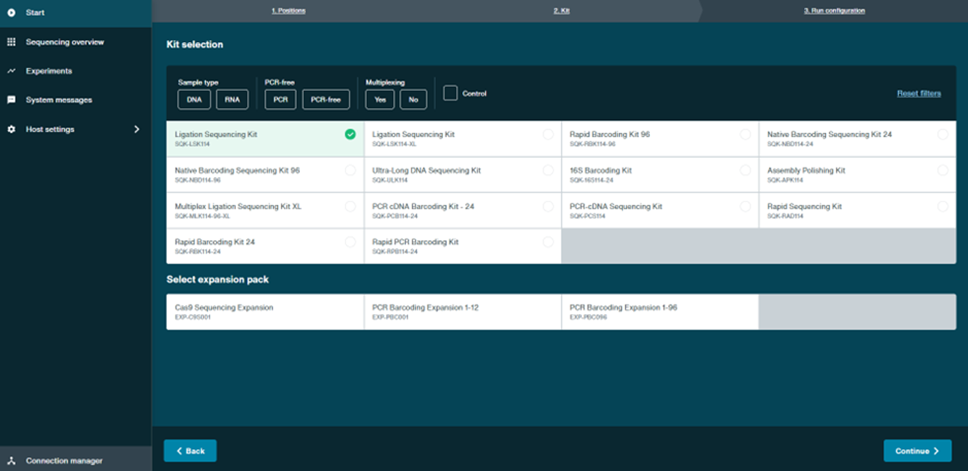
- Under the Kit selection tab, select the Ligation Sequencing Kit SQK-LSK114. Then click Continue in the bottom right of the window.
- In the Run configuration tab, configure the following settings in the Sequencing and analysis panel to enable real-time basecalling, modified base detection, and alignment:
Enable high-accuracy (HAC) basecalling:
Locate the Basecalling section and toggle the switch to ON.
From the drop-down menu, select High-accuracy (HAC) as the basecalling model.
Confirm your selection by clicking Save.
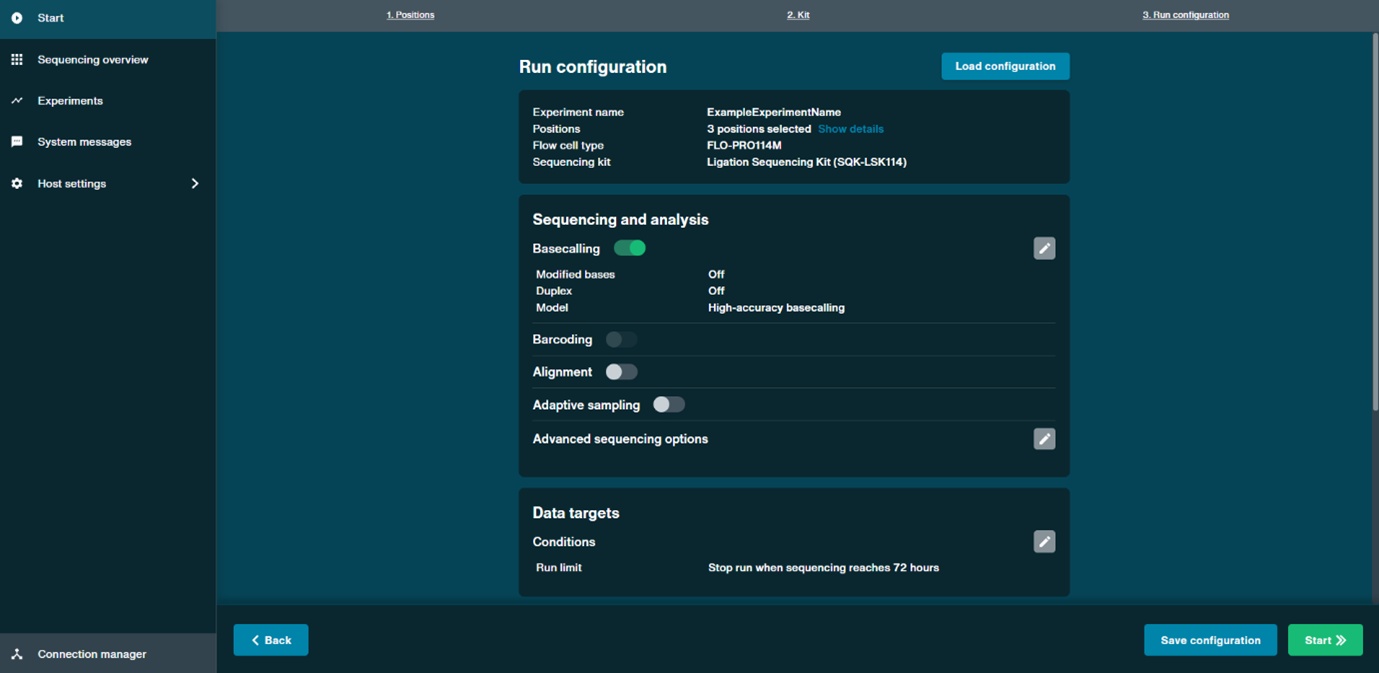
Enable modified base detection (5mC/5hmC in CpG).
Below the basecalling settings, locate the Modified bases toggle and turn it ON.
Select the model for 5-methylcytosine (5mC) and 5-hydroxymethylcytosine (5hmC) in CG contexts.
Click Save after enabling this option.
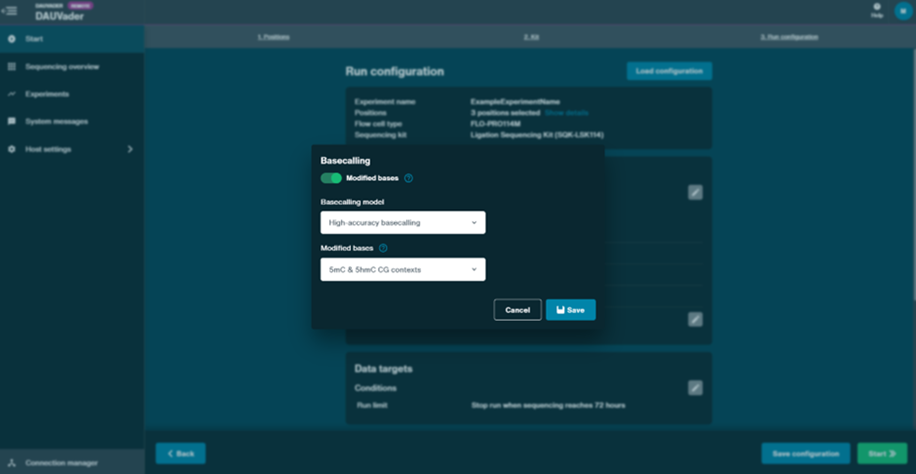
Enable alignment to a reference genome.
Scroll to the Alignment section and switch it ON.
Click on the white file selection box that appears.
Navigate to and select the hg38 reference genome file that you downloaded in the earlier step. This will allow MinKNOW to perform real-time alignment during the run.
Click Save once the reference file has been selected.

- Under the Data targets panel, set the Run limit to 24 hours. Leave the other settings as default and click Continue.
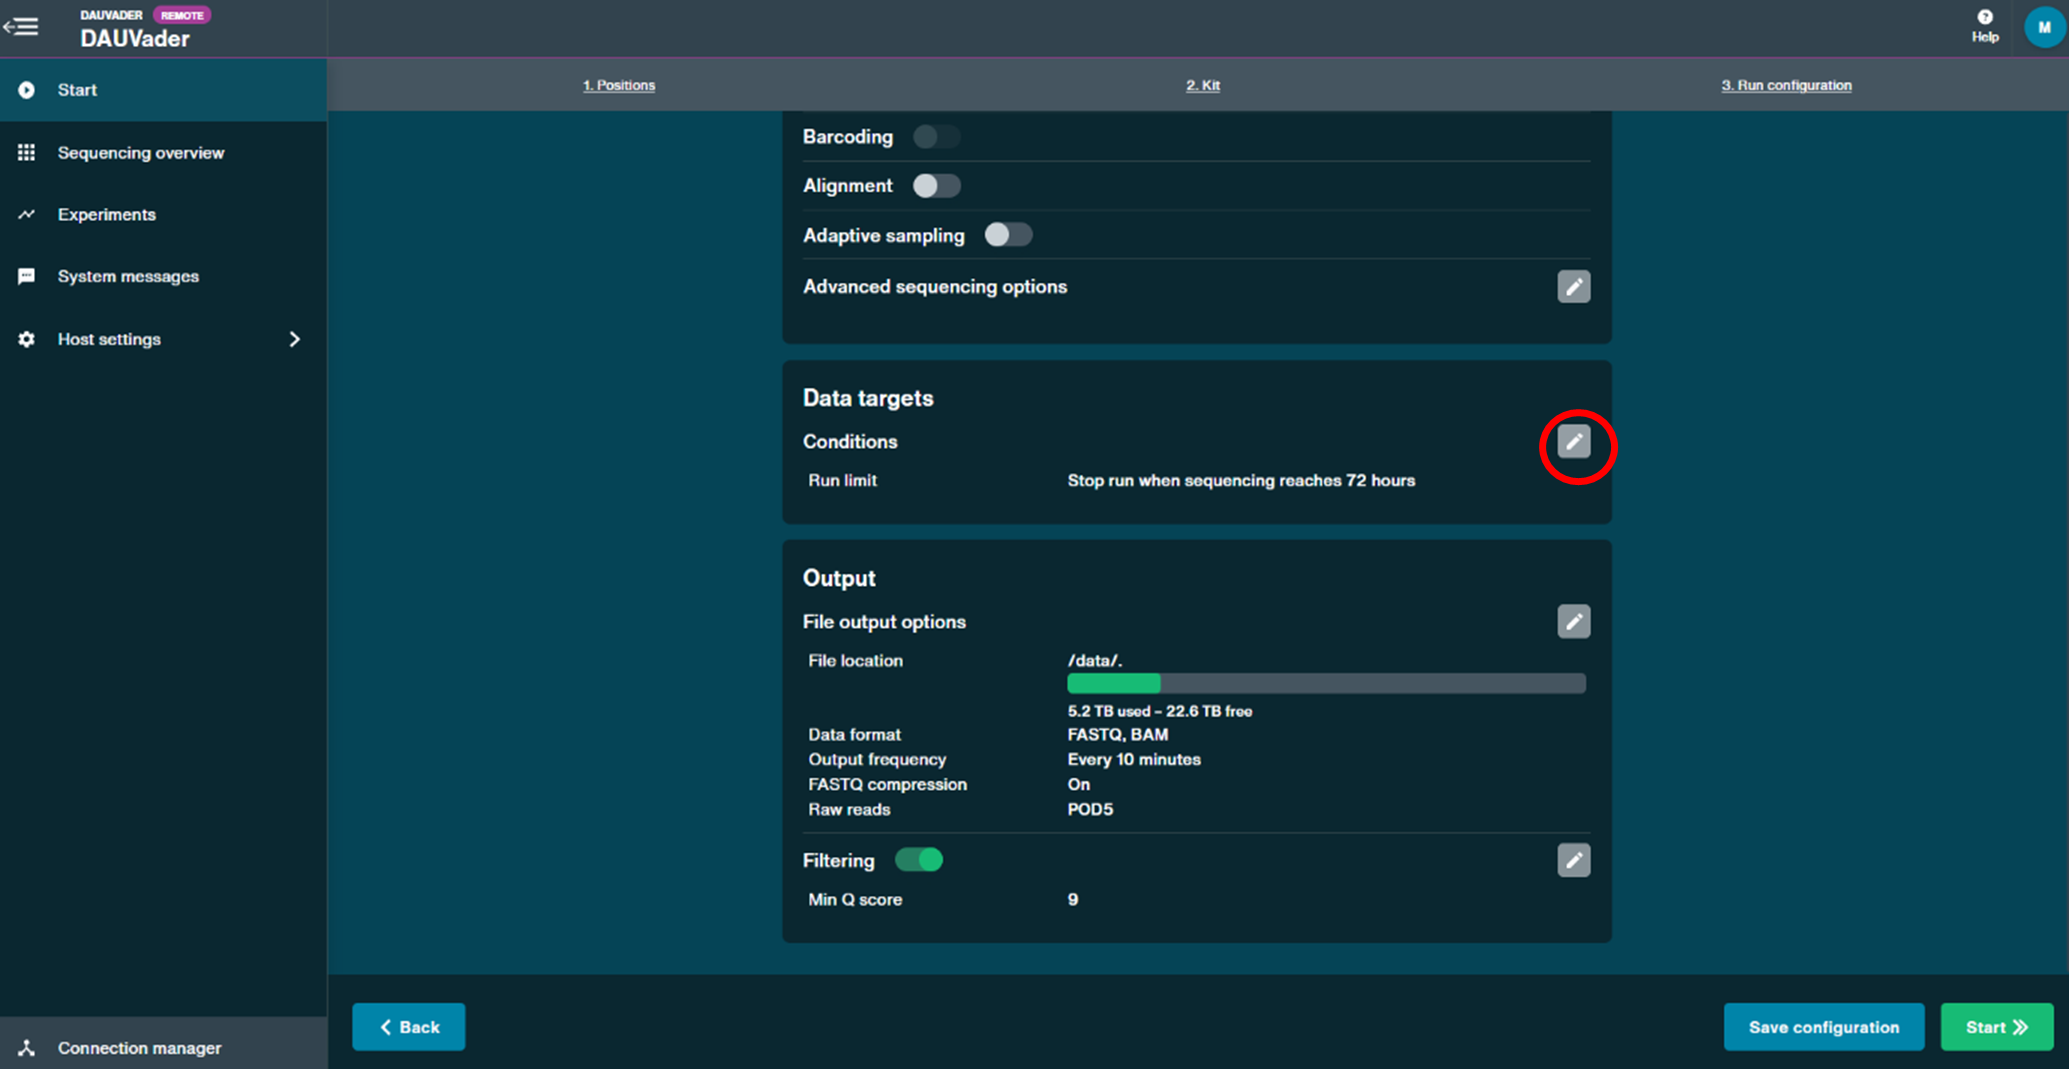
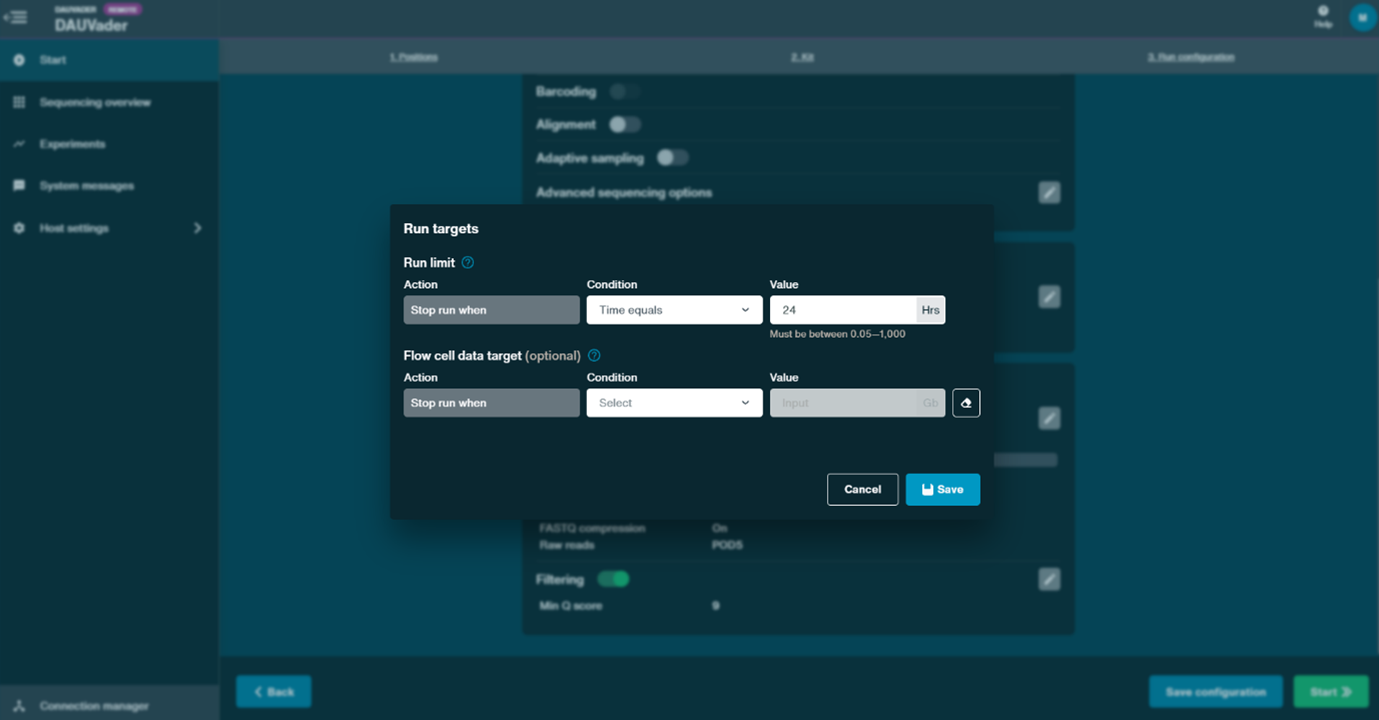
- In the Output panel, select .BAM format as the output by opening the settings section as indicated below. Also set file output frequency to End of run. Once completed, click Save.
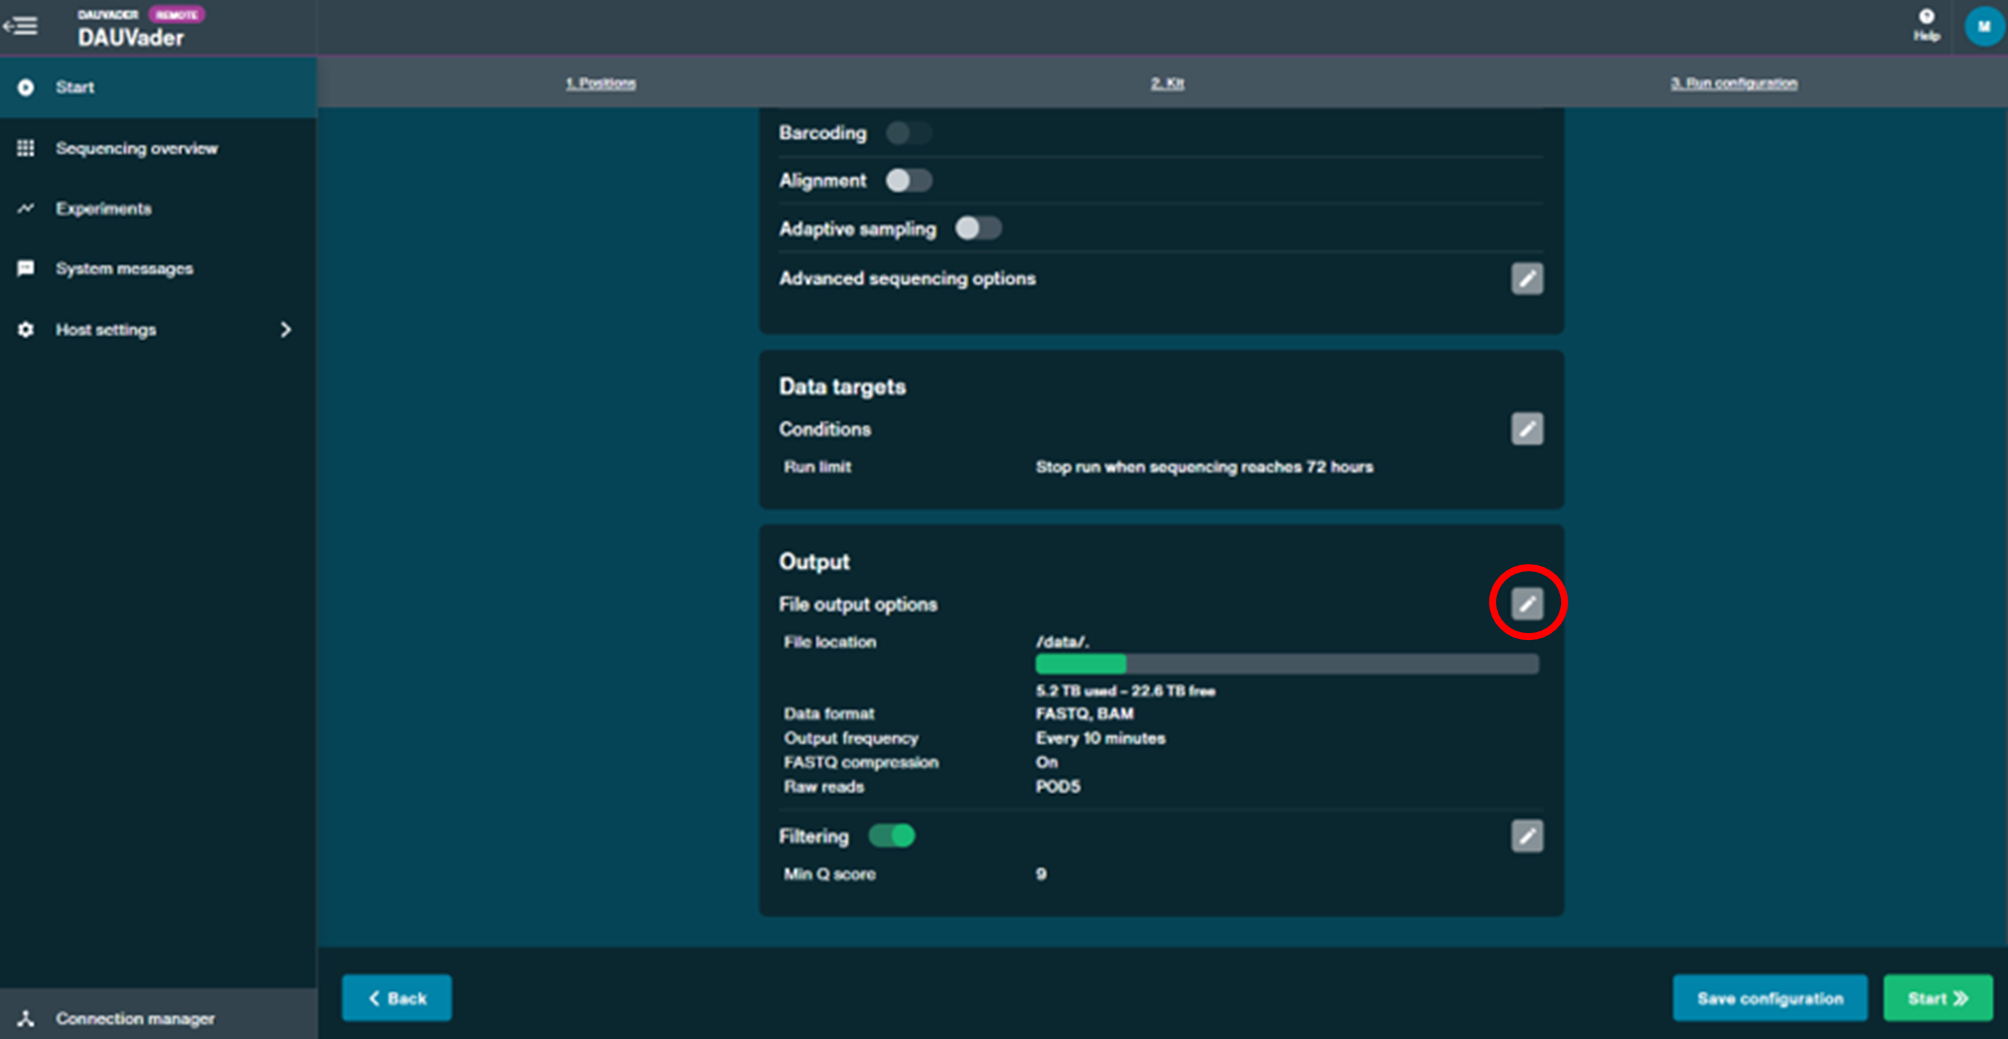
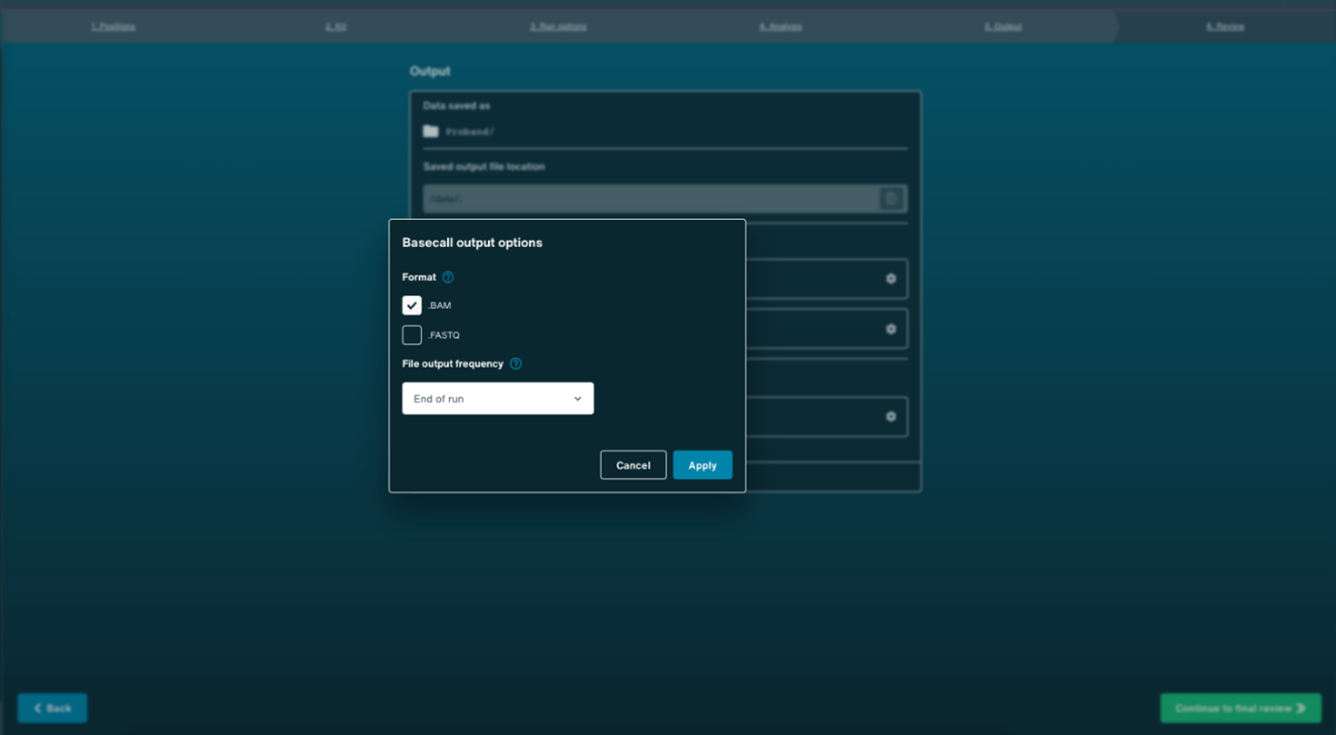
- Double-check the run parameters and click Start once you are ready to begin your sequencing run. The following section shows some representative sequencing results when using the above parameters.
Representative sequencing results
 Figure 1: Read length profile for a 30 kb N50 library. The approximate Gaussian shape is characteristic of genomic DNA that has undergone Megaruptor shearing.

Figure 2: Rate of data accumulation for a library split over three flow cells (3x FCs) with 7,000 (7k) pores (blue), and three flow cells with 5,000 (5k) pores (covered by warranty) (green). Results show that 30x data coverage can be achieved in the quickest time of 12.9 hours of sequencing, using three flow cells with 7,000 pores.
9. Data analysis
Secondary analysis is performed following sequencing, using the wf-human-variation workflow via EPI2ME or the command line. This variant calling uses:
Clair3 for single nucleotide variants (SNVs) and small indels
Sniffles2 for structural variants (SVs)
Spectre for copy number variants (CNVs)
Straglr for short tandem repeat expansions (STRs)
modkit for DNA methylation
The workflow produces per sample VCF files for each variant type (e.g. SNV, SV, STR, CNV). These should be merged as described in the VCF Merging instructions below. Merged VCF files can then be uploaded directly to tertiary interpretation platforms such as Fabric or Geneyx, using your own account credentials with the selected provider.
For trio analysis, this workflow must be run independently for each individual (proband, mother, and father).
EPI2ME workflow: Starting an analysis
- With the EPI2ME client open on your device, click the Launch button on the side bar.
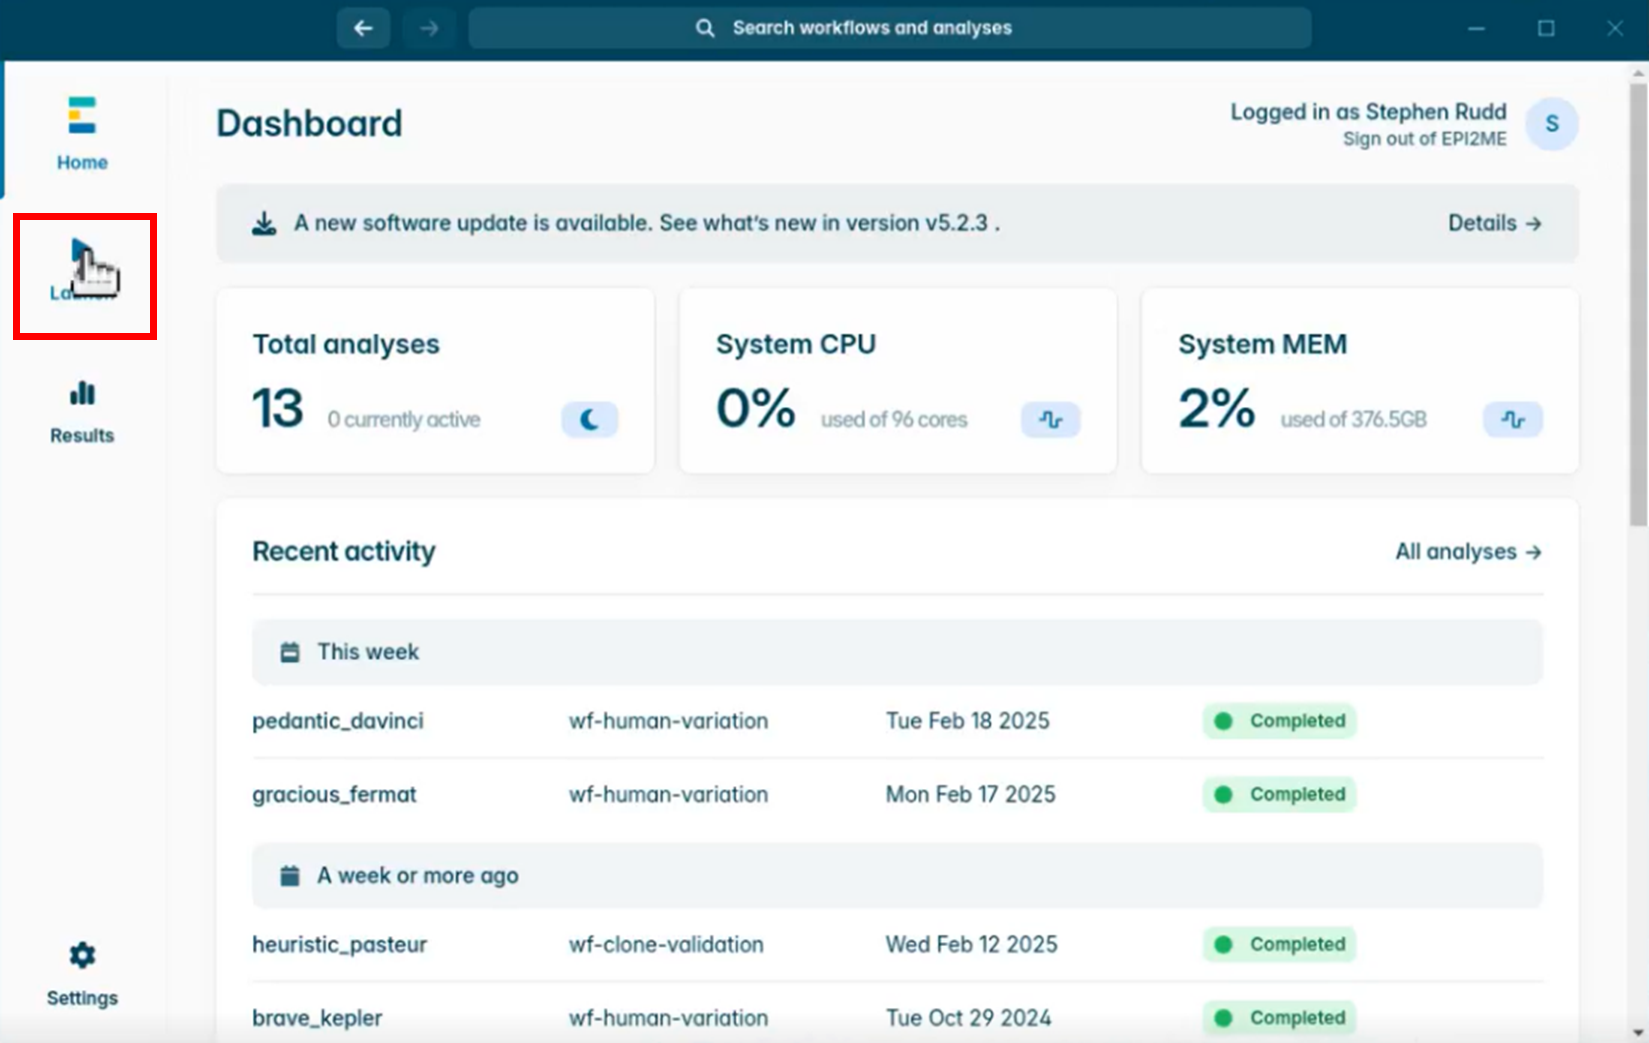
- Select the Human Variation workflow.
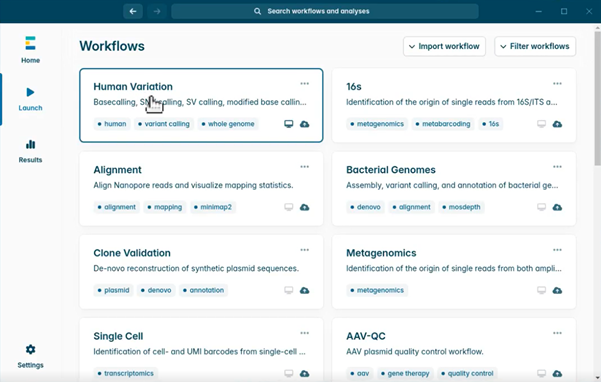
- Run Locally and select Launch.
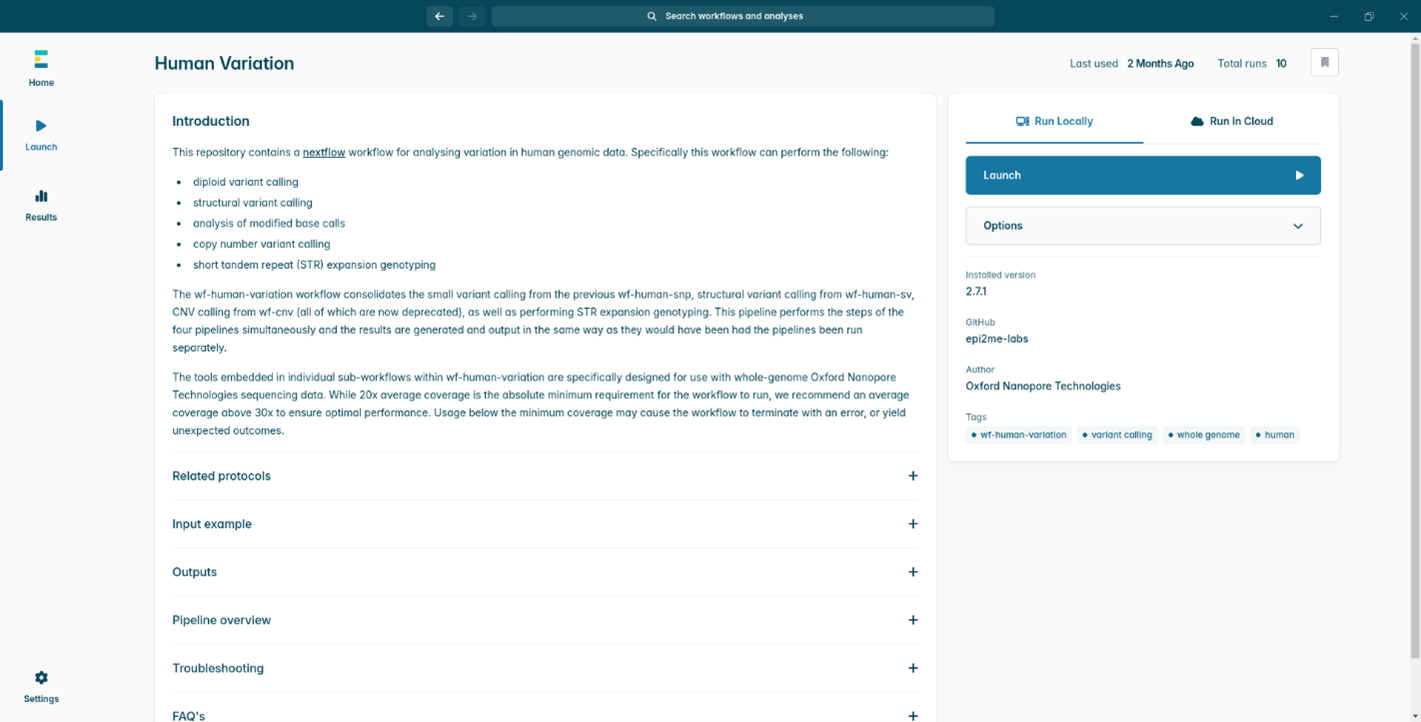
- In the Workflow Options panel, select all variant types:
SNP – single nucleotide variants
SV – structural variants
CNV – copy number variants
STR – short tandem repeats
MOD – modified base summary
If the samples are to be analysed in Fabric, please note that at the time of the production of these instructions, Fabric only supports SNPs and some SVs. However, we recommend choosing all variant types in this analysis for future compatibility purposes in tertiary and as a complete record for the current experiment. A separate VCF file will be generated for each selected workflow.

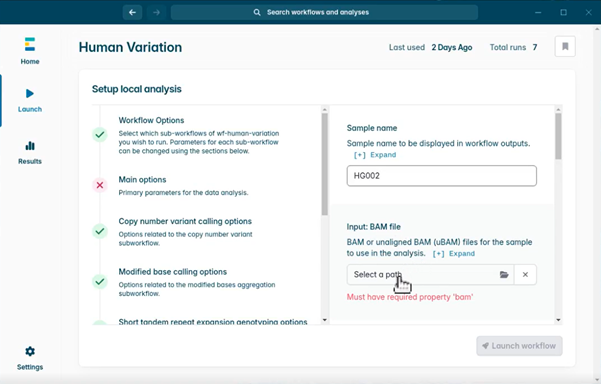
- In the Sample name box, provide the Sample ID which you used in MinKNOW. Remember that we specified an identical sample ID for all three flow cells which were loaded with the same sample. This should be replicated here, for the workflow to find and merge all sets of data related to this sample.
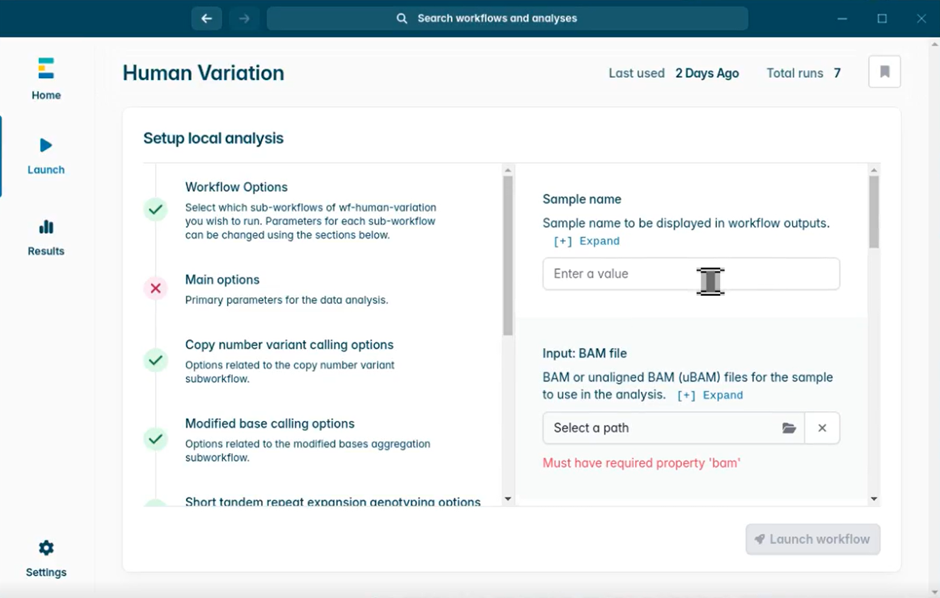
- Select the folder under Input: BAM file. This opens a file browser window. Find and select your experiment folder. Then click Open to complete.
- Select the Reference file. Navigate using the file browser window and select the reference file you downloaded earlier. Then click Open.

- Select the Phasing checkbox if you want phased variant calls. In the Partner integration drop-down menu, choose either Geneyx or Fabric. This step ensures the VCF output is compatible for upload with the chosen tertiary analysis provider. For Geneyx analysis, two VCF files will be written out (SNPs and all other variant types – CNV, SV, STR), whereas for Fabric, a single VCF file merging all variants will be made available.
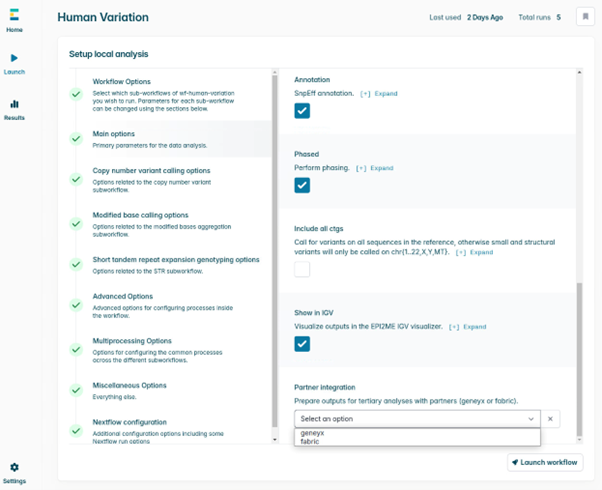
- Once you have provided the appropriate sample name, a path to the experiment folder, a reference file, and selected your tertiary partner, the Main options selection will show a green tick. Double-check everything and then click Launch workflow in the bottom right.
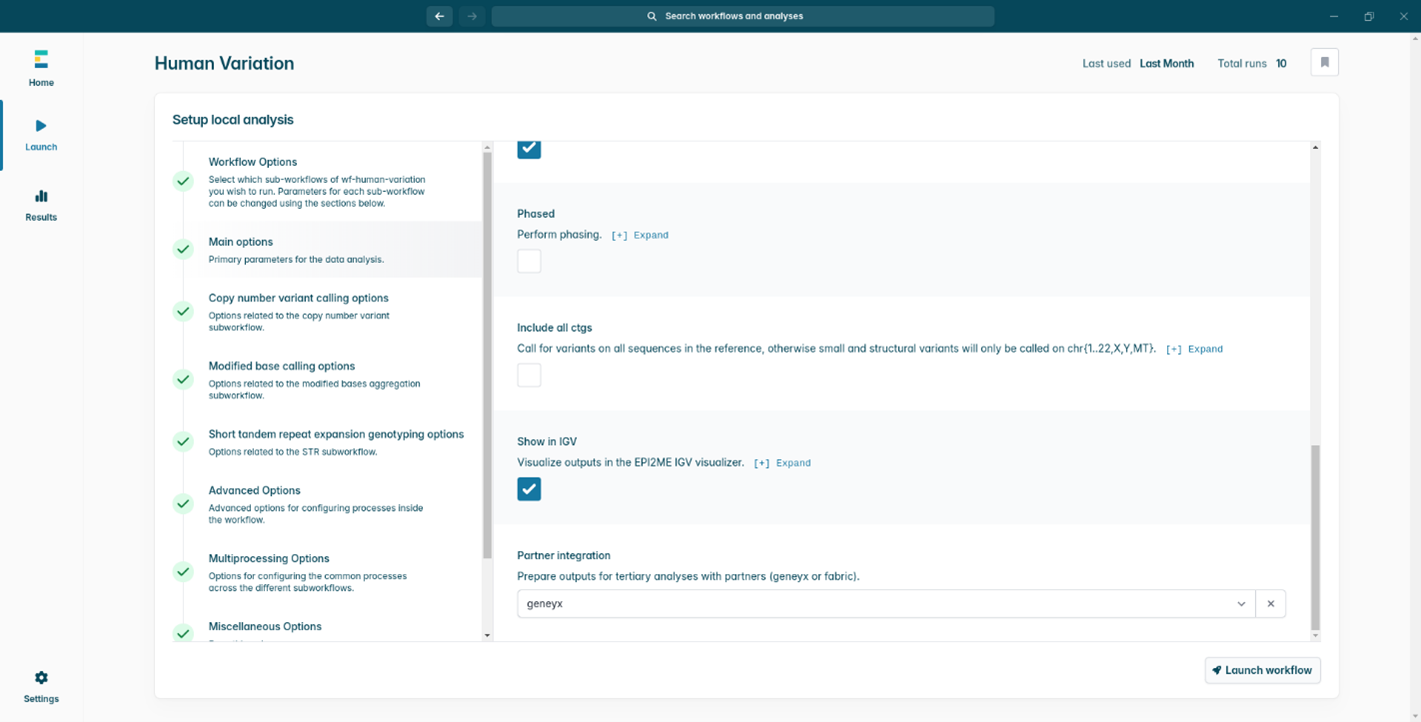
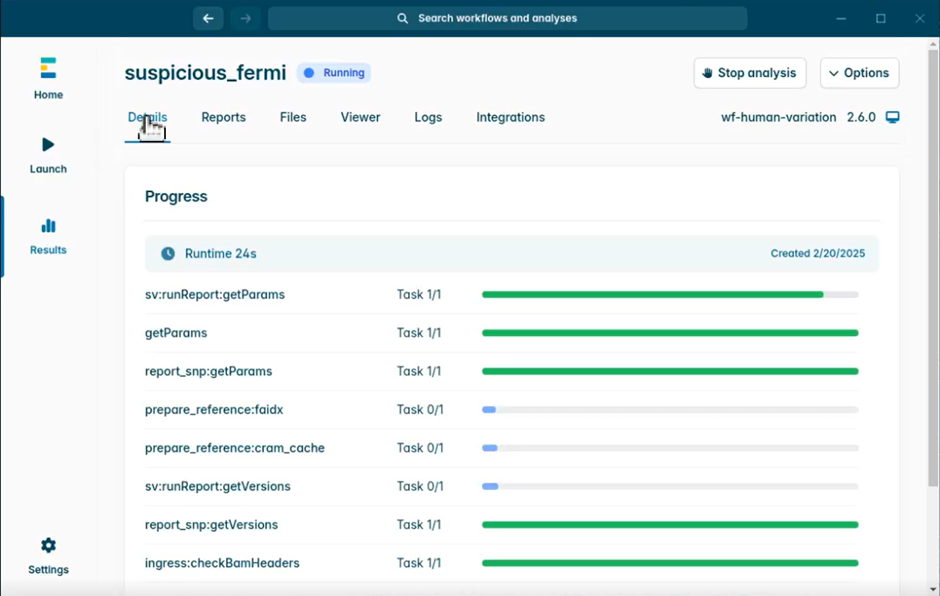
- To check that your analysis is running properly, go to the Results section, find your analysis and click Details. After a delay of ~20 seconds, progress bars will appear showing the active processes.
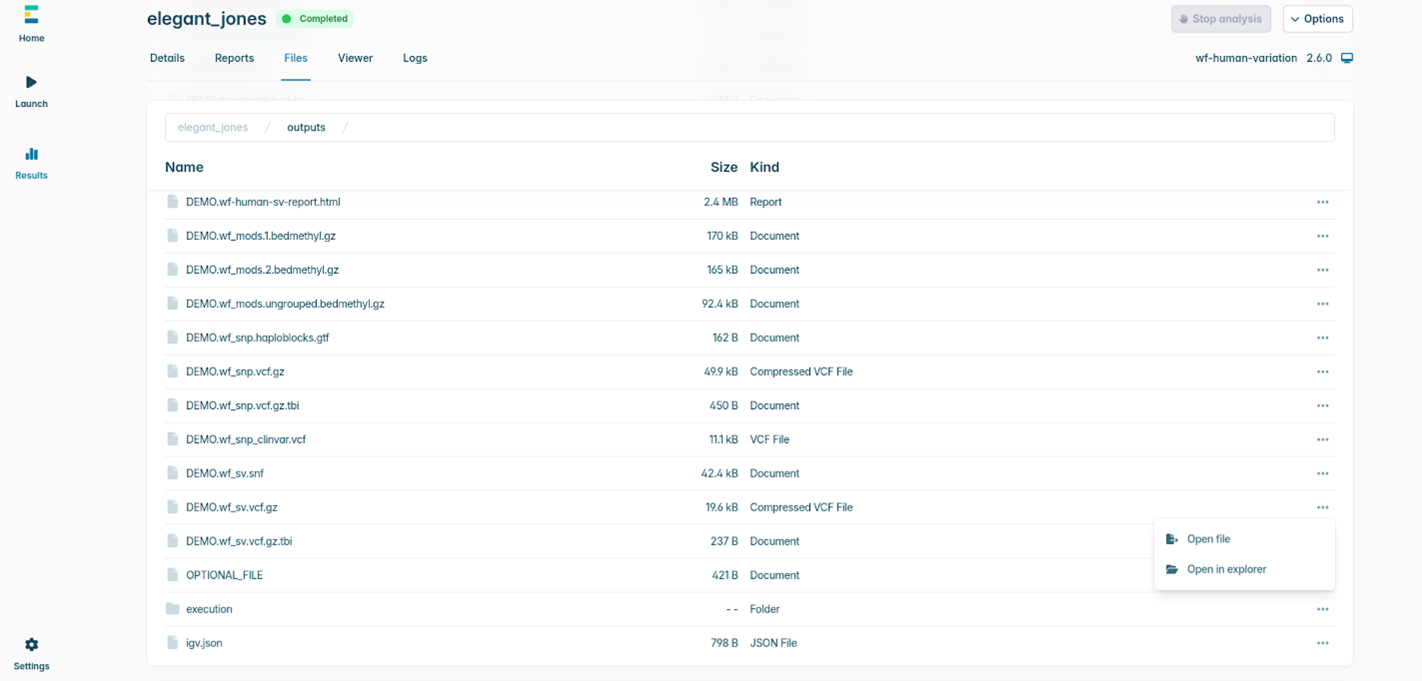
- Once the analysis is complete, navigate to the Files tab within the run dashboard. All outputs, including reports, VCFs, and intermediate files are listed here.
You can Open files directly (e.g. VCFs, reports) to review results within the interface.
Alternatively, select Open in explorer to access the files in their local directory for downstream analysis or transfer.
The files created for uploading to Fabric/Geneyx (if chosen) will be in a subdirectory inside the output folder called integrations/TertiaryPartner where the latter is either Fabric or Geneyx.
Upload to Tertiary Provider
Once the wf-human-variation analysis has completed successfully, the resulting VCF should be uploaded to either Fabric or Geneyx for tertiary analysis.
10. Flow cell reuse and returns
Materials
- Flow Cell Wash Kit (EXP-WSH004)
After your sequencing experiment is complete, if you would like to reuse the flow cell, please follow the Flow Cell Wash Kit protocol and store the washed flow cell at +2°C to +8°C.
The Flow Cell Wash Kit protocol is available on the Nanopore Community.
We recommend you to wash the flow cell as soon as possible, after you stop the run. However, if this is not possible, leave the flow cell on the device and wash it the next day.
Alternatively, follow the returns procedure to send the flow cell back to Oxford Nanopore.
Instructions for returning flow cells can be found here.
If you encounter issues or have questions about your sequencing experiment, please refer to the Troubleshooting guide in this protocol.
11. Issues during DNA extraction and library preparation
Below is a list of the most commonly encountered issues, with some suggested causes and solutions.
We also have an FAQ section available on the Nanopore Community Support section.
If you have tried our suggested solutions and the issue still persists, please contact Technical Support via email (support@nanoporetech.com) or via LiveChat in the Nanopore Community.
Low sample quality
| Observation | Possible cause | Comments and actions |
|---|---|---|
| Low DNA purity (Nanodrop reading for DNA OD 260/280 is <1.8 and OD 260/230 is <2.0–2.2). | The DNA extraction method does not provide the required purity. | The effects of contaminants are shown in the Contaminants document. Please try an alternative extraction method that does not result in contaminant carryover. Consider performing an additional SPRI clean-up step. |
Low DNA recovery after AMPure bead clean-up
| Observation | Possible cause | Comments and actions |
|---|---|---|
| Low recovery | DNA loss due to a lower than intended AMPure beads-to-sample ratio. | 1. AMPure beads settle quickly, so ensure they are well resuspended before adding them to the sample. 2. When the AMPure beads-to-sample ratio is lower than 0.4:1, DNA fragments of any size will be lost during the clean-up. |
| Low recovery | DNA fragments are shorter than expected. | The lower the AMPure beads-to-sample ratio, the more stringent the selection against short fragments. Please always determine the input DNA length on an agarose gel (or other gel electrophoresis methods) and then calculate the appropriate amount of AMPure beads to use. 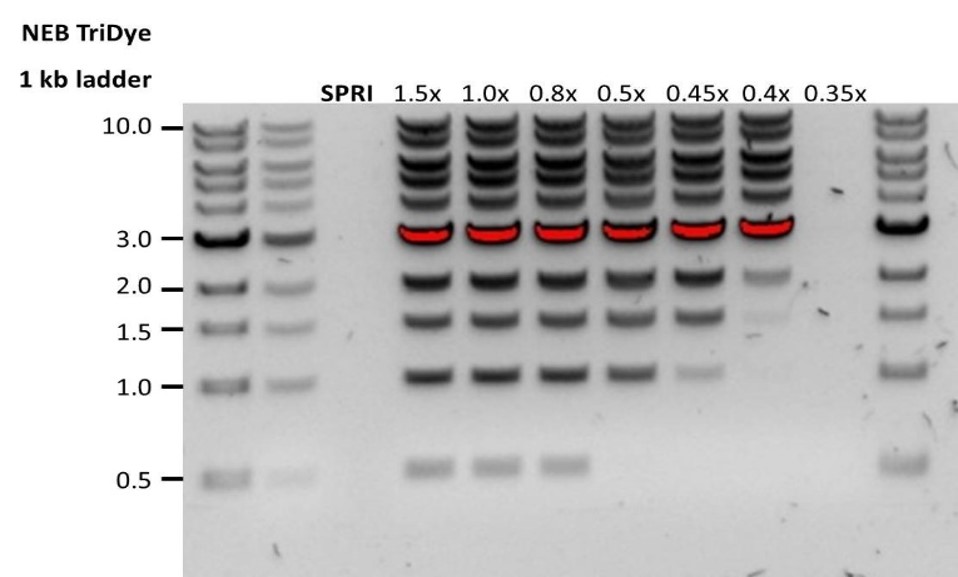 |
| Low recovery after end-prep | The wash step used ethanol <70%. | DNA will be eluted from the beads when using ethanol <70%. Make sure to use the correct percentage. |
12. Issues during the sequencing run
Below is a list of the most commonly encountered issues, with some suggested causes and solutions.
We also have an FAQ section available on the Nanopore Community Support section.
If you have tried our suggested solutions and the issue still persists, please contact Technical Support via email (support@nanoporetech.com) or via LiveChat in the Nanopore Community.
Fewer pores at the start of sequencing than after Flow Cell Check
| Observation | Possible cause | Comments and actions |
|---|---|---|
| MinKNOW reported a lower number of pores at the start of sequencing than the number reported by the Flow Cell Check. | An air bubble was introduced into the nanopore array. | After the Flow Cell Check it is essential to remove any air bubbles near the priming port before priming the flow cell. If not removed, the air bubble can travel to the nanopore array and irreversibly damage the nanopores that have been exposed to air. The best practice to prevent this from happening is demonstrated in this how to load a PromethION Flow Cell video. |
| MinKNOW reported a lower number of pores at the start of sequencing than the number reported by the Flow Cell Check. | The flow cell is not correctly inserted into the device. | Stop the sequencing run, remove the flow cell from the sequencing device and insert it again, checking that the flow cell is firmly seated in the device and that it has reached the target temperature. If applicable, try a different position on the device. |
| MinKNOW reported a lower number of pores at the start of sequencing than the number reported by the Flow Cell Check. | Contaminations in the library damaged or blocked the pores. | The pore count during the Flow Cell Check is performed using the QC DNA molecules present in the flow cell storage buffer. At the start of sequencing, the library itself is used to estimate the number of active pores. Because of this, variability of about 10% in the number of pores is expected. A significantly lower pore count reported at the start of sequencing can be due to contaminants in the library that have damaged the membranes or blocked the pores. Alternative DNA extraction or purification methods may be needed to improve the purity of the input material. The effects of contaminants are shown in the Contaminants Know-how piece. Please try an alternative extraction method that does not result in contaminant carryover. |
MinKNOW script failed
| Observation | Possible cause | Comments and actions |
|---|---|---|
| MinKNOW shows "Script failed". | Restart the computer and then restart MinKNOW. If the issue persists, please collect the MinKNOW log files and contact Technical Support. If you do not have another sequencing device available, we recommend storing the flow cell and the loaded library at 4°C and contact Technical Support for further storage guidance. |
Pore occupancy below 40%
| Observation | Possible cause | Comments and actions |
|---|---|---|
| Pore occupancy <40% | Not enough library was loaded on the flow cell. | Ensure you load the recommended amount of good quality library in the relevant library prep protocol onto your flow cell. Please quantify the library before loading. |
| Pore occupancy close to 0 | The Ligation Sequencing Kit was used, and sequencing adapters did not ligate to the DNA. | Make sure to use the NEBNext Quick Ligation Module (E6056) and Oxford Nanopore Technologies Ligation Buffer (LNB, provided in the sequencing kit) at the sequencing adapter ligation step, and use the correct amount of each reagent. A Lambda control library can be prepared to test the integrity of the third-party reagents. |
| Pore occupancy close to 0 | The Ligation Sequencing Kit was used, and ethanol was used instead of LFB or SFB at the wash step after sequencing adapter ligation. | Ethanol can denature the motor protein on the sequencing adapters. Make sure the LFB or SFB buffer was used after ligation of sequencing adapters. |
| Pore occupancy close to 0 | No tether on the flow cell. | Tethers are added during flow cell priming (FCT tube). Make sure FCT was added to FCF before priming. |
Shorter than expected read length
| Observation | Possible cause | Comments and actions |
|---|---|---|
| Shorter than expected read length | Unwanted fragmentation of DNA sample | Read length reflects input DNA fragment length. Input DNA can be fragmented during extraction and library prep. 1. Please review the Extraction Methods in the Nanopore Community for best practice for extraction. 2. Visualise the input DNA fragment length distribution on an agarose gel before proceeding to the library prep. 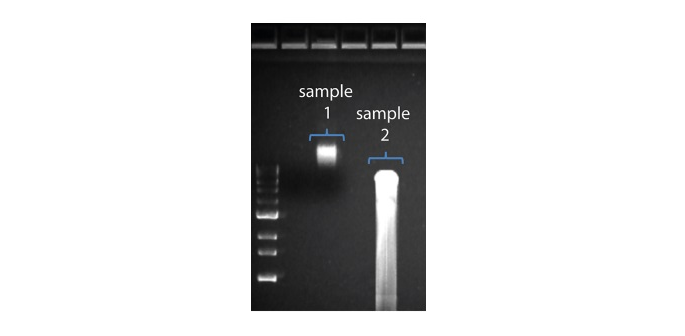 In the image above, Sample 1 is of high molecular weight, whereas Sample 2 has been fragmented. In the image above, Sample 1 is of high molecular weight, whereas Sample 2 has been fragmented.3. During library prep, avoid pipetting and vortexing when mixing reagents. Flicking or inverting the tube is sufficient. |
Large proportion of unavailable pores
| Observation | Possible cause | Comments and actions |
|---|---|---|
Large proportion of unavailable pores (shown as blue in the channels panel and pore activity plot). 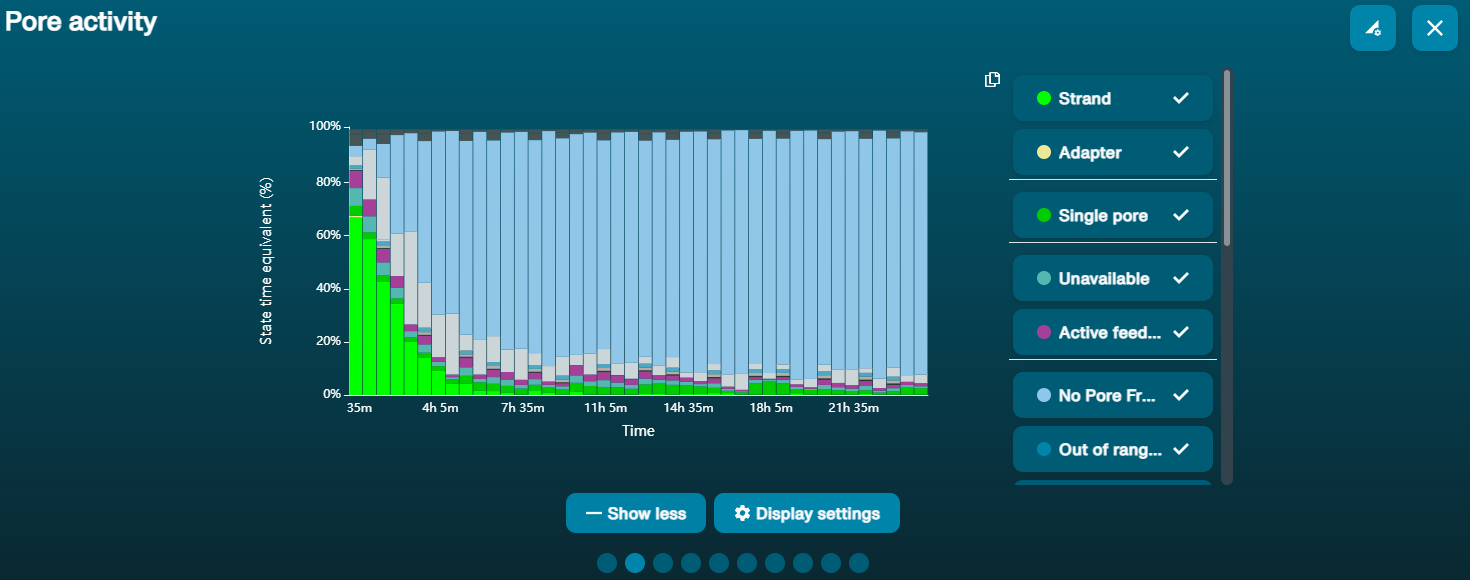 The pore activity plot above shows an increasing proportion of "unavailable" pores over time. The pore activity plot above shows an increasing proportion of "unavailable" pores over time. | Contaminants are present in the sample. | Some contaminants can be cleared from the pores by the unblocking function built into MinKNOW. If this is successful, the pore status will change to "sequencing pore". If the portion of unavailable pores stays high or increases: A nuclease flush using the Flow Cell Wash Kit (EXP-WSH004) can be performed. |
Large proportion of inactive pores
| Observation | Possible cause | Comments and actions |
|---|---|---|
| Large proportion of inactive/unavailable pores (shown as light blue in the channels panel and pore activity plot. Pores or membranes are irreversibly damaged). | Air bubbles have been introduced into the flow cell. | Air bubbles introduced through flow cell priming and library loading can irreversibly damage the pores. Watch the how to load a PromethION Flow Cell video for best practice. |
| Large proportion of inactive/unavailable pores | Certain compounds co-purified with DNA. | Known compounds include polysaccharides. 1. Clean-up using the QIAGEN PowerClean Pro kit. 2. Perform a whole genome amplification with the original gDNA sample using the QIAGEN REPLI-g kit. |
| Large proportion of inactive/unavailable pores | Contaminants are present in the sample. | The effects of contaminants are shown in the Contaminants Know-how piece. Please try an alternative extraction method that does not result in contaminant carryover. |
Temperature fluctuation
| Observation | Possible cause | Comments and actions |
|---|---|---|
| Temperature fluctuation | The flow cell has lost contact with the device. | Check that there is a heat pad covering the metal plate on the back of the flow cell. Re-insert the flow cell and press it down to make sure the connector pins are firmly in contact with the device. If the problem persists, please contact Technical Services. |
Failed to reach target temperature
| Observation | Possible cause | Comments and actions |
|---|---|---|
| MinKNOW shows "Failed to reach target temperature". | The instrument was placed in a location that is colder than normal room temperature, or a location with poor ventilation (which leads to the flow cells overheating). | MinKNOW has a default timeframe for the flow cell to reach the target temperature. Once the timeframe is exceeded, an error message will appear and the sequencing experiment will continue. However, sequencing at an incorrect temperature may lead to a decrease in throughput and lower q-scores. Please adjust the location of the sequencing device to ensure that it is placed at room temperature with good ventilation, then re-start the process in MinKNOW. |
