PromethION 24/48 user manual (PIC_1013_v1_revAH_15Dec2025)
PromethION: Protocol
V PIC_1013_v1_revAH_15Dec2025
FOR RESEARCH USE ONLY
Contents
Overview
Installation
- 2. What's in the box
- 3. Installing and powering on the device
- 4. Network settings and connection
- 5. Changing the default password and hostname
- 6. (Advanced) Updating the timezone and setting a local NTP server
- 7. Hardware check
Pre-sequencing checks and sequencing run
After completing a sequencing run
Updating the software
Operating system update on PromethION
Troubleshooting
1. Device information
The PromethION 24 and 48
The PromethION is a benchtop device designed to run up to 24 (for PromethION 24 and PromethION 24 Combined) or 48 (for PromethION 48) flow cells. Each flow cell is independently addressable, meaning that experiments can be run concurrently or individually. Integrated compute in the PromethION enables real-time data streaming and analysis.

Technical specification
| Component | Specification |
|---|---|
| Size and weight | PromethION 24 Sequencing Unit: H190 x W590 x D430 mm Weight 23 kg PromethION 48 Sequencing Unit: H190 x W590 x D430 mm Weight 30 kg Data Acquisition Unit: H470 x W178 x D440 mm Weight 26 kg |
| Power | 2x for Data Acquisition Unit C13 cables included with device Mains supply voltage: 200-240 VAC (50/60 Hz) Peak power consumption: 2,450 W 1x for Sequencing Unit C13 cable included with device Mains supply voltage: 100-240 VAC (50/60 Hz) Peak power consumption: 1,200 W |
| Compute specification | PromethION P24: 30 TB SSD Storage, 384 GB RAM PromethION P48: 60 TB SSD Storage, 384 GB RAM PromethION 24/48 A-Series: 60 TB SSD Storage, 512 GB RAM, 4x Ampere-Series GPUs Common features: Intel CPU for Ubuntu OS and basecalling orchestration PromethION Accelerator |
| Pre-loaded software | Ubuntu OS, PromethION OS, MinKNOW |
| Environmental conditions | Designed to sequence at +18ºC to +22ºC* |
*Functional range of electronics +5ºC to +40ºC
PromethION information
FAQs
Our device FAQs are located here.
2. What's in the box
PromethION 24/PromethION 48 packaging
PromethION 24/48 A-Series
This device ships to most countries worldwide. The device is shipped in two separate boxes: one for the Data Acquisition unit and one for the Sequencing Unit. The devices are stored and shipped at ambient temperature (15–25°C).
PromethION 24 Combined
This device ships to selected countries worldwide. The Data Acquisition Unit and Sequencing Unit that make up The PromethION 24 Combined are shipped in one box. The device is stored and shipped at ambient temperature (15–25°C). The PromethION 24 Combined must only be unpacked and installed by an Oxford Nanopore Technologies Field Service Engineer.
What's in the box - PromethION 24
- PromethION 24 Sequencing Unit
- PromethION 24 Data Acquisition Unit
- 3x Country-specific C13 cables
- 24x Configuration Test Cells (CTCs)
- 2x PCIe cables
- 2x USB-A/Mini USB cable
- 1x USB-A/USB B cable
- 1x MiniDP/Display port cable
- 1x USB-A stick (ISO reset image)
- 1x USB-C/USB-A adapter
What's in the box - PromethION 48
- PromethION 48 Sequencing Unit
- PromethION 48 Data Acquisition Unit
- 3x Country-specific C13 cables
- 48x Configuration Test Cells (CTCs)
- 3x PCIe cables
- 3x USB-A/Mini-USB cable
- 1x USB-A/USB-B cable
- 1x MiniDP/Display port cable
- 1x USB-A stick (ISO reset image)
- 1x USB-C/USB-A adapter
Status LEDs
The LEDs provide information about the status of each flow cell position. The LEDs display the following patterns:
- No light: no flow cell present
- Solid blue: flow cell ready
- Solid green: script is running
- Solid white: script completed. The LED will not turn white until calibration has ended
- Solid red: firmware error, or communication failure between the Sequencing Unit and the Data Acquisition Unit
3. Installing and powering on the device
If you have purchased a PromethION 24 Combined, the device must only be unpacked and installed by an Oxford Nanopore Technologies Field Service Engineer.
Preparing for installation
The following should be available before installing the device: - SFP+ modules and cabling for 2x 10 Gbps fibre OR cabling for 2x 10 Gbps Copper (Ethernet - Cat6a or above) - A single Copper cable for hardware check
- Fibre OR Copper ports providing: - IP address through DHCP - Outbound-only access to the internet over ports 80 and 443
- 1x VGA-capable monitor (for original PromethION 24/48 Data Acquisition Unit)
- 1x VGA-capable/DisplayPort-capable monitor (for new PromethION A-Series Data Acquisition Unit)
- 1x VGA cable
- 1x USB connected keyboard
- 1x USB connected mouse
- 3x Power supplies/wall sockets for the PromethION Data Acquisition Unit and Sequencing Unit - 1x Power supply/wall socket for a monitor
- Optional: UPS solution with C14 cables
Recommended laboratory location
- Place the device on a strong, clean laboratory bench. If you are using a PromethION 24 Combined, the device needs to be installed with the Sequencing and Data Acquisition units next to each other. The bench space required for a PromethION installation is 167 cm x 75 cm
- Ensure power, Ethernet and/or Fibre connectors are in close proximity
- Ensure power socket is easily accessible should a disconnection be required in case of emergency
- Sequencing should be carried out at a room temperature of +18°C to +22°C with device doors closed prior to sequencing beginning
- Allow 30 cm clearance to rear and sides of the device to ensure correct airflow
- Do not cover any ventilation grills
- WARNING - The rear of the device will heat up during operation
Unpack the device and place it on the bench where it is to be run.
Place the Sequencing Unit on the bench where it is to be run and the Data Acquisition Unit within two meters of the Sequencing Unit.
If you are using the PromethION 24 Combined, the device must only be unpacked and installed by an Oxford Nanopore Technologies Field Service Engineer. Once your device has been correctly installed, proceed from step 9.
PromethION 24 Sequencing and Data Acquisition Units

PromethION 48 Sequencing and Data Acquisition Units

Connect the networking cable into the appropriate port (using copper OR fibre optic connection).
As part of the device setup process, a network cable must be connected according to the Network configuration specified in section 4 of this document. This network connection is essential for:
- Downloading the latest software updates
- Performing a hardware check on the device
Ensure the network is active and properly configured before proceeding with the setup.

Inserting the SFP+ modules into the ports shown below:
If using fibre optic cables, then you must insert your chosen SFP+ modules into the ports on the rear of the Data Acquisition Unit.

This is the first step of the inter-unit connections. Connect the PCIe cables between your Sequencing Unit and Data Acquisition Unit.
Connect the PCIe cables to the rear of the Sequencing Unit and the rear of the Data Acquisition Unit.
Note: the ports are colour coded, e.g. connect red to red, blue to blue, and green to green (P48 only). Earlier Data Acquisition Units have different colour coding; follow the colour coding on the device for correct installation.
PromethION 24

PromethION 48

This is the second step of the inter-unit connections. Connect the USB cables between the Data Acquisition Unit and Sequencing Unit.
PromethION 24 Connect:
- 2x USB A – Mini USB
- 1x USB A to USB B
from the Data Acquisition Unit to the Sequencing Unit (see the diagram below):

PromethION 48 Connect:
- 3x USB A – Mini USB
- 1x USB A to USB B
from the Data Acquisition Unit to the Sequencing Unit (see the diagram below):

Connect peripheral devices to the appropriate ports.
Plug in the following:
1a. Monitor VGA cable (if using original PromethION 24/48 Data Acquisition Unit) 1b. Monitor VGA/miniDP cable* (if using the PromethION A-Series Data Acquisition Unit) 2. USB keyboard 3. USB mouse into the remaining USB A port.
* Use either the miniDP output or the VGA output. It is not possible to use both outputs simultaneously.

Two C13 power cables will plug into the Data Acquisition Unit and one C13 power cable will plug into the Sequencing Unit.
Insert two of the supplied C13 cables into the top of the Data Acquisition Unit, and the third into the Sequencing Unit. Connect all to a mains power supply.
Note: You will be provided with at least three C13 cables with plugs for your country of use.
Turn on the power at the mains supply. Then turn on the PromethION units in the order below:
- Turn on the Sequencing Unit

- Wait for 3 minutes
- Turn on the Data Acquisition Unit

At the login screen, you will be prompted to enter the password for the device. The default password is 'prom.' (also found in the Quick Start Guide). You will then be prompted to update your password. Set a new password using the following criteria:
- Minimum 8 characters
- Must contain a capital letter and a lower case letter
- Must contain a number or special character
- Cannot be a palindrome (e.g. “racecar”)
- Must differ from a previous password by more than 2 characters
Double-click the MinKNOW icon located on the desktop to open the MinKNOW UI.
![]()
We recommend logging into the MinKNOW software using your Community credentials.
To log in, you must be connected to the internet.
From here, you can also change the language in the user interface in the bottom right corner.

You will be prompted to enter your email address and Nanopore password:
If you experience login issues, please visit the Community Support channel (https://community.nanoporetech.com/support) and use Continue as guest for temporary use.
Select the sequencing device in the Connection Manager to connect to the computer.

You will be taken to the Sequencing Overview, displaying the connected flow cells.

4. Network settings and connection
Changing your network configuration
The network parameters for your PromethION 24 or PromethION 48 must be suited to your local network.
WARNING! Changing the network parameters on your PromethION may leave your device non-functional.
If you are uncertain about which parameters to use to configure your PromethION network settings, please contact your IT department.
Networking requirements
Oxford Nanopore is pleased to advise that from Noble onwards you can now use both the GUI or command line to configure network settings i.e. it may be easier to use command line to set the basic settings and then tweak any further settings inside the GUI.
However, for Focal we still recommend using the GUI for a single network configuration and the command line for bonded network configurations.
Your PromethION can use copper or fibre interfaces for connecting to your local infrastructure. The type of port is labelled on the diagram of the back of the PromethION below:

This connection will be used for:
- Sending telemetry* information to Oxford Nanopore Technologies
- Receiving software and firmware updates to the device
- Streaming biological sequence data to your local storage infrastructure
To implement the PromethION into the local infrastructure, *all appropriate cabling must be provided by the customer.
* Telemetry contains metadata about the settings and conditions of a sequencing run. Nothing specific about the genomic content of individual reads is included - only generic information is logged, such as sequence length and q-score.
Copper or fibre data transfer connections can be used - BUT NOT BOTH.
Oxford Nanopore only provides support and scripts to use either copper OR fibre but if you have your own advanced networking team, you can use both if required.
If you have an internal advanced networking team, it is possible to use both copper and fibre and have diverse routing — but Oxford Nanopore will NOT be able to aid or support in configuration setup.
You can run with copper or fibre connections for your data transfer. We do not recommend one over the other, however, it is down to your local network environment for which connectivity you may prefer to use.
Note: Please only attach copper or fibre cables. Using both is not supported and will cause networking issues if you do not have an expert in this area.
A summary of the connectivity options is shown in the diagram below. Please consult the instructions below to ensure the PromethION network connections are set up correctly.

Instructions for setting up a copper connection
Single copper port on DHCP service
- Open a Terminal window and enter the following command:
ont-network-settings --dhcp --interfaces eno2 --overwrite
2. Power cycle the PromethION.
Connections: Use only the lower RJ45 port for this configuration. 
Dual copper ports on DHCP service
- Open a Terminal window and enter the following command:
ont-network-settings --dhcp --interfaces copper --bond failover --overwrite
2. Power cycle the PromethION.
Note: If using LACP/Cisco/802.3ad, then enter:
--bond lacp
You must ensure that the networking switch is setup to allow this. LACP needs two ports to be allocated.
Connections: Use both RJ45 ports for this configuration. 
Dual copper ports with a static IP address
- Open a Terminal window and enter the following command:
ont-network-settings --address 1.1.1.1 --subnet 255.255.255.0 --gateway 1.1.1.254 --dns 1.1.1.2,1.1.1.3 --search mycompany.local --bond failover --interfaces copper --overwrite
2. Power cycle the PromethION.
Note: You must change the IP addresses above according to your site's network configuration.
Connections: Use both RJ45 ports for this configuration; however, the configuration will also function with only the bottom port occupied. 
Instructions for setting up a fibre connection
Single fibre port on DHCP service
- Open a Terminal window and enter the following command:
ont-network-settings --dhcp --interfaces fibre --overwrite
2. Power cycle the PromethION.
Connections: Use the right fibre port for this configuration:

Dual fibre ports on DHCP service
- Open a Terminal window and enter the following command:
ont-network-settings --dhcp --interfaces fibre --bond failover --overwrite
2. Power cycle the PromethION.
Note: If using LACP/Cisco/802.3ad, then enter:
--bond lacp
You must ensure that the networking switch is setup to allow this. LACP needs two ports to be allocated.
Connections: Use both fibre ports for this configuration. 
Dual fibre ports with a static IP address
- Open a Terminal window and enter the following command:
ont-network-settings --address 1.1.1.1 --subnet 255.255.255.0 --gateway 1.1.1.254 --dns 1.1.1.2,1.1.1.3 --search mycompany.local --bond failover --interfaces fibre --overwrite
2. Power cycle the PromethION.
Note: You must change the IP addresses above according to your site's network configuration.
Connections: Use both fibre ports for this configuration; however, the configuration will also function with only the right port port occupied. 
Validate the IP address
You can use the command: ifconfig to validate that the IP address has been set correctly using a static or DHCP address.
The returned information will contain the IP address for the Ethernet link, as below:
prom@PRO00001:~$ ifconfig
docker0: flags=4099<UP,BROADCAST,MULTICAST>  mtu 1500
        inet 172.17.0.1  netmask 255.255.0.0  broadcast 172.17.255.255
        ether 02:42:35:39:60:40  txqueuelen 0  (Ethernet)
        RX packets 0  bytes 0 (0.0 B)
        RX errors 0  dropped 0  overruns 0  frame 0
        TX packets 0  bytes 0 (0.0 B)
        TX errors 0  dropped 0 overruns 0  carrier 0  collisions 0
eno1: flags=4163<UP,BROADCAST,RUNNING,MULTICAST>  mtu 1500
        inet 10.150.60.13  netmask 255.255.255.0  broadcast 10.150.60.255
        inet6 fe80::78cf:8a5c:26ec:4611  prefixlen 64  scopeid 0x20<link>
        ether 3c:7c:3f:be:02:81  txqueuelen 1000  (Ethernet)
Note: inet 10.150.60.13 netmask 255.255.255.0 broadcast 10.150.60.255 – this is the address that needs to match the network.
5. Changing the default password and hostname
Navigate to the host settings to open Device settings.
Click Reset password in the System box.

In the Change Password dialogue box, enter your current password, followed by the new password.

Click Reset Password to confirm password change.
(Advanced) Changing the default password via the Terminal
Change the default password at the earliest opportunity to ensure the security of your device.
To do this, open a Terminal window and type: passwd
Then press Enter.
The following arguments will be presented in the Terminal; follow the instructions to change the password:
prom@PRO00001:~$ passwd
Changing password for prom.
(current) UNIX password: prom
Enter new UNIX password: XXXX
Retype new UNIX password: XXXX
passwd: password updated successfully
Note: The new PromethION/UNIX password should be in line with your local IT guidelines for device security. Make a note of your new password, as this will be required to login to your device and for running with sudo privileges required for e.g. Oxford Nanopore Technologies’ software updates.
(Advanced) Changing the default hostname
- If you need to update the hostname of the device, run the following command and replace the
<new_hostname>portion with your desired hostname (omitting the angle bracket characters<>):
sudo -S hostnamectl set-hostname <new_hostname>
- Power cycle the device by shutting down with the following command, then press the physical power button to turn the device back on:
sudo shutdown -h now
6. (Advanced) Updating the timezone and setting a local NTP server
To update the timezone:
First find the correct timezone name by typing the command:
sudo timedatectl list-timezones
Then change the timezone using the following commands:
sudo su -
Timezone="Europe/London"
timedatectl set-timezone $Timezone
systemctl restart systemd-timesyncd
To set a local NTP server:
Note: this requires NTP/port 123 access if using an external internet time server.
Enter the following commands:
sudo su -
printf "[Time]\nNTP=ntp.ubuntu.com\nFallbackNTP=pool.ntp.org\n" | tee /etc/systemd/timesyncd.conf
timedatectl set-ntp false
timedatectl set-ntp true
systemctl restart systemd-timesyncd.service
hwclock --systohc
timedatectl set-local-rtc 0
You can check that the process has worked by typing:
timedatectl status
Note: it may take several minutes to sync with the NTP server.
7. Hardware check
Hardware check
A hardware check must be performed on all new devices or when software has been upgraded.
Load all the CTCs that came with the device into the flow cell positions.
All the strips should be loaded with CTCs.
Note:
- A PromethION 24 has three strips that contain a total of 24 flow cell positions.
- A PromethION 48 has six strips that contain a total of 48 flow cell positions.

The MinKNOW UI recognises the CTCs as they are loaded, and the LED adjacent to the flow cell will first show blue (initialising), followed by green (ready).
Close all of the doors on the top of the Sequencing Unit once the CTCs are loaded.
Correct insertion of PromethION CTCs
Note that regular flow cells are shown in the images, however the recommendations apply equally to CTCs.
Line up the CTC with the connector (horizontally and vertically) and smoothly insert it into position.

Press the CTC down firmly into the loader, and ensure that the latch engages.

Insertion of the CTC at the wrong angle can damage the pins on the PromethION:

Navigate to the start homepage and click 'Hardware check'.

Select the CTCs in the UI.
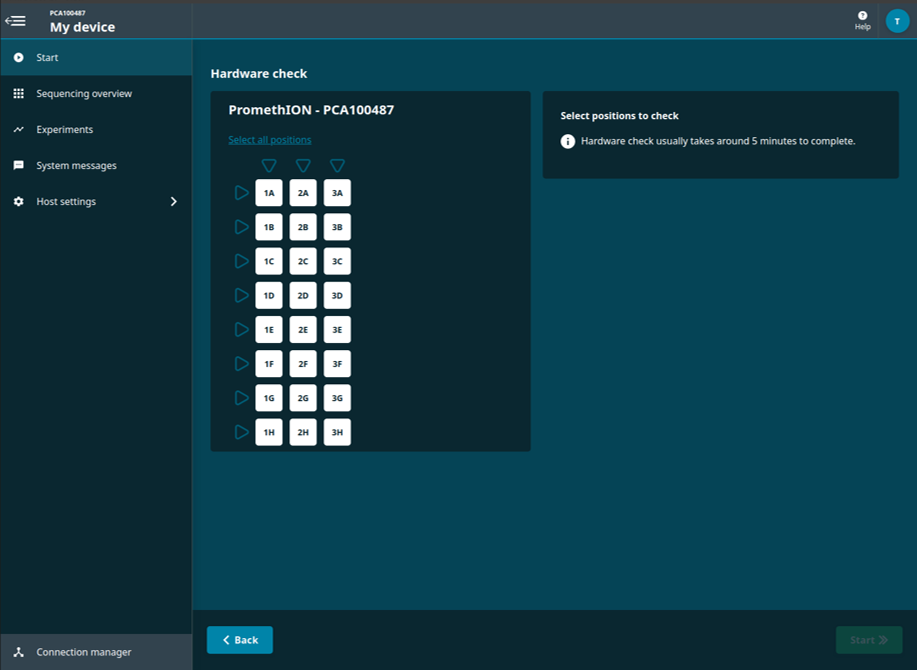
Click 'Start' on the bottom right of the screen for the hardware check to begin.
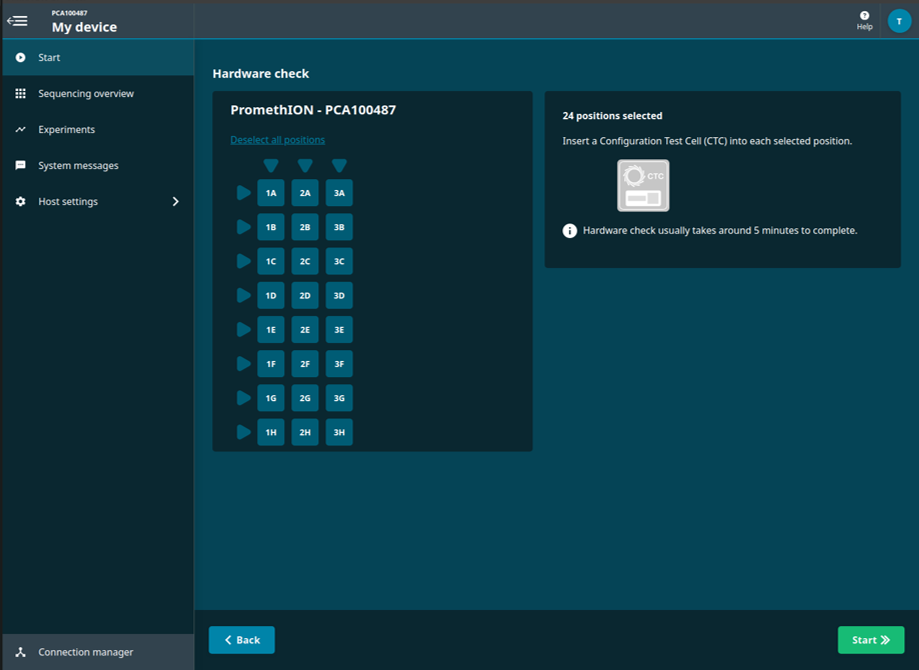
The progress of the hardware check will be displayed.

When the hardware check is complete, you will be notified if the selected position(s) has passed or failed the hardware check.

The 'Sequencing Overview' will show if the device passed or failed the hardware check.
Hardware check passed:
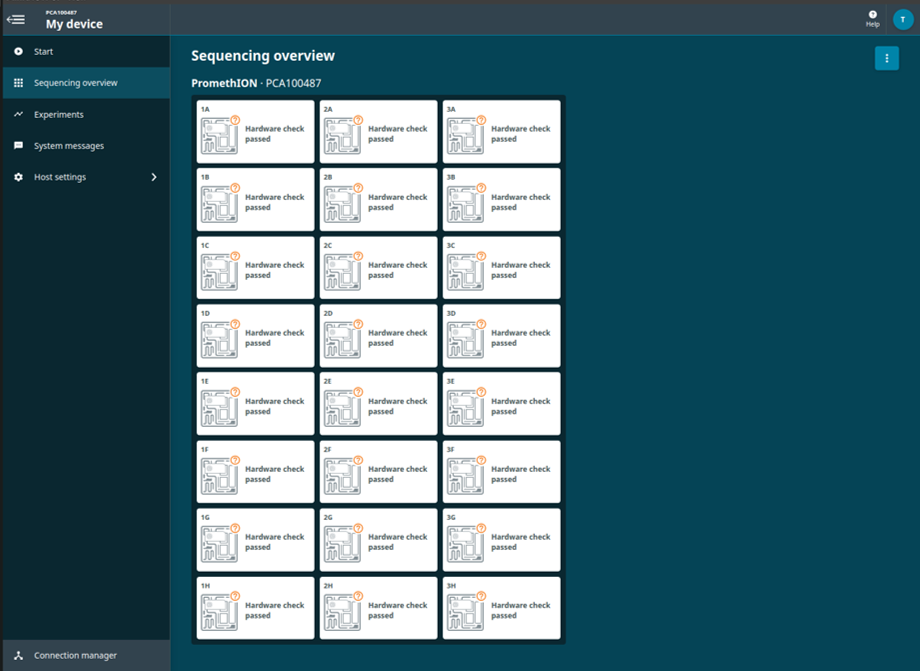
If the hardware check fails, remove and reinsert the CTCs, and run a hardware check again. If the check fails for a second time, please contact Customer Support (online Live Support).
To view the hardware check report, return to 'Hardware check' and click on ‘View previous hardware check reports’.

Select the report(s) for exporting.
A green tick will show on the selected report. Click 'Export' to download the report. 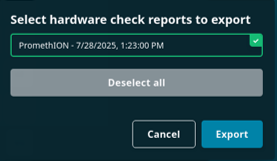
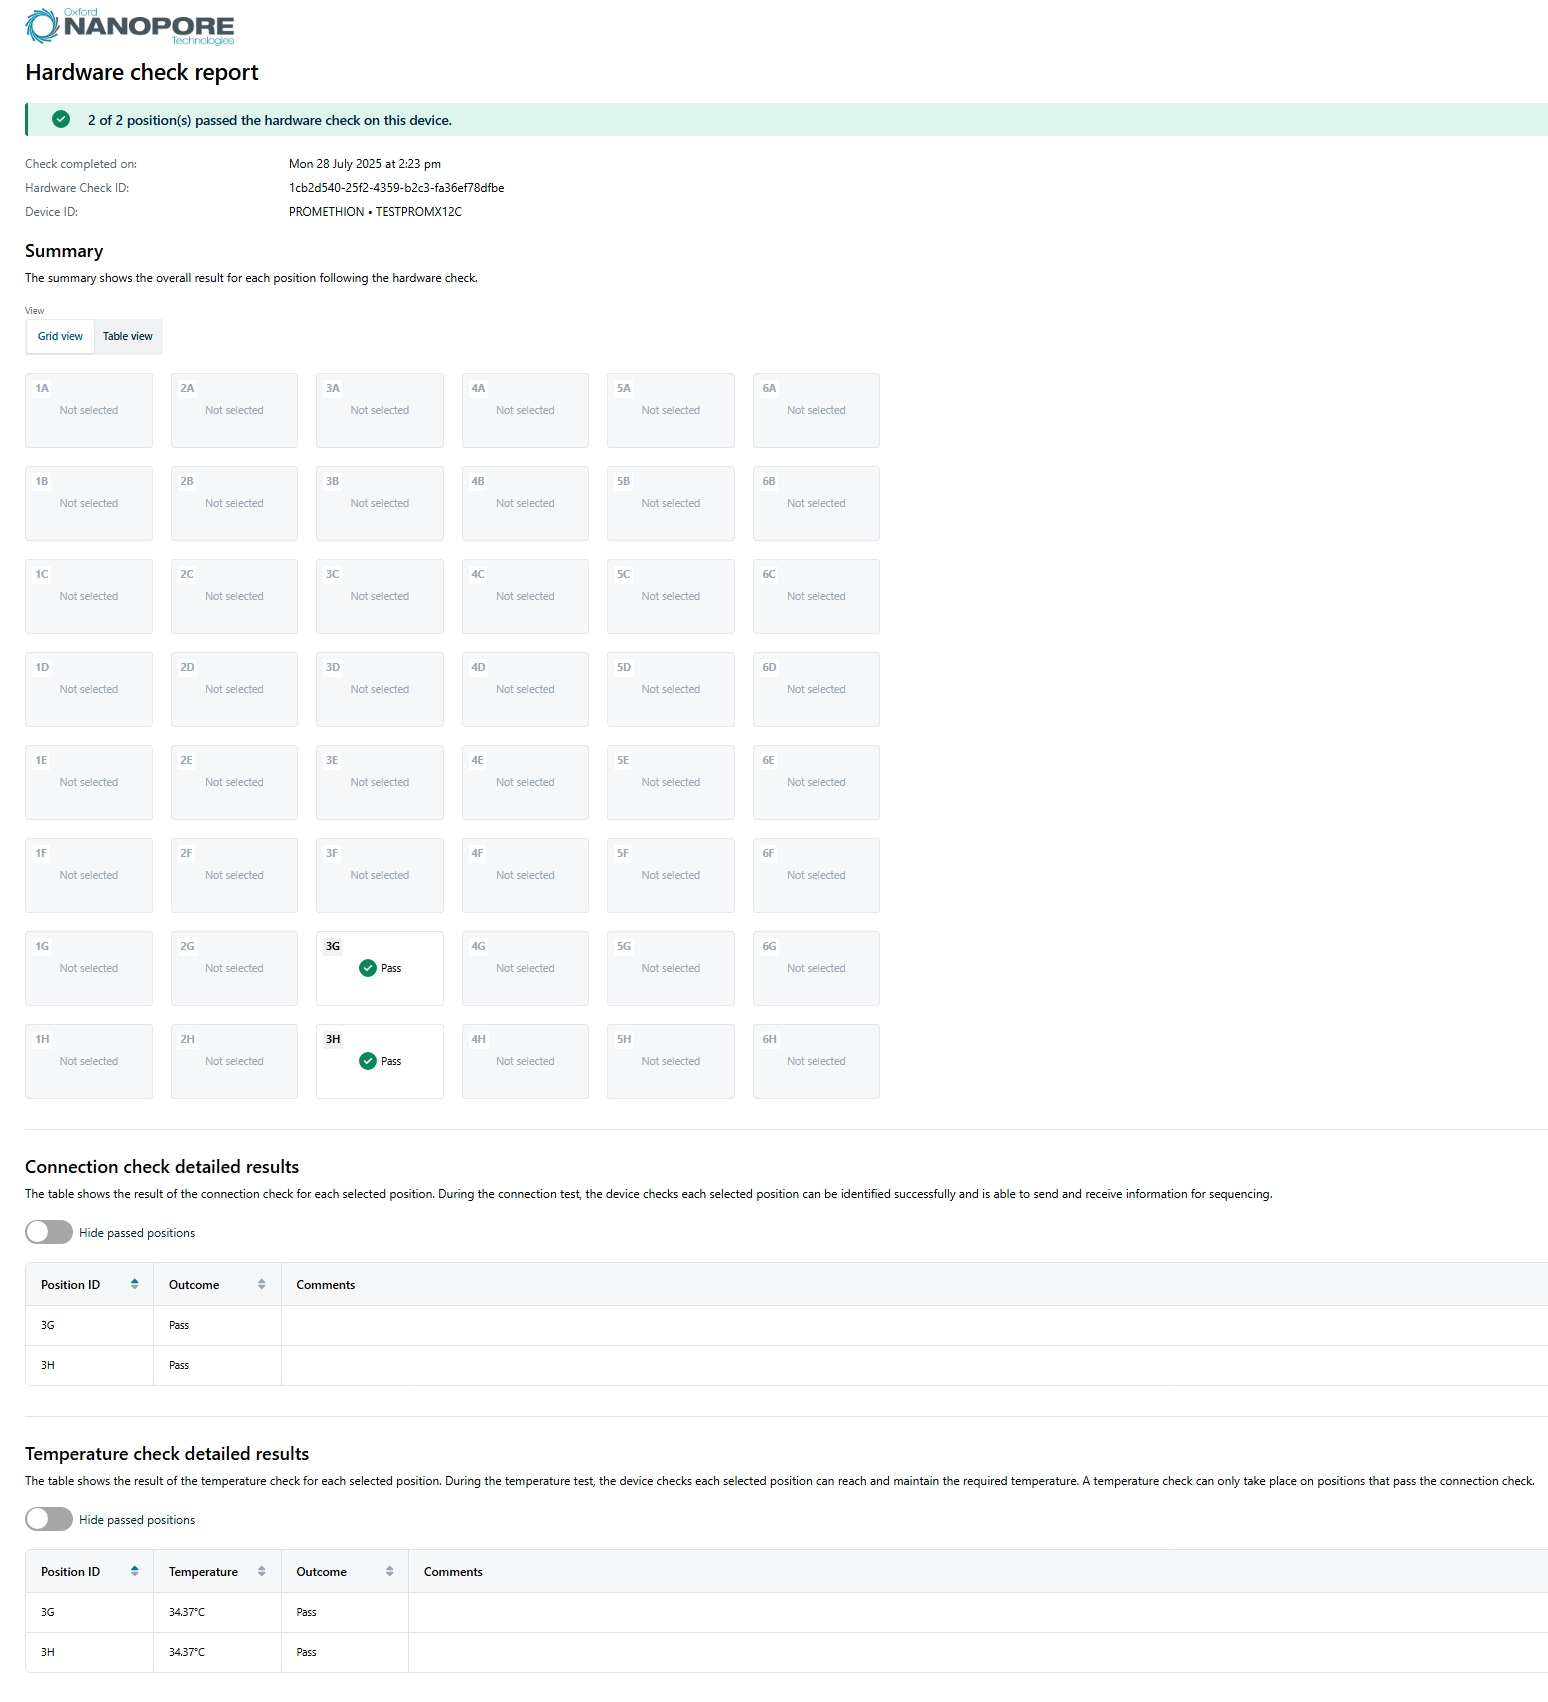
Hardware check report
The hardware check generates a report in HTML format and contains the following information:
- Number of positions that passed/failed the hardware check on the device
- Date and time that the hardware check was completed
- Hardware check ID
- Device ID
Summary shows the overall result for each position following a hardware check.
Connection check detailed results contains information on whether the connection check passed or failed for the selected position with the option to hide passed positions.
Temperature check detailed results contains information on whether the temperature check passed or failed for the selected position with the option to hide passed positions.
An example report from a PromethION 48 is shown below:
Do not store the CTCs in the flow cell positions when the platform/position is not in use.
Do not leave the CTCs in the Sequencing Unit flow cell positions once the unit is powered down, and do not insert the CTCs until the Sequencing Unit is powered on and the position is required for a Hardware check.
Store the CTCs in dry conditions at room temperature.
8. Flow cell check
消耗品
- PromethION Flow Cell
装置
- PromethION sequencing device
Flow cell check
We strongly recommend performing a flow cell check before loading a DNA or RNA library to assess the number of pores available.
Oxford Nanopore Technologies will replace any flow cell that falls below the warranty number of active pores within 12 weeks of purchase, provided that you report the results within two days of performing the flow cell check and you have followed the storage recommendations.
| Flow cell | Minimum number of active pores covered by warranty |
|---|---|
| Flongle Flow Cell (FLO-FLG001) | 50 |
| MinION/GridION Flow Cell | 800 |
| PromethION Flow Cell | 5000 |
After taking flow cells out of the fridge, wait 20 minutes before inserting the flow cell into the PromethION for the flow cell to come to room temperature. Condensation can form on the flow cell in humid environments. Inspect the gold connector pins on the top and underside of the flow cell for condensation and wipe off with a lint-free wipe if any is observed. Ensure the heat pad (black pad) is present on the underside of the flow cell.
Load the flow cells to be run into the docking ports of the PromethION.
Insert the chip connector fully into the docking port. Take note to ensure the latch to hold the chip in place clicks in.
Correct insertion of PromethION flow cells into a PromethION 24/48 device
Line up the flow cell with the connector (horizontally and vertically) and smoothly insert it into position.

Press the flow cell down firmly into the loader, and ensure that the latch engages.

Insertion of the flow cell at the wrong angle can damage the pins on the PromethION and affect your sequencing results. If you find the pins on a PromethION position damaged, please contact support@nanoporetech.com for assistance.

Navigate to the start homepage and click 'Flow cell check'.

When you see the flow cell type and flow cell IDs recognised, click Start to begin.

You will be automatically navigated to the Sequencing Overview page.
A loading bar appears under the flow cell during the checks.
This example is a Flongle CTC (loading bar highlighted in red). 
Flow cell health indicators
The quality of the flow cell will be shown as one of the three outcomes:
Yellow exclamation mark (Flongle flow cell): The number of sequencing pores is below warranty. Take the flow cell out of the device, re-insert it and run a flow cell check again. If the flow cell is still below warranty, contact support@nanoporetech.com
Green tick (MinION flow cell): The number of sequencing pores is above warranty.
Question mark (PromethION flow cell): A flow cell check has not been run on the flow cell during this MinKNOW session.
![]()
Note: The indicator of quality will only remain visible during a MinKNOW session. Once the MinKNOW session has ended, the status of the flow cell will be erased.
9. Sequencing and monitoring the experiment
For instructions on how to set up a sequencing experiment and how to monitor the progress of the experiment, refer to the MinKNOW protocol in the Nanopore Community.
10. Data management
From MinKNOW version 21.02 onwards, we have added new functionality to enable smoother data transfer off the box during a sequencing run. The instructions below are an example method to mount an external NFS and transfer data. Please consult your local IT department before implementing any code to ensure it is compatible with the local infrastructure and the correct permissions are in place.
Mount your local NFS file system on the device (note that Linux mounts a remote filesystem into a directory locally). Below is an example setup through the terminal:
prom@PCT0001:~$ sudo su -
prom@PCT0001:~$ apt install autofs
prom@PCT0001:~$ echo -en “+auto.master\n/nfs /etc/auto.ont\n” > /etc/auto.master prom@PCT0001:~$ echo -en "NETWORKSTORAGE -nfsvers=3,rw,bg,async,actimeo=300,soft,intr,noatime,tcp,nolock IPADDRESS:/PATH/TO/SHARE" > /etc/auto.ont prom@PCT0001:~$ ln -s /nfs/NETWORKSTORAGE /media/NETWORKSTORAGE prom@PCT0001:~$ ls -al /media/NETWORKSTORAGE/*
Install the latest version of the MinKNOW software:
prom@PCT0001:~$ sudo apt update prom@PCT0001:~$ sudo apt install ont-promethion-release
Make a source directory that your experiments will be saved to in /data/ , for example:
prom@PCT0001:~$ mkdir /data/data-offload
Make a destination directory on your networked storage. This also tests that the ‘prom’ user can write to the networked storage:
prom@PCT0001:~$ mkdir /media/mounted_drive/destination_directory/
As root, edit /etc/systemd/ont-platform-data-offload.conf to set the SOURCE_DIR and DESTINATION_DIR variables. SOURCE_DIR is the directory the PromethION software writes to, and DESTINATION_DIR is on your networked storage.
prom@PCT0001:~$ sudo vi /etc/systemd/ont-platform-data-offload.conf

A log of the actions taken by the script will be written to /data/data-offload.log
Start your sequencing in the MinKNOW UI, setting the output location to SOURCE_DIR set above.

We currently recommend manually controlling the service, as the data offload activity could affect active runs.
To start the offload service as root:
sudo systemctl start ont-platform-data-offload
To stop the offload service as root:
sudo systemctl stop ont-platform-data-offload
To check that the service is running, run the following command:
sudo systemctl status ont-platform-data-offload
Data transfer speeds will depend on local network infrastructure. Oxford Nanopore recommends a 10 Gbps (PromethION) connection is used to maximise transfer speeds.
Initially, write the data directly to the internal SSD drives. Writing to a networked drive is not currently supported.
11. Shutting down
Shutting down your PromethION 24/48
The PromethION Data Acquisition Unit requires a stepwise, processed shut down, otherwise you may face problems e.g. when recognising flow cells.
Follow the instructions in this section to ensure you do not face errors with your PromethION from incorrectly shutting down your device.
Remove all flow cells from the device.
Navigate to Device Settings in the admin interface.

Select Shutdown.
Click Shut Down in the pop-up to confirm.

Do not click on Reboot, as this will lead to errors in recognising the flow cells when starting an experiment.
Switch off the Sequencing Unit using the switch on the back of the device.

Turn off the device at the mains supply, if you are using mains power.
After powering off the device, wait for 2 minutes before powering the device back on. If you are power cycling the device, do not use the "Restart" option while shutting down, as this may lead to the Data Acquisition Unit not recognising the Sequencing Unit.
12. Stopping a sequencing run and shutting down
Stop your sequencing run through the MinKNOW UI and wait for the sequencing to terminate.
To stop the experiment during sequencing, click Stop (red button) using the Run controls on the Experiments page.
This is only necessary if you want to stop your run before the end of the set run time.

Confirm to stop experiment by clicking on one of the two options:
- Stop sequencing which will start catch-up basecalling.
- Stop sequencing and basecalling which will stop both sequencing and basecalling immediately.

Once sequencing is complete, generate a run report.
A run report containing information about the sequencing run and performance graphs are automatically generated. To manually generate a run report, click Export run report and select the experiment to export.

For more information about the run report, please see the Run report section in MinKNOW.
Before shutting down the device, check that no sequencing, basecalling, or analysis is running on the device.
Navigate to Device Settings and click 'Shut down'.

Do NOT select 'Reboot'. This will lead to errors in recognising the flow cells when commencing an experiment.
Switch off the Sequencing Unit using the switch on the back of the device.

Turn off the device at the mains supply, if you are using mains power.
After powering off the device, wait for 2 minutes before powering the device back on. If you are power cycling the device, do not use the "Restart" option while shutting down, as this may lead to the Data Acquisition Unit not recognising the Sequencing Unit.
13. Updating the software via the UI
Updating the software
Oxford Nanopore Technologies will post a release note when new software or updates go out via the Nanopore Community.
We urge you to update as soon as reasonably possible after the release has been made available.
Please note, you will not be able to update your device if connected remotely or if a sequencing run is in progress.
Open the MinKNOW UI via the desktop icon and the auto-updater will automatically check for updates when connected to the device.
A dialogue box will open when a new update is available.
Select Get Update to update the device software automatically.
Updates may be skipped. However, we recommend to update the device as soon as updates are available. Some updates will be mandatory to use the device and are unable to be skipped.

Note: For MinION Mk1B/Mk1D, clicking Get Update will open the Software Downloads page on the connected computer for you to download the updated MinION software.
You can also update the device from the Software page of the Host settings.
Navigate to Software in the Host settings and click Get Update to open the installer window.
An update button will only appear when a new version of the software is available to download.
Note: For MinION Mk1B devices, clicking Get Update will open the Software Downloads page on the connected computer for you to select and download the updated MinION software.

Click Install Update in the installer window to download the new update.
A change log for the update is available in this dialogue box.

Wait for the software to update; this may take several minutes.

The installer window will notify you when the update is complete.

After the update has completed successfully, complete a full power cycle to reboot the device.
Re-installing MinKNOW
In some cases (e.g. if there is a problem with the version of MinKNOW that you are using), it may be necessary to re-install the software. To do this, first do a full uninstall of the current version by following the instructions in the Support article: How to uninstall MinKNOW Software for the MinION Mk1B, Mk1D and P2 Solo Devices.
14. (Advanced) Updating the software via the Terminal
Obtain the latest updates
After successfully checking the hardware, you should update to the latest software release. To do this, enter the following commands into the terminal:
sudo apt clean
sudo apt update
sudo apt install ont-promethion-release
The default sudo password is __prom__; change this to ensure the security of your device. Once these commands have completed successfully with no errors, turn off the device using the following command. ``` sudo poweroff ```
Then turn the device on again to complete a full power cycle.
Updating the device in the future
Oxford Nanopore Technologies will post a release note in the Nanopore Community when new software or updates to the device go out.
We urge users to update as soon as reasonably possible after the release has been made available.
Keep the device up-to-date with Linux security updates, in line with advice from your local IT department.
Note: It is specifically required that you make outbound-only access to the internet over port 443 to enable updates through your network Firewall.
15. (Advanced) Downloading the ISO image and burning it to a USB drive
Overview
The instructions below can be used to create a bootable USB drive that can be used to rebuild the OS on your device.
These instructions are for users who did not receive a USB drive with the ISO image. If you have received a USB drive, proceed to the next step: "How to boot from USB".
We strongly recommend transferring your data to backup storage even if you select an option that keeps the data. This is because ISO rebuilds can be corrupted halfway through (e.g. due to a USB disconnection, power cut etc.).
To download the latest ISO image, please contact 'support@nanoporetech.com'.
Burning the ISO image to a USB drive
Appropriate software for burning the ISO image is:
- Rufus on Windows
Note: The alternate ISO burning tool balenaEtcher does not work for our ISO image. You will need access to a computer running Windows and may need Administrator rights to install the Rufus software.

When burning the ISO image, use the settings below (it must use an EFI/GPT boot):
- Partition scheme: GPT
- Target system: UEFI
The USB drive should have the specification below:
- Must be 64 GB or larger
- USB 3.0 recommended
- UEFI boot option must be used
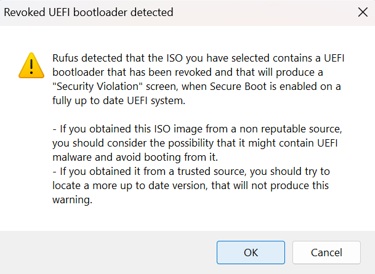
After clicking START, you may see the warning below pop up. Click OK to proceed.
Note: We recommend flashing two USB drives with a different vendor as a backup. Common USB drives can fail to reimage devices with no obvious root cause.
16. How to boot from USB
Power off the PromethION 24/48.
Insert the bootable USB into the blue USB port (USB 3.0) port on the back of the device.
Before powering on the device, prepare to press F11 on the keyboard.
Power on the PromethION 24/48.
a. Repeatedly press F11 on the keyboard to enter the Boot Menu.

b. Under Please select boot device, use the keyboard arrow keys to select UEFI OS (USB key name) and press Enter.

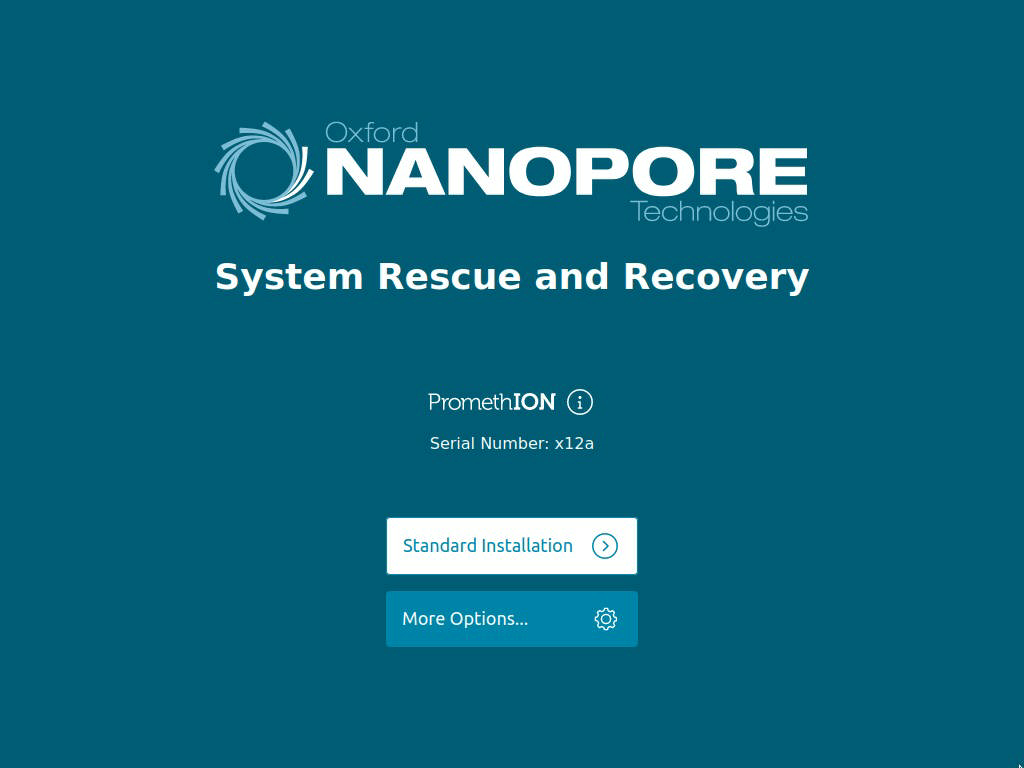
On the "Platform Rescue & Recovery" screen, highlight “Customer Factory Reset image XX.YY” (XX.YY specifies the image version). Then click "Enter".

This does the following:
- Keeps network configuration
- Keeps hostname
- Keeps data
- Does not clear the metadata or format all the disks
Note: The Standard Installation may take several minutes to load. Only use the other options if instructed to do so by Oxford Nanopore Technologies Technical Support.
Click "Standard Installation".
Note: in some instances, you may see the following screen. If this happens, please contact Support.

You will see an install page with progress bars. The device will reboot several times during the installation, and you may be presented with system messages showing errors. This is expected behaviour, and you can leave the device to complete the installation. The entire process will take ~1 hour to complete.

e.g. first boot screen:

second boot screen:

third boot screen:

Once the rebuild process has completed, the standard login screen will be displayed. Log in using the password: prom

Power cycle the device. Once powered down, wait for 60 seconds, then remove the USB.
Power on the device.
Log into the device using the password: prom

Double-click the MinKNOW icon located on the desktop to open the MinKNOW UI.

Log into MinKNOW using your Community credentials.
You will be prompted to enter your email address and Nanopore password:
Check that all flow cell positions are recognised and that the device serial number is correct.
Insert the Configuration Test Cells into the device and perform a hardware check.
Please refer to the hardware check instructions for the P24/48.
The ISO restore is now complete.
17. Troubleshooting your device
If there are any issues associated with your device or sequencing, please contact Technical Services.
To find our most common FAQs, please see the support section for MinKNOW here.
In most cases where troubleshooting is required, we recommend exporting your logs and sending them to Technical Services.
Help feature and support link from MinKNOW.
The Nanopore support hub can also be accessed directly from your MinKNOW UI.
In the top right of MinKNOW you will see the "Help" option:

Clicking this option will bring you to a page with a link and a QR code:

On larger devices such as the GridION and PromethION 24/48, and devices such as the MinION Mk1B/Mk1D and P2 Solo, clicking the link will directly bring you to the Nanopore support page.
On devices such as the P2 Integrated and MinION Mk1C, you will be able to scan the QR code with another device, or type in the shortened URL on another device to quickly reach the support hub.
To export logs:
For the PromethION 24/48, PromethION 2i, GridION and PromethION 2 Solo connected to a GridION:
- Click Export in the Export Logs section.
When you have successfully exported the logs, you will be notified of where they are located below the button. The logs will be downloaded as a TGZ file in the logs directory.
You can change the location of the logs by using the file manager, where you can easily retrieve them without needing SSH:
- Click on the file next to Logs exported to: in the Export Logs panel. This will open where the logs are located in the File Manager of MinKNOW.
- Use the control panel in the lower right corner of the File Manager to move the log files.

If the PromethION 2 Solo is connected to a stand-alone computer
Log files for each sequencing experiment can be found in:
Windows: C:\data\logs
macOS: /private/var/log/MinKNOW
Linux: /var/log/minknow
To remove logs and temporary data:
In the "Help" page, click Clean up in the Clean Up Files section and confirm in the in the pop-up.
Note: Run data will not be deleted. Logs and temporary data will be removed.

To repair device issues:
Click Run repair in the troubleshooting section of the Help page and confirm in the pop-up. MinKNOW will attempt to repair the following issues:
- Ensure required directories under "/data" exist and have the correct ownership and permissions
- Ensure required files under "/data" have the correct ownership and permissions
- Ensure the GPU is working at maximum performance
- Ensure that Bluetooth is disabled

