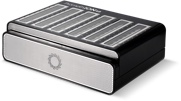
PromethION 24/48 用户手册 (PIC_1013_v1_revAH_15Dec2025)
PromethION: Protocol
PromethION 24/48 用户手册 V PIC_1013_v1_revAH_15Dec2025
FOR RESEARCH USE ONLY
Contents
概览
安装
测序前检查及运行测序
测序实验结束后
更新软件
PromethION上的操作系统更新
常见问题解答
概览
Document version: PIC_1013_v1_revAH_15Dec20251. 测序设备信息
PromethION 24 和 48
PromethION 是一款台式测序设备,支持同时或独立运行多达24张(适用于PromethION 24和PromethION 24 Combined)或48张(适用于PromethION 48)测序芯片,并通过内置高性能软件实时进行碱基识别和数据分析。

技术规格
| 组成 | 规格 |
|---|---|
| 尺寸和重量 | PromethION 24 测序单元: 190(高)x 590(宽)x 430(深)mm 23kg 重 PromethION 48 测序单元: 190(高)x 590(宽)x 430(深)mm 30kg 重 数据采集单元: 470(高)x 178(宽)x 440(深)mm 26kg 重 |
| 电源 | 2x 供数据采集单元使用的电源 随设备提供C13电缆 主电源电压:200-240V交流电(50/60 Hz) 峰值功耗:2450 W 1x 供测序单元使用的电源 随设备提供C13电缆 主电源电压:100-240V交流电(50/60 Hz) 峰值功耗:1200W |
| 计算规格 | PromethION P24: 30TB 固态硬盘存储、384GB 内存 PromethION P48: 60TB 固态硬盘存储、384GB 内存 PromethION 24/48 A系列: 60TB 固态硬盘存储、512GB 内存、4xAmpere-系列GPU 共有配置: 用于Ubuntu 操作系统及碱基识别流程编排的Intel CPU PromethION 加速器 |
| 预装软件 | Ubuntu OS、PromethION OS、MinKNOW |
| 环境条件 | 请在+18℃至+22℃的环境温度范围内使用本测序仪* |
*电子设备的工作环境温度为+5℃至+40℃。
常见问题
请点击此处,查看测序设备相关的常见问题解答。
2. 包装盒内容物
PromethION 24/PromethION 48包装
PromethION 24/48 A系列
该设备可发往全球大多数国家,分为两个包装:数据采集单元和测序单元。设备在常温(15–25°C)下储存和运输。
PromethION 24 Combined
该设备仅发货至指定国家。PromethION 24 Combined设备包含数据采集单元和测序单元,二者合装在一个箱子中。设备需在常温(15–25°C)下储存和运输。 PromethION 24 Combined 必须由Oxford Nanopore Technologies的现场服务工程师进行拆箱和安装。
包装盒内容物- PromethION 24
- PromethION 24 测序单元
- PromethION 24 数据采集单元
- 3x 国标C13电源线
- 24x 配置测试芯片(CTC)
- 2x PCIe线缆
- 2x USB A 转 迷你USB 线缆
- 1x USB A 转 USB B 线缆
- 1x MiniDP/DisplayPort 传输线
- 1x USB-A 闪存盘(内有ISO重置镜像)
- 1x USB-C/USB-A 转接头
包装盒内容物- PromethION 48
- PromethION 48 测序单元
- PromethION 48 数据采集单元
- 3x 国标C13电源线
- 48x 配置测试芯片(CTC)
- 3x PCIe线缆
- 3x USB A 转 迷你USB 线缆
- 1x USB A 转 USB B 线缆
- 1x MiniDP/DisplayPort 传输线
- 1x USB-A 闪存盘(内有ISO重置镜像)
- 1x USB-C/USB-A 转接头
LED状态指示灯
LED 指示灯用于显示每个测序芯片位置的状态,具体灯光模式如下:
- 无灯光:未检测到测序芯片
- 常亮蓝光:测序芯片已就绪
- 常亮绿光:脚本运行中
- 常亮白色:脚本运行完成。LED指示灯会在校准结束后显示白色
- 常亮红色:固件错误,或测序单元与数据采集单元之间出现通信故障
3. 安装并启动测序设备
如果您购买的是 PromethION 24 Combined,必须由 Oxford Nanopore Technologies 的现场服务工程师进行拆箱和安装。
准备安装
在安装测序仪之前,请配置好:
- 支持2x10Gbps光纤连接的 SFP+模块和电缆或支持2x10Gbps铜缆连接的电缆(宽带网电缆标准不低于Cat6a)
- 一条用于硬件检测的铜缆
- 提供如下配置的光纤或铜缆端口:
- 可通过DHCP服务器获取IP地址
- 可对互联网上的 80及443端口 进行出站访问
- 1x 兼容VGA的显示器(用于原版PromethION 24/48数据采集单元)
- 1x 兼容VGA或DisplayPort的显示器(用于新版 PromethION A 系列数据采集单元)
- 1x VGA 线缆
- 1x 通过USB连接的键盘
- 1x 通过USB连接的鼠标
- 3x 电源/墙壁插座,供PromethION数据采集单元和测序单元使用
- 1x 电源/墙壁插座,供显示器使用
- 非必需:连接C14电线的不间断电源
推荐的实验室摆放位置
- 请将仪器至于一张稳固、清洁的实验台上。如果您使用PromethION 24 Combined设备,请确保测序单元和数据采集单元并排安装。该设备所需的工作台面积为167cm x 75cm。
- 请确保电源、宽带网接口 及/或 光纤接口彼此靠近。
- 请确保电源插头处在方便插拔的位置,以便在紧急情况下将测序仪断开。
- 测序应在+18℃至+22℃的室温下进行,且在测序开始前设备上盖处于闭合状态。
- 请确保仪器四周均留有30厘米的空间,以保证空气流通。
- 请勿覆盖任何通风口。
- 警告 - 操作过程中仪器后部会发热。
打开测序设备包装,将仪器置于操作台上。
请将测序单元置于操作台上,并将数据采集单元置于距测序单元两米的范围内。
如果您使用的是 PromethION 24 Combined,必须由 Oxford Nanopore Technologies 的现场服务工程师进行拆箱和安装。 安装完成后,请从第9步开始操作。
PromethION 24 测序单元和数据采集单元

PromethION 48 测序单元和数据采集单元

请按下图所示将网线插入对应端口(铜缆或光纤)。
在设备安装过程中,请务必根据本文件第 4 节中的 网络配置 要求,连接网线。该网络连接对于下述操作至关重要:
- 下载最新版软件
- 执行设备的硬件检测 请确保网络已连接、并正确配置后再继续后续设置流程。
开始设置前,请确认网络已正常连接且配置无误。

将 SFP+ 模块插入下方所示端口:
若采用光纤连接方式,请将所选的 SFP+ 模块 插入下图所示的数据采集单元背面端口中:

以下为单元间连接的第一步。请使用PICe线缆缆连接测序单元和数据采集单元。
使用PICe线缆连接位于测序单元和数据采集单元背面的端口。
请注意: 端口采用颜色编码,例如:红对红、蓝对蓝、绿对绿(仅适用于 P48)。较早版本的数据采集单元采用不同的颜色编码,请根据设备上的颜色标识正确安装。
PromethION 24

PromethION 48

以下为单元间连接的第二步。 使用USB线缆连接测序单元和数据采集单元。
PromethION 24 请按下图所示,使用以下线缆连接测序单元和数据采集单元:
- 2x USB A 转 迷你USB 线缆
- 1x USB A 转 USB B 线缆

PromethION 48 请按下图所示,使用以下线缆连接测序单元和数据采集单元:
- 3x USB A 转 迷你USB 线缆
- 1x USB A 转 USB B 线缆

将外围设备与相应接口连接。
插入:
1a. 显示器VGA线缆(如使用原版PromethION 24/48数据采集单元)
1b. 显示器VGA/miniDP线缆*(如使用PromethION A系列数据采集单元)
2. USB 键盘
3. 将USB鼠标插入空余的USB A端口
* 请选择使用 miniDP 输出接口或VGA 输出接口。两个输出接口不能同时使用。

两条C13电源线与数据采集单元连接,一条C13电源线与测序单元连接。
将随附的两条 C13 电源线插入数据采集单元的顶部,将第三条插入测序单元。将所有电源线连接主电源。
请注意: 我们将提供至少三根适用于设备使用国的、带插头的C13电源线。
打开主电源。按以下顺序打开PormethION各单元:
- 打开测序单元

- 等待3分钟
- 打开数据采集单元

在登录界面,系统将提示您输入设备密码。默认密码为 “prom”,您也可在《快速入门指南》(Quick Start Guide)中找到该密码。随后,系统会要求您更新密码,请按照以下要求设置新密码:
- 至少包含 8 个字符
- 必须包含一个大写字母和一个小写字母
- 必须包含一个数字或特殊字符
- 不得使用回文(例如:“racecar”)
- 与之前使用的密码须有至少两个字符不同
双击桌面上的MinKNOW图标,打开MinKNOW图形用户界面。
![]()
我们建议您使用纳米孔社区的账户信息登录MinKNOW软件。
您须连接到互联网方可登录。
用户可在此页面的右下角选择界面语言。

界面将提示您输入电邮地址和纳米孔密码:
如您在登录时遇到问题,请通过我们的纳米孔微信公众号(NanoporeSupport)或社区支持通道(https://community.nanoporetech.com/support) 联系我们的客服。与此同时,您可点击 Continue as guest ,以访客身份暂时使用MinKNOW。
在“Connection Manager”(连接管理器)下选择连接至计算机上的测序仪。

随即进入“Sequencing Overview”(测序概览)页面。页面上会显示已建立连接的测序芯片。

4. 网络设置和连接
更改您的网络配置
PromethION 24 或 PromethION 48的网络参数配置须适合您当地的网络环境。
警告! 更改 PromethION 网络参数可能导致设备无法正常工作。
如您对PromethION网络设置的配置参数存疑,请联系本地IT部门。
网络要求
自 Noble 版本起,您可通过 图形界面(GUI) 或 命令行(CLI) 来配置网络设置。例如,您可以先通过命令行完成基础配置,再在 GUI 中进行后续调整,这样通常会更为便捷。
但是对于 Focal 版本,我们仍建议:单一网络配置使用 GUI,绑定(bonded)网络配置使用命令行。
PromethION 使用铜线或光纤接口与您本地网络基础设施连接。下图标注了位于PromethION背面的端口的类型: 
连接将用于:
- 向 Oxford Nanopore Technologies 发送遥测* 信息。
- 接收设备的软件和固件更新
- 将生物测序数据传输至您本地的存储基础设施
*用户须自备网线进行配置。
* 遥测包含有关测序运行条件和设置的元数据,只记录一般信息(如序列长度和Q值),不包括具体基因组信息。
您可使用铜缆或光纤连接进行数据传输,但二者不能同时使用。
Oxford Nanopore 仅为铜缆 或 光纤连接方式提供支持及相关脚本。如您所在机构具备专业网络团队,可按需同时使用铜缆与光纤。
如由您机构的专业网络团队进行配置,则可同时启用铜缆与光纤,并实现多路径路由。但请注意,Oxford Nanopore 无法 为此类配置提供协助或支持。
您可使用铜缆或光纤连接进行数据传输。请您根据本地网络环境选用网络连接方式。
请注意: 如无相关专业人员,请 仅 选择铜缆 或 光纤其中一种方式进行连接。未经专业团队配置而同时使用两种方式将导致网络故障。
下图汇总了可用的连接选项。请参阅以下说明以确保正确设置 PromethION 网络连接。

设置铜缆连接的说明
通过单铜缆端口连接DHCP服务
- 打开终端窗口,输入以下命令:
ont-network-settings --dhcp --interfaces eno2 --overwrite
- 关闭PromethION,再重新启动。
连接: 此配置仅使用下部的 RJ45 端口。 
通过双铜缆端口连接DHCP服务
- 打开终端窗口,输入以下命令:
ont-network-settings --dhcp --interfaces copper --bond failover --overwrite
- 关闭PromethION,再重新启动。
请注意: 如使用 LACP/Cisco/802.3ad,请输入:
--bond lacp
请确保网络交换机已按要求进行配置。LACP 需预留两个端口。
连接: 此配置需使用两个 RJ45 端口。 
通过双铜缆端口连接静态IP地址
- 打开终端窗口,输入以下命令:
ont-network-settings --address 1.1.1.1 --subnet 255.255.255.0 --gateway 1.1.1.254 --dns 1.1.1.2,1.1.1.3 --search mycompany.local --bond failover --interfaces copper --overwrite
- 关闭PromethION,再重新启动。
请注意: 您必须根据站点的网络配置更改上述 IP 地址。
连接: 请同时使用两个RJ45端口或仅使用底部端口进行配置。 
光纤连接的设置说明
通过单光纤端口连接DHCP服务
- 打开终端窗口,输入以下命令:
ont-network-settings --dhcp --interfaces fibre --overwrite
2. 关闭PromethION,再重新启动。
连接: 此配置仅使用右侧的光纤端口。

通过双光纤端口连接DHCP服务
- 打开终端窗口,输入以下命令:
ont-network-settings --dhcp --interfaces fibre --bond failover --overwrite
- 关闭PromethION,再重新启动。
请注意: 如使用 LACP/Cisco/802.3ad,请输入:
--bond lacp
请确保网络交换机已按要求进行配置。LACP 需预留两个端口。
连接: 此配置需使用两个光纤端口。 
通过双光纤端口连接静态IP地址
- 打开终端窗口,输入以下命令:
ont-network-settings --address 1.1.1.1 --subnet 255.255.255.0 --gateway 1.1.1.254 --dns 1.1.1.2,1.1.1.3 --search mycompany.local --bond failover --interfaces fibre --overwrite
- 关闭PromethION,再重新启动。
请注意: 您必须根据站点的网络配置更改上述 IP 地址。
连接: 请同时使用两个光线端口或仅使用右侧端口进行配置。 
验证 IP 地址
您可使用命令ifconfig验证静态或动态(DHCP)IP地址的配置是否正确。
返回信息将包含宽带网络的IP地址,示例如下:
prom@PRO00001:~$ ifconfig
docker0: flags=4099<UP,BROADCAST,MULTICAST>  mtu 1500
        inet 172.17.0.1  netmask 255.255.0.0  broadcast 172.17.255.255
        ether 02:42:35:39:60:40  txqueuelen 0  (Ethernet)
        RX packets 0  bytes 0 (0.0 B)
        RX errors 0  dropped 0  overruns 0  frame 0
        TX packets 0  bytes 0 (0.0 B)
        TX errors 0  dropped 0 overruns 0  carrier 0  collisions 0
eno1: flags=4163<UP,BROADCAST,RUNNING,MULTICAST>  mtu 1500
        inet 10.150.60.13  netmask 255.255.255.0  broadcast 10.150.60.255
        inet6 fe80::78cf:8a5c:26ec:4611  prefixlen 64  scopeid 0x20<link>
        ether 3c:7c:3f:be:02:81  txqueuelen 1000  (Ethernet)
注意: inet 10.150.60.13 netmask 255.255.255.0 broadcast 10.150.60.255 – 该地址需与目标网络保持一致。
5. 更改默认密码和主机名
导航至“Host Settings”(测序设备设置)下的“Device Settings”(仪器设置)板块。
点击“System”(系统)框内的“Reset password”(重置密码)。

在“Change Password”(更改密码)对话框中,输入您当前使用的密码,然后输入新密码。

点击“Reset Password”(重置密码),确认密码变更。
(进阶)通过终端更改默认密码
为确保设备安全,请您在第一时间更改默认密码。
如需修改密码,请打开终端(Terminal)窗口,键入:passwd
按 Enter 键。
终端将显示以下信息,请按照提示更改密码:
prom@PRO00001:~$ passwd
Changing password for prom (为prom更改密码).
(current) UNIX password (当前UNIX密码): prom
Enter new UNIX password(请输入新的UNIX密码): XXXX
Retype new UNIX password (请再次输入新的UNIX密码): XXXX
passwd: password updated successfully (成功更新密码)
请注意: 新的 PromethION/UNIX 密码应符合您所在机构的 IT 安全指南。该密码将用于登录设备,以及执行需要 sudo 权限的操作(例如 Oxford Nanopore Technologies 软件更新),因此请妥善保管。
(进阶)变更默认的主机名
- 如您需要更新设备的主机名,请运行以下命令并将“
”部分替换为您所需的主机名(请省略尖括号“<>”):
sudo -S hostnamectl set-hostname <new_hostname>
- 使用以下命令关闭设备,然后按下设备上的电源按钮重新启动设备:
sudo shutdown -h now
6. (进阶)更新时区并设置本地NTP服务器
更新时区:
首先键入以下命令,找到正确的时区名称:
sudo timedatectl list-timezones
使用以下命令更改时区:
sudo su -
Timezone="Europe/London"
timedatectl set-timezone $Timezone
systemctl restart systemd-timesyncd
设置本地NTP服务器:
请注意: 如使用外部时间服务器,则需访问NTP/123端口。
键入如下命令:
sudo su -
printf "[Time]\nNTP=ntp.ubuntu.com\nFallbackNTP=pool.ntp.org\n" | tee /etc/systemd/timesyncd.conf
timedatectl set-ntp false
timedatectl set-ntp true
systemctl restart systemd-timesyncd.service
hwclock --systohc
timedatectl set-local-rtc 0
如需确认命令是否成功运行,请键入:
timedatectl status
请注意: 与 NTP 服务器同步可能需要几分钟。
7. 硬件检测
硬件检测
如您使用的是新设备或刚完成软件更新,请务必进行硬件检测。
请将所有随附的配置测试芯片(CTC)插入测序设备中。
每列芯片槽均应插入配置测试芯片(CTC)。
请注意:
- PromethION 24 包含三列测序芯片槽,共24个芯片位置。
- PromethION 48 包含六列测序芯片槽,共48个芯片位置。

MinKNOW 界面会在测试芯片插入后自动识别其状态,插槽旁的指示灯将依次显示蓝色(初始化)和绿色(就绪)。
当所有配置测试芯片均就位后,请关闭测序单元的所有上盖。
正确插入PormethION配置测试芯片
请注意:尽管示意图中展示的是常规测序芯片,但其操作方法与配置测试芯片(CTC)相同。
将配置测试芯片与连接器横竖对齐后,即可轻松插入至测序仪的相应位置。

用力下压芯片至插槽,并确认卡夹位置归位。

如插入配置测试芯片的角度出现偏差,可能会损坏PromethION上的引脚:

进入“开始”页面(Start),选择“硬件检测”(Hardware Check)。

在用户界面上选择配置测试芯片。
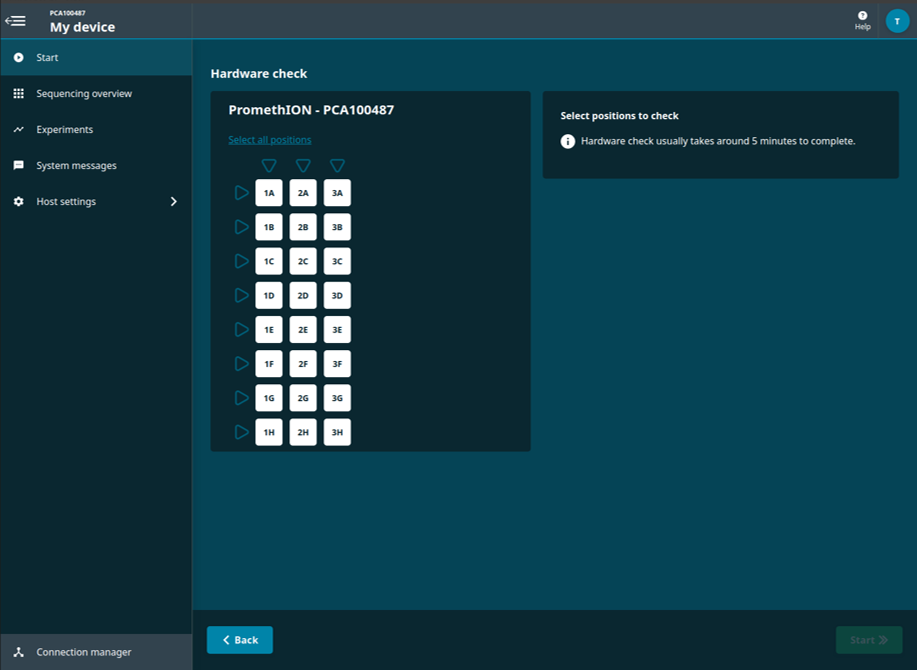
点击屏幕右下角的“开始”(Start)按钮,启动硬件检测。
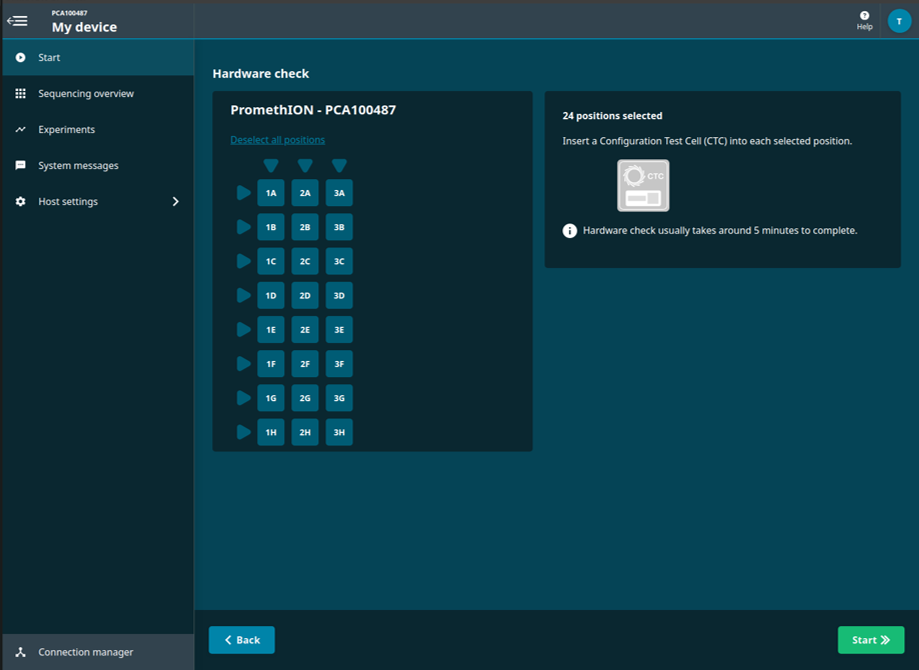
屏幕上将显示硬件检测的进度。

硬件检测完成后,系统将提示所选位置是否通过检测。

您可在“测序概览(Sequencing Overview)”页面查看设备的硬件检测结果。
通过硬件检测:
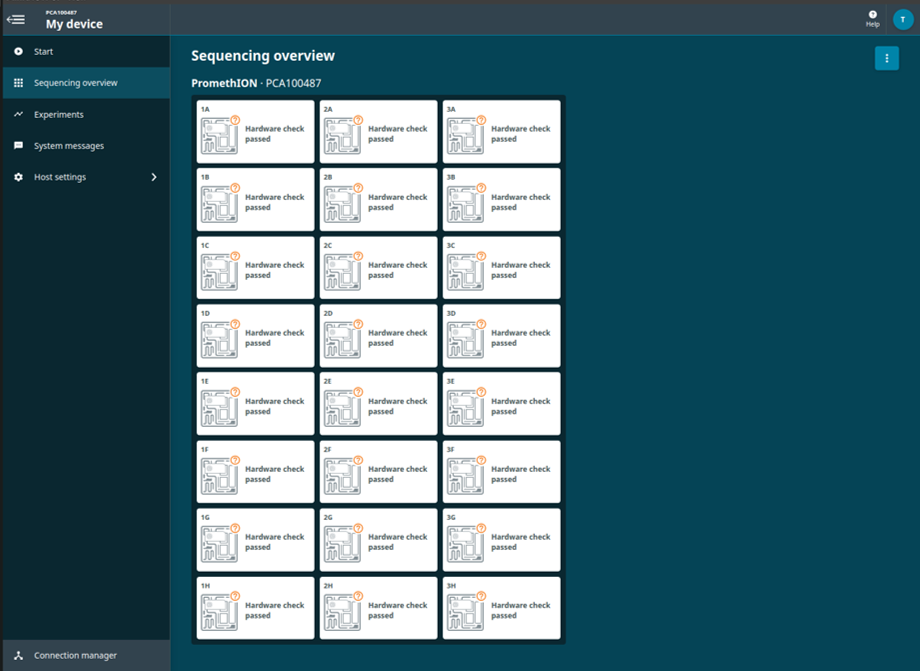
如检测未通过,请取出并重新插入 CTC,再次运行硬件检测。若第二次仍未通过,请联系客户支持(建议您使用在线支持)。
如需查看硬件检测报告,请返回“硬件检测”(Hardware check)页面,点击“查看先前的硬件检测报告”(View previous hardware check reports)。

选择需要导出的报告。
选中的报告将以绿色边框和对勾标记。点击“导出”(Export)即可下载报告。 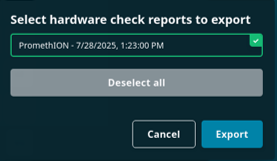
硬件检测报告
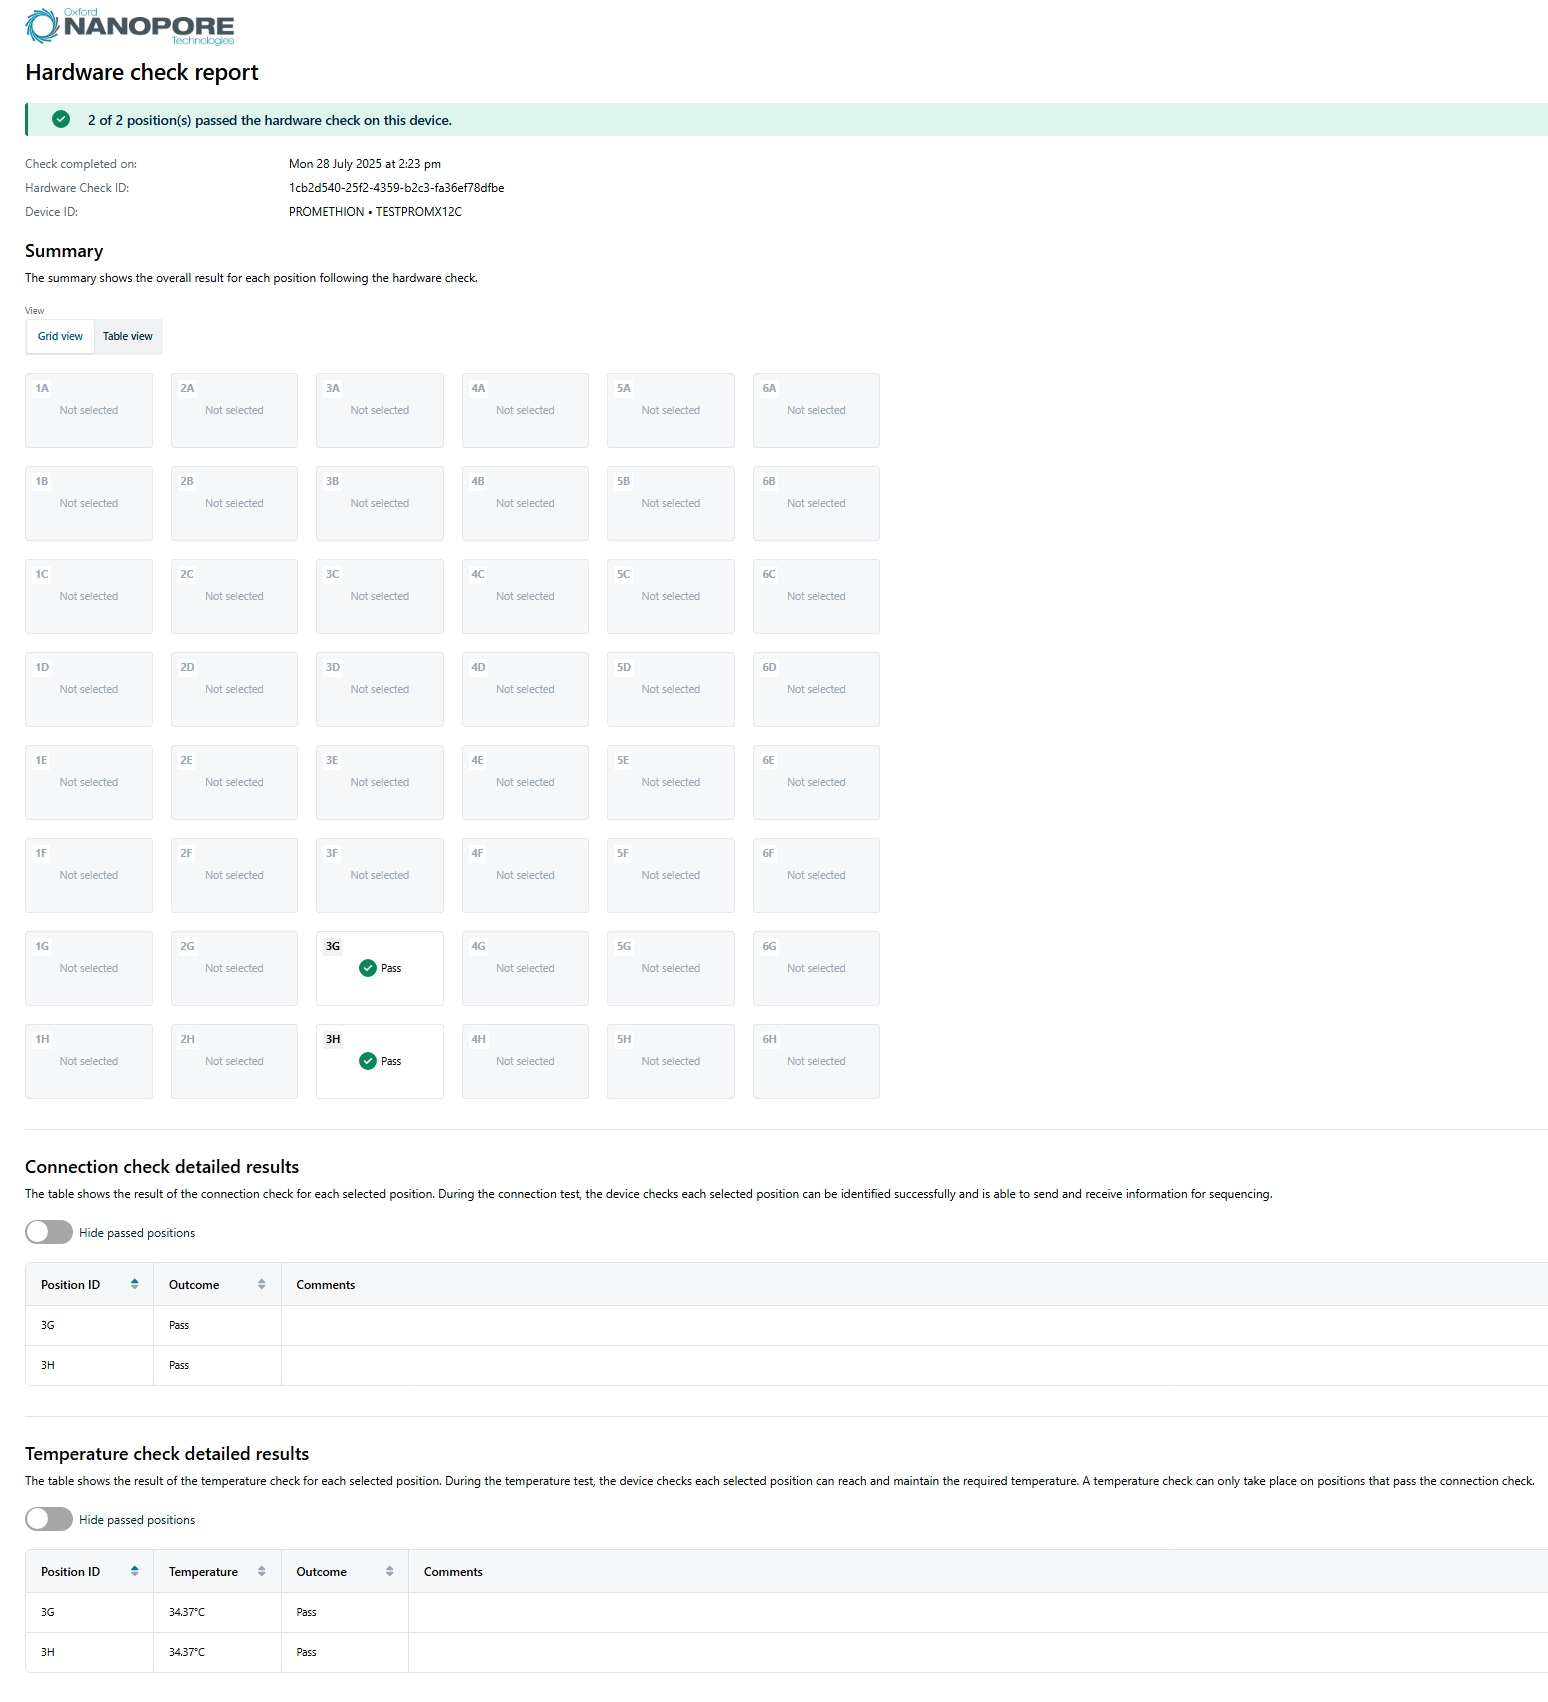
硬件检测将生成一份 HTML 格式的报告,内容包括:
- 设备各芯片位置的硬件检测结果统计(通过/未通过数量)
- 检测完成的日期与时间
- 硬件检测 ID
- 设备 ID
概要(Summary) 显示每个芯片位置的整体硬件检测结果。
连接检测结果(Connection check detailed results) 显示所选芯片位置是否通过连接检测,并可选择隐藏已通过的位置。
温度检测结果(Temperature check detailed results) 显示所选芯片位置是否通过温度检测,并可选择隐藏已通过的位置。
下图为报告示例:
当测序平台/位置未在运行时,请将配置测试芯片从插槽中取出。
关闭测序单元后,请务必将配置测试芯片从芯片槽内取出。且仅当测序单元通电并有 硬件检测 需求时,再将配置测试芯片插入相应位置。
请在室温干燥条件下储存配置测试芯片。
8. 测序芯片质检
耗材
- PromethION 测序芯片
仪器
- 或 PromethION 24/48 测序设备
测序芯片质检
在DNA/RNA文库上样前,请务必对测序芯片的活性纳米孔数进行质检。质检需在您收到测序芯片12周之内进行。Oxford Nanopore Technologies会对活性孔数量少于以下标准的芯片进行替换** :
| 测序芯片 | 芯片上的活性孔数确保不少于 |
|---|---|
| Flongle 测序芯片 (FLO-FLG001) | 50 |
| MinION/GridION 测序芯片 | 800 |
| PromethION 测序芯片 | 5000 |
** 请注意:自收到之日起,芯片须一直贮存于Oxford Nanopore Technologies推荐的条件下。且质检结果须在质检后的两天内递交给我们。
将芯片从冰箱中取出后,请将其置于室温环境孵育20分钟再插入PromethION测序仪。潮湿环境下的测序芯片上可能会形成冷凝水。因此,请检查测序芯片顶部和底部的金色连接器引脚处是否有水凝结。如有,请使用无纤维布擦干。请确保测序芯片底部有热垫(黑色)覆盖。
将待运行的测序芯片插入PromethION上相应插槽的对接端口。
将芯片连接器应完全插入对接端口。请确保用于固定芯片的卡夹卡入原位。
正确插入PormethION测序芯片
将测序芯片与连接器横竖对齐后,即可轻松插入至测序设备的相应位置。

用力下压芯片至插槽,并确认卡夹位置归位。

如插入配置测试芯片的角度出现偏差,可能会损坏PromethION上的引脚并影响测序结果。如您发现PromethION测序仪芯片卡槽上的引脚损坏,请通过电子邮件(Support@nanoporetech.com)联系我们的客服。

导航至“Start”(开始)页面,点击“Flow Cell Check”,打开测序芯片质检页面。

当界面显示测序芯片类型并识别出芯片ID时,点击“Start”(开始)启动芯片质检。

随即进入“Sequencing Overview”(测序概览)页面。
测序芯片下方将有进度栏显示检测进度。
下图以Flongle配置测试芯片(CTC)为例(红框内为进度栏)。

测序芯片健康状况指示框
测序概览(Sequencing Overview)页面会显示测序芯片的质量。质量分为三个等级:
黄色!(图中Flongle测序芯片): 活性测序孔数量低于质保范围。将芯片从测序设备中取出后重新插入,并运行测序芯片质检。如果测序芯片活性孔数仍然低于质保范围,请您发邮件至support@nanoporetech.com。
绿色√(图中MinION 测序芯片): 活性测序孔数量在质保范围之上。
?(图中PromethION 测序芯片): 测序芯片在本次MinKNOW使用期间还未经过质检。
![]()
请注意: 芯片质量指示框仅在当次MinKNOW使用期间可见。一旦该次使用结束,测序芯片的状态将被清除。
10. 数据管理
自MinKNOW21.02版起,我们向MinKNOW中添加了新功能,以实现测序期间更顺畅的数据传输。 以下示例方法向您展示了如何挂载外部NFS及传输数据:在执行任何代码之前,请您咨询当地的IT部门,确保代码与本地基础架构兼容且具有正确权限。
在设备上挂载本地 NFS文件系统(请注意,Linux支持将远程文件系统挂载到本地目录)。以下是通过终端进行设置的示例:
prom@PCT0001:~$ sudo su -
prom@PCT0001:~$ apt install autofs
prom@PCT0001:~$ echo -en “+auto.master\n/nfs /etc/auto.ont\n” > /etc/auto.master prom@PCT0001:~$ echo -en "NETWORKSTORAGE -nfsvers=3,rw,bg,async,actimeo=300,soft,intr,noatime,tcp,nolock IPADDRESS:/PATH/TO/SHARE" > /etc/auto.ont prom@PCT0001:~$ ln -s /nfs/NETWORKSTORAGE /media/NETWORKSTORAGE prom@PCT0001:~$ ls -al /media/NETWORKSTORAGE/*
安装最新版本的MinKNOW软件:
prom@PCT0001:~$ sudo apt update prom@PCT0001:~$ sudo apt install ont-promethion-release
创建源目录,将您的实验保存至 /data/ 中,例如:
prom@PCT0001:~$ mkdir /data/data-offload
在您的网络存储上创建目标目录。同时可以测试“prom”用户是否能写入网络存储:
prom@PCT0001:~$ mkdir /media/mounted_drive/destination_directory/
以root用户身份编辑 /etc/systemd/ont-platform-data-offload.conf,设置 SOURCE_DIR 和DESTINATION_DIR。SOURCE_DIR为 PromethION软件产出数据的写入目录,DESTINATION_DIR为网络存储路径。
prom@PCT0001:~$ sudo vi /etc/systemd/ont-platform-data-offload.conf

脚本所执行操作会被写入/data/data-offload.log日志文件。
在MinKNOW用户界面上启动测序,将输出路径设为上述SOURCE_DIR。

我们当前建议您手动控制服务,因数据卸载可能影响正在运行的实验。
以 root用户身份启动卸载服务:
sudo systemctl start ont-platform-data-offload
以 root用户身份停止卸载服务:
sudo systemctl stop ont-platform-data-offload
如需检查服务是否在运行中,请运行以下命令:
sudo systemctl status ont-platform-data-offload
数据传输速度取决于本地网络基础设施。Oxford Nanopore 建议使用 10 Gbps (PromethION) 带宽以最大化传输速度。
数据首先需直接写入内置固态硬盘。当前不支持写入网络硬盘。
11. 关闭设备
关闭PromethION 24/48
用户须按顺序逐步关闭PromethION数据采集单元,否则可能会遇到问题(如无法识别测序芯片)。
请您按照本节中的说明进行操作,以避免因错误的关机方法导致PromethION出现问题。
将所有芯片从测序设备中取出。
导航至管理界面的下的“Device Settings”(仪器设置)板块。

点击“Shutdown”(关闭)。
在弹出的对话框中,点击“Shutdown”(关闭)确认。

请勿点击Reboot(关闭后重新启动),此举会导致下次实验时,测序芯片识别出现错误。
使用设备背面的开关关闭测序单元。

如使用电源,则请关闭电源。
为确保设备正常运行,请在关闭设备后等待两分钟再重新开启。如果需要对设备进行电源重启(即关闭后再开启),请勿在关机时使用“重启”(restart)选项,以避免数据采集单元无法识别测序单元。
12. 终止运行测序并关闭设备
通过MinKNOW用户界面停止运行测序并等待测序终止。
测序完成后,生成测序实验报告。
系统会自动生成一份实验报告,其中包括测序运行的详细信息和相关性能图表。如需手动生成实验报告,请点击 导出测序实验报告 ,并选择要导出的实验。

有关测序实验报告的详细说明,请参阅 MinKNOW 实验指南中的测序实验报告部分。
关闭设备前,请确保设备上未在运行测序、碱基识别或数据分析。
进入 “仪器设置”(Device Settings),点击 “关闭”(Shut down)。

请勿选择 “关闭后重新启动”(Reboot),否则可能导致启动实验时无法识别测序芯片。
使用设备背面的开关关闭测序单元。

如使用电源,则请关闭电源。
为确保设备正常运行,请在关闭设备后等待两分钟再重新开启。如果需要对设备进行电源重启(即关闭后再开启),请勿在关机时使用“重启”(restart)选项,以避免数据采集单元无法识别测序单元。
13. 通过用户界面更新软件
更新软件
当有新软件或更新时,Oxford Nanopore Technologies 会通过社区发布公告。
我们强烈建议用户在新版本发布后尽快更新。
请注意:用户将无法更新远程连接或正在运行的设备。
通过桌面图标打开MinKNOW用户界面,连接测序设备后,软件的自动更新程序将自动检查更新。
当有新更新可用时,将弹出一个对话框。
选择 Get Update (获取更新)以自动更新软件。
您可以跳过更新,但是我们建议您在 有可用更新时尽快更新软件。 有些更新为仪器使用必需,因此无法跳过。

请注意: 对MinION Mk1B/Mk1D,单击 Get Update (获取更新)将在测序仪所连计算机上打开 软件下载 页面。用户可于该页面下载更新后的 MinION 软件。
用户可以通过“Host settings”(测序设备设置)下的“Software”(软件)板块更新仪器。
导航至“Host Settings”(测序设备设置)下的“Software”(软件)板块。点击“Get Update”(获取更新)以打开安装窗口。
当软件有可下载的新版本时,界面会出现“Update”(更新)按钮。
请注意: 对MinION Mk1B,单击 Get Update (获取更新)将在测序仪所连计算机上打开软件下载页面。用户可于该页面下载更新后的 MinION 软件。

在安装窗口点击“Install Update”(安装更新)以下载更新。
对话框中将显示版本变更信息。

等待软件更新;需要几分钟的时间。

更新完成后,您将收到安装窗口的通知。

更新完成后,请关闭设备,然后重新启动。
重装MinKNOW
一些情况下,您可能需要重装软件(比如如果您目前使用的 MinKNOW 版本存在问题)。为此,您需要首先彻底卸载当前版本。请按照“Support ”(支持)文章中的说明进行卸载:如何卸载 MinION Mk1B、MinION Mk1D 和 PromethION 2 Solo 设备所使用的 MinKNOW 软件?。
14. (进阶)通过终端升级软件
获取最新更新
硬件检测成功后,请更新软件至最新版本。在终端输入以下命令即可:
sudo apt clean
sudo apt update
sudo apt install ont-promethion-release
默认的sudo密码为 prom; 为确保测序设备的安全,请修改密码。 上述命令成功执行后,请使用以下命令关闭设备:
sudo poweroff
然后重新启动设备。
后续的测序设备更新
当有GridION相关的新软件或更新时,Oxford Nanopore Technologies 会在社区发布公告。
我们强烈建议用户在新版本发布后尽快更新。
请遵循本地IT部门的建议,及时对设备的Linux系统进行安全更新。
请注意: 请务必配置防火墙,允许使用443端口进行出站访问,以便顺利更新。
15. (进阶)下载 ISO 镜像并刻录至 USB 硬盘
概览
您可参考下文说明,制作用于测序设备操作系统重建的 USB 启动盘。
如果您尚未收到带有 ISO 镜像的 USB 硬盘,请继续阅读以下步骤。 如果您已经收到 USB 硬盘,请直接跳至下一步骤:“如何从 USB 启动”。
即使您已选择保留数据,我们仍强烈建议您将数据传输到备份存储。这是因为在操作系统重建的过程中可能会发生意外情况,比如 USB 断开、断电等,导致数据损坏。
如需下载最新的 ISO 镜像,请联系 'support@nanoporetech.com'。
刻录IOS镜像至USB硬盘
适用于刻录ISO镜像的软件:
- Windows: Rufus
请注意: 另一款 ISO 刻录工具 balenaEtcher 不适用于我们的 ISO 镜像 。您需使用运行 Windows 系统的计算机,并可能需要管理员权限来安装 Rufus 软件。

请使用下述配置刻录 ISO 镜像(须 使用EFI/GPT引导):
- 分区方案:GPT
- 目标系统:UEFI
USB硬盘须具备如下规格:
- 容量须在 64GB 及以上
- 推荐使用 USB 3.0 接口
- 须使用 UEFI 引导选项
点击 START 后,可能会弹出以下警告提示。请点击 OK 继续。
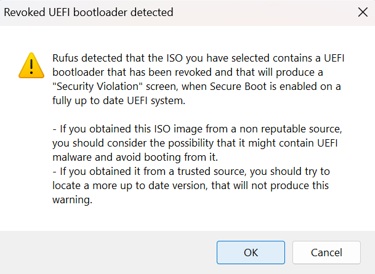
请注意: 我们建议使用两个来自不同制造商的 USB 硬盘进行闪存备份。普通的 USB 硬盘在重建操作系统时可能会无缘故地出现故障。
16. 如何从 USB 启动
关闭 PromethION 24/48。
将制作好的 USB 启动盘插入测序设备背面、蓝色的 USB 端口(USB 3.0)。
在启动设备前,请准备按下键盘上的 F11 键。
启动 PromethION 24/48。
a.反复按 F11 键 ,进入启动菜单。

b. 在 Please select boot device 界面中,使用键盘方向键选择 UEFI OS(USB 名称),然后按 回车键 确认。

在“Platform Rescue & Recovery”界面,选中 “Customer Factory Reset image XX.YY”(其中 XX.YY 表示镜像版本号),然后按回车键继续。

该操作将执行以下内容:
- 保留网络配置
- 保留主机名
- 保留数据
- 不清除元数据或格式化所有磁盘
请注意: 标准安装(Standard Installation)可能需要几分钟时间加载。请您仅在 Oxford Nanopore Technologies 技术支持团队要求的情况下使用其他选项。
点击“Standard Installation”。
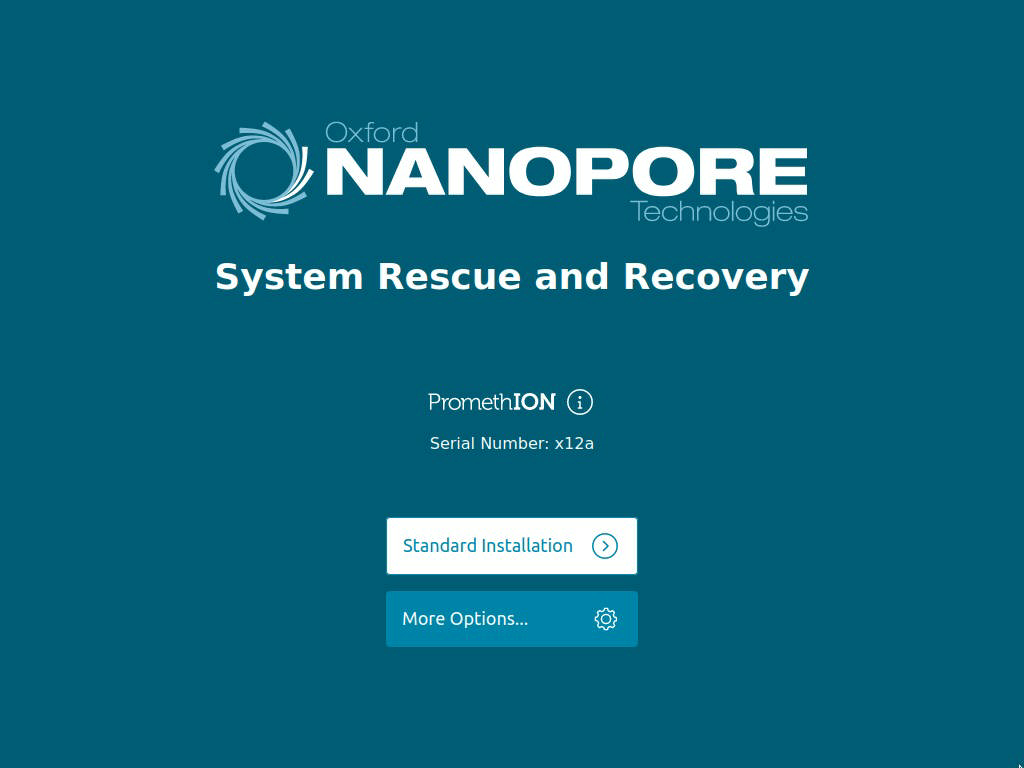 请注意:在某些情况下,您可能会看到以下屏幕。如遇此情况,请联系我们的技术支持团队。

安装页面将显示进度条,整个过程预计用时约 1 小时。期间设备将多次重启,并可能显示系统错误信息。此为正常现象,请勿干预,静待安装完成。

示例,首次启动界面:

二次启动界面:

三次启动界面:

系统重建完成后,屏幕将显示常规登陆界面。 请使用密码prom登录。

关闭设备后重启。关机后,请先等待 60 秒,然后拔除 USB。
随后启动设备。
使用密码prom登录设备

双击桌面上的 MinKNOW 图标,打开 MinKNOW 用户界面。

请使用纳米孔社区的账户信息登录 MinKNOW。
界面将提示您输入电邮地址和纳米孔密码:
检查所有测序芯片位置已正确识别,并确认设备序列号无误。
将配置测试芯片(CTC)插入测序设备,并进行硬件检测。
请参阅 P24/48 的硬件检查说明。
ISO 镜像重建完成。
17. 常见问题解答
如果您的测序设备出现问题或在测序过程中遇到困难,请联系我们的技术服务团队。
如需查看常见问题解答,请参阅MinKNOW支持板块 。
通常,需要排除故障时,我们建议您导出日志并发送给技术服务团队。
MinKNOW的帮助功能和支持链接
您亦可直接通过MinKNOW界面访问Nanopore支持中心。
点击MinKNOW界面右上角的“Help”(帮助)选项后,页面将弹出一个带有链接和二维码的窗口: 

如果您使用的是较大型测序设备(如GridION、PromethION 24/48)或MinION Mk1B/Mk1D、P2 Solo,点击窗口中的链接即可直接跳转到Nanopore支持页面。
如果您使用的是P2 Integrated或MinION Mk1C,可以用其他设备扫描二维码,或者输入短链接,快速访问支持中心。
导出日志:
对GridION、PromethION 24/48、PromethION 2i、及与GridION连接的PromethION 2 Solo:
- 在“Export Logs”(导出日志)栏目下选择 Export(导出)。
日志成功导出后,“Export”按钮下方将显示导出路径。日志将以.tgz压缩文件格式下载至“logs”(日志)目录中。
您可于“Host Settings ”(测序设备设置)下的“File Manager”(文件管理器)中按需设定日志导出路径:
- 在“Export Logs”(导出日志)栏目下,点击 **Logs exported to:**(日志导出至:)对话框右侧的文件,在MinKNOW的文件管理器中打开日志所在路径。
- 使用文件管理器右下角的控制面板移动日志文件。

如 PromethION 2 Solo 与独立计算机连接
您可于下述路径获取各测序实验的日志:
Windows C:\data\logs
Mac OS X /private/var/log/MinKNOW
Linux /var/log/minknow
清除日志和临时数据:
在“帮助”(Help)页面的“清除文件”(Clean up files)部分选择清除(Clean up),并在弹出的对话框内确认。
请注意: 将清除日志及临时数据,实验数据不会被删除。

修复仪器故障:
在“帮助”(Help)页面的“Troubleshooting”(故障排查)部分点击 Run repair(修复问题),并在弹出的对话框内确认。MinKNOW将尝试修复以下问题:
- 确保“/data”下所需路径存在,且具有正确的所有权和权限。
- 确保“/data”下所需文件的所有权和权限正确。
- 确保GPU正以最高性能运行
- 确保已禁用蓝牙

