High Throughput Barcoding sequencing (SQK-HTB114.96) (HTB_9238_v114_revA_02Sep2026)


PromethION: Protocol
High Throughput Barcoding sequencing (SQK-HTB114.96) V HTB_9238_v114_revA_02Sep2026
This document describes the high throughput barcoding method of native genomic DNA libraries.
The protocol:
- Requires the High Throughput Barcoding Kit 96 V14 (SQK-HTB114.96)
- Is PCR-free
- Uses up to 96 barcodes
- Splits individual genomes across multiple flow cells to balance sequencing performance
- Allows analysis of native DNA
- Is compatible with PromethION Flow Cells (FLO-PRO114M)
FOR RESEARCH USE ONLY.
Contents
实验指南简介
Sample preparation
文库制备
Sample QC and barocde abundance sequencing
Normalisation and sequencing
测序及数据分析
Troubleshooting
概览
This document describes the high throughput barcoding method of native genomic DNA libraries.
The protocol:
- Requires the High Throughput Barcoding Kit 96 V14 (SQK-HTB114.96)
- Is PCR-free
- Uses up to 96 barcodes
- Splits individual genomes across multiple flow cells to balance sequencing performance
- Allows analysis of native DNA
- Is compatible with PromethION Flow Cells (FLO-PRO114M)
1. 实验指南概览
免扩增条形码试剂盒-96 V14 实验指南简介
本实验指南详细描述了使用免扩增条形码测序试剂盒-96 V14(SQK-NBD114.96)为基因组DNA(gDNA)样品进行免扩增添加条码建库测序的操作流程及常见问题的解决方法。试剂盒内含96种不同的条形码,可实现多达96个不同样本的混样测序。为使您尽快熟悉操作流程,我们强烈建议您在使用样品测序前,先使用Lambda标准品完成标准对照实验。
测序工作流程:
准备您的实验
您将需要:
- 提取DNA,并评估DNA的长度、浓度和纯度。 质量评估步骤对确保实验成功至关重要。
- 确保您已准备好测序试剂盒、正确的仪器以及第三方试剂。
- 下载数据收集和分析软件。
- 检查您的测序芯片上有足够多的活性纳米孔,以确保测序良好运行。
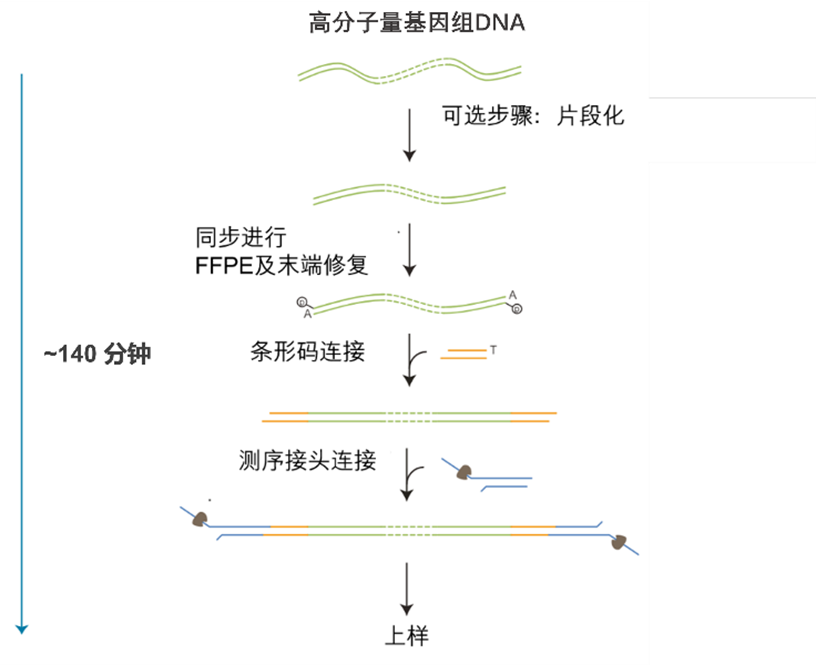
文库制备
下表概述了文库制备所需的步骤,包括时间安排和可以中止的节点。
| 文库制备 | 步骤 | 时间 | 中止节点 |
|---|---|---|---|
| DNA损伤及末端修复 | 修复DNA,并对DNA进行末端修复以便与接头连接 | 20 分钟 | 4°C 过夜 |
| 免扩增条形码连接 | 将免扩增条形码连接到DNA末端 | 60 分钟 | 4°C 过夜 |
| 接头连接及纯化 | 将测序接头连接到DNA末端 | 50 分钟 | 若为短期保存或重复使用(例如在清洗芯片后再次上样),我们建议将文库置于4℃保存。 若为长期保存,我们建议将文库置于-80℃。 |
| 测序芯片预处理及上样 | 对测序芯片进行预处理,然后将DNA文库加至芯片中进行测序。 | 10 分钟 |
测序和分析
您将需要:
- 使用MinKNOW软件开始测序。该软件会通过测序仪收集原始数据,并将其识别成碱基序列。
- 通过MinKNOW或Guppy碱基识别进行条形码拆分,选择“SQK-NBD114.96 试剂盒”选项。
- 使用EPI2ME软件,选择所需工作流程进行进一步分析(此步骤非必需)。
实验方案适用性
本实验方案只适用于与以下产品搭配使用:
- 免扩增条形码测序试剂盒-96(SQK-NBD114.96)
- R10.4.1 测序芯片 (FLO-PRO114M)
- 测序芯片清洗剂盒 (EXP-WSH004)
- 测序辅助扩展包 V14 (EXP-AUX003)
- 免扩增条形码扩展包 V14 (EXP-NBA114)
- PromethION 24/48 - PromethION IT 配置要求文档
- PromethION 2 Solo - PromethION 2 Solo IT 配置要求文档
- PromethION 2 Integrated - PromethION 2 Integrated IT 配置要求文档
2. 仪器及耗材
材料
- High Throughput Barcoding Kit 96 V14 (SQK-HTB114.96)
- (For sample preparation) 400 µl of human whole blood in K2 EDTA per sample
- (For library preparation) 1.2 µg gDNA per sample, sheared to ~15 kbp
- Flow Cell Wash Kit XL (EXP-WSH004-XL)
耗材
- PromethION 测序芯片 R10.4.1(Oxford Nanopore,FLO-PRO114M)
- Chemagic BBS DNA Kit H96 (IVD-1091)
- TE Buffer (Invitrogen, 12090015)
- NEBNext FFPE修复混合液(NEB,M6630)
- NEBNext Ultra II 末端修复/ dA尾添加模块(NEB,E7546)
- NEB Blunt/TA 连接酶预混液(NEB,M0367)
- 耐盐T4® DNA连接酶(NEB, M0467)
- 乙醇,100%(例如 Fisher, 16606002)
- 无核酸酶水(如 Thermo Scientific,AM9937)
- Rigid 96-well PCR plates, 200 µL minimum volume per well (e.g. Hard-Shell 96-Well PCR Plate, low profile, thin wall, skirted, BIO-RAD, HSP9601)
- Adhesive PCR plate seals (e.g. ThermoFisher, AB0558)
- (ALTERNATIVE TO PCR PLATES) 0.2 ml 8-strip PCR tubes (e.g. AB0452, Thermo Scientific)
- Reagent reservoirs (e.g. Thermo Scientific, 10141873)
- 1.5 ml Eppendorf DNA LoBind 离心管
- 2 ml Eppendorf DNA LoBind 离心管
- Qubit™ 分析管(Invitrogen, Q32856)
- Qubit 1x dsDNA BR Assay(双链DNA宽范围检测)试剂盒(ThermoFisher,Q33265)
- Qubit™ dsDNA HS Assay(双链 DNA 高灵敏度检测)试剂盒(ThermoFisher,Q32851)
- Quant-iT dsDNA BR Assay kit (Q33130, Thermo Scientific)
仪器
- Chemagic™ 360-D instrument (2024-0010)
- Chemagic 96 Rod Head Set (CMG-370)
- Cole-Parmer HG-600 Geno/Grinder 2010 High-Throughput Homogenizer
- 热循环仪
- Plate shaker with temperature control (Eppendorf ThermoMixer C, or equivalent)
- Sample mixer (ThermoFisher HulaMixer or equivalent)
- 微孔板离心机
- Magnetic separation rack suitable for 96-well plates (e.g. Magnum FLX® with Solid-Core™ Technology, A000400)
- 涡旋混匀仪
- 迷你离心机
- 多通道移液枪和枪头
- P1000 移液枪和枪头
- P200 移液枪和枪头
- P100 移液枪和枪头
- P20 移液枪和枪头
- P10 移液枪和枪头
- P2 移液枪和枪头
- 计时器
- 盛有冰的冰桶
- Qubit™ 荧光计(或用于质控检测的等效仪器)
- Qubit fluorometer plate reader (or equivalent for QC check)
- PromethION 24/48 device
- PromethION 测序芯片遮光片
可选仪器
- Agilent Femto Pulse 系统(或用于读长质控的等效仪器)
- Agilent Genomic DNA 165 kb Analysis Kit (Agilent, FP-1002-0275)
The above list of materials, consumables, and equipment is for the extraction method in the sample preparation section, as well as the library preparation section of the protocol. If you have pre-extracted sample(s), you will only require the materials for the library preparation section of this protocol.
For this protocol, the following inputs are required:
Input requirements per sample for the extraction method:
- 400 µl of human blood in EDTA K2 vacuum tube per sample
Input requirements per sample for the gDNA shearing:
- At least 1.3 µg gDNA per sample
Input requirements per sample for the library preparation:
- 1.2 µg gDNA per sample, sheared to ~15 kbp
起始DNA
DNA质控
选择符合质量和浓度要求的起始DNA至关重要的。使用过少或过多的DNA,或者质量较差的DNA(如,高度碎片化、含有RNA或化学污染物的DNA)都会影响文库制备。
有关如何对DNA样品进行质控,请参考起始DNA/RNA质控实验指南 。
化学污染物
从原始样本中提取DNA的方法不同,可能会导致经纯化的DNA中所残留的化学污染物不同。这会影响文库的制备效率和测序质量。请在牛津纳米孔社区的 Contaminants(污染物)页面 了解更多信息。
第三方试剂
Oxford Nanopore Technologies推荐您使用本实验指南中提及的所有第三方试剂,并已对其加以验证。我们尚未对其它替代试剂进行测试。
我们建议您按制造商说明准备待用的第三方试剂.
NEB reagent usage
Find below guidance for the required volumes for the 3rd party reagents used in this method and the corresponding number of vials required per preparation. Please note, the number of vials suggested below will include excess volumes that may be used in subsequent experiments.
| Reagent | Volume per sample (including excess) | Volume for 96 samples (including excess) | Number of vials required per prep of 96 samples |
|---|---|---|---|
| NEBNext FFPE DNA Repair Mix (NEB, M6630LVIAL) | 2 µl (+ 0.2 µl) | 192 µl (+ 19.2 µl) | 2 |
| NEBNext FFPE DNA Repair Buffer (NEB, E6622AAVIAL) | 3.5 µl (+ 0.35 µl) | 336 µl (+ 33.6 µl) | 1 |
| NEBNext Ultra II End Prep Enzyme Mix (NEB, E7646AAVIAL) | 3 µl (+ 0.3 µl) | 288 µl (+ 28.8 µl) | 2 |
| NEBNext Ultra II End Prep Reaction Buffer (NEB, E7647AAVIAL) | 3.5 µl (+ 0.35 µl) | 336 µl (+ 33.6 µl) | 1 |
| NEB Blunt/TA Ligase Master Mix (NEB, M0367LVIAL) | 20 µl | 1,920 µl | 2 |
| Salt-T4® DNA Ligase (NEB, M0467LVIAL) | 5 µl | 480 µl | 3 |
Check your flow cells
We highly recommend that you check the number of pores in your flow cells prior to starting a sequencing experiment. This should be done within 12 weeks of purchasing your PromethION Flow Cells. Oxford Nanopore Technologies will replace any unused flow cell with fewer than the number of pores listed in the Table below, when the result is reported within two days of performing the flow cell check, and when the storage recommendations have been followed. To do the flow cell check, please follow the instructions in the Flow Cell Check document.
| Flow cell | Minimum number of active pores covered by warranty |
|---|---|
| PromethION Flow Cell | 5000 |
本试剂盒及实验指南中所使用的免扩增接头(NA) 不能与其它测序接头互换使用。
免扩增条形码测序试剂盒-96 V14(SQK-NBD114.96)内容物
请注意: 我们正在更新免扩增条形码建库试剂盒,新版将增加短片段缓冲液(SFB)的体积。如果您使用的是旧版试剂盒,或需要额外的短片段缓冲液(SFB),可通过购买 SFB 扩展包(EXP-SFB001) 获取。
新版试剂盒:短片段缓冲液体积增加(SFB)
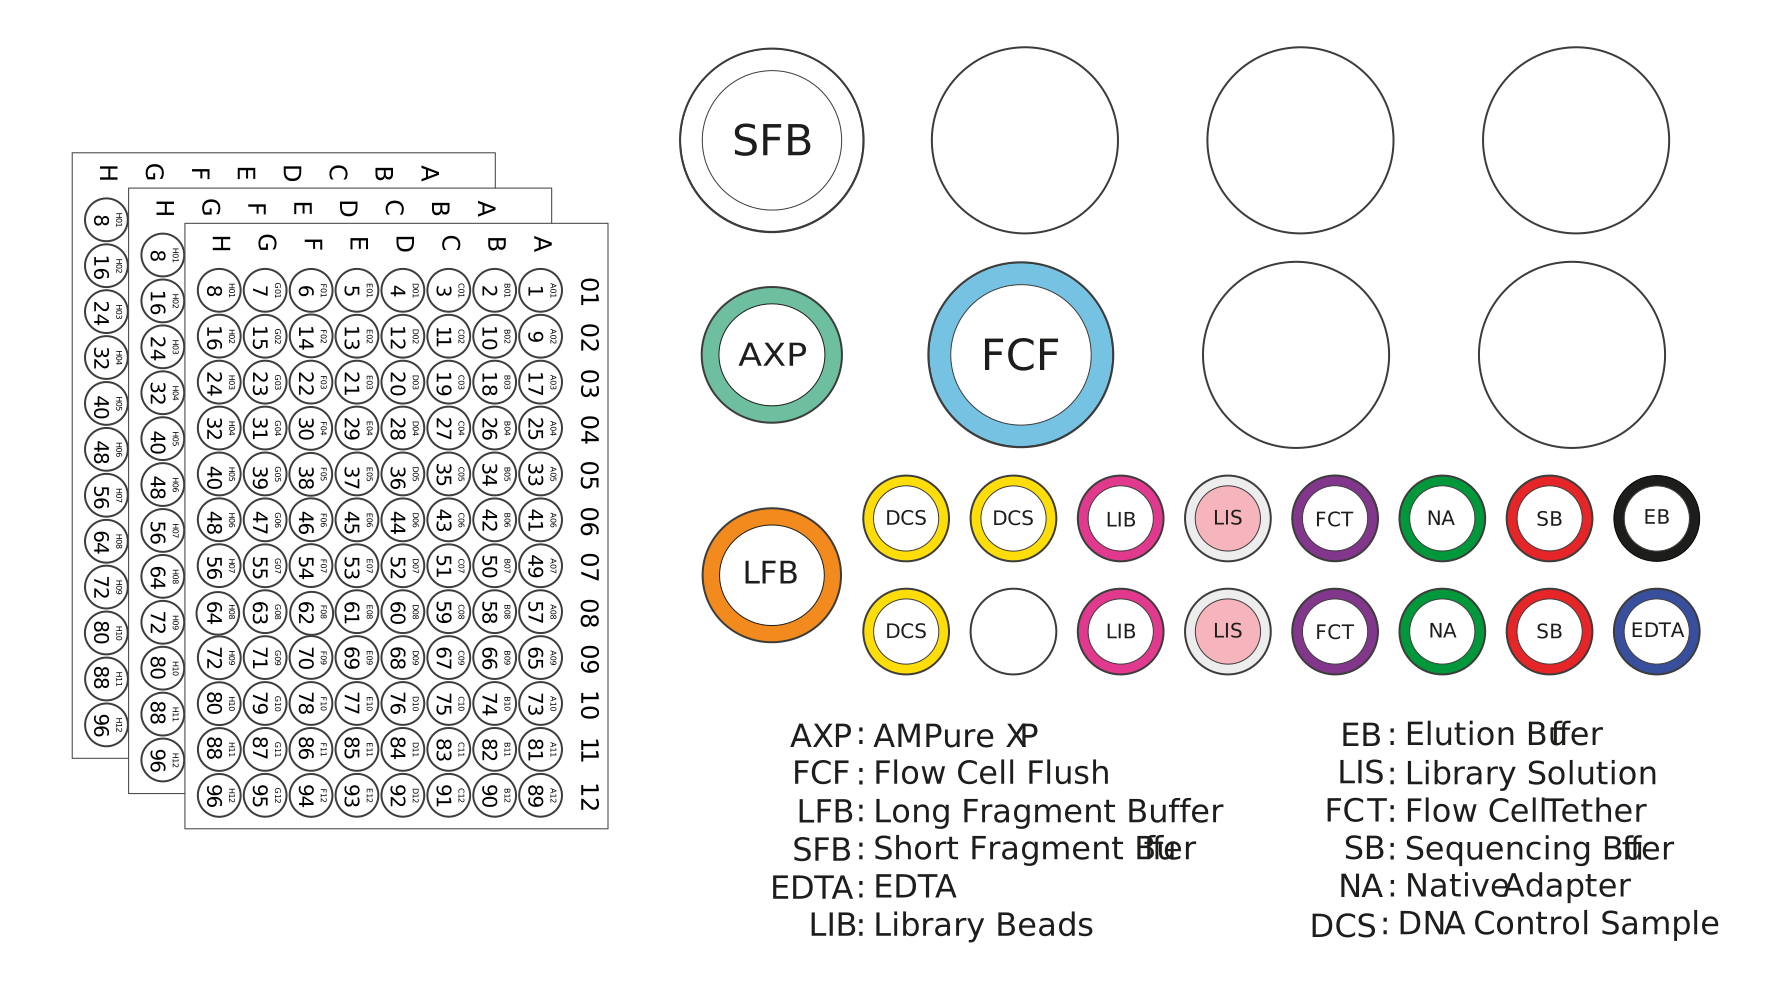
| 名称 | 缩写 | 管盖颜色 | 管数 | 每管溶液体积 (μl) |
|---|---|---|---|---|
| 免扩增条形码 | NB01-96 | - | 3 盘 | 每孔 8 μl |
| DNA 参照 | DCS | 黄色 | 3 | 35 |
| 免扩增接头 | NA | 绿色 | 2 | 40 |
| 测序缓冲液 | SB | 红色 | 2 | 700 |
| 文库颗粒 | LIB | 粉色 | 2 | 600 |
| 文库溶液 | LIS | 白色管盖,粉色标签 | 2 | 600 |
| 洗脱缓冲液 | EB | 黑色 | 1 | 1500 |
| AMPure XP 磁珠 | AXP | 琥珀色 | 1 | 6000 |
| 长片段缓冲液 | LFB | 橙色 | 1 | 7500 |
| 短片段缓冲液 | SFB | 透明 | 1 | 25000 |
| 测序芯片冲洗液 | FCF | 蓝色 | 1 | 15500 |
| 测序芯片系绳 | FCT | 紫色 | 2 | 200 |
| EDTA | EDTA | 透明 | 1 | 700 |
旧版试剂盒:较低体积的短片段缓冲液(SFB)
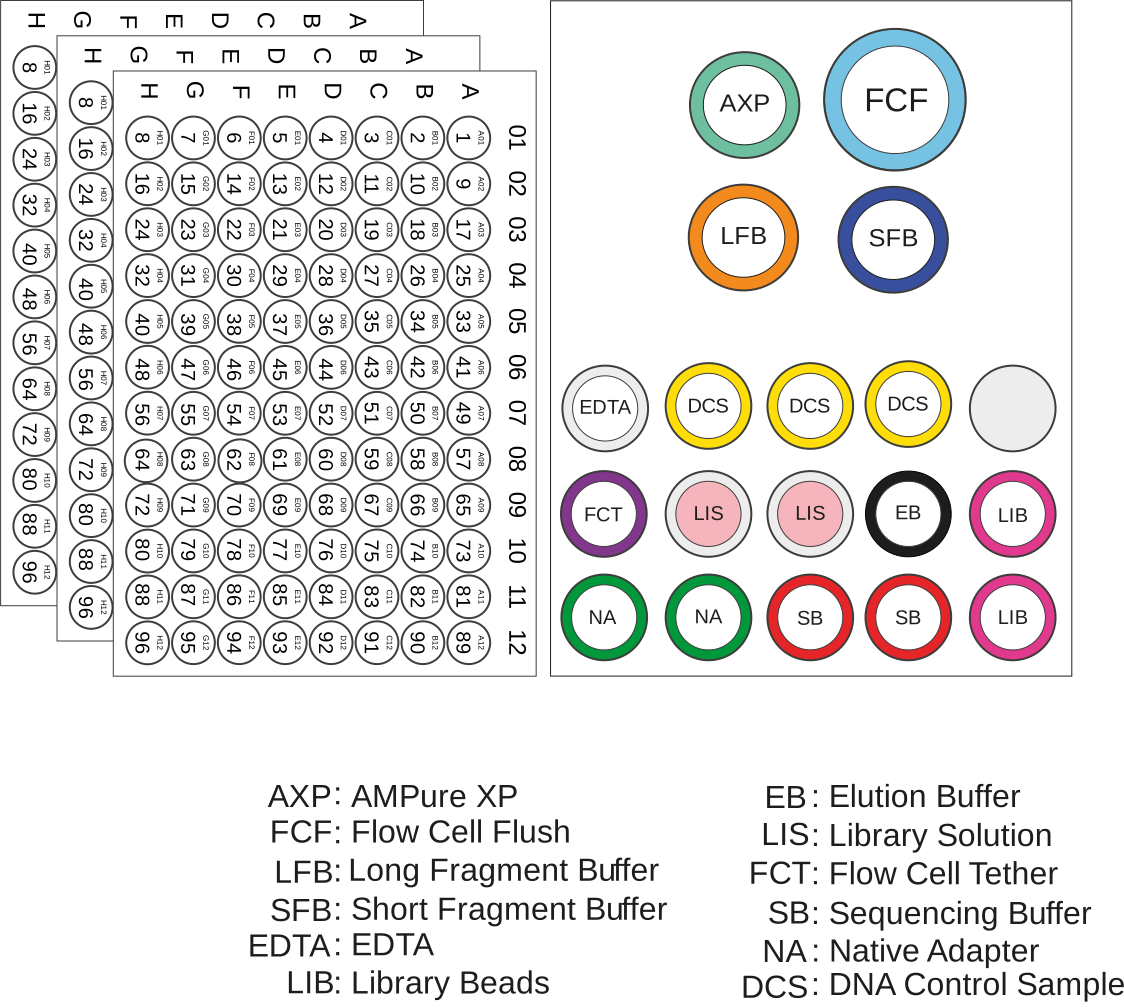
| 名称 | 缩写 | 管盖颜色 | 管数 | 每管溶液体积 (μl) |
|---|---|---|---|---|
| 免扩增条形码 | NB01-96 | - | 3 盘 | 每孔 8 μl |
| DNA 参照 | DCS | 黄色 | 3 | 35 |
| 免扩增接头 | NA | 绿色 | 2 | 40 |
| 测序缓冲液 | SB | 红色 | 2 | 700 |
| 文库颗粒 | LIB | 粉色 | 2 | 600 |
| 文库溶液 | LIS | 白色管盖,粉色标签 | 2 | 600 |
| 洗脱缓冲液 | EB | 黑色 | 1 | 1500 |
| AMPure XP 磁珠 | AXP | 琥珀色 | 1 | 6000 |
| 长片段缓冲液 | LFB | 橙色 | 1 | 7500 |
| 短片段缓冲液 | SFB | 透明 | 1 | 7500 |
| 测序芯片冲洗液 | FCF | 蓝色 | 1 | 15500 |
| 测序芯片系绳 | FCT | 紫色 | 2 | 200 |
| EDTA | EDTA | 透明 | 1 | 700 |
请注意: 本产品包含由贝克曼库尔特公司(Beckman Coulter, Inc)生产的 AMPure XP 试剂,并可与试剂盒一起于-20℃下储存(试剂稳定性将不受损害)。
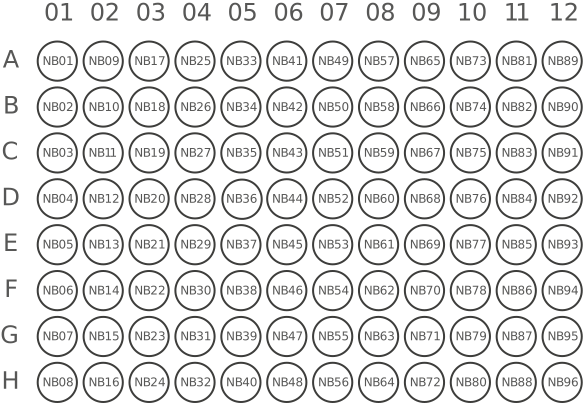
条形码孔板中的条形码是按列排序的。
请注意: DNA参照(DCS)是一段可比对到Lambda基因组的3'端、长度为3.6 kb 的标准扩增子。
3. Extraction of gDNA from 400 µl of human blood
材料
- (For sample preparation) 400 µl of human whole blood in K2 EDTA per sample
耗材
- Chemagic BBS DNA Kit H96 (IVD-1091)
- 无核酸酶水(如 ThermoFisher,AM9937)
- 新制备的70%乙醇(用无核酸酶水配制)
- 15 ml Falcon离心管
- 1.5 ml Eppendorf DNA LoBind 离心管
- Qubit dsDNA BR Assay(双链DNA宽范围检测)试剂盒(Invitrogen,Q32850)
- Qubit™ 分析管(Invitrogen, Q32856)
- Agilent 基因组 DNA 165 kb 分析试剂盒(Agilent,FP-1002-0275)
仪器
- Chemagic™ 360-D instrument (2024-0010)
- Chemagic 96 Rod Head Set (CMG-370)
- 涡旋混匀仪
- 迷你离心机
- Qubit fluorometer plate reader (or equivalent for QC check)
- 盛有冰的冰桶
- 计时器
- 宽口移液枪头
- P1000 移液枪和枪头
- P200 移液枪和枪头
- P20 移液枪和枪头
- P10 移液枪和枪头
- P2 移液枪和枪头
可选仪器
- Agilent Femto Pulse 系统(或用于读长质控的等效仪器)
- Agilent Genomic DNA 165 kb Analysis Kit (Agilent, FP-1002-0275)
Ensure you are using the reagents from the extraction kit at this stage in the method.
The Elution Buffer 7 used in the sample preparation is from the Chemagic BSS DNA Kit, not the Elution Buffer supplied in the SQK-HTB114.96 kit and used for the library preparation.
Extract your gDNA according to the extraction kit manufacturers documentation.
For instructions on how to perform blood extraction using a Chemagic 360-D, see pages 21 – 28 in the Revvity instructions for use document.
- Elute your extracted gDNA using 100 µl of Elution Buffer 7 per sample.
Optional: If struggling with sample viscosity or incomplete resuspension during elution, incubate your samples at 50°C on a thermomixer with gentle agitation 300 RPM to ensure homogeneous resuspension.
Quantify your samples using a plate reader and the Quant-iT dsDNA BR Assay Kit prior to proceeding to the concentration normalisation.
Note: Approximately 5–12 µg of gDNA is expected following sample extraction.
Expected Qubit measurements of 50–120 ng/μl.
If your Qubit measurements are not consistent, this could indicate that the DNA has not been homogeneously resuspended.
If this occurs, we recommend increasing the incubation time, allowing more time for the DNA pellet to solubilise.
Your extracted gDNA can also be analysed using Femto Pulse (Agilent) to check the size and quality.
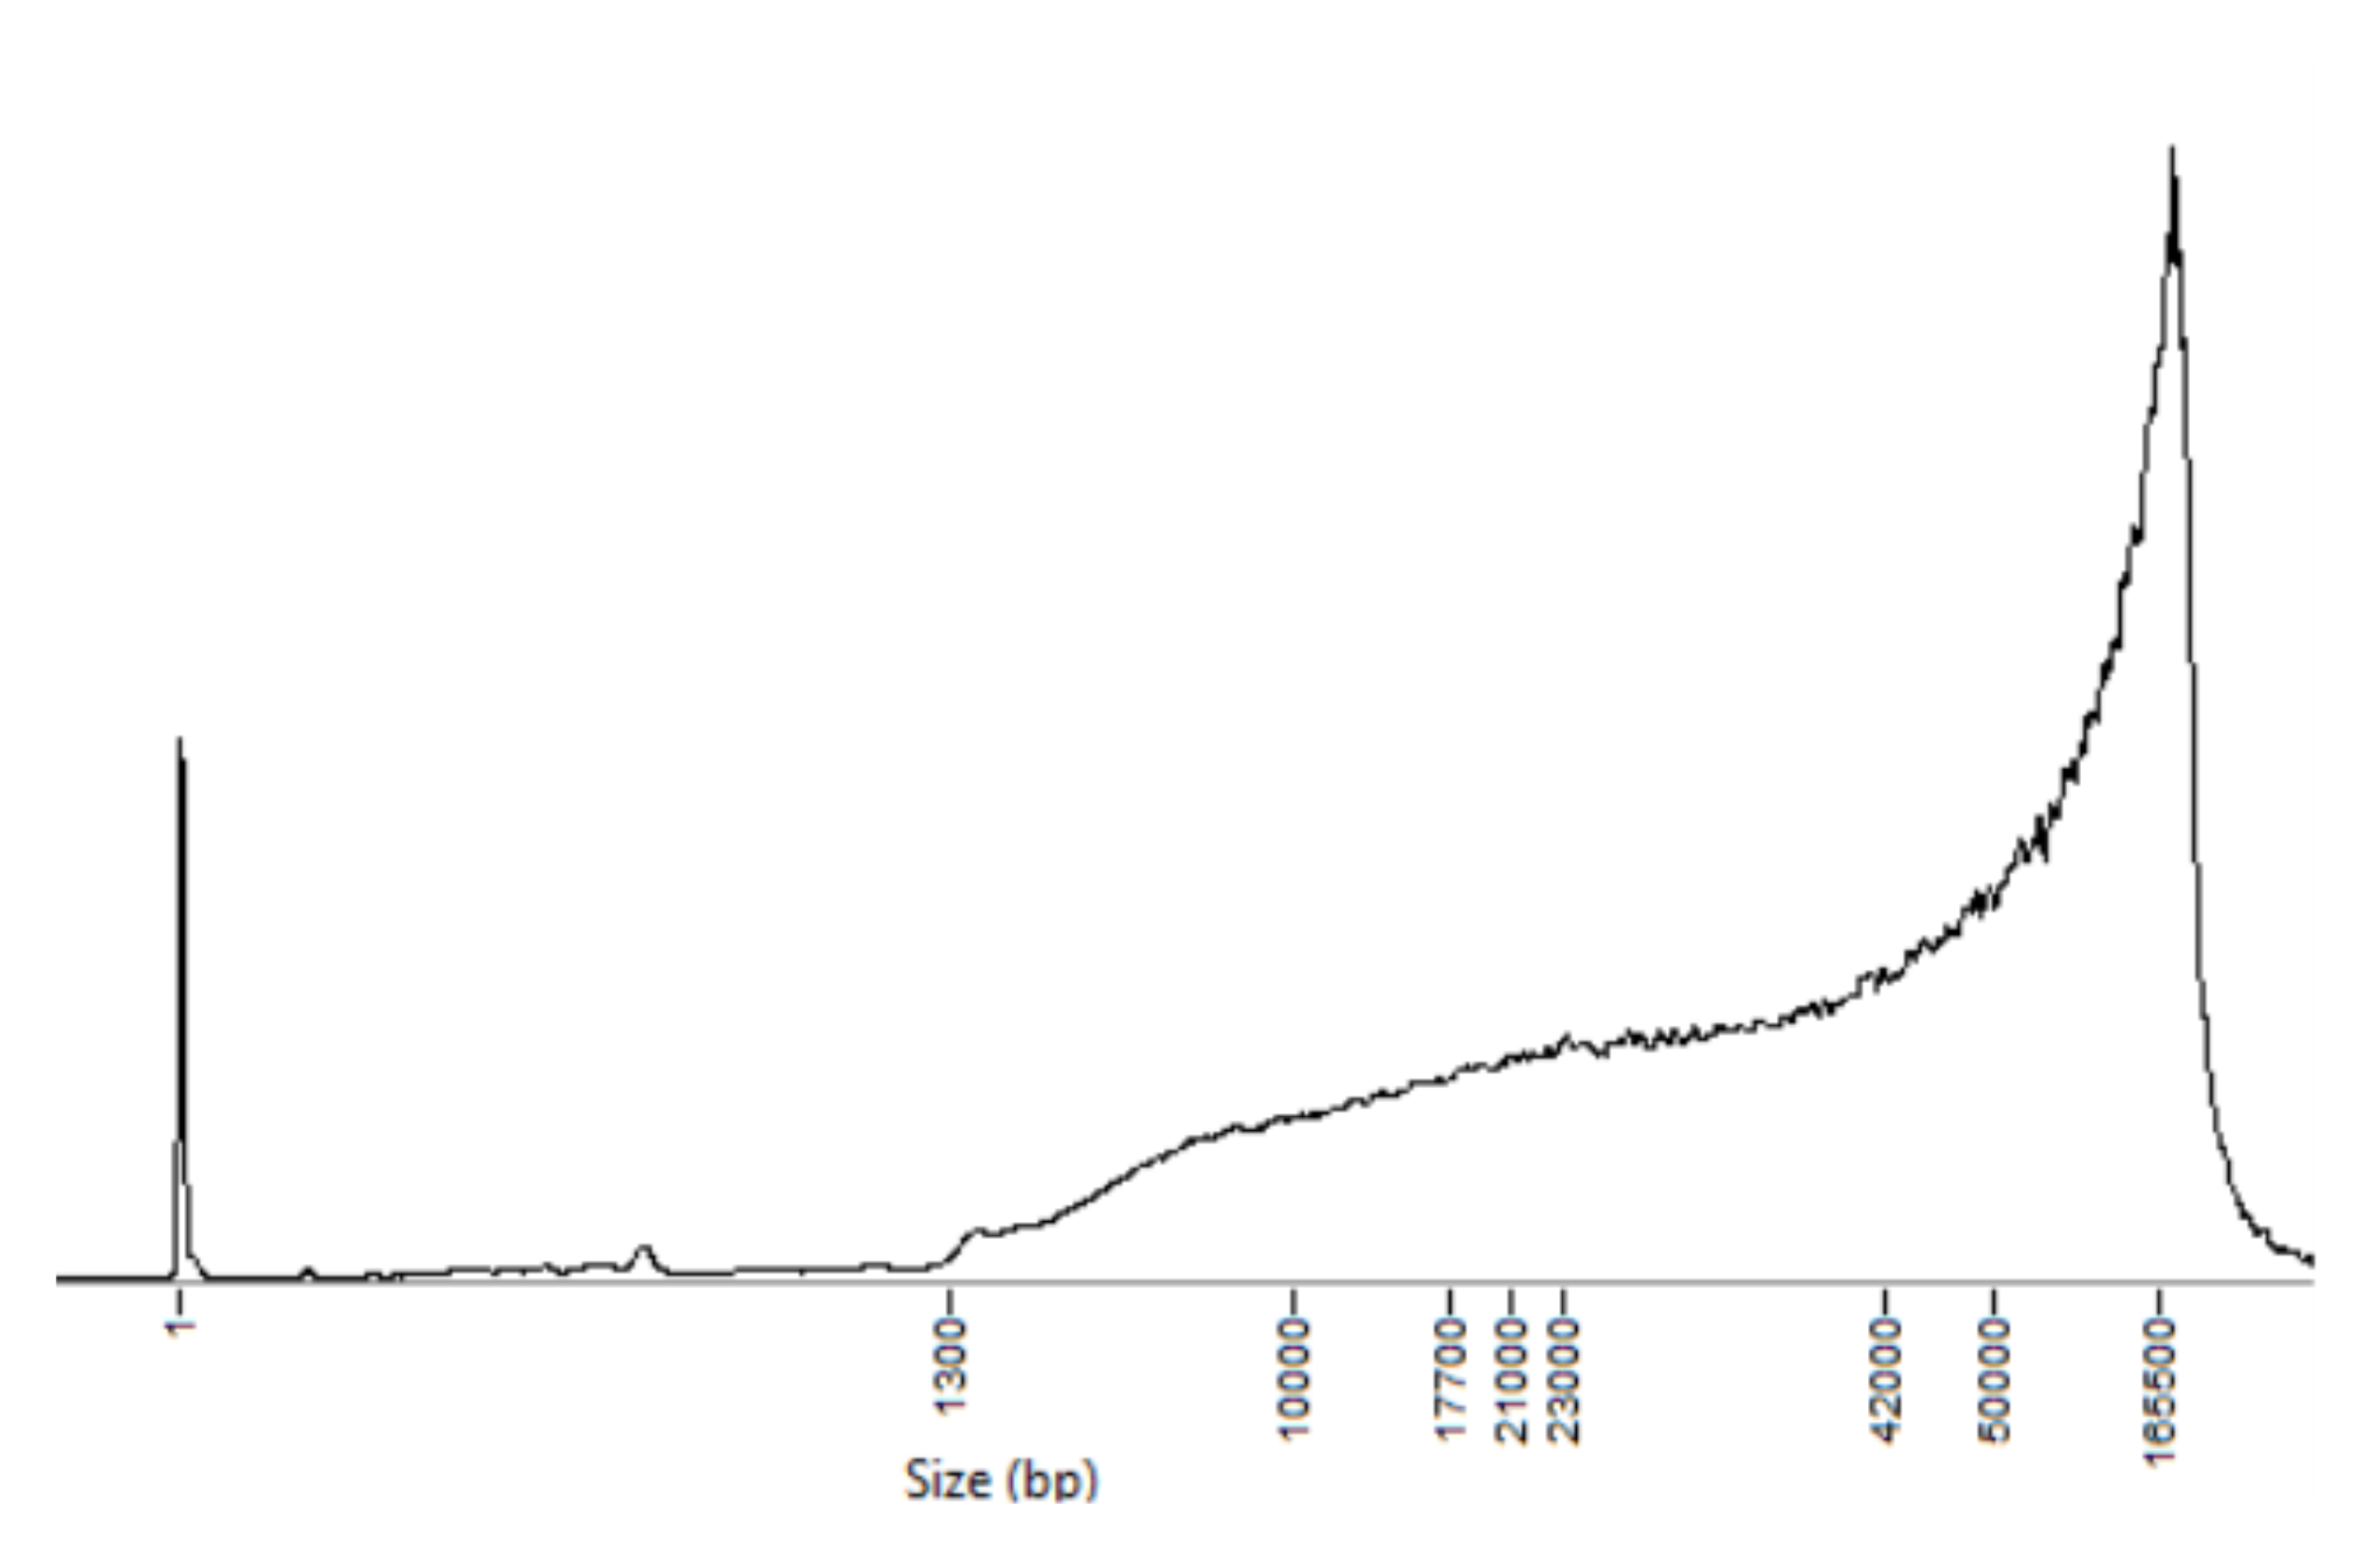
Example fragment length profile of gDNA extracted from human blood using the Chemagic BBS DNA Kit H96.
Take your extracted gDNA forward into the gDNA shearing step of this protocol. Alternatively, your sample can be stored at 4°C overnight.
4. gDNA shearing using the Geno/Grinder
材料
- 1.3 µg of extracted gDNA per sample
耗材
- Hard-Shell 96-Well PCR plates, low profile, thin wall, skirted (BIO-RAD, HSP9621)
- Adhesive PCR plate seals (e.g. ThermoFisher, AB0558)
- TE Buffer (Invitrogen, 12090015)
- Quant-iT dsDNA BR Assay kit (Q33130, Thermo Scientific)
- Qubit Assay Tubes (e.g. ThermoFisher Q32856 or equivalent)
- Agilent 基因组 DNA 165 kb 分析试剂盒(Agilent,FP-1002-0275)
仪器
- Cole-Parmer HG-600 Geno/Grinder 2010 High-Throughput Homogenizer
- 96 well plate compatible microcentrifuge (e.g. Eppendorf, 5430)
- 迷你离心机
- 盛有冰的冰桶
- 计时器
- 宽口移液枪头
- P1000 移液枪和枪头
- P200 移液枪和枪头
- P20 移液枪和枪头
- P10 移液枪和枪头
- P2 移液枪和枪头
- Qubit fluorometer plate reader (or equivalent for QC check)
- Agilent Femto Pulse 系统(或用于读长质控的等效仪器)
可选仪器
- Agilent Femto Pulse 系统(或用于读长质控的等效仪器)
- Agilent Genomic DNA 165 kb Analysis Kit (Agilent, FP-1002-0275)
Dilute each of your extracted human blood gDNA samples using TE Buffer to a final concentration of 25 ng/μl.
Aliquot 53 µl (equivalent to 1.3 µg) of each of your diluted gDNA samples into a separate well of a 96-well plate.
Seal the plate completely with a PCR plate seal.
This plate serves as the sample shearing plate.
Prepare a 96-well plate as a balance plate by filling wells with equivalent volume of TE Buffer in the exact number and positions corresponding to the shearing plate.
Seal the plate completely with a PCR plate seal.
Position the balance plate opposite the shearing plate as a mirror image in the Geno/Grinder.
Secure both plates tightly using the adjustable clamp.
Setup the shearing parameters on the Geno/Grinder device as follows:
| Geno/Grinder setting | |
|---|---|
| Shearing speed | 1600 spm |
| Time | 5 minutes |
| Cycles | 1 |
Begin the shearing of DNA using the Geno/Grinder.
Assess the fragmented gDNA for fragment size using Femto Pulse (Agilent).
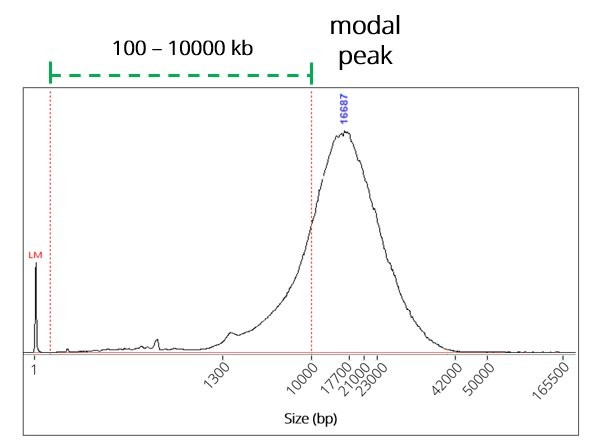
Example of a ~15kb N50 fragmented Chemagic gDNA trace in ProSize, showing the smear analysis lines (red) displaying the FP signal <10kb.
QC metrics guidance
The Geno/Grinder fragmentation reduces the fragment length profile to a size centred around approximately 15 kb.
During development and testing, 97% of samples prepared for 15kb protocols met the recommended 15kb Femto Pulse QC pass criteria (unimodal peak 11–25 kb and <36% of total DNA mass below 10 kb). Among samples meeting these criteria, 90% achieved the target read-length N50 of 13–19 kb. For samples outside the QC pass criteria, 96% did not achieve the target read N50.
Quantify your samples using a plate reader and the Quant-iT dsDNA BR Assay Kit.
Take your fragmented gDNA forward into the library preparation section of this protocol. Alternatively, your sample can be stored at 4°C overnight.
5. DNA损伤及末端修复
材料
- 1.2 µg gDNA per sample, sheared to ~15 kbp
- AMPure XP 磁珠(AXP)
耗材
- NEBNext FFPE DNA 修复混合液(NEB,M6630)
- NEBNext® Ultra II 末端修复/ dA尾添加模块(NEB,E7546)
- 1.5 ml Eppendorf DNA LoBind 离心管
- Rigid 96-well PCR plates, 200 µL minimum volume per well (e.g. Hard-Shell 96-Well PCR Plate, low profile, thin wall, skirted, BIO-RAD, HSP9601)
- 乙醇,100%(例如 Fisher, 16606002)
- 无核酸酶水(如 Thermo Scientific,AM9937)
- Reagent reservoirs (e.g. Thermo Scientific, 10141873)
仪器
- P1000 移液枪和枪头
- P200 移液枪和枪头
- P100 移液枪和枪头
- P20 移液枪和枪头
- P10 移液枪和枪头
- P2 移液枪和枪头
- 多通道移液枪和枪头
- Plate shaker with temperature control (Eppendorf ThermoMixer C, or equivalent)
- Magnetic separation rack suitable for 96-well plates
- 涡旋混匀仪
- 热循环仪
- 迷你离心机
- 微孔板离心机
- 盛有冰的冰桶
根据生产厂家的说明准备NEBNext FFPE DNA 修复混合液和 NEBNext Ultra II 末端修复/ dA尾添加模块,并置于冰上。
为获得最优表现,NEB建议如下:
于冰上解冻所有试剂。
轻弹并/或翻转各管,确保各试剂充分混匀。
注意: 请切勿涡旋振荡 FFPE DNA修复混合液或 Ultra II末端修复酶混合物。同一日内首次打开一管试剂前,请务必先将该管试剂瞬时离心。
Ultra II 末端修复反应缓冲液和 FFPE DNA 修复缓冲液内可能出现少量沉淀。待此两管液体回复至室温后,使用移液枪上下吹打数次,打散沉淀;然后涡旋振荡30秒,以确保沉淀充分溶解。
注意: 请务必涡旋振荡混匀缓冲液。FFPE DNA 修复缓冲液可能轻微泛黄,不影响使用。
勿涡旋振荡NEBNext FFPE DNA 修复混合液或NEBNext Ultra II 末端修复酶混合物。
请务必涡旋振荡NEBNext FFPE DNA 修复缓冲液及NEBNext Ultra II末端修复反应缓冲液,以充分混匀。
查看是否有残留沉淀。涡旋振荡至少30秒以溶解所有沉淀。
We recommend making up a master mix of the End Prep and DNA Repair reagents for your total number of samples.
We recommend adding some excess volume (~10%) when preparing your master mix for multiple samples to account for pipetting volume loss.
| Reagent | Volume per sample (+ excess) | Volume for 96 samples (+ excess) |
|---|---|---|
| NEBNext FFPE DNA Repair Buffer | 3.5 µl (+ 0.35 µl) | 336 µl (+ 33.6 µl) |
| NEBNext Ultra II End Prep Reaction Buffer | 3.5 µl (+ 0.35 µl) | 336 µl (+ 33.6 µl) |
| NEBNext FFPE DNA Repair Mix | 2 µl (+ 0.2 µl) | 192 µl (+ 19.2 µl) |
| NEBNext Ultra II End Prep Enzyme Mix | 3 µl (+ 0.3 µl) | 288 µl (+ 28.8 µl) |
| Total volume | 12 µl (+ 1.2 µl) | 1,152 µl (+ 115.2 µl) |
Ensure the master mix is fully mixed by pipetting full volume ten times. Do not vortex the mix.
Tip: The prepared master mix can be evenly aliquoted into an 8-tube strip, enabling the use of multichannel pipettes to dispense into your sample plate.
将400ng的各样本DNA分别加入一洁净96孔板的不同孔中。
使用热循环仪,在20℃下孵育5分钟,然后在65℃下孵育5分钟。
During the incubation, allow the AMPure XP Beads (AXP) to come to room temperature. Resuspend the AMPure XP Beads (AXP) by vortexing immediately before use.
The remaining AMPure XP Beads (AXP) can be stored at 4°C following thawing.
Consider post-thaw storage of this component at 4°C to avoid having to rethaw the component for your subsequent sequencing runs. Freeze/thawing wont affect performance, but thawing large volumes may be time-consuming.
Remove the sample plate from the thermal cycler and briefly centrifuge.
Add 60 µl of AMPure XP Beads (AXP) to sample each reaction and mix well by pipetting (ten full-volume pipette mixes). Re-seal the plate.
Place your sample plate in a bench-top shaker capable of accommodating PCR plates and agitate at 350 rpm for 20 minutes at room temperature.
Prepare sufficient fresh 80% ethanol with nuclease-free water for all of your samples.
Allow enough for 200 µl of fresh 80% ethanol per sample.
Briefly centrifuge your sample plate, then place onto a suitable plate magnet and pellet the beads for at least 3 minutes or until the supernatant is clear and colourless (whichever is longer). Keep the samples on the magnet and aspirate the supernatant by pipetting, taking care not to aspirate any beads.
Keeping the samples on the magnet, wash the beads by adding 70 µl of the freshly prepared 80% ethanol without disturbing the pellets. Remove the ethanol using a pipette and discard.
Repeat the previous step.
Briefly centrifuge the sample plate, then place back onto the magnet for the beads to pellet. Remove any residual ethanol by pipetting, taking care not to aspirate any beads.
将离心管从磁力架上移开。将磁珠重悬于35µl的无核酸酶水中,轻弹离心管混匀。
Agitate the sample plate in a bench-top shaker at 350 rpm for 15 minutes at room temperature, followed by an additional 15-minute agitation at 37°C.
Return sample plate to magnet and pellet beads for at least 3 minutes or until the respective eluates are clear and colourless (whichever is longer).
Transfer 18 µl of each eluate to separate wells of a clean 96-well PCR plate.
Take care not to disturb the pelleted beads.
Dispose of the bead-containing plate.
完成末端修复的样本即可用于稍后的免扩增条形码连接步骤。
如您希望在此步骤暂停文库制备,我们建议您使用1X AMPure XP 磁珠(AXP)纯化样品并使用无核酸酶水洗脱,然后置于4℃储存。
请注意:此步骤非必需,且需要额外的AMPure XP 磁珠(AXP)。
6. 免扩增条形码连接
材料
- End-prepped DNA samples (from previous step)
- 免扩增条形码(NB01-NB96)
- 免扩增接头(NA)
- AMPure XP 磁珠(AXP)
- 长片段缓冲液(LFB)
- 洗脱缓冲液(EB)
耗材
- NEB Blunt/TA 连接酶预混液(NEB,M0367)
- 耐盐T4® DNA连接酶(NEB, M0467)
- 无核酸酶水(如 Thermo Scientific,AM9937)
- Rigid 96-well PCR plates, 200 µL minimum volume per well (e.g. Hard-Shell 96-Well PCR Plate, low profile, thin wall, skirted, BIO-RAD, HSP9601)
- Adhesive PCR plate seals (e.g. ThermoFisher, AB0558)
- Qubit™ 分析管(Invitrogen, Q32856)
- Qubit™ dsDNA HS Assay(双链 DNA 高灵敏度检测)试剂盒(ThermoFisher,Q32851)
仪器
- Plate shaker with temperature control (Eppendorf ThermoMixer C, or equivalent)
- Magnetic separation rack suitable for 96-well plates
- 涡旋混匀仪
- 迷你离心机
- 盛有冰的冰桶
- 多通道移液枪和枪头
- P1000 移液枪和枪头
- P200 移液枪和枪头
- P100 移液枪和枪头
- P20 移液枪和枪头
- P10 移液枪和枪头
- P2 移液枪和枪头
- Qubit™ 荧光计(或用于质控检测的等效仪器)
根据生产厂家的说明准备 NEB Blunt/TA 连接酶预混液,并置于冰上:
- 于室温下解冻试剂。
- 瞬时离心试剂管5秒。
- 上下吹打整管试剂10次,以确保充分混匀。
于室温下解冻AMPure XP磁珠(AXP),并涡旋振荡混匀,置于室温。
于室温下解冻短片段缓冲液(SFB),并涡旋振荡混匀,然后置于冰上。
于室温下解冻短片段缓冲液(SFB),并涡旋振荡混匀,然后置于冰上。
根据样本数目,于室温下解冻相应数目的免扩增条形码(NB01-96)。分别吹打混匀,瞬时离心后置于冰上。
条形码板孔仅限一次使用。使用前请确认所选孔密封完好;一旦刺穿或开启,不得再次使用。
Mix the Native Barcodes well by pipetting before use, then add 2 µl of distinct Native Barcode to each well from your eluted sample plate (from previous step).
Add 20 µl of Blunt/TA Master Mix to each well from your eluted sample plate (from previous step). Mix well by pipetting, and seal the plate.
室温下孵育20分钟。
Spin down the Native Adapter (NA), pipette mix and place on ice.
向每孔内加入2 µl EDTA(蓝色管盖),吹打混匀,然后瞬时离心。
室温下孵育20分钟。
During the incubation, allow the AMPure XP Beads (AXP) to come to room temperature. Resuspend the AMPure XP Beads (AXP) by vortexing immediately before use.
Add 20 µl of AMPure XP Beads (AXP) to sample each reaction and mix well by pipetting (ten full-volume pipette mixes). Re-seal the plate.
Agitate the sample plate on a plate shaker at 350 rpm at room temperature for 20 minutes.
During the incubation, allow the L Fragment Buffer (LFB) and Elution Buffer (EB) to come to room temperature.
Briefly centrifuge your sample plate, then place onto a suitable plate magnet and pellet the beads for at least 3 minutes or until the supernatant is clear and colourless (whichever is longer). Keep the samples on the magnet and aspirate the supernatant by pipetting, taking care not to aspirate any beads.
Perform a sample clean-up by following the steps below:
- Remove the sample plate from the magnet and resuspend each sample pellet in 120 µl L Fragment Buffer (LFB) by pipetting.
- Return samples to the magnet and pellet the beads on the magnet for at least 3 minutes or until the supernatant is clear and colourless (whichever is longer).
- Keep the samples on the magnet and aspirate the supernatant, taking care not to aspirate any beads.
Repeat the previous steps two more times, for a total of three L Fragment Buffer (LFB) washes and resuspensions.
Carefully remove any residual supernatant by pipetting.
Resuspend each sample bead pellet in 80 µl Elution Buffer (EB). Seal your sample plate.
Agitate the samples on a plate shaker at 350 rpm at room temperature for 15 minutes followed by an additional 15 minutes' agitation at 37°C.
Return sample plate to magnet and pellet beads for at least 3 minutes or until the respective eluates are clear and colourless (whichever is longer).
Transfer 78 µl of each eluate to separate wells of a clean 96-well PCR plate.
Take care not to disturb the pelleted beads.
Dispose of the bead-containing plate.
取1µl洗脱样品,用Qubit荧光计定量。
连有条形码的DNA样本将用于稍后的接头连接及纯化步骤。如需要,您也可以此时将样品置于4℃储存过夜。
7. 免扩增条形码连接
材料
- Barcoded and adapted samples (from previous step)
耗材
- 1.5 ml Eppendorf DNA LoBind 离心管
- Qubit™ 分析管(Invitrogen, Q32856)
- Qubit™ dsDNA HS Assay(双链 DNA 高灵敏度检测)试剂盒(ThermoFisher,Q32851)
仪器
- 涡旋混匀仪
- 迷你离心机
- 盛有冰的冰桶
- 多通道移液枪和枪头
- P1000 移液枪和枪头
- P200 移液枪和枪头
- P100 移液枪和枪头
- P20 移液枪和枪头
- P10 移液枪和枪头
- P2 移液枪和枪头
- Qubit™ 荧光计(或用于质控检测的等效仪器)
Into a clean 1.5 ml Eppendorf DNA LoBind tube, pool 5 µL from each of your barcoded and adapted samples and mix well by pipetting (10 times, full-volume).
Quantify 1 µl of the QC Pool using Qubit (or equivalent) in at least triplicate.
Keep a note of the quantification measurements.
8. PromethION 测序芯片的预处理及上样
材料
- 测序芯片冲洗液(FCF)
- 冲洗系绳 UL(FTU)
- 文库颗粒(LIB)
- 测序缓冲液(SB)
耗材
- PromethION 测序芯片
- 1.5 ml Eppendorf DNA LoBind 离心管
仪器
- PromethION 测序设备
- PromethION 测序芯片遮光片
- P1000 移液枪和枪头
- P200 移液枪和枪头
- P20 移液枪和枪头
将芯片从冰箱中取出后,请将其置于室温环境孵育20分钟再插入PromethION测序仪。潮湿环境下的测序芯片上可能会形成冷凝水。因此,请检查测序芯片顶部和底部的金色连接器引脚处是否有水凝结。如有,请使用无纤维布擦干。请确保测序芯片底部有热垫(黑色)覆盖。
于室温下解冻测序缓冲液(SB)、文库颗粒(LIB)或文库溶液(LIS)、测序芯片系绳(FCT)和一管测序芯片冲洗液(FCF)。完全解冻后,涡旋振荡混匀,然后瞬时离心并置于冰上。
按下表制备测序芯片的预处理液,再于室温下短暂涡旋振荡混匀。
| 试剂 | 体积(每张芯片) |
|---|---|
| 测序芯片冲洗液 (FCF) | 1170 µl |
| 测序芯片系绳 (FCT) | 30 µl |
| 总体积 | 1200 µl |
The remaining Flow Cell Flush (FCF) can be stored for up to 48 hours at 4°C.
Consider post-thaw storage of this component at 4°C to avoid having to rethaw the component for your subsequent sequencing runs. Freeze/thawing will not affect performance, but thawing large volumes may be time-consuming.
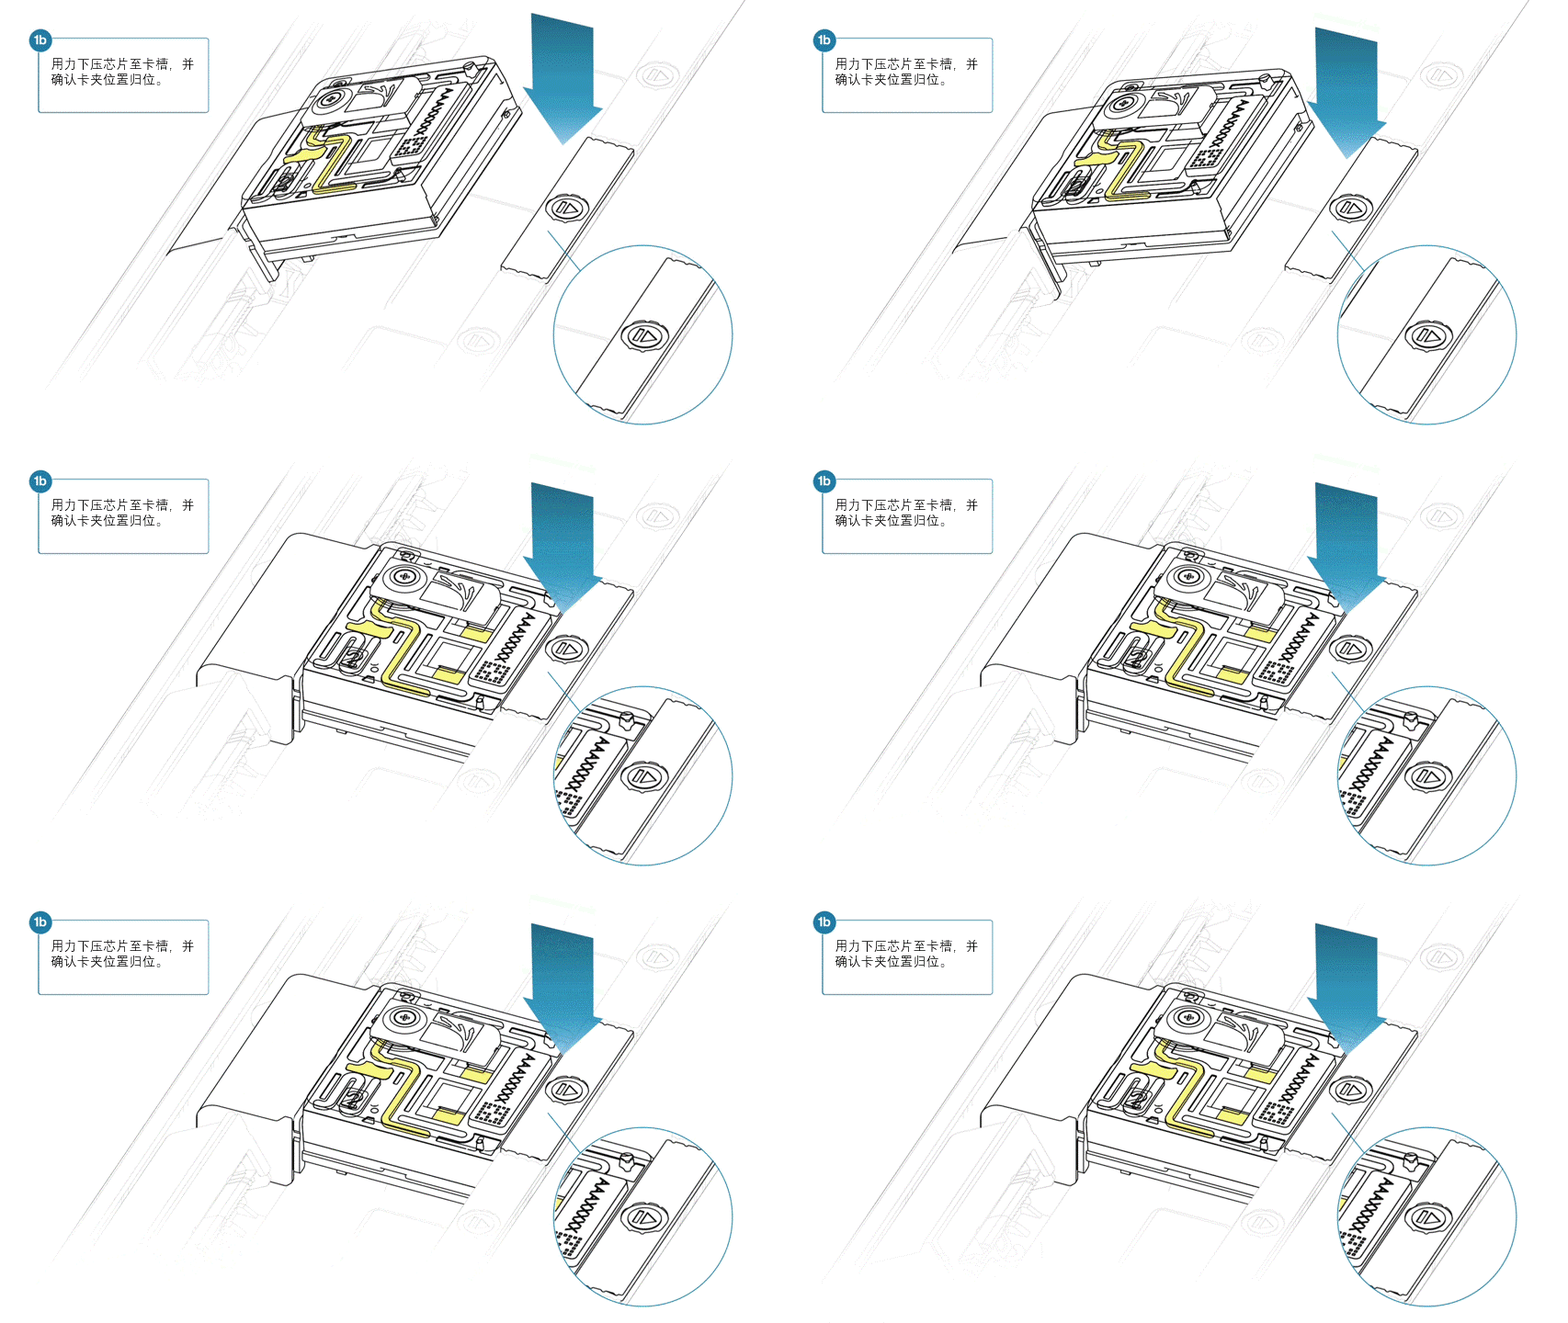
对PromethION 24/48,将测序芯片插入相应卡槽的对接端口:
将测序芯片与连接器横竖对齐,以便顺利卡入。
用力下压芯片至卡槽,并确认卡夹位置归位。
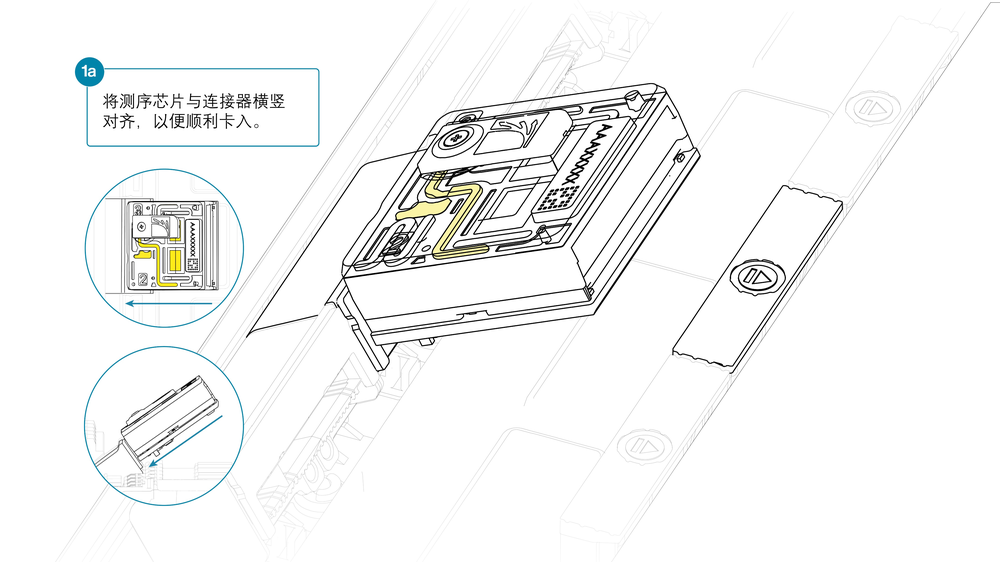
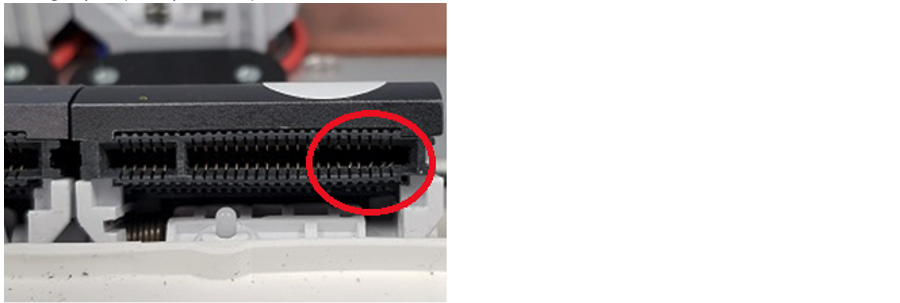
如插入配置测试芯片的角度出现偏差,可能会损坏PromethION上的引脚并影响测序结果。如您发现 PromethION测序仪芯片位置上的引脚损坏,请通过电子邮件(support@nanoporetech.com)或微信公众号在线支持(NanoporeSupport)联系我们的技术支持团队。
请在文库上样前完成测序芯片质检,评估可用的活性纳米孔数量。
若该测序芯片此前已完成质检,则可跳过此步骤。
详细操作说明请参阅 MinKNOW 实验指南中的测序芯片质检说明部分。
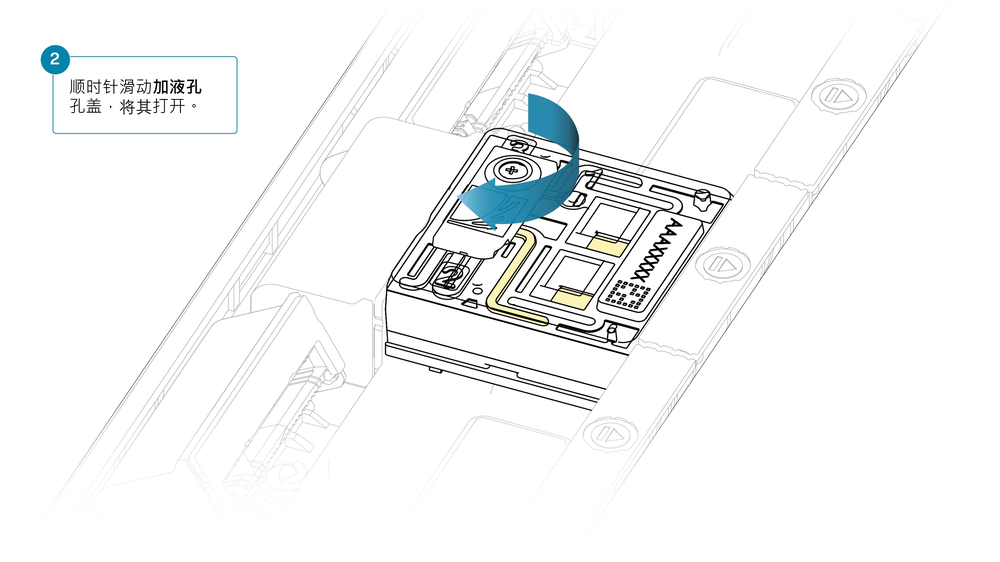
顺时针滑动加液孔孔盖,将其打开。
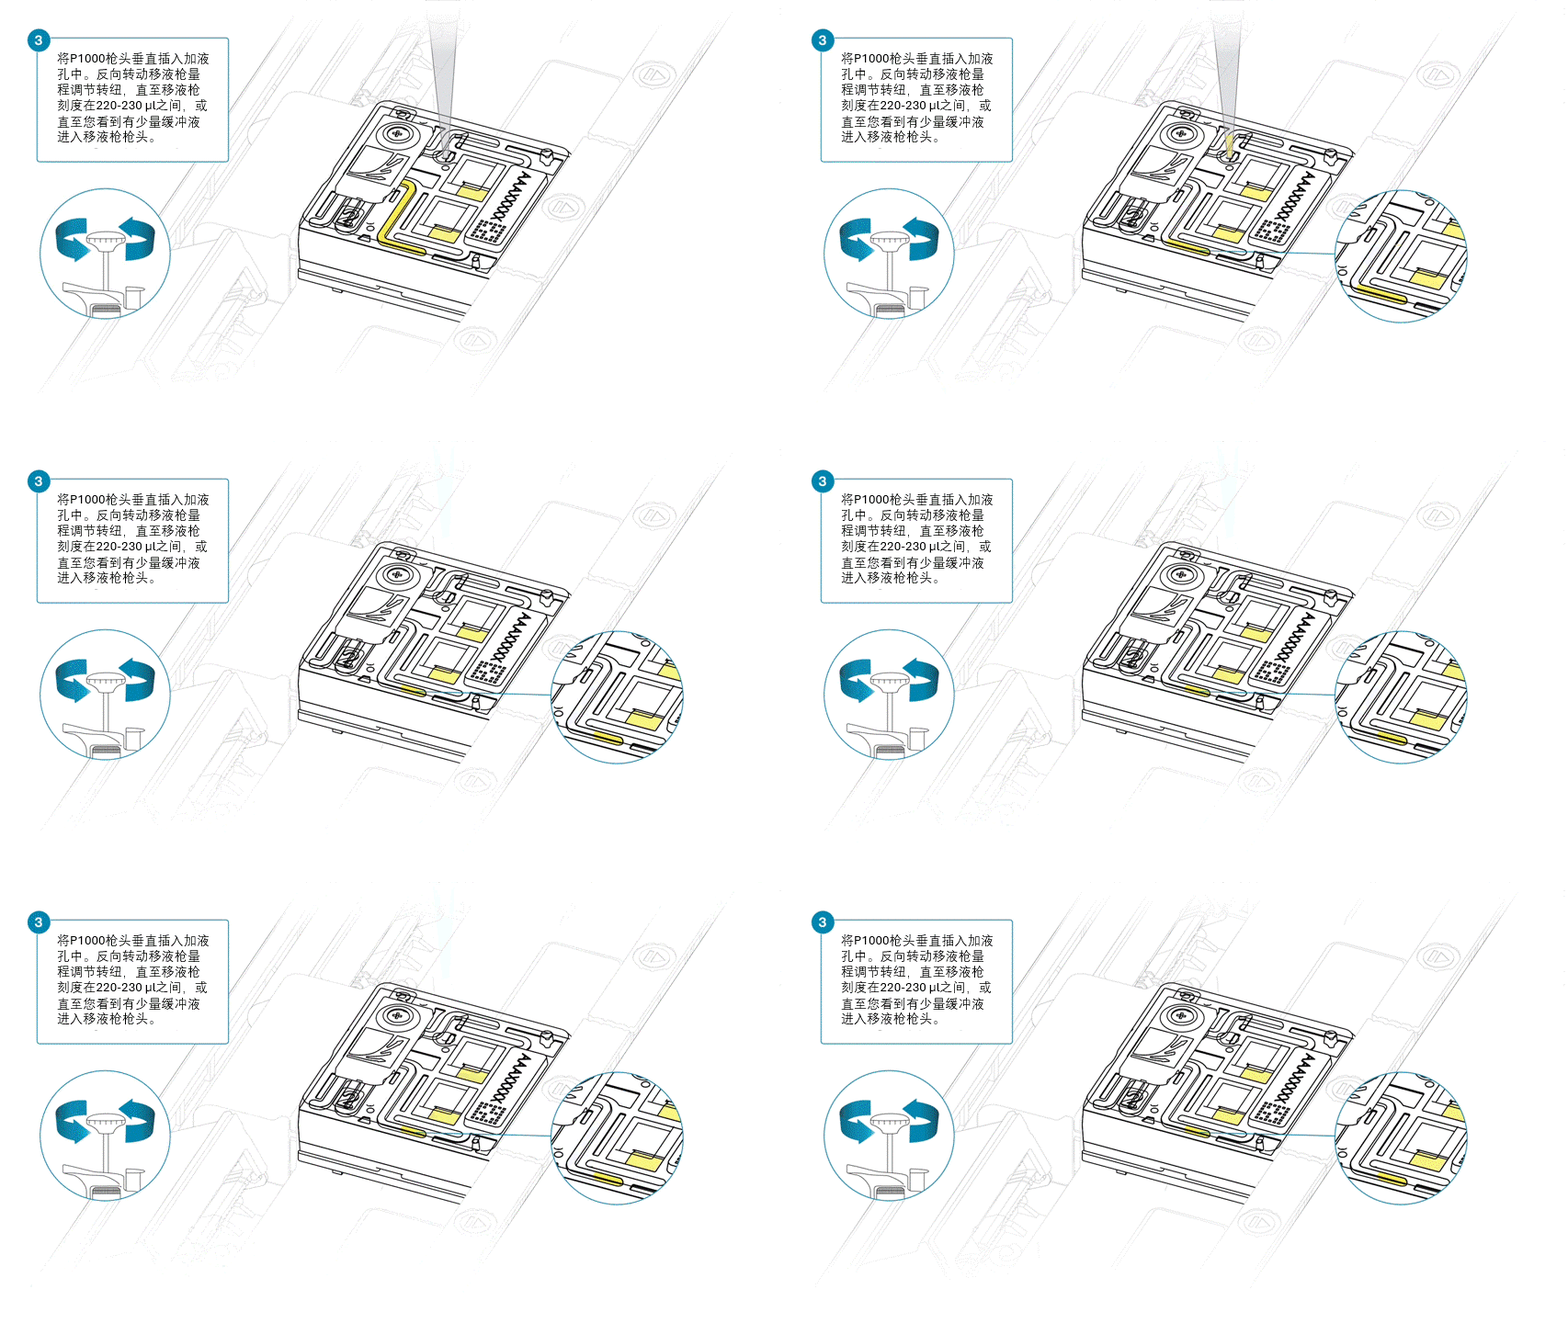
从测序芯片中反旋排出缓冲液。请勿吸出超过20-30µl的缓冲液,并确保芯片上的纳米孔阵列一直有缓冲液覆盖。将气泡引入阵列会对纳米孔造成不可逆转地损害。
在加液孔打开的状态下,按下述步骤吸取少量液体,同时避免引入气泡:
- 将P1000移液枪转至200µl刻度。
- 将枪头垂直插入加液孔中。
- 反向转动移液枪量程调节转纽,直至移液枪刻度在220-230 µl之间,或直至您看到有少量缓冲液进入移液枪枪头。
使用P1000移液枪向芯片的加液孔中加入500 µl芯片预处理溶液。加入过程中,请避免引入气泡。等待5分钟,与此同时,您可按以下步骤准备上样文库。
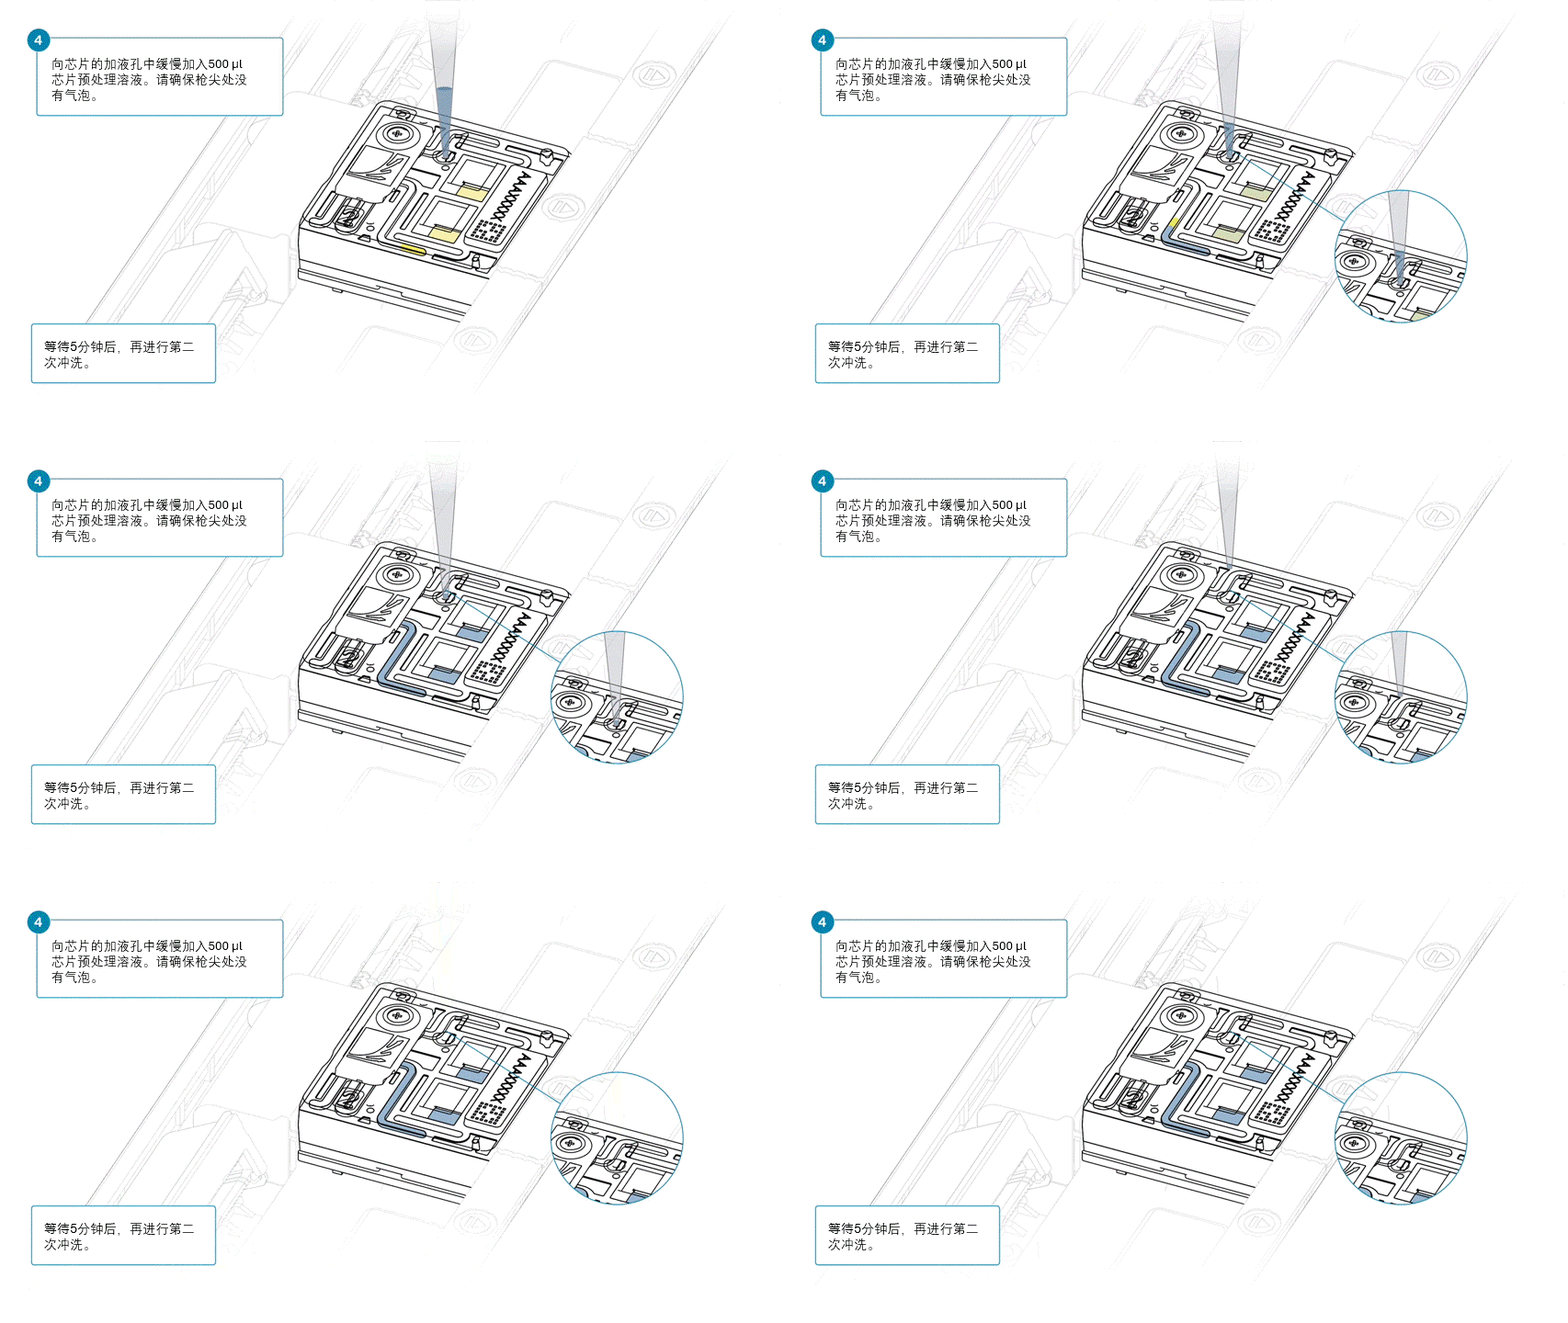
将含有文库颗粒的LIB管用移液枪吹打混匀。
LIB管内的文库颗粒分散于悬浮液中。由于颗粒沉降速度非常快,因此请在混匀颗粒后立即使用。
对于大多数测序实验,我们建议您使用文库颗粒(LIB)。但如文库较为粘稠,您可考虑使用文库溶液(LIS)。
在一支新的1.5ml Eppendorf DNA LoBind离心管内,将所有试剂按以下顺序混合:
| 试剂 | 每张测序芯片的上样体积 |
|---|---|
| 测序缓冲液 (SB) | 100 µl |
| 文库颗粒 (LIB),使用前充分混匀;或文库溶液 (LIS) | 68 µl |
| DNA 文库 | 32 µl |
| 总体积 | 200 µl |
请注意: 此处增大了文库的上样量,以增强纳米孔阵列的覆盖度。
缓慢向芯片的加液口中加入500 µl预处理液,完成芯片的预处理。
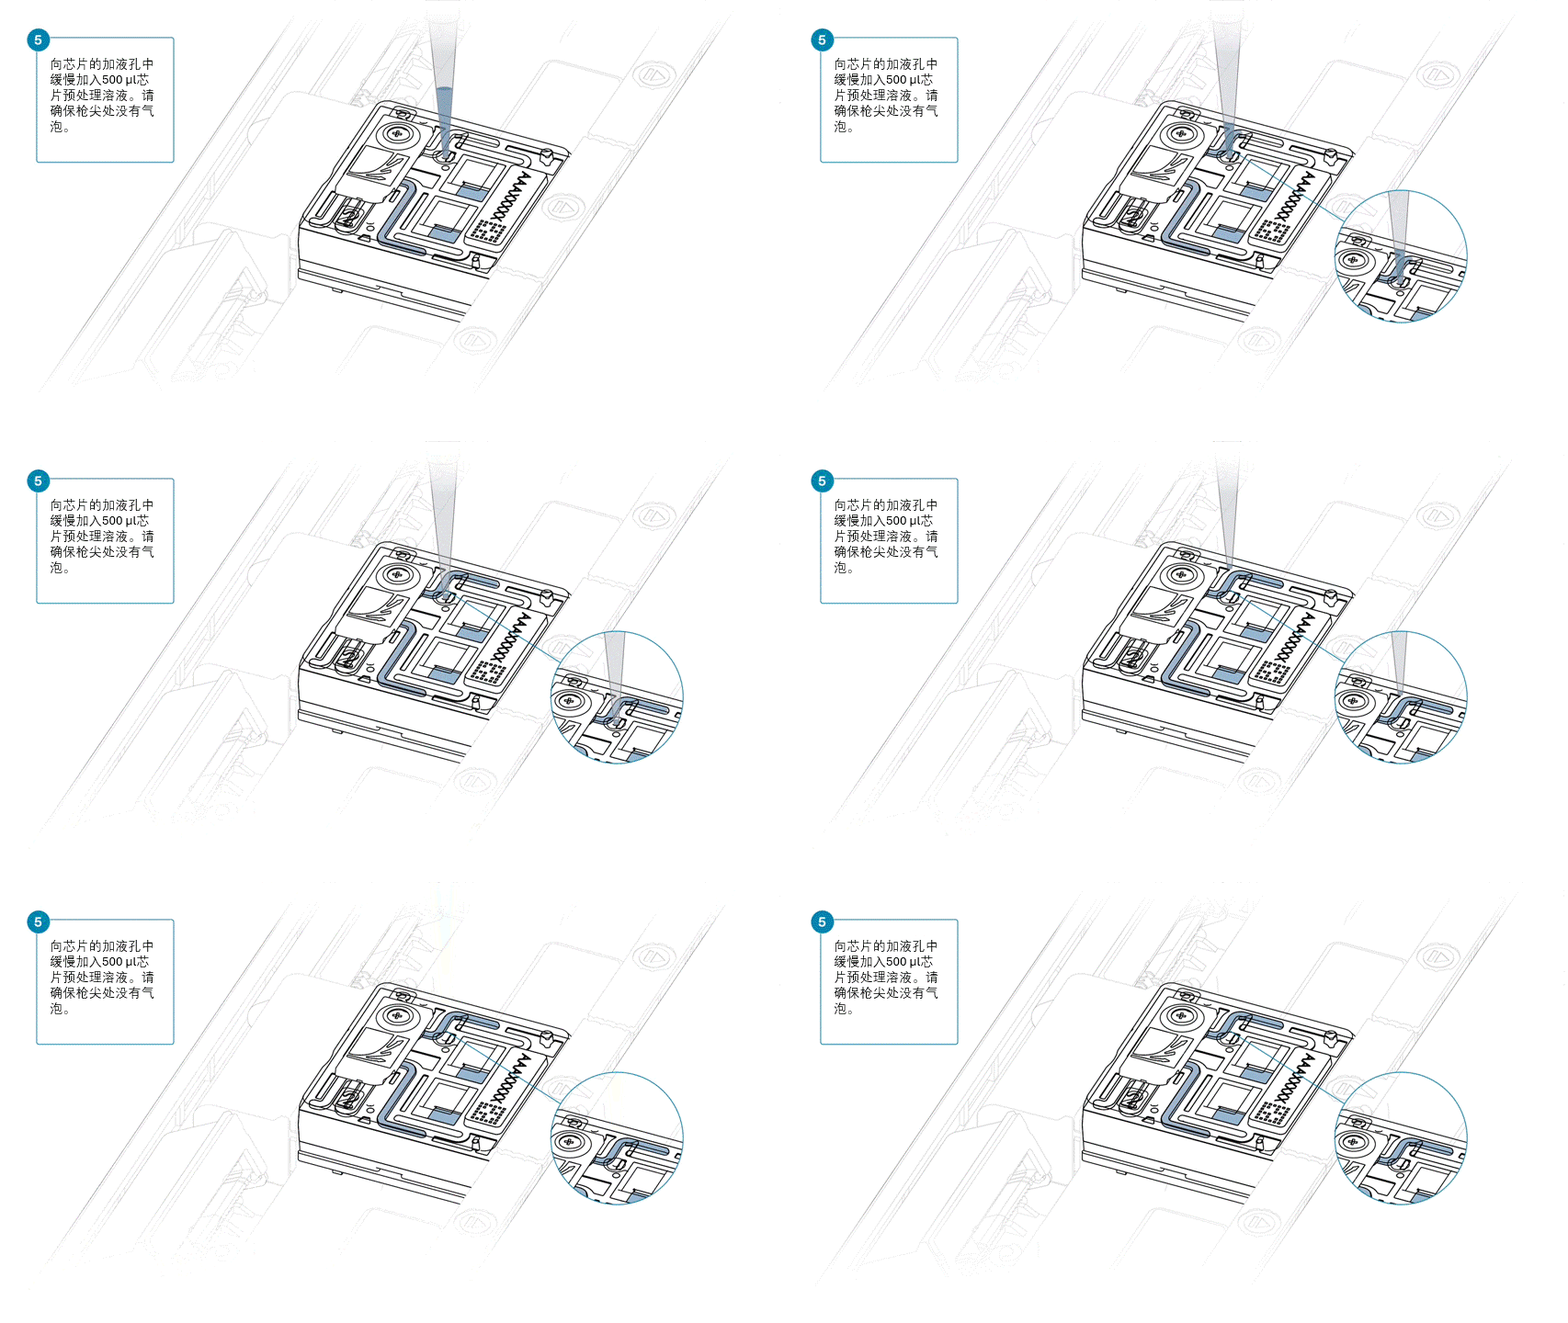
临上样前,用移液枪轻轻吹打混匀制备好的文库。
使用 P1000 移液枪向加液孔中加入200 µl 文库。
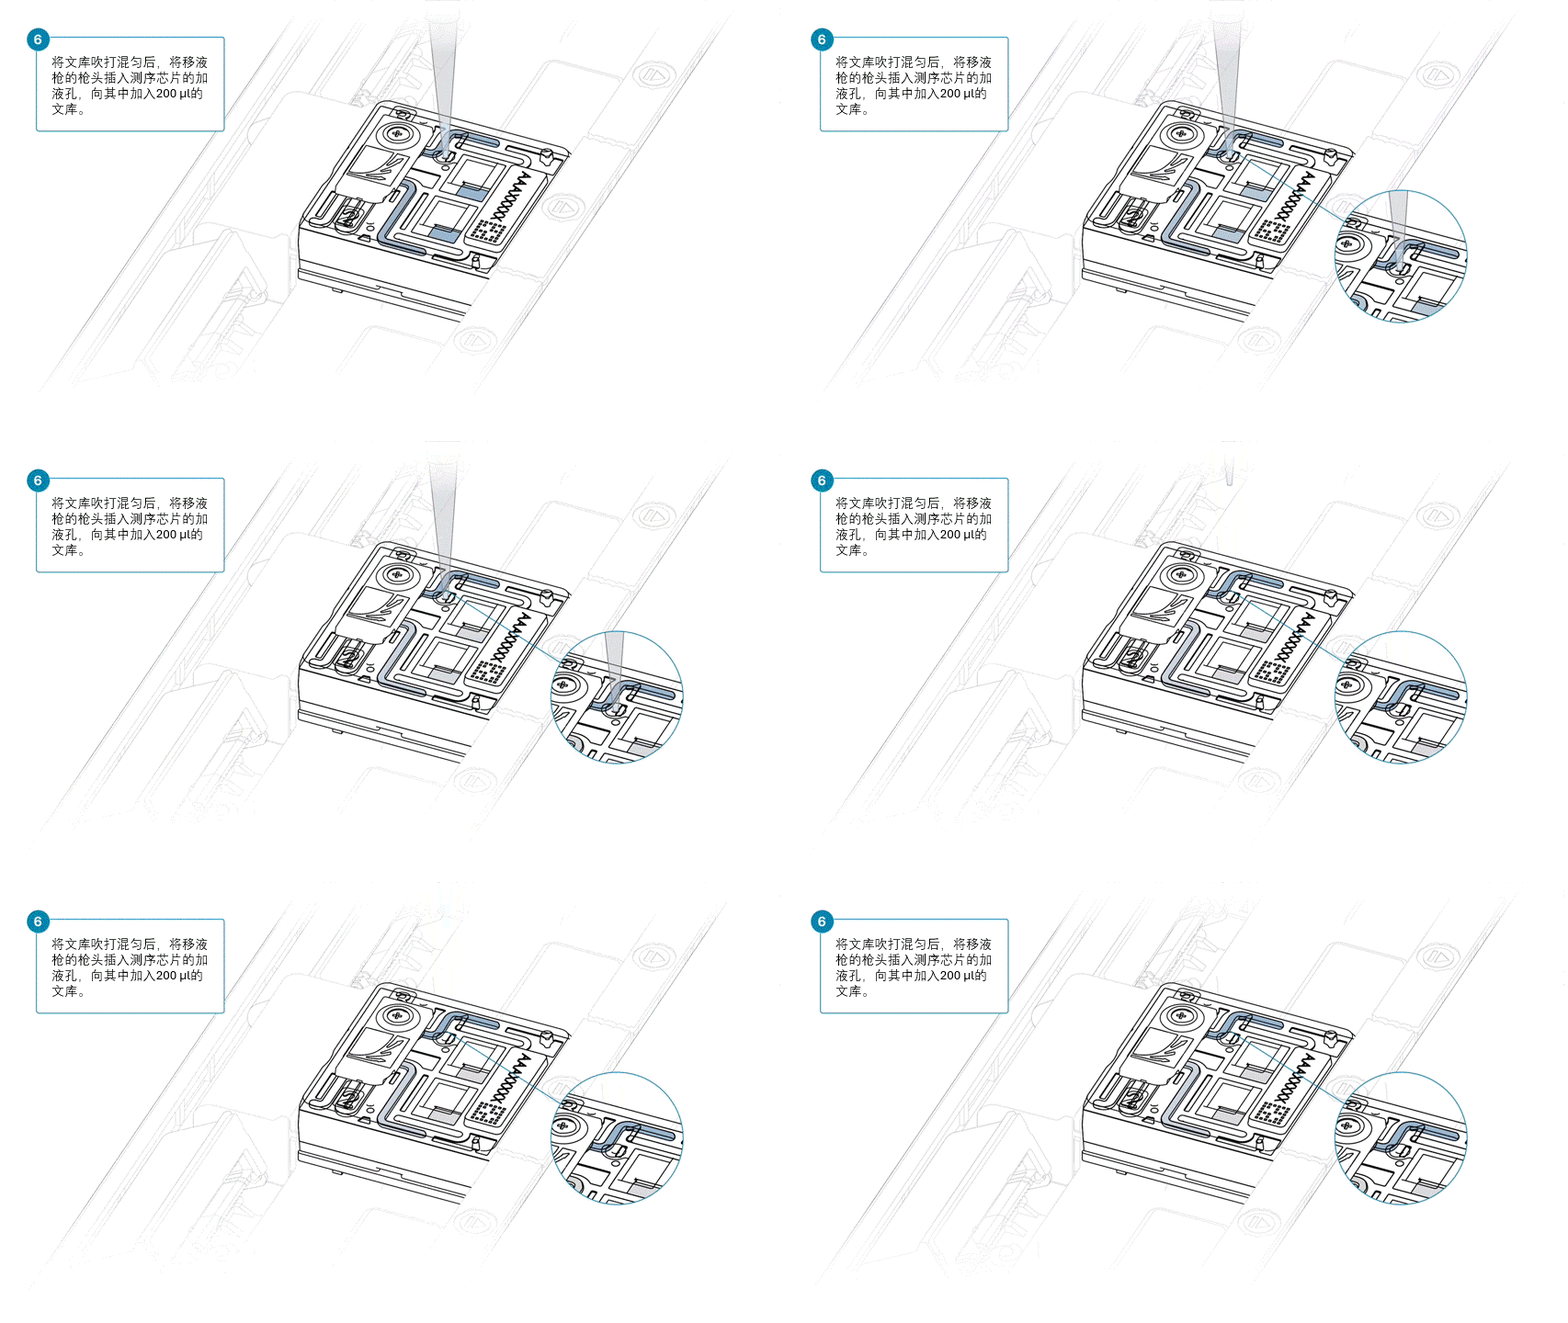
合上加液孔孔盖。
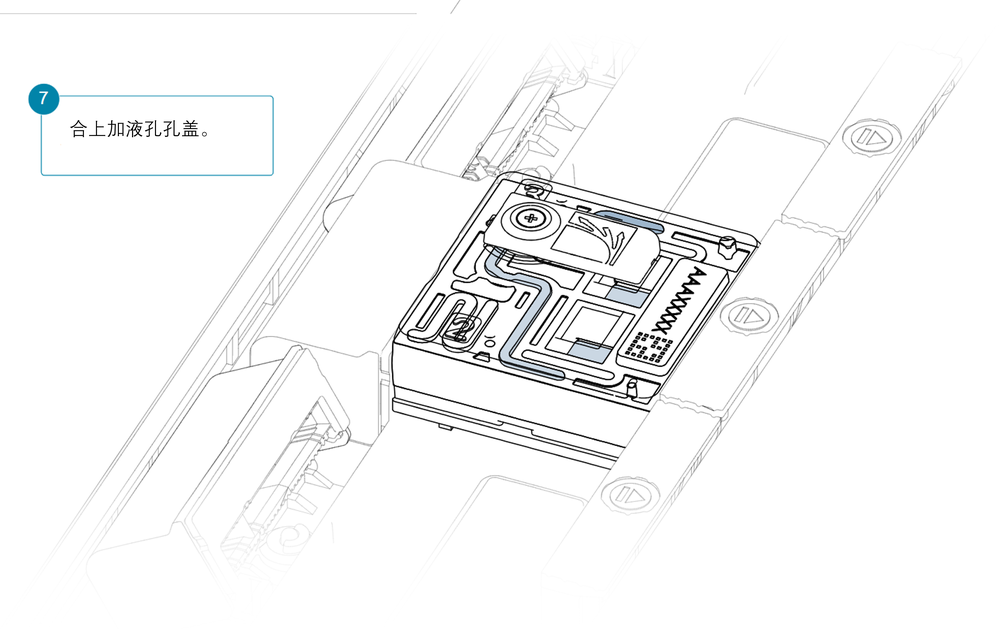
为获得最佳测序产出,在文库样本上样后,请立即在测序芯片上安装遮光片。
我们建议在清洗芯片并重新上样时,将遮光片保留在测序芯片上。一旦文库从测序芯片中吸出,即可取下遮光片。
如遮光片不在测序芯片上,请您按照以下步骤安装:
- 将遮光片的中空部分(空槽)与测序芯片的加液孔孔盖对齐。确保遮光片的前沿位于测序芯片ID的上方。
- 用力下压遮光片的卡垫部分,遮光片空槽边缘会随卡垫卡入加液孔孔盖下方。
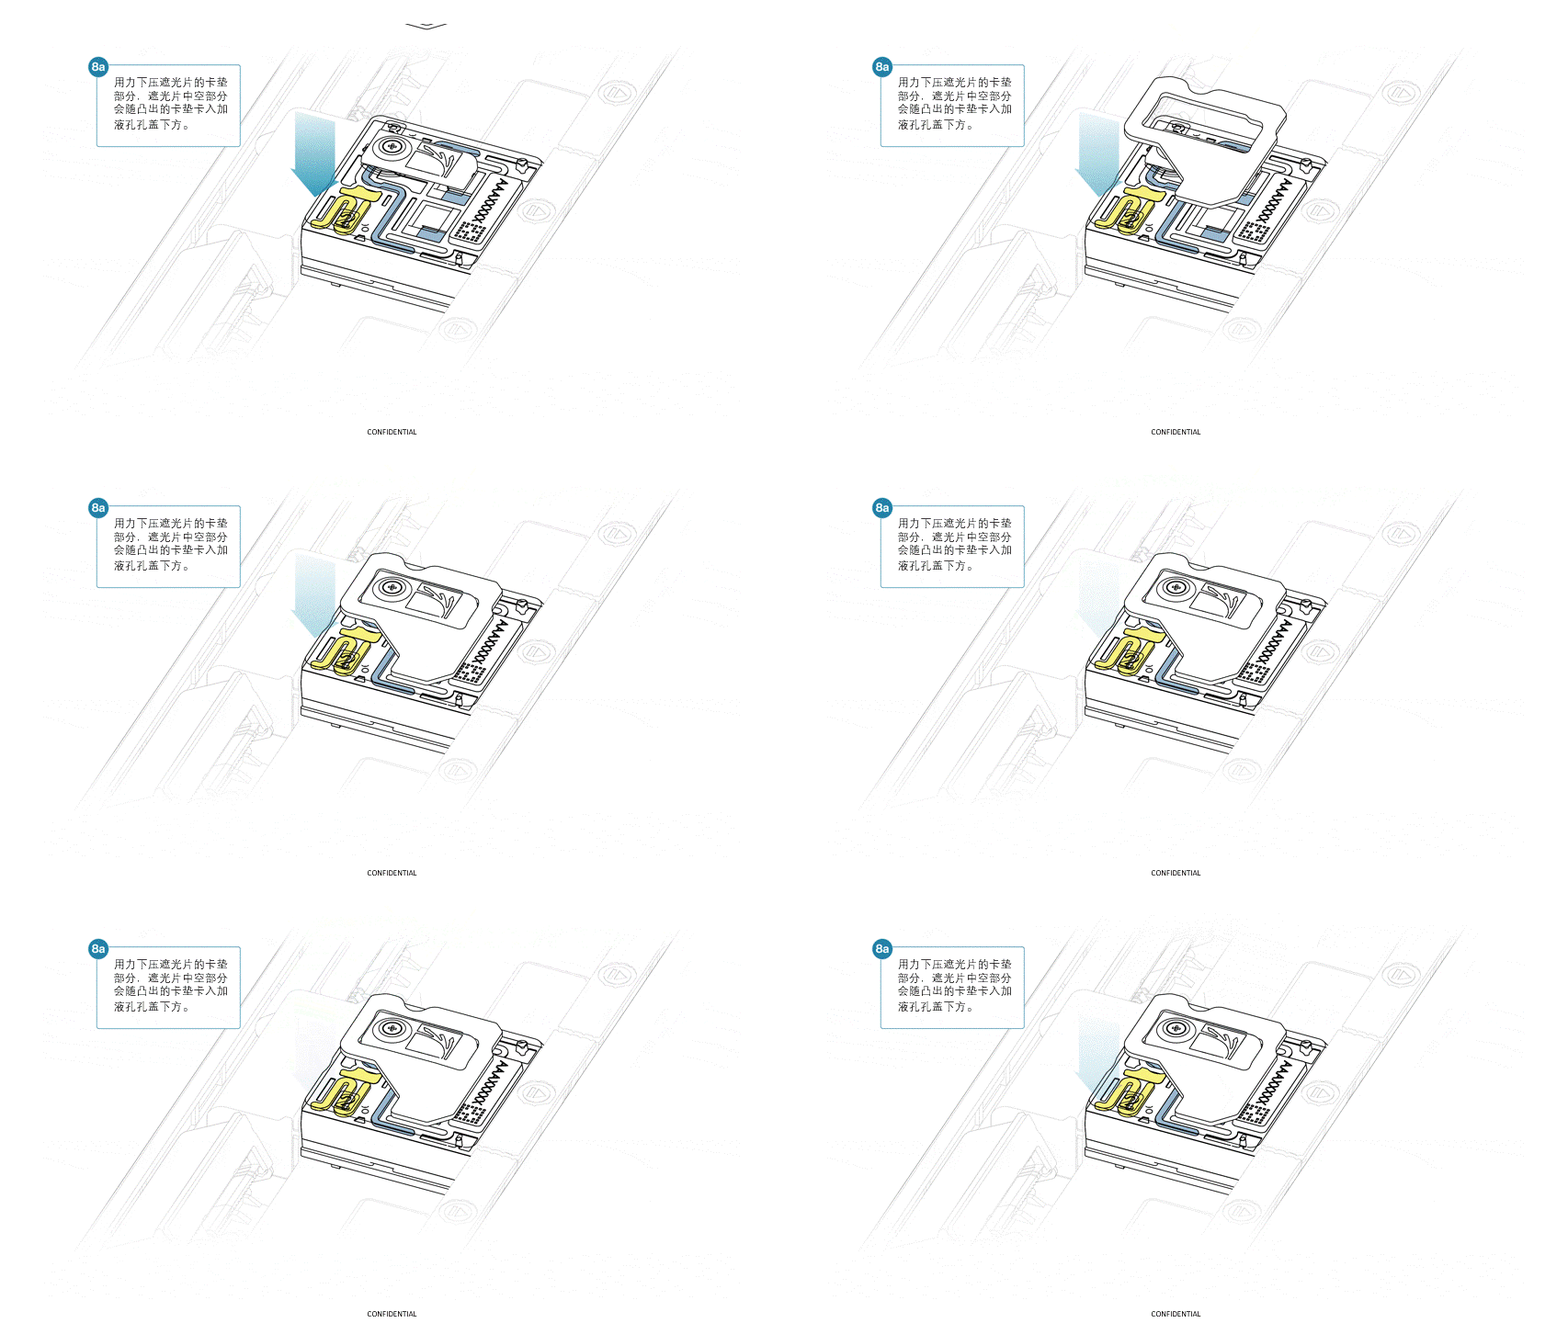
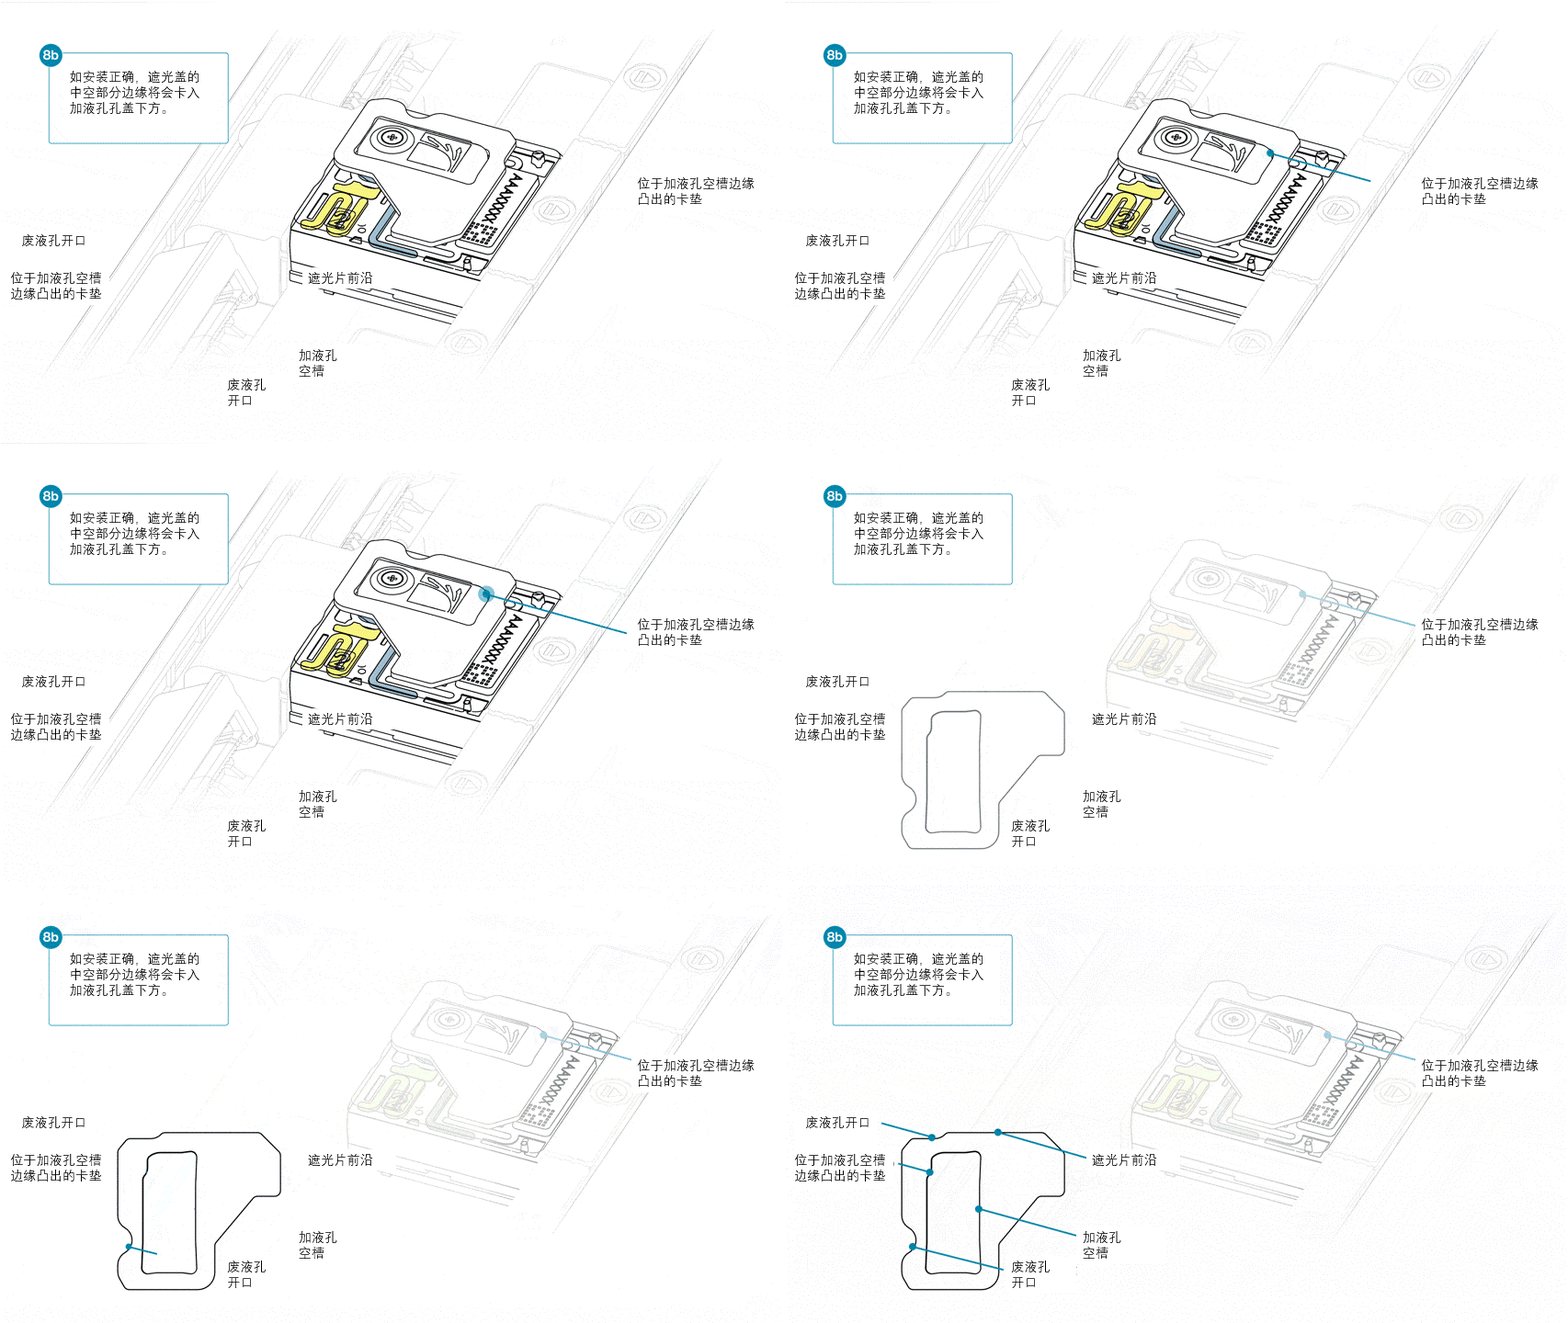
准备就绪后,合上PromethION设备上盖。
请在为PromethION芯片上样后,等待10分钟再启动实验,以提高芯片产出。
9. 免扩增条形码连接
材料
- Barcoded and adapted samples (from previous step)
耗材
- 1.5 ml Eppendorf DNA LoBind 离心管
- Qubit™ 分析管(Invitrogen, Q32856)
- Qubit™ dsDNA HS Assay(双链 DNA 高灵敏度检测)试剂盒(ThermoFisher,Q32851)
仪器
- 涡旋混匀仪
- 迷你离心机
- 盛有冰的冰桶
- 多通道移液枪和枪头
- P1000 移液枪和枪头
- P200 移液枪和枪头
- P100 移液枪和枪头
- P20 移液枪和枪头
- P10 移液枪和枪头
- P2 移液枪和枪头
- Qubit™ 荧光计(或用于质控检测的等效仪器)
请在文库上样前完成测序芯片质检,评估可用的活性纳米孔数量。
若该测序芯片此前已完成质检,则可跳过此步骤。
详细操作说明请参阅 MinKNOW 实验指南中的测序芯片质检说明部分。
This method uses the sequencing data from the sample QC pool run to optimise barcode balancing in your sequencing runs. The data is processed using a library pooling calculator spreadsheet.
Download the library pooling calculator spreadsheet using the link below:
Library pooling calculator spreadsheet
Fill in the “Sample Details” tab of the library pooling calculator spreadsheet.
Importantly, ensure that respective barcodes are correctly assigned to corresponding wells of sample-containing 96-well PCR plate.
Download the final run report from the sample QC pool sequencing run.
In the sequencing run report, navigate to the "Barcodes" section and export the CSV file.
From the exported CSV file, copy the “Barcode”, “Total bases (Mb)” and “Passed bases (%)” columns.
Paste the copied columns from the CSV file into the denoted sections within the “Output ranking” tab of the library pooling calculator spreadsheet.
The samples are automatically ranked from the highest to the lowest facilitating splitting into four groups (“pooling groups”) of descending output.
Navigate to the "Pooling calculations" tab of the library pooling calculator.
1. Enter the flow cell type that you will use for sequencing:
- For PromethION Flow Cells enter the product code FLO-PRO114M
2. Enter the QC Pool Concentration measurement obtained during the "Sample QC Pool preparation" step.
The volumes for each sample to be pooled, and the required volume of Elution Buffer (EB) needed, will display on this tab.
Amounts of each barcoded sample within a Pooling Group are combined to create a sample pool that will result in balanced output per sample during subsequent sequencing.
To calculate volumes per sample needed, the respective output values from the highest and lowest output samples are first considered:
If the ratio between the two is equal to or less than 1.2, the "Pooling Group" is considered well balanced enough to simply pool equal volumes (64 µl of each sample is the default, but this can be adjusted as long as enough volume for flow cell loading is achieved).
If the ratio is greater than 1.2, bespoke volumes are needed, which are calculated by the spreadsheet. In this scenario, the volume of the lowest-represented sample is fixed, and volumes of all other samples are calculated accordingly to match the predicted output of that initial sample. Elution Buffer (EB) is then added to top up the pool to the required volume to support loading onto the desired number of flow cells.
If required, omit any samples and adjust the amount of Elution Buffer (EB) required accordingly.
The amount of any Elution Buffer (EB) to add to a pooled group is indicated in the library pooling calculator. A minimum value is stated in order to bring the total volume of the pool to 5% over the total volume needed for the required number of flow cell loads.
Please note, the highest concentration of Pooled Groups tested during kit verification was 11.25 ng/µl (equating to ~360 ng of library per flow cell load). The predicted Pooled Group concentration value is indicated on the library pooling calculator. If the value obtained is above 11.25 ng/µl, increase the amount of Elution Buffer needed (“EB to add” cell).
It should also be noted that a minimum of 100 ng of pooled library per flow cell load is recommended, equating to a final Pooled Group concentration of 3.125 ng/µl (as 32 µl of the Pooled Group is used per load). If the lowest‑output sample(s) within a group is/are particularly low, the subsequent pooling of lower volumes of all other samples could result in a final concentration below this lower limit.
If the predicted Pooled Group concentration value is lower than 3.125 ng/µl, it becomes necessary to omit the lowest-performing sample from the pool. To do this:
- Change the respective “Omit sample?” entry from “N” (No) to “Y” (Yes).
- Continue to omit the lowest-performing sample within a group in this way until the Pooled Group concentration reaches at least 3.125 ng/µl.
Conditional formatting within the library pooling calculator is in place to guide the process of forming the Pooled Group at the correct concentration:
- An amber value indicates that more Elution Buffer may be needed as the concentration rises above the verified range.
- A red value indicates that sample omission is required.
Omission of samples from a pooled group automatically adjusts the default number of flow cells needed for the experiment, and the total volume of library required is adjusted accordingly. For the PromethION Flow Cell (FLO-PRO114M) the number of flow cells to be used must match the number of samples that pass the QC step.
The "Manual Pooling Template" tab in the library pooling calculator summarises the volumes of samples/Elution Buffer (EB) for each Pooled Group.
Please ensure the information filled out in the library pooling calculator is correct before proceeding with sample pooling.
Note: The number of samples per pooled group should not exceed 24 samples.
Additionally, please ensure you have selected the correct flow cell type for your use-case, as this will affect pooling volumes: FLO-PRO114M or FLO-PRO114P.
Using the volumes outlined in the library pooling calculator, generate your sequencing sample pooled groups.
In separate clean 1.5 ml Eppendorf DNA LoBind tubes combine the indicated volumes of barcoded and adapted samples, and Elution Buffer (EB), for the separate pooled groups.
Ensure the pooled groups are well mixed by pipetting ten times at full volume.
连有条形码的DNA样本将用于稍后的接头连接及纯化步骤。如需要,您也可以此时将样品置于4℃储存过夜。
10. PromethION 测序芯片的预处理及上样
材料
- 测序芯片冲洗液(FCF)
- 冲洗系绳 UL(FTU)
- 文库颗粒(LIB)
- 测序缓冲液(SB)
耗材
- PromethION 测序芯片
- 1.5 ml Eppendorf DNA LoBind 离心管
仪器
- PromethION 测序设备
- PromethION 测序芯片遮光片
- P1000 移液枪和枪头
- P200 移液枪和枪头
- P20 移液枪和枪头
When loading multiple flow cells please ensure your prepared and/or combined reagents are regularly mixed.
We strongly recommend thoroughly mixing the Priming mix and the prepared Pooled Groups with their respective reagents before each use, and in regular intervals during the flow cell loading steps to ensure all components are homogeneous, resulting in even flow cell loading and optimal sequencing conditions.
The number of flow cells needed for sequencing is indicated through the use of library pooling calculator and the associated notes above.
In summary, 96 samples are run across:
- 96x FLO-PRO114M flow cells (split across four groups of 24 flow cells, with each group sequencing a separate Pooled Group).
Note: Flow cells sequencing each "Pooled Group" should all be run on the same PromethION device.
Remove the appropriate number of PromethION Flow Cells (FLO-PRO114M) from the fridge.
将芯片从冰箱中取出后,请将其置于室温环境孵育20分钟再插入PromethION测序仪。潮湿环境下的测序芯片上可能会形成冷凝水。因此,请检查测序芯片顶部和底部的金色连接器引脚处是否有水凝结。如有,请使用无纤维布擦干。请确保测序芯片底部有热垫(黑色)覆盖。
于室温下解冻测序缓冲液(SB)、文库颗粒(LIB)或文库溶液(LIS)、测序芯片系绳(FCT)和一管测序芯片冲洗液(FCF)。完全解冻后,涡旋振荡混匀,然后瞬时离心并置于冰上。
按下表制备测序芯片的预处理液,再于室温下短暂涡旋振荡混匀。
| 试剂 | 体积(每张芯片) |
|---|---|
| 测序芯片冲洗液 (FCF) | 1170 µl |
| 测序芯片系绳 (FCT) | 30 µl |
| 总体积 | 1200 µl |
对PromethION 24/48,将测序芯片插入相应卡槽的对接端口:
将测序芯片与连接器横竖对齐,以便顺利卡入。
用力下压芯片至卡槽,并确认卡夹位置归位。
如插入配置测试芯片的角度出现偏差,可能会损坏PromethION上的引脚并影响测序结果。如您发现 PromethION测序仪芯片位置上的引脚损坏,请通过电子邮件(support@nanoporetech.com)或微信公众号在线支持(NanoporeSupport)联系我们的技术支持团队。
顺时针滑动加液孔孔盖,将其打开。
从测序芯片中反旋排出缓冲液。请勿吸出超过20-30µl的缓冲液,并确保芯片上的纳米孔阵列一直有缓冲液覆盖。将气泡引入阵列会对纳米孔造成不可逆转地损害。
在加液孔打开的状态下,按下述步骤吸取少量液体,同时避免引入气泡:
- 将P1000移液枪转至200µl刻度。
- 将枪头垂直插入加液孔中。
- 反向转动移液枪量程调节转纽,直至移液枪刻度在220-230 µl之间,或直至您看到有少量缓冲液进入移液枪枪头。
使用P1000移液枪向芯片的加液孔中加入500 µl芯片预处理溶液。加入过程中,请避免引入气泡。等待5分钟,与此同时,您可按以下步骤准备上样文库。
将含有文库颗粒的LIB管用移液枪吹打混匀。
LIB管内的文库颗粒分散于悬浮液中。由于颗粒沉降速度非常快,因此请在混匀颗粒后立即使用。
对于大多数测序实验,我们建议您使用文库颗粒(LIB)。但如文库较为粘稠,您可考虑使用文库溶液(LIS)。
在一支新的1.5ml Eppendorf DNA LoBind离心管内,将所有试剂按以下顺序混合:
| 试剂 | 每张测序芯片的上样体积 |
|---|---|
| 测序缓冲液 (SB) | 100 µl |
| 文库颗粒 (LIB),使用前充分混匀;或文库溶液 (LIS) | 68 µl |
| DNA 文库 | 32 µl |
| 总体积 | 200 µl |
请注意: 此处增大了文库的上样量,以增强纳米孔阵列的覆盖度。
缓慢向芯片的加液口中加入500 µl预处理液,完成芯片的预处理。
临上样前,用移液枪轻轻吹打混匀制备好的文库。
使用 P1000 移液枪向加液孔中加入200 µl 文库。
合上加液孔孔盖。
为获得最佳测序产出,在文库样本上样后,请立即在测序芯片上安装遮光片。
我们建议在清洗芯片并重新上样时,将遮光片保留在测序芯片上。一旦文库从测序芯片中吸出,即可取下遮光片。
如遮光片不在测序芯片上,请您按照以下步骤安装:
- 将遮光片的中空部分(空槽)与测序芯片的加液孔孔盖对齐。确保遮光片的前沿位于测序芯片ID的上方。
- 用力下压遮光片的卡垫部分,遮光片空槽边缘会随卡垫卡入加液孔孔盖下方。
准备就绪后,合上PromethION设备上盖。
请在为PromethION芯片上样后,等待10分钟再启动实验,以提高芯片产出。
11. Washing and reloading the PromethION Flow Cells
材料
- Flow Cell Wash Kit XL (EXP-WSH004-XL)
耗材
- 1.5 ml Eppendorf DNA LoBind 离心管
仪器
- P1000 移液枪和枪头
- P20 移液枪和枪头
- 盛有冰的冰桶
- 涡旋混匀仪
When loading multiple flow cells please ensure your prepared and/or combined reagents are regularly mixed.
We strongly recommend thoroughly mixing the Wash mix, the Priming mix and the prepared Pooled Groups with their respective reagents before each use, and in regular intervals during the flow cell loading steps to ensure all components are homogeneous, resulting in even flow cell loading and optimal sequencing conditions.
Washing and reloading the flow cell after ~40 hours of sequencing is required for PromethION Flow Cells (FLO-PRO114M).
The PromethION Flow Cells (FLO-PRO114M are washed after ~40 hours of sequencing to restore pores to ensure efficient data acquisition.
- This washing procedure aims to remove most of the initial library and unblock the pores to prepare the flow cell for the loading of a subsequent library.
- Data acquisition in MinKNOW should be paused during the wash procedure and library loading.
- After the flow cell has been washed, the Pooled Group library can be loaded.
Washing and reloading a PromethION Flow Cell video
This video will show you how to wash a flow cell after a sequencing run and how to load a new library.
We recommend keeping the light shield on the flow cell during washing if a second library will be loaded straight away.
If the flow cell is to be washed and stored, the light shield can be removed.
Place sufficient tubes of Wash Mix (WMX) on ice for all your flow cells. Do not vortex the tube.
Thaw sufficient Wash Diluent (DIL) at room temperature for all your flow cells.
Mix the contents of Wash Diluent (DIL) thoroughly by vortexing, then spin down briefly and place on ice.
Prepare the following Flow Cell Wash Mix for all of your flow cells:
| Reagent | Volume per flow cell |
|---|---|
| Wash Mix (WMX) | 2 μl |
| Wash Diluent (DIL) | 398 μl |
| Total | 400 μl |
Mix well by pipetting, and place on ice. Do not vortex the tube.
Pause the sequencing experiment in MinKNOW, and leave the flow cell in the device.
It is vital that the inlet port is closed before removing waste to prevent air from being drawn across the sensor array area, which would lead to a significant loss of sequencing channels.
Remove waste buffer, as follows:
- Close the inlet port.
- Insert a P1000 pipette into a waste port and remove the waste buffer.
Note: As both the inlet port is closed, no fluid should leave the sensor array area.
Slide the inlet port cover clockwise to open the inlet port.
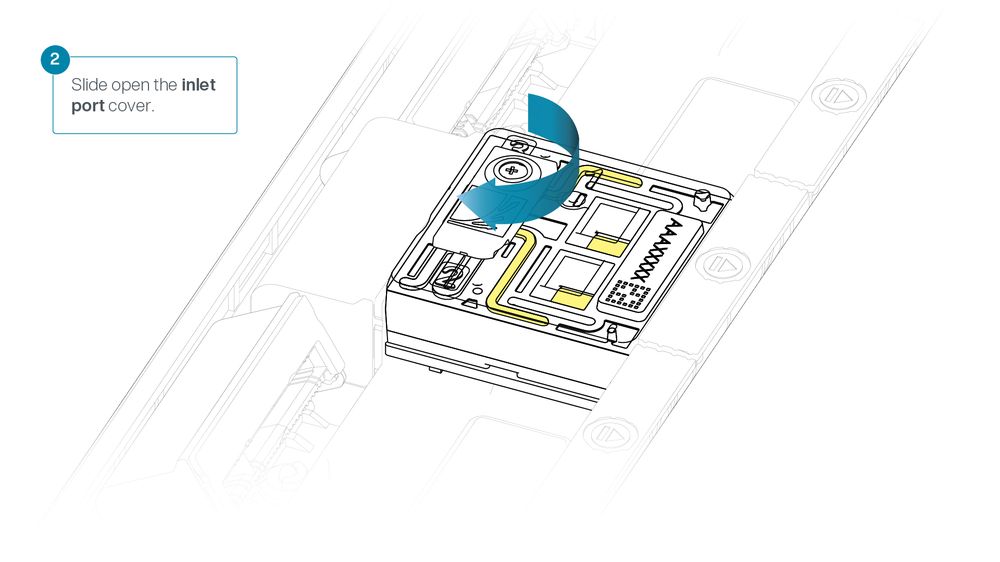
Take care when drawing back buffer from the flow cell. Do not remove more than 20-30 µl, and make sure that the array of pores are covered by buffer at all times. Introducing air bubbles into the array can irreversibly damage pores.
After opening the inlet port, check for a small air bubble under the cover. Draw back a small volume to remove any bubbles:
- Set a P1000 pipette to 200 µl
- Insert the tip into the inlet port
- Turn the wheel until the dial shows 220-230 µl, or until you can see a small volume of buffer entering the pipette tip.
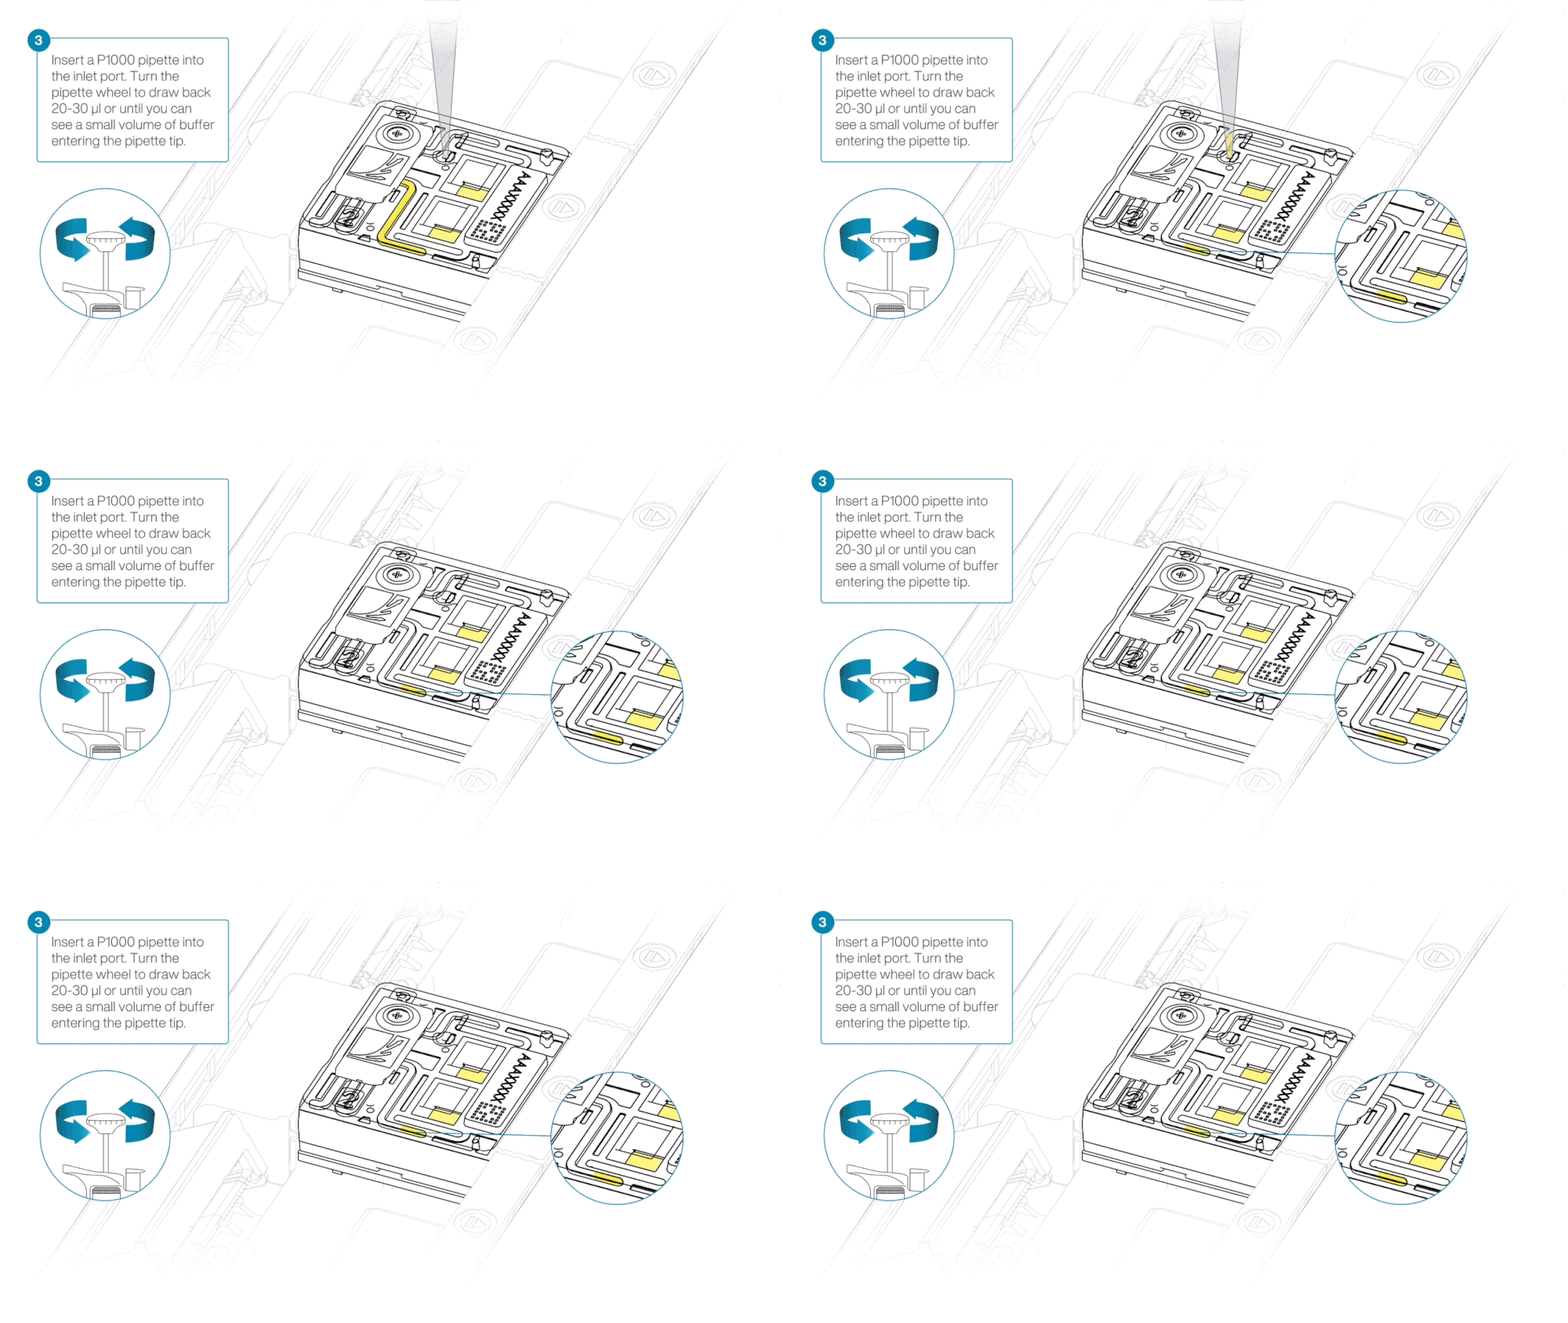
Slowly load 200 µl of the prepared flow cell wash mix into the inlet port, as follows:
- Using a P1000 pipette, take 200 µl of the flow cell wash mix
- Insert the pipette tip into the inlet port, ensuring there are no bubbles in the tip
- Slowly twist the pipette wheel down to load the flow cell (if possible with your pipette) or push down the plunger very slowly, leaving a small volume of buffer in the pipette tip.
- Set a timer for a 5 minute incubation.
Once the 5 minute incubation time is complete, carefully load the remaining 200 µl of the prepared flow cell wash mix into the inlet port, as follows:
- Using a P1000 pipette, take 200 µl of the flow cell wash mix
- Insert the pipette tip into the inlet port, ensuring there are no bubbles in the tip
- Slowly twist the pipette wheel down to load the flow cell (if possible with your pipette) or push down the plunger very slowly, leaving a small volume of buffer in the pipette tip.
Close the inlet port and wait for 1 hour.
It is vital that the inlet port is closed before removing waste to prevent air from being drawn across the sensor array area, which would lead to a significant loss of sequencing channels.
Remove the waste buffer, as follows:
- Ensure the inlet port is closed.
- Insert a P1000 pipette into a waste port and remove the waste buffer
Note: As the inlet port is closed, no fluid should leave the sensor array area.
The buffers used in this process are incompatible with conducting a Flow Cell Check step prior to loading the subsequent library. However, number of available pores will be reported after the next pore scan.
于室温下解冻测序缓冲液(SB)、文库颗粒(LIB)或文库溶液(LIS)、测序芯片系绳(FCT)和一管测序芯片冲洗液(FCF)。完全解冻后,涡旋振荡混匀,然后瞬时离心并置于冰上。
按下表制备测序芯片的预处理液,再于室温下短暂涡旋振荡混匀。
| 试剂 | 体积(每张芯片) |
|---|---|
| 测序芯片冲洗液 (FCF) | 1170 µl |
| 测序芯片系绳 (FCT) | 30 µl |
| 总体积 | 1200 µl |
Slide the inlet port cover clockwise to open.
Take care when drawing back buffer from the flow cell. Do not remove more than 20-30 µl, and make sure that the array of pores are covered by buffer at all times. Introducing air bubbles into the array can irreversibly damage pores.
After opening the inlet port, draw back a small volume to remove any air bubbles:
- Set a P1000 pipette tip to 200 µl.
- Insert the tip into the inlet port.
- Turn the wheel until the dial shows 220-230 µl, or until you see a small volume of buffer entering the pipette tip.
Slowly load 500 µl of the priming mix into the inlet port, as follows:
- Using a P1000 pipette, take 500 µl of the priming mix
- Insert the pipette tip into the priming port, ensuring there are no bubbles in the tip
- Slowly twist the pipette wheel down to load the flow cell (if possible with your pipette) or push down the plunger very slowly, leaving a small volume of buffer in the pipette tip.
It is vital to wait five minutes between the priming mix flushes to ensure effective removal of the nuclease.
Close the inlet port and wait five minutes.
During this time, prepare the library for loading using the next steps in the protocol.
Thoroughly mix the contents of the Library Beads (LIB) by pipetting.
The Library Beads (LIB) tube contains a suspension of beads. These beads settle very quickly. It is vital that they are mixed immediately before use.
We recommend using the Library Beads (LIB) for most sequencing experiments. However, the Library Solution (LIS) is available for more viscous libraries.
在一支新的1.5ml Eppendorf DNA LoBind离心管内,将所有试剂按以下顺序混合:
| 试剂 | 每张测序芯片的上样体积 |
|---|---|
| 测序缓冲液 (SB) | 100 µl |
| 文库颗粒 (LIB),使用前充分混匀;或文库溶液 (LIS) | 68 µl |
| DNA 文库 | 32 µl |
| 总体积 | 200 µl |
请注意: 此处增大了文库的上样量,以增强纳米孔阵列的覆盖度。
It is vital that the inlet port is closed before removing waste to prevent air from being drawn across the sensor array area, which would lead to a significant loss of sequencing channels.
Remove the waste buffer, as follows:
- Ensure the inlet port is closed.
- Insert a P1000 pipette into a waste port and remove the waste buffer
Note: As the inlet port is closed, no fluid should leave the sensor array area.
Slide the inlet port cover clockwise to open.
Take care when drawing back buffer from the flow cell. Do not remove more than 20-30 µl, and make sure that the array of pores are covered by buffer at all times. Introducing air bubbles into the array can irreversibly damage pores.
After opening the inlet port, draw back a small volume to remove any air bubbles:
- Set a P1000 pipette tip to 200 µl.
- Insert the tip into the inlet port.
- Turn the wheel until the dial shows 220-230 µl, or until you see a small volume of buffer entering the pipette tip.
Slowly load 500 µl of the priming mix into the inlet port, as follows:
- Using a P1000 pipette, take 500 µl of the priming mix
- Insert the pipette tip into the priming port, ensuring there are no bubbles in the tip
- Slowly twist the pipette wheel down to load the flow cell (if possible with your pipette) or push down the plunger very slowly, leaving a small volume of buffer in the pipette tip.
It is vital that the inlet port is closed before removing waste to prevent air from being drawn across the sensor array area, which would lead to a significant loss of sequencing channels.
Remove waste buffer, as follows:
- Close the inlet port.
- Insert a P1000 pipette into a waste port and remove the waste buffer.
Note: As both the inlet port is closed, no fluid should leave the sensor array area.
Slide the inlet port cover clockwise to open.
Take care when drawing back buffer from the flow cell. Do not remove more than 20-30 µl, and make sure that the array of pores are covered by buffer at all times. Introducing air bubbles into the array can irreversibly damage pores.
After opening the inlet port, draw back a small volume to remove any air bubbles:
- Set a P1000 pipette tip to 200 µl.
- Insert the tip into the inlet port.
- Turn the wheel until the dial shows 220-230 µl, or until you see a small volume of buffer entering the pipette tip.
Mix the prepared library gently by pipetting up and down just prior to loading.
Load 200 µl of library into the inlet port using a P1000 pipette.
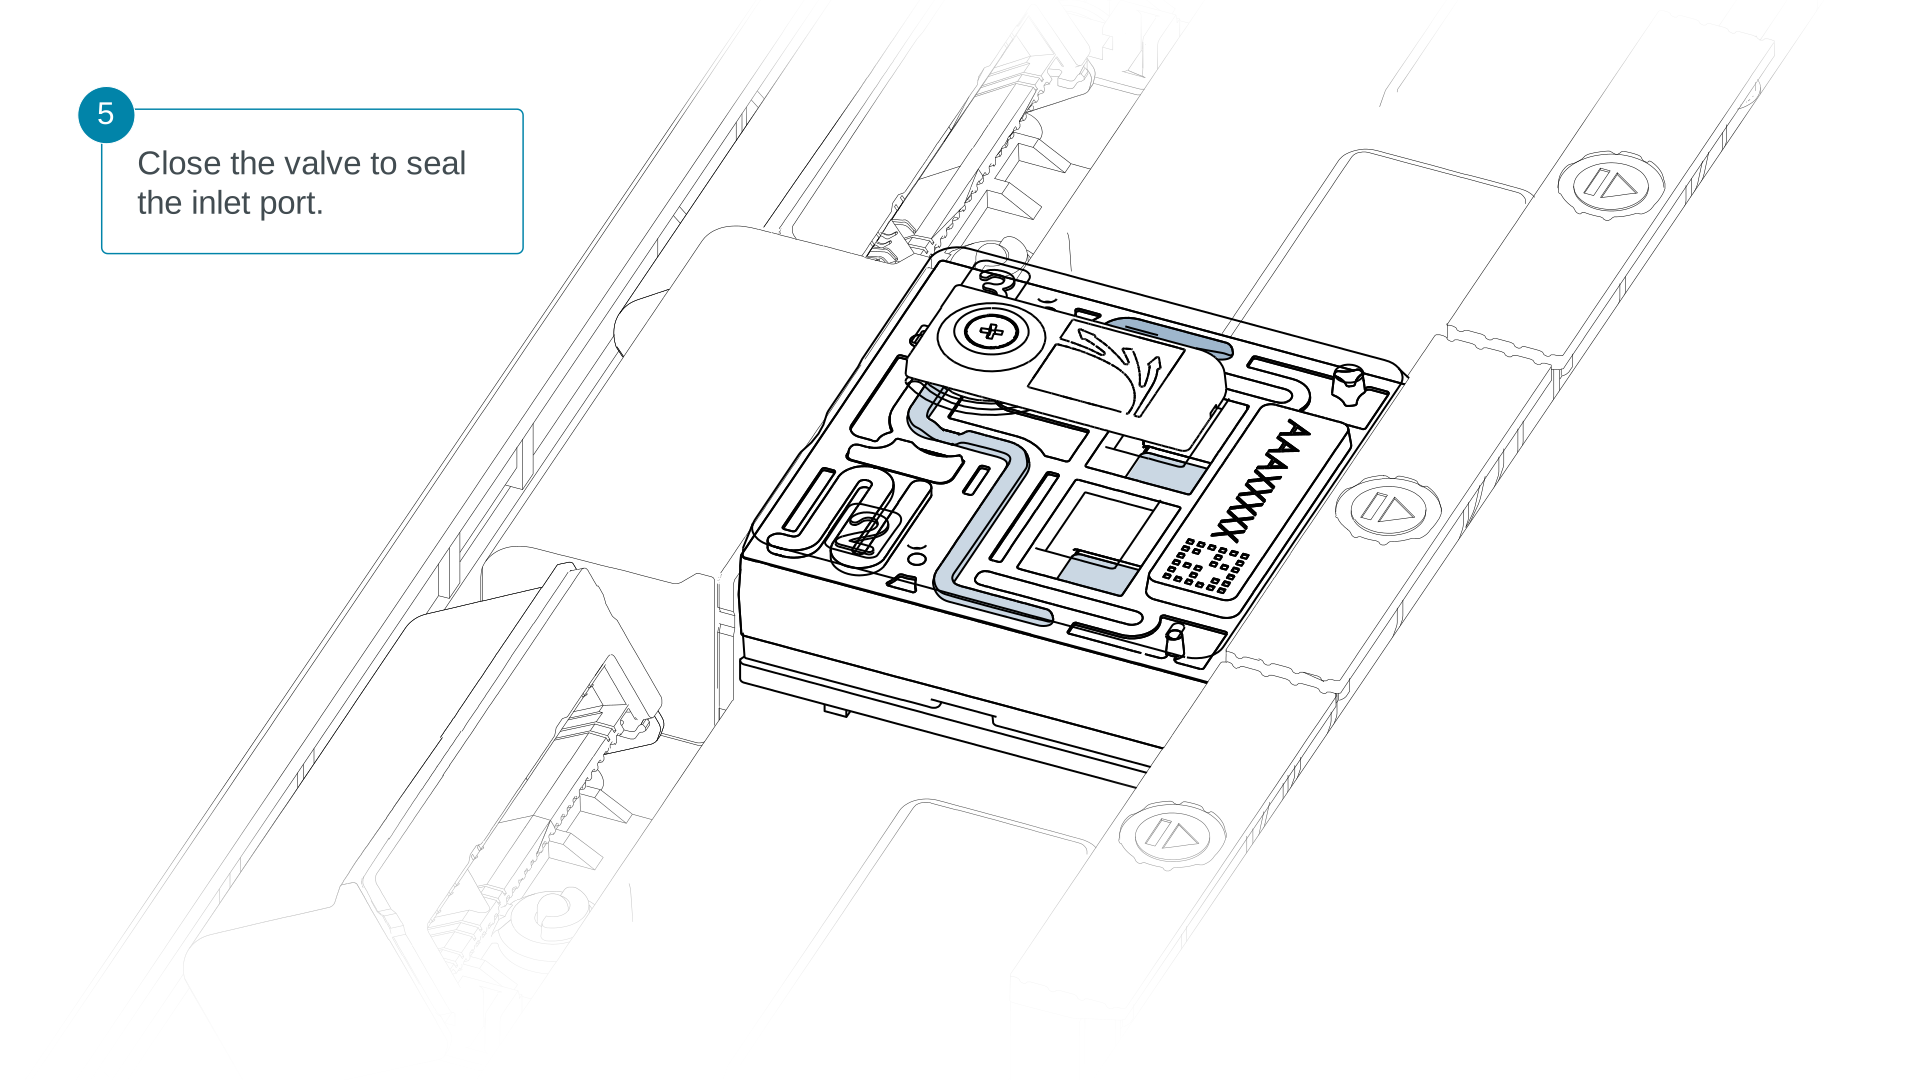
Close the valve to seal the inlet port.
For optimal sequencing output, install the light shield on your flow cell as soon as the library has been loaded.
We recommend leaving the light shield on the flow cell when library is loaded, including during any washing and reloading steps. The shield can be removed when the library has been removed from the flow cell.
If the light shield has been removed from the flow cell, install the light shield as follows:
- Align the inlet port cut out of the light shield with the inlet port cover on the flow cell. The leading edge of the light shield should sit above the flow cell ID.
- Firmly press the light shield around the inlet port cover. The inlet port clip will click into place underneath the inlet port cover.
Close the PromethION lid, and resume sequening for all your flow cells when ready on MinKNOW.
12. 数据采集和碱基识别
如何开始测序
在完成测序芯片的加样后,您即可在MinKNOW中启动测序实验。MinKNOW 软件负责仪器控制、数据采集以及实时碱基识别。有关设置和使用 MinKNOW 的详细信息,请参阅MinKNOW 实验指南。
您可以通过多种方式使用并设置MinKNOW:
- 在直接或远程连接到测序设备的计算机上。
- 直接在 PromethION 24/48 或 PromethION 2 Integrated 测序设备上。
有关在测序设备上使用 MinKNOW 的更多信息,请参阅相应设备的用户手册:
在MinKNOW中启动测序:
1. 在 "开始 "(Start)页面上,选择 开始测序 (Start Sequencing)。
2. 输入实验详情:例如实验名称,测序芯片位置及样本ID。
3. 在"试剂盒"页面上,选择 免扩增条形码试剂盒-96 V14(SQK-NBD114.96) 。
4. 在“实验配置”(Run Configuration)页面设置测序与输出参数,或保持默认值。
请注意: 如果在设置实验参数时关闭了碱基识别,您可在实验结束后,在MinKNOW中运行线下碱基识别。详情请参阅MinKNOW实验指南。
5. 单击 "参数确认" 页面上的 开始 启动测序。
测序后数据分析
当于MinKNOW上完成测序后,您可按照“测序芯片的重复利用及回收”一节中的说明重复使用或返还测序芯片。
完成测序和碱基识别后,即可进行数据分析。有关碱基识别和后续分析选项的详细信息,请参阅数据分析文档。
在下游分析部分,我们将概述更多用于数据分析的选项。
13. Flow cell reuse and returns
We do not recommend washing and reusing your flow cells for this method.
Re-using these flow cells for subsequent sequencing experiments will result in insufficient data generation for analysis.
Follow the returns procedure to send back flow cells to Oxford Nanopore for recycling.
Instructions for returning flow cells can be found here.
If you encounter issues or have questions about your sequencing experiment, please refer to the Troubleshooting Guide that can be found in the online version of this protocol.
14. 下游分析
下游分析
您可以选择以下几个途径来进一步分析经过碱基识别的数据:
EPI2ME 工作流程
Oxford Nanopore Technologies通过EPI2ME提供了一系列针对高阶数据分析的生物信息学教程和工作流程。上述资源汇总于纳米孔社区的 EPI2ME 板块。该平台通过描述性文字、生物信息学代码和示例数据,具象化地展示出我们的研究和应用团队发布在 GitHub 上的工作流程。
科研分析工具
Oxford Nanopore Technologies的研发部门开发了许多分析工具,您可在Oxford Nanopore的 GitHub 资料库中找到。这些工具面向有一定经验的用户,并包含如何安装和运行软件的说明。工具以源代码形式提供,因此我们仅提供有限的技术支持。
纳米孔社区用户开发的分析工具
如上述资源未能提供满足您研究需求的数据分析方法,请前往资源中心,查找适用的生物信息学工具。该板块汇总了许多由纳米孔社区成员开发、且在Github上开源的、针对纳米孔数据的生信分析工具。请注意,Oxford Nanopore Technologies不为这些工具提供支持,也不能保证它们与测序所用的最新的化学试剂/软件配置兼容。
15. Issues during DNA extraction and library preparation
Below is a list of the most commonly encountered issues, with some suggested causes and solutions.
We also have an FAQ section available on the Nanopore Community Support section.
If you have tried our suggested solutions and the issue still persists, please contact Technical Support via email (support@nanoporetech.com) or via LiveChat in the Nanopore Community.
Low sample quality
| Observation | Possible cause | Comments and actions |
|---|---|---|
| Low DNA purity (Nanodrop reading for DNA OD 260/280 is <1.8 and OD 260/230 is <2.0–2.2) | The DNA extraction method does not provide the required purity | The effects of contaminants are shown in the Contaminants Know-how piece. Please try an alternative extraction method that does not result in contaminant carryover. Consider performing an additional AMPure bead clean-up step. |
Low DNA recovery after AMPure bead clean-up
| Observation | Possible cause | Comments and actions |
|---|---|---|
| Low recovery | DNA loss due to a lower than intended AMPure beads-to-sample ratio | 1. AMPure beads settle quickly, so ensure they are well resuspended before adding them to the sample. 2. When the AMPure beads-to-sample ratio is lower than 0.4:1, DNA fragments of any size will be lost during the clean-up. |
| Low recovery | DNA fragments are shorter than expected | The lower the AMPure beads-to-sample ratio, the more stringent the selection against short fragments. Please always determine the input DNA length on an agarose gel (or other gel electrophoresis methods) and then calculate the appropriate amount of AMPure beads to use. 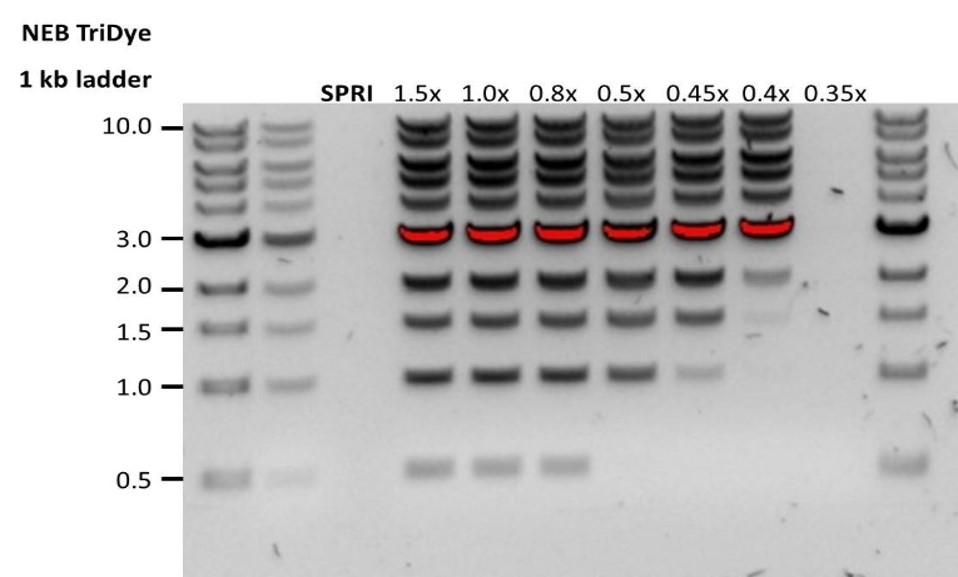 |
| Low recovery after end-prep | The wash step used ethanol <70% | DNA will be eluted from the beads when using ethanol <70%. Make sure to use the correct percentage. |
16. Issues during the sequencing run
Below is a list of the most commonly encountered issues, with some suggested causes and solutions.
We also have an FAQ section available on the Nanopore Community Support section.
If you have tried our suggested solutions and the issue still persists, please contact Technical Support via email (support@nanoporetech.com) or via LiveChat in the Nanopore Community.
Fewer pores at the start of sequencing than after Flow Cell Check
| Observation | Possible cause | Comments and actions |
|---|---|---|
| MinKNOW reported a lower number of pores at the start of sequencing than the number reported by the Flow Cell Check | An air bubble was introduced into the nanopore array | After the Flow Cell Check it is essential to remove any air bubbles near the priming port before priming the flow cell. If not removed, the air bubble can travel to the nanopore array and irreversibly damage the nanopores that have been exposed to air. The best practice to prevent this from happening is demonstrated in this video for how to load a PromethION Flow Cell. |
| MinKNOW reported a lower number of pores at the start of sequencing than the number reported by the Flow Cell Check | The flow cell is not correctly inserted into the device | Stop the sequencing run, remove the flow cell from the sequencing device and insert it again, checking that the flow cell is firmly seated in the device and that it has reached the target temperature. If applicable, try a different position on the device (GridION/PromethION). |
| MinKNOW reported a lower number of pores at the start of sequencing than the number reported by the Flow Cell Check | Contaminations in the library damaged or blocked the pores | The pore count during the Flow Cell Check is performed using the QC DNA molecules present in the flow cell storage buffer. At the start of sequencing, the library itself is used to estimate the number of active pores. Because of this, variability of about 10% in the number of pores is expected. A significantly lower pore count reported at the start of sequencing can be due to contaminants in the library that have damaged the membranes or blocked the pores. Alternative DNA/RNA extraction or purification methods may be needed to improve the purity of the input material. The effects of contaminants are shown in the Contaminants Know-how piece. Please try an alternative extraction method that does not result in contaminant carryover. |
MinKNOW script failed
| Observation | Possible cause | Comments and actions |
|---|---|---|
| MinKNOW shows "Script failed" | Restart the computer and then restart MinKNOW. If the issue persists, please collect the MinKNOW log files and contact Technical Support. If you do not have another sequencing device available, we recommend storing the flow cell and the loaded library at 4°C and contact Technical Support for further storage guidance. |
Pore occupancy below 40%
| Observation | Possible cause | Comments and actions |
|---|---|---|
| Pore occupancy <40% | Not enough library was loaded on the flow cell | Follow the guidance outlined in the method for flow cell loadng qunatities to ensure high pore occupancy on your flow cell. |
| Pore occupancy close to 0 | The sequencing adapters did not ligate to the DNA | Make sure to use the reagents outlined in the method, and use the correct amount of each reagent. A Lambda control library can be prepared to test the integrity of the third-party reagents. |
| Pore occupancy close to 0 | Ethanol was used instead of LFB at the wash step after sequencing adapter ligation | Ethanol can denature the motor protein on the sequencing adapters. Make sure the LFB buffer was used after ligation of sequencing adapters. |
| Pore occupancy close to 0 | No tether on the flow cell | Tethers are adding during flow cell priming (FTU tube). Make sure FTU was added to FCF before priming. |
Shorter than expected read length
| Observation | Possible cause | Comments and actions |
|---|---|---|
| Shorter than expected read length | Unwanted fragmentation of DNA sample | Read length reflects input DNA fragment length. Input DNA can be fragmented during extraction and library prep. 1. Please review the Extraction Methods in the Nanopore Community for best practice for extraction. 2. Visualise the input DNA fragment length distribution on an agarose gel before proceeding to the library prep. 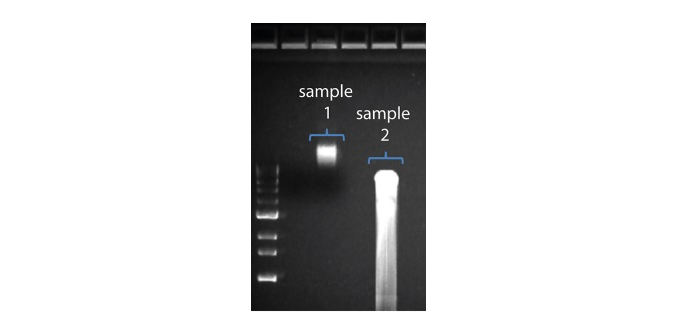 In the image above, Sample 1 is of high molecular weight, whereas Sample 2 has been fragmented. In the image above, Sample 1 is of high molecular weight, whereas Sample 2 has been fragmented.3. During library prep, avoid pipetting and vortexing when mixing reagents. Flicking or inverting the tube is sufficient. |
Large proportion of unavailable pores
| Observation | Possible cause | Comments and actions |
|---|---|---|
Large proportion of unavailable pores (shown as blue in the channels panel and pore activity plot) 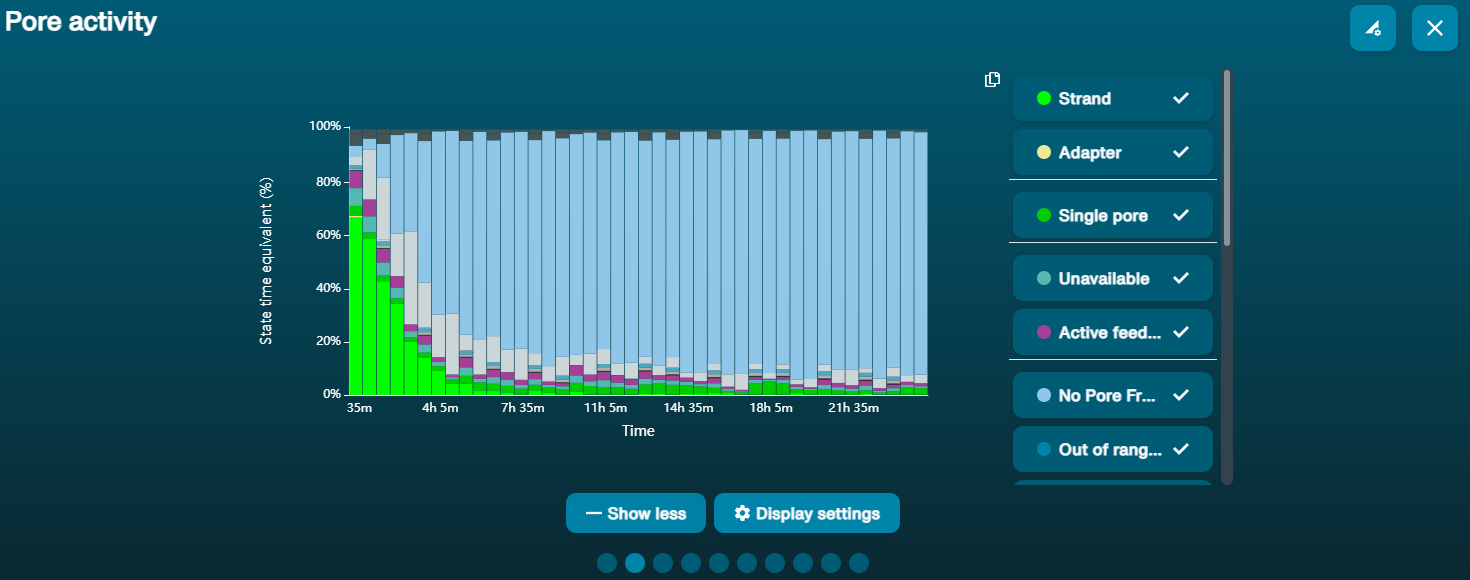 The pore activity plot above shows an increasing proportion of "unavailable" pores over time. The pore activity plot above shows an increasing proportion of "unavailable" pores over time. | Contaminants are present in the sample | Some contaminants can be cleared from the pores by the unblocking function built into MinKNOW. If this is successful, the pore status will change to "sequencing pore". If the portion of unavailable pores stays large or increases: A nuclease flush using the Flow Cell Wash Kit (EXP-WSH004) can be performed. |
Large proportion of inactive pores
| Observation | Possible cause | Comments and actions |
|---|---|---|
| Large proportion of inactive/unavailable pores (shown as light blue in the channels panel and pore activity plot. Pores or membranes are irreversibly damaged) | Air bubbles have been introduced into the flow cell | Air bubbles introduced through flow cell priming and library loading can irreversibly damage the pores. Watch the how to load a PromethION Flow Cell video for best practice. |
| Large proportion of inactive/unavailable pores | Contaminants are present in the sample | The effects of contaminants are shown in the Contaminants Know-how piece. Please try an alternative extraction method that does not result in contaminant carryover. |
Temperature fluctuation
| Observation | Possible cause | Comments and actions |
|---|---|---|
| Temperature fluctuation | The flow cell has lost contact with the device | Check that there is a heat pad covering the metal plate on the back of the flow cell. Re-insert the flow cell and press it down to make sure the connector pins are firmly in contact with the device. If the problem persists, please contact Technical Services. |
Failed to reach target temperature
| Observation | Possible cause | Comments and actions |
|---|---|---|
| MinKNOW shows "Failed to reach target temperature" | The instrument was placed in a location that is colder than normal room temperature, or a location with poor ventilation (which leads to the flow cells overheating) | MinKNOW has a default timeframe for the flow cell to reach the target temperature. Once the timeframe is exceeded, an error message will appear and the sequencing experiment will continue. However, sequencing at an incorrect temperature may lead to a decrease in throughput and lower q-scores. Please adjust the location of the sequencing device to ensure that it is placed at room temperature with good ventilation, then re-start the process in MinKNOW. |
Last updated: 9/8/2026
文档选项