Hereditary Cancer Panel (HCP) (HCP_9227_v114_revB_15Oct2025)
PromethION: Protocol
Hereditary Cancer Panel (HCP) V HCP_9227_v114_revB_15Oct2025
This is an end-to-end method outlining sample extraction, library preparation, sequencing, and data analysis.
The protocol:
- Uses genomic DNA extracted from whole blood
- Requires no PCR
- Is compatible with R10.4.1 flow cells
For Research Use Only
FOR RESEARCH USE ONLY
Contents
Introduction to the protocol
- 1. Overview of the protocol
- 2. Before getting started: Data bundle and workflow setup
- 3. Equipment and consumables
Sample preparation
文库制备
Sequencing and data analysis
Troubleshooting
概览
This is an end-to-end method outlining sample extraction, library preparation, sequencing, and data analysis.
The protocol:
- Uses genomic DNA extracted from whole blood
- Requires no PCR
- Is compatible with R10.4.1 flow cells
For Research Use Only
1. Overview of the protocol
Introduction to the Hereditary Cancer Panel (HCP) protocol
This protocol describes the process for DNA extraction, library preparation, and analysis for the Hereditary Cancer Panel (HCP) for 3 samples per PromethION Flow Cell, using the Native Barcoding Kit and the adaptive sampling target enrichment function in MinKNOW. All Oxford Nanopore Technologies supplied reagents required for this protocol are included in the Hereditary Cancer Panel Bundle, available in 18 or 72 sample formats. This bundle includes the Native Barcoding Kit and all necessary sequencing components, and is the standard configuration for implementing this workflow.
Please note, after extraction if processing multiple samples, samples are to be processed in increments of three for library preparation.
Overview of steps in the workflow
Prepare for your experiment
You will need to:
- Extract your input sample (whole blood, DNA).
- Ensure you have your sequencing kit, the correct equipment, and third-party reagents.
- Download the software for acquiring and analysing your data.
- Check your flow cell to ensure it has enough pores for a good sequencing run.
Sample preparation, library preparation, and sequencing
| Step in workflow | Process | Time | Stop option |
|---|---|---|---|
| Sample preparation | Extract gDNA from sample and quantify. Fragment the gDNA and quantify. Check the length, quantity and purity of your extracted material. The quality checks performed during the protocol are recommended to ensure experimental success. | 4 to 6 hours | At this stage, the extracted gDNA or fragmented gDNA can be stored at –20°C for later use. |
| DNA repair and end-prep | Repair the gDNA, and prepare the DNA ends for adapter attachment. | 60 minutes | 4°C overnight |
| Native barcode ligation | Ligate the native barcodes to the DNA ends. | 70 minutes | 4°C overnight |
| Sequencing adapter ligation and clean-up | Ligate sequencing adapters to the DNA ends. | 60 minutes | 4°C for short-term storage or for repeated use, such as for reloading your flow cell. –80°C for long-term storage. |
| Priming and loading the flow cell | Prime the flow cell, and load your DNA library into the flow cell. | 10 minutes | |
| Sequencing | Sequence your library using your sequencing device. | 72 hours | |
| Data analysis | Analysis using HCP data bundle. | 120 minutes |
Compatibility of this protocol
This protocol should only be used in combination with:
- Hereditary cancer panel bundle
- PromethION 24 - PromethION IT requirements document
- PromethION 2 Integrated - PromethION 2 Integrated IT requirements document
2. Before getting started: Data bundle and workflow setup
Data bundle and workflow setup
Following the Hereditary cancer profiling (HCP) registration, a link will be provided by email to a file storage location containing the data bundle to initiate and analyse your sequencing run. This data bundle is specifically configured for this product and ensures consistent setup and compatibility. Instructions for installing the 2ME file in EPI2ME, including how to test it with demo data, are provided in the data analysis section of this protocol.
The data bundle contains:
Hereditary Cancer adaptive sampling files for MinKNOW (reference genome FASTA, target region BED file) to be used during sequencing for target enrichment.
Hereditary Cancer analysis workflow files for post-sequencing bioinformatic analysis in EPI2ME (2ME).
Example files
If you have purchased the Hereditary Cancer bundle, and you have not received an email from the Oxford Nanopore CloudHub platform with a secure link to the required Data Bundle files, please contact our Support Team (support@nanoporetech.com) with your order ID and we will work to provide you with the required invitation.
3. Equipment and consumables
材料
- (FOR EXTRACTION) ≥ 1 ml of human blood in EDTA K2 vacuum tube
- (FOR LIBRARY PREPARATION) ~1 µg of sheared gDNA
- Hereditary Cancer Panel bundle (HCP18 or HCP72) (containing the materials listed below)
- 免扩增条形码测序试剂盒-24 V14(SQK-NBD114.24)
- LFB Expansion (EXP-LFB001)
- SFB Expansion (EXP-SFB001) if using the 72 sample bundle
- PromethION Flow Cell
耗材
- Puregene Blood Kit (QIAGEN, 158023)
- g-TUBE™(Covaris,520079)
- NEBNext FFPE修复混合液(NEB,M6630)
- NEBNext Ultra II 末端修复/ dA尾添加模块(NEB,E7546)
- NEB Blunt/TA 连接酶预混液(NEB,M0367)
- NEBNext®快速连接模块(NEB,E6056)
- 无核酸酶水(如ThermoFisher,AM9937)
- 新制备的 80% 乙醇(用无核酸酶水配制)
- 异丙醇,100%(Fisher, 10723124)
- TE 缓冲液(10 mM Tris-HCl、1 mM EDTA、pH 8.0)(Fisher scientific,10224683)
- Qubit dsDNA BR Assay(双链DNA宽范围检测)试剂盒(ThermoFisher ,Q32850)
- Agilent 基因组 DNA 165 kb 分析试剂盒(Agilent,FP-1002-0275)
- Qubit™ 分析管(Invitrogen, Q32856)
- 15 ml Falcon离心管
- 1.5 ml Eppendorf DNA LoBind 离心管
- 0.2 ml 薄壁PCR管
仪器
- PromethION 测序设备
- PromethION 测序芯片遮光片
- Rotator mixer (e.g. Hula mixer)
- 适用于1.5ml Eppendorf 离心管的磁力架
- Heating block
- 设定为 37°C 和 50°C 的培养箱或水浴锅
- 迷你离心机
- 涡旋混匀仪
- 热循环仪
- 适用于 15 ml Falcon 管的离心机及转子
- Megaruptor 3 (Diagenode, B06010003)
- 宽口移液枪头
- P1000 移液枪和枪头
- P200 移液枪和枪头
- P100 移液枪和枪头
- P20 移液枪和枪头
- P10 移液枪和枪头
- P2 移液枪和枪头
- 盛有冰的冰桶
- 计时器
- Qubit™ 荧光计(或用于质控检测的等效仪器)
- Agilent Femto Pulse 系统(或用于读长质控的等效仪器)
Oxford Nanopore Technologies Hereditary Cancer Panel bundle
All Oxford Nanopore Technologies reagents required for this protocol are included in the Hereditary Cancer Panel bundles, available in the Nanopore Store in 18-sample (HCP18) or 72-sample (HCP72) formats.
These bundle include the Native Barcoding Kit and all necessary sequencing components, and are the standard configuration for implementing this workflow.
For more information on specific kit components found within this bundle, please refer to the relevant products found in the Nanopore store page:
The above list of materials, consumables, and equipment is for the extraction method in the sample preparation section, as well as the library preparation section of the protocol. If you have pre-extracted sample(s), you will only require the materials for the library preparation section of this protocol.
For this protocol, the following inputs are required:
Input requirements per sample for the extraction method:
- ≥ 1 ml of human blood in EDTA K2 vacuum tube
Input requirements per sample for the library preparation:
- ~1 µg of sheared gDNA
Input DNA
How to QC your input DNA
It is important that the input DNA meets the quantity and quality requirements. Using too little or too much DNA, or DNA of poor quality (e.g. highly fragmented or containing RNA or chemical contaminants) can affect your library preparation.
For instructions on how to perform quality control of your DNA sample, please read the Input DNA/RNA QC protocol.
Chemical contaminants
Depending on how the DNA is extracted from the raw sample, certain chemical contaminants may remain in the purified DNA, which can affect library preparation efficiency and sequencing quality. Read more about contaminants on the Contaminants page of the Community.
Eppendorf tube orientation in centrifuge
For all centrifugation steps, ensure that tubes are loaded into the centrifuge with the hinge side of the tube facing outwards. This will assist in visual identification of the pellet.
Ensure gentle handling when removing the tubes from the centrifuge to avoid dislodging the pellet.

Third-party reagents
We have validated and recommend the use of all the third-party reagents used in this protocol. Alternatives have not been tested by Oxford Nanopore Technologies.
For all third-party reagents, we recommend following the manufacturer's instructions to prepare the reagents for use, unless specified in this protocol.
Check your flow cell
We highly recommend that you check the number of pores in your flow cell prior to starting a sequencing experiment. This should be done within 12 weeks of purchasing your PromethION Flow Cells. Oxford Nanopore Technologies will replace any unused flow cell with fewer than the number of pores listed in the Table below, when the result is reported within two days of performing the flow cell check, and when the storage recommendations have been followed. To do the flow cell check, please follow the instructions in the Flow Cell Check document.
| Flow cell | Minimum number of active pores covered by warranty |
|---|---|
| PromethION Flow Cell | 5000 |
本试剂盒及实验指南中所使用的免扩增接头(NA) 不能与其它测序接头互换使用。
4. Purification of gDNA from 1 ml of human blood
材料
- ≥ 1 ml of human blood in EDTA K2 vacuum tube
耗材
- Puregene Blood Kit (QIAGEN, 158023)
- Absorbent material e.g. paper towel or tissues
- 新制备的 80% 乙醇(用无核酸酶水配制)
- TE 缓冲液(10 mM Tris-HCl、1 mM EDTA、pH 8.0)(Fisher scientific,10224683)
- 无核酸酶水(如ThermoFisher,AM9937)
- Qubit dsDNA BR Assay(双链DNA宽范围检测)试剂盒(ThermoFisher ,Q32850)
- Qubit™ 分析管(Invitrogen, Q32856)
- 15 ml Falcon离心管
- 1.5 ml Eppendorf DNA LoBind 离心管
仪器
- 适用于 15 ml Falcon 管的离心机及转子
- 设定为 37°C 和 50°C 的培养箱或水浴锅
- 涡旋混匀仪
- 迷你离心机
- Qubit™ 荧光计(或用于质控检测的等效仪器)
- 盛有冰的冰桶
- 计时器
- 宽口移液枪头
- P1000 移液枪和枪头
- P200 移液枪和枪头
- P20 移液枪和枪头
- P10 移液枪和枪头
- P2 移液枪和枪头
可选仪器
- Agilent Femto Pulse 系统(或用于读长质控的等效仪器)
Prepare your blood sample(s).
- If using fresh blood or blood stored at 4°C, proceed to DNA extraction.
- If using frozen blood, ensure your sample is thawed completely before proceeding.
Dispense 3 ml RBC Lysis Solution into a 15 ml centrifuge tube.
Ensure the blood is mixed well in the EDTA K2 tube, then transfer 1 ml of the blood sample into the tube containing the RBC lysis solution.
Mix by inverting the tube 10 times.
Incubate for 5 minutes at room temperature (15–25°C). Invert at least once during the incubation.
Centrifuge for 2 minutes at 2000 x g to pellet the white blood cells.
Carefully discard the supernatant, ensuring your leave approximately 200 µl of the residual liquid and the white blood cell pellet.
Note: The supernatant can be removed by pipetting or by pouring the volume out on to an absorbent material.
Gently flick the tube and/or pipette mix using a wide bore tip to resuspend the pellet in the residual liquid.
Note: The pellet should be completely dispersed, this greatly facilitates the cell lysis in the next step.
Add 3 ml of Cell Lysis Solution.
Note: Pipette mix gently 10-15 times to lyse the cells and homogenise the solution until no clumps remain. Ensure that the solution is homogenous.
Incubate the reaction at 37°C for 30 minutes.
Note: Ensure the solution is homogenous by the end of the incubation, and no clumps should remain.
If necessary, you can mix the reaction by pipette mixing with a wide bore pipette tip or gently inverting the tube to assist with homogenisation.
Add 15 μl of RNase A solution and incubate the reaction for 15 minutes at 37°C.
Transfer the reaction to ice bucket with ice, and incubate for 3 min to quickly cool the sample.
Add 1 ml of Protein Precipitation Solution to your sample. Pulse vortex the tube twice for 5 seconds.
Centrifuge your sample for 5 minutes at 2000 x g.
Note: The precipitated protein should form a tight, reddish-brown pellet. If the protein pellet is not tight, incubate the tube on ice for 5 minutes and repeat the centrifugation.
Pipette 3 ml of isopropanol into a clean 15 ml falcon tube.
Carefully pour the supernatant from the sample tube into the 15 ml falcon tube containing the isopropanol.
Ensure that the protein pellet is not dislodged during pouring.
Alternatively, the supernatant can also be transferred by pipetting. Please ensure the protein pellet is not disturbed and remains intact when transferring the supernatant.
Note: If at any point the protein pellet is disturbed, repeat the 10 mininute at 2000 x g centrifugation step. Ensure only the clear supernatant is transferred to avoid protein contamination in the final elute.
Gently mix the tube by inverting 50 times until the DNA is visible as threads or a clump.
Centrifuge the tube for 3 minutes at 2000 x g.
Note: Your DNA should be visible as a small white pellet at the bottom of the tube.
Carefully discard the supernatant and drain the tube by inverting on a clean piece of absorbent paper. Ensure the DNA pellet is undisturbed and remains in the tube.
Note: The supernatant can be removed by pipetting or by pouring the volume out on to an absorbent material. Take care as the pellet might be loose and easily dislodged.
Prepare 300 µl of fresh 80% ethanol in nuclease-free water, and place on ice.
Add 300 μl of ice-cold freshly-prepared 80% ethanol to the sample tube. Gently invert the tube several times to wash the DNA pellet.
Transfer the pellet and the full 300 μl volume of ethanol into a new 1.5 ml Eppendorf tube.
Centrifuge the sample tube for 1 minute at 2000 x g.
Carefully discard the supernatant and drain the tube by inverting on a clean piece of absorbent paper. Ensure the DNA pellet is undisturbed and remains in the tube.
Note: The supernatant can be removed by pipetting or by pouring the volume out on to an absorbent material. Take care as the pellet might be loose and easily dislodged.
Leave the lid off the sample tube and air dry the pellet for 1 min.
Note: Avoid over-drying the pellet, ensure it is not dried to the point of cracking.
Add 100 μl of TE buffer (10 mM Tris-HCl, 1 mM EDTA, pH 8.0) to the tube containing the sample pellet. Gently resuspend the pellet by flicking.
Incubate the tube for 2 hours at 50°C, occasionally pipette mixing the whole volume tube contents (100 μl) with a wide-bore pipette tip.
Note: The DNA pellet may take some time to solubilise. Please ensure the solution is homogenous before quantifying.
Optional: Alternatively, this incubation can be performed at room temperature overnight.
Quantify your sample three times using the Qubit dsDNA BR Assay Kit. Ensure the replicate Qubit measurements are consistent before continuing to the next step.
Note: Approximately 10–30 µg of gDNA is expected following sample extraction.
Expected Qubit measurements of 100–300 ng/μl.
If your Qubit measurements are not consistent, this could indicate that the DNA has not been homogeneously resuspended.
If this occurs, we recommend increasing the incubation time, allowing more time for the DNA pellet to solubilise.
Note: The elution can be aided by incubating at 50°C on a thermomixer with gentle agitation at 300 rpm. Alternatively an end-over-end rotating mixer can be used.
Your extracted gDNA can also be analysed using Femto Pulse (Agilent) to check the size and quality.

Example fragment length profile of gDNA extracted from human blood using the Puregene Blood Kit.
Take your extracted gDNA forward into the size selection of gDNA step of this protocol. Alternatively, your sample can be stored at 4°C overnight.
5. gDNA shearing using the Covaris g-TUBE
材料
- >1 µg of extracted gDNA (from previous step)
耗材
- g-TUBE (Covaris, 520079)
- Nuclease-free water (e.g. ThermoFisher, AM9937)
- Qubit dsDNA BR Assay(双链DNA宽范围检测)试剂盒(ThermoFisher ,Q32850)
- Qubit™ Assay Tubes (ThermoFisher, Q32856)
- 1.5 ml Eppendorf DNA LoBind 离心管
仪器
- Eppendorf 5424 离心机(或等效器材)
- 迷你离心机
- Agilent Femto Pulse 系统(或用于读长质控的等效仪器)
- Qubit™ fluorometer (or equivalent for QC check)
- 盛有冰的冰桶
- 计时器
- 宽口移液枪头
- P1000 移液枪和枪头
- P200 移液枪和枪头
- P20 移液枪和枪头
- P10 移液枪和枪头
- P2 移液枪和枪头
Prepare the DNA in nuclease-free water:
1. Ensure you have 1 µg of extracted gDNA from sample extraction, and transfer this into a 1.5 ml Eppendorf tube.
2. Adjust the volume to 50 μl with nuclease-free water.
3. Mix thoroughly by pipetting up and down using a wide-bore pipette tip.
4. Spin down briefly in a microfuge.
Transfer 50 μl of the sample into the top of the g-TUBE and screw the cap firmly.
Load the sample tube into the centrifuge, ensuring the instrument is appropriately balanced according to the manufacturers instructions.
Centrifuge your sample as follows:
Note: the speeds may vary depending on the type of centrifuge being used. Please refer to the manufacturer’s manual for further details of your equipment.
1. Centrifuge at 6,000 rpm (3381 RCF) for 60 seconds.
2. Visually inspect to confirm the entire sample has passed through the upper chamber to the lower chamber of the g-TUBE. If the sample has not passed through, then repeat the step until the sample has fully passed into the lower chamber.
3. Remove the tube from the centrifuge, invert the g-TUBE and place it back in the centrifuge (ensuring the volume of sample is in the upper chamber.
4. Spin the g-tube again at the same speed and duration as above: 6,000rpm (3381 RCF) for 60 seconds.
5. Visually inspect to confirm the entire sample has passed through the upper chamber to the lower chamber of the g-TUBE. If the sample has not passed through, then repeat the step until the sample has fully passed into the lower chamber.
Repeat the previous step two more times, for a total of 3 passes through the g-TUBE in each direction.
With the sample volume in the lower chamber, unscrew the g-TUBE body, leaving the screw-cap containing the sample volume.
Retrieve the sample from the g-TUBE screw-cap and transfer it into a clean 1.5 ml Eppendorf tube.
Quantify your sample using the Qubit dsDNA BR Assay Kit.
Note: Approximately 1 µg of gDNA is expected following shearing. Expected Qubit measurements of ~18–20 ng/μl.
The sheared gDNA can also be assessed for fragment size using Femto Pulse (Agilent).
Expected sheared length ~7.5–8.5 kb
Take forward your 48 µl of sheared gDNA into the library preparation section of this protocol. Alternatively, your sample can be stored at 4°C overnight.
6. DNA损伤及末端修复
材料
- 1 µg of sheared gDNA in 48 µl (from previous step) for each sample
耗材
- NEBNext FFPE DNA 修复混合液(NEB,M6630)
- NEBNext® Ultra II 末端修复/ dA尾添加模块(NEB,E7546)
- 无核酸酶水(如ThermoFisher,AM9937)
- 0.2 ml 薄壁PCR管
- 1.5 ml Eppendorf DNA LoBind 离心管
仪器
- P1000 移液枪和枪头
- P200 移液枪和枪头
- P100 移液枪和枪头
- P20 移液枪和枪头
- P10 移液枪和枪头
- P2 移液枪和枪头
- 多通道移液枪和枪头
- 涡旋混匀仪
- 热循环仪
- 迷你离心机
- 盛有冰的冰桶
- Rotator mixer (e.g. Hula mixer)
根据生产厂家的说明准备NEBNext FFPE DNA 修复混合液和 NEBNext Ultra II 末端修复/ dA尾添加模块,并置于冰上。
为获得最优表现,NEB建议如下:
于冰上解冻所有试剂。
轻弹并/或翻转各管,确保各试剂充分混匀。
注意: 请切勿涡旋振荡 FFPE DNA修复混合液或 Ultra II末端修复酶混合物。同一日内首次打开一管试剂前,请务必先将该管试剂瞬时离心。
Ultra II 末端修复缓冲液和 FFPE DNA 修复缓冲液内可能出现少量沉淀。待此两管液体回复至室温后,使用移液枪上下吹打数次,打散沉淀;然后涡旋振荡30秒,以确保沉淀充分溶解。
注意: 请务必涡旋振荡混匀缓冲液。FFPE DNA 修复缓冲液可能轻微泛黄,不影响使用。
勿涡旋振荡NEBNext FFPE DNA 修复混合液或NEBNext Ultra II 末端修复酶混合物。
请务必涡旋振荡NEBNext FFPE DNA 修复缓冲液及NEBNext Ultra II末端修复反应缓冲液,以充分混匀。
查看是否有残留沉淀。涡旋振荡至少30秒以溶解所有沉淀。
将400ng的各样本DNA分别加入一洁净96孔板的不同孔中。
在各板孔中,混合以下试剂:
每添加一样试剂后,请吹打混匀10-20次,再添加下一样试剂。
| 试剂 | 体积 |
|---|---|
| DNA 样本 | 11 µl |
| 稀释后的DNA参照 (DCS) | 1 µl |
| NEBNext FFPE DNA 修复缓冲液 | 0.875 µl |
| Ultra II 末端修复反应缓冲液 | 0.875 µl |
| Ultra II 末端修复酶混合物 | 0.75 µl |
| NEBNext FFPE DNA 修复混合液 | 0.5 µl |
| 总体积 | 15 µl |
充分吹打混匀管中试剂,再瞬时离心。
使用热循环仪,在20℃下孵育5分钟,然后在65℃下孵育5分钟。
Remove the reaction from the thermal cycler and place the tubes on ice.
At this stage, you can transfer each sample reaction to a separate clean 1.5 ml Eppendorf LoBind tube for ease of handling.
Resuspend the AMPure XP Beads (AXP) by vortexing.
Add a 1X volume (60 µl) of resuspended the AMPure XP Beads (AXP) to each end-prep reaction and mix by flicking the tube.
Incubate on a rotator mixer (e.g. Hula mixer) for 10 minutes at room temperature.
Freshly prepare 2 ml of 80% ethanol in nuclease-free water (this is sufficient to process three samples).
Note: Ensure you prepare sufficient 80% ethanol for all your samples.
Spin down each sample and pellet on a magnet for 10 minutes until supernatant is clear and colourless. Keep the tube(s) on the magnet, and pipette off the supernatant.
Keep the tube(s) on the magnet and wash the beads with 200 µl of freshly prepared 80% ethanol without disturbing the pellet. Remove the ethanol using a pipette and discard.
Repeat the previous step.
Spin down and place the tube back on the magnet. Pipette off any residual ethanol. Allow to dry for ~30 seconds, but do not dry the pellet to the point of cracking.
For each sample, remove the tube from the magnetic rack and resuspend the pellet in 20 µl nuclease-free water. Incubate for 5 minutes at room temperature.
Pellet the beads on a magnet until the eluate is clear and colourless, for at least 1 minute.
For each sample, remove and retain 20 µl of eluate into a separate clean 1.5 ml Eppendorf DNA LoBind tube.
Note: Ensure your samples are processed separately. At this stage, they are not yet barcoded.
Quantify 1 µl of each eluted sample using a Qubit fluorometer.
We recommend performing multiple (triplicate) Qubit readings of each of the 3 samples to quantify them more accurately. This will be essential for further normalising of each sample before barcoding.
Note: You should expect to recover between 500–700 ng per sample after end-prep.
Using your quantification results, normalise your samples to the sample with the lowest yield as follows:
1. Take forward 16 μl of your lowest-performing sample into a clean 0.2 ml thin-walled PCR tube.
2. Take forward an equivalent mass of each of the other samples into separate clean 0.2 ml thin-walled PCR tubes.
3. Adjust the volume of each of the samples to 16 μl using nuclease-free water.
完成末端修复的样本即可用于稍后的免扩增条形码连接步骤。
如您希望在此步骤暂停文库制备,我们建议您使用1X AMPure XP 磁珠(AXP)纯化样品并使用无核酸酶水洗脱,然后置于4℃储存。
请注意:此步骤非必需,且需要额外的AMPure XP 磁珠(AXP)。
7. 免扩增条形码连接
材料
- 免扩增条形码(NB01-24)
- AMPure XP 磁珠(AXP)
- EDTA(EDTA)
- 短片段缓冲液(SFB)
耗材
- NEB Blunt/TA 连接酶预混液(NEB,M0367)
- 无核酸酶水(如ThermoFisher,AM9937)
- 1.5 ml Eppendorf DNA LoBind 离心管
- Eppendorf 低吸附 twin.tec® 96 孔 PCR 板,半裙边(Eppendorf™,0030129504)带热封
- Qubit™ 分析管(Invitrogen, Q32856)
- Qubit™ dsDNA HS Assay(双链DNA高灵敏度检测)试剂盒(ThermoFisher,Q32851)
仪器
- 磁力架
- 涡旋混匀仪
- Rotator mixer (e.g. Hula mixer)
- 迷你离心机
- 热循环仪
- 盛有冰的冰桶
- 多通道移液枪和枪头
- P1000 移液枪和枪头
- P200 移液枪和枪头
- P100 移液枪和枪头
- P20 移液枪和枪头
- P10 移液枪和枪头
- P2 移液枪和枪头
- Qubit™ 荧光计(或用于质控检测的等效仪器)
根据生产厂家的说明准备NEB Blunt/TA 连接酶预混液及NEBNext快速连接模块,并置于冰上:
- 于室温下解冻试剂。
- 瞬时离心试剂管5秒。
- 上下吹打整管试剂10次,以确保充分混匀。
于室温下解冻AMPure XP磁珠(AXP),并涡旋振荡混匀,置于室温。
于室温下解冻EDTA,并涡旋振荡混匀,然后瞬时离心,置于冰上。
于室温下解冻短片段缓冲液(SFB),并涡旋振荡混匀,然后置于冰上。
根据样本数目,于室温下解冻相应数目的免扩增条形码(NB01-96)。分别吹打混匀,瞬时离心后置于冰上。
条形码板孔仅限一次使用。使用前请确认所选孔密封完好;一旦刺穿或开启,不得再次使用。
为计划上样于同一测序芯片的各样本选择不同的条形码。一个实验最多可为96个样本添加条码并混样测序。
请注意: 每个样本使用一种条形码。
向一张新的96孔板的各孔内按顺序依次添加下表试剂:
每添加一样试剂后,请吹打混匀10-20次,再添加下一样试剂。
| 试剂 | 体积 |
|---|---|
| 无核酸酶水 | 3 µl |
| 经过末端修复的DNA | 0.75 µl |
| 免扩增条形码 (NB01-96) | 1.25 µl |
| Blunt/TA 连接酶预混液 | 5 µl |
| 总体积 | 10 µl |
轻轻吹打以充分混匀,并瞬时离心。
室温下孵育20分钟。
按下表向每孔内加入对应体积的EDTA,吹打混匀,然后瞬时离心。
注意: 请根据EDTA的管盖颜色进行相应操作。
| EDTA 管盖颜色 | 每孔/每管体积 |
|---|---|
| 透明管盖的EDTA | 1 µl |
| 蓝色管盖的EDTA | 2 µl |
在此步骤中添加EDTA的目的是终止反应。
于一支洁净的1.5 ml Eppendorf DNA LoBind离心管中,混合已连接条形码的各DNA样本。
注意: 请根据EDTA的管盖颜色进行相应操作。
| 每个样本的体积 | 24个样本 | 48个样本 | 96个样本 | |
|---|---|---|---|---|
| 使用 透明管盖的EDTA 时,合并后样本总体积 | 11 µl | 264 µl | 528 µl | 1056 µl |
| 使用 蓝色管盖的EDTA 时,合并后样本总体积 | 12 µl | 288 µl | 576 µl | 1152 µl |
涡旋振荡以重悬AMPure XP磁珠(AXP)。
向混合的反应体系内加入0.4X AMPure XP磁珠(AXP),吹打混匀。
注意: 请根据EDTA的管盖颜色进行相应操作。
| 每个样本的体积 | 24个样本 | 48个样本 | 96个样本 | |
|---|---|---|---|---|
| 如使用 透明管盖的EDTA ,需加入的AXP磁珠的体积 | 4 µl | 106 µl | 211 µl | 422 µl |
| 如使用 蓝色管盖的EDTA ,需加入的AXP磁珠的体积 | 5 µl | 115 µl | 230 µl | 461 µl |
将离心管置于Hula混匀仪(低速旋转式混匀仪)上室温孵育10分钟。
为获得最佳结果,我们建议您在免扩增条形码连接后的纯化步骤中使用短片段缓冲液(SFB)。
研发团队研究表明,在条形码连接后的洗涤步骤中,使用 短片段缓冲液(SFB)替代乙醇 能够更有效地去除多余条形码,从而提高条形码分类的准确率,并降低样本之间因条形码残留导致的交叉污染。
新批次的免扩增条形码试剂盒已配备充足的短片段缓冲液(SFB),以支持更新后的操作流程。如您使用的是 SFB 含量较少的旧版试剂盒,可能需要通过 SFB 扩展包(EXP-SFB001)补充短片段缓冲液。
请注意,使用 80% 乙醇的旧版操作方法仍可用于当前流程。如您希望在条形码连接后继续使用 80% 乙醇进行纯化,请按照以下步骤操作:
- 使用无核酸酶水新鲜配制足量的 80% 乙醇;
- 在后续洗涤步骤中,以新鲜配制的 80% 乙醇替代短片段缓冲液(SFB)使用。
将样品瞬时离心,再静置于磁力架上5分钟待磁珠和液相分离。保持离心管在磁力架上不动,直到洗脱液澄清无色,吸出上清。
保持离心管在磁力架上不动,以 700µl 短片段缓冲液(SFB)洗涤磁珠。小心不要扰动磁珠。用移液枪将缓冲液吸走并弃掉。
如在此过程中不慎扰动磁珠,请静待磁珠和液相分离后再吸出缓冲液。
重复上述步骤。
将离心管瞬时离心后置于磁力架上。用移液枪吸走残留的缓冲液。
将离心管从磁力架上移开。将磁珠重悬于35µl的无核酸酶水中,轻弹离心管混匀。
37℃下孵育10分钟。请每两分钟轻弹离心管10秒以搅动样本,促进DNA洗脱。
将离心管静置于磁力架上,直到磁珠和液相分离,且洗脱液澄清无色。
将此35µl洗脱液转移至一支新的1.5ml Eppendorf DNA LoBind管中。
取1µl洗脱样品,用Qubit荧光计定量。
连有条形码的DNA样本将用于稍后的接头连接及纯化步骤。如需要,您也可以此时将样品置于4℃储存过夜。
8. 接头连接及纯化
材料
- 长片段缓冲液(LFB)
- 洗脱缓冲液(EB)
- 免扩增接头(NA)
- AMPure XP 磁珠(AXP)
耗材
- NEBNext®快速连接模块(NEB,E6056)
- 1.5 ml Eppendorf DNA LoBind 离心管
- Qubit™ 分析管(Invitrogen, Q32856)
- Qubit™ dsDNA HS Assay(双链DNA高灵敏度检测)试剂盒(ThermoFisher,Q32851)
仪器
- 迷你离心机
- 磁力架
- 涡旋混匀仪
- Rotator mixer (e.g. Hula mixer)
- 热循环仪
- P1000 移液枪和枪头
- P200 移液枪和枪头
- P100 移液枪和枪头
- P20 移液枪和枪头
- P10 移液枪和枪头
- 盛有冰的冰桶
- Qubit™ 荧光计(或用于质控检测的等效仪器)
本试剂盒及实验指南中所使用的免扩增接头(NA) 不能与其它测序接头互换使用。
测序芯片质检
我们强烈建议在开始文库制备之前,对测序芯片的活性纳米孔数量进行质检,以确保其足够支持实验的顺利进行。
详情请参阅 MinKNOW 实验指南中的 测序芯片质检说明。
根据生产厂家的说明准备NEBNext 快速连接反应模块,并置于冰上:
于室温下解冻试剂。
瞬时离心试剂管5秒。
下吹打全部体积的试剂10次,以确保充分混匀。 注意: 请勿涡旋振荡快速T4 DNA连接酶。
NEBNext快速连接反应缓冲液(5x)内可能存在少量沉淀。请待该缓冲液回复至室温后,吹打数次使沉淀溶解,再涡旋振荡数秒以充分混匀。
请勿涡旋振荡快速T4 DNA连接酶。
将免扩增接头(NA)和T4连接酶瞬时离心后吹打混匀,然后置于冰上。
将洗脱缓冲液(EB)于室温下解冻,涡旋振荡混匀后,再瞬时离心,置于冰上。
请在室温下按需解冻一管长片段缓冲液(LFB)或短片段缓冲液(SFB),涡旋振荡混合,瞬时离心后置于室温。
在一支1.5ml Eppendorf LoBind离心管内,将所有试剂按以下顺序混合:
每添加一样试剂后,请吹打混匀10-20次,再添加下一样试剂。
| 试剂 | 体积 |
|---|---|
| 混合后的含条码样本 | 30 µl |
| 免扩增接头(NA) | 5 µl |
| NEBNext快速连接反应缓冲液(5X) | 10 µl |
| NEBNext快速T4 DNA连接酶 | 5 µl |
| 总体积 | 50 µl |
轻轻吹打以充分混匀,并瞬时离心。
室温下孵育20分钟。
以下纯化步骤中使用长片段缓冲液(LFB)或短片段缓冲液(SFB)洗涤磁珠,而非80%乙醇。使用乙醇将对测序反应产生不利影响。
涡旋振荡以重悬AMPure XP磁珠。
将20µl重悬的AMPure XP磁珠加入反应体系中,吹打混匀。
将离心管置于Hula混匀仪(低速旋转式混匀仪)上室温孵育10分钟。
将样品瞬时离心,并静置于磁力架上待磁珠和液相分离。保持离心管在磁力架上不动,用移液枪吸去清液。
用125μl的长片段缓冲液(LFB)或短片段缓冲液(SFB)洗涤磁珠。轻弹离心管将磁珠混匀后,将离心管瞬时离心,再放回磁力架,静置待磁珠和液相分离。保持离心管在磁力架上不动,用移液枪吸出清液并丢弃。
重复上述步骤。
将离心管瞬时离心后置于磁力架上。用移液枪吸走残留的上清液。让磁珠在空气中干燥约30秒,但不要干至表面开裂。
将离心管从磁力架上移开。将磁珠重悬于25µl洗脱缓冲液中(EB)。
瞬时离心,然后在37℃下孵育10分钟。请每两分钟轻弹离心管10秒以搅动样本,促进DNA洗脱。
将离心管静置于磁力架上至少一分钟,直到磁珠和液相分离,且洗脱液澄清无色。
将此25µl含有DNA文库的洗脱液转移至一支新的1.5ml Eppendorf DNA LoBind管中。
将磁珠丢弃。
取1µl洗脱样品,用Qubit荧光计定量。
构建好的文库即可用于测序芯片上样。在上样前,请将文库置于冰上或4℃条件下保存。
文库保存建议
若为 短期 保存或重复使用(例如在清洗芯片后再次上样),我们建议将文库置于Eppendorf LoBind 离心管中 4℃ 保存。 若为一次性使用且储存时长 超过3个月 ,我们建议将文库置于Eppendorf LoBind 离心管中 -80℃ 保存。
9. PromethION 测序芯片的预处理及上样
材料
- 测序芯片冲洗液(FCF)
- 测序芯片系绳(FCT)
- 文库颗粒(LIB)
- 测序缓冲液(SB)
耗材
- PromethION 测序芯片
- 1.5 ml Eppendorf DNA LoBind 离心管
仪器
- PromethION 测序设备
- Hereditary Cancer Panel adaptive sampling files for MinKNOW (reference genome FASTA, target region BED file)
- PromethION 测序芯片遮光片
- P1000 移液枪和枪头
- P200 移液枪和枪头
- P20 移液枪和枪头
本试剂盒仅兼容R10.4.1测序芯片(FLO-PRO114M)。
将芯片从冰箱中取出后,请将其置于室温环境孵育20分钟再插入PromethION测序仪。潮湿环境下的测序芯片上可能会形成冷凝水。因此,请检查测序芯片顶部和底部的金色连接器引脚处是否有水凝结。如有,请使用无纤维布擦干。请确保测序芯片底部有热垫(黑色)覆盖。
于室温下解冻测序缓冲液(SB)、文库颗粒(LIB)或文库溶液(LIS)、测序芯片系绳(FCT)和一管测序芯片冲洗液(FCF)。完全解冻后,涡旋振荡混匀,然后瞬时离心并置于冰上。
按下表制备测序芯片的预处理液,再于室温下短暂涡旋振荡混匀。
| 试剂 | 体积(每张芯片) |
|---|---|
| 测序芯片冲洗液 (FCF) | 1170 µl |
| 测序芯片系绳 (FCT) | 30 µl |
| 总体积 | 1200 µl |
对PromethION 24/48,将测序芯片插入相应卡槽的对接端口:
将测序芯片与连接器横竖对齐,以便顺利卡入。
用力下压芯片至卡槽,并确认卡夹位置归位。


如插入配置测试芯片的角度出现偏差,可能会损坏PromethION上的引脚并影响测序结果。如您发现 PromethION测序仪芯片位置上的引脚损坏,请通过电子邮件(support@nanoporetech.com)或微信公众号在线支持(NanoporeSupport)联系我们的技术支持团队。

请在文库上样前完成测序芯片质检,评估可用的活性纳米孔数量。
若该测序芯片此前已完成质检,则可跳过此步骤。
详细操作说明请参阅 MinKNOW 实验指南中的测序芯片质检说明部分。
顺时针滑动加液孔孔盖,将其打开。

从测序芯片中反旋排出缓冲液。请勿吸出超过20-30µl的缓冲液,并确保芯片上的纳米孔阵列一直有缓冲液覆盖。将气泡引入阵列会对纳米孔造成不可逆转地损害。
在加液孔打开的状态下,按下述步骤吸取少量液体,同时避免引入气泡:
- 将P1000移液枪转至200µl刻度。
- 将枪头垂直插入加液孔中。
- 反向转动移液枪量程调节转纽,直至移液枪刻度在220-230 µl之间,或直至您看到有少量缓冲液进入移液枪枪头。

使用P1000移液枪向芯片的加液孔中加入500 µl芯片预处理溶液。加入过程中,请避免引入气泡。等待5分钟,与此同时,您可按以下步骤准备上样文库。

将含有文库颗粒的LIB管用移液枪吹打混匀。
LIB管内的文库颗粒分散于悬浮液中。由于颗粒沉降速度非常快,因此请在混匀颗粒后立即使用。
对于大多数测序实验,我们建议您使用文库颗粒(LIB)。但如文库较为粘稠,您可考虑使用文库溶液(LIS)。
在一支新的1.5ml Eppendorf DNA LoBind离心管内,将所有试剂按以下顺序混合:
| 试剂 | 每张测序芯片的上样体积 |
|---|---|
| 测序缓冲液 (SB) | 100 µl |
| 文库颗粒 (LIB),使用前充分混匀;或文库溶液 (LIS) | 68 µl |
| DNA 文库 | 32 µl |
| 总体积 | 200 µl |
请注意: 此处增大了文库的上样量,以增强纳米孔阵列的覆盖度。
缓慢向芯片的加液口中加入500 µl预处理液,完成芯片的预处理。

临上样前,用移液枪轻轻吹打混匀制备好的文库。
使用 P1000 移液枪向加液孔中加入200 µl 文库。

合上加液孔孔盖。

为获得最佳测序产出,在文库样本上样后,请立即在测序芯片上安装遮光片。
我们建议在清洗芯片并重新上样时,将遮光片保留在测序芯片上。一旦文库从测序芯片中吸出,即可取下遮光片。
如遮光片不在测序芯片上,请您按照以下步骤安装:
- 将遮光片的中空部分(空槽)与测序芯片的加液孔孔盖对齐。确保遮光片的前沿位于测序芯片ID的上方。
- 用力下压遮光片的卡垫部分,遮光片空槽边缘会随卡垫卡入加液孔孔盖下方。


准备就绪后,合上PromethION设备上盖。
请在为PromethION芯片上样后,等待10分钟再启动实验,以提高芯片产出。
10. Data acquisition and basecalling
How to start sequencing
The sequencing device control, data acquisition and real-time basecalling are carried out by the MinKNOW software.
We recommend basecalling with the high accuracy (HAC) basecaller in real-time with BAM selected as output type using the P24 device.
Refer to the links below containing the detailed instructions for setting up the device and sequencing run:
- PromethION 24: "Starting a sequencing run with PromethION 24"
Below are the recommended sequencing parameters for MinKNOW.
MinKNOW settings for hereditary cancer profiling workflow on PromethION
We strongly recommend using MinKNOW version 25.03.7 for optimal results. Instructions for MinKNOW 25.03.7 rollback can be downloaded here.
Please ensure you have the correct BED files available on your device for data acquisition and analysis.
If you require assistance ensuring you are on the correct version of MinKNOW please contact your Oxford Nanopore Technologies representative.
Setting up your sequencing run in MinKNOW:
- Open the MinKNOW software UI via your desktop application.
- In the MinKNOW UI, you can choose either Start sequencing (option 1) or Start from a sample sheet (option 2).
Option 1: Selecting "Start sequencing"
- Follow the sequencing run set up on-screen using the settings defined below:
Positions
Flow cell position: [user defined]
Experiment name: [user defined]
Flow cell type: FLO-PRO114M
Sample ID: [user defined]
Kit
Kit selection: Native Barcoding Sequencing Kit (SQK-NBD114.24)
Run configuration
Sequencing and analysis
Basecalling: On [default]
Modified bases: On with '5mC & 5hmC CG contexts' selected
Model: High-accuracy basecalling (HAC) [default]
Barcoding: On [default]
Alignment: On
Upload the reference genome file provided in the Hereditary Cancer Panel file pack (HCP_GRCh38_masked_v1.0.fasta) for alignment
Adaptive sampling: On
Enrich: On
Deplete: Off [default]
Barcode balancing: Off [default]
Basecall on-target reads only: Off [default]
Upload the reference genome file (HCP_GRCh38_masked_v1.0.fasta) and target region (HCP_GRCh38_masked_v1.0.bed) provided in the Hereditary Cancer Panel file pack for alignment
Advanced options
Active channel selection: On [default]
Time between pore scans: 1.5 [default]
Reserve pores: On [default]
Data targets
Run limit: 72 hours [default]
Analysis workflow
Workflow: Off [default]
Output
Ensure enough space on your device: minimum of 0.8TB per flow cell.
Output format
.BAM: On [default]
.FASTQ: On [default]
Based on: Time elapsed [default]
Frequency: Every 10 minutes [default]
Barcoding: Split files by barcode: On [default]
FASTQ options: Compression: Off
Raw reads output: On [default]
.POD5: On [default]
.FAST5: Off [default]
Raw reads options: Split .POD5 files by barcode: Off [default]
Filtering: On [default]
Qscore: 9 [default]
Minimum read length: [default]
Max read length: [default]
Option 2: Selecting "Start from a sample sheet"
Starting from a sample sheet (CSV format) enables assigning each barcode a name that will be carried through the analysis (alias column). The sample sheet defines the flow cell (flow_cell_product_code column) and kit (kit column) used. Additionally, a column for experiment (experiment_id column) and either slot number on the device (position_ID) or unique flow cell identifier (position_ID) is requiredIt is compulsory to add a column for either the sequencing slot number on the device( position_ID) or the flow cell unique identifier (flow_cell_ID).
For further information on sample sheet options, see the sample sheet upload section of our MinKNOW documentation.
- Select the sample sheet file from your file system. Please, ensure that your sample sheet name has a visible “.csv” extension for it to be recognised by MinKNOW.
- Follow the sequencing run set up on-screen using the settings defined below:
Positions
Flow cell position: [Defined in sample sheet]
Experiment name: [Defined in sample sheet]
Flow cell type: FLO-PRO114M
Sample ID: [Defined in sample sheet]
Kit
Kit selection: Native Barcoding Sequencing Kit (SQK-NBD114.24)
Run configuration
Sequencing and analysis
Basecalling: On [default]
Modified bases: On with '5mC & 5hmC CG contexts' selected
Model: High-accuracy basecalling (HAC) [default]
Barcoding: On [default]
Alignment: On
Upload the reference genome file provided in the Hereditary Cancer Panel file pack (HCP_GRCh38_masked_v1.0.fasta) for alignment
Adaptive sampling: On
Enrich: On
Deplete: Off [default]
Barcode balancing: Off [default]
Basecall on-target reads only: Off [default]
Upload the reference genome file (HCP_GRCh38_masked_v1.0.fasta) and target region (HCP_GRCh38_masked_v1.0.bed) provided in the Hereditary Cancer Panel file pack for alignment
Advanced options
Active channel selection: On [default]
Time between pore scans: 1.5 [default]
Reserve pores: On [default]
Data targets
Run limit: 72 hours [default]
Analysis workflow
Workflow: Off [default]
Output
Ensure enough space on your device: minimum of 0.8TB per flow cell.
Output format
.BAM: On [default]
.FASTQ: On [default]
Based on: Time elapsed [default]
Frequency: Every 10 minutes [default]
Barcoding: Split files by barcode: On [default]
FASTQ options: Compression: Off
Raw reads output: On [default]
.POD5: On [default]
.FAST5: Off [default]
Raw reads options: Split .POD5 files by barcode: Off [default]
Filtering: On [default]
Qscore: 9 [default]
Minimum read length: [default]
Max read length: [default]
We do not recommend sequencing and performing data analysis simultaneously on your device.
To ensure the compute on your device can keep up with the requirements for sequencing and/or analysis, we strongly recommend against running both processes at the same time.
Ensure your sequencing run has completed before setting off data analysis. Data analysis will be performed post-sequencing.
Equally, we do not recommend starting a sequencing run if you are currently performing data analysis on your device.
11. Downstream analysis
Software and file requirements
The sequencing output files (.bam) can be analysed using wf-hereditary-cancer, a bioinformatics workflow implemented in Nextflow that is part of Oxford Nanopore’s EPI2ME suite of analysis workflows. wf-hereditary-cancer can be run within the EPI2ME Desktop App. To run the analysis, you will need the workflow package (reference genome FASTA, target region BED files, and the workflow itself) distributed separately as a 2ME file.
Please note that we do not recommend sequencing and performing data analysis simultaneously on your device.
Minimum hardware requirements
| Resource | Recommended | Minimum |
|---|---|---|
| CPU | 16 | 8 |
| Memory | 64 GB | 32 GB |
| Storage | 500 GB | 500 GB |
- Approximate run time: ~ 1 hour per sample on a PromethION 24
- ARM processor support: False
- Compatible operating systems: Linux, Windows, Mac* (*M type chips currently not supported).
Before starting analysis
Installing EPI2ME and working directory setup
If not already installed on your device, you can download and install the EPI2ME Desktop App following these instructions. Once installed, click on ‘Settings’ on the main dashboard, and ensure the working directory is set to ‘/data/epi2melabs’ as follows. This will ensure that the files generated by the workflow during analysis do not fill up the system’s home directory:
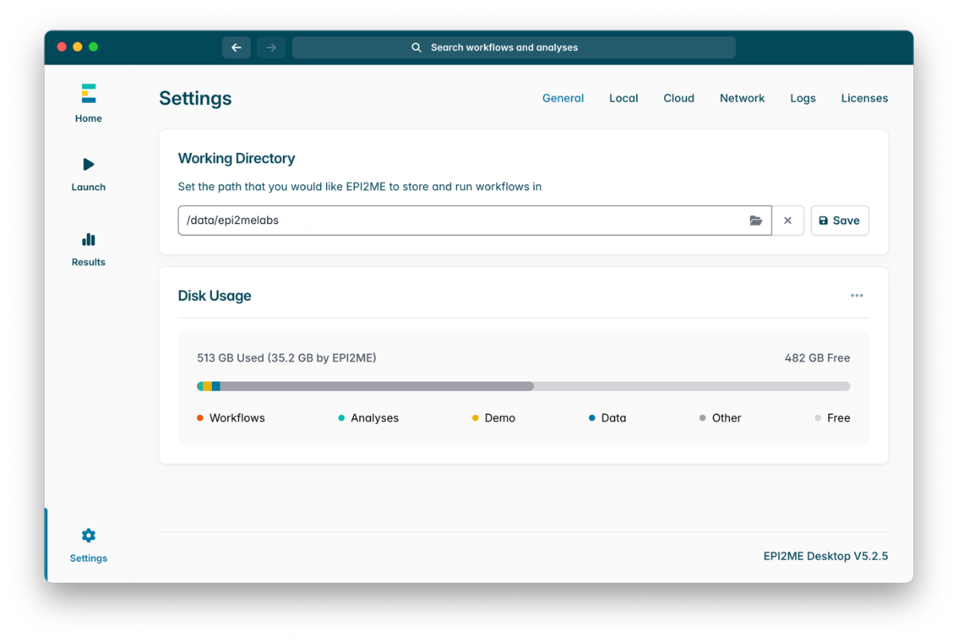
The wf-hereditary-cancer analysis workflow is distributed as a 2ME file which is distributed via CloudHub. Please see the Before getting started: Data bundle and workflow setup section of the protocol for instructions on how to gain access to and download these files.
Running wf-hereditary cancer for the first time: installing the workflow 2ME package
If you are running wf-hereditary-cancer for the first time, follow these steps to install the workflow 2ME package:
1. Open the EPI2ME desktop application and select Launch from the menu on the left.
2. Select Import workflow on the right of the screen, and in the dropdown, select Import a 2ME file.
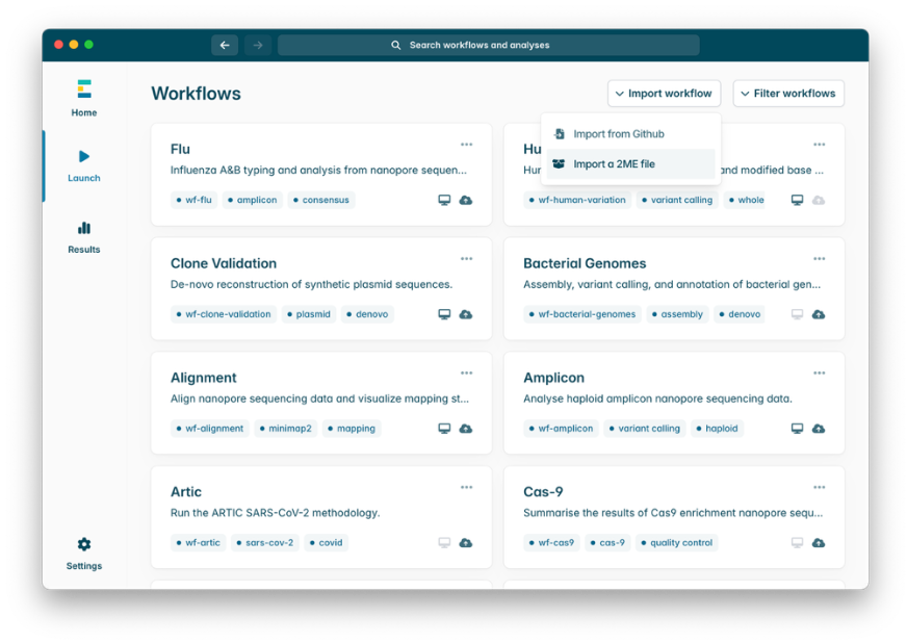
3. In the pop-up window, ensure Select a file is selected, and then click Select a path to navigate to the location of the downloaded 2ME file.
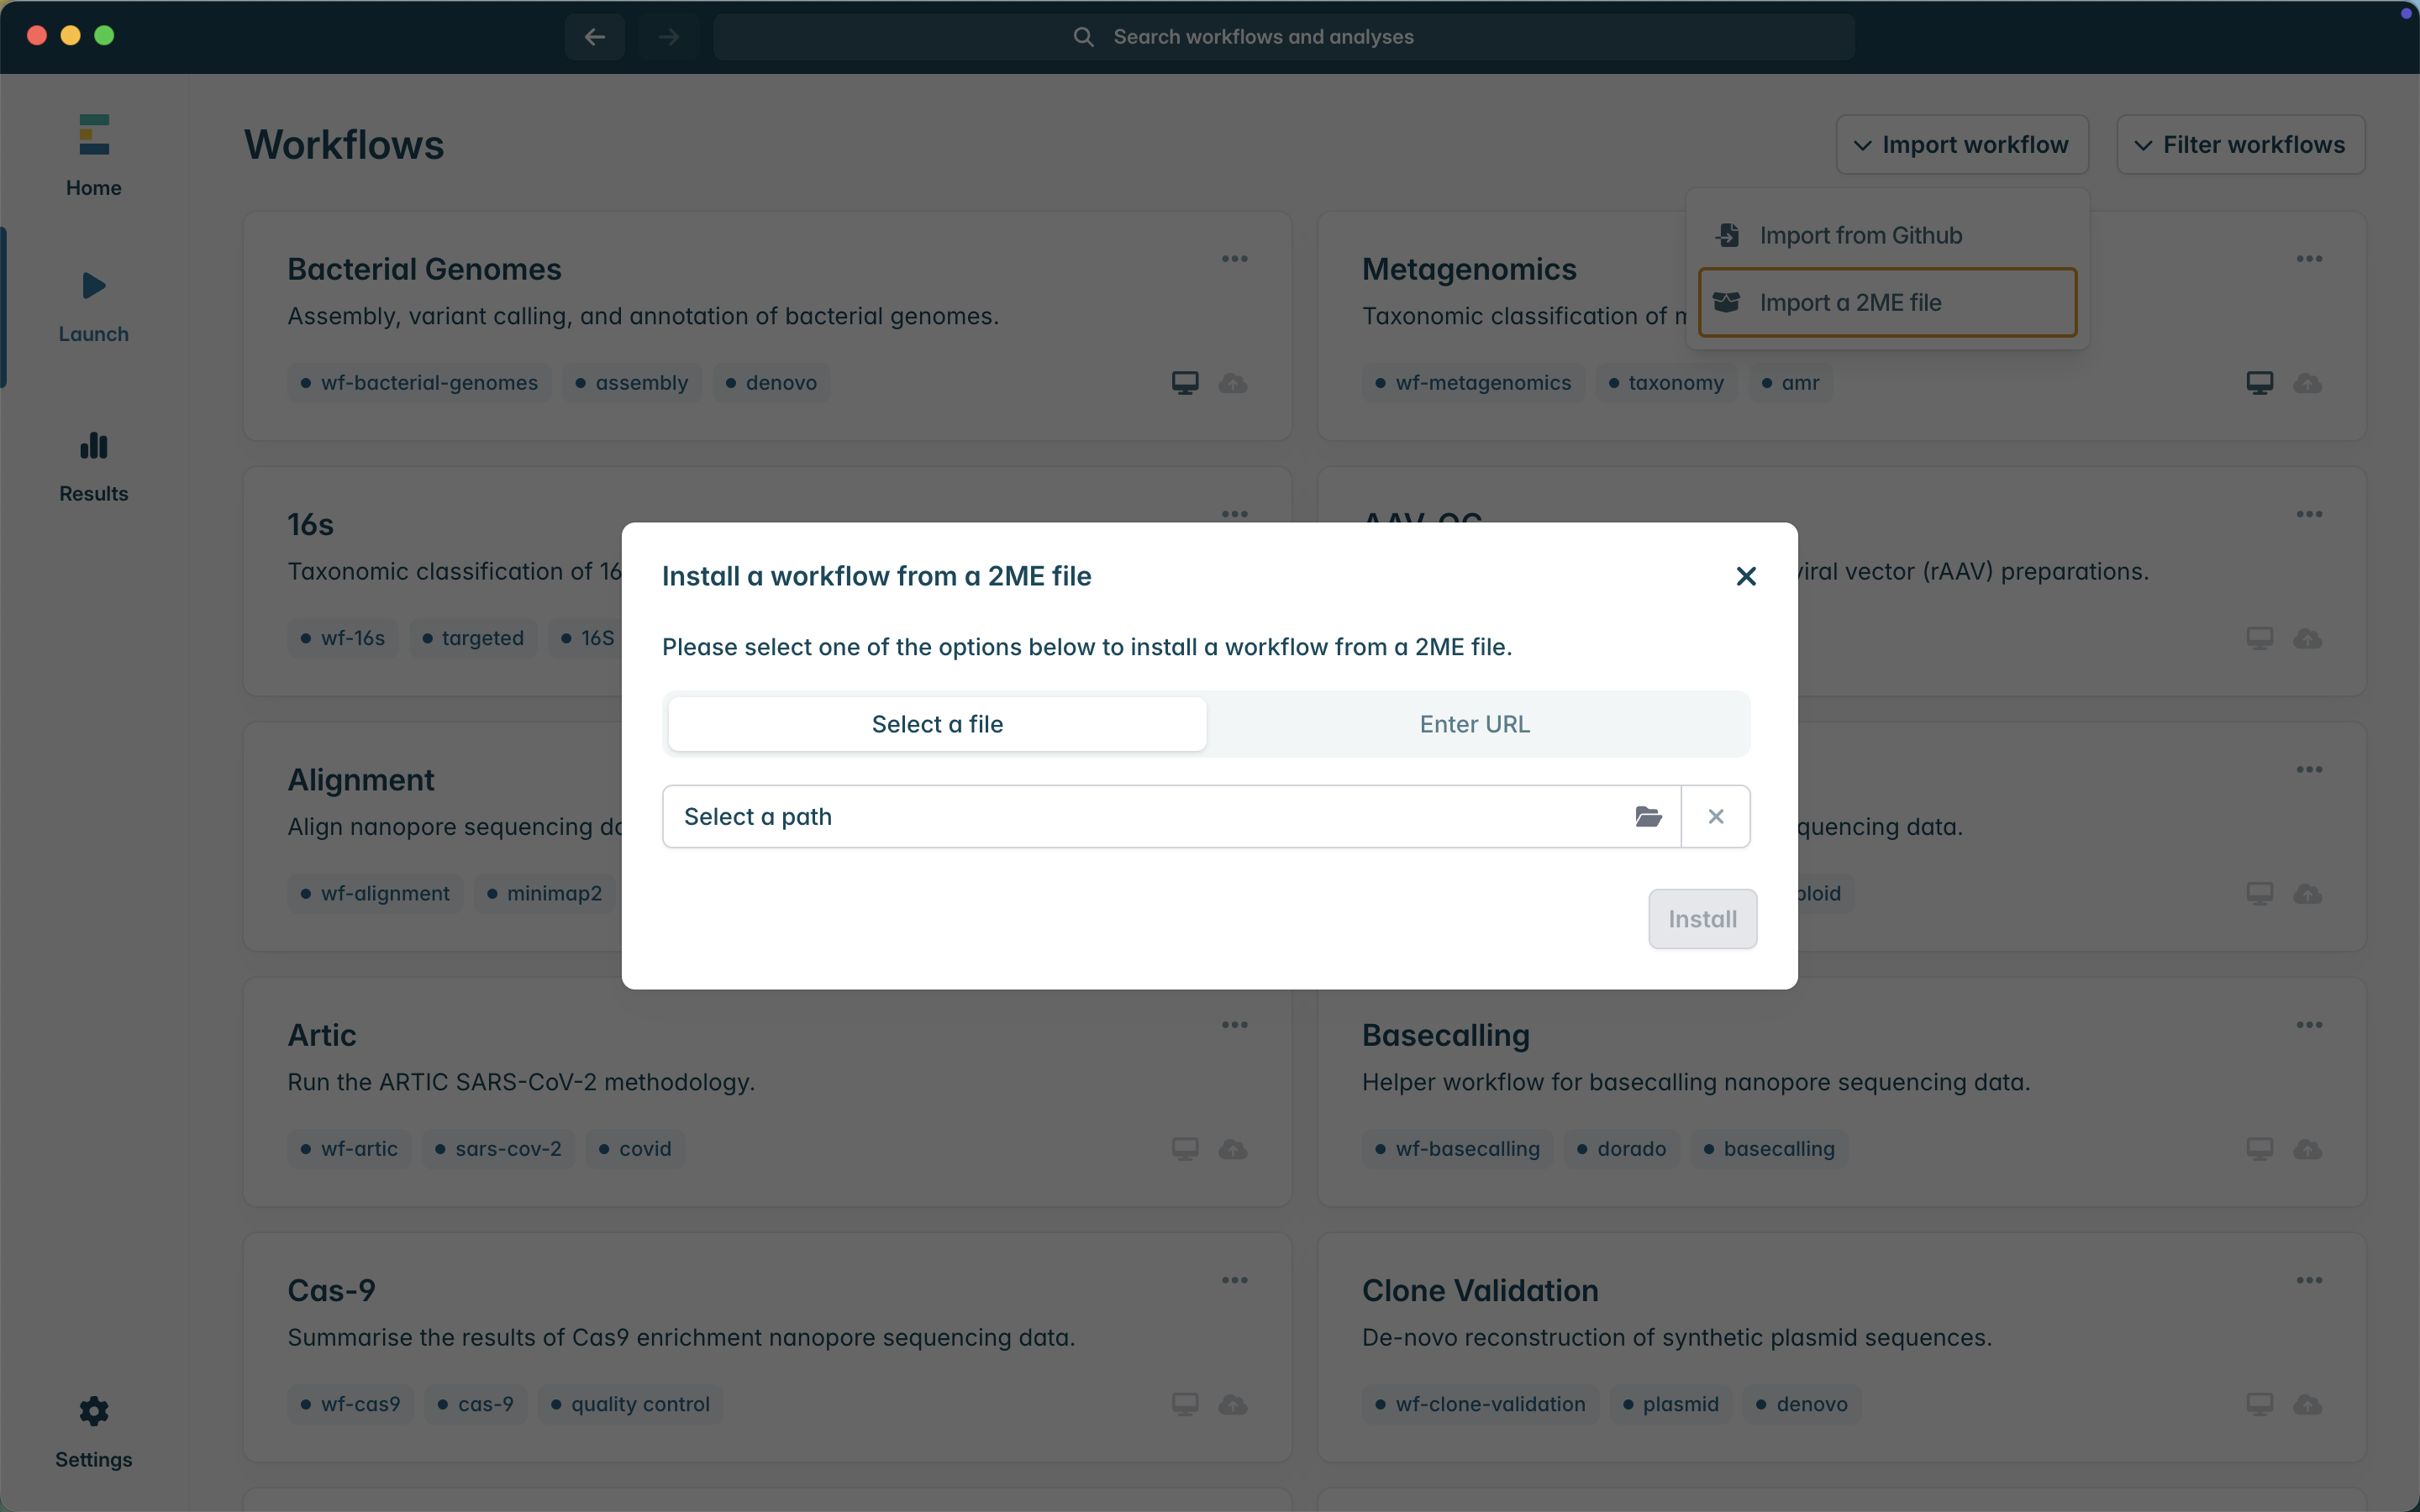
4. Click Install. The application will then install the workflow. This may take a few minutes as it will install the required containers.
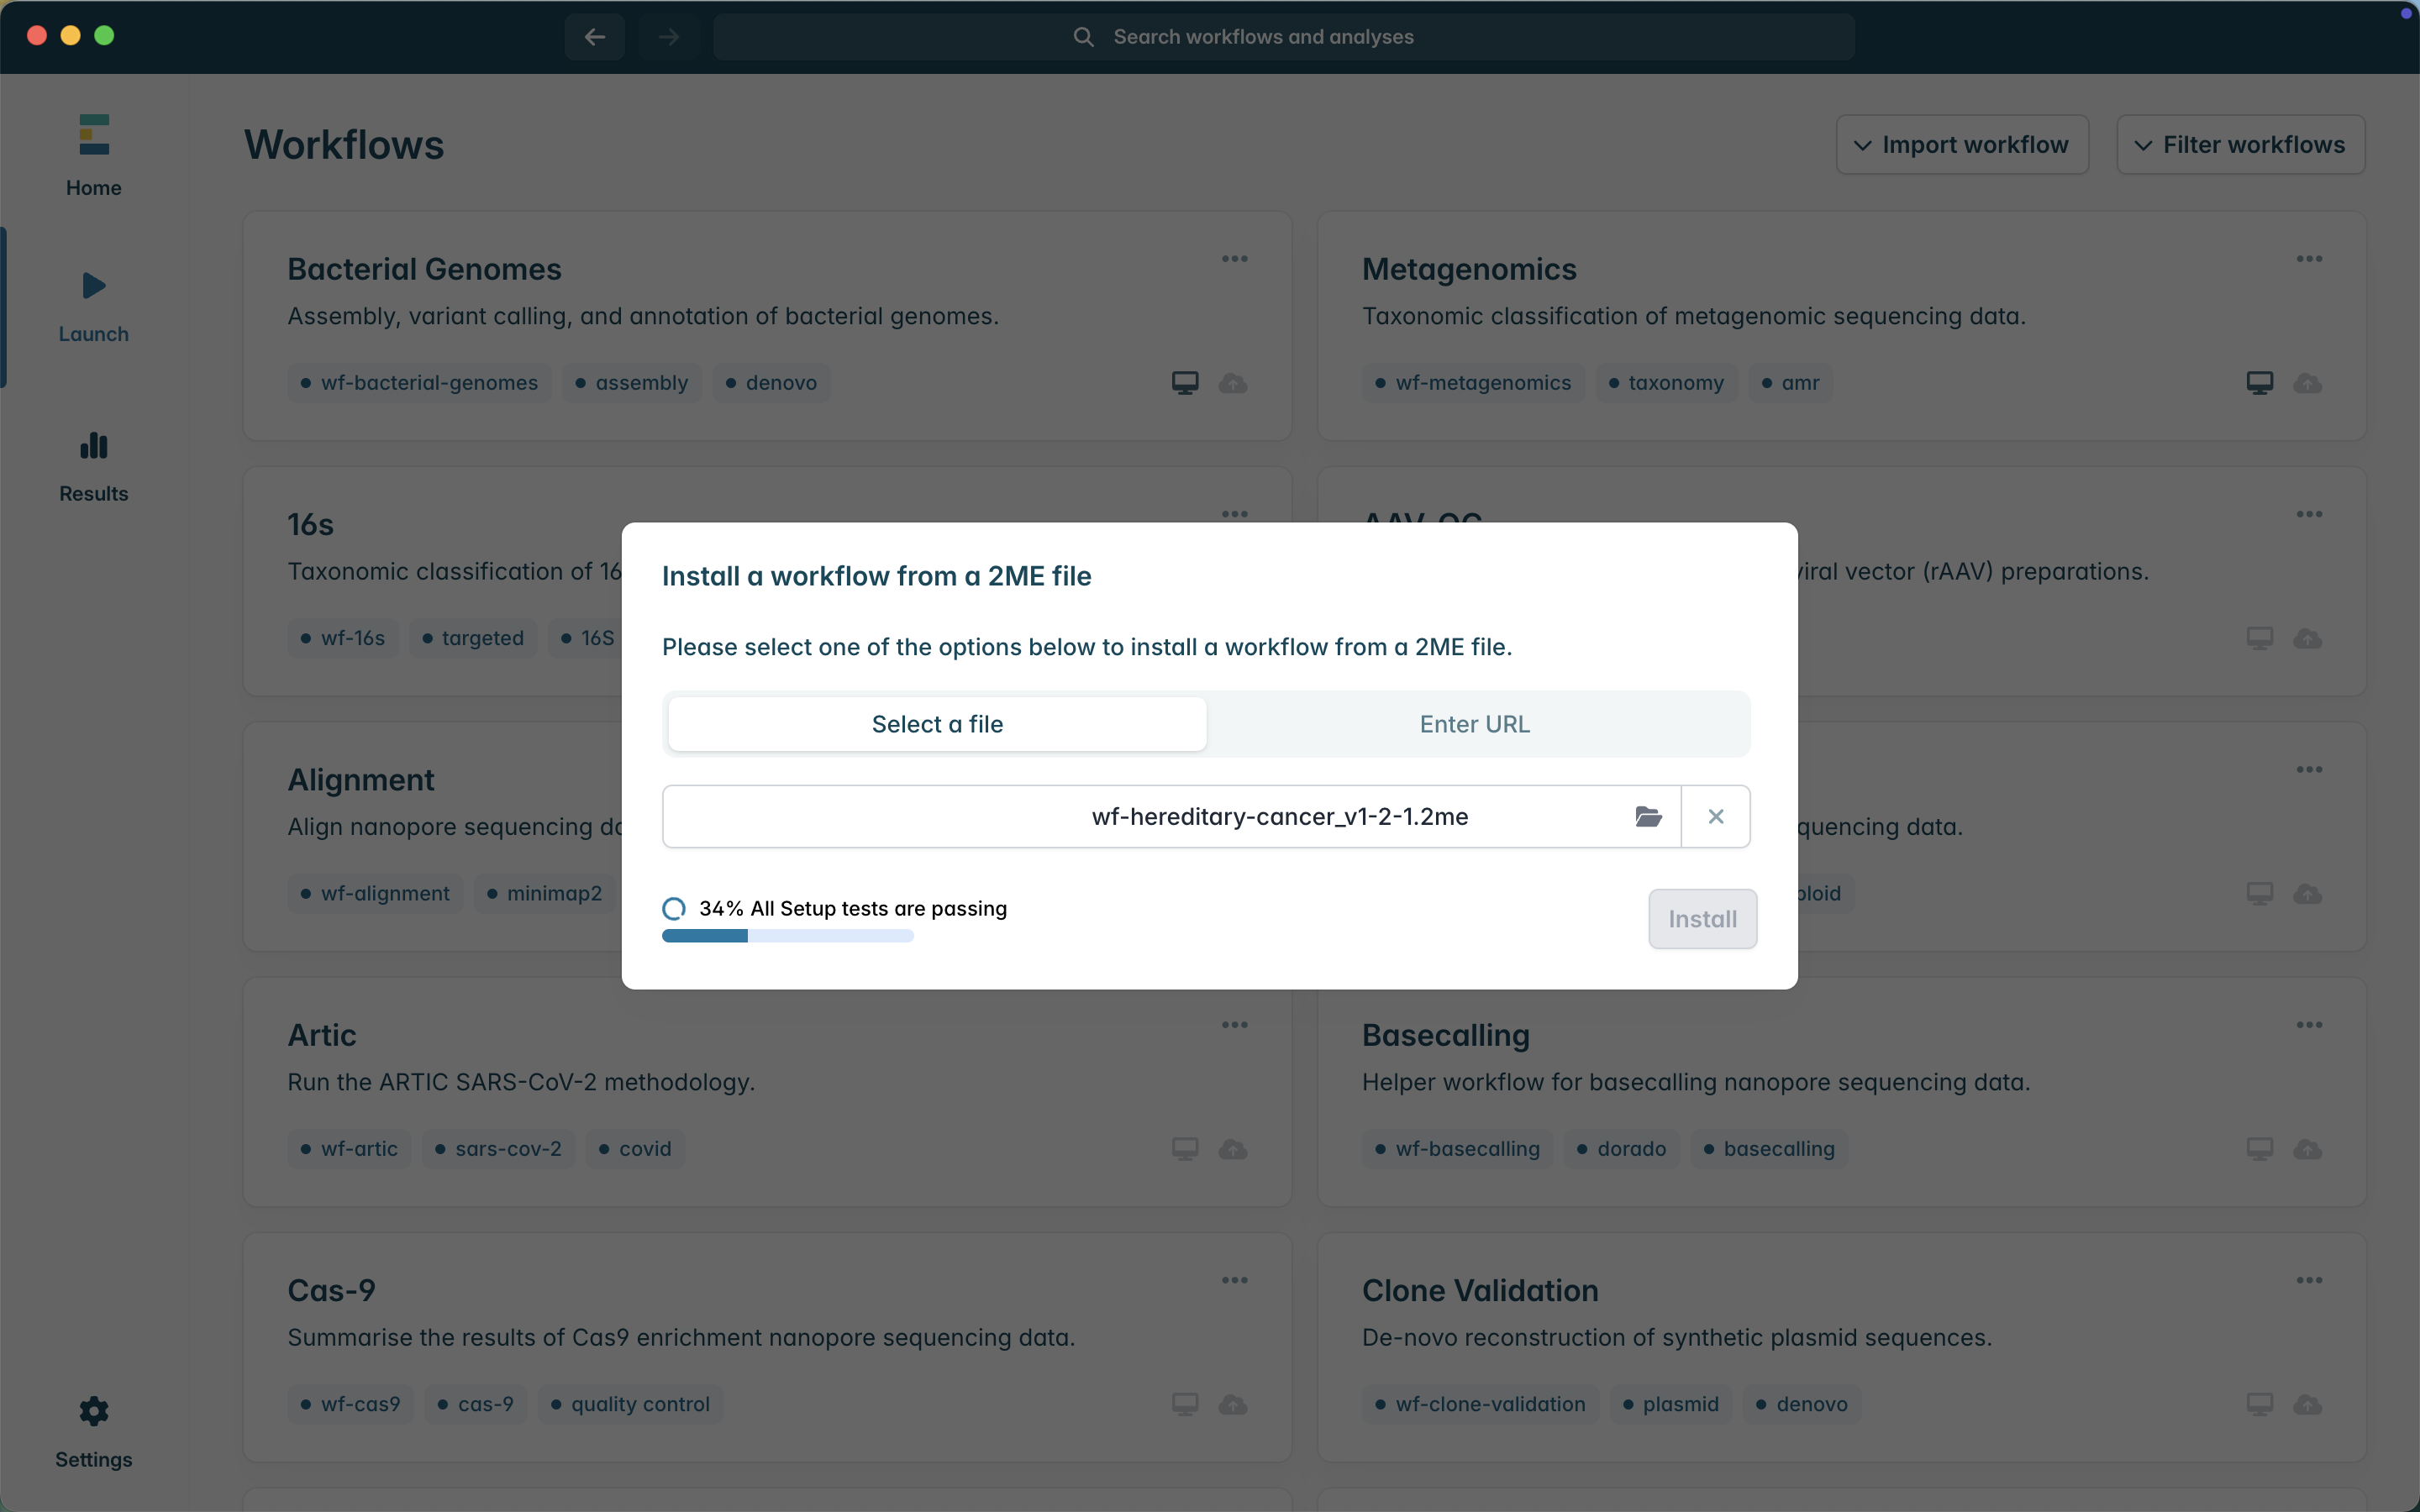
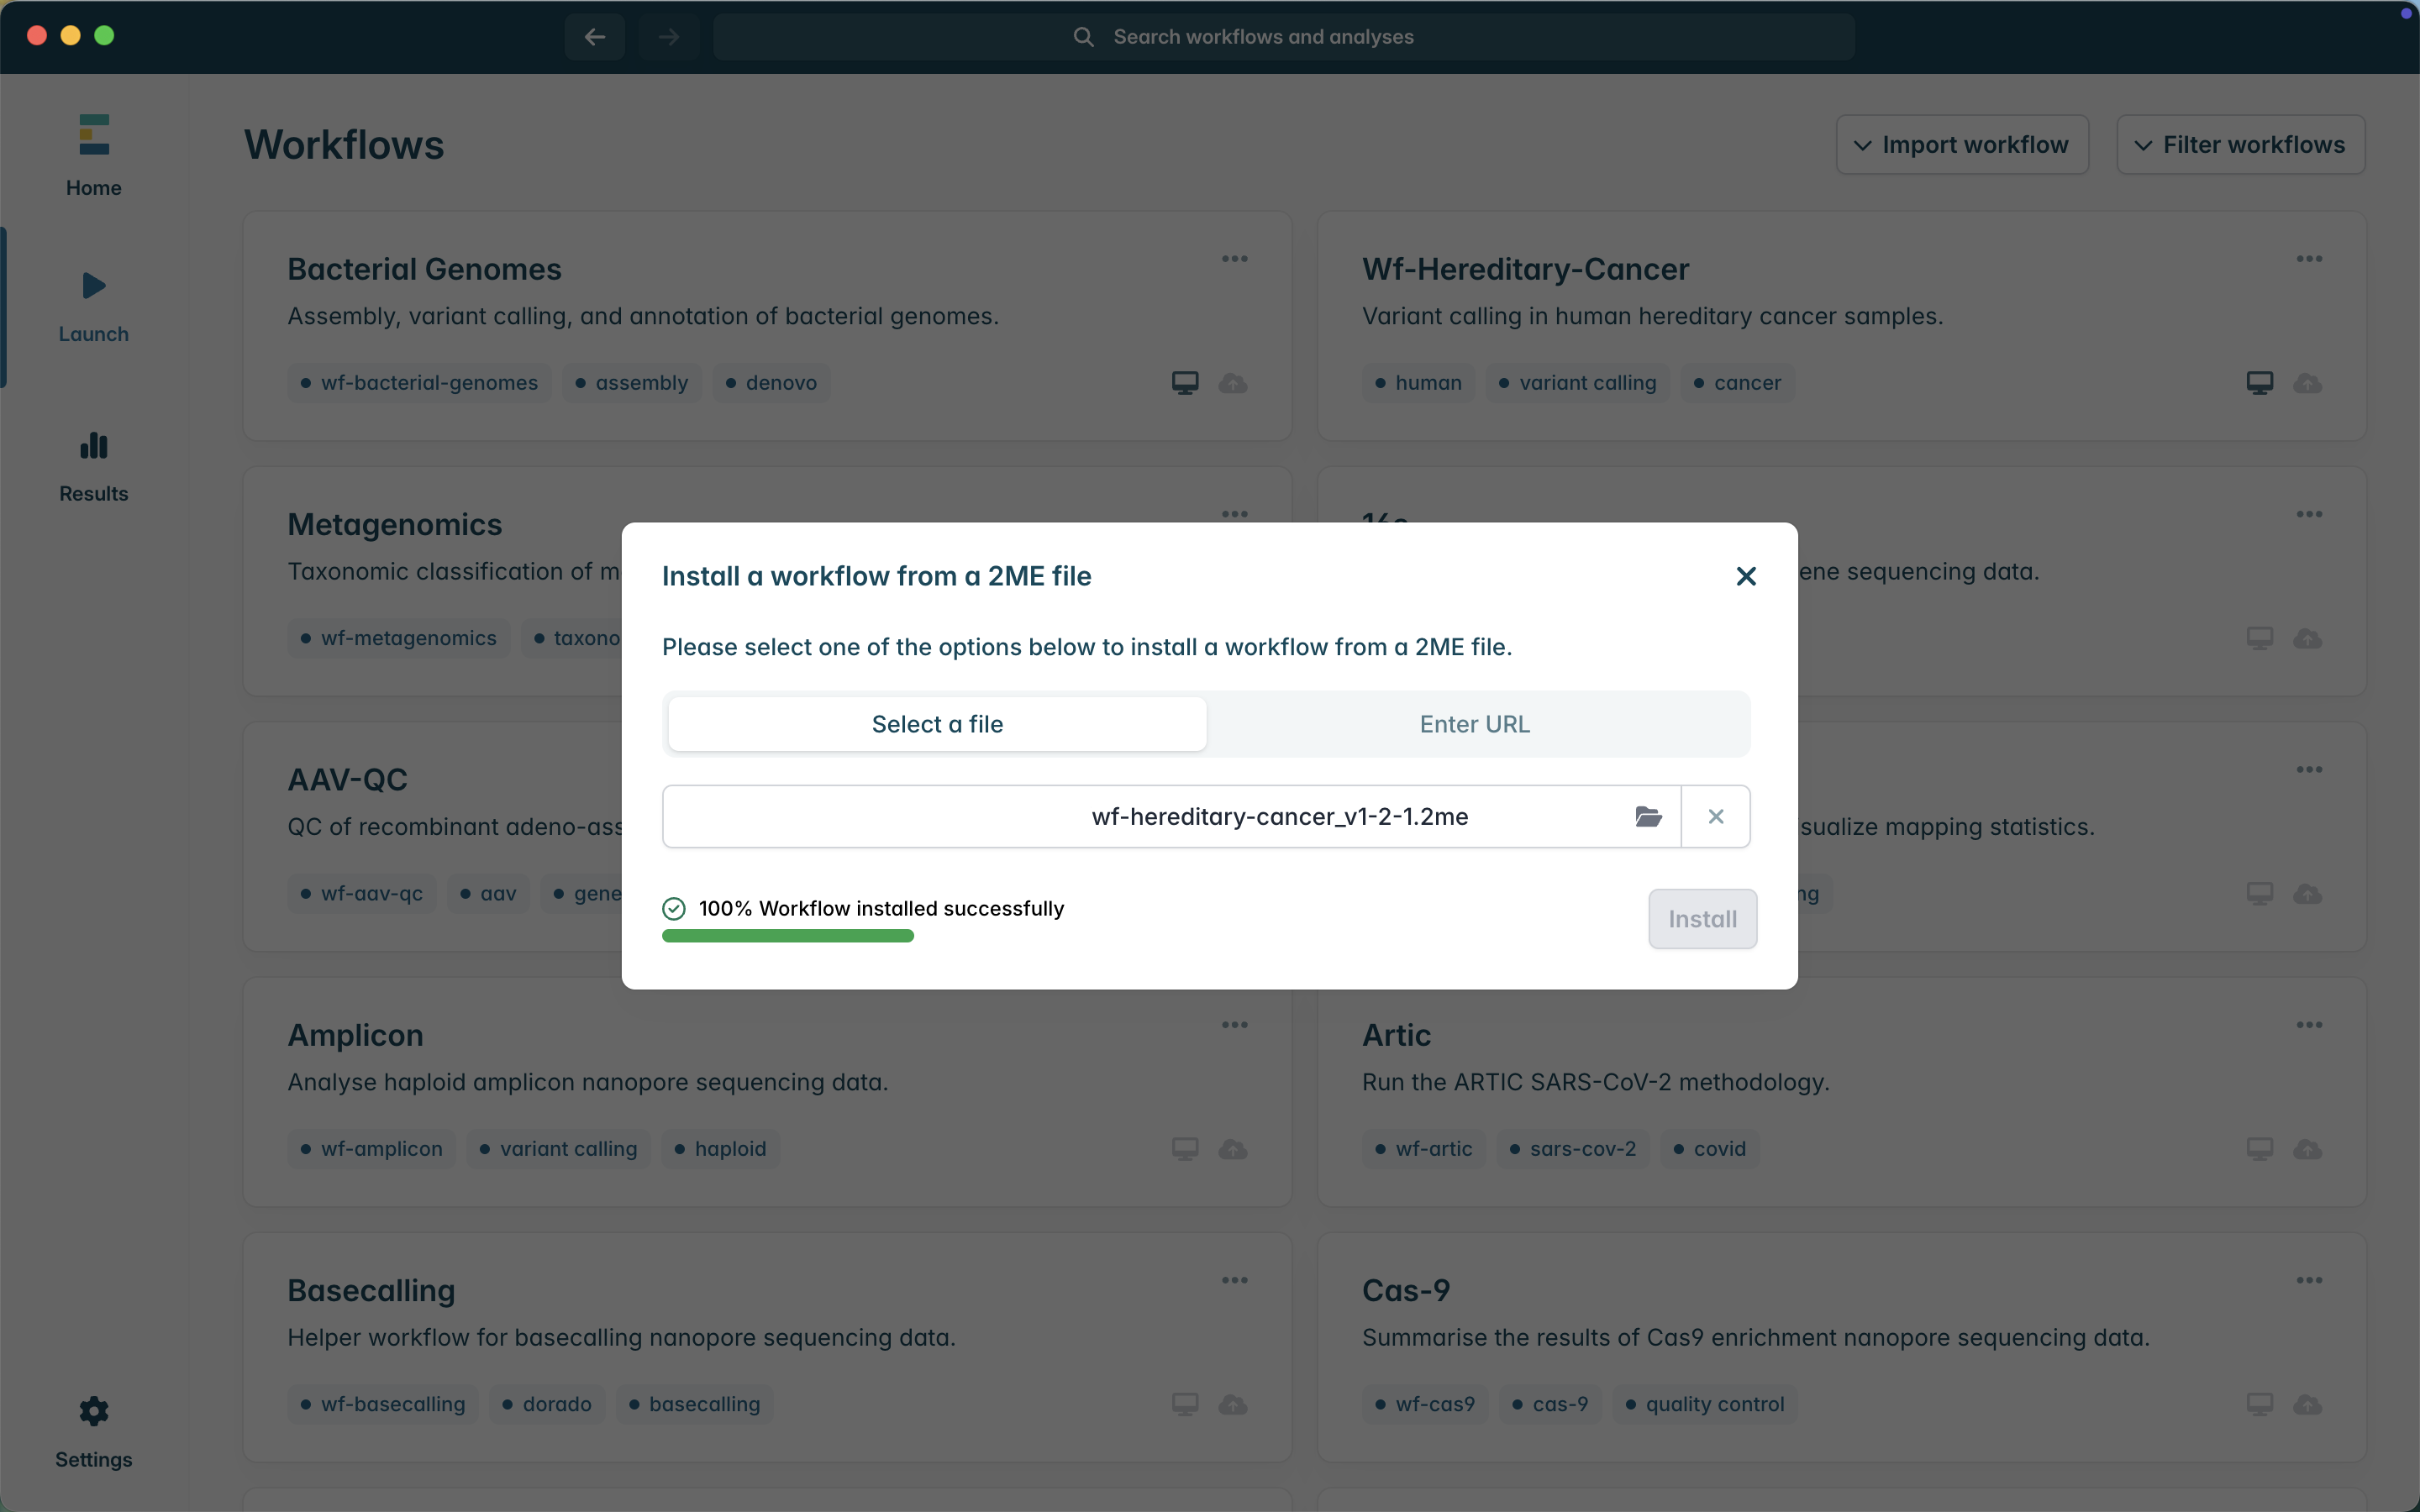
5. Successful installation will be indicated with a message. Close the pop-up. The workflow is now installed and ready to use.
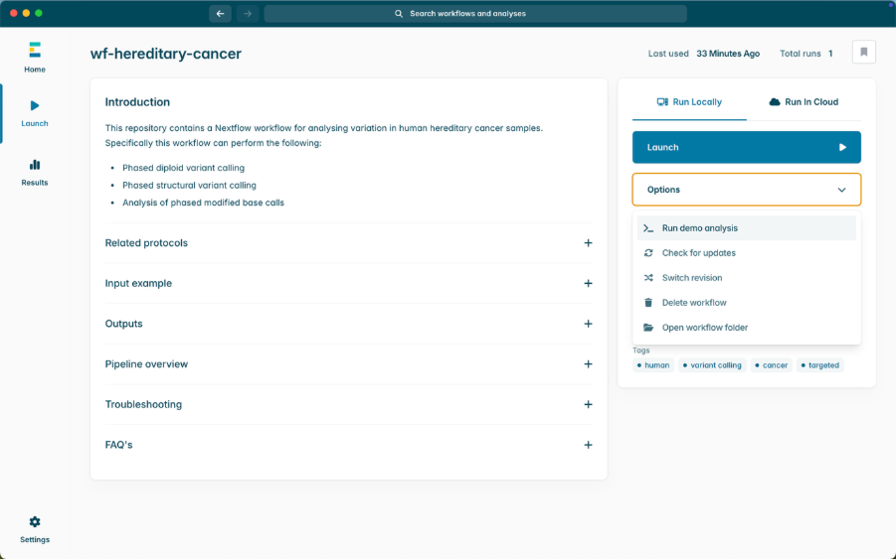
6. If you wish to test the installation using a small demo dataset provided with the workflow, select wf-hereditary-cancer under the Installed workflows tab. Then, under the Options drop-down menu, select Run demo analysis. Then select Launch.
Analysis with wf-hereditary-cancer
Running the workflow:
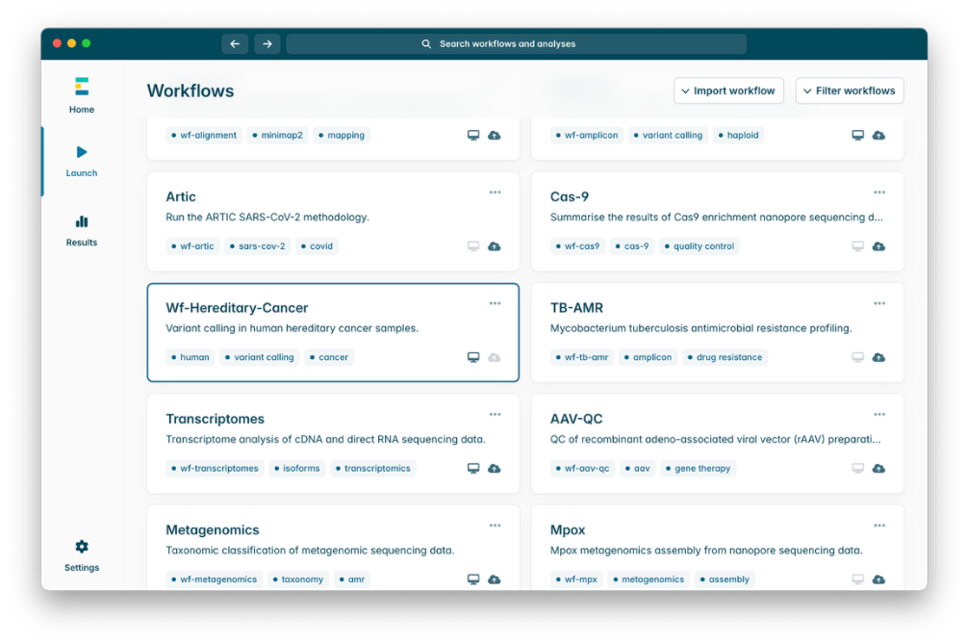
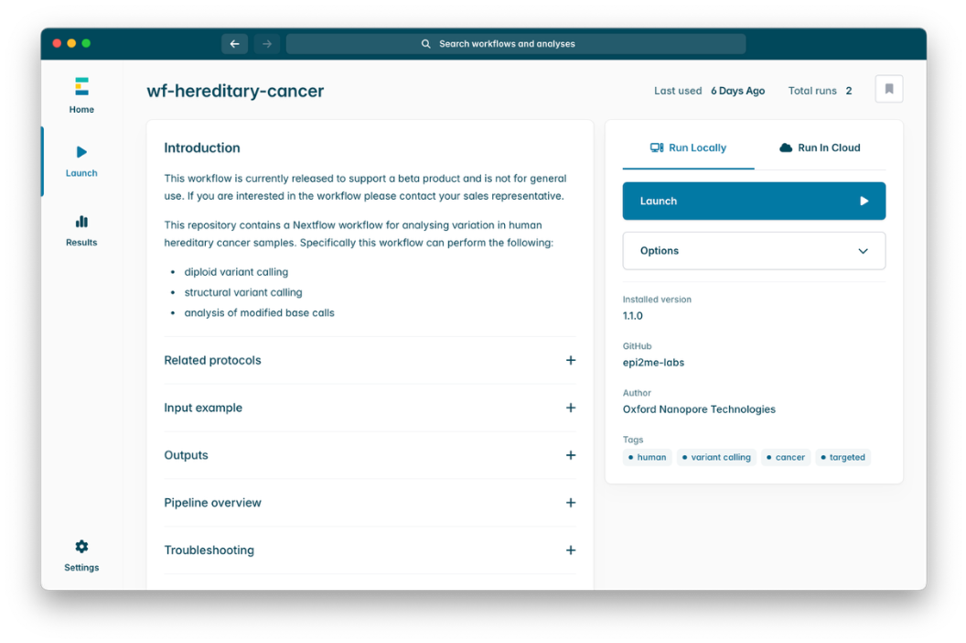
1. Launch the EPI2ME Desktop App.
2. Select wf-hereditary-cancer under the installed workflows tab. Then select Launch.
3. Under Main options, enter the path to the folder containing BAMs for the sample (e.g. barcode01). Please note that the workflow should be run separately for each sample. If you wish to use a name different from the folder name in your final output report, provide the new name in the Sample Name field.
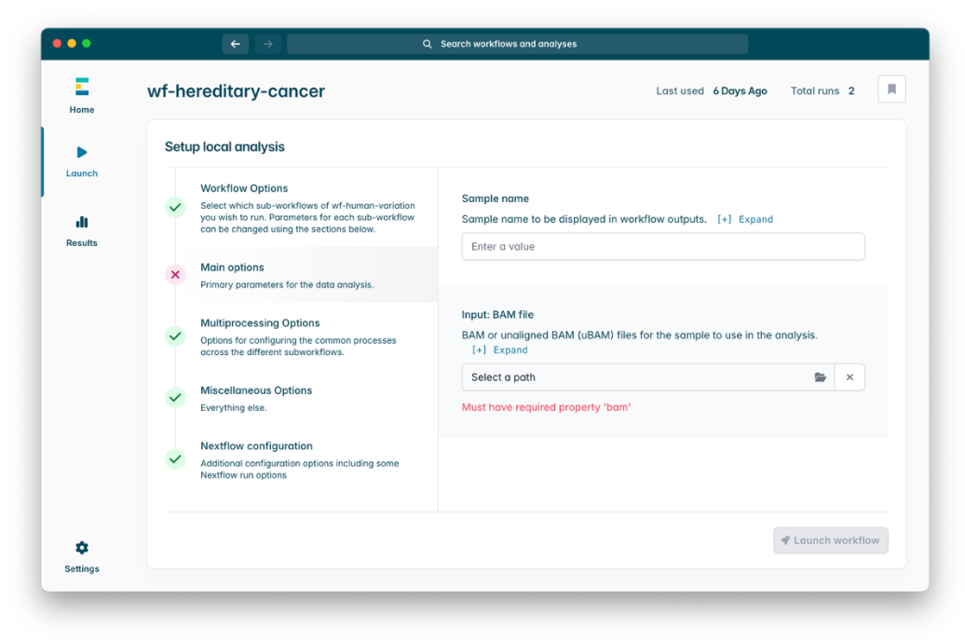
4. Click Launch workflow.
The default values under Multiprocessing Options and Nextflow configuration are suitable for running the workflow on Oxford Nanopore’s PromethION and GridION instruments. We recommend leaving all other parameters at the default values.
Output files
wf-hereditary-cancer produces several interactive HTML reports with information on data quality metrics, coverage across target regions, and variants detected. The workflow also outputs additional files that can be used for downstream analysis and exploration, including variant calls (.vcf) for tertiary variant annotation analysis and haplotagged alignment and methylation files (.bam, .bedmethyl) for inspecting the data on a genome browser.
12. Flow cell reuse and returns
We do not recommend washing and reusing your flow cells for this method.
Due to the extended sequencing time, and the multiple flow cell washes and library reloads, we do not recommend re-using the flow cells used in this method.
Re-using these flow cells for subsequent sequencing experiments may result in insufficient data generation for analysis.
Follow the returns procedure to send back flow cells to Oxford Nanopore for recycling.
Instructions for returning flow cells can be found here.
If you encounter issues or have questions about your sequencing experiment, please refer to the Troubleshooting Guide that can be found in the online version of this protocol.
13. Troubleshooting for Hereditary Cancer Panel
Live basecalling was not enabled during my sequencing run. What can I do?
Post-run basecalling
If the data was not live basecalled with the recommended HAC model during sequencing, it can be basecalled using the standalone version of the Dorado software. To do so using the command line, please follow the instructions on GitHub page.
You can also basecall your data using our wf-basecalling workflow, available for command line use and via the EPI2ME Desktop App.
Please note that we strongly recommend live basecalling. Post-run basecalling has not been validated at Oxford Nanopore for this Hereditary Cancer Profiling workflow.
Issues during DNA extraction and library preparation
Below is a list of the most commonly encountered issues, with some suggested causes and solutions.
We also have an FAQ section available on the Nanopore Community Support section.
If you have tried our suggested solutions and the issue still persists, please contact Technical Support via email (support@nanoporetech.com) or via LiveChat in the Nanopore Community.
Low sample quality
| Observation | Possible cause | Comments and actions |
|---|---|---|
| Low DNA purity (Nanodrop reading for DNA OD 260/280 is <1.8 and OD 260/230 is <2.0–2.2) | The DNA extraction method does not provide the required purity | The effects of contaminants are shown in the Contaminants Know-how piece. Please try an alternative extraction method that does not result in contaminant carryover. Consider performing an additional AMPure bead clean-up step. |
Low DNA recovery after AMPure bead clean-up
| Observation | Possible cause | Comments and actions |
|---|---|---|
| Low recovery | DNA loss due to a lower than intended AMPure beads-to-sample ratio | 1. AMPure beads settle quickly, so ensure they are well resuspended before adding them to the sample. 2. When the AMPure beads-to-sample ratio is lower than 0.4:1, DNA fragments of any size will be lost during the clean-up. |
| Low recovery | DNA fragments are shorter than expected | The lower the AMPure beads-to-sample ratio, the more stringent the selection against short fragments. Please always determine the input DNA length on an agarose gel (or other gel electrophoresis methods) and then calculate the appropriate amount of AMPure beads to use. 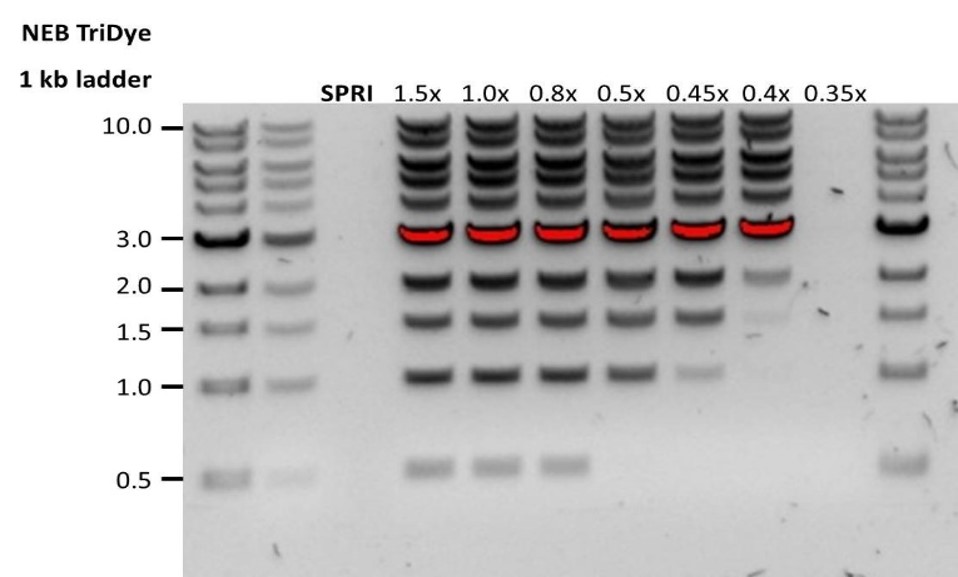 |
| Low recovery after end-prep | The wash step used ethanol <70% | DNA will be eluted from the beads when using ethanol <70%. Make sure to use the correct percentage. |
Issues during the sequencing run
Below is a list of the most commonly encountered issues, with some suggested causes and solutions.
We also have an FAQ section available on the Nanopore Community Support section.
If you have tried our suggested solutions and the issue still persists, please contact Technical Support via email (support@nanoporetech.com) or via LiveChat in the Nanopore Community.
Fewer pores at the start of sequencing than after Flow Cell Check
| Observation | Possible cause | Comments and actions |
|---|---|---|
| MinKNOW reported a lower number of pores at the start of sequencing than the number reported by the Flow Cell Check | An air bubble was introduced into the nanopore array | After the Flow Cell Check it is essential to remove any air bubbles near the priming port before priming the flow cell. If not removed, the air bubble can travel to the nanopore array and irreversibly damage the nanopores that have been exposed to air. The best practice to prevent this from happening is demonstrated in this video how to load a PromethION Flow Cell. |
| MinKNOW reported a lower number of pores at the start of sequencing than the number reported by the Flow Cell Check | The flow cell is not correctly inserted into the device | Stop the sequencing run, remove the flow cell from the sequencing device and insert it again, checking that the flow cell is firmly seated in the device and that it has reached the target temperature. If applicable, try a different position on the device (GridION/PromethION). |
| MinKNOW reported a lower number of pores at the start of sequencing than the number reported by the Flow Cell Check | Contaminations in the library damaged or blocked the pores | The pore count during the Flow Cell Check is performed using the QC DNA molecules present in the flow cell storage buffer. At the start of sequencing, the library itself is used to estimate the number of active pores. Because of this, variability of about 10% in the number of pores is expected. A significantly lower pore count reported at the start of sequencing can be due to contaminants in the library that have damaged the membranes or blocked the pores. Alternative DNA/RNA extraction or purification methods may be needed to improve the purity of the input material. The effects of contaminants are shown in the Contaminants Know-how piece. Please try an alternative extraction method that does not result in contaminant carryover. |
MinKNOW script failed
| Observation | Possible cause | Comments and actions |
|---|---|---|
| MinKNOW shows "Script failed" | Restart the computer and then restart MinKNOW. If the issue persists, please collect the MinKNOW log files and contact Technical Support. If you do not have another sequencing device available, we recommend storing the flow cell and the loaded library at 4°C and contact Technical Support for further storage guidance. |
Pore occupancy below 40%
| Observation | Possible cause | Comments and actions |
|---|---|---|
| Pore occupancy <40% | Not enough library was loaded on the flow cell | For the human genome sequencing protocols, 250-300 ng of good quality library should be loaded on to an R10.4.1 flow cell to keep pore occupancy high. |
| Pore occupancy close to 0 | The Ligation Sequencing Kit was used, and ethanol was used instead of LFB or SFB at the wash step after sequencing adapter ligation | Ethanol can denature the motor protein on the sequencing adapters. Make sure the LFB or SFB buffer was used after ligation of sequencing adapters. |
| Pore occupancy close to 0 | No tether on the flow cell | Tethers are adding during flow cell priming (FCT tube). Make sure FCT was added to FCF before priming. |
Shorter than expected read length
| Observation | Possible cause | Comments and actions |
|---|---|---|
| Shorter than expected read length | Unwanted fragmentation of DNA sample | Read length reflects input DNA fragment length. Input DNA can be fragmented during extraction and library prep. 1. Please review the Extraction Methods in the Nanopore Community for best practice for extraction. 2. Visualise the input DNA fragment length distribution on an agarose gel before proceeding to the library prep. 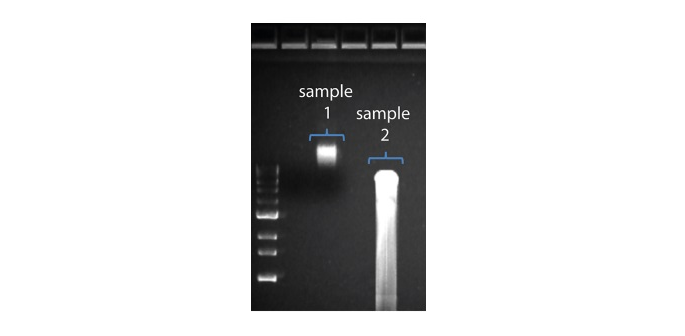 In the image above, Sample 1 is of high molecular weight, whereas Sample 2 has been fragmented. In the image above, Sample 1 is of high molecular weight, whereas Sample 2 has been fragmented.3. During library prep, avoid pipetting and vortexing when mixing reagents. Flicking or inverting the tube is sufficient. |
Large proportion of unavailable pores
| Observation | Possible cause | Comments and actions |
|---|---|---|
Large proportion of unavailable pores (shown as blue in the channels panel and pore activity plot) 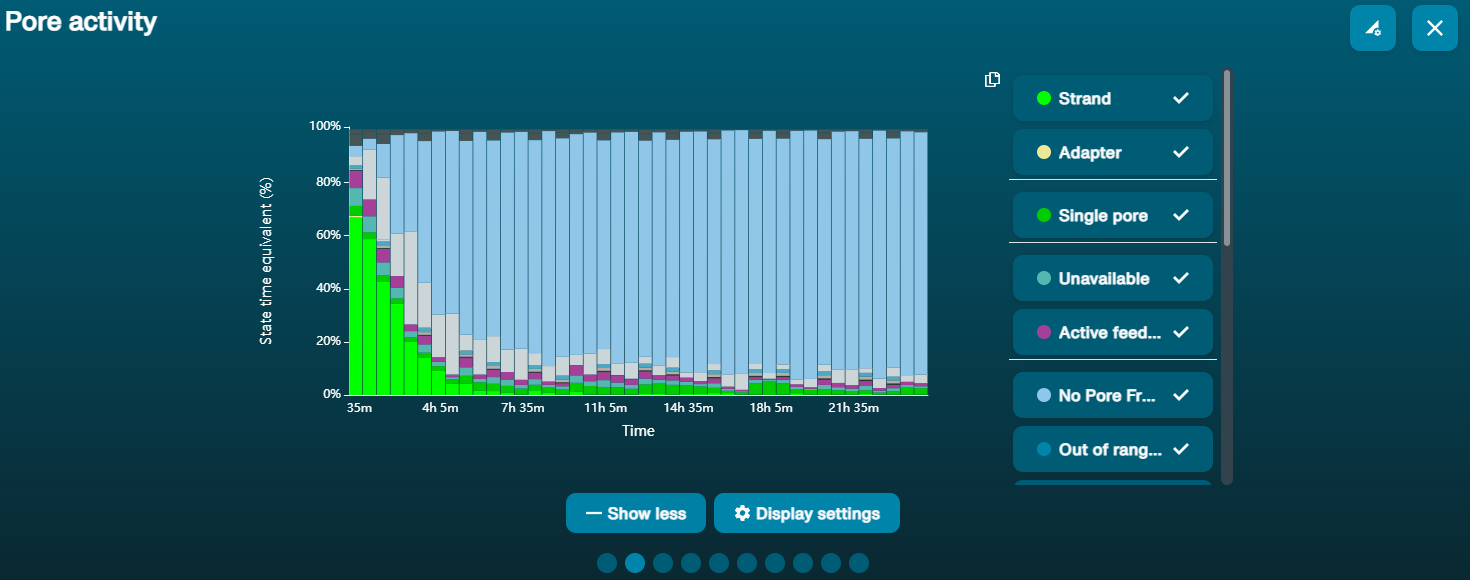 The pore activity plot above shows an increasing proportion of "unavailable" pores over time. The pore activity plot above shows an increasing proportion of "unavailable" pores over time. | Contaminants are present in the sample | Some contaminants can be cleared from the pores by the unblocking function built into MinKNOW. If this is successful, the pore status will change to "sequencing pore". If the portion of unavailable pores stays large or increases: A nuclease flush using the Flow Cell Wash Kit (EXP-WSH004) can be performed. |
Large proportion of inactive pores
| Observation | Possible cause | Comments and actions |
|---|---|---|
| Large proportion of inactive/unavailable pores (shown as light blue in the channels panel and pore activity plot. Pores or membranes are irreversibly damaged) | Air bubbles have been introduced into the flow cell | Air bubbles introduced through flow cell priming and library loading can irreversibly damage the pores. Watch the [how to load a PromethION Flow Cell video for best practice. |
| Large proportion of inactive/unavailable pores | Certain compounds co-purified with DNA | Known compounds, include polysaccharides. 1. Clean-up using the QIAGEN PowerClean Pro kit. 2. Perform a whole genome amplification with the original gDNA sample using the QIAGEN REPLI-g kit. |
| Large proportion of inactive/unavailable pores | Contaminants are present in the sample | The effects of contaminants are shown in the Contaminants Know-how piece. Please try an alternative extraction method that does not result in contaminant carryover. |
Temperature fluctuation
| Observation | Possible cause | Comments and actions |
|---|---|---|
| Temperature fluctuation | The flow cell has lost contact with the device | Check that there is a heat pad covering the metal plate on the back of the flow cell. Re-insert the flow cell and press it down to make sure the connector pins are firmly in contact with the device. If the problem persists, please contact Technical Services. |
Failed to reach target temperature
| Observation | Possible cause | Comments and actions |
|---|---|---|
| MinKNOW shows "Failed to reach target temperature" | The instrument was placed in a location that is colder than normal room temperature, or a location with poor ventilation (which leads to the flow cells overheating) | MinKNOW has a default timeframe for the flow cell to reach the target temperature. Once the timeframe is exceeded, an error message will appear and the sequencing experiment will continue. However, sequencing at an incorrect temperature may lead to a decrease in throughput and lower q-scores. Please adjust the location of the sequencing device to ensure that it is placed at room temperature with good ventilation, then re-start the process in MinKNOW. |
