Long read de novo sequencing from blood and cells using SQK-ULK114 – resolve method (T2TE_9231_v114_revB_17Aug2026)


PromethION: Protocol
Long read de novo sequencing from blood and cells using SQK-ULK114 – resolve method V T2TE_9231_v114_revB_17Aug2026
This protocol describes a workflow for long read de novo sequencing of the human genome using the Oxford Nanopore PromethION platform to generate near-T2T de novo assemblies from long read data.
FOR RESEARCH USE ONLY.
Contents
Introduction to the protocol
Ultra-long DNA experiment
- 3. Sample preparation: whole blood cell isolation
- 4. Sample preparation: ultra-long DNA extraction
- 5. Library preparation: ultra-long DNA sequencing
- 6. Priming and loading ultra-long DNA library on the PromethION Flow Cell
- 7. Washing and reloading the PromethION Flow Cell with ultra-long DNA library
- 8. Data acquisition and basecalling: ultra-long DNA
Pore-C experiment
- 9. Sample preparation: custom SPRI bead preparation
- 10. Sample preparation: PBMC isolation
- 11. Sample preparation: Pore-C extraction
- 12. Library preparation: Pore-C sequencing
- 13. Priming and loading Pore-C library on the PromethION Flow Cell
- 14. Data acquisition and basecalling: Pore-C
Sequencing and data analysis
Troubleshooting
概要
This protocol describes a workflow for long read de novo sequencing of the human genome using the Oxford Nanopore PromethION platform to generate near-T2T de novo assemblies from long read data.
1. Overview of the protocol
Introduction to the protocol
The protocol includes two separate sequencing experiments, using the Ultra-Long DNA Sequencing Kit V14 (SQK-ULK114) and the Pore-C protocol with the Ligation Sequencing Kit V14 (SQK-LSK114). A total of three PromethION Flow Cells are recommended for telomere-to-telomere sequencing of a single human sample.
The protocol describes each experiment individually; however, the Ultra-Long DNA Sequencing Kit and Pore-C library preparation steps will be carried out across multiple days. All optional and required pause steps will be highlighted throughout the protocol.
This protocol was developed in collaboration with the UCSC Nanopore Production Center, led by Dr. Karen Miga.
For supplementary information on this end-to-end workflow please visit our know-how document: De novo genome assembly know-how document.
To achieve in-depth telomere-to-telomere sequencing of a sample, two different datasets must be generated to give high-accuracy data, ultra-long reads, as well as chromatin conformation capture data. This protocol describes the generation of chromatin conformation capture data using the Pore-C protocol. It is also possible to use Hi-C data instead of Pore-C, and the analysis workflow includes both options.
The following two experiments are set up:
- Ultra-long DNA sequencing experiment: This experiment yields ultra-long reads using the Ultra-Long DNA Sequencing Kit V14 (SQK-ULK114), generating a viscous library of ultra-long DNA fragments that requires careful handling to maintain the long fragments. The DNA extraction and library preparation processes are performed in duplicate side-by-side, taking ~3.5 hours with an overnight elution, yielding a total of ten library loads across two flow cells. This means five library loads are required per flow cell across a 140-hour sequencing run.
This experiment aims to generate 40–60x coverage of the human genome, with a read N50 of 60+ kb, although optimal assembly performance is observed with 50–60x coverage and a read N50 of 70–100kb (see the De novo genome assembly know-how document for further details on performance).
- Pore-C sequencing experiment: This experiment generates chromatin conformation capture data using the Pore-C protocol and the Ligation Sequencing Kit V14 (SQK-LSK114). The Pore-C DNA extraction takes ~3 hours of hands-on time over three days with two overnight steps. The library preparation step takes ~60 minutes of hands-on time and is loaded on one PromethION Flow Cell. This experiment has been developed by Oxford Nanopore Technologies and the following published literature: Lieberman-Aiden et al., 2009; Comet et al., 2011; Belton et al., 2012; Gavrilov, Golov and Razin, 2013; Nagano et al., 2015; Belaghzal, Dekker and Gibcus, 2017; Ulahannan et al., 2019. This experiment intends to manipulate cell suspensions to capture three-dimensional interactions of DNA within chromatin. This workflow has been written using NlaIII restriction enzyme and the heat denaturation method. For further information on protocol considerations, please see the Restriction Enzyme Pore-C info sheet.
This protocol aims to generate 10x coverage Pore-C data.
Note that the Pore-C data must come from the same sample as the ultra-long read data.
Steps in the sequencing workflow
Prepare for your experiment
You will need to:
- Ensure you have your human cell line or fresh whole blood samples ready. Fresh blood samples which have not been frozen are essential.
- Ensure you have your sequencing kits, the correct equipment, and third-party reagents.
- Download the MinKNOW software for acquiring and analysing your data.
- Check your flow cells to ensure they have enough pores for a good sequencing run.
Protocol workflow
The Tables below are an overview of the steps required in each experiment, including timings and optional stopping points.
Ultra-long DNA experiment
Note: this experiment is performed in duplicate, each prep yielding five library loads per flow cell.
| Steps | Process | Time | Stop option |
|---|---|---|---|
| Cell isolation | Isolate white blood cells from whole blood or cells from cell culture. | 30 minutes | The custom SPRI beads can be made and stored at 4°C before use. 4°C overnight |
| Ultra-long DNA extraction | Extract ultra-long high molecular weight DNA. | 190 minutes | Stored at room temperature overnight or store at 4°C for short-term storage. |
| Library preparation | Tagment your DNA using a diluted fragmentation mix, attach the sequencing adapters and clean up the sample by precipitating your DNA and eluting overnight. | 190 minutes | Overnight elution at room temperature. 4°C short-term storage or for repeated use, such as reloading your flow cell. -80°C for single-use, long-term storage. We strongly recommend sequencing your library as soon as it is adapted. All excess adapted DNA library should be stored at 4°C or on ice until use. |
| Priming and loading your flow cell | Prime your flow cell and load the prepared library for sequencing. | ~ 30 minutes (5 minutes hands-on time) | |
| Washing and reloading your flow cell | Wash your flow cell and reload the prepared library for further sequencing every 20-24 hours until you have sequenced five library loads on a flow cell. | ~ 45 minutes (5-10 minutes hands-on time) |
Pore-C experiment
| Steps | Process | Time | Stop option |
|---|---|---|---|
| Cell isolation | Isolate PBMC from whole blood or cells from cell culture. | 30 minutes | The custom SPRI beads can be made and stored at 4°C before use. Snap freeze aliquots of white blood cells and store at -80°C until the experiment can begin. |
| Pore-C extraction | Crosslink the three-dimensional DNA interactions within the nucleus of isolated cells. Next, permeabilise the cells and denature the chromatin. Cleave the genome with a restriction enzyme and ligate the cohesive ends of proximal crosslinked monomers into chimeric Pore-C polymers held in proximity. Degrade the protein structures to release the chimeric Pore-C polymers into solution and finally, purify the Pore-C extract. | Day 1: 50 minutes hands on time, 2.5 hour procedure time and overnight Day 2: 10 minutes hands on time, 6 hours procedure time and overnight Day 3: 40 minute hands on time, 1 hour 50 procedure time and optional overnight step | Aside from the multiple overnight incubations, there are a couple of optional pause steps. Snap-freeze the crosslinked aliquots in liquid nitrogen. Store frozen sample pellets at –80°C and use within one year. The extracted DNA can be stored at 4°C overnight until library preparation. |
| Library preparation | Repair DNA and prepare the ends for sequencing adapter attachment. | 60 minutes | Overnight storage at 4°C following DNA library elution. We strongly recommend sequencing your library as soon as it is adapted. |
| Priming and loading your flow cell | Prime the flow cell and load the prepared library for sequencing. | ~ 30 minutes (5 minutes hands-on time) |
Sequencing and analysis
- For each experiment, start a sequencing run using the MinKNOW software which will collect raw data from the device. Live basecalling is performed to support output estimates during sequencing.
Further details for each experiment set-up and basecalling are outlined in the "Data acquisition and basecalling" section of each experiment.
For the Ultra-long DNA experiment, re-basecall your data after sequencing has completed using Dorado.
For the Pore-C experiment, proceed with the data that has been basecalled live in MinKNOW during sequencing.
Telomere-to-telomere assembly:
- Finally, perform the telomere-to-telomere assembly using your basecalled data from all three experiments following the "Downstream analysis" section of the protocol.
Compatibility of this protocol
This protocol should only be used in combination with:
- Ligation Sequencing Kit V14 (SQK-LSK114)
- Ultra-Long DNA Sequencing Kit V14 (SQK-ULK114)
- Ultra-Long Auxiliary Vials (EXP-ULA001)
- Flow Cell Wash Kit (EXP-WSH004 or EXP-WSH004-XL)
- Flow Cell Priming Kit V14 (EXP-FLP004)
- Sequencing Auxiliary Vials V14 (EXP-AUX003)
- R10.4.1 PromethION Flow Cells (FLO-PRO114M)
- PromethION 24/48 device – PromethION IT requirements document
- PromethION 2 Integrated device – PromethION 2 Integrated requirements document
2. Equipment and consumables
材料
- 10–15 ml of whole blood
- Ultra-Long DNA Sequencing Kit V14 (SQK-ULK114)
- Ligation Sequencing Kit V14 (SQK-LSK114)
- Flow Cell Wash Kit (EXP-WSH004) or Flow Cell Wash Kit XL (EXP-WSH004-XL)
- Ultra-Long Auxiliary Vials (EXP-ULA001)
消耗品
- PromethION Flow Cell
- 10X phosphate-buffered saline (PBS), pH 7.4 (Thermo Fisher, 70011044)
- 15 ml Falcon tubes
- 3 M sodium acetate, pH 5.5 (Invitrogen, AM9740)
- 5 M NaCl (Sigma, 71386)
- Agencourt AMPure XP beads (Beckman Coulter, A63881)
- Chilled 1X Phosphate buffered saline (PBS), pH 7.4 (ThermoFisher, 10010023)
- Chilled phenol:chloroform:isoamyl alcohol in a 25:24:1 ratio, saturated with 10 mM Tris.HCl pH 8.0, 1 mM EDTA (Sigma, P3803-400ML)
- Density gradient medium (e.g. Lymphoprep™ Stemcell Technologies 07801) or similar with a density of 1.077 g/ml.
- ECOSURF EH-9 (Dow, 64366-70-7)
- Ethanol, 100% (e.g. Fisher, 16606002)
- Fetal bovine serum (FBS) (Gibco™, A3840401)
- Formaldehyde at 36.5% v/v (Sigma, 33220)
- Glycine (Sigma, 56-40-6)
- IGEPAL CA-630 (Sigma, I8896)
- Isopropanol, 100% (Fisher Scientific, 10723124)
- Monarch® HMW DNA Extraction Kit for Tissue (NEB, T3060)
- NEBNext® Companion Module v2 for Oxford Nanopore Technologies® Ligation Sequencing (NEB, E7672S or E7672L)
- NlaIII restriction enzyme with CutSmart Buffer (NEB, R0125L)
- Nuclease-free water (e.g. ThermoFisher, AM9937)
- Phosphate buffered saline (PBS), pH 7.4 (ThermoFisher, 10010023)
- Protease Inhibitor Cocktail (Sigma, P8340)
- Proteinase K at 20 μg/μl (NEB, P8107S)
- RBC Lysis Solution (QIAGEN, 158106)
- Recombinant Albumin at 20 μg/μl (NEB, B9200S)
- SepMate™-50 (Stemcell Technologies, 85450)
- Sodium dodecyl sulfate (SDS) at 10% v/v (Sigma, 71736)
- T4 DNA Ligase 400,000 U/ml (NEB, M0202S/L)
- TE buffer (10 mM Tris, 1 mM EDTA, pH 8) (Fisher Scientific, 10224683)
- Tris.HCl pH 8.0, 1 mM EDTA (Sigma, P3803-400ML)
- Tween-20 (Sigma, P9416)
- Qubit dsDNA BR Assay Kit (Invitrogen, Q32850)
- Qubit dsDNA HS Assay Kit (ThermoFisher, Q32851)
- Qubit™ Assay Tubes (ThermoFisher, Q32856)
- 1.5 ml Eppendorf DNA LoBind tubes
- 2 ml Eppendorf DNA LoBind tubes
- 5 ml Eppendorf DNA LoBind tubes
- 50 ml centrifuge tubes
- Sterile 0.2 µm syringe filter (Fisher 15206869 or similar)
- Sterile 10 ml syringe (Fisher 15879152 or similar)
- Ziplock bags
装置
- PromethION Flow Cell Light Shield
- PromethION device
- Centrifuge with capacity for 50 ml tubes with a swinging bucket rotor
- Class I hood with active charcoal filter
- Eppendorf 5424 centrifuge (or equivalent)
- Hula mixer(緩やかに回転するミキサー)
- アイスバケツ(氷入り)
- 小型遠心機
- Qubit蛍光光度計(またはQCチェックのための同等品)
- Serological pipettes (Stemcell Technologies, 38004)
- Stripette aide
- Temperature-controlled centrifuge
- Temperature-controlled microfuge
- Thermal cycler or heat block
- Thermomixer
- ボルテックスミキサー
- P1000 ピペット及びチップ
- P200 ピペットとチップ
- P100 ピペットとチップ
- P10 ピペットとチップ
- P20 ピペットとチップ
- Wide-bore pipette tips
- Pasteur pipettes
- マグネットラック
- 1 µl inoculation loop for spooling DNA
- -80°C freezer storage
オプション装置
- Liquid nitrogen and canister
We recommend performing this experiment with freshly extracted DNA from either human cell lines or fresh whole blood.
We recommend different sample preparations due to different input requirements for each experiment, with the option to use either human cell lines or human whole blood. Other methods are available and may be more appropriate for your lab; however, please ensure to yield enough input required for each library preparation. It is also worth noting that depending on how DNA is extracted from a sample, certain chemical contaminants may remain in the purified DNA, which can affect library preparation efficiency and sequencing quality. Read more about contaminants on the Contaminants page.
Human whole blood: approximately a total of 10–15 ml of blood is required for all sample preparation steps. The whole blood can be collected in an anticoagulant such as K2-EDTA but we do not recommend mixing with other additives as they may interfere with the Pore-C DNA extraction or the DNA sequencing run. Fresh blood samples which have not been frozen are essential for Pore-C DNA extraction.
Human whole blood input requirements:
- Ultra-long DNA experiment: 3.2 ml
- Pore-C experiment: 5–10 ml
Human cell lines from culture can also be used. We recommend isolating DNA from cell culture using standard techniques. However, for the Assembly Polishing Kit experiment, we have included an extraction protocol from cell culture.
- Ultra-long DNA experiment: 6 million cells
- Pore-C experiment: 10 million cells
We recommend preparing your samples and the custom SPRI bead suspension a day ahead of the experiments to ensure maximum use of time each day.
Third-party reagents
We have validated and recommend the use of all the third-party reagents used in this protocol. Alternatives have not been tested by Oxford Nanopore Technologies.
For all third-party reagents, we recommend following the manufacturer's instructions to prepare the reagents for use.
This protocol includes the use of potentially hazardous reagents. Please adhere to the correct health and safety practices in accordance to the manufacturers instructions and your laboratory standards.
Check your flow cell
We highly recommend that you check the number of pores in your flow cell prior to starting a sequencing experiment. This should be done within 12 weeks of purchasing your PromethION Flow Cells. Oxford Nanopore Technologies will replace any unused flow cell with fewer than the number of pores listed in the Table below, when the result is reported within two days of performing the flow cell check, and when the storage recommendations have been followed. To do the flow cell check, please follow the instructions in the Flow Cell Check document.
| Flow cell | Minimum number of active pores covered by warranty |
|---|---|
| PromethION Flow Cell | 5,000 |
Ultra-Long DNA Sequencing Kit (SQK-ULK114) contents
| Name | Acronym | Cap colour | Number of vials | Fill volume per vial (µl) |
|---|---|---|---|---|
| Rapid Adapter | RA | Green | 1 | 40 |
| Fragmentation Mix | FRA | Amber | 1 | 50 |
| FRA Dilution Buffer | FDB | Clear | 1 | 1,600 |
| Elution Buffer | EB | Black | 2 | 1,500 |
| Extraction EB | EEB | Orange | 3 | 1,700 |
| Sequencing Buffer UL | SBU | Red | 2 | 1,000 |
| Loading Solution UL | LSU | White cap, pink label | 1 | 200 |
| Flush Tether UL | FTU | Purple | 1 | 600 |
| Flow Cell Flush | FCF | Blue | 2 | 15,500 |
| Precipitation Buffer | PTB | Blue | 2 | 1,700 |
| Precipitation Star | PS | Yellow | 6 | 1 star |
Ultra-Long DNA Auxiliary Vials (EXP-ULA001) contents:
| Name | Acronym | Cap colour | Number of vials | Fill volume per vial (µl) |
|---|---|---|---|---|
| Elution Buffer | EB | Black | 1 | 1,500 |
| Sequencing Buffer UL | SBU | Red | 2 | 1,000 |
| Loading Solution UL | LSU | White cap, pink label | 1 | 200 |
| Flush Tether UL | FTU | Purple | 1 | 600 |
| Flow Cell Flush | FCF | Clear cap, light blue label | 1 | 15,500 |
Ligation Sequencing Kit V14 (SQK-LSK114) contents
| Name | Acronym | Cap colour | No. of vials | Fill volume per vial (µl) |
|---|---|---|---|---|
| DNA CS | DCS | Yellow | 1 | 35 |
| Ligation Adapter | LA | Green | 1 | 40 |
| AMPure XP Beads | AXP | Amber | 1 | 1,200 |
| Ligation Buffer | LNB | White | 1 | 200 |
| Long Fragment Buffer | LFB | Orange | 2 | 1,800 |
| Short Fragment Buffer | SFB | Clear | 2 | 1,800 |
| Sequencing Buffer | SB | Red | 1 | 700 |
| Elution Buffer | EB | Black | 1 | 500 |
| Library Beads | LIB | Pink | 1 | 600 |
| Library Solution | LIS | White cap, pink label | 1 | 600 |
| Flow Cell Flush | FCF | Clear cap, light blue label | 1 | 8,000 |
| Flow Cell Tether | FCT | Purple | 1 | 200 |
Note: This product contains AMPure XP reagent manufactured by Beckman Coulter, Inc. and can be stored at -20°C with the kit without detriment to reagent stability.
Note: The DNA Control Sample (DCS) is a 3.6 kb standard amplicon mapping the 3' end of the Lambda genome.
Flow Cell Wash Kit (EXP-WSH004) contents
| Name | Acronym | Cap colour | No. of vials | Fill volume per vial (µl) |
|---|---|---|---|---|
| Wash Mix | WMX | Brown | 1 | 15 |
| Wash Diluent | DIL | Brown | 2 | 1,300 |
| Storage Buffer | S | Brown | 2 | 1,600 |
- Wash Mix (WMX) contains DNase I.
- Wash Diluent (DIL) contains the exonuclease buffer that maximises activity of the DNase I.
- The Storage Buffer allows flow cells to be stored for extended periods of time.
3. Sample preparation: whole blood cell isolation
材料
- 1.6 ml of whole blood (x2, one for each duplicate preparation)
消耗品
- RBC Lysis Solution (QIAGEN, 158106)
- 10X phosphate-buffered saline (PBS), pH 7.4 (Thermo Fisher, 70011044)
- 15 ml Falcon tubes
- 1.5 ml Eppendorf DNA LoBind tubes
- Nuclease-free water (e.g. ThermoFisher, AM9937)
装置
- 小型遠心機
- P1000 ピペット及びチップ
- P200 ピペットとチップ
- P20 ピペットとチップ
- Eppendorf 5424 centrifuge (or equivalent)
White blood cell sample preparation for the ultra-long DNA experiment
Approximately 6 million isolated white blood cells must be prepared from 1.6 ml of whole blood to use as input in the ultra-long DNA experiment.
Users may isolate white blood cells by any means they think are most appropriate for the whole blood sample to be used. If an alternative method is used, this step can be skipped and proceed directly to the next section of the protocol.
As explained in the introduction, the ultra-long DNA experiment must be performed in duplicate and we recommend performing this step for both volumes of blood side by side. Note: ensure both blood volumes are from the same sample.
In a fresh 15 ml Falcon tube, prepare 10 ml of 1x PBS in nuclease-free water as follows:
| Reagent | Volume |
|---|---|
| 10X PBS | 1 ml |
| Nuclease-free water | 9 ml |
| Total | 10 ml |
Add 4.8 ml of RBC Lysis Solution to 1.6 ml of whole blood in a 15 ml Falcon tube.
Gently invert the tube ten times to mix.
Incubate for 5 minutes at room temperature and gently invert twice during the incubation.
Centrifuge at 2,000 x g for 2 minutes at 4°C to pellet the white blood cells.
Discard the supernatant by pouring. There will be ~200 µl supernatant remaining in the tube.
Resuspend the cells in the residual supernatant by gently flicking the tube.
Make up the volume to 1.6 ml with 1x PBS.
Repeat steps 2-8 twice more to complete three washes in total.
If any red colouration persists, repeat the wash step until the cell pellet is white.
After the final spin, remove the entire supernatant by pouring and aspirating any remaining supernatant.
Resuspend the cell pellet in 40 µl 1x PBS. There will be approximately 6 million cells in the suspension.
Take forward 6 million white blood cells forward into the next step. Store the pellet at 4°C until the experiment can begin.
4. Sample preparation: ultra-long DNA extraction
材料
- 6 million white blood cells isolated from whole blood (x2, one for each duplicate preparation)
- Ultra-Long DNA Sequencing Kit V14 (SQK-ULK114)
消耗品
- Monarch® HMW DNA Extraction Kit for Tissue (NEB, T3060)
- Qubit dsDNA BR Assay Kit (Invitrogen, Q32850)
- Phosphate-buffered saline (PBS), pH 7.4 (Thermo Fisher, 10010023)
- Isopropanol, 100% (Fisher Scientific, 10723124)
- Ethanol, 100% (e.g. Fisher, 16606002)
- 5 ml Eppendorf DNA LoBind tubes
- 2 ml Eppendorf DNA LoBind tubes
- 1.5 ml Eppendorf DNA LoBind tubes
装置
- Thermomixer
- Temperature-controlled centrifuge
- 小型遠心機
- Hula mixer(緩やかに回転するミキサー)
- ボルテックスミキサー
- Qubit fluorometer (or equivalent)
- P1000 ピペット及びチップ
- P200 ピペットとチップ
- P20 ピペットとチップ
- Wide-bore pipette tips
- アイスバケツ(氷入り)
Ultra-long DNA extraction
In this step, ultra-long DNA is extracted from the isolated cells and quantified before proceeding to the library preparation step.
As explained in the introduction, the ultra-long DNA experiment must be performed in duplicate and we recommend performing this step for both white blood cells isolated from whole blood side by side.
This method does NOT use the Monarch Elution Buffer II from the Monarch® HMW DNA Extraction Kit.
This method has been optimised using the Extraction EB (EEB) from the Oxford Nanopore sequencing kit.
Ensure ethanol is added to the Monarch gDNA Wash Buffer as per kit guidance.
Thaw the Extraction EB (EEB) at room temperature, mix by vortexing and place on ice.
Transfer 6 million cells resuspended in 40 µl PBS to a fresh 5 ml tube.
Thorough but gentle resuspension of cells is required to ensure efficient lysis and to prevent heterogeneity in the subsequent steps.
In a separate 2 ml Eppendorf DNA LoBind tube, combine the following reagents:
| Reagent | Volume |
|---|---|
| Monarch HMW gDNA Tissue Lysis Buffer | 1,800 µl |
| Proteinase K | 60 µl |
| Total | 1,860 µl |
Add 1.8 ml of mixed Monarch HMW gDNA Tissue Lysis Buffer and Proteinase K to the resuspended cells.
Gently mix by slowly pipetting the reaction five times using a 1 ml wide-bore pipette tip.
Incubate the reaction at 56°C for 10 minutes.
Using a regular pipette tip, add 15 µl of Monarch RNase A.
Gently mix by slowly pipetting the reaction five times using a 1 ml wide-bore pipette tip.
Incubate the reaction at 56°C for 10 minutes on a thermomixer at 650 rpm.
Using a regular pipette tip, add 900 µl of the Monarch Protein Separation Solution to the reaction and mix using a Hula Mixer (rotator mixer) for 10 minutes, rotating at 3 rpm.
Centrifuge the reaction at 16,000 x g for 10 minutes at 4°C to separate the protein from the DNA.
DNA will be present in the upper phase, whereas protein and other contaminants will be in the lower phase.
Using a wide-bore pipette tip, carefully aspirate the upper phase containing the DNA and transfer to a fresh 5 ml tube without disturbing the phase below.
The DNA in the upper phase should be extremely viscous and should only be possible to aspirate using a wide-bore pipette tip.
If the protein phase is disturbed, the tube can be centrifuged again at 16,000 x g for 10 minutes at 4°C.
Add three Monarch DNA Capture Beads to the collected DNA phase.
Note: the first bead is sacrificial and will remain stuck at the bottom of the tube throughout the remainder of the process.
Add 2.5 ml isopropanol to the tube and mix using a Hula Mixer (rotator mixer) for 20 minutes rotating at 3 rpm. Ensure the DNA has fully precipitated around the glass beads.
Check the DNA is binding to the beads by looking for a viscous mass around the beads. The mixing step can be extended if the DNA is not obviously condensing around the beads.
Leave the tube to stand for 1 minute, without rotating, at room temperature.
Aspirate the supernatant from the tube, being careful not to aspirate the DNA that is bound to the beads. Check for and remove any supernatant remaining in the lid of the tube.
Note: if ~100 µl of supernatant is remaining in the tube, perfomance will not be affected.
Prepare the Monarch gDNA Wash Buffer with ethanol.
Ensure ethanol is added to the Monarch gDNA Wash Buffer as per kit guidance.
Add 2 ml of Monarch gDNA Wash Buffer to the tube containing DNA bound to the beads and invert the tube to mix.
Ensure ethanol is added to the Monarch gDNA Wash Buffer as per kit guidance.
Aspirate the Wash Buffer, being careful not to aspirate the DNA that is bound to the beads. Check for and remove any Wash Buffer remaining in the lid of the tube.
Add 2 ml of Monarch gDNA Wash Buffer to the tube containing the DNA bound to the beads.
To a fresh 2 ml Eppendorf tube, add 560 µl of Extraction EB (EEB).
Aspirate the Wash Buffer, being careful not to aspirate the DNA that is bound to the beads. Check for and remove any Wash Buffer remaining in the lid of the tube.
Insert a Monarch Bead Retainer into a Monarch Collection Tube II and transfer the beads into the retainer.
Briefly spin the tube using a microfuge to remove any remaining Wash Buffer from the beads. Dispose of the collection tube containing residual wash buffer.
Do NOT use the Monarch Elution Buffer II in the Monarch® HMW DNA Extraction Kit for Tissue.
Immediately transfer the beads from the bead retainer into the 2 ml tube containing 560 µl of Extraction EB (EEB).
The beads should be transferred immediately to ensure that they do not over-dry, which could lead to increased solubilisation times.
Incubate the tube for 10 minutes at 56°C and insert a fresh Monarch Bead Retainer into a fresh Monarch Collection Tube II.
Pour the eluate and beads into a clean bead retainer inserted in a collection tube. Spin the tube at 1,000 x g for 1 minute to separate the eluate from the beads. Dispose of beads and bead retainer.
Add 200 µl of Extraction EB (EEB) to the collection tube to bring the total elution volume to 760 µl.
Transfer the eluate to a fresh 2 ml Eppendorf DNA LoBind tube.
Incubate the eluate for 10 minutes at 56°C.
Gently mix the eluate by slowly pipetting 10 times using a 1 ml wide-bore pipette tip.
Thorough but gentle resuspension of DNA is required to prevent heterogeneity in the sample.
At this point, the sample can be stored overnight at room temperature.
The next steps for DNA quantification are optional. Continue to the next stage of the protocol if quantification is to be omitted.
Use a regular P200 pipette tip to aspirate 10 µl of gDNA.
If the DNA is particularly viscous, the aspirated DNA can be separated from the sample by forcing the sample against the side of the tube to break the DNA off. It is critical that the DNA is completely homogenous, so that the 10 µl of sample that is removed is representative of the entire sample.
Dispense the aspirated gDNA into a fresh 2 ml Eppendorf DNA LoBind tube.
Add a Monarch DNA Capture Bead to the 10 µl of gDNA and vortex aggressively for 1 minute to shear the gDNA.
Transfer the gDNA and beads into a clean Monarch Bead Retainer inserted in a Monarch Collection Tube II. Spin the tube at 1,000 x g for 1 minute to separate gDNA from the beads. Dispose of beads and bead retainer.
Transfer the gDNA into a clean 1.5 ml Eppendorf DNA LoBind tube.
Quantify the sample using a Qubit fluorometer. The expected yield is 30-40 µg of DNA.
Take forwards 750 µl of extracted ultra-long DNA into the library preparation step. Store the DNA on ice until the next step can begin.
5. Library preparation: ultra-long DNA sequencing
材料
- 750 µl of extracted uHMW gDNA in EEB (x2, one for each duplicate preparation)
- Ultra-Long DNA Sequencing Kit V14 (SQK-ULK114)
消耗品
- 1.5 ml Eppendorf DNA LoBind tubes
装置
- Thermal cycler or heat block
- 小型遠心機
- ボルテックスミキサー
- Hula mixer (rotator mixer)
- Eppendorf 5424 centrifuge (or equivalent)
- P1000 ピペット及びチップ
- P200 ピペットとチップ
- P20 ピペットとチップ
- Wide-bore pipette tips
- アイスバケツ(氷入り)
Library preparation for the ultra-long DNA experiment
In this step, the extracted ultra-long DNA is prepared for sequencing by tagmentation and rapid attachment of sequencing adapters.
As explained in the introduction, the ultra-long DNA experiment must be performed in duplicate. This step can be performed side by side or separately for both duplicates of 750 µl of extracted uHMW gDNA in EEB.
Thaw, spin down and pipette mix the Fragmentation Mix (FRA), FRA Dilution Buffer (FDB), and Rapid Adapter (RA) and store on ice.
Pre-heat a thermal cycler or heat block to 75ºC.
In a 1.5 ml Eppendorf DNA LoBind tube, dilute the Fragmentation Mix (FRA) with FRA Dilution Buffer (FDB) as follows:
| Reagent | Volume |
|---|---|
| Fragmentation Mix (FRA) | 6 µl |
| FRA dilution buffer (FDB) | 244 µl |
| Total | 250 µl |
Mix the diluted Fragmentation Mix (FRA) by pipetting.
Using a regular pipette tip, add 250 µl of diluted Fragmentation Mix (FRA) to the 750 µl of extracted DNA. Stir the reaction with the pipette tip whilst expelling the diluted Fragmentation Mix (FRA) to ensure an even distribution.
Immediately mix the reaction by slowly pipetting 10 times with a wide-bore pipette tip.
Visually check the reagents are thoroughly mixed. It is important to immediately mix the diluted Fragmentation Mix (FRA) with the DNA thoroughly.
Incubate the reaction as follows:
| Temperature | Time |
|---|---|
| Room temperature | 10 minutes |
| 75°C | 10 minutes |
| On ice | Cool on ice for a minimum of 10 minutes |
Note: the reaction must be cooled on ice before adding Rapid Adapter (RA) to prevent denaturing the enzyme.
Add 5 µl Rapid Adapter (RA) to the reaction using a regular pipette tip.
Gently mix the reaction by slowly pipetting five times using a 1 ml wide-bore pipette tip.
Note: visually check to ensure the reaction is thoroughly mixed.
Incubate the reaction for 30 minutes at room temperature.
The use of the Precipitation Star (PS) has been omitted from this method.
However, if you find the use of the Precipitation Star (PS) beneficial for the clean-up steps, please refer to our standard SQK-ULK114 protocol for guidance: Ultra-Long DNA Sequencing Kit V14 (SQK-ULK114) protocol
Caution: If using the Precipitation Star (PS), ensure you still follow the eluting volume outlined in this protocol: using 480 µl of Elution Buffer (EB).
Thaw the Precipitation Buffer (PTB) and Elution Buffer (EB) at room temperature before spinning down and pipette mixing the reagents. Once thawed, store the reagents on ice.
Using a regular pipette tip, add 500 µl of Precipitation Buffer (PTB) to the sample.
Mix the sample by rotating on a Hula Mixer (rotator mixer) for 20 minutes at 3 rpm.
Visually inspect to check the DNA has precipitated, forming a glassy white mass.
Centrifuge the sample at 1,000 x g for 1 minute.
Using a regular pipette tip, carefully remove the supernatant from the tube, taking care not to aspirate the DNA pellet.
Centrifuge the sample at 1,000 x g for 1 minute.
Using a regular pipette tip, carefully remove any residual supernatant from the tube, taking care not to aspirate the DNA pellet.
Using a regular pipette tip, add 480 µl of Elution Buffer (EB) to the tube containing the DNA. Incubate overnight at room temperature, for a minimum of 12 hours.
Gently mix the DNA library by slowly pipetting ten times with a wide-bore pipette tip.
Thorough but gentle resuspension of DNA is required to prevent heterogeneity in the sample.
After overnight incubation, the DNA library can be taken forwards into flow cell priming and loading. Store the library at 4°C for short-term storage as the flow cell will need to be loaded with the same library five times.
6. Priming and loading ultra-long DNA library on the PromethION Flow Cell
材料
- Flow Cell Flush (FCF)
- Flush Tether UL (FTU)
- Loading Solution UL (LSU)
- Sequencing Buffer UL (SBU)
消耗品
- PromethION Flow Cell
- 1.5 ml Eppendorf DNA LoBind tubes
装置
- PromethION device
- PromethION Flow Cell Light Shield
- P1000 ピペット及びチップ
- P200 ピペットとチップ
- P20 ピペットとチップ
- Wide-bore pipette tips
Priming and loading the flow cell for sequencing ultra-long DNA
Once the ultra-long DNA library has been prepared, the PromethION Flow Cell can be primed, and the library prepared with the final sequencing reagents before loading for sequencing to begin. Due to the viscosity of the library, the flow cell priming and loading steps have been modified.
As explained in the introduction, the ultra-long DNA experiment must be performed in duplicate. This step can be performed side by side or separately for both duplicates.
After taking the flow cells out of the fridge, wait 20 minutes for the flow cells to reach room temperature, before inserting them into the PromethION. Condensation can form on the flow cell in humid environments. Inspect the gold connector pins on the top and underside of the flow cell for condensation and wipe off with a lint-free wipe if any is observed. Ensure the heat pad (black pad) is present on the underside of the flow cell.
Thaw the Sequencing Buffer UL (SBU), Loading Solution UL (LSU), Flush Tether UL (FTU) and one tube of Flow Cell Flush (FCF) at room temperature and mix by vortexing. Then spin down and place on ice.
In a fresh 1.5 ml Eppendorf DNA LoBind tube, prepare the DNA library for loading as follows using a wide-bore pipette tip for the addition of the DNA library:
| Reagent | Volume per flow cell |
|---|---|
| Sequencing Buffer UL (SBU) | 100 µl |
| Loading Solution UL (LSU) | 10 µl |
| DNA library | 90 µl |
| Total | 200 µl |
Note: ensure the Sequencing Buffer UL (SBU) and Loading Solution UL (LSU) are thoroughly mixed by pipetting before the addition of the DNA library.
Gently mix the prepared DNA library by slowly pipetting ten times using a wide-bore pipette tip.
Incubate at room temperature for 30 minutes then gently mix by slowly pipetting with a wide-bore tip. Visually inspect to ensure the sample is homogenous.
Prepare the flow cell priming mix in a 1.5 ml Eppendorf DNA LoBind tube and mix by vortexing at room temperature.
| Reagent | Volume |
|---|---|
| Flush Tether UL (FTU) | 30 µl |
| Flow Cell Flush (FCF) | 1,170 µl |
| Total | 1,200 µl |
For the PromethION 24/48, load the flow cell(s) into the docking ports:
- Line up the flow cell with the connector horizontally and vertically before smoothly inserting into position.
- Press down firmly onto the flow cell and ensure the latch engages and clicks into place.
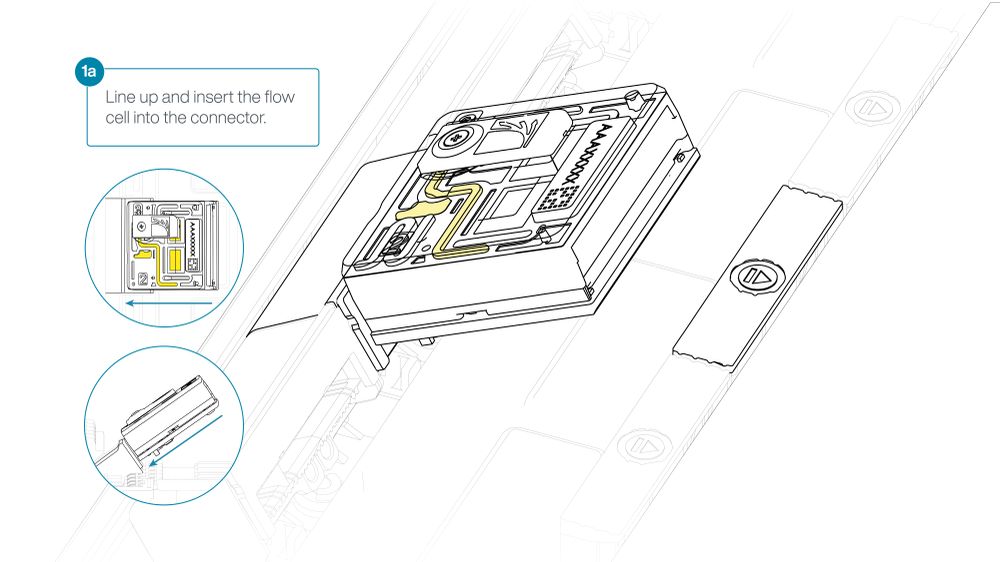
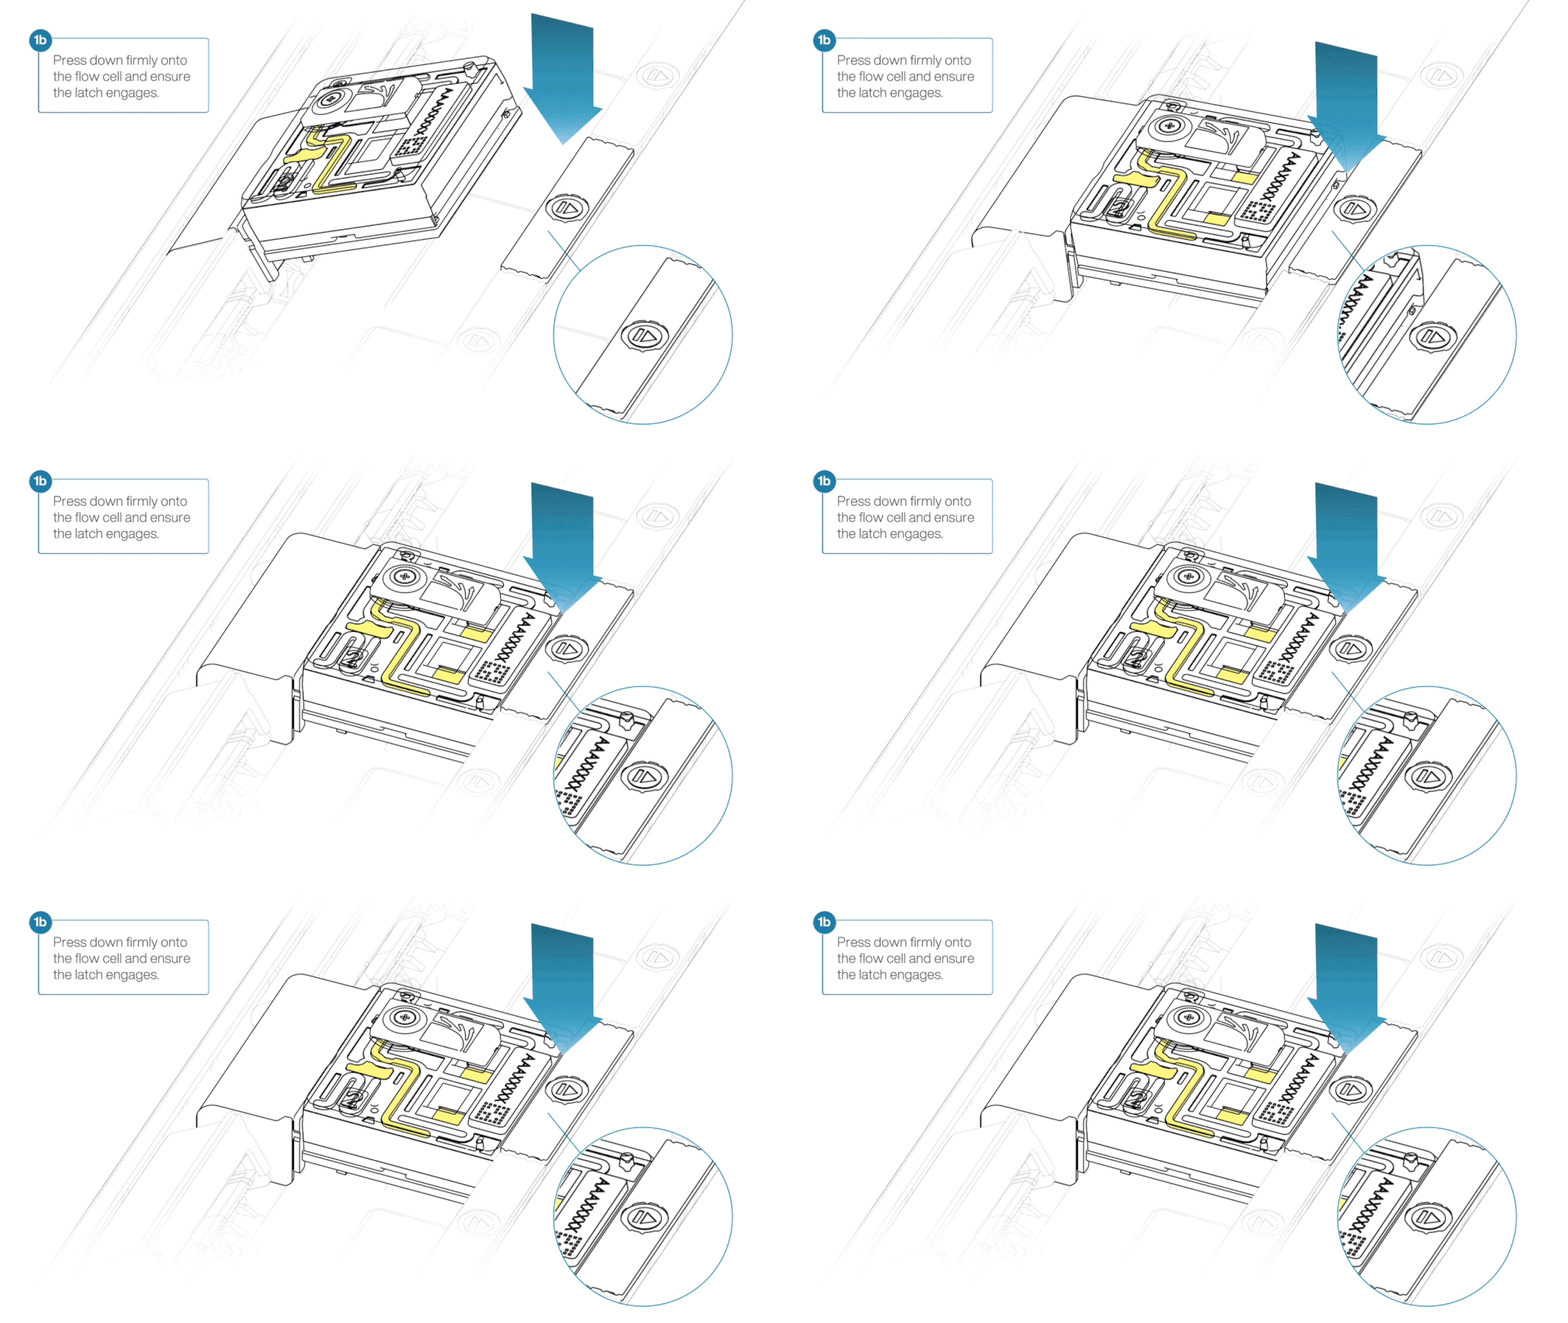
Insertion of the flow cells at the wrong angle can cause damage to the pins on the PromethION and affect your sequencing results. If you find the pins on a PromethION position are damaged, please contact support@nanoporetech.com for assistance.
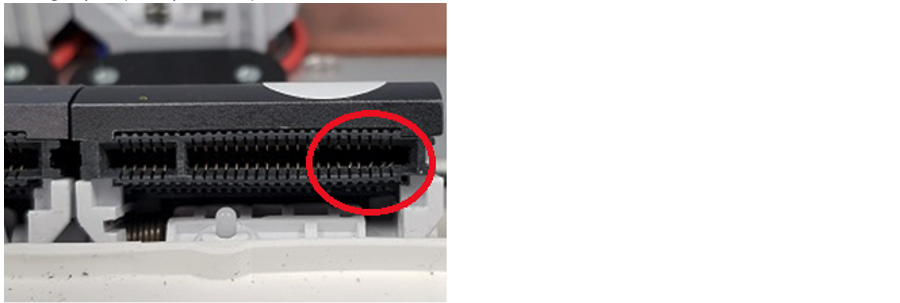
Complete a flow cell check to assess the number of pores available before loading the library.
This step can be omitted if the flow cell has been checked previously.
See the flow cell check document for more information.
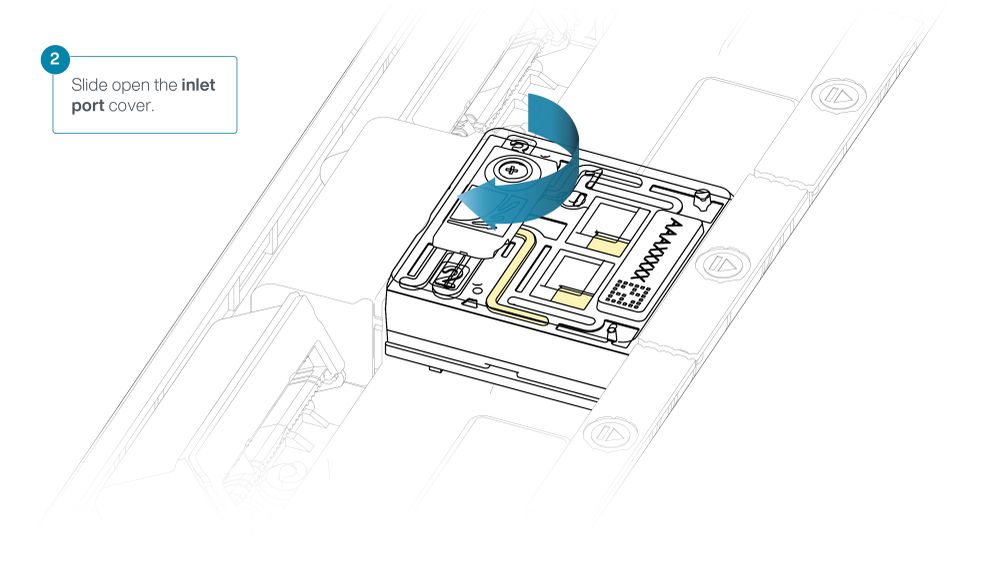
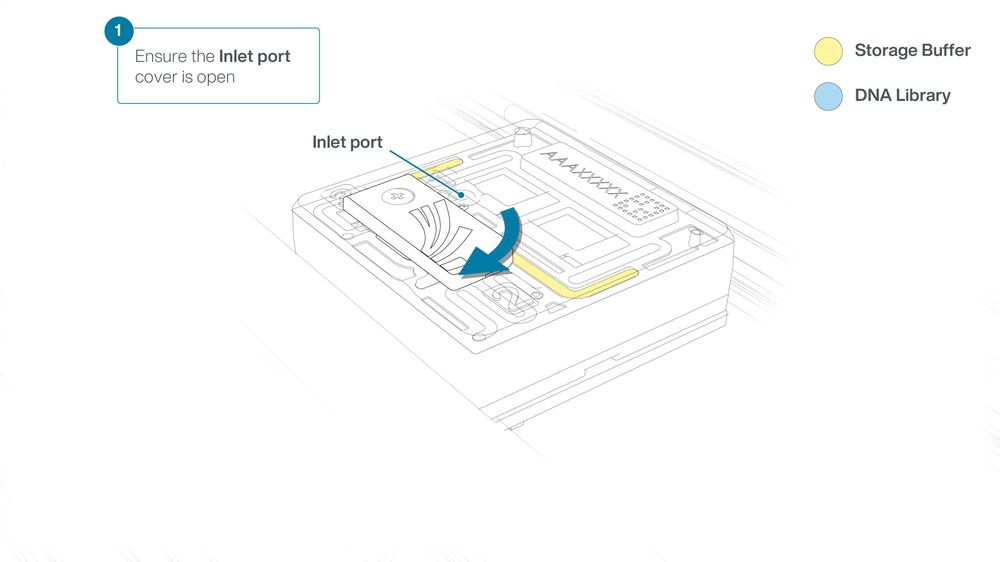
Slide the inlet port cover clockwise to open.
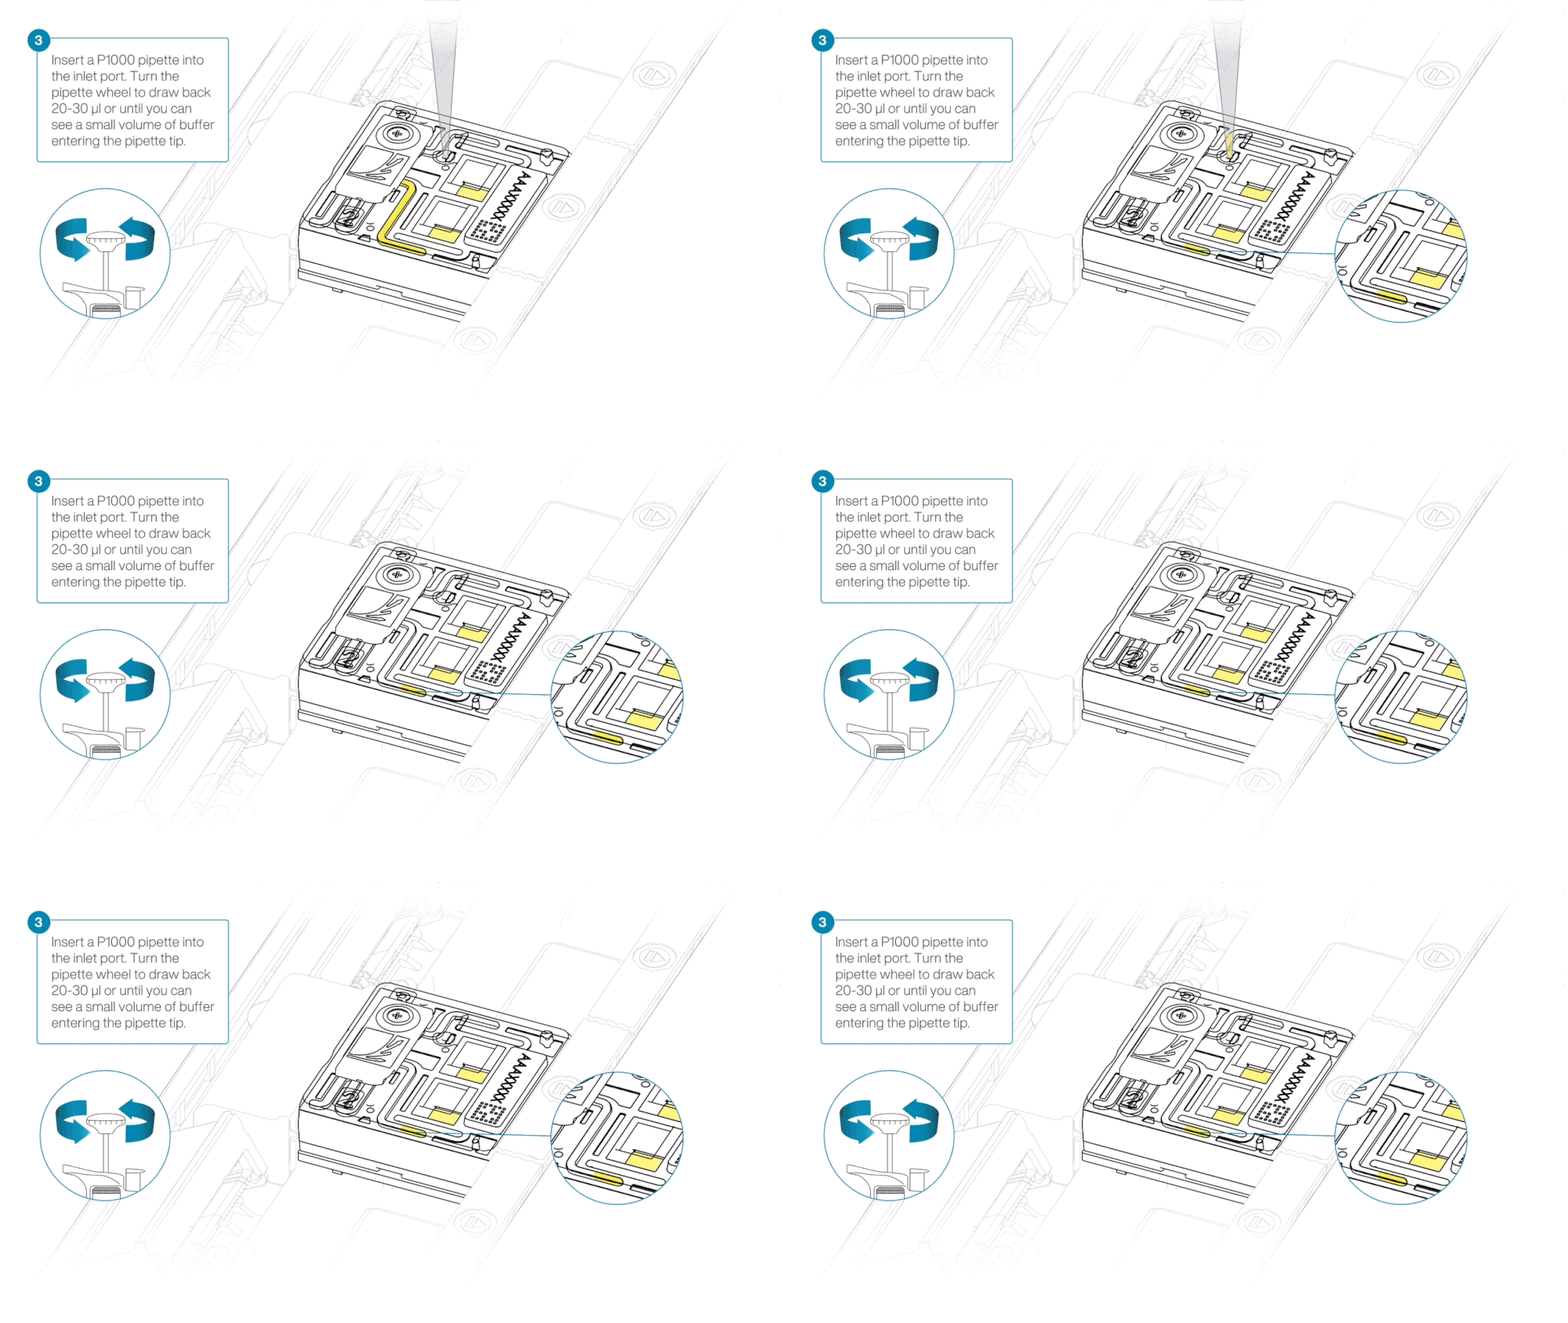
Take care when drawing back buffer from the flow cell. Do not remove more than 20-30 µl, and make sure that the array of pores are covered by buffer at all times. Introducing air bubbles into the array can irreversibly damage pores.
After opening the inlet port, draw back a small volume to remove any air bubbles:
- Set a P1000 pipette tip to 200 µl.
- Insert the tip into the inlet port.
- Turn the wheel until the dial shows 220-230 µl, or until you see a small volume of buffer entering the pipette tip.
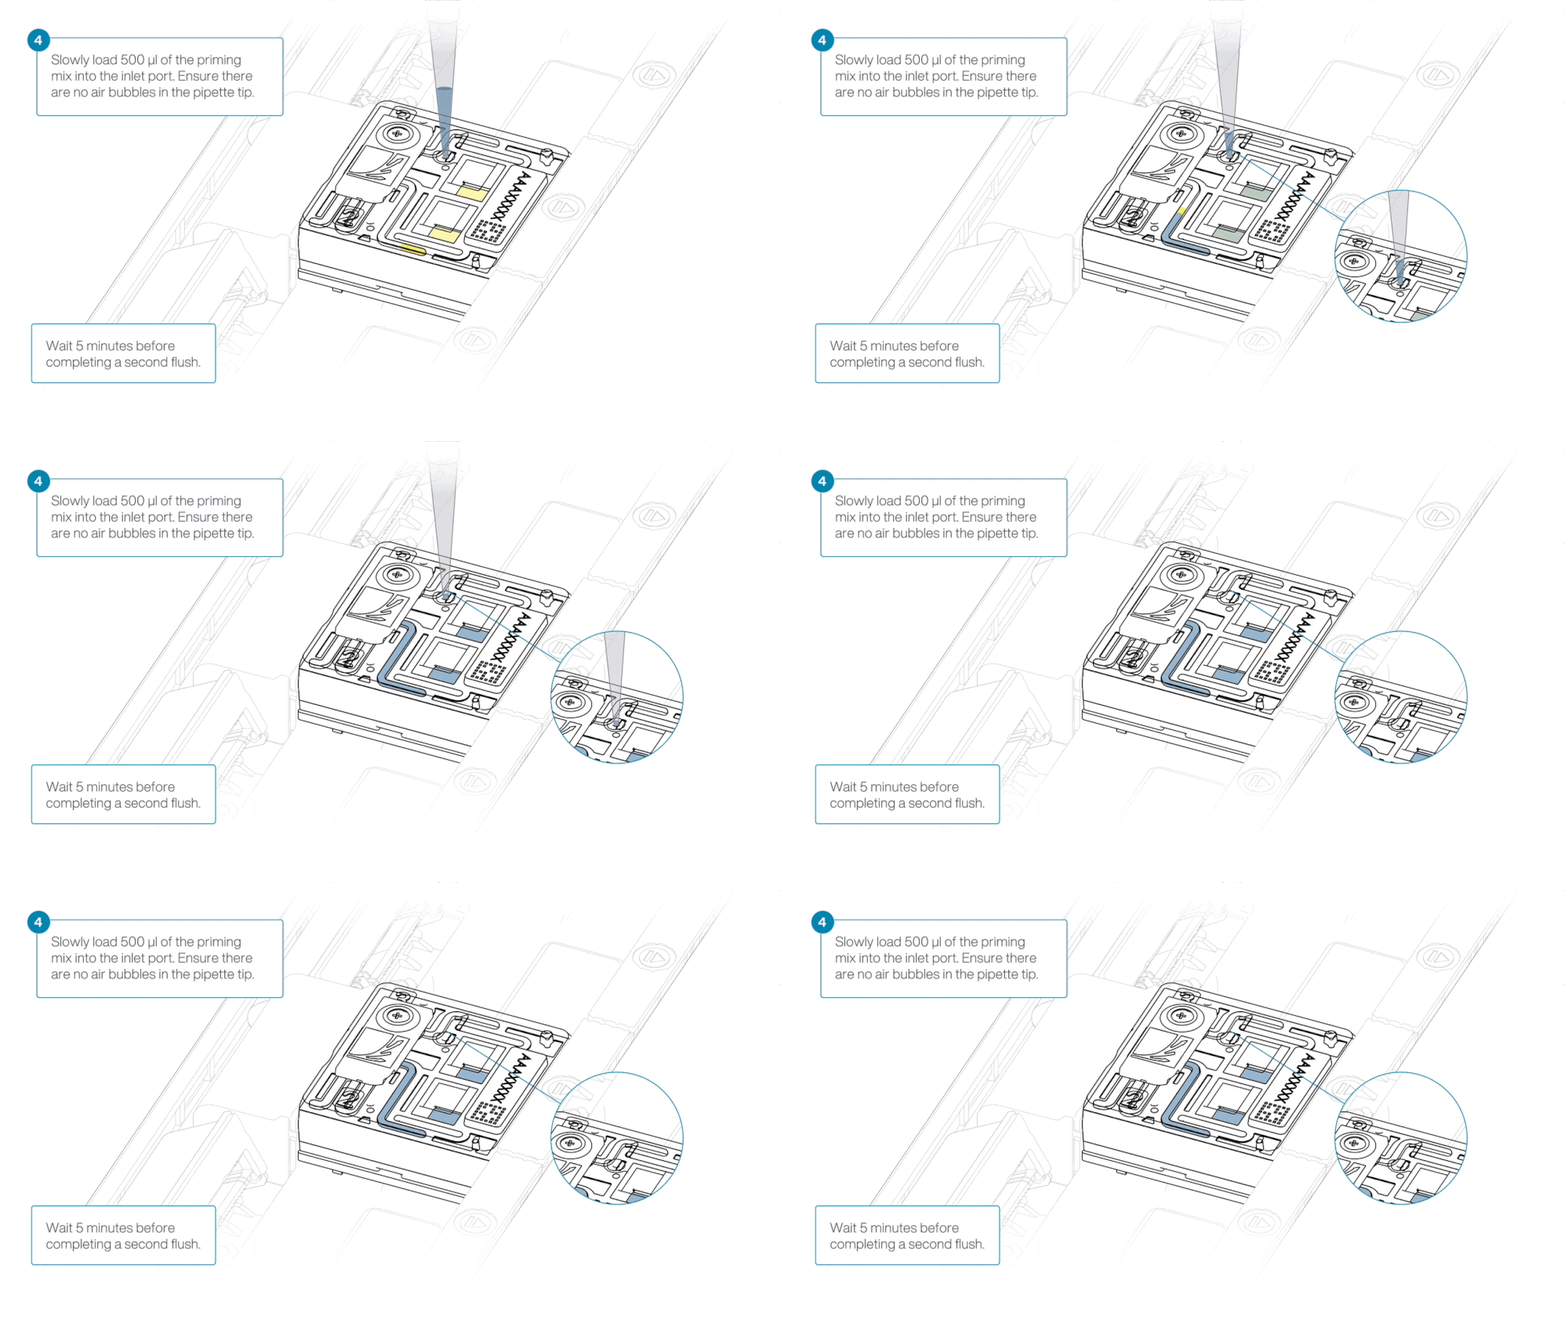
Load 500 µl of the priming mix into the flow cell via the inlet port, avoiding the introduction of air bubbles. Wait five minutes.
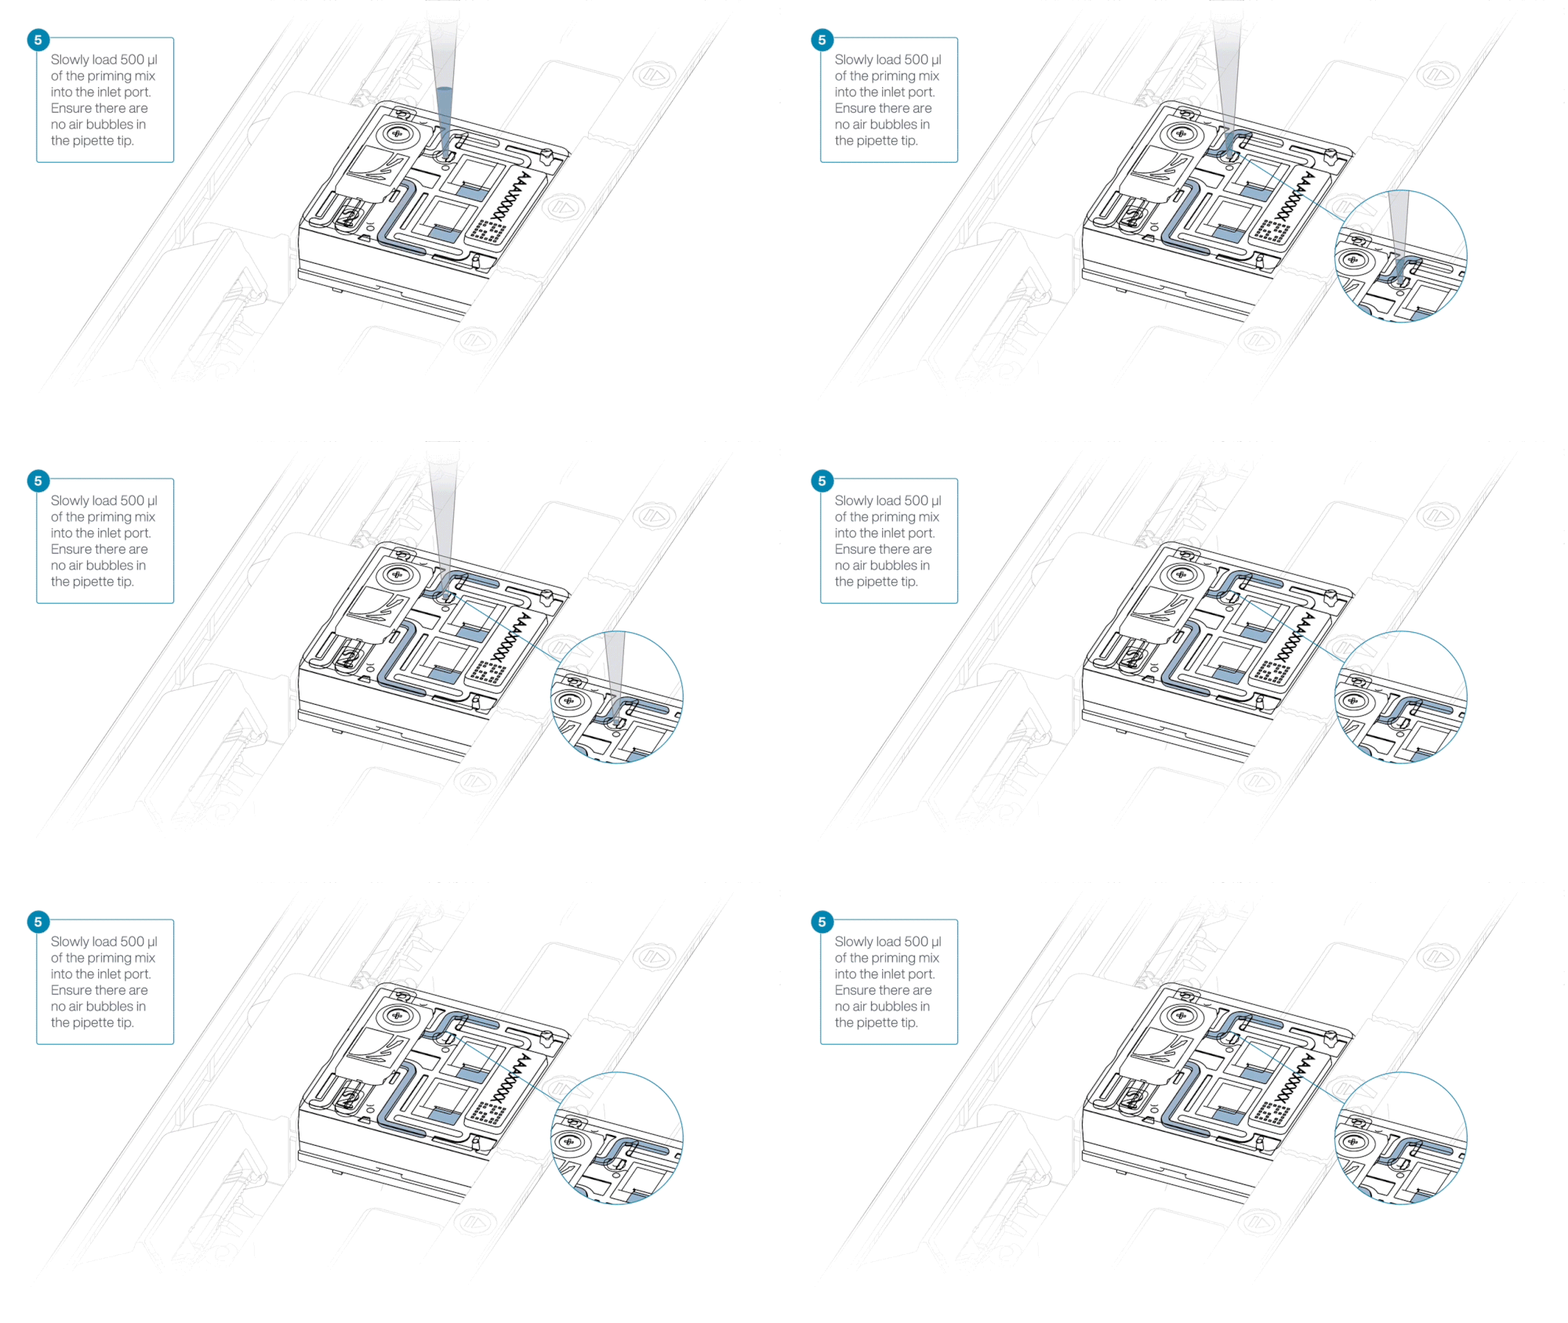
Complete the flow cell priming by slowly loading 500 µl of the priming mix into the inlet port.
Ensure the inlet port cover of the flow cell is still open in preparation for loading.
Check that no air bubbles have been introduced to the inlet port during flow cell priming. If air is present, draw back a small volume to remove any air bubbles by using a P1000 pipette set to 200 µl and turning the pipette wheel (as per the instructions above).
Take care when loading the flow cell as the DNA library is very viscous and may not readily flow through the inlet port, requiring extra careful pipetting to prevent introducing air bubbles.
Aspirate the DNA library with a wide-bore pipette tip and ensure there are no air bubbles in the tip. Place the wide-bore pipette tip directly on the inlet port. Slowly depress the pipette to dispense the library into the inlet port.
The DNA library is viscous and there can be a delay between depressing the pipette and the library dispensing from the pipette tip.
Dispense the library slowly, allowing the library to leave the pipette tip before depressing the pipette further. It is important to dispense the library slowly to prevent air being introduced onto the flow cell. Due to the viscosity of the DNA library, a drop may sit on the inlet port.
If the DNA library is not fully absorbed into the inlet port, use a P200 pipette, set it to 50 µl and insert the tip into port 2.
Very slowly turn the wheel of the pipette to create a negative pressure in the flow cell. This will pull the DNA library into the inlet port. Closely watch the DNA library and completely remove the pipette as soon as the library starts to be pulled into the port.
Note: take care to not apply negative pressure too quickly to avoid bringing air bubbles into the flow cell. Air bubbles will cause irreversible damage to the flow cell.
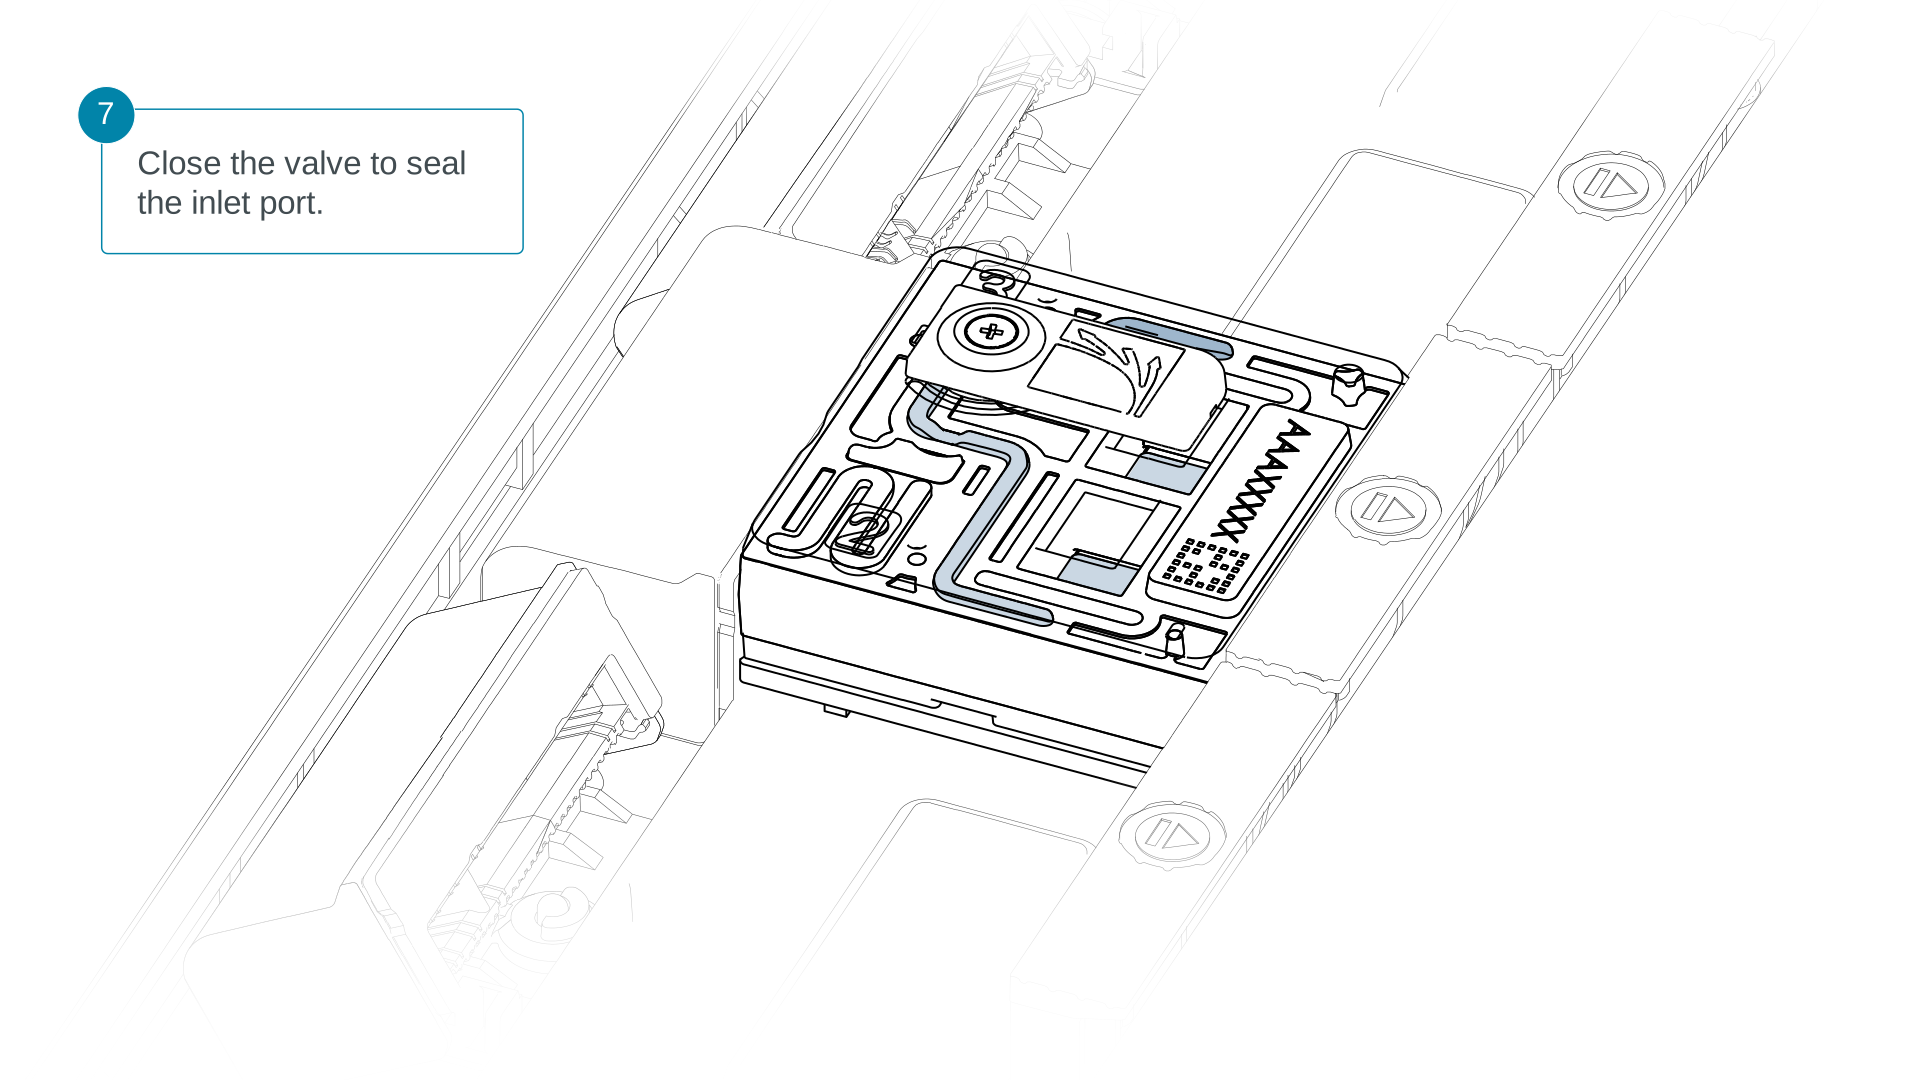
Close the valve to seal the inlet port.
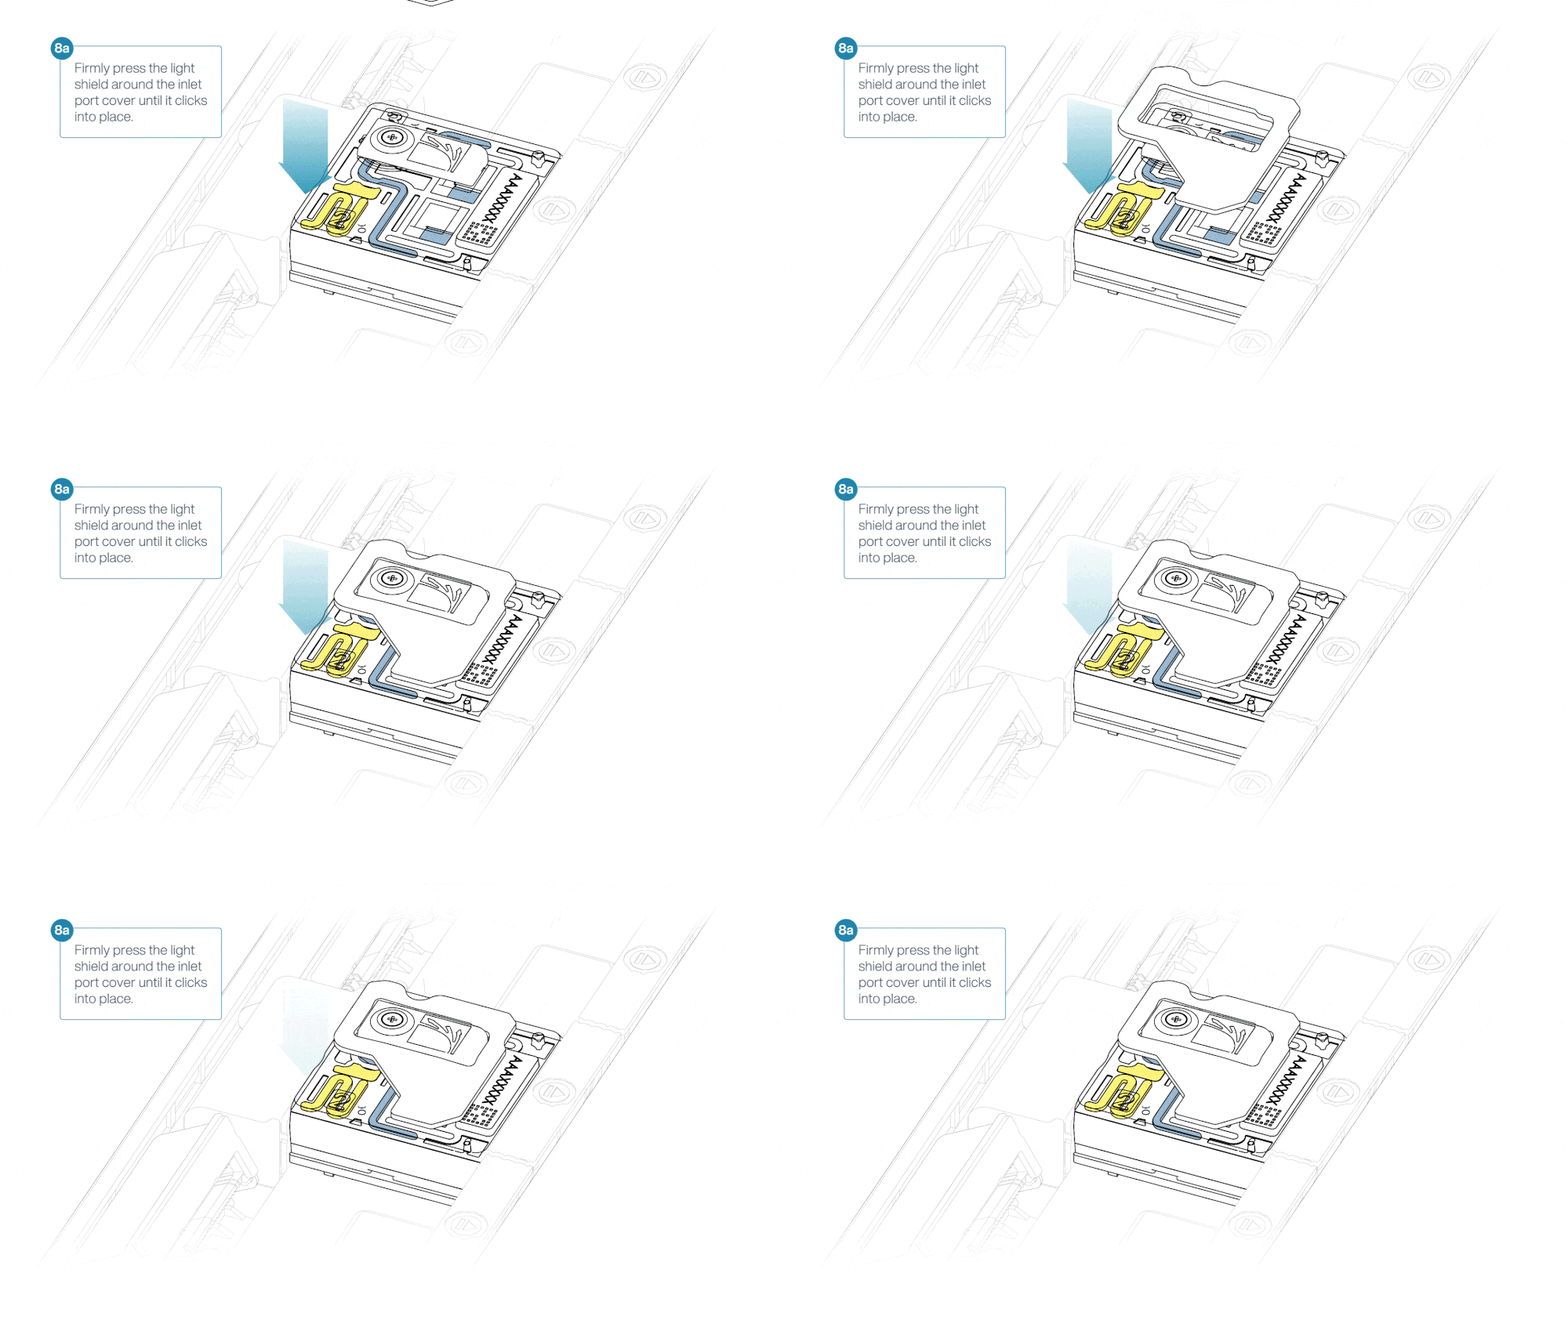
For optimal sequencing output, install the light shield on your flow cell as soon as the library has been loaded.
We recommend leaving the light shield on the flow cell when library is loaded, including during any washing and reloading steps. The shield can be removed when the library has been removed from the flow cell.
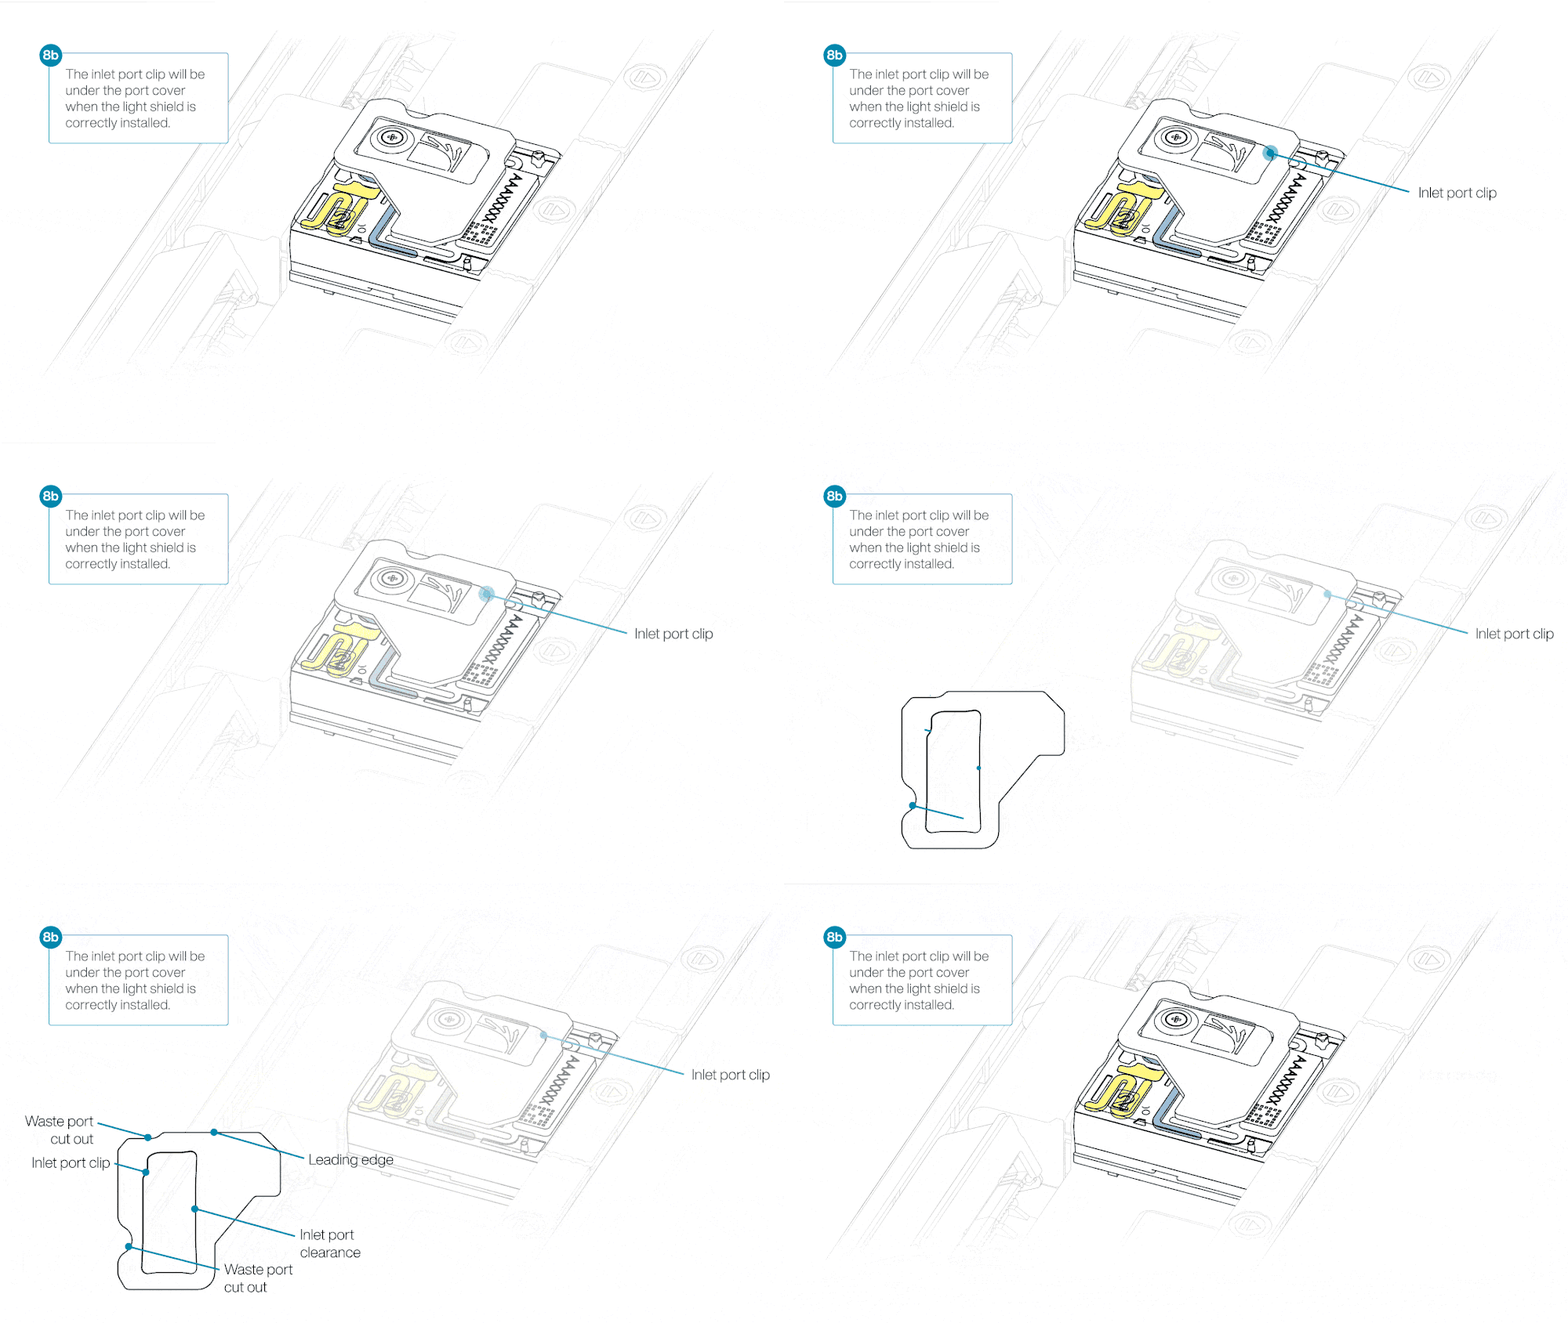
If the light shield has been removed from the flow cell, install the light shield as follows:
- Align the inlet port cut out of the light shield with the inlet port cover on the flow cell. The leading edge of the light shield should sit above the flow cell ID.
- Firmly press the light shield around the inlet port cover. The inlet port clip will click into place underneath the inlet port cover.
Close the PromethION lid when ready to start a sequencing run on MinKNOW.
Wait a minimum of 10 minutes after loading the flow cells onto the PromethION before initiating any experiments. This will help to increase the sequencing output.
7. Washing and reloading the PromethION Flow Cell with ultra-long DNA library
材料
- Flow Cell Wash Kit (EXP-WSH004) or Flow Cell Wash Kit XL (EXP-WSH004-XL)
- Flush Tether UL (FTU)
- Flow Cell Flush (FCF)
- Loading Solution UL (LSU)
- Sequencing Buffer UL (SBU)
消耗品
- 1.5 ml Eppendorf DNA LoBind tubes
装置
- P1000 ピペット及びチップ
- P200 ピペットとチップ
- P20 ピペットとチップ
Flow cell washing and reloading for the ultra-long DNA experiment
We recommend reloading your PromethION Flow Cell with a fresh ultra-long DNA library to maintain high output, using the modified method for reloading a viscous library.
For the Ultra-long DNA experiment, up to five libraries prepared using the Ultra-Long DNA Sequencing Kit V14 (SQK-ULK114) can be loaded on the PromethION Flow Cell during a sequencing run. We recommend washing the flow cell when ~20-25% of active pores are remaining, which typically occurs after ~20-24 hours of sequencing. Washing removes most of the initial library as well as unblocking pores to prepare the flow cell for loading a new library for further sequencing.
Navigate to the pore activity or the pore scan results plot to see pore availability. Below is an example of pore states observed on a flow cell before and after wash steps are performed. The red asterisks indicates the reloads.
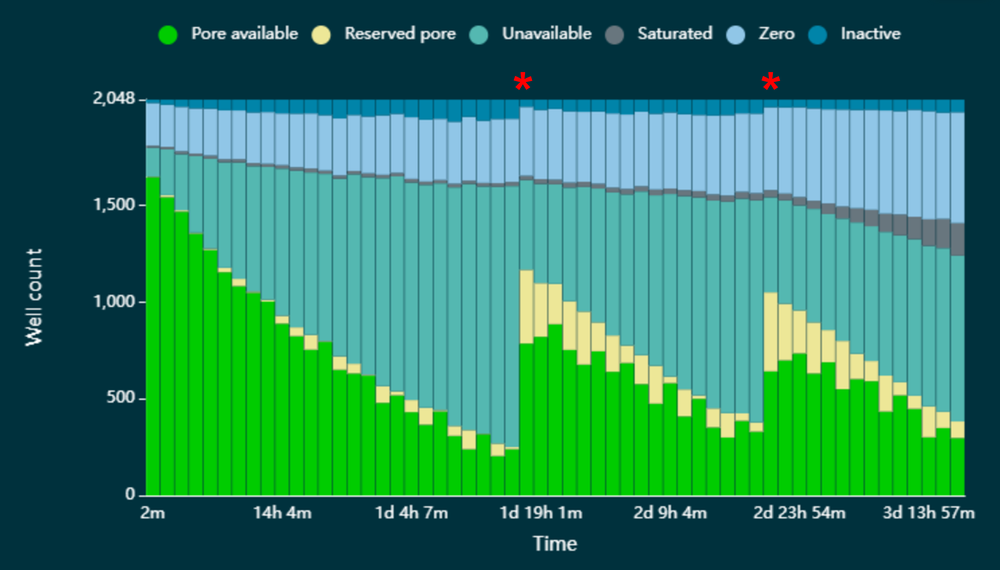
Due to the viscosity of the library, the flow cell washing and reloading steps have been modified. It is also recommended to remove the waste fluid before washing the flow cell and before reloading of an ultra-long DNA library after each priming step.
As explained in the introduction, the ultra-long DNA experiment must be performed in duplicate. This step can be performed side by side or separately for both duplicates.
We recommend keeping the light shield on the flow cell during washing if a second library will be loaded straight away.
If the flow cell is to be washed and stored, the light shield can be removed.
Place the tube of Wash Mix (WMX) on ice. Do not vortex the tube.
Thaw one tube of Wash Diluent (DIL) at room temperature.
Mix the contents of Wash Diluent (DIL) thoroughly by vortexing, then spin down briefly and place on ice.
In a fresh 1.5 ml Eppendorf DNA LoBind tube, prepare the following Flow Cell Wash Mix:
| Reagent | Volume per flow cell |
|---|---|
| Wash Mix (WMX) | 2 μl |
| Wash Diluent (DIL) | 398 μl |
| Total | 400 μl |
Mix well by pipetting, and place on ice. Do not vortex the tube.
Pause the sequencing experiment in MinKNOW, and leave the flow cell in the device.
Ensure the inlet port is closed and remove the buffer from the waste port, using a P1000 pipette.
The waste fluid can be aspirated from either one of the ports, labelled 2 and 3 on the flow cell.
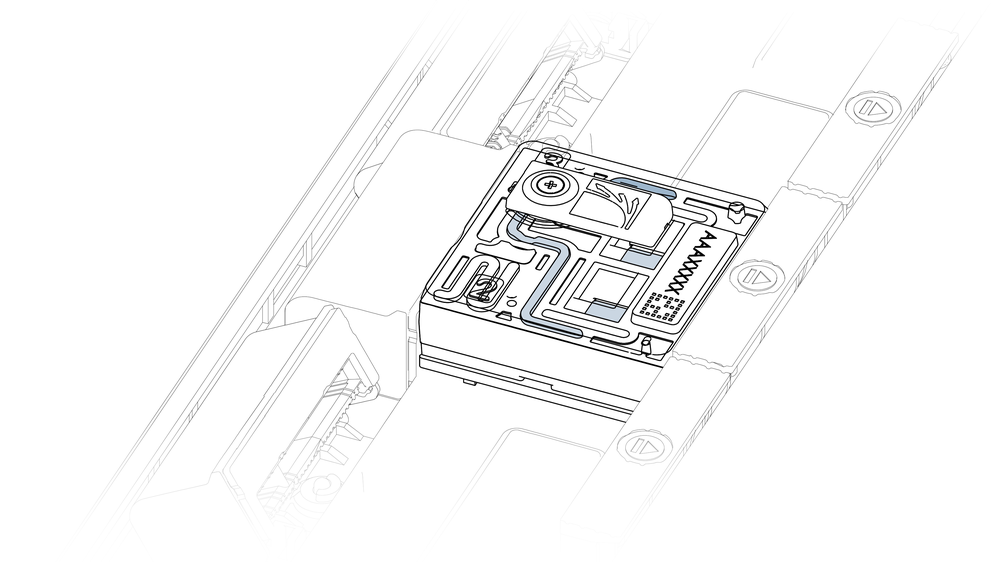
Slide the inlet port cover clockwise to open the inlet port.
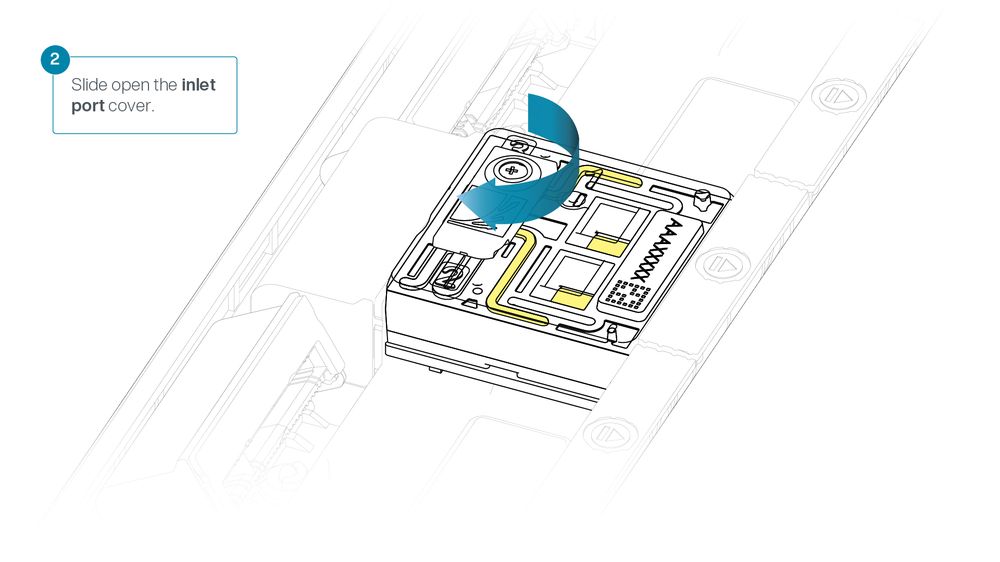
After opening the inlet port, check for a small air bubble under the cover. Draw back a small volume to remove any bubbles:
- Set a P1000 pipette to 200 µl
- Insert the tip into the inlet port
- Turn the wheel until the dial shows 220-230 µl, or until you can see a small volume of buffer entering the pipette tip.
Slowly load 200 µl of the prepared flow cell wash mix into the inlet port, as follows:
- Using a P1000 pipette, take 200 µl of the flow cell wash mix.
- Insert the pipette tip into the inlet port, ensuring there are no bubbles in the tip.
- Slowly twist the pipette wheel down to load the flow cell (if possible with your pipette) or push down the plunger very slowly, leaving a small volume of buffer in the pipette tip.
- Set a timer for a 5 minute incubation.
Once the 5 minute incubation time is complete, carefully load the remaining 200 µl of the prepared flow cell wash mix into the inlet port, as follows:
- Using a P1000 pipette, take 200 µl of the flow cell wash mix.
- Insert the pipette tip into the inlet port, ensuring there are no bubbles in the tip.
- Slowly twist the pipette wheel down to load the flow cell (if possible with your pipette) or push down the plunger very slowly, leaving a small volume of buffer in the pipette tip.
Close the inlet port and wait for 1 hour.
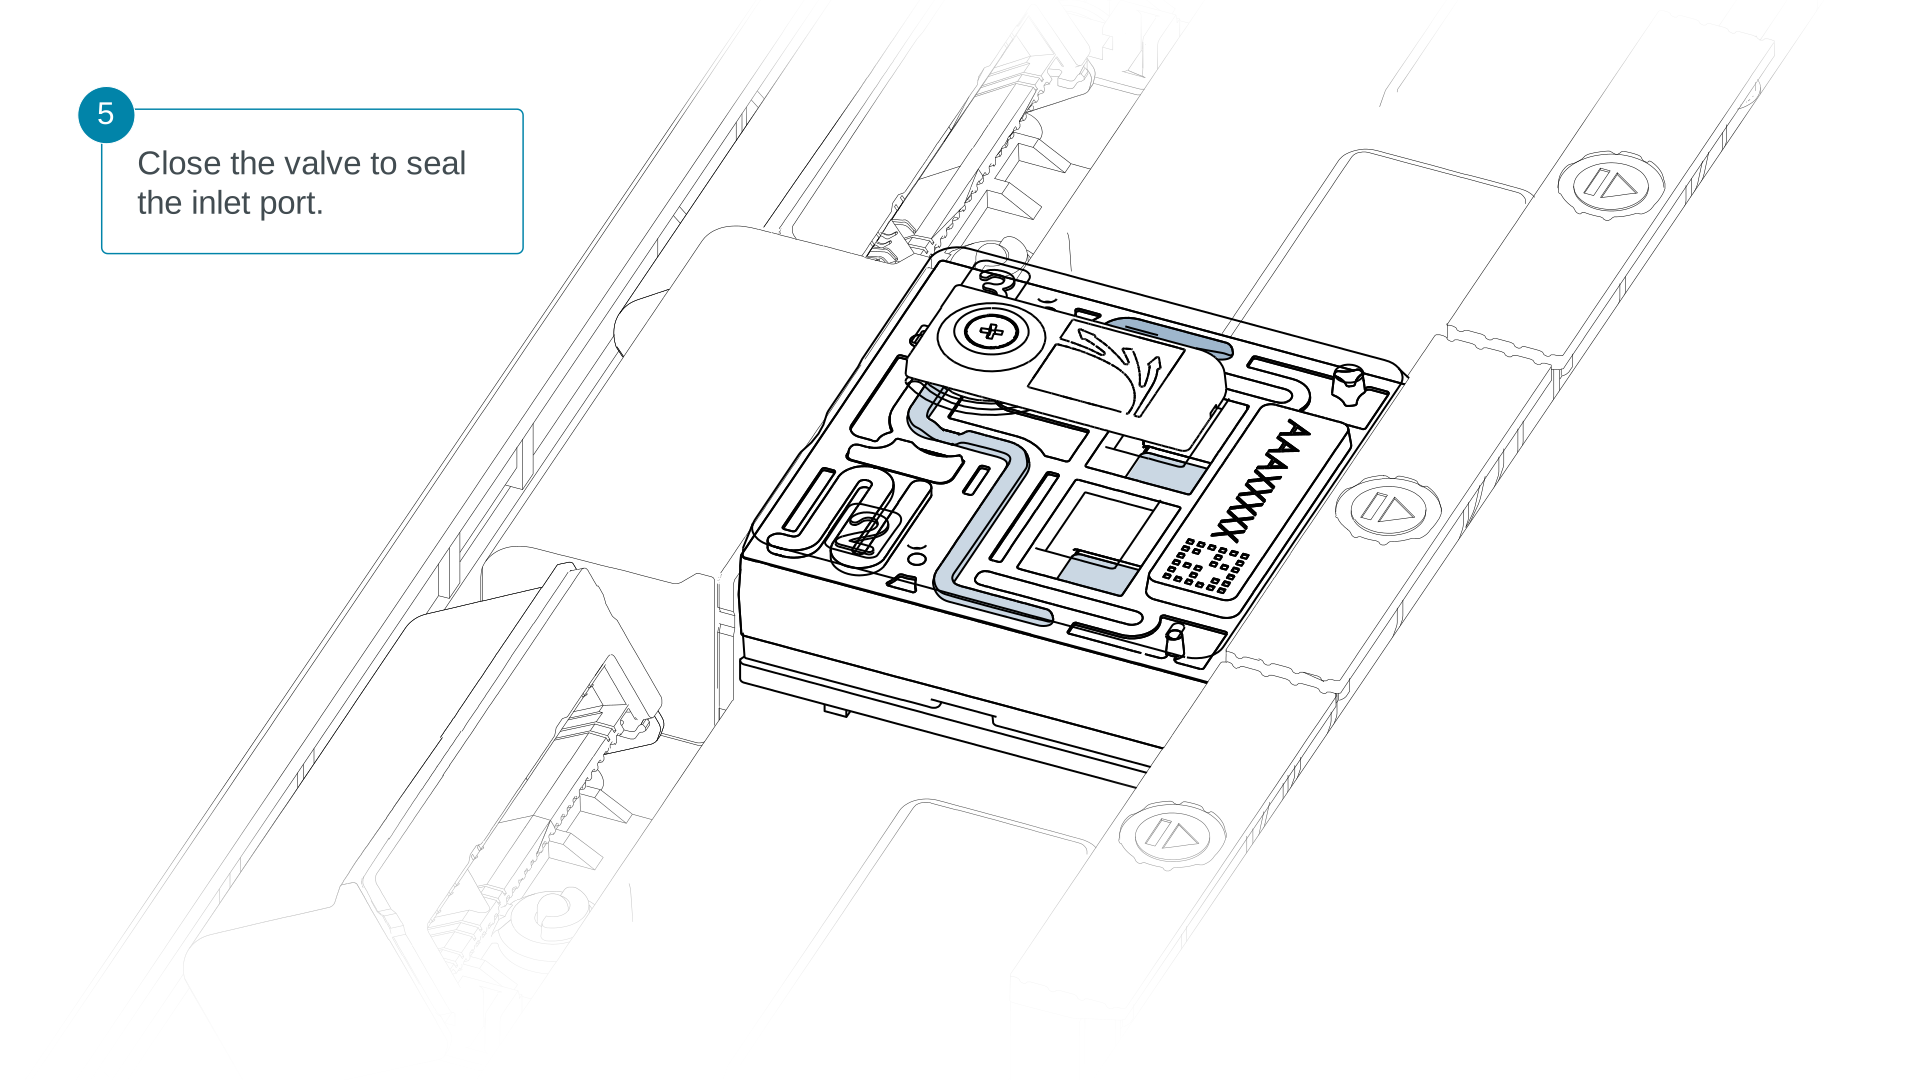
Ensure the inlet port is closed and remove buffer from the waste port a second time.
The waste fluid can be aspirated from either one of the ports, labelled 2 and 3 on the flow cell.
The buffers used in this process are incompatible with conducting a Flow Cell Check step prior to loading the subsequent library. However, number of available pores will be reported after the next pore scan.
Thaw the Sequencing Buffer UL (SBU), Loading Solution UL (LSU), Flush Tether UL (FTU) and one tube of Flow Cell Flush (FCF) at room temperature and mix by vortexing. Then spin down and place on ice.
In a fresh 1.5 ml Eppendorf DNA LoBind tube, prepare the DNA library for loading as follows using a wide-bore pipette tip for the addition of the DNA library:
| Reagent | Volume per flow cell |
|---|---|
| Sequencing Buffer UL (SBU) | 100 µl |
| Loading Solution UL (LSU) | 10 µl |
| DNA library | 90 µl |
| Total | 200 µl |
Note: ensure the Sequencing Buffer UL (SBU) and Loading Solution UL (LSU) are thoroughly mixed by pipetting before the addition of the DNA library.
Gently mix the prepared DNA library by slowly pipetting ten times using a wide-bore pipette tip.
Incubate at room temperature for 30 minutes then gently mix by slowly pipetting with a wide-bore tip. Visually inspect to ensure the sample is homogenous.
Prepare the flow cell priming mix in a 1.5 ml Eppendorf DNA LoBind tube and mix by vortexing at room temperature.
| Reagent | Volume |
|---|---|
| Flush Tether UL (FTU) | 30 µl |
| Flow Cell Flush (FCF) | 1,170 µl |
| Total | 1,200 µl |
Slide the inlet port cover clockwise to open.
Take care when drawing back buffer from the flow cell. Do not remove more than 20-30 µl, and make sure that the array of pores are covered by buffer at all times. Introducing air bubbles into the array can irreversibly damage pores.
After opening the inlet port, draw back a small volume to remove any air bubbles:
- Set a P1000 pipette tip to 200 µl.
- Insert the tip into the inlet port.
- Turn the wheel until the dial shows 220-230 µl, or until you see a small volume of buffer entering the pipette tip.
It is vital to wait five minutes between the priming mix flushes to ensure effective removal of the nuclease.
Load 500 µl of the priming mix into the flow cell via the inlet port, avoiding the introduction of air bubbles. Wait five minutes.
Turn the valve to close the inlet port and use a P1000 to remove all fluid from the waste channel through one of the waste ports.
The waste liquid can be aspirated from either one of the ports, labelled 2 and 3.
Slide open the inlet port and load 500 µl of the priming mix into the flow cell via the inlet port to complete a second flow cell flush, avoiding the introduction of air bubbles.
Close the inlet port and use a P1000 to remove all fluid from the waste channel through a waste port again.
Open the inlet port cover of the flow cell in preparation for loading.
Take care when loading the flow cell as the DNA library is very viscous and may not readily flow through the inlet port, requiring extra careful pipetting to prevent introducing air bubbles.
Aspirate the DNA library with a wide-bore pipette tip and ensure there are no air bubbles in the tip. Place the wide-bore pipette tip directly on the inlet port. Slowly depress the pipette to dispense the library into the inlet port.
The DNA library is viscous and there can be a delay between depressing the pipette and the library dispensing from the pipette tip.
Dispense the library slowly, allowing the library to leave the pipette tip before depressing the pipette further. It is important to dispense the library slowly to prevent air being introduced onto the flow cell. Due to the viscosity of the DNA library, a drop may sit on the inlet port.
If the DNA library is not fully absorbed into the inlet port, use a P200 pipette, set it to 50 µl and insert the tip into port 2.
Very slowly turn the wheel of the pipette to create a negative pressure in the flow cell. This will pull the DNA library into the inlet port. Closely watch the DNA library and completely remove the pipette as soon as the library starts to be pulled into the port.
Note: take care to not apply negative pressure too quickly to avoid bringing air bubbles into the flow cell. Air bubbles will cause irreversible damage to the flow cell.
Close the valve to seal the inlet port.
For optimal sequencing output, install the light shield on your flow cell as soon as the library has been loaded.
We recommend leaving the light shield on the flow cell when library is loaded, including during any washing and reloading steps. The shield can be removed when the library has been removed from the flow cell.
If the light shield has been removed from the flow cell, install the light shield as follows:
- Align the inlet port cut out of the light shield with the inlet port cover on the flow cell. The leading edge of the light shield should sit above the flow cell ID.
- Firmly press the light shield around the inlet port cover. The inlet port clip will click into place underneath the inlet port cover.
Resume the sequencing run on MinKNOW to continue data acquisition.
8. Data acquisition and basecalling: ultra-long DNA
Ensure you are using the most recent version of MinKNOW.
We recommend updating MinKNOW to the latest version prior to starting a sequencing run for the best sequencing results.
For more information on updating MinKNOW, please refer to our MinKNOW protocol.
How to start sequencing
Once you have loaded your flow cell, the sequencing run can be started on MinKNOW, our sequencing software that controls the device, data acquisition and real-time basecalling. For more detailed information on setting up and using MinKNOW, please see the MinKNOW protocol.
We recommend first basecalling in real-time using the fast basecaller on MinKNOW using the PromethION 24 or 48 device. MinKNOW can be used and set up to sequence in multiple ways:
- On a computer either directly or remotely connected to a sequencing device.
- Directly on a PromethION 24/48 sequencing device or PromethION 2 Integrated sequencing device.
After real-time basecalling, re-basecall the data using the super-accurate (SUP) basecaller v5.0 model (or newer) in Dorado.
For more information on using MinKNOW on a sequencing device, please see the PromethION 24/48 user manual or PromethION 2 Integrated user manual.
Refer to the links below containing the detailed instructions for setting up the device and sequencing run:
- PromethION 24 and 48: Starting a sequencing run with PromethION 24 and 48 PromethION 2 Solo: Starting a sequencing run on PromethION 2 Solo
Real time sequencing
To start a sequencing run on MinKNOW:
1. Navigate to the start page and click start sequencing.
2. Fill in your experiment details, such as name and PromethION Flow Cell position and sample ID.
3. Select the Ultra-Long DNA Sequencing Kit V14 (SQK-ULK114) on the Kit page.
4. Configure the sequencing parameters as follows:
| Basecalling | OFF |
| Modified bases | OFF |
| Model | FAST basecalling |
| Barcoding | OFF [default] |
| Alignment | OFF [default] We do not currently recommend live alignment during sequencing, as it can slow down system processing. |
| Adaptive sampling | OFF [default] |
| Advanced options | default settings |
5. Configure the data targets as follows:
| Run duration | 140 hours |
6. Configure the analysis workflow as follows:
| Workflow | OFF |
7. Configure the output parameters as follows:
| Basecalled output type | .BAM |
| Based on | Time elapsed |
| Frequency | Every 10 minutes |
| FASTQ options - Compression | ON [default] |
| Raw reads | ON [default] |
| POD5 | ON [default] |
| FAST5 | OFF [default] |
8. Configure the filtering options as follows:
| Filtering | ON [default] |
| Min Qscore | 10 [default] |
| Min read length (kb) | 1 kb |
Post-sequencing basecalling
Once sequencing is complete, re-basecall your data using the super-accurate (SUP) basecaller using command line Dorado with the following commands as described on the Dorado Github page:
$ dorado basecaller --min-qscore 10 sup ultralong_pod5s/ > ulk_reads.bam
Note: when running Dorado, we recommend stopping other basecalling for the best performance by maximising available memory to Dorado. This can be stopped and re-started when Dorado has finished via the GUI on MinKNOW.
Please remember to change the output file name to differentiate between each of the ultra-long experiment flow cells run in duplicate.
In the Downstream analysis section, we outline further options for analysing your basecalled data for the telomere-to-telomore experiment.
9. Sample preparation: custom SPRI bead preparation
消耗品
- Agencourt AMPure XP beads (Beckman Coulter, A63881)
- 1 M Tris-HCl, pH 7.5
- 0.5 M EDTA, pH 8 (Thermo Scientific, R1021)
- 5 M NaCl (Sigma, 71386)
- PEG 8000, 50% w/v (Rigaku Reagents, 25322-68-3)
- Nuclease-free water
- nuclease-free waterで調整した 80% エタノール溶液
- 2 ml Eppendorf DNA LoBind tubes
装置
- マグネットラック
- Hula mixer(緩やかに回転するミキサー)
- Thermal cycler or heat block
- P1000 ピペット及びチップ
- P200 ピペットとチップ
- P100 ピペットとチップ
- P10 ピペットとチップ
- Wide-bore pipette tips
- アイスバケツ(氷入り)
Custom SPRI bead suspension preparation for Pore-C extraction
Before starting the Pore-C experiment, a custom SPRI bead suspension needs to be prepared. This will be used to deplete non-chimeric monomers and to maximise the frequency of chimeric Pore-C polymers, improving purity ratios and read lengths before library preparation.
Prepare a custom buffer in a 2 ml Eppendorf DNA LoBind tube as follows for use in step 7.
| Reagent | Final | Volume |
|---|---|---|
| Tris-HCl, 1 M | 10 mM | 20 μl |
| EDTA, pH 8, 0.5 M | 1 mM | 4 μl |
| NaCl, 5 M | 1.6 M | 640 μl |
| PEG 8000, 50% (w/v) | 11% (w/v) | 440 μl |
| Nuclease-free water | - | 888 μl |
| Total | - | 1,992 μl |
Note: We recommend using wide-bore 1 ml pipette tips to accurately pipette 440 μl of 50% PEG 8000.
Transfer 1 ml of resuspended Agencourt AMPure XP beads into two 2 ml Eppendorf DNA LoBind tubes, so that each tube contains 1 ml.
Place the tubes on a magnetic rack to pellet the beads until the solution is clear and colourless. Pipette off and discard the supernatant.
Remove the tubes from the magnet and resuspend the pellets with 1 ml of nuclease-free water. Pellet the beads on the magnet until the supernatant is clear and colourless. Then pipette off the supernatant.
Repeat the previous step.
Spin down and place the tubes back on the magnet to pipette off any residual water.
Resuspend both tubes of pelleted beads in 200 µl of custom buffer and then pool both tubes into a single tube to a total of 400 µl.
Transfer the remaining custom buffer into the tube containing the pooled beads.
Store the beads at 4°C. Before use, bring the suspension to room temperature.
10. Sample preparation: PBMC isolation
材料
- 5–10 ml whole blood
消耗品
- 10X phosphate-buffered saline (PBS), pH 7.4 (Thermo Fisher, 70011044)
- Fetal bovine serum (FBS) (Gibco™, A3840401)
- SepMate™-50 (Stemcell Technologies, 85450)
- Density gradient medium (e.g. Lymphoprep™ Stemcell Technologies 07801) or similar with a density of 1.077 g/ml.
- 50 ml centrifuge tubes
- 2 ml Eppendorf DNA LoBind tubes
装置
- Centrifuge with capacity for 50 ml tubes with a swinging bucket rotor
- Serological pipettes (Stemcell Technologies, 38004)
- Stripette aide
- アイスバケツ(氷入り)
- P1000 ピペット及びチップ
- P200 ピペットとチップ
- P100 ピペットとチップ
- P20 ピペットとチップ
- P10 ピペットとチップ
オプション装置
- Liquid nitrogen and canister
- -80°C freezer storage
Peripheral Blood Mononuclear Cells (PBMCs) isolation for the Pore-C DNA experiment
Before starting the Pore-C DNA extraction, the PBMCs must be isolated from whole blood whilst maintaining cell viability. Approximately 5–10 ml of whole blood should yield sufficient PBMCs for the Pore-C DNA extraction. If necessary, combine multiple aliquots of whole blood to achieve a final 5–10 ml pooled sample. Using the method below, approximately 10 million PBMCs are prepared in aliquots of 1x PBMCs supplemented with 2% FBS. Approximately 10 million PBMCs are taken forwards into the Pore-C sample preparation step.
We recommend using SepMate™ PBMC Isolation Tubes from STEMCELL Technologies. However, users may isolate PBMCs by any means they feel are most appropriate for the whole blood sample to be used, provided that:
- PBMCs are isolated as soon as possible from fresh blood and no later than 24 hours.
- PBMCs are isolated using a method optimised for cell viability.
- The whole blood is not mixed with any additives, except for anticoagulants (e.g. K2-EDTA), which are acceptable and will not interfere with the Pore-C DNA extraction.
Prepare the following reagents:
- 500 ml of 1X PBS supplemented with 2% FBS final concentration and store at room temperature.
| Reagent | Volume |
|---|---|
| 10X PBS | 50 ml |
| Fetal bovine serum (FBS) | 10 ml |
| Nuclease-free water | 440 ml |
| Total | 500 ml |
- (Optional for storage) 2 ml of FBS supplemented with 20% DMSO final concentration and store at 4°C.
| Reagent | Volume |
|---|---|
| FBS | 1,600 µl |
| DMSO | 400 µl |
| Total | 2,000 µl |
Ensure that the blood sample, density gradient medium and 1X PBS supplemented with 2% FBS are at room temperature, and centrifuge.
Isolate PBMCs following the SepMate™ manufacturer’s instructions.
Assuming every 1 ml of whole blood originally used will yield approximately 1.5 million white blood cells, resuspend cells to approximately 10 million white blood cells/ml in room temperature 1X PBS supplemented with 2% FBS.
Transfer an aliquot of approximately 10 million white blood cells total to a fresh 2 ml Eppendorf DNA LoBind tube.
Cool on ice for 5 minutes.
The cells can be stored if Pore-C sample extraction cannot be started immediately.
- Centrifuge at 350 x g at 4°C for 2 minutes with the brake on.
- Aspirate and discard the supernatant, then resuspend the PBMC pellet in 1 ml of chilled FBS.
- Once resuspended, slowly mix in 1 ml of chilled FBS supplemented with 20% DMSO, drop by drop.
Note: As DMSO is mixed with water, energy is released as heat. Adding DMSO to the white blood cells suspension drop by drop prevents heat shock to the cells. - Snap freeze aliquots of white blood cells in liquid nitrogen then store at –80°C.
Take forward approximately 10 million white blood cells into the Pore-C experiment. Store the cells at 4°C until the experiment can begin.
11. Sample preparation: Pore-C extraction
材料
- 10 million white blood cells isolated from whole blood
- Custom SPRI bead suspension
消耗品
- ECOSURF EH-9 (Dow, 64366-70-7)
- Ethanol, 100% (e.g. Fisher, 16606002)
- Formaldehyde at 36.5% v/v (Sigma, 33220)
- Glycine (Sigma, 56-40-6)
- IGEPAL CA-630 (Sigma, I8896)
- 5 M NaCl (Sigma, 71386)
- NlaIII restriction enzyme with CutSmart Buffer (NEB, R0125L)
- Nuclease-free water (e.g. ThermoFisher, AM9937)
- Chilled phenol:chloroform:isoamyl alcohol in a 25:24:1 ratio, saturated with 10 mM Tris.HCl pH 8.0, 1 mM EDTA (Sigma, P3803-400ML)
- Chilled 1X Phosphate buffered saline (PBS), pH 7.4 (ThermoFisher, 10010023)
- Protease Inhibitor Cocktail (Sigma, P8340)
- Proteinase K at 20 μg/μl (NEB, P8107S)
- Qubit™ Assay Tubes (ThermoFisher, Q32856)
- Qubit™ dsDNA HS Assay Kit (ThermoFisher, Q32851)
- Recombinant Albumin at 20 μg/μl (NEB, B9200S)
- 3 M sodium acetate, pH 5.5 (Invitrogen, AM9740)
- Tween-20 (Sigma, P9416)
- Sodium dodecyl sulfate (SDS) at 10% v/v (Sigma, 71736)
- T4 DNA Ligase 400,000 U/ml (NEB, M0202S/L)
- TE buffer (10 mM Tris, 1 mM EDTA, pH 8) (Fisher Scientific, 10224683)
- Tris.HCl pH 8.0, 1 mM EDTA (Sigma, P3803-400ML)
- Sterile 0.2 µm syringe filter (Fisher 15206869 or similar)
- Sterile 10 ml syringe (Fisher 15879152 or similar)
- 50 ml centrifuge tubes
- 15 ml centrifuge tubes (e.g. Falcon tubes)
- 2 ml Eppendorf DNA LoBind tubes
- 1.5 ml Eppendorf DNA LoBind tubes
- Ziplock bags
装置
- Class I hood with active charcoal filter
- Temperature-controlled centrifuge
- Temperature-controlled microfuge
- Thermomixer
- ボルテックスミキサー
- Hula mixer(緩やかに回転するミキサー)
- Qubit fluorometer (or equivalent)
- 小型遠心機
- Thermal cycler or heat block
- P1000 ピペット及びチップ
- P100 ピペットとチップ
- P200 ピペットとチップ
- P20 ピペットとチップ
- Wide-bore pipette tips
- アイスバケツ(氷入り)
- -80°C freezer storage
Reagent preparation
The following reagents can be prepared in advance of the Pore-C experiment or at the start of day that they are needed.
Prepare 1 ml of 1% SDS in nuclease-free water, as follows:
- Add 100 µl 10% SDS to a fresh 1.5 ml microfuge tube.
- Add 900 µl nuclease-free water to the same tube.
Prepare 1 ml of 10% (v/v) ECOSURF™ EH-9 in nuclease-free water, as follows:
- Transfer 100 µl ECOSURF™ EH-9 to a fresh 1.5 ml microfuge tube. Ensure the full volume is aspirated and transferred, it is a viscous liquid.
- Add 900 µl nuclease-free water to the same tube.
- Allow to mix on a hula mixer until homogenous and free of striations.
Prepare 1 ml of 10% (v/v) IGEPAL CA-630 in nuclease-free water, as follows:
Note: We recommend using wide-bore pipette tips when handling the IGEPAL CA-630.
1.Add 100 µl of IGEPAL CA-630 to a fresh 1.5 ml microfuge tube. Ensure the full volume is aspirated and transferred, it is a viscous liquid.
2.Add 900 µl nuclease-free water to the same tube.
3.Allow to mix on a hula mixer until homogenous and free of striations
Prepare 10 ml of 2.5 M glycine in nuclease-free water, as follows:
- Weigh out 1.9 g glycine and transfer this to a 15 ml centrifuge tube.
- Bring the volume to 10 mL with nuclease-free water.
- Allow to mix on a hula mixer until homogenous.
- Aspirate the full volume into a 10 mL syringe.
- Fill the full volume through a 0.2 µm syringe filter into a fresh 15 ml centrifuge tube.
- Store at room temperature.
Prepare 1 ml of 20% (v/v/) Tween-20 in nuclease free water as follows:
- Transfer 200 µl Tween-20 to a fresh 1.5 ml microfuge tube. Ensure the full volume is aspirated and transferred, it is a viscous liquid.
- Add 800 µl nuclease-free water to the same tube.
- Allow to mix on a hula mixer until homogenous and free of striations.
Pore-C extraction
Pore-C extraction is performed across three days to stabilise the three-dimensional interactions of the DNA in the nucleus before extracting the DNA.
Day 1
50 minutes hands-on time, 2.5 hour procedure time + overnight
During day 1, the white blood cells are prepared for stabilising of the three-dimensional interactions of DNA in the nucleus by chemically cross- linking DNA and protein. The nuclei are then permeabilised to expose the crosslinked cytoskeleton cage and nuclear structures before the chromatin is denatured. The DNA is now accessible to the chosen restriction enzyme† which passively diffuses through the crosslinked cytoskeleton cage and nuclear structures to digest the genome at compatible recognition sites. The sample is incubated overnight which creates clusters of DNA fragments held in proximity by crosslinks between DNA and the cytoskeleton, preserving the original interactions which were crosslinked.
†This protocol has been written using NlaIII and the heat denaturation method as our investigations have found this 4-cutter is particularly suitable for Pore-C across many different species, yielding Pore-C extracts with high contact densities. For more information, please see the "Protocol considerations" section of our Restriction enzyme Pore-C info sheet.
Pre-cool a centrifuge to 4°C.
Thaw the protease inhibitor cocktail at room temperature, then store on ice ready for use.
Note: Protease inhibitor contains DMSO and will take some time to thaw.
1% formaldehyde solution is a biological hazard. Formaldehyde crosslinks DNA and is a mutagen. It must be handled with caution, and vessels containing the solution should only be uncapped in a class I hood.
Prepare the formaldehyde solution as follows:
- Transfer 10 ml of 1X PBS into a 50 ml Falcon tube.
Note: Using a 15 ml Falcon tube is not recommended. - Inside a class I hood, with double gloves, add 291 μl of 36.5% formaldehyde to the 10 ml 1X PBS aliquot to a final concentration of 1% formaldehyde in ~10.3 ml.
- Mix by gentle inversion, and open the tube to allow gases to escape, then close the tube.
- Check that no formaldehyde residue has remained on the gloves, Falcon tube, or pipette.
- Remove the outer gloves and discard them in a biohazard bag in the hood.
- Remove the 1% formaldehyde 1X PBS solution from the hood.
- Store the tube with formaldehyde inside a zip lock bag at 4°C prior to use.
Prepare the PBMCs as follows:
- On ice, take approximately 10 million PBMCs and briefly homogenise the suspension by gently pipetting with a wide-bore pipette tip.
- Transfer the cell suspension to a 50 ml centrifuge tube.
- Rinse the original tube with a further 1 ml of chilled 1X PBS and transfer into the 50 ml centrifuge tube.
- Bring the volume of the resuspended PBMCs to 10 ml with chilled 1X PBS.
Centrifuge the sample at 300 x g at 4°C for 5 minutes.
Aspirate and discard the supernatant, then add 10 ml of chilled 1X PBS to the pellet. Resuspend the pellet by gently pipetting up and down using a wide-bore pipette tip.
Note: The pellet is typically very small and difficult to see. A small volume of supernatant can be retained to prevent discarding the pellet.
Centrifuge the sample at 300 x g at 4°C for 5 minutes.
Check the 2.5 M glycine solution has not precipitated before crosslinking the sample. Dissolve the precipitate with heat and vortexing if required.
Inside a class I hood, with double gloves, aspirate and discard the supernatant.
Add 1 ml of the previously prepared 1% formaldehyde solution in 1X PBS to the pellet. Resuspend the pellet by gently pipetting up and down using a wide-bore pipette tip.
Once resuspended, add a further 9 ml of the 1% formaldehyde solution in 1X PBS. Mix gently by pipetting up and down, using a wide-bore pipette tip.
Incubate at room temperature for exactly 10 minutes to crosslink the sample. The incubated solution should be mixed by gentle agitation every few minutes.
We do not recommend extending incubation times as it may have a detrimental impact on the efficiency of de-crosslinking the DNA later in the protocol.
Inside the hood with double gloves, quench the formaldehyde by adding 527 μl of 2.5 M glycine to the sample suspension for a final concentration of 1% w/v glycine (125 mM) in ~10.5 ml. Mix gently by pipetting up and down, using a wide-bore pipette tip.
Incubate at room temperature for 5 minutes, then chill on ice for a further 10 minutes with regular, gentle agitation.
Centrifuge the crosslinked sample suspension at 300 x g at 4°C for 5 minutes.
Continuing in the class I hood, aspirate and discard the supernatant. Add 10 ml of chilled 1X PBS to the tube.
Note: The pellet is typically very small and difficult to see. A small volume of supernatant can be retained to prevent discarding the pellet.
Centrifuge the sample at 500 x g at 4°C for 5 minutes.
Continuing in the class I hood, aspirate and discard the supernatant, and add 1 ml of chilled 1X PBS to the pellet. Mix gently by pipetting up and down using a wide-bore pipette tip.
Split the resuspended sample into two separate 500 μl aliquots in fresh 2 ml Eppendorf tubes.
Note: 2 ml Eppendorf tubes are required for a compact sample pellet. Do not use 1.5 ml tubes.
Wash the previous sample tube with a further 1 ml of 1X PBS, and split this between the two aliquots in 2 ml Eppendorf DNA LoBind tubes.
The rest of the protocol can be continued outside of the class I hood.
Centrifuge the samples at 500 x g at 4°C for 5 minutes, with the tube hinge facing outward.
Following centrifugation, the pellet will be delicate. With the pipette tip on tube wall opposite of the pellet, carefully aspirate and discard as much of the supernatant as possible without disturbing the pellet.
Note: Take care not to discard the pellet, hence it is important to pay attention to the tube hinge and where the pellet is on the wall. If the pellet becomes dislodged or aspirate, re-homogenise and repeat the centrifugation step before attempting again to aspirate the supernatant.
Process each crosslinked sample pellet separately. Do not pool multiple pellets into a single reaction.
The remainder of the protocol is written for one pellet.
We advise continuing with a freshly crosslinked sample pellet. However, if you intend to store samples for later use, you can snap-freeze the aliquots in liquid nitrogen. Store frozen sample pellets at –80°C and use within one year.
Do not proceed any further unless it is possible to complete the remainder of this section consecutively without interruption. It is not advisable to incubate any step longer than stated in this protocol. Doing so may be detrimental to Pore-C data quality and sequencing performance.
Thaw the CutSmart buffer on ice and prepare 600 μl of 1.5X CutSmart Buffer in nuclease-free water as follows in a 1.5 ml Eppendorf DNA LoBind tube. Keep on ice.
| Reagent | Volume |
|---|---|
| Nuclease-free water | 510 µl |
| 10X CutSmart Buffer | 90 µl |
| Total | 600 µl |
To make the permeabilisation solution, add the components below to a 1.5 ml Eppendorf DNA LoBind tube in the following order. Keep the prepared permeabilisation solution on ice until ready to use.
| Reagent | Final | Volume |
|---|---|---|
| Tris-HCl, pH 8.0, 1 M | 10 mM | 5 µl |
| NaCl, 5 M | 10 mM | 1 µl |
| IGEPAL CA-630, 10% | 0.2% | 10 µl |
| Nuclease-free water | - | 484 µl |
| Total | - | 500 µl |
Proceed with a single crosslinked sample pellet (e.g. an aliquot of ~5 million cells).
Note: If processing multiple pellets, treat each pellet separately. Do not pool multiple pellets into a single reaction.
Add 50 μl of protease inhibitor cocktail to 500 μl of permeabilisation solution at 4°C.
Add 550 μl protease inhibitor cocktail-permeabilisation solution to the sample pellet. Resuspend the pellet by gently pipetting up and down, using a wide-bore pipette tip.
Incubate on ice for 15 minutes and mix by regular, gentle inversion.
Centrifuge the sample at 500 x g at 4°C for 10 minutes, with the tube hinge facing outwards.
Following centrifugation, the pellet will be delicate. With the pipette tip on tube wall opposite of the pellet, carefully aspirate and discard as much of the supernatant as possible without disturbing the pellet.
Resuspend the pellet in 200 μl of the prepared chilled 1.5X CutSmart buffer by gently pipetting up and down, using a wide-bore pipette tip.
Centrifuge the sample at 500 x g at 4°C for 5 minutes, with the tube hinge facing outwards.
Following centrifugation, the pellet will be delicate. With the pipette tip on tube wall opposite of the pellet, carefully aspirate and discard as much of the supernatant as possible without disturbing the pellet.
Resuspend the pellet in 300 μl of the prepared chilled 1.5X CutSmart buffer by gently pipetting up and down, using a wide-bore pipette tip.
To denature the chromatin, add 33.5 μl 1% SDS directly to the sample suspension to a final concentration of 0.1% SDS and a total volume of 333.5 μl. Mix gently by pipetting up and down using a wide-bore pipette tip.
Note: The SDS may precipitate at this point. This will not impact the experiment so proceed to the next step.
Incubate the sample suspension in a thermomixer at 300 RPM at 65°C for 10 minutes.
Note: This incubation can be performed without mixing.
Remove the tube from the thermomixer and immediately put on ice.
Set the thermomixer to 37°C.
Add 37.5 μl of 10% (v/v) ECOSURF™ EH-9 directly to the cell suspension for a final concentration of 1% ECOSURF™ EH-9 (total volume of 371 μl). Mix gently by pipetting with a wide-bore pipette tip.
Incubate the tube on ice for 10 minutes.
Note: The SDS may precipitate at this point. This will not impact the experiment, so proceed to the next step.
Add the following reagents to the sample suspension and invert 3-4 times to mix.
Note: NlaIII should not be vortexed. Mix by flicking and/or inverting the tube, and spin briefly before opening.
| Reagent | Final | Volume |
|---|---|---|
| Permeabilised cells | - | 371 µl |
| NEB NlaIII, 10 U/µl | 1 U/µl | 45 µl |
| Nuclease-free water | - | 34 µl |
| Total | - | 450 µl |
Incubate the tube in a thermomixer at 37°C for 18 hours with periodic <1000 rpm rotation for <30 seconds every 15 minutes. This will prevent condensation inside the lid.
Note: This incubation can be performed without mixing.
During the long/overnight incubation step, please ensure all your reagents are stored appropriately until the incubation has finished by following the manufacturers recommendations
Day 2
10 minutes hands-on time, 6 hour procedure time + overnight
During day 2, the restriction enzymes are heat inactivated to prevent re-digesting ligated products. DNA ligase is added to the clusters of crosslinked DNA and passively diffuses through the crosslinked cytoskeleton cage to ligate the cohesive ends of proximal monomers into chimeric Pore-C polymers. After ligation, the ligated products can be released from the crosslinked cytoskeleton cages by an overnight proteinase K digestion. This releases the chimeric Pore-C polymers into solution as dsDNA.
Prepare the T4 DNA Ligase and T4 DNA Ligase Reaction Buffer in accordance with the manufacturer's instructions and place on ice.
- Thaw the reagents on ice.
- Flick and/or invert the reagent tube(s) to ensure they are well mixed.
Note: Do not vortex the T4 DNA Ligase enzyme. - Spin down tubes before opening for the first time each day.
Set the thermomixer to 65°C.
Heat denature the restriction enzyme by incubating the sample suspension in the thermomixer at 65°C with 300 rpm rotation for 20 minutes. Allow the reaction to cool to room temperature.
Set the thermomixer to 16°C.
Set up the proximity ligation reaction according to the table below, adding reagents directly to the sample suspension in the following order. Mix gently by pipetting up and down, using a wide-bore pipette tip.
| Reagent | Final | Volume |
|---|---|---|
| Digestion reaction (from Day 1) | - | 450 µl |
| Nuclease-free water | - | 395 µl |
| T4 DNA Ligase Reaction Buffer, 10X | 1X | 100 µl |
| Recombinant albumin, 20 µg/µl | 0.1 µg/µl | 5 µl |
| T4 DNA Ligase, 400 U/µl | 20 U/µl | 50 µl |
| Total | - | 1,000 µl |
Incubate the sample suspension in a thermomixer at 16°C for 6 hours, with periodic <1000 RPM rotation for <30 seconds every 15 minutes. This prevents condensation inside the lid.
Note: Ensure thermomixer has reached 16°C before incubation to prevent heating the ligase. This incubation can be performed without mixing.
Do not extend the 6-hour incubation as prolonged ligation may increase trans-chromosomal contacts in the Pore-C data.
Set the thermomixer to 56°C.
Add the reagents to the previous ligation reaction in the following order to make up the protein degradation reaction. Mix the sample gently by inverting the tube 3–4 times.
| Reagent | Final | Volume |
|---|---|---|
| Ligation reaction (from the Proximity Ligation) | - | 1,000 μl |
| Nuclease-free water | - | 300 μl |
| Tween-20, 20% | 5% | 500 μl |
| SDS, 10% | 0.5% | 100 μl |
| Proteinase K, 20 μg/μl | 1 μg/μl | 100 μl |
| Total | - | 2,000 μl |
Incubate the sample suspension in a thermomixer at 56°C for 18 hours with periodic <1000 rpm rotation for <30 seconds every 15 minutes to prevent condensation inside the lid.
Note: This incubation can be performed without mixing.
Incubation at 56°C compromises enzyme activity over a prolonged incubation. It is not advisable to incubate at higher temperatures as enzyme activity will reduce over time.
We do NOT recommend performing this overnight incubation at higher temperatures as enzyme activity will reduce over time.
Day 3
40 minutes hands-on time, 110 minutes procedure time, optional overnight step.
During day 3, the chimeric Pore-C dsDNA polymers are purified from the solution of polypeptide fragments and residual reaction buffers. The peptides are removed by using a phenol:chloroform extraction, followed by an ethanol precipitation to purify the DNA from the residual reaction buffers and phenol. The final Pore-C DNA extract is a pool of chimeric dsDNA polymers made of multiple ligated monomers which are sequenced to determine DNA interactions, proximity in sequence space and the three-dimensional structures of chromatin within the nucleus.
Pre-cool the centrifuge to 15°C.
Note: If the centrifuge is capable of spinning a 5 ml centrifuge tube at 16,000 x g, the following steps can be performed in a single 5 ml centrifuge tube rather than splitting into two 2 ml tubes.
Place the sample on ice until cool, then transfer the entire volume evenly between two 2 ml centrifuge tube.
Rinse the original tube with a further 200 μl of nuclease-free water and add 100 μl to each 2 ml centrifuge tube for a total sample volume of ~1,100 μl.
Note: If the total sample is <1.1 ml per tube, bring it to volume with nuclease-free water.
Inside a class I hood, with double gloves, add 1,100 μl of chilled phenol:chloroform:isoamyl alcohol 25:24:1 saturated with 10 mM Tris HCl pH 8.0, 1 mM EDTA to each 2 ml tube.
Mix by gently inverting the tubes for 5 minutes to achieve a homogeneous emulsion.
Note: after 5 minutes mixing, the emulsion should resemble cream as a white opaque suspension. When stood upright, it there should be no immediate stratification to the suspension. Continue mixing until homogeneity is achieved.
Centrifuge the aliquots at 16,000 x g at 15°C for 15 minutes.
Incubate the aliquots on ice for 2 minutes until the organic phase becomes cloudy; this will strengthen the integrity of the interphase layer.
If the protein degradation has been successful, the interphase layer will be very thin and clear.
Do not remove the interphase layer in the next step.
Inside a class I hood, with double gloves, for each tube, transfer the aqueous phase (top phase) into a fresh 2 ml centrifuge tube. Expect a total recovery of ~1 ml per tube. If the recovery is <1 ml per tube, bring it to 1 ml with as much nuclease-free water as required.
Inside a class I hood, with double gloves add 0.1 final NaCl and 0.3 M final sodium acetate as to the volume of the recovered aqueous phase of the aliquot as below:
| Reagent | Final | Volume |
|---|---|---|
| Pooled aqueous phase recovery | - | 2,000 μl |
| NaCl 5M | 0.1 M | 40 μl |
| Sodium acetate 3 M | 0.3 M | 200 μl |
| Total | - | 2,240 μl |
Mix by gently inverting the tubes.
Inside a class I hood, with double gloves, transfer half (1,220 μl) of the sample solution to a second 5 ml centrifuge tube to create two equal aliquots.
Inside a class I hood, with double gloves, for each aliquot, add 3x volume (3,660 μl) of 100% ethanol relative to the volume of the sample solution. Mix by gently inverting the tubes.
The solution will likely turn cloudy and then become clear once again.
Precipitate at –80°C for >1 hour.
Note: If a –80°C freezer is not available or a pause in the protocol is required, an overnight incubation at –20°C can be used instead.
Pre-cool a centrifuge to 4°C.
Centrifuge the sample at 16,000 x g at 4°C for 30 minutes.
Inside a class I hood, with double gloves, aspirate and discard the supernatant, then wash the pellets with 4 ml of 80% ethanol.
Centrifuge the sample at 16,000 x g at 4°C for 5 minutes.
Inside a class I hood, with double gloves, aspirate and discard the supernatant, then wash the pellets with 2 ml of 70% ethanol.
Centrifuge the sample at 16,000 x g at 4°C for 5 minutes.
Aspirate and discard the supernatant. Briefly spin down the tubes and aspirate any residual supernatant. Allow the pellets to dry for 5 minutes.
After the DNA pellets have dried, they may loosen from the tube.
Carefully resuspend each aliquot in 75 μl of TE buffer. Incubate for 5 minutes at room temperature, mixing by gently inverting the tube every few minutes.
Briefly spin down the tubes, then transfer and pool all aliquots together into a 1.5 ml Eppendorf DNA LoBind tube.
Quantify DNA concentration by using the Qubit dsDNA HS Assay Kit.
Ensure a 1/10 dilution is used, as the Qubit reading will be affected by high salt concentration. Note: The expected yield is ~7 μg per 10 million cells input for cell culture. Yields for other sample types may be reduced.
Dilute your sample to 60 ng/µl in a final volume of 50 µl of TE buffer at pH 8.
Add 42.5 µl (0.85X) of room temperature custom SPRI bead suspension and mix by flicking the tube.
Note: Please ensure you are using the custom SPRI bead suspension (generated on day 1).
Incubate on a Hula mixer (rotator mixer) for 10 minutes at room temperature.
Spin down briefly and pellet on a magnet until the supernatant is clear and colourless. Keep the tube on the magnet, and pipette off the supernatant.
Keep the tube on the magnet and wash the beads with 200 µl of freshly prepared 80% ethanol without disturbing the pellet. Remove the ethanol using a pipette and discard.
If the pellet was disturbed, wait for beads to pellet again before removing the ethanol.
Repeat the previous step.
Spin down and place the tube back on the magnetic rack. Pipette off any residual ethanol. Allow the pellet to dry for ~30 seconds, but do not dry the pellet to the point of cracking.
Remove the tube from the magnetic rack and resuspend the pellet in 40 µl of TE buffer. Incubate for 1 minute at 50°C, and then for 5 minutes at room temperature.
Pellet the beads on a magnet until the eluate is clear and colourless, for at least 1 minute.
Remove and retain 40 µl of eluate into a clean 1.5 ml Eppendorf DNA LoBind tube.
Quantify 1 µl of eluted sample using a Qubit fluorometer.
You can expect a 50-55% loss of DNA depending on a fragment length distribution of input material: the greater the proportion of short fragments (<1.5-2 kb), the greater the sample loss.
Take forwards 2 µg of Pore-C DNA extract into the next step. Store the DNA at 4°C until the next step can begin.
12. Library preparation: Pore-C sequencing
材料
- 2 μg Pore-C DNA extract
- Ligation Sequencing Kit V14 (SQK-LSK114)
消耗品
- NEBNext® FFPE DNA Repair Mix (NEB, M6630)
- NEBNext® FFPE DNA Repair v2 Module (NEB, E7360)
- NEBNext® Ultra™ II End Repair/dA-Tailing Module (NEB, E7546)
- Salt-T4® DNA Ligase (NEB, M0467)
- Qubit dsDNA HS Assay Kit (Invitrogen, Q32851)
- Agencourt AMPure XP beads (Beckman Coulter™, A63881)
- Nuclease-free water (e.g. ThermoFisher, AM9937)
- nuclease-free waterで調整した 80% エタノール溶液
- Qubit™ Assay Tubes (Invitrogen, Q32856)
- 1.5 ml Eppendorf DNA LoBind tubes
- 0.2 ml 薄壁のPCRチューブ
装置
- サーマルサイクラー
- 小型遠心機
- Hula mixer(緩やかに回転するミキサー)
- マグネットラック
- ボルテックスミキサー
- Qubit fluorometer (or equivalent)
- アイスバケツ(氷入り)
- P1000 ピペット及びチップ
- P200 ピペットとチップ
- P100 ピペットとチップ
- P20 ピペットとチップ
- P10 ピペットとチップ
Library preparation for the Pore-C experiment
In this step, the extracted Pore-C DNA is prepared for sequencing by repairing any nicks in the DNA and preparing the ends for sequencing adapter attachment.
Prepare the NEBNext FFPE DNA Repair Mix and NEBNext Ultra II End Repair / dA-tailing Module reagents in accordance with manufacturer’s instructions, and place on ice.
For optimal performance, NEB recommend the following:
Thaw all reagents on ice.
Flick and/or invert the reagent tubes to ensure they are well mixed.
Note: Do not vortex the FFPE DNA Repair Mix or Ultra II End Prep Enzyme Mix.Always spin down tubes before opening for the first time each day.
The Ultra II End Prep Buffer and FFPE DNA Repair Buffer may have a little precipitate. Allow the mixture to come to room temperature and pipette the buffer up and down several times to break up the precipitate, followed by vortexing the tube for 30 seconds to solubilise any precipitate.
Note: It is important the buffers are mixed well by vortexing.The FFPE DNA Repair Buffer may have a yellow tinge and is fine to use if yellow.
Prepare the DNA in nuclease-free water:
- Transfer 2 μg input DNA into a 1.5 ml Eppendorf DNA LoBind tube.
- Adjust the volume to 47 μl with nuclease-free water.
- Mix thoroughly by pipetting up and down, or by flicking the tube.
- Spin down briefly in a microfuge
In a 0.2 ml thin-walled PCR tube, mix the following:
Between each addition, pipette mix 10-20 times.
| Reagent | Volume |
|---|---|
| DNA from the previous step | 47 µl |
| DNA CS (optional) | 1 µl |
| NEBNext FFPE DNA Repair Buffer v2 | 7 µl |
| NEBNext FFPE DNA Repair Mix | 2 µl |
| Ultra II End-prep Enzyme Mix | 3 µl |
| Total | 60 µl |
Thoroughly mix the reaction by gently pipetting and briefly spinning down.
Using a thermal cycler, incubate at 20°C for 15 minutes and 65°C for 5 minutes.
Resuspend the AMPure XP Beads by vortexing.
Transfer the DNA sample to a clean 1.5 ml Eppendorf DNA LoBind tube.
Add 60 µl of resuspended the AMPure XP Beads to the end-prep reaction and mix by flicking the tube.
Incubate on a Hula mixer (rotator mixer) for 5 minutes at room temperature.
Prepare 500 μl of fresh 80% ethanol in nuclease-free water.
Spin down the sample and pellet on a magnet until supernatant is clear and colourless. Keep the tube on the magnet, and pipette off the supernatant.
Keep the tube on the magnet and wash the beads with 200 µl of freshly prepared 80% ethanol without disturbing the pellet. Remove the ethanol using a pipette and discard.
Repeat the previous step.
Spin down and place the tube back on the magnet. Pipette off any residual ethanol. Allow to dry for ~30 seconds, but do not dry the pellet to the point of cracking.
Remove the tube from the magnetic rack and resuspend the pellet in 61 µl nuclease-free water. Incubate for 2 minutes at room temperature.
Pellet the beads on a magnet until the eluate is clear and colourless, for at least 1 minute.
Remove and retain 61 µl of eluate into a clean 1.5 ml Eppendorf DNA LoBind tube.
Quantify 1 µl of eluted sample using a Qubit fluorometer.
If a pause is required, the sample can be stored overnight at 4°C.
Although third-party ligase products may be supplied with their own buffer, the ligation efficiency of the Ligation Adapter (LA) is higher when using the Ligation Buffer (LNB) supplied in the Ligation Sequencing Kit.
Spin down the Ligation Adapter (LA) and Salt-T4 Ligase, and place on ice.
Thaw Ligation Buffer (LNB) at room temperature, spin down and mix by pipetting. Due to viscosity, vortexing this buffer is ineffective. Place on ice immediately after thawing and mixing.
Thaw the Elution Buffer (EB) at room temperature and mix by vortexing. Then spin down and place on ice.
Thaw the Short Fragment Buffer (SFB) at room temperature and mix by vortexing. Then spin down and place on ice.
In a 1.5 ml Eppendorf DNA LoBind tube, mix in the following order:
Between each addition, pipette mix 10-20 times.
| Reagent | Volume |
|---|---|
| DNA sample from the previous step | 60 µl |
| Ligation Adapter (LA) | 5 µl |
| Ligation Buffer (LNB) | 25 µl |
| Salt-T4® DNA ligase | 10 µl |
| Total | 100 µl |
Thoroughly mix the reaction by gently pipetting and briefly spinning down.
Incubate the reaction for 10 minutes at room temperature.
Resuspend the AMPure XP Beads by vortexing.
Add 40 µl of resuspended AMPure XP Beads to the reaction and mix by flicking the tube.
Incubate on a Hula mixer (rotator mixer) for 5 minutes at room temperature.
Spin down the sample and pellet on a magnet. Keep the tube on the magnet, and pipette off the supernatant when clear and colourless.
Wash the beads by adding 250 μl Short Fragment Buffer (SFB). Flick the beads to resuspend, spin down, then return the tube to the magnetic rack and allow the beads to pellet. Remove the supernatant using a pipette and discard.
Repeat the previous step.
Spin down and place the tube back on the magnet. Pipette off any residual supernatant. Allow to dry for ~30 seconds, but do not dry the pellet to the point of cracking.
Remove the tube from the magnetic rack and resuspend the pellet in 25 µl Elution Buffer (EB). Spin down and incubate for 10 minutes at room temperature.
Pellet the beads on a magnet until the eluate is clear and colourless, for at least 1 minute.
Remove and retain 25 µl of eluate containing the DNA library into a clean 1.5 ml Eppendorf DNA LoBind tube.
Dispose of the pelleted beads
Quantify 1 µl of eluted sample using a Qubit fluorometer.
Expected recovery is sample dependent, >1 µg is sufficient.
In a fresh 1.5 ml Eppendorf DNA LoBind tube, make up your DNA library for Flow Cell loading to 32 µl using Elution Buffer (EB) as follows:
| Reagent | Volume |
|---|---|
| Eluted DNA sample, from the previous step | 8 µl |
| Elution Buffer (EB) | 24 µl |
| Total | 32 µl |
The prepared library is used for loading onto the flow cell. Store the library on ice until ready to load.
13. Priming and loading Pore-C library on the PromethION Flow Cell
材料
- Sequencing Buffer (SB)
- Library Beads (LIB)
- Flow Cell Tether (FCT)
- Flow Cell Flush (FCF)
消耗品
- PromethION Flow Cell (FLO-PRO114M)
- 1.5 ml Eppendorf DNA LoBind tubes
装置
- PromethION sequencing device
- PromethION Flow Cell Light Shield
- P1000 ピペット及びチップ
- P200 ピペットとチップ
- P20 ピペットとチップ
Pore-C experiment flow cell loading
Once the Pore-C DNA extracts have been prepared using the Ligation Sequencing Kit V14 (SQK-LSK114), the PromethION Flow Cell can be primed, and the library prepared with the final sequencing reagents for the first library load to be sequenced.
After taking the flow cells out of the fridge, wait 20 minutes for the flow cells to reach room temperature. before inserting them into the PromethION. Condensation can form on the flow cell in humid environments. Inspect the gold connector pins on the top and underside of the flow cell for condensation and wipe off with a lint-free wipe if any is observed. Ensure the heat pad (black pad) is present on the underside of the flow cell.
Thaw the Sequencing Buffer (SB), Library Beads (LIB), Flow Cell Tether (FCT) and Flow Cell Flush (FCF) at room temperature before mixing by vortexing. Then spin down and store on ice.
Prepare the flow cell priming mix in a suitable tube for the number of flow cells to flush. Once combined, mix well by briefly vortexing.
| Reagents | Volume per flow cell |
|---|---|
| Flow Cell Flush (FCF) | 1,170 µl |
| Flow Cell Tether (FCT) | 30 µl |
| Total volume | 1,200 µl |
For the PromethION 24/48, load the flow cell(s) into the docking ports:
- Line up the flow cell with the connector horizontally and vertically before smoothly inserting into position.
- Press down firmly onto the flow cell and ensure the latch engages and clicks into place.
Insertion of the flow cells at the wrong angle can cause damage to the pins on the PromethION and affect your sequencing results. If you find the pins on a PromethION position are damaged, please contact support@nanoporetech.com for assistance.
Complete a flow cell check to assess the number of pores available before loading the library.
This step can be omitted if the flow cell has been checked previously.
See the flow cell check document for more information.
Slide the inlet port cover clockwise to open.
Take care when drawing back buffer from the flow cell. Do not remove more than 20-30 µl, and make sure that the array of pores are covered by buffer at all times. Introducing air bubbles into the array can irreversibly damage pores.
After opening the inlet port, draw back a small volume to remove any air bubbles:
- Set a P1000 pipette tip to 200 µl.
- Insert the tip into the inlet port.
- Turn the wheel until the dial shows 220-230 µl, or until you see a small volume of buffer entering the pipette tip.
Load 500 µl of the priming mix into the flow cell via the inlet port, avoiding the introduction of air bubbles. Wait five minutes. During this time, prepare the library for loading using the next steps in the protocol.
Thoroughly mix the contents of the Library Beads (LIB) by pipetting.
The Library Beads (LIB) tube contains a suspension of beads. These beads settle very quickly. It is vital that they are mixed immediately before use.
We recommend using the Library Beads (LIB) for most sequencing experiments. However, the Library Solution (LIS) is available for more viscous libraries.
In a new 1.5 ml Eppendorf DNA LoBind tube, prepare the library for loading as follows:
| Reagent | Volume per flow cell |
|---|---|
| Sequencing Buffer (SB) | 100 µl |
| Library Beads (LIB) thoroughly mixed before use | 68 µl |
| DNA library | 32 µl |
| Total | 200 µl |
Note: Library loading volume has been increased to improve array coverage.
Complete the flow cell priming by slowly loading 500 µl of the priming mix into the inlet port.
Mix the prepared library gently by pipetting up and down just prior to loading.
Load 200 µl of library into the inlet port using a P1000 pipette.
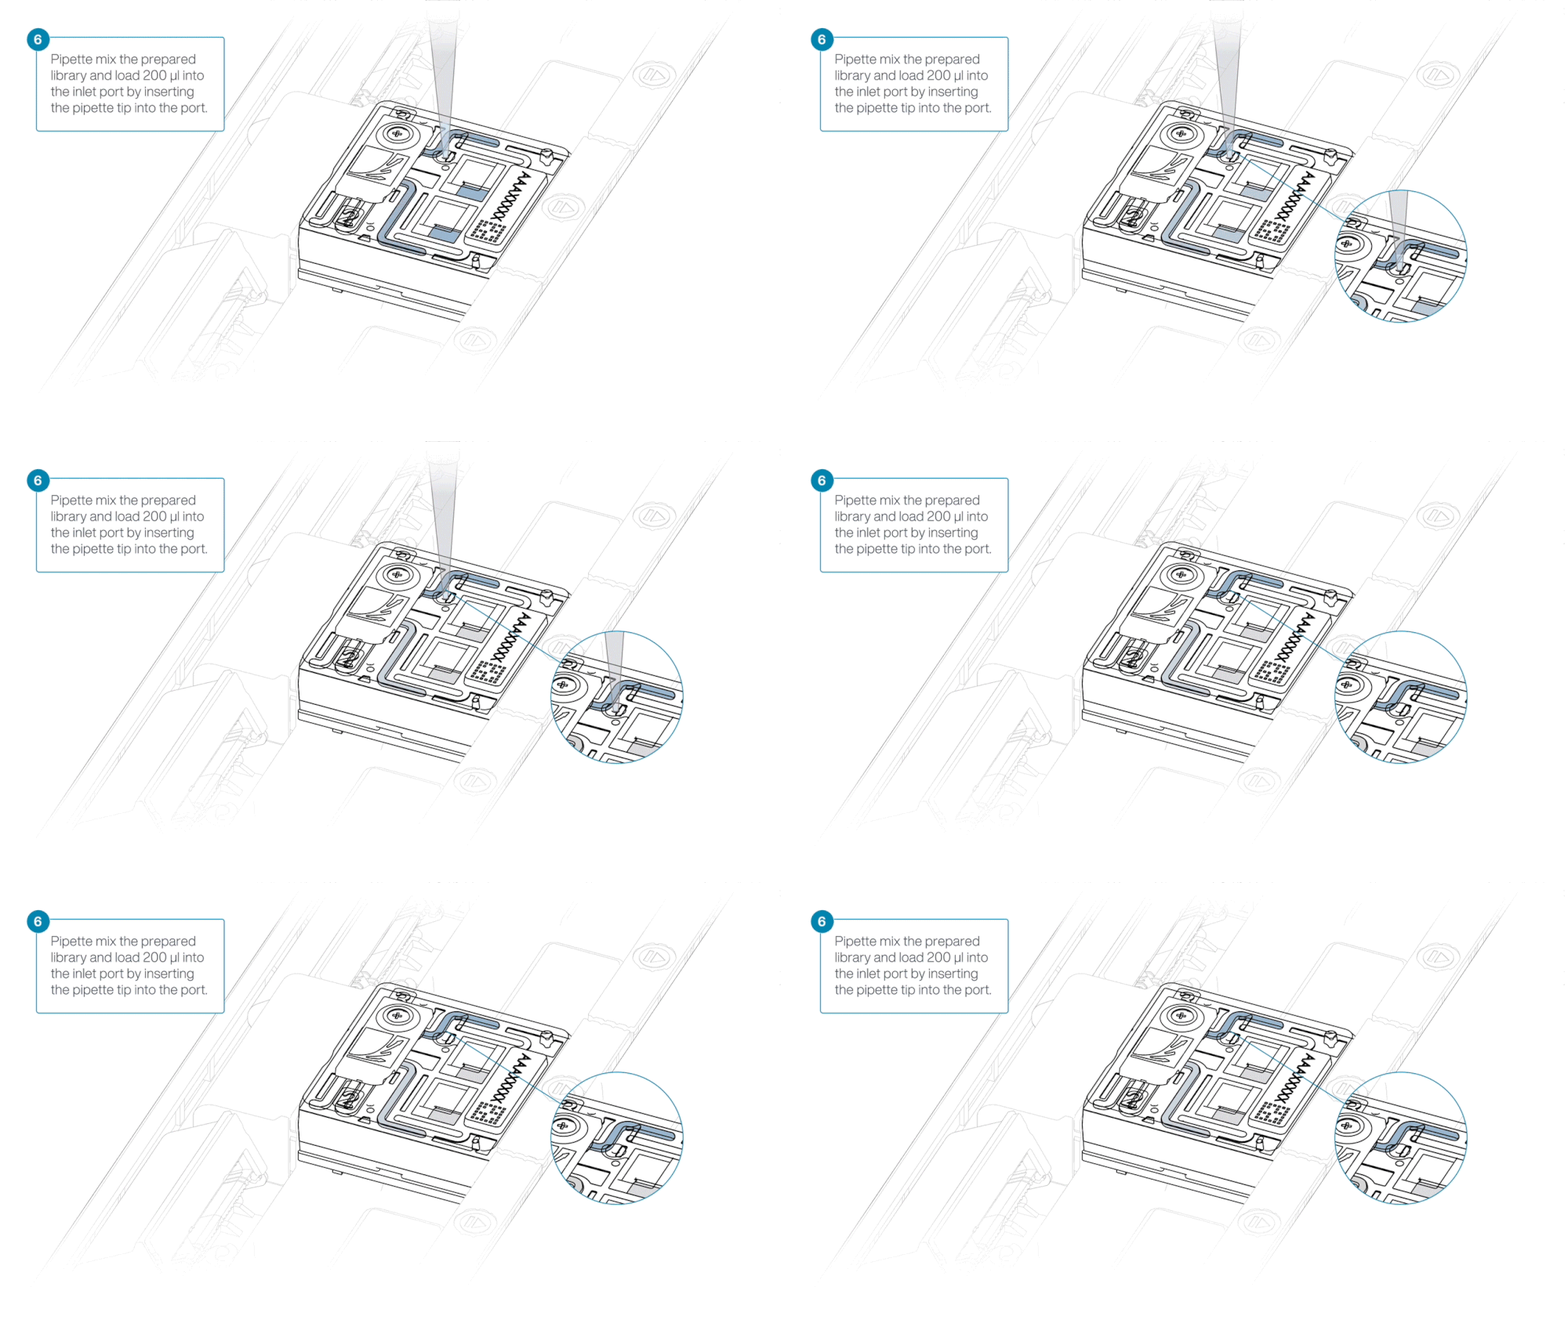
Close the valve to seal the inlet port.
For optimal sequencing output, install the light shield on your flow cell as soon as the library has been loaded.
We recommend leaving the light shield on the flow cell when library is loaded, including during any washing and reloading steps. The shield can be removed when the library has been removed from the flow cell.
If the light shield has been removed from the flow cell, install the light shield as follows:
- Align the inlet port cut out of the light shield with the inlet port cover on the flow cell. The leading edge of the light shield should sit above the flow cell ID.
- Firmly press the light shield around the inlet port cover. The inlet port clip will click into place underneath the inlet port cover.
Close the PromethION lid when ready to start a sequencing run on MinKNOW.
Wait a minimum of 10 minutes after loading the flow cells onto the PromethION before initiating any experiments. This will help to increase the sequencing output.
14. Data acquisition and basecalling: Pore-C
Ensure you are using the most recent version of MinKNOW.
We recommend updating MinKNOW to the latest version prior to starting a sequencing run for the best sequencing results.
For more information on updating MinKNOW, please refer to our MinKNOW protocol.
How to start sequencing
Once you have loaded your flow cell, the sequencing run can be started on MinKNOW, our sequencing software that controls the device, data acquisition and real-time basecalling. For more detailed information on setting up and using MinKNOW, please see the MinKNOW protocol.
We recommend basecalling in real-time using the high-accuracy (HAC) basecaller on MinKNOW using the PromethION 24 or 48 device. MinKNOW can be used and set up to sequence in multiple ways:
- On a computer either directly or remotely connected to a sequencing device.
- Directly on a PromethION 24/48 sequencing device or PromethION 2 Integrated sequencing device.
For more information on using MinKNOW on a sequencing device, please see the PromethION 24/48 user manual or PromethION 2 Integrated user manual.
Refer to the links below containing the detailed instructions for setting up the device and sequencing run:
- PromethION 24 and 48: Starting a sequencing run with PromethION 24 and 48 PromethION 2 Solo: Starting a sequencing run on PromethION 2 Solo
Real time sequencing
To start a sequencing run on MinKNOW :
1. Navigate to the start page and click start sequencing.
2. Fill in your experiment details, such as name and PromethION Flow Cell position and sample ID.
3. Select the Ligation Sequencing Kit V14 (SQK-LSK114) on the Kit page.
4. Configure the sequencing parameters as follows:
| Basecalling | ON |
| Modified bases | OFF |
| Model | High-accuracy (HAC) basecalling |
| Barcoding | OFF [default] |
| Alignment | OFF [default] We do not currently recommend live alignment during sequencing, as it can slow down system processing. |
| Adaptive sampling | OFF [default] |
| Advanced options | default settings |
5. Configure the data targets as follows:
| Run duration | 72 hours |
6. Configure the analysis workflow as follows:
| Workflow | OFF |
7. Configure the output parameters as follows:
| Basecalled output type | .BAM & .FASTQ |
| Based on | Time elapsed |
| Frequency | Every 10 minutes |
| FASTQ options - Compression | ON [default] |
| Raw reads | ON [default] |
| POD5 | ON [default] |
| FAST5 | OFF [default] |
8. Configure the filtering options as follows:
| Filtering | ON [default] |
| Min Qscore | 9 |
| Min read length (kb) | 0.2 kb |
Data analysis after sequencing
Your Pore-C experiment data is basecalled live in MinKNOW during sequencing, using the high-accuracy (HAC) basecaller.
In the Downstream analysis section, we outline further options for analysing your basecalled data.
15. Downstream analysis
The downstream analysis information outlined in this document are recommendations for 3rd party analysis tools and methods to use in conjunction with the library preparation method.
Please refer to the attached document below for the information:
Long read de novo sequencing from blood and cells using ULK resolve method downstream analysis recommendations
Oxford Nanopore Technologies do maintain or support these analysis tools. For further information and support please refer to the tools repositories.
To carry out the resolve long read assembly downstream analysis, we recommend previous bioinformatics experience.
16. Flow cell reuse and returns
We do not recommend washing and reusing your flow cells for this method.
Due to the extended sequencing time, and the multiple flow cell washes and library reloads, we do not recommend re-using the flow cells used in this method.
Re-using these flow cells for subsequent sequencing experiments may result in insufficient data generation for analysis.
Follow the returns procedure to send back flow cells to Oxford Nanopore for recycling.
Instructions for returning flow cells can be found here.
If you encounter issues or have questions about your sequencing experiment, please refer to the Troubleshooting Guide in this protocol.
17. Issues during DNA extraction and library preparation
Below is a list of the most commonly encountered issues, with some suggested causes and solutions.
We also have an FAQ section available on the Nanopore Community Support section.
If you have tried our suggested solutions and the issue still persists, please contact Technical Support via email (support@nanoporetech.com) or via LiveChat in the Nanopore Community.
Low sample quality
| Observation | Possible cause | Comments and actions |
|---|---|---|
| Low DNA purity (Nanodrop reading for DNA OD 260/280 is <1.8 and OD 260/230 is <2.0–2.2) | The DNA extraction method does not provide the required purity | The effects of contaminants are shown in the Contaminants Know-how piece. Please try an alternative extraction method that does not result in contaminant carryover. Consider performing an additional AMPure bead clean-up step. |
Low DNA recovery after AMPure bead clean-up
| Observation | Possible cause | Comments and actions |
|---|---|---|
| Low recovery | DNA loss due to a lower than intended AMPure beads-to-sample ratio | 1. AMPure beads settle quickly, so ensure they are well resuspended before adding them to the sample. 2. When the AMPure beads-to-sample ratio is lower than 0.4:1, DNA fragments of any size will be lost during the clean-up. |
| Low recovery | DNA fragments are shorter than expected | The lower the AMPure beads-to-sample ratio, the more stringent the selection against short fragments. Please always determine the input DNA length on an agarose gel (or other gel electrophoresis methods) and then calculate the appropriate amount of AMPure beads to use. 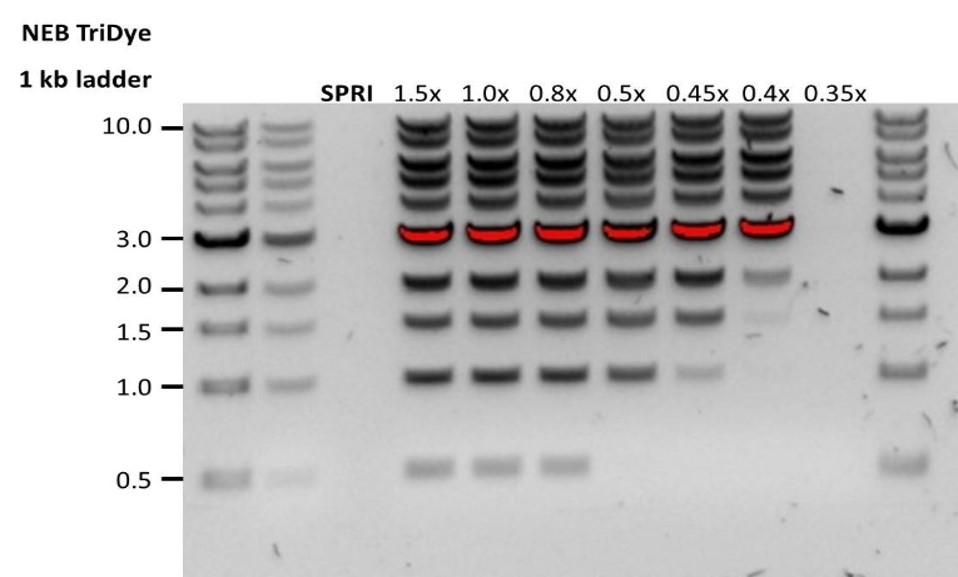 |
| Low recovery after end-prep | The wash step used ethanol <70% | DNA will be eluted from the beads when using ethanol <70%. Make sure to use the correct percentage. |
18. Issues during the sequencing run
Below is a list of the most commonly encountered issues, with some suggested causes and solutions.
We also have an FAQ section available on the Nanopore Community Support section.
If you have tried our suggested solutions and the issue still persists, please contact Technical Support via email (support@nanoporetech.com) or via LiveChat in the Nanopore Community.
Fewer pores at the start of sequencing than after Flow Cell Check
| Observation | Possible cause | Comments and actions |
|---|---|---|
| MinKNOW reported a lower number of pores at the start of sequencing than the number reported by the Flow Cell Check | An air bubble was introduced into the nanopore array | After the Flow Cell Check it is essential to remove any air bubbles near the priming port before priming the flow cell. If not removed, the air bubble can travel to the nanopore array and irreversibly damage the nanopores that have been exposed to air. The best practice to prevent this from happening is demonstrated in this video for how to load a PromethION Flow Cell. |
| MinKNOW reported a lower number of pores at the start of sequencing than the number reported by the Flow Cell Check | The flow cell is not correctly inserted into the device | Stop the sequencing run, remove the flow cell from the sequencing device and insert it again, checking that the flow cell is firmly seated in the device and that it has reached the target temperature. If applicable, try a different position on the device (GridION/PromethION). |
| MinKNOW reported a lower number of pores at the start of sequencing than the number reported by the Flow Cell Check | Contaminations in the library damaged or blocked the pores | The pore count during the Flow Cell Check is performed using the QC DNA molecules present in the flow cell storage buffer. At the start of sequencing, the library itself is used to estimate the number of active pores. Because of this, variability of about 10% in the number of pores is expected. A significantly lower pore count reported at the start of sequencing can be due to contaminants in the library that have damaged the membranes or blocked the pores. Alternative DNA/RNA extraction or purification methods may be needed to improve the purity of the input material. The effects of contaminants are shown in the Contaminants Know-how piece. Please try an alternative extraction method that does not result in contaminant carryover. |
MinKNOW script failed
| Observation | Possible cause | Comments and actions |
|---|---|---|
| MinKNOW shows "Script failed" | Restart the computer and then restart MinKNOW. If the issue persists, please collect the MinKNOW log files and contact Technical Support. If you do not have another sequencing device available, we recommend storing the flow cell and the loaded library at 4°C and contact Technical Support for further storage guidance. |
Pore occupancy below 40%
| Observation | Possible cause | Comments and actions |
|---|---|---|
| Pore occupancy <40% | Not enough library was loaded on the flow cell | Ensure the correct volume and concentration as stated on the appropriate protocol for your sequencing library is loaded onto the flow cell. Please quantify the library before loading and calculate fmols using tools like the Promega Biomath Calculator, choosing "dsDNA: µg to fmol". |
| Pore occupancy close to 0 | The Ligation Sequencing Kit was used, and sequencing adapters did not ligate to the DNA | Make sure to use the NEBNext Quick Ligation Module (E6056) and Oxford Nanopore Technologies Ligation Buffer (LNB, provided in the SQK-LSK114 kit) at the sequencing adapter ligation step, and use the correct amount of each reagent. A Lambda control library can be prepared to test the integrity of the third-party reagents. |
| Pore occupancy close to 0 | The Ligation Sequencing Kit was used, and ethanol was used instead of LFB or SFB at the wash step after sequencing adapter ligation | Ethanol can denature the motor protein on the sequencing adapters. Make sure the LFB or SFB buffer was used after ligation of sequencing adapters. |
| Pore occupancy close to 0 | No tether on the flow cell | Tethers are adding during flow cell priming (FCT tube). Make sure FCT was added to FCF before priming. |
Shorter than expected read length
| Observation | Possible cause | Comments and actions |
|---|---|---|
| Shorter than expected read length | Unwanted fragmentation of DNA sample | Read length reflects input DNA fragment length. Input DNA can be fragmented during extraction and library prep. 1. Please review the Extraction Methods in the Nanopore Community for best practice for extraction. 2. Visualise the input DNA fragment length distribution on an agarose gel before proceeding to the library prep. 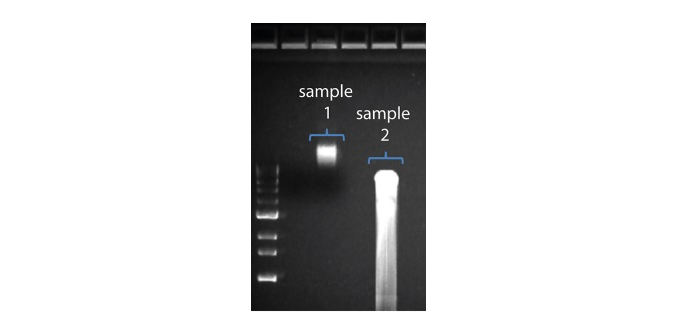 In the image above, Sample 1 is of high molecular weight, whereas Sample 2 has been fragmented. In the image above, Sample 1 is of high molecular weight, whereas Sample 2 has been fragmented.3. During library prep, avoid pipetting and vortexing when mixing reagents. Flicking or inverting the tube is sufficient. |
Large proportion of unavailable pores
| Observation | Possible cause | Comments and actions |
|---|---|---|
Large proportion of unavailable pores (shown as blue in the channels panel and pore activity plot) 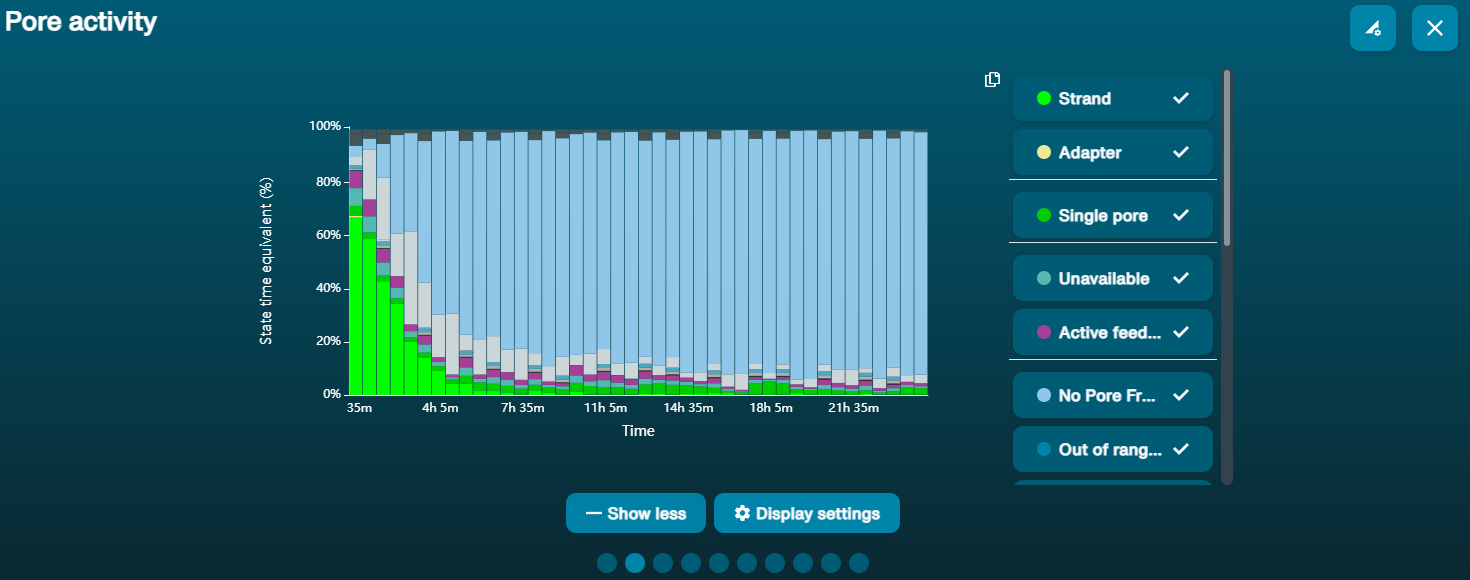 The pore activity plot above shows an increasing proportion of "unavailable" pores over time. The pore activity plot above shows an increasing proportion of "unavailable" pores over time. | Contaminants are present in the sample | Some contaminants can be cleared from the pores by the unblocking function built into MinKNOW. If this is successful, the pore status will change to "sequencing pore". If the portion of unavailable pores stays large or increases: 1. A nuclease flush using the Flow Cell Wash Kit (EXP-WSH004) can be performed, or 2. Run several cycles of PCR to try and dilute any contaminants that may be causing problems. |
Large proportion of inactive pores
| Observation | Possible cause | Comments and actions |
|---|---|---|
| Large proportion of inactive/unavailable pores (shown as light blue in the channels panel and pore activity plot. Pores or membranes are irreversibly damaged) | Air bubbles have been introduced into the flow cell | Air bubbles introduced through flow cell priming and library loading can irreversibly damage the pores. Watch the how to load a PromethION Flow Cell video for best practice. |
| Large proportion of inactive/unavailable pores | Certain compounds co-purified with DNA | Known compounds, include polysaccharides. 1. Clean-up using the QIAGEN PowerClean Pro kit. 2. Perform a whole genome amplification with the original gDNA sample using the QIAGEN REPLI-g kit. |
| Large proportion of inactive/unavailable pores | Contaminants are present in the sample | The effects of contaminants are shown in the Contaminants Know-how piece. Please try an alternative extraction method that does not result in contaminant carryover. |
Temperature fluctuation
| Observation | Possible cause | Comments and actions |
|---|---|---|
| Temperature fluctuation | The flow cell has lost contact with the device | Check that there is a heat pad covering the metal plate on the back of the flow cell. Re-insert the flow cell and press it down to make sure the connector pins are firmly in contact with the device. If the problem persists, please contact Technical Services. |
Failed to reach target temperature
| Observation | Possible cause | Comments and actions |
|---|---|---|
| MinKNOW shows "Failed to reach target temperature" | The instrument was placed in a location that is colder than normal room temperature, or a location with poor ventilation (which leads to the flow cells overheating) | MinKNOW has a default timeframe for the flow cell to reach the target temperature. Once the timeframe is exceeded, an error message will appear and the sequencing experiment will continue. However, sequencing at an incorrect temperature may lead to a decrease in throughput and lower q-scores. Please adjust the location of the sequencing device to ensure that it is placed at room temperature with good ventilation, then re-start the process in MinKNOW. |
Last updated: 9/17/2026
ドキュメントオプション