Whole blood sample preparation for RE-Pore-C

Extraction Method
Whole blood sample preparation for RE-Pore-C
FOR RESEARCH USE ONLY.
Contents
Introduction
Materials
Method
- 1. PBMC sample requirements
- 2. PBMC isolation procedure
- 3. Optional PBMC storage procedure
- 4. RE-Pore-C extraction
Results
Introduction
This protocol describes the preparation of whole blood samples to be processed using the restriction enzyme Pore-C (RE-Pore-C) protocol. This protocol was developed using whole blood isolated from the Hsd:Sprague Dawley (SD) strain of Rattus norvegicus domestica, and based on research by Oxford Nanopore Technologies and published literature:
- Centre Physiopathologie de Toulouse-Purpan (CTPT). (2015) PBMC isolation from buffy coats or whole blood PBMC cryopreservation.
Materials
- 5–10 ml whole blood
- Percol (GE Healthcare 17-0891-09, 1.135 g/ml)
- DMSO
- FBS (Gibco™ 10500056)
- 1X PBS pH 7.4
- Crushed ice
- Liquid nitrogen
- Pasteur pipettes
- 2 ml and 50 ml centrifuge tubes
- Temperature-controlled 2 ml and 50 ml centrifuge
- –80°C freezer storage
Method
PBMC sample requirements
The peripheral blood mononuclear cells (PBMCs) must be isolated from whole blood before proceeding with the RE-Pore-C extraction. Approximately 5 – 10 ml of whole blood should yield sufficient PBMCs for the RE-Pore-C extraction. If necessary, combine multiple aliquots of whole blood to achieve a final 5-10 ml pooled sample. Users may isolate PBMCs by any means they feel are most appropriate for the whole blood sample to be used, provided that:
- PBMCs are isolated as soon as possible from fresh blood and no later than 24 hours after exsanguination.
- The whole blood is not mixed with any additives, except for anticoagulants (e.g. K2-EDTA), which are acceptable and will not interfere with the Pore-C DNA extraction.
If users have PBMCs which have been isolated previously and satisfy these requirements, they may start sample extraction directly from the RE-Pore-C extraction section of this protocol.
If users are unsure of how best to isolate PBMCs from whole blood, proceed with the PBMC isolation procedure suggested below.
PBMC isolation procedure
Note: results may vary depending on the species and health of the organism exsanguinated.
Prepare 3 solutions prior to PBMC isolation:
Prepare 500 ml of 1X PBS supplemented with 2% FBS final concentration and store at room temperature.
Prepare 100 ml of 1X PBS supplemented with 60% Percol final concentration and store at room temperature.
Prepare 2 ml of FBS supplemented with 20% DMSO final and store at 4°C.
Allow the whole blood sample to warm to room temperature and then dilute 1:1 with room temperature 1X PBS supplemented with 2% FBS. Transfer the diluted blood to a 50 ml centrifuge tube.
Centrifuge at 800 g at 20°C for 10 minutes with the brake off.
Check the turbidity of the plasma layer (see Figure 1). If it is not clear, centrifuge at 800g at 20°C for a further 10 minutes with the brake off.
Using a Pasteur pipette, remove as much of the plasma layer as possible without disturbing the layer of buffy coat. Gently remove the buffy coat layer, taking care to draw as little of the red blood cell layer as possible. Transfer the recovered buffy coat to a fresh 50 ml centrifuge tube.
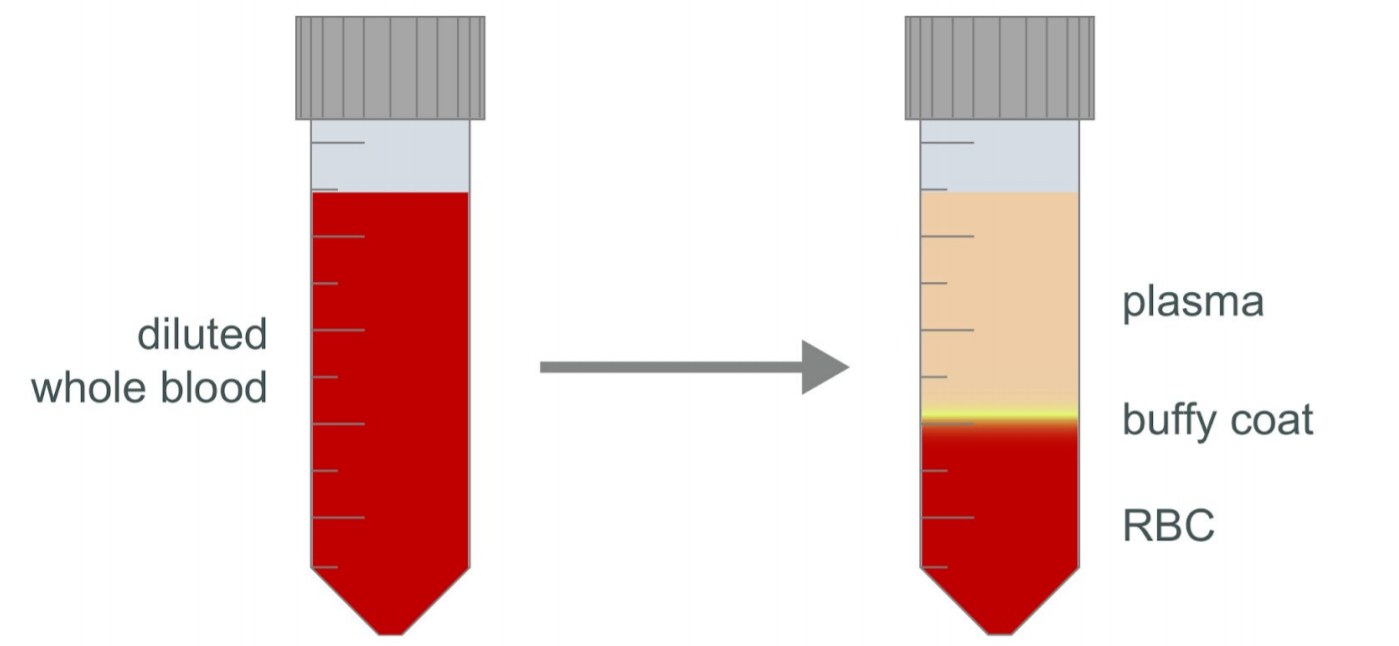 Figure 1. Diagram of buffy coat sample layers after centrifugation.
Resuspend the recovered buffy coat sample in 1X PBS supplemented with 2% FBS to a final volume of 25 ml.
Aliquot 20 ml of 1X PBS supplemented with 60% Percol in a fresh 50 ml tube.
Using a fresh Pasteur pipette, very gently layer the diluted buffy coat sample over the Percol layer at a 45° angle (see Figure 2).
Centrifuge at 350g at 20°C for 40 minutes with slow acceleration and with the brake off. Note: If the centrifuge appears to be unbalanced, stop the acceleration and allow the rotor to come to a halt with the brake off. Re-balance and then restart the 40 min centrifugation.
Check the turbidity of the plasma layer and the formation of the PMBCs layer (see Figure 2). If the plasma layer is not clear or the PBMC layer is not well defined, continue to centrifuge at 350g at 20°C for a further 20 minutes using slow acceleration with the brake off.
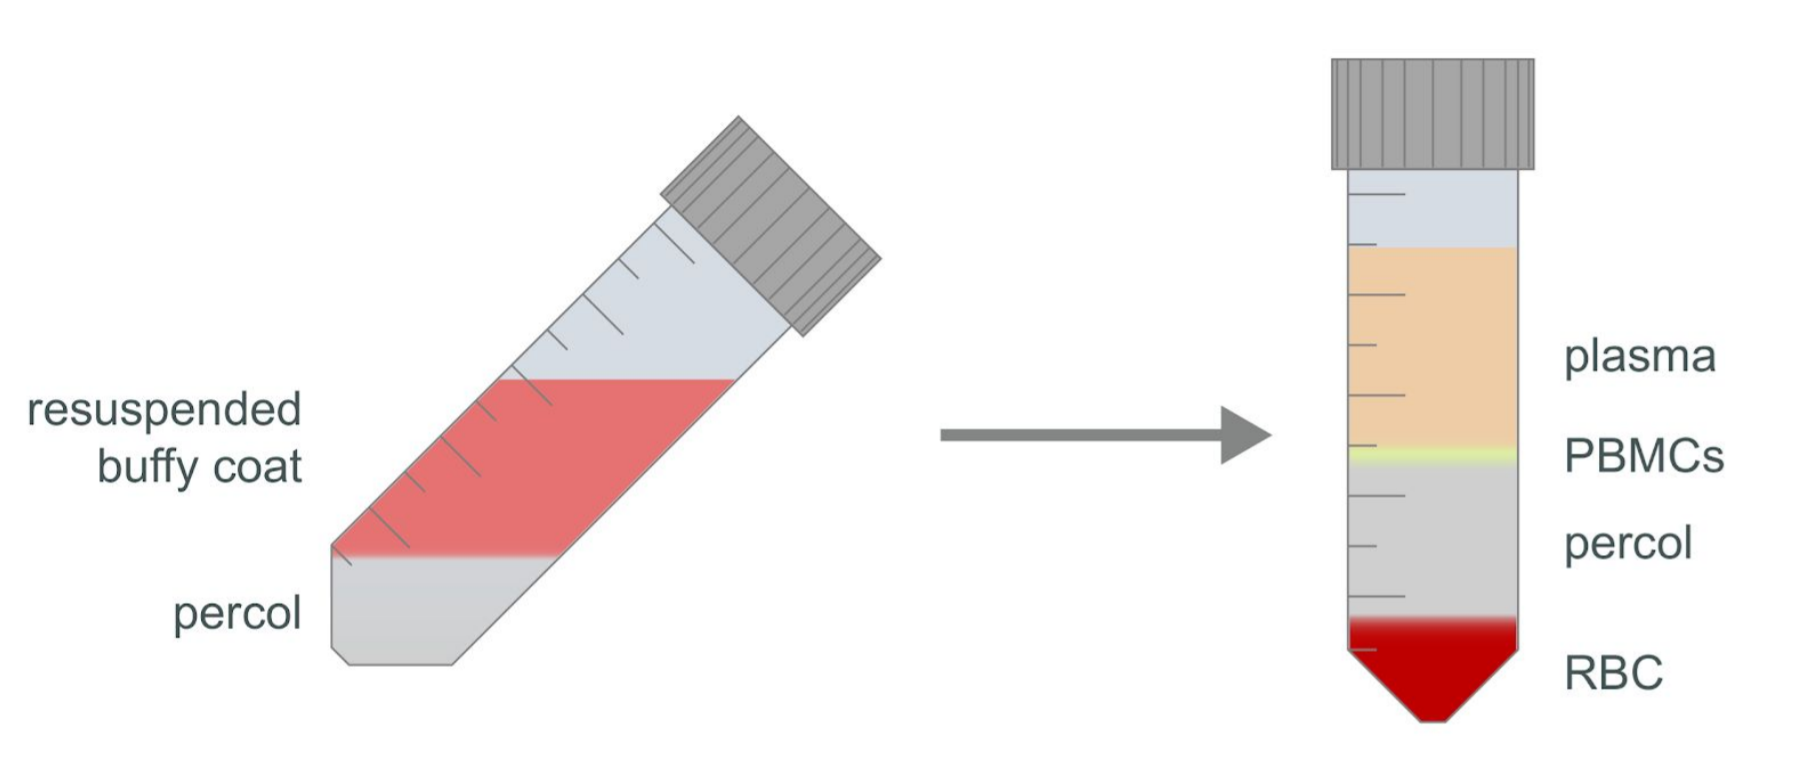 Figure 2. Diagram of PBMC sample layers after centrifugation.
Using a Pasteur pipette, remove as much of the plasma layer as possible without disturbing the layer of PMBCs, then gently remove the layer of PBMCs. It is acceptable to draw plasma with the layer of PBMCs; however, take care to draw as little of the Percol layer as possible. Transfer the recovered PBMCs to a fresh 50 ml centrifuge tube.
Resuspend the recovered PBMCs in 50 ml of room temperature 1X PBS supplemented with 2% FBS.
Centrifuge at 350 g at 20°C for 15 minutes with the brake on.
Aspirate and discard the supernatant. Gently resuspend the PBMCs in 25 ml of room temperature 1X PBS supplemented with 2% FBS.
Centrifuge at 350 g at 20°C for 15 minutes with the brake on.
Aspirate and discard the supernatant. Gently resuspend the PBMCs in another 25 ml of room temperature 1X PBS supplemented with 2% FBS.
Centrifuge at 350 g at 20°C for 15 minutes with the brake on.
Aspirate and discard the supernatant. Gently resuspend the PBMCs in another 25 ml of room temperature 1X PBS supplemented with 2% FBS.
Centrifuge at 200 g at 20°C for 10 minutes with the brake on.
Assuming every 1 ml of whole blood originally used will yield approximately 1.5 x10^6 PBMCs, resuspend cells to approximately 10.0 x10^6 PBMCs/ml in room temperature 1X PBS supplemented with 2% FBS. Transfer aliquots of approximately 10.0 x10^6 PBMCs total to a fresh 2 ml centrifuge tube.
Chill on ice for 5 minutes.
Optional PBMC storage procedure
If immediately proceeding with Pore-C DNA extraction without storage, go directly to RE-Pore-C extraction.
Centrifuge at 350g at 4°C for 2 minutes with the brake on.
Aspirate and discard the supernatant then resuspend the PBMC pellet in 1 ml of chilled FBS.
Once resuspended, slowly mix in drop by drop, 1 ml of chilled FBS supplemented with 20% DMSO. Note: As DMSO is mixed with water, energy is released as heat. Adding DMSO to the PBMC suspension drop by drop prevents heat shock to the cells.
Snap freeze aliquots of PBMCs in liquid nitrogen then store at –80°C.
RE-Pore-C extraction
Take approximately 10.0 x10^6 PBMCs and briefly homogenise the suspension by gently pipetting with a large-bore pipette tip. Transfer the cell suspension to a 50 ml centrifuge tube. Rinse the original cell pellet tube with a further 1 ml of chilled 1X PBS into the 50 ml centrifuge tube.
Bring the volume of the re-suspended PBMCs to 10 ml in chilled 1X PBS.
Proceed with the RE-Pore-C protocol using approximately 10 x10^6 PBMCs as input
Results
| Sample | DNA concentration, ng/μl | Total DNA mass, μg |
|---|---|---|
| PBMCs | 79.4 | 11.91 |
Table 1. The yield of non-size selected RE-Pore-C DNA extract using NlaIII restriction enzyme.
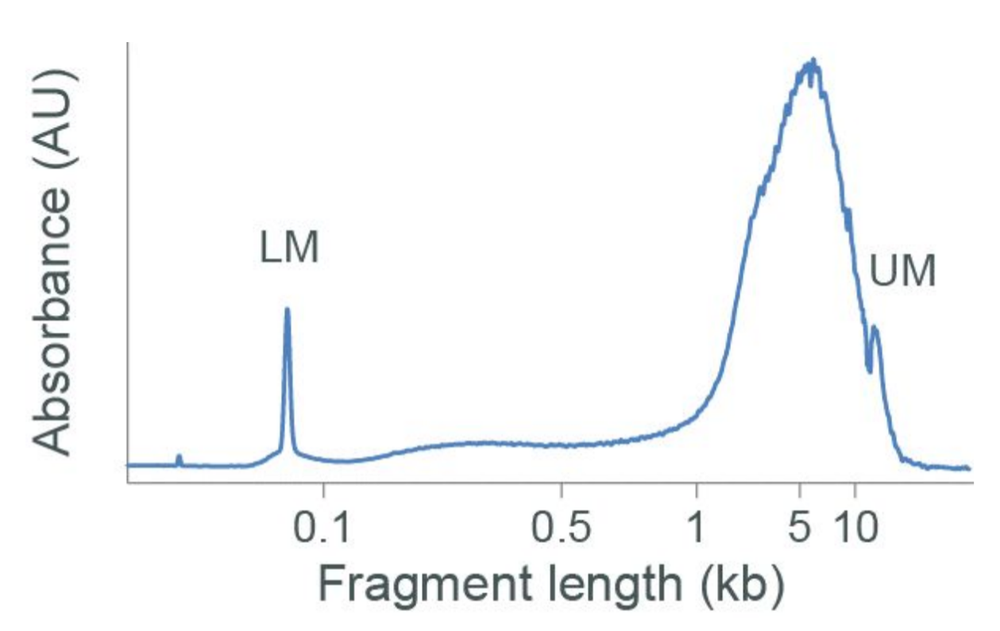 Figure 3. Agilent Bioanalyser DNA 12000 trace of non-size selected RE-Pore-C DNA extract.
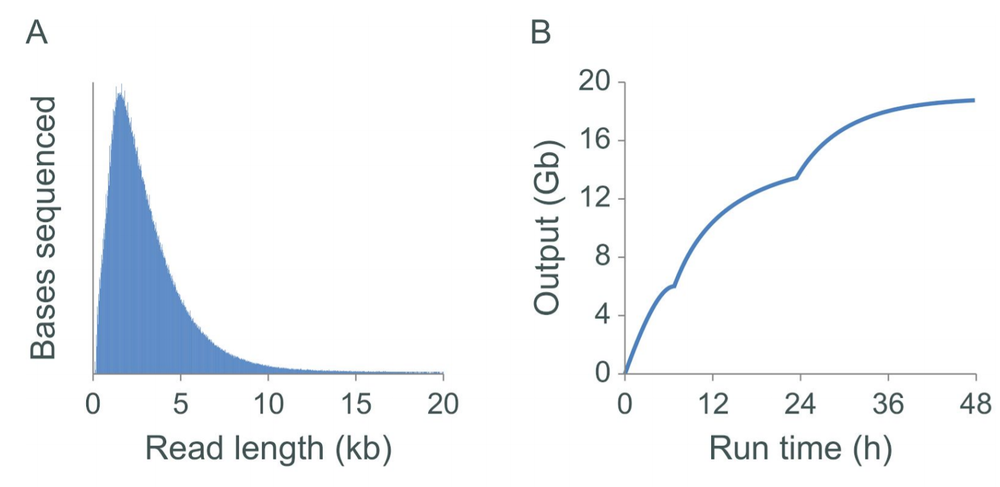
 Figure 4. The sequencing and Pore-C output for libraries assessed on PromethION. Libraries were generated as described using Pore-C extracts prepared with the NlaIII restriction enzyme. The read length distributions and output (Gbases) obtained from the libraries generated are shown in panels A and B, respectively. Panel C displays the Pore-C metrics obtained.


