Q-Line Ligation Sequencing Kit V14 (Q-SQK-LSK114) (Q_LSK114_RevA_01Jun2026)


GridION: Protocol
Q-Line Ligation Sequencing Kit V14 (Q-SQK-LSK114) V Q_LSK114_RevA_01Jun2026
For Research Use Only. Not for use in diagnostic procedures.
Manufacturer: Oxford Nanopore Technologies, Gosling Building, Edmund Halley Rd, Oxford Science Park, Oxford, OX4 4DQ, United Kingdom
FOR RESEARCH USE ONLY.
Contents
Introduction to the protocol
Library preparation
概要
For Research Use Only. Not for use in diagnostic procedures.
Manufacturer: Oxford Nanopore Technologies, Gosling Building, Edmund Halley Rd, Oxford Science Park, Oxford, OX4 4DQ, United Kingdom
1. Overview of the protocol
This kit is recommended for users who:
- Want to optimise their sequencing experiment for throughput
- Want to use upstream processes such as size selection, whole-genome amplification, or enrichment for long reads
This protocol describes how to carry out sequencing of a DNA sample using the Q-Line Ligation Sequencing Kit (Q-SQK-LSK114). This kit is designed to prepare genomic DNA, amplicons, and cDNA, with or without barcoding, for sequencing on Oxford Nanopore devices to produce 1D reads. The kit provides enough material for six reactions. We recommend that new users test this protocol using the Lambda Control Expansion Kit (Q-EXP-CTL001) as an input.
Workflow
The library preparation involves two enzymatic steps to prepare the DNA ends for sequencing. The first enzymatic step repairs any damage in the DNA molecules, such as nicks, and generates uniform ends with 5’ phosphates and 3’ adenine overhangs. The second enzymatic step ligates the sequencing adapters that have complementary thymine tails with the dA-tailed template.
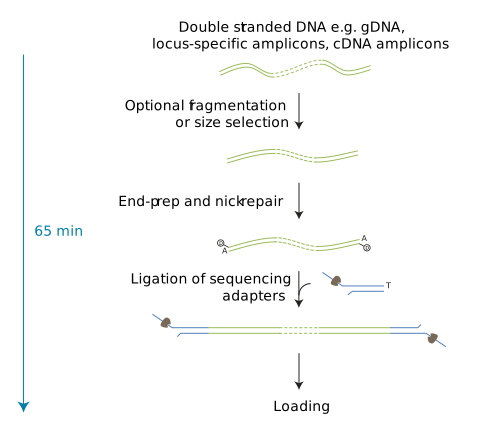
Steps in the sequencing workflow:
Prepare for your experiment
You will need to:
- Extract your DNA and check its length, quantity, and purity. The quality checks performed during the protocol are essential to ensure experimental success.
- Ensure you have your sequencing kit, the correct equipment, and third-party reagents.
Library preparation
You will need to:
- Repair nicks in the DNA and prepare the DNA ends for adapter attachment.
- Attach sequencing adapters, supplied in the kit, to the DNA ends.
- Prime the flow cell and load your DNA library into the flow cell.
Sequencing and analysis
You will need to start an assay using the sequencing software, which will collect raw data from the device and convert it into basecalled reads.
Compatibility of this protocol
This protocol should only be used in combination with:
- Q-Line Ligation Sequencing Kit V14 (Q-SQK-LSK114)
- Q-Line Control Expansion Kit (Q-EXP-CTL001)
- Q-Line GridION
- Q-Line MinION Flow Cell R10 (Q-FLO-MIN114)
Considerations for use
Warnings
- Follow Good Laboratory Practice in relation to personal safety, including but not limited to the use of personal protective equipment when handling the samples and test reagents. Refer to Safety Data Sheets provided with the product for specific safety requirements.
- Take care to prevent the reagents from contacting your skin, eyes, and mucous membranes.
- If contact occurs, immediately wash the affected area with soap and water. Thoroughly wash hands after handling samples and test reagents.
- In the event of a serious incident, contact the Manufacturer of the device. The user may also wish to contact the competent authority of the Member State in which the device was used.
- The Q-Line GridION as supplied provides only raw sequence data, which requires validated downstream analysis and the inclusion of assay-specific controls.
- Using the Q-Line GridION outside of the intended use is not recommended and is at the user’s risk.
Precautions
- Refer to local or WHO health and safety guidance for handling samples containing hazard group (HG)/BioSafety Level (BSL) 3 organisms.
- Decontaminate surfaces with 0.5% sodium hypochlorite (bleach) diluted with deionised or purified water.
- Prevent contamination of reagents by following standard contamination prevention procedures including but not limited to the use of personal protective equipment and using filter pipette tips for handling DNA.
- Reagents must be stored under the indicated storage conditions before and after use.
- Waste should be disposed of in accordance with local waste disposal regulations.
- Do not mix different lots of reagents.
- We recommend using DNase-free pipette tips.
- Never reuse the consumables intended for single use (for example, tips, gloves, and test tubes).
- When using a pipette, use correct volumes and adhere to manufacturer’s instructions. The use of multichannel pipettes is recommended where possible. Mouth pipettes must not be used.
- Do not use the reagents if the package is damaged or reagent tubes are leaking (reagents may be compromised, leading to an incorrect result). Please contact technical support.
- Do not use test reagents after their expiration date.
- Do not use the flow cell if the package is damaged or the flow cell is leaking as the flow cell may be compromised, leading to an incorrect result. If leakage occurs, refer to the Flow Cell Safety Data Sheet for handling guidance, and contact technical support.
- Following recalibration, flow cells should be used within 7 days.
- After use, the flow cell must be prepared for return and disposal as described in the Q-Line GridION user guide.
Sequencing performance specifications
| Library description | Sequencing run time | Accuracy | Data output |
|---|---|---|---|
| 48 kb fragment | 24 hours | ~99.3% modal single-read accuracy | ~9.5 Gb |
| 1 kb amplicon | 24 hours | ~99.4% modal single-read accuracy | ~12.5 Gb |
Statistics are representative of average observed performance in verification tests. Values vary depending on sample quality, library preparation method, flow cell type, and basecalling model. Values provided assume high-quality samples that are prepared following our optimised protocols.
2. Equipment and consumables
材料
- gDNA (1 µg for samples >10 kb, 200 ng for samples ≤10 kb)
- Q-Line Ligation Sequencing Kit V14 (Q-SQK-LSK114)
- Optional — Q-Line Control Expansion Kit (Q-EXP-CTL001)
消耗品
- Q-Line MinION Flow Cell R10 (Q-FLO-MIN114)
- Qubit dsDNA HS Assay Kit (Invitrogen, Q32851)
- NEBNext® Companion Module v2 for Oxford Nanopore Technologies® Ligation Sequencing (NEB, E7672S or E7672L)
- Ethanol, 100% (e.g. Fisher, 16606002)
- Nuclease-free water (e.g. ThermoFisher, AM9937)
- Bovine Serum Albumin (BSA) (50 mg/ml) (e.g Invitrogen™ UltraPure™ BSA 50 mg/ml, AM2616)
- Qubit™ Assay Tubes (Invitrogen, Q32856)
- 1.5 ml Eppendorf DNA LoBind tubes
- 0.2 ml 薄壁のPCRチューブ
装置
- Q-Line GridION (Q-GRD-MK1)
- Q-Line MinION Flow Cell R10 Light Shield
- 小型遠心機
- タイマー
- サーマルサイクラー
- 1.5 mlエッペンドルフチューブに最適のマグネット式ラック
- Hula mixer(緩やかに回転するミキサー)
- ボルテックスミキサー
- アイスバケツ(氷入り)
- Qubit™ fluorometer (or equivalent for QC check)
- P1000 ピペット及びチップ
- P200 ピペットとチップ
- P100 ピペットとチップ
- P20 ピペットとチップ
- P10 ピペットとチップ
- P2 ピペットとチップ
インプットDNA
インプットDNAのQC方法
インプットDNAの量と品質の要件を満たすことが重要です。DNAの使用量が少なすぎたり多すぎたり、あるいは品質の低いDNA(例としてDNAが非常に断片化されていたり、RNAや化学汚染物質が含まれている場合など)を使用すると、ライブラリーの調製に影響を及ぼす可能性があります。
DNAサンプルの品質管理の方法については、Input DNA/RNA QC protocolのプロトコルをご覧ください。
コンタミネーション
DNAの抽出する方法によっては、精製DNAに特定の化学汚染物質が残留する可能性があり、ライブラリ調製の効率やシークエンシングの品質に影響を及ぼす可能性があります。コンタミネーションについての詳細は、コミュニティーの Contaminants page をご覧ください。
Ligation Sequencing Kit V14 (SQK-LSK114) のコンテンツ
(注: 現在のキットの容器を変更しています。今までは実験毎に使い捨てのシングルユーズチューブを使用していましたが、バッファー単位のボトル容器に変更しています。
シングルユースチューブの場合: 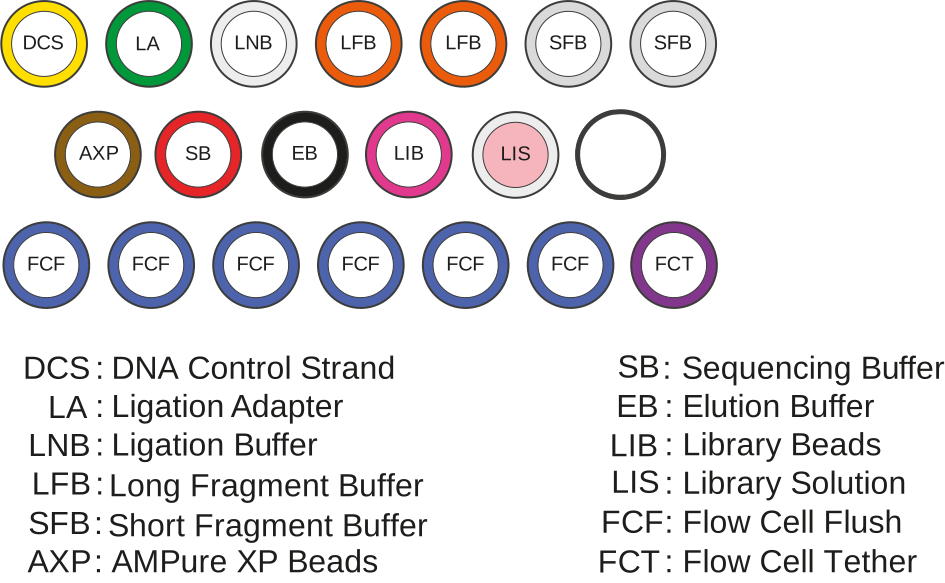
ボトル容器の場合: 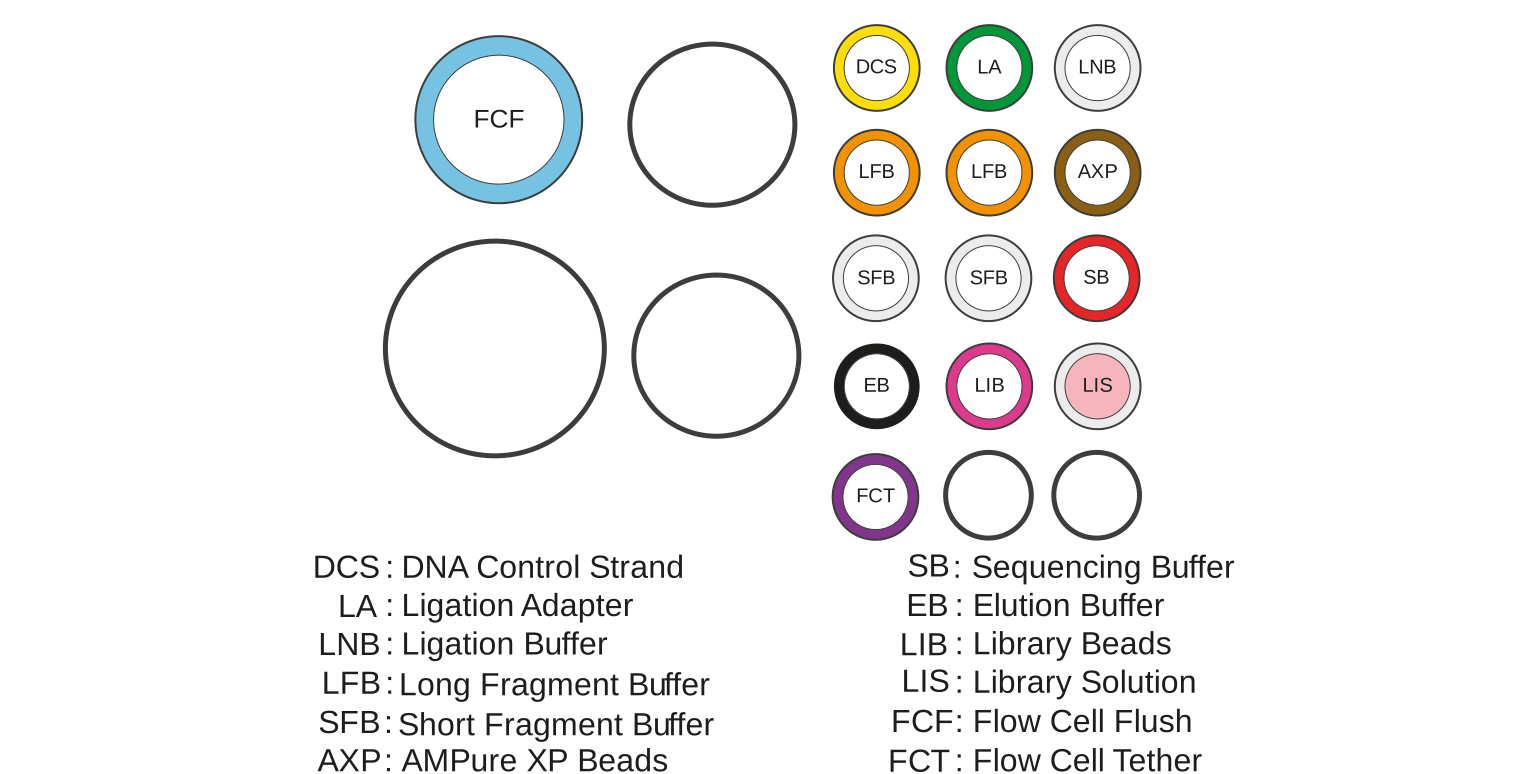
(注: 本製品には、Beckman Coulter、Inc.製のAMPure XP試薬が含まれており、試薬の安定性を損なうことなくキットと共に-20 ° Cで保存することができます。
(注: DNA Control Sample(DCS)は3.6kbのアンプリコンで、Lambda genomeの3'末端をマッピングしたプレップコントロールです。
3. Computer requirements and software
Q-Line GridION IT requirements
The Q-Line GridION device contains all the hardware required to control up to five sequencing experiments simultaneously and acquire the data. The device is further enhanced with high-performance GPU technology for real-time basecalling. Read more in the Q-Line GridION configuration guide.
The Sequencing Software
The Sequencing Software controls the GridION, collects sequencing data in real-time and processes it into basecalled reads. The software can also demultiplex reads by barcode, and basecall/demultiplex data after a sequencing run has completed. You will be using the Sequencing Software for every assay you run.
For instructions on how to run the Sequencing Software on the GridION, please refer to the Q-Line GridION user guide.
4. DNA repair and end-prep
材料
- gDNA (1 µg for samples >10 kb, 200 ng for samples ≤10 kb)
- AMPure XP Beads (AXP)
消耗品
- NEBNext® FFPE DNA Repair Mix from the NEBNext® Companion Module v2 (NEB, E7672S or E7672L)
- NEBNext® FFPE DNA Repair Buffer v2 from the NEBNext® Companion Module v2 (NEB, E7672S or E7672L)
- NEBNext® Ultra II End Prep Enzyme Mix from the NEBNext® Companion Module v2 (NEB, E7672S or E7672L)
- Nuclease-free water (e.g. ThermoFisher, AM9937)
- nuclease-free waterで調整した 80% エタノール溶液
- 1.5 ml Eppendorf DNA LoBind tubes
- 0.2 ml 薄壁のPCRチューブ
- Qubit dsDNA HS Assay Kit (Invitrogen, Q32851)
- Qubit™ Assay Tubes (Invitrogen, Q32856)
装置
- サーマルサイクラー
- Hula mixer(緩やかに回転するミキサー)
- Magnetic separation rack
- アイスバケツ(氷入り)
- 小型遠心機
- P1000 ピペット及びチップ
- P100 ピペットとチップ
- P10 ピペットとチップ
- Qubit™ fluorometer (or equivalent for QC check)
NEB試薬を製造元の指示に従って調製し、氷上に置きます。
最適なパフォーマンスを得るために、NEBは以下を推奨しています。
すべての試薬を氷上で解凍します。
試薬チューブをタッピングや転倒混和にてよく混ぜてください。
(注: FFPE DNA Repair MixまたはUltra II End Prep Enzyme Mixをボルテックスしないでください。毎日、初めて開封する前に、必ずチューブをスピンダウンしてください。
FFPE DNA Repair Buffer v2、または NEBNext FFPE DNA Repair Buffer と Ultra II End Prep Reaction Buffer をボルテックスし、よく混合してください。
(注: これらのバッファーは白色の沈殿を含むことがあります。このような場合には混合物を室温で戻し、バッファー液を数回上下にピペットで沈殿物を分解してください。その後、素早くチューブをボルテックスして混合させてください。FFPE DNA Repair Bufferは黄色味を帯びることがありますが、問題はありません。
Use a Qubit fluorometer to quantify the stock solution of the relevant DNA sample and calculate the required input volume.
Transfer the required input DNA into a 0.2 ml PCR tube and make the volume up to 47 µl with nuclease-free water.
DNA inputs for samples >10 kb should be 1 µg and for samples ≤10 kb should be 200 ng.
For a Lambda control experiment use 20 µl of Lambda control (LMD) from Q-EXP-CTL001.
Flick to mix the tube 10 times.
In the 0.2 ml PCR tube, add the reagents for DNA repair and end-prep in the order shown in the table below:
| Reagent | Volume (µl) |
|---|---|
| DNA from previous step | 47 |
| NEBNext FFPE DNA Repair Buffer v2 | 7 |
| NEBNext FFPE DNA Repair Mix | 2 |
| Ultra II End Prep Enzyme Mix | 3 |
| Total | 59 |
Thoroughly mix the reaction by gently flicking the tube 10 times and briefly spinning down for 5 seconds.
Using a thermal cycler, incubate at 20°C for 5 minutes and 65°C for 5 minutes. Then cool down to 10°C on the thermal cycler or place the samples on ice.
Spin down and transfer the DNA sample to a clean 1.5 ml Eppendorf DNA LoBind tube.
Resuspend the AMPure XP Beads (AXP) by vortexing for at least 30 seconds.
Add 60 µl of resuspended AMPure XP Beads (AXP) to the end-prep reaction and mix by flicking the tube 10 times.
Incubate the tube on a Hula mixer (rotator mixer) for 5 minutes at room temperature (18°C to 23°C).
If this solution has not previously been prepared, freshly prepare 500 µl of 80% ethanol in nuclease-free water.
Spin down the sample and pellet on a magnet until the supernatant is clear and colourless.
Keep the tube on the magnet and pipette off the supernatant.
Keep the tube on the magnet and wash the beads with 200 µl of freshly prepared 80% ethanol without disturbing the pellet. Remove the ethanol using a pipette and discard.
Repeat the previous step.
Spin down and place the tube back on the magnet.
Pipette off any residual ethanol. Allow to dry for approximately 30 seconds.
Remove the tube from the magnet and resuspend the pellet in 61 µl nuclease-free water.
Incubate for 2 minutes at room temperature (18°C to 23°C).
Pellet the beads on the magnet until the eluate is clear and colourless (at least 1 minute).
Transfer 60 µl of eluate into a clean 1.5 ml Eppendorf DNA LoBind tube.
Note: Repaired and end-prepped DNA can be stored overnight at 1°C to 8°C before proceeding to adapter ligation.
5. Adapter ligation and clean-up
材料
- Ligation Adapter (LA)
- Ligation Buffer (LNB)
- Long Fragment Buffer (LFB)
- Short Fragment Buffer (SFB)
- AMPure XP Beads (AXP)
- Elution Buffer (EB)
消耗品
- Salt-T4® DNA Ligase (NEB, M0467)
- 1.5 ml Eppendorf DNA LoBind tubes
- Qubit dsDNA HS Assay Kit (Invitrogen, Q32851)
- Qubit™ Assay Tubes (Invitrogen, Q32856)
装置
- Magnetic separation rack
- 小型遠心機
- ボルテックスミキサー
- P1000 ピペット及びチップ
- P100 ピペットとチップ
- P20 ピペットとチップ
- P10 ピペットとチップ
- Qubit™ fluorometer (or equivalent for QC check)
Reagent preparation
Ligation Adapter (LA) とSalt-T4® DNA Ligaseをスピンダウンし、氷上に置きます。
ライゲーションバッファー(LNB)を室温で融解し、スピンダウンしてピペッティングで混合します。粘性が高い為、この緩衝液をボルテックスするのは効果的ではないです。解凍して混ぜたら、すぐに氷の上に置いてください。
溶出バッファー(EB)を室温で融解し、ボルテックスで混合します。その後、スピンダウンして氷の上に置きます。
使用するウォッシュバッファー(LFBまたはSFB)に応じて、アダプターライゲーション後のクリーンアップステップは、3 kb以上のDNAの断片を濃縮するか、全ての断片長を均等に精製するように設計されています。
- 3kb以上のDNA断片を濃縮するには、Long Fragment Buffer (LFB)を使用してください。
- 一方であらゆるサイズの DNA 断片を保持するには、Short Fragment Buffer (SFB) を使用してください。
Long Fragment Buffer(LFB)または Short Fragment Buffer(SFB)のいずれかを室温で解凍し、ボルテックスで混合します。その後、スピンダウンして氷の上に置きます。
Library preparation
In a 1.5 ml Eppendorf DNA LoBind tube, add the reagents for adapter ligation in the order shown in the table below:
Between each addition, mix by pipetting 10–20 times.
| Reagent | Volume (µl) |
|---|---|
| DNA sample (eluted following DNA repair and end-prep) | 60 |
| Ligation Adapter (LA) | 5 |
| Ligation Buffer (LNB) | 25 |
| Salt-T4® DNA Ligase | 10 |
| Total | 100 |
Thoroughly mix the reaction by gently pipetting 10 times and briefly spinning down for 5 seconds.
Incubate the reaction for 10 minutes at room temperature (18°C to 23°C).
Resuspend the AMPure XP Beads (AXP) by vortexing for at least 30 seconds.
Add 40 µl of resuspended AMPure XP Beads (AXP) to the reaction and mix by flicking the tube 10 times.
Incubate on a Hula mixer (rotator mixer) for 5 minutes at room temperature (18°C to 23°C).
Spin down the sample and pellet on a magnet until the supernatant is clear and colourless.
Keep the tube on the magnet and pipette off the supernatant.
Wash the beads by adding either:
250 μl L Fragment Buffer (LFB) for >3 kb (and Lambda control experiments) or
250 μl S Fragment Buffer (SFB) for ≤3 kb
Flick the beads to resuspend, spin down, then return the tube to the magnet and allow the beads to pellet. Remove the supernatant using a pipette and discard.
Repeat the previous two steps.
Spin down and place the tube back on the magnet.
Pipette off any residual buffer and allow to dry for approximately 30 seconds.
Remove the tube from the magnet and resuspend the pellet in 15 µl Elution Buffer (EB).
Spin down and incubate for 10 minutes at room temperature (18°C to 23°C).
Pellet the beads on the magnet until the eluate is clear and colourless (at least 1 minute).
Transfer 12 µl of eluate into a clean 1.5 ml Eppendorf DNA LoBind tube.
Quantify the eluate using a Qubit fluorometer and record the resulting concentration in the associated lab record.
Using the results of the quantification, dilute the eluate to achieve the loading mass shown in the table below, relative to DNA sample length.
| DNA sample length | Loading mass |
|---|---|
| >10 kb | 300 ng |
| ≤10 kb | 50 ng |
Calculate the required volume for the loading mass instructed in the table above and make the volume up to 12 µl with Elution Buffer.
Note: The prepared library can be stored overnight at 1°C to 8°C before proceeding to flow cell loading.
6. Priming and loading
材料
- Flow Cell Flush (FCF)
- Flow Cell Tether (FCT)
- Library Beads (LIB)
- Sequencing Buffer (SB)
消耗品
- Q-Line MinION Flow Cell R10 (Q-FLO-MIN114)
- Bovine Serum Albumin (BSA) (50 mg/ml) (e.g Invitrogen™ UltraPure™ BSA 50 mg/ml, AM2616)
- Nuclease-free water (e.g. ThermoFisher, AM9937)
- 1.5 ml Eppendorf DNA LoBind tubes
装置
- Q-Line GridION (Q-GRD-MK1)
- Q-Line MinION Flow Cell R10 Light Shield
- P1000 ピペット及びチップ
- P100 ピペットとチップ
- P20 ピペットとチップ
- P10 ピペットとチップ
Note: This protocol describes the process of starting a sequencing run using the default Q-SQK-LSK114 assay supplied with Q-Line GridION. For more information on setting up a sequencing run, see the Q-Line GridION user guide. For more information on configuring an assay definition file for your own assay, see the Q-Line GridION configuration guide. Ensure you select the correct assay for your experiment.
Priming and loading a flow cell
We recommend that all new users watch the 'Priming and loading your flow cell' video before your first run.
Slide open the Q-Line GridION lid.
Insert the required number of Q-Line MinION Flow Cells.
Insert the flow cell into the device under the clip.
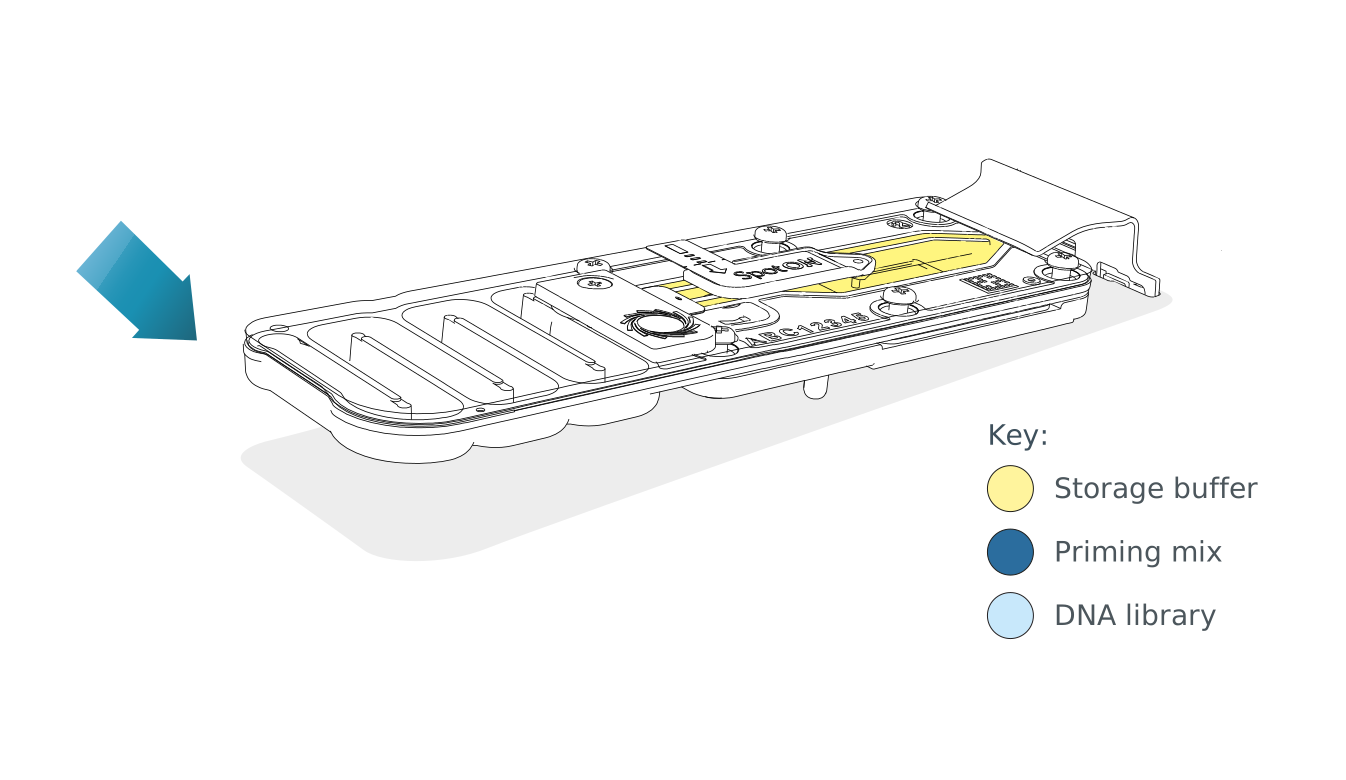 Press down firmly to ensure correct thermal and electrical contact.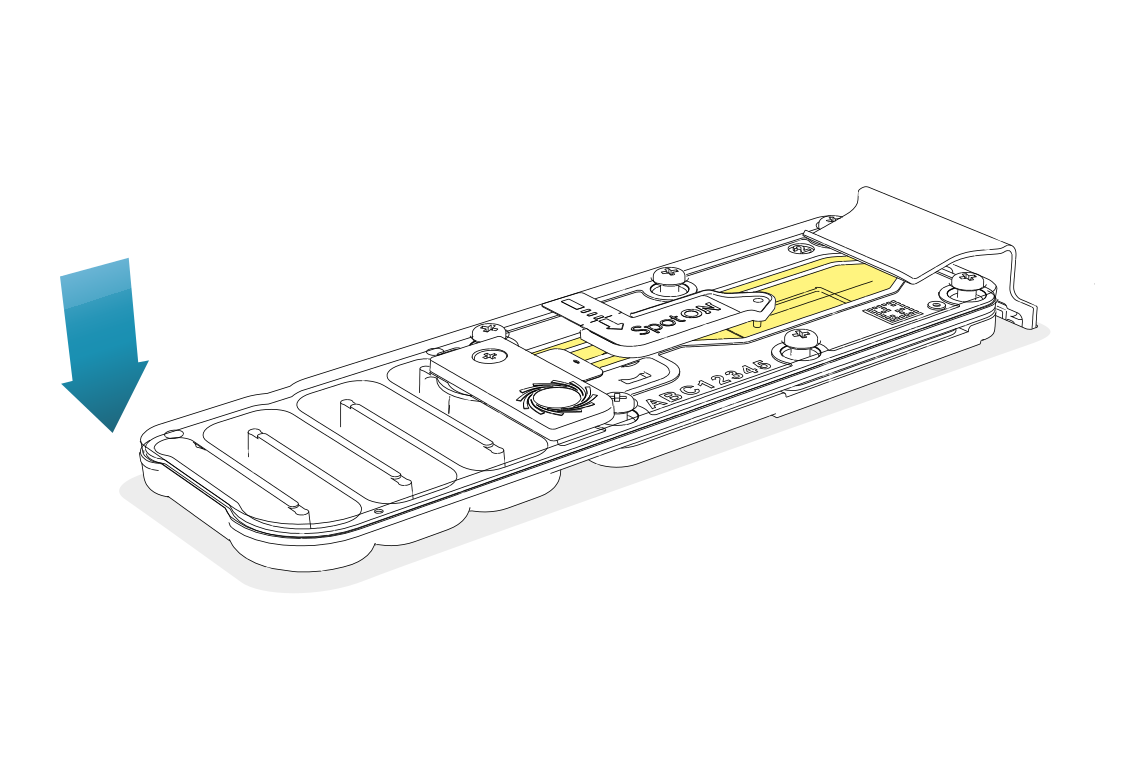
Open the Sequencing Software and navigate to the Run setup page.
Select the Q-SQK-LSK114 assay and click Continue.
Import and/or select the correct sample sheet for your sequencing assay run, and then click Continue.
For instructions on how to prepare a sample sheet, please refer to the Q-Line GridION user guide.
Run the flow cell check on the required number of flow cells.
Ensure the flow cell has passed the flow cell check before proceeding.
If a flow cell fails the flow cell check, remove and reinsert the flow cell before running the flow cell check again.
If a flow cell fails a second flow cell check, replace the flow cell.
When the flow cell check has completed, click Continue.
Ensure the library IDs shown by the Sequencing Software match those you are about to prepare.
Prepare the flow cell priming mix in a 1.5 ml Eppendorf DNA LoBind tube using the reagents shown in the table below:
| Reagent | Volume (µl) |
|---|---|
| Flow Cell Flush (FCF) | 1,170 |
| Flow Cell Tether (FCT) | 30 |
| Bovine Serum Albumin (BSA) | 5 |
| Total | 1,205 |
Slide the flow cell priming port cover clockwise to open the priming port.
Note: The priming port cover is located next to the waste channel.
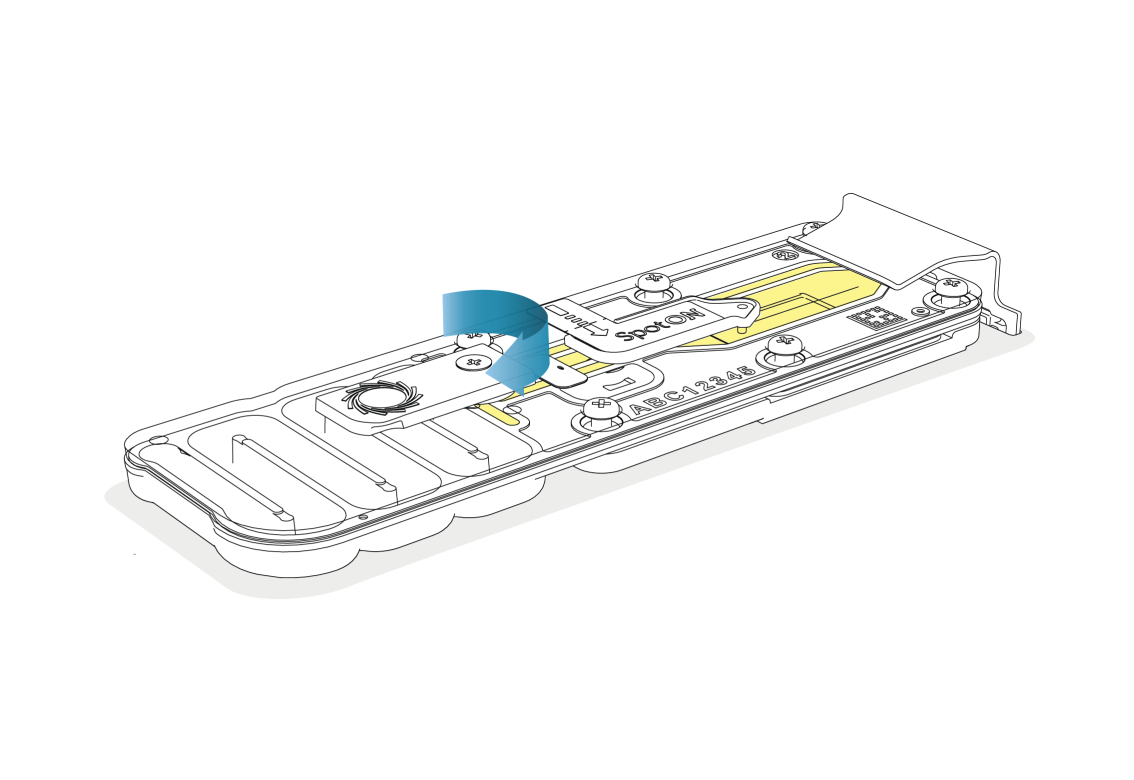
Take care when drawing back buffer from the flow cell.
Do not remove more than 20–30 µl, and make sure that the array of pores is covered by buffer at all times. Introducing air bubbles into the array can irreversibly damage pores.
After opening the priming port, remove any potential air bubbles under the cover by performing the following steps:
- Set a P1000 pipette to 200 µl.
- Carefully insert the tip into the priming port, holding the pipette perpendicular to the flow cell.
- Turn the wheel until the dial shows 220–230 µl to draw back 20–30 µl, or until you can see a small volume of buffer entering the pipette tip.
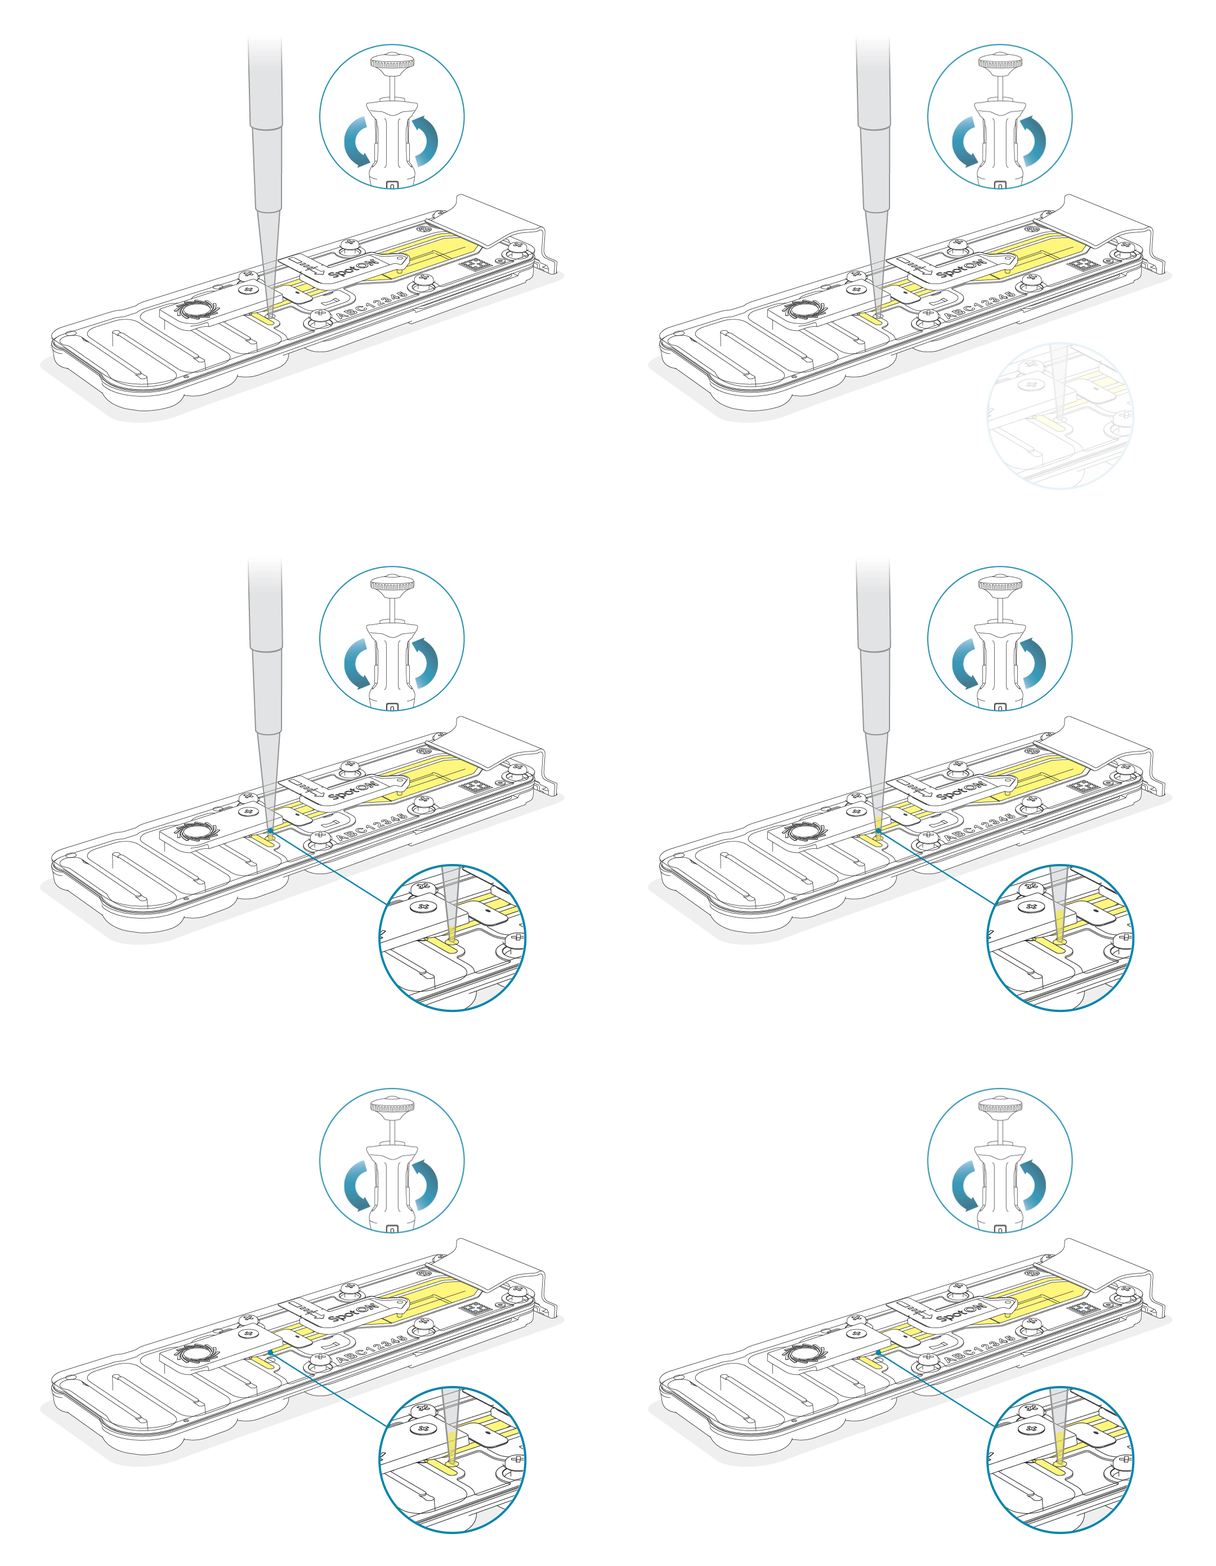
Note: Visually check that there is continuous buffer from the priming port across the sensor array.
Load 800 µl of the priming mix into the flow cell via the priming port, avoiding the introduction of air bubbles.
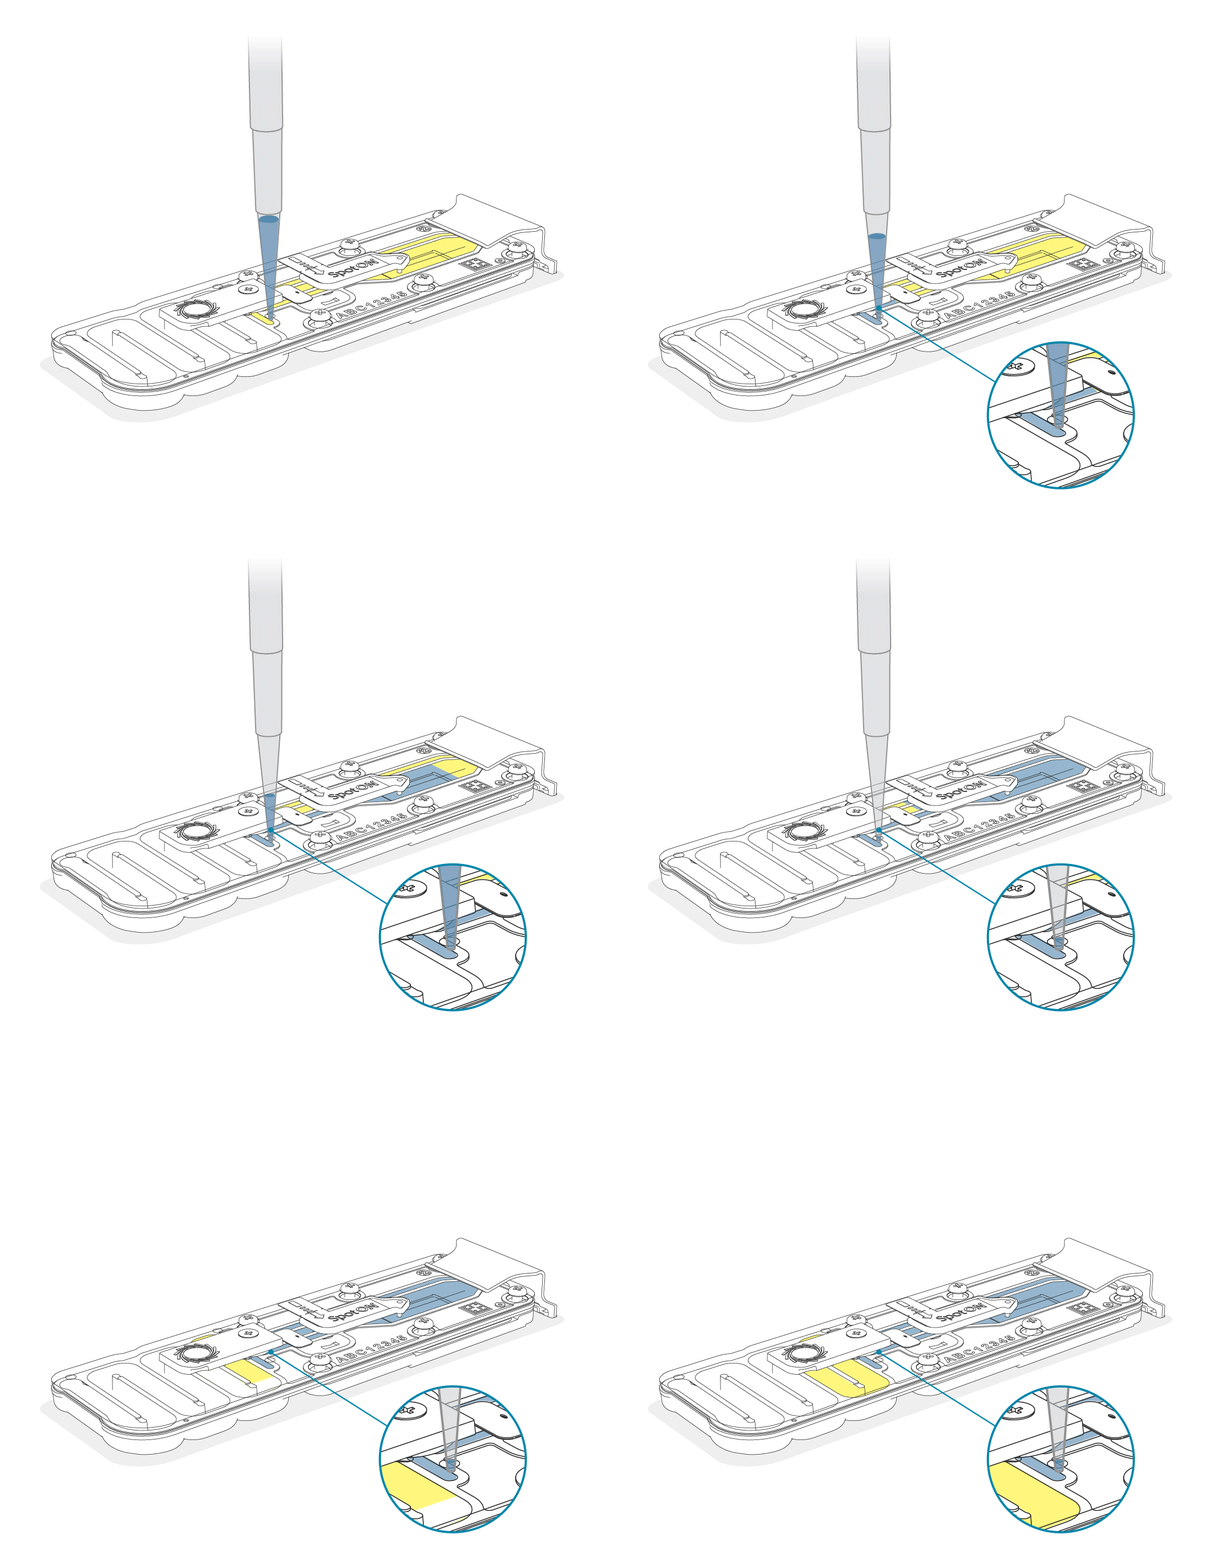
Leave the flow cell to incubate for 5 minutes.
During this time, prepare each library for loading by combining the reagents using the volumes shown in the table below:
| Reagent | Volume (µl) |
|---|---|
| Eluted library | 12 |
| Sequencing Buffer (SB) | 37.5 |
| Library Beads (LIB) | 25.5 |
| Total | 75 |
Note: Ensure the Library Beads (LIB) are thoroughly mixed immediately before adding to the library.
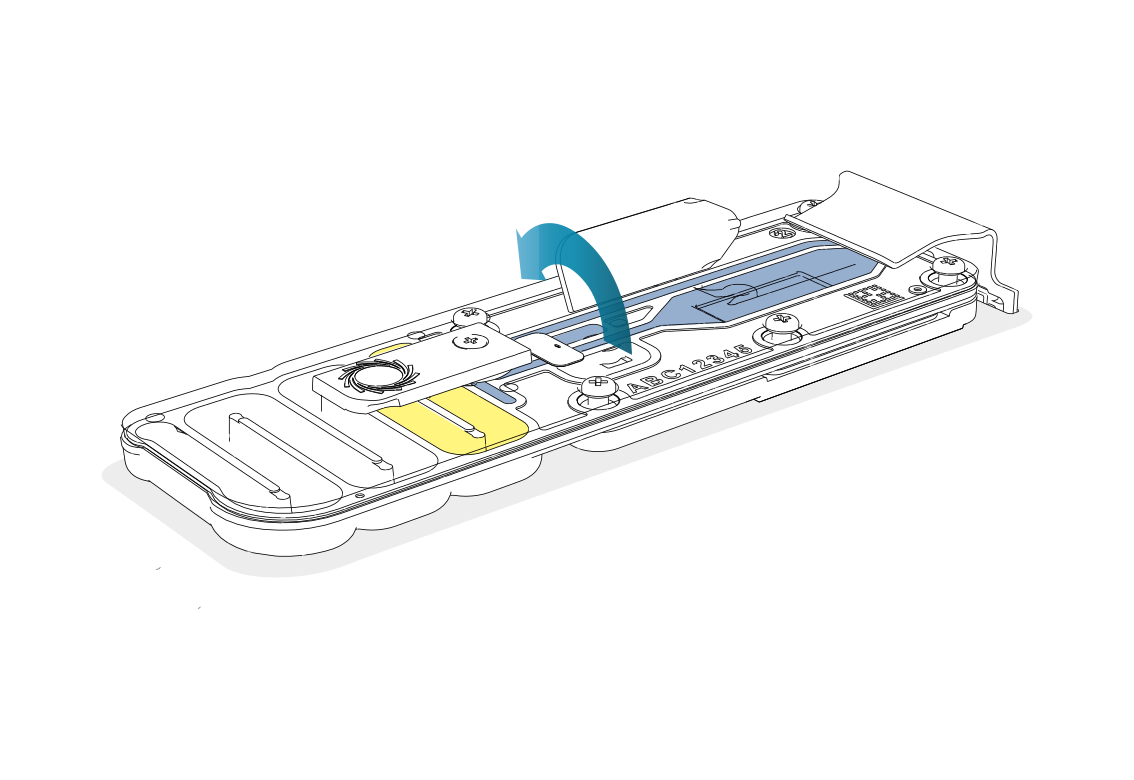
Once the incubation (step 13) is complete, gently lift the SpotON sample port cover to make the SpotON sample port accessible.
Load 200 µl of the priming mix into the flow cell priming port (not the SpotON sample port), avoiding the introduction of air bubbles.
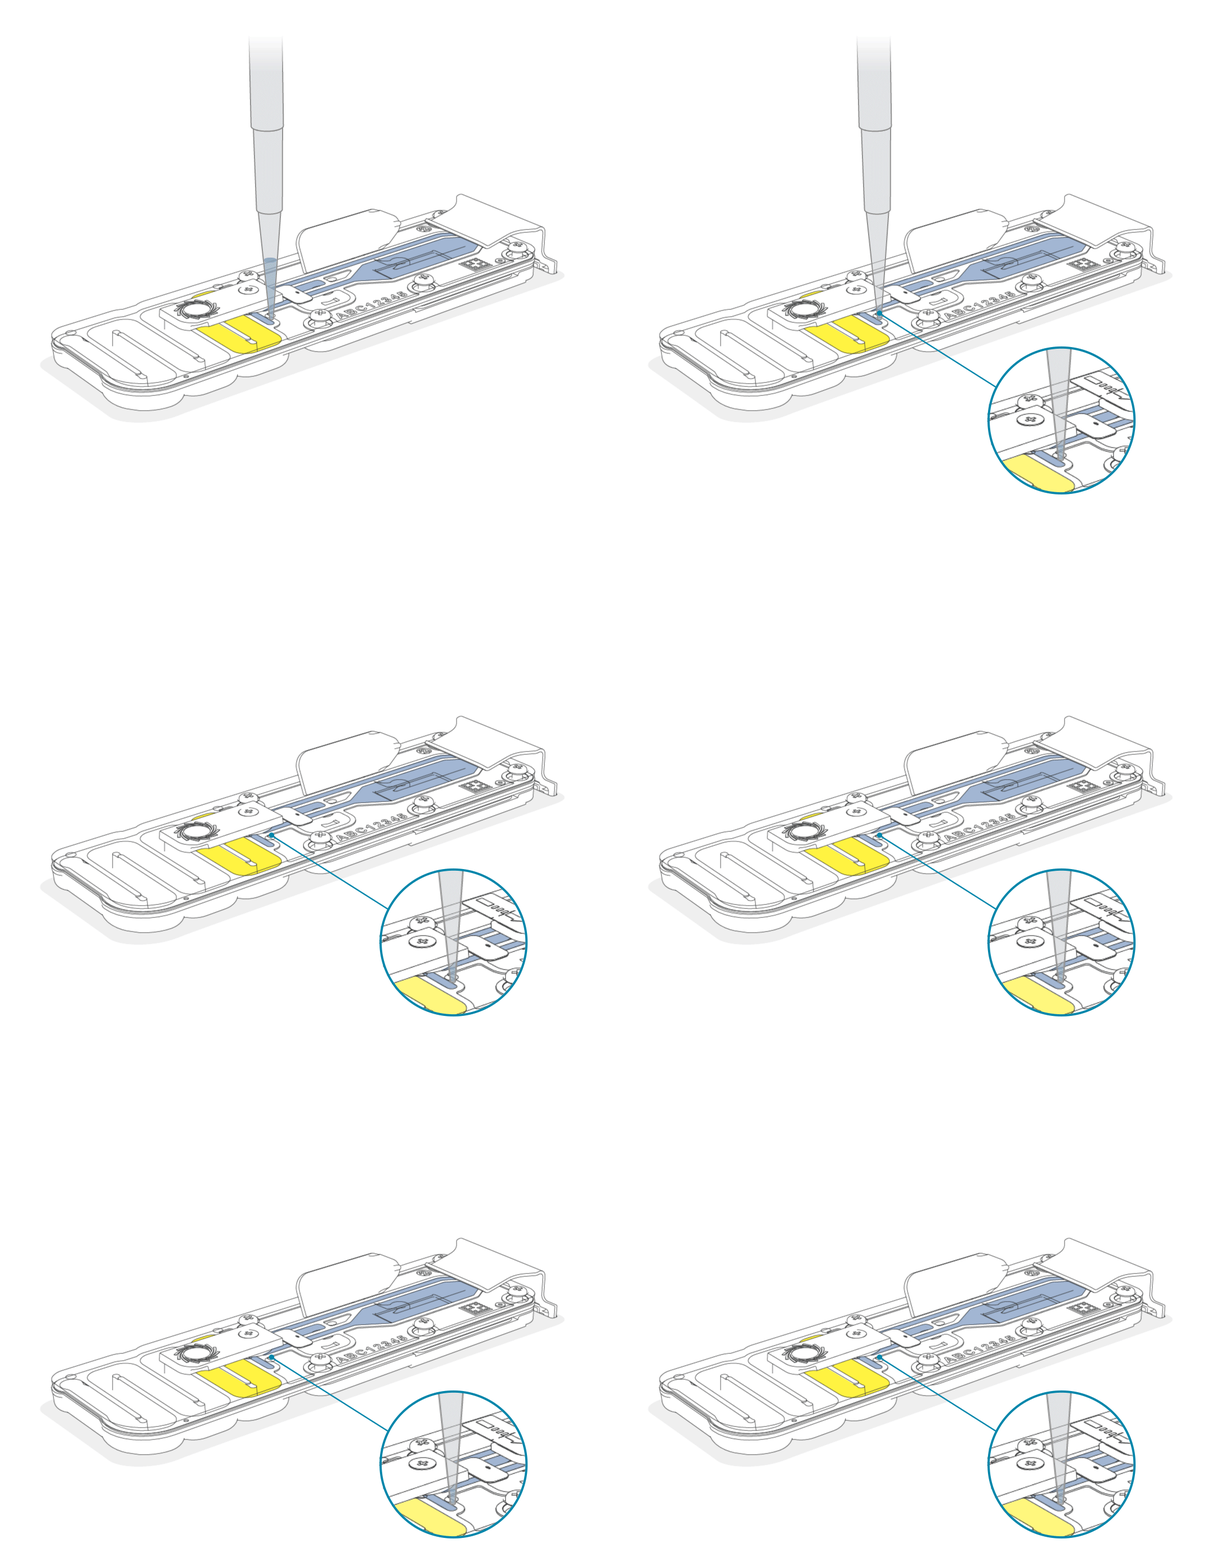
Note: A small volume of priming mix may be visible as a meniscus over the SpotON sample port. Take care not to allow priming mix to spill over the top of the flow cell. The liquid will wick back in through the port once pressure from the pipette is no longer applied.
Mix each prepared library gently by pipetting up and down just prior to loading.
Pay careful attention to the Sequencing Software to ensure that the correct library is loaded onto the correct flow cell.
The Sequencing Software assigns libraries (based on the sample sheet column 'library_id') to flow cells automatically. The libraries must be loaded onto the correct flow cell to ensure that data is correctly attributed to the sample.
Add 75 μl of the prepared library to the flow cell via the SpotON sample port in a dropwise fashion. Ensure each drop flows into the port before adding the next.
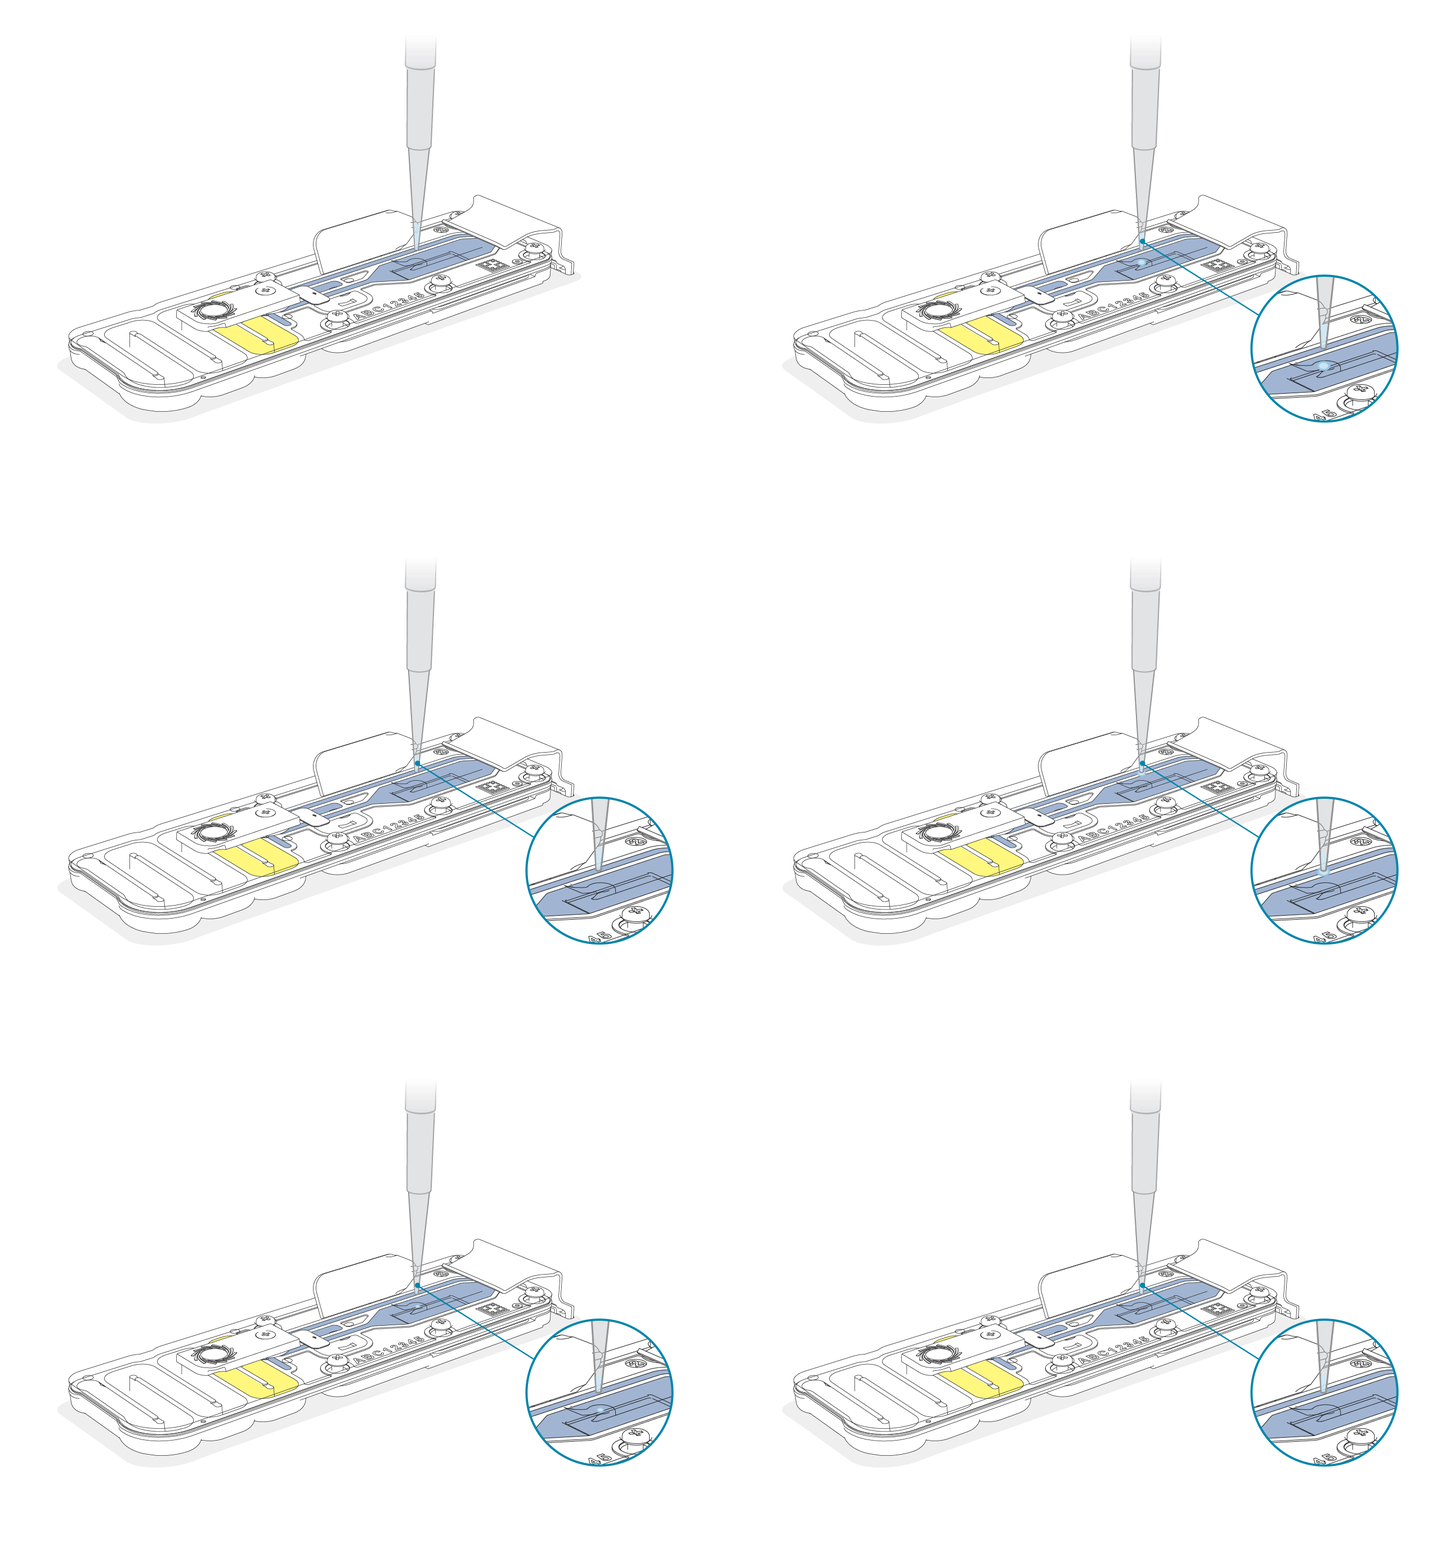
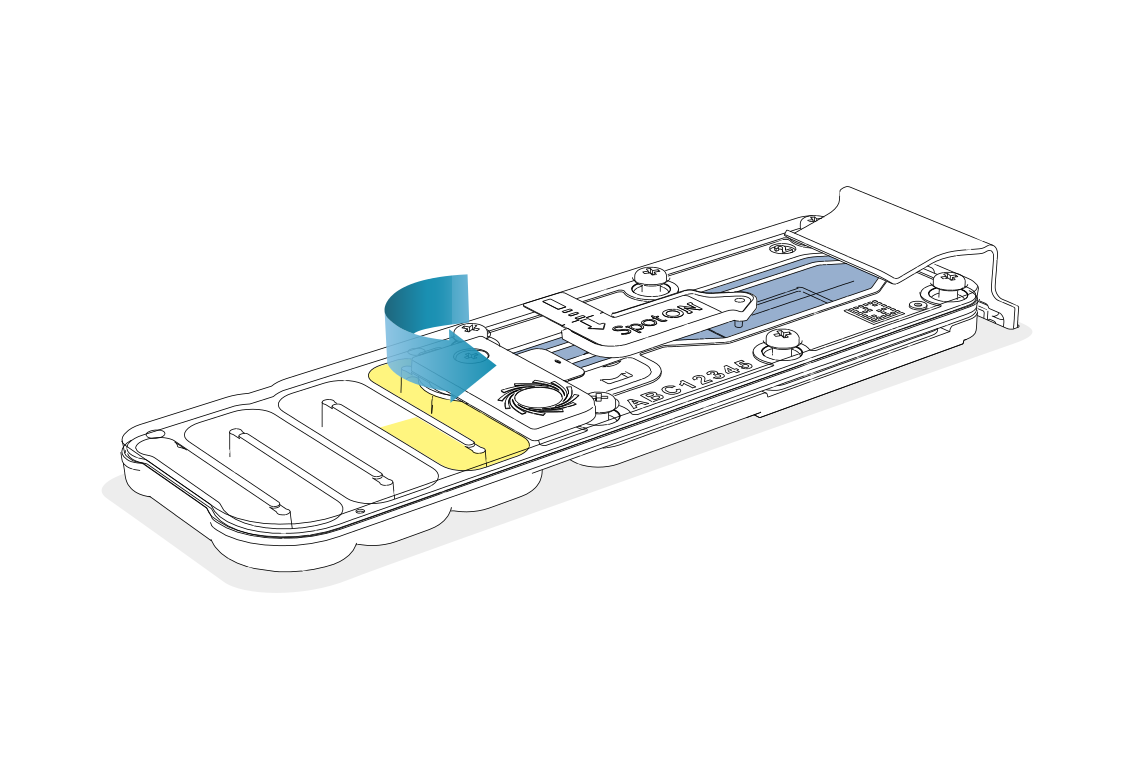
Gently replace the SpotON sample port cover, making sure the bung enters the SpotON port.
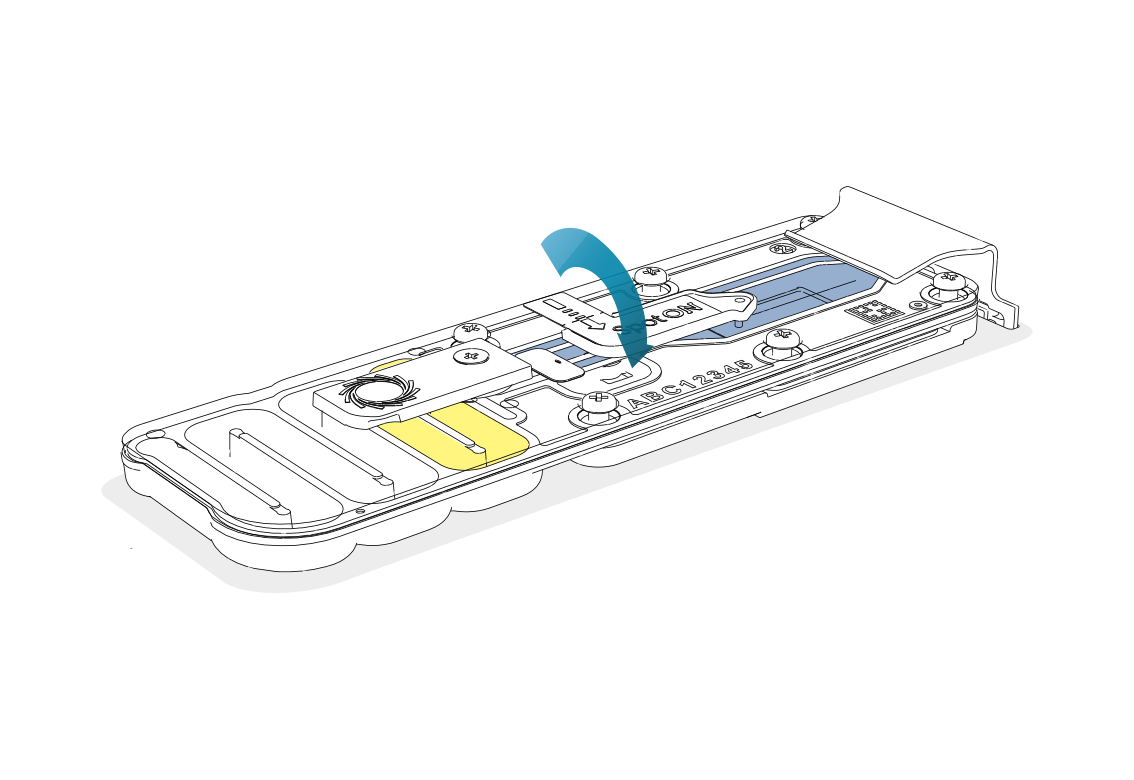
Close the flow cell priming port.
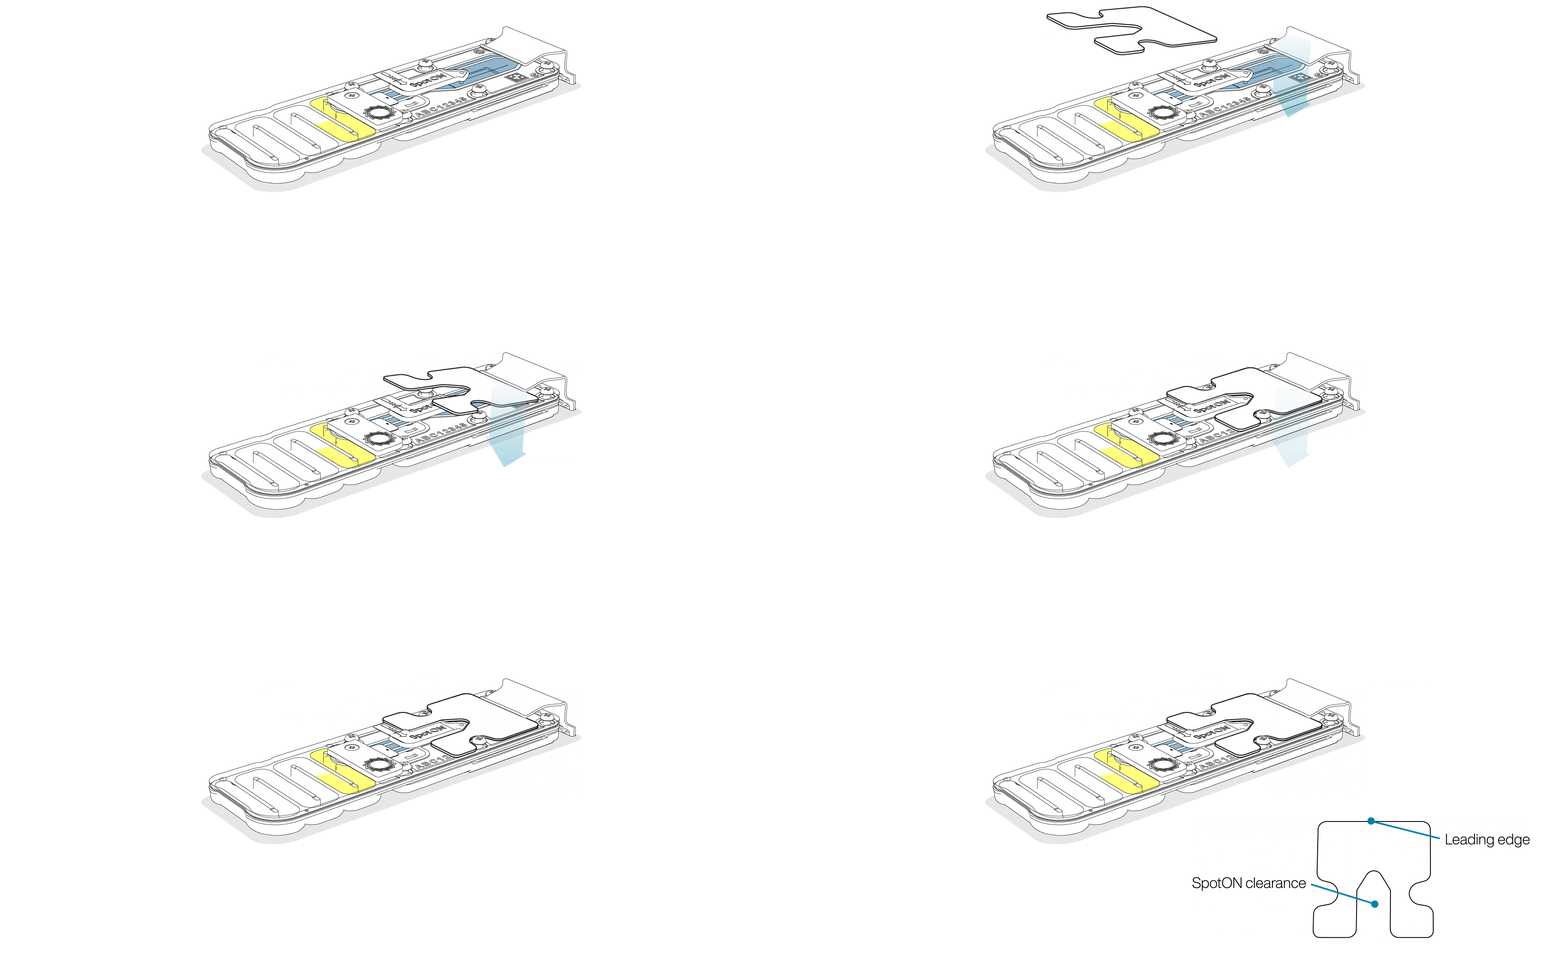
Attach the light shield (supplied with the flow cell).
Close the lid of the Q-Line GridION, and click Continue in the Sequencing Software.
Review the details in the Sequencing Software and, if ready, click Run assay.
Note: A small prompt will appear in the bottom right corner stating that the run has started. If you did not mean to start it, click Undo within 30 seconds, and the run will not start.
For further information
Refer to the Setting up a run section of the Q-Line GridION user guide.
For technical support
Contact Oxford Nanopore Technologies technical support at: support@nanoporetech.com
Last updated: 8/20/2026
ドキュメントオプション