Q-Line GridION configuration guide (ONQ-GRDV2-CG_revA_20Jul2026)


Guide
V ONQ-GRDV2-CG_revA_20Jul2026
FOR RESEARCH USE ONLY.
NOT FOR USE IN DIAGNOSTIC PROCEDURES.
Contents
Introduction
- 1. Introduction
- 2. Technical specification
- 3. IT requirements
- 4. Package contents
- 5. Telemetry
- 6. Data storage
First time set up
- 7. Setting up the device
- 8. Starting your device
- 9. Changing the encryption passphrase
- 10. Connecting to a network with a static IP address
- 11. Position check
User accounts
- 12. Creating a user account
- 13. Editing existing user accounts
- 14. Active Directory and LDAP integration
Networking
- 15. Networking requirements
- 16. Enabling and configuring the firewall
- 17. Updating the timezone and setting a local NTP server
Data
- 18. Configuring USB mounting settings
- 19. Setting up a data output location
- 20. Monitoring offload progress during a run
- 21. Configuring the device for LIMS integration
- 22. Deleting data
Assays and files
- 23. Importing an assay definition file
- 24. Hiding an assay from run set up
- 25. Managing supporting files
- 26. Using a new supporting file for an existing assay
System
Security
- 29. Configuring auto-lockout and unlocking accounts
- 30. The Linux Audit system
- 31. Viewing audit reports
- 32. GridION security
Appendix
1. Introduction
The Q-Line GridION™ is a compact benchtop sequencing system with integrated real-time data processing allowing up to five assays to be run either concurrently or individually.
This document provides guidance for the configuration of the Q-Line GridION device. It is intended for laboratory managers and IT administrators responsible for installing and maintaining IT infrastructure and equipment in your organisation. In most cases, the operations described here require the user to be logged in to a user account with IT administrator or Laboratory manager permissions, as specified in the relevant section introductions. Some procedures may also require access to local IT infrastructure or support from your organisation’s IT department.
For guidance on routine laboratory use of the device, refer to the Q-Line GridION user guide.
2. Technical specification
| Parameter | Specification |
|---|---|
| Size | H 220 x W 365 x D 370 mm |
| Weight | 14.4 kg |
| Power consumption | 650 W |
| Computer specification | 7 TB SSD storage*, 64 GB RAM, Intel i9 CPU for OS and orchestration, GridION accelerator |
| Operating system | Ubuntu 24.04 |
| Pre-loaded software | Sequencing Software |
| Environmental operating range | Designed to sequence at +18°C to +25°C; functional range of electronics +5°C to +40°C |
*Devices that have been upgraded from previous versions may have different technical specifications. Please refer to the original device user guide.
3. IT requirements
This table outlines the minimum requirements for installing the Q-Line GridION.
| Item | Specification |
|---|---|
| Ethernet connection | 1 x RJ45 port (1 Gbps) with DHCP or static IP |
| Ethernet cable | 1 x 1 Gbps cable |
| Firewall permissions for telemetry feedback | HTTPS/ports 80 and 443 to 52.17.110.146, 52.31.111.95, 79.125.100.3 (outbound-only access), or DNS rule for ping.oxfordnanoportal.com |
| Firewall permissions for critical software updates | HTTPS/ports 80 and 443 to 178.79.175.200 and 96.126.99.215 (outbound-only access), or DNS rule for cdn.oxfordnanoportal.com |
| Keyboard and mouse | USB connected |
| Monitor | HDMI or DisplayPort compatible (minimum 1920×1080 resolution) |
| Power supply | Maximum power draw 650 W Maximum current 6.5 A Supply voltage 100–240 VAC (50/60 Hz) |
| Data storage | Sufficient infrastructure for required storage option. Storage requirements will depend on use case. Refer to the Managing data section. |
Recommended:
Anti-malware: Install in accordance with institutional policy; ensure scans do not coincide with sequencing runs. Ensure that CPU-intensive activities such as system scans do not occur during sequencing and that files written during the sequencing process are not being checked at time of production.
Laboratory information management system (LIMS): LIMS integrations are available. Refer to the Managing data section.
4. Package contents
The shipment will contain:
- Q-Line GridION device
- 5 country-specific C13 cables
- 5 configuration test cells (CTCs)
- DisplayPort to HDMI adapter
- Quick Start Guide
Packaging: 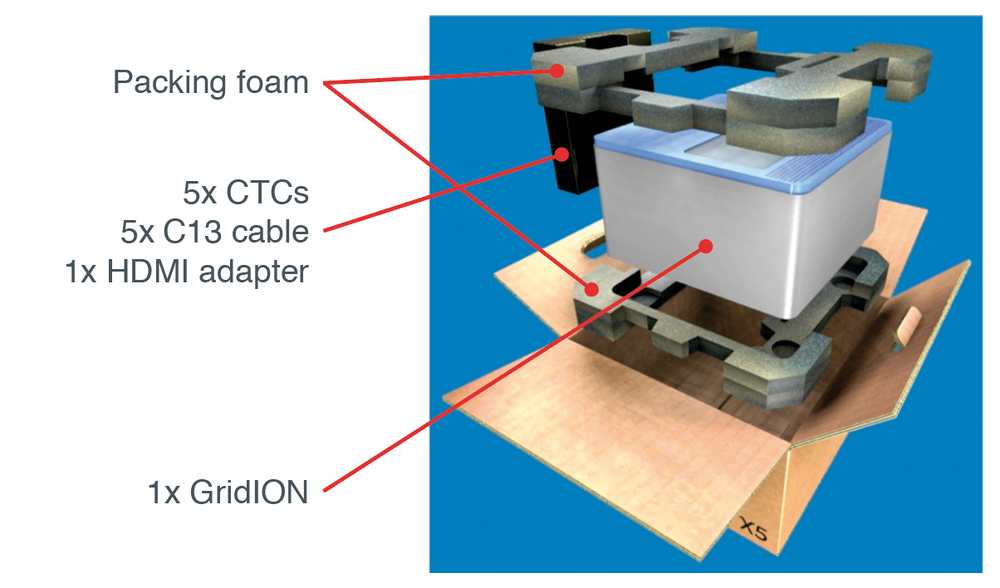
The components of the Q-Line GridION: 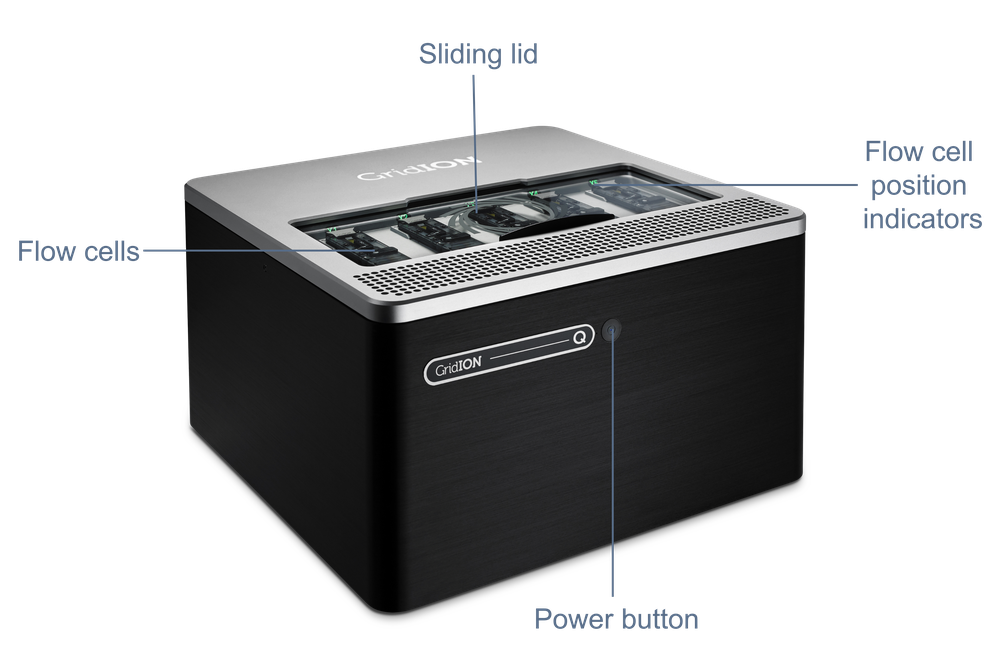
The connections and ports available on the Q-Line GridION: 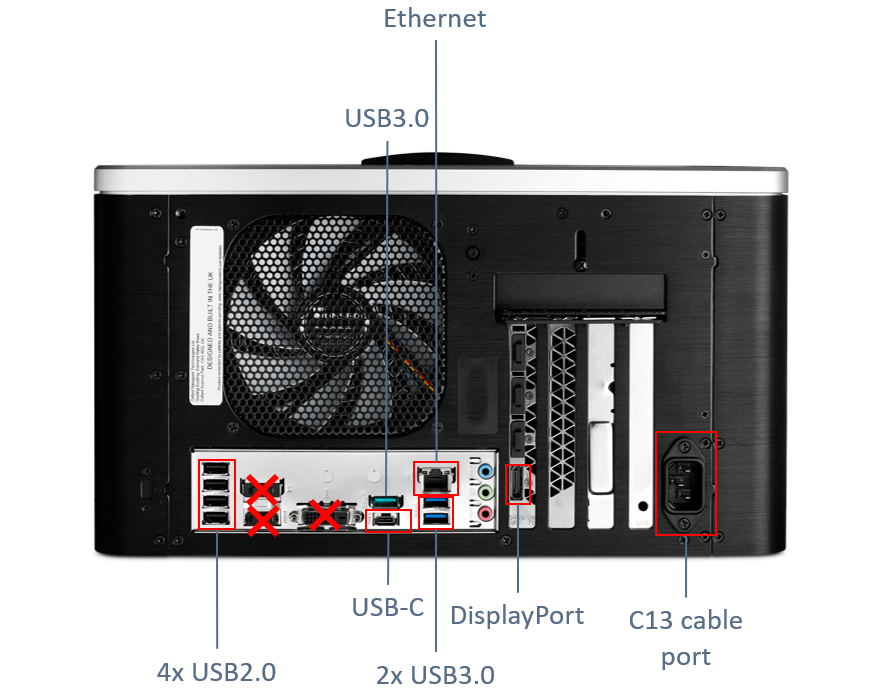
5. Telemetry
The Sequencing Software collects telemetry information if the Q-Line GridION is connected to the internet. This allows monitoring of device performance and enables remote troubleshooting. Some of this information can come from free-form text entry fields when errors are logged. Therefore, it is important that no personally identifiable information is entered into the sample sheet. No sequence data is collected by Oxford Nanopore Technologies. If you are running the Q-Line GridION offline and require troubleshooting, you will be able to send telemetry to Oxford Nanopore Technologies via an alternative route.
6. Data storage
File types
Nanopore sequencing data is stored in FASTQ, BAM or POD5 file types.
FASTQ is a text-based sequence storage format, containing both the sequence of DNA/RNA and its quality scores. By default, nanopore sequencing experiments save up to 4000 DNA sequences in one FASTQ file.
BAM files are output if you perform alignment or modified base calling on the basecalled dataset.
POD5 is an Oxford Nanopore-developed file format for storing nanopore sequencing data in an easily accessible way.
The volume of data produced by an assay run will vary considerably depending on the assay being run. Please refer to the documentation for each assay for further details.
Long-term storage
The Q-Line GridION has sufficient SSD disk space for multiple runs to be carried out, with data stored as FASTQ or BAM files. To prevent successive runs from terminating due to insufficient storage space you will need to transfer data to external storage by manual or automated means.
The Q-Line GridION runs on Ubuntu and can mount multiple filesystem types. We recommend storage presented as NFS or CIFS. Instructions on how to configure output locations and set up automatic offload to a network drive are included in this guide. You can also transfer data to USB drives. Only use trusted USB drives with the device. Instructions on mounting a USB drive are included in the Q-Line GridION user guide. Instructions on configuring USB mounting settings are included in this guide.
No specific network bandwidth is needed to continue sequencing. The bandwidth available for offload will need to be sufficient to keep up with the throughput of your device, which will depend on the assay you are running and the frequency at which you are running it.
7. Setting up the device
On delivery of your Q-Line GridION, the initial installation will be carried out by an Oxford Nanopore Technologies representative. You may wish to refer to these instructions in the future if you need to reconnect or relocate the device.
Ensure that all items listed under Package contents above are present, and that IT requirements are met.
Unpack the device and place it in the selected location.
Considerations for device location
Place the device on a strong, clean laboratory bench with 30 cm clearance to rear and sides of the device
Ensure Ethernet and power connectors are in close proximity
Ensure power socket is easily accessible should a disconnection be required in case of emergency
Maintain a room temperature of +18°C to +25°C when operating the device
Do not cover any ventilation grilles
Warning
The rear of the device will heat up during operation.
Attach all the required cables to the device using the diagram below to assist.
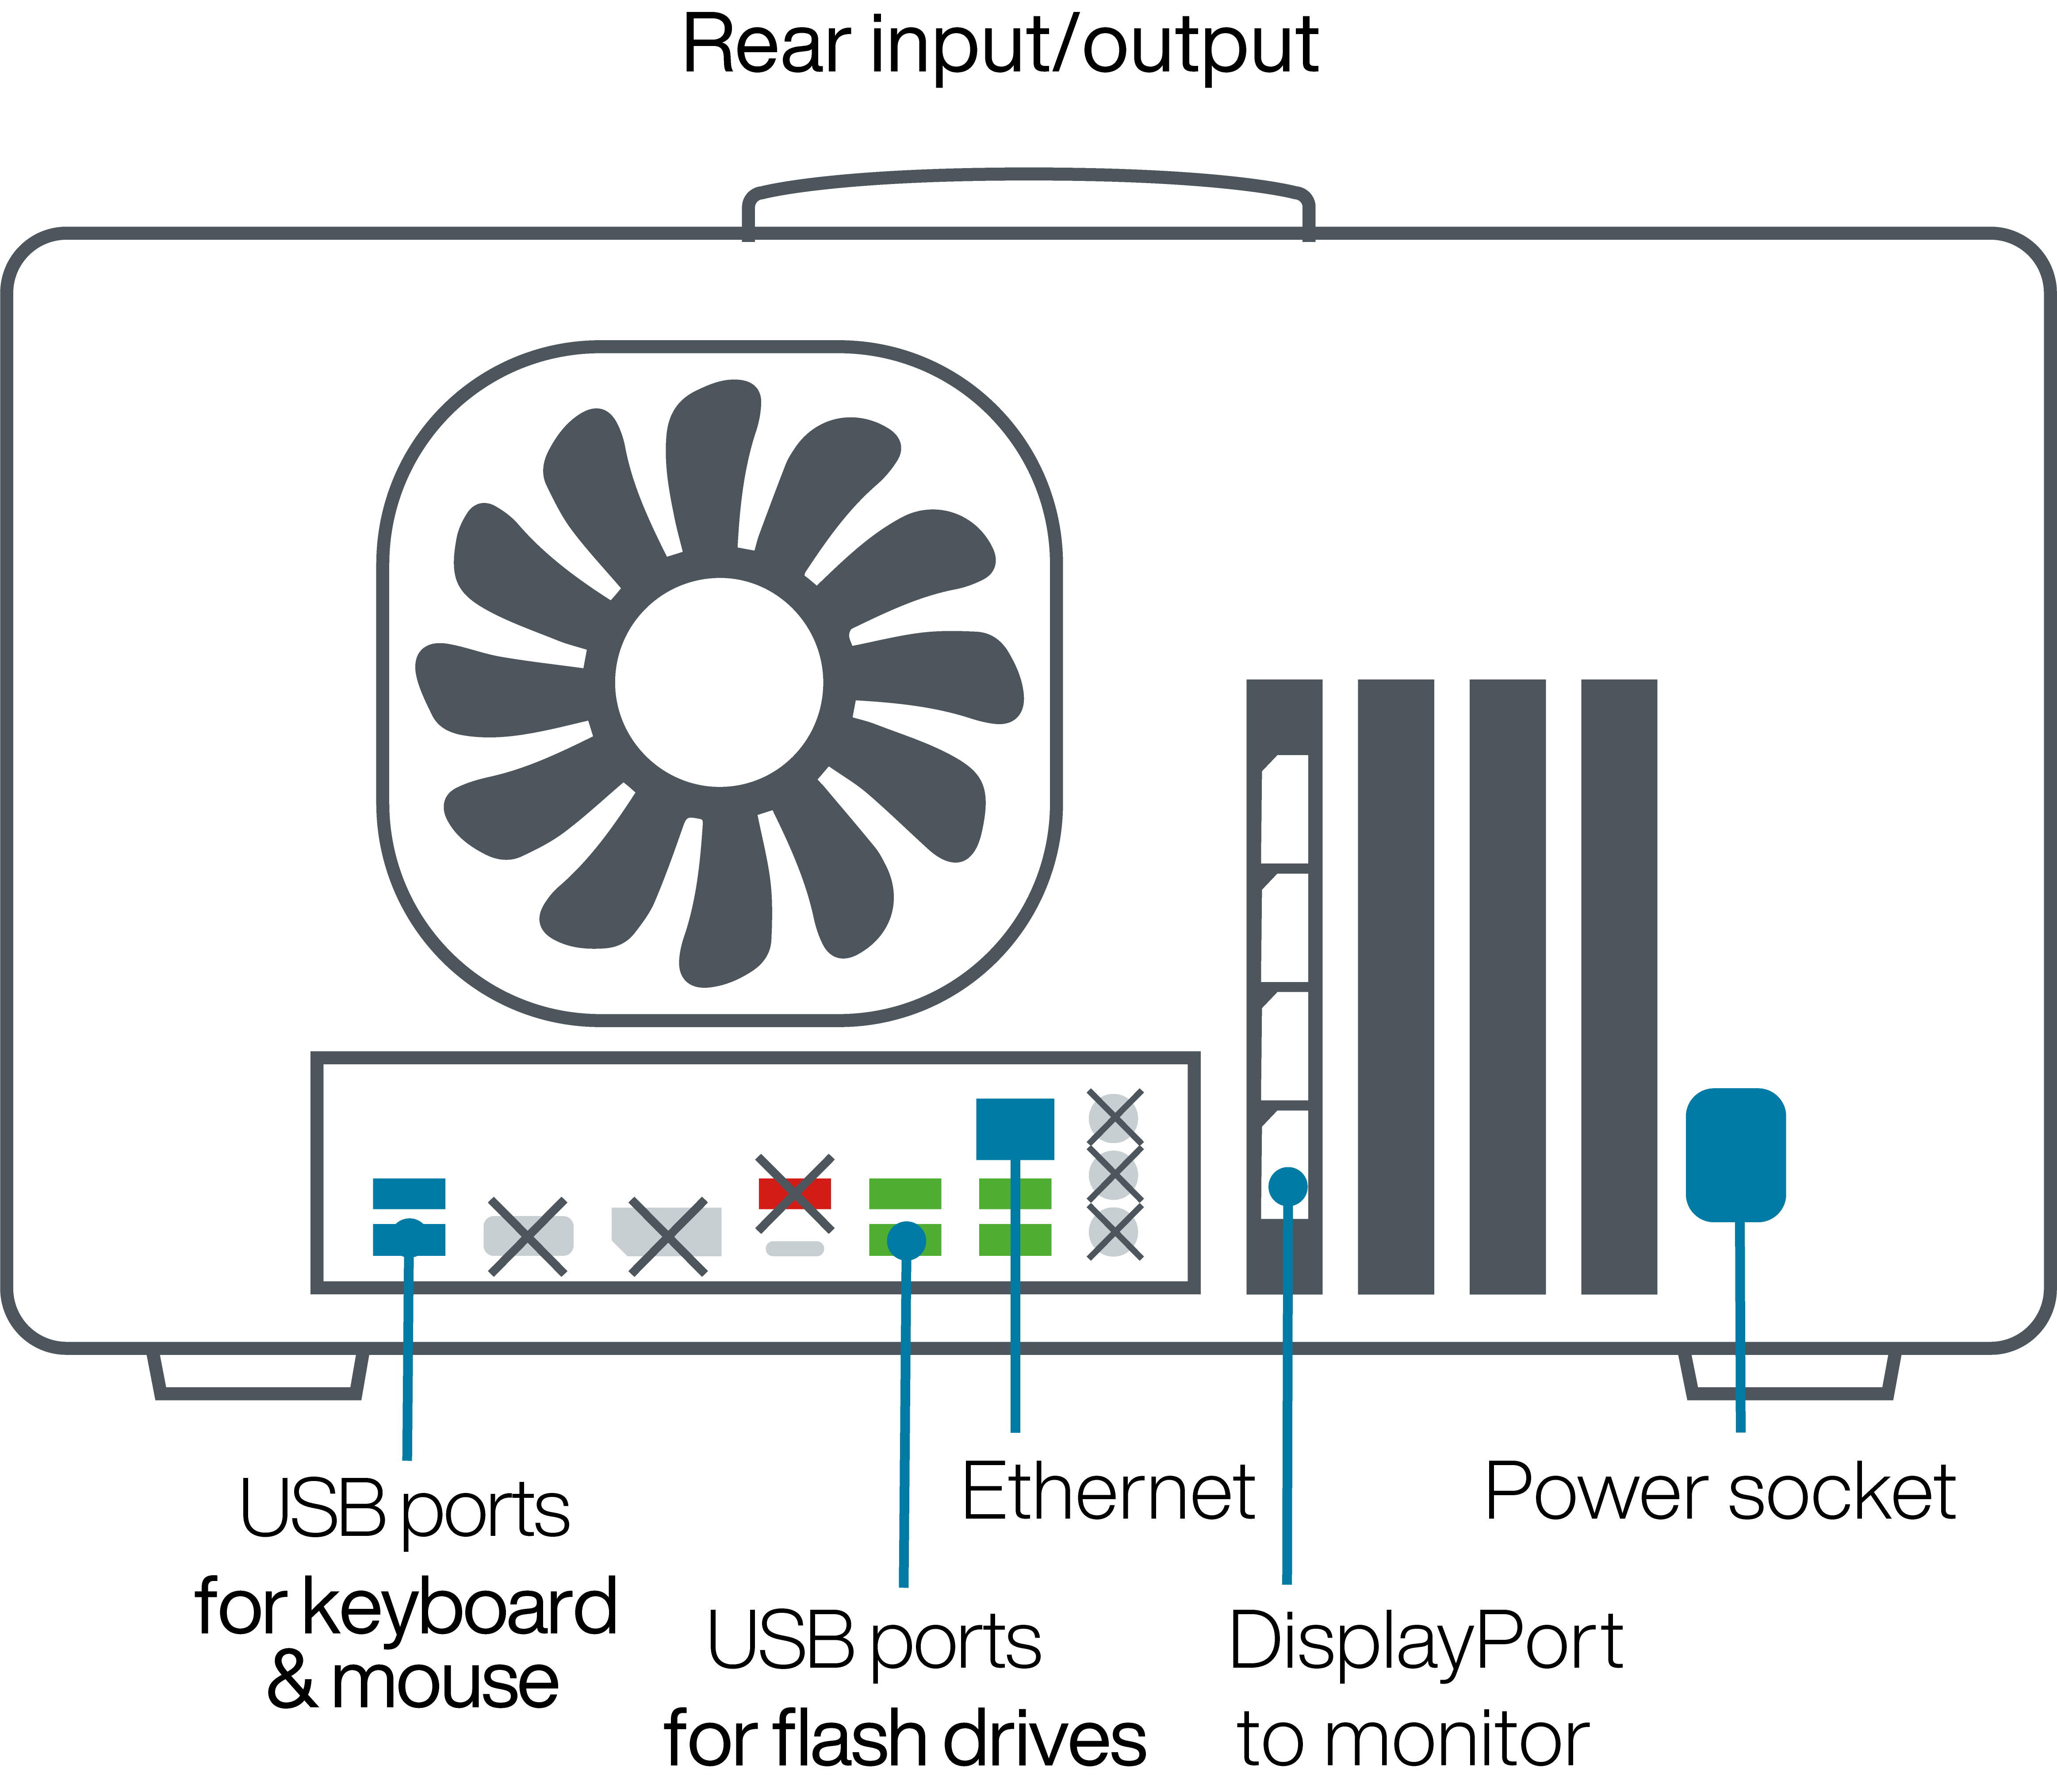
- 1 x Ethernet
- 1 x HDMI or DisplayPort to monitor*
- 1 x USB for keyboard
- 1 x USB for mouse
- 1 x C13 cable
*1 x DisplayPort to HDMI adapter is provided
Connect the power cable to your mains/UPS solution. Use the mains cord supplied, or a suitable approved and rated power cord. Ensure the device is connected to a protective earth mains supply. Turn the power source on.
8. Starting your device
Every time you boot up your Q-Line GridION, you will need to decrypt the device’s hard drive and log into a user account. The Q-Line GridION is shipped with a default encryption passphrase and account credentials; after the first time you log in, you will be prompted to change the password for the GridION user account. It is also highly recommended to change the passphrase and to begin working with an alternative IT administrator account in your own name.
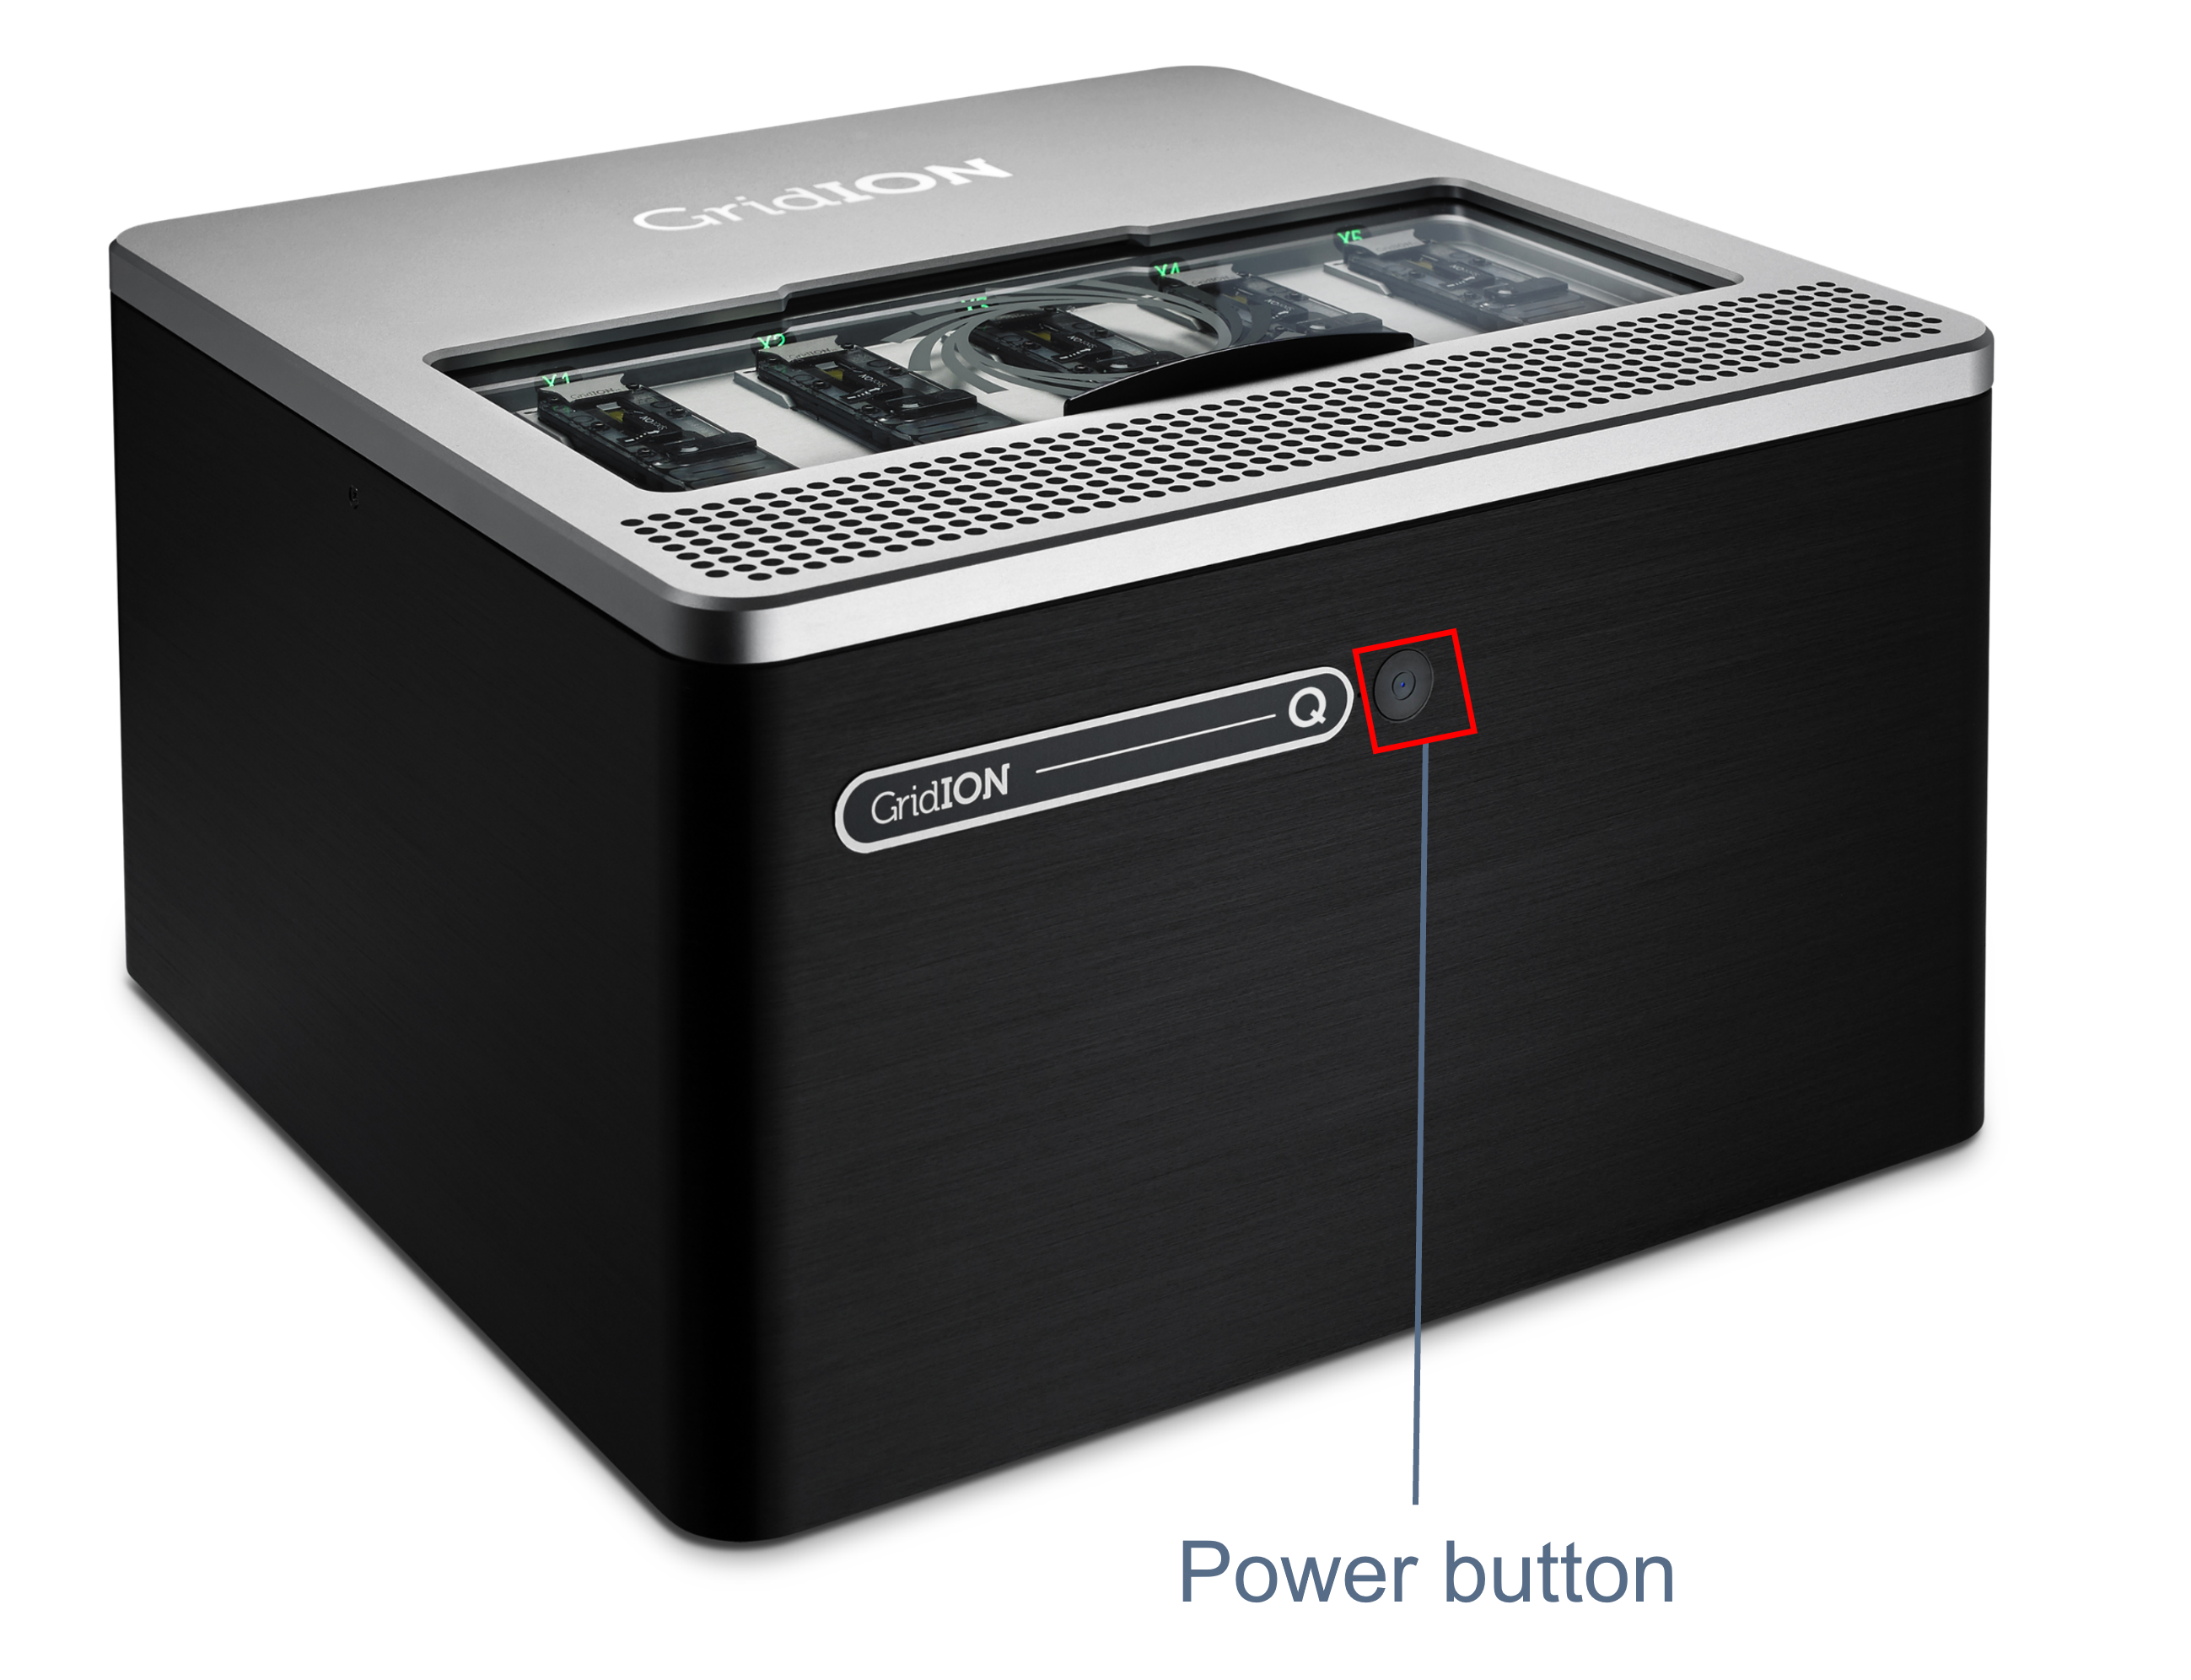
Press the power button. A blue light will appear in the middle of the button.
When prompted, enter the encryption passphrase and press Enter.
Note: This is not the same as the user password. When booting your device for the first time, the passphrase for every Q-Line GridION is ‘nanopore’.

At the lock screen, click or press any key to unlock.
Click GridION user to log into the Q-Line GridION.
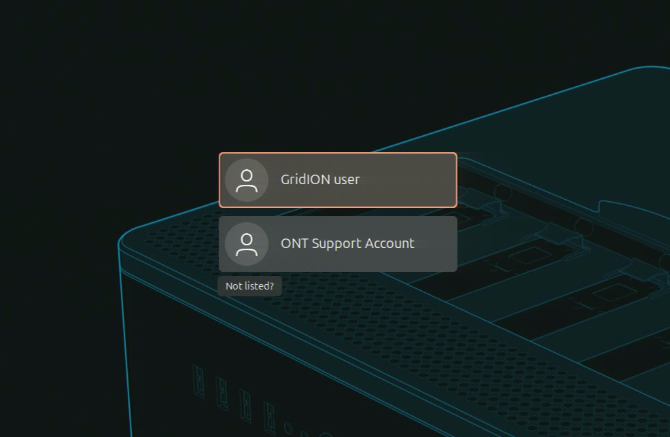
Important: The GridION user account retains the highest level of security clearance and should only be used as a backup account. For day-to-day use of the Q-Line GridION, we recommend user accounts in the Laboratory user group, which cannot change configuration. Laboratory manager accounts are capable of managing assays, while IT administrator accounts have full access to the system. GridION user remains as a last-resort recovery method and has permissions to create and manage the user accounts.
Enter the password.
The first time you log in to the user account, the password will be ‘grid’.
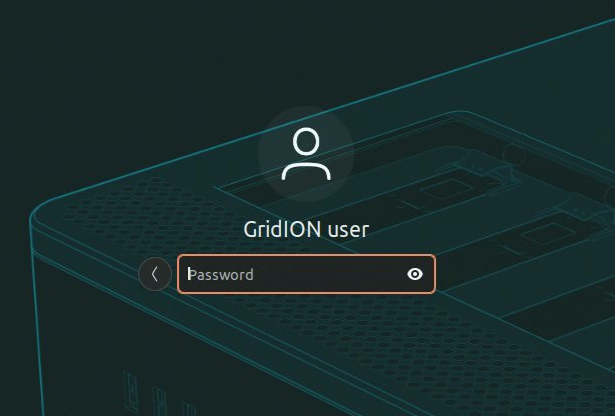
If you are logging in for the first time, you will be asked to change the Q-Line GridION user password.
Keep your new password secure. For more information about password requirements, see the Changing your password section of the Q-Line GridION user guide.
Click the Sequencing Software icon located on the desktop.
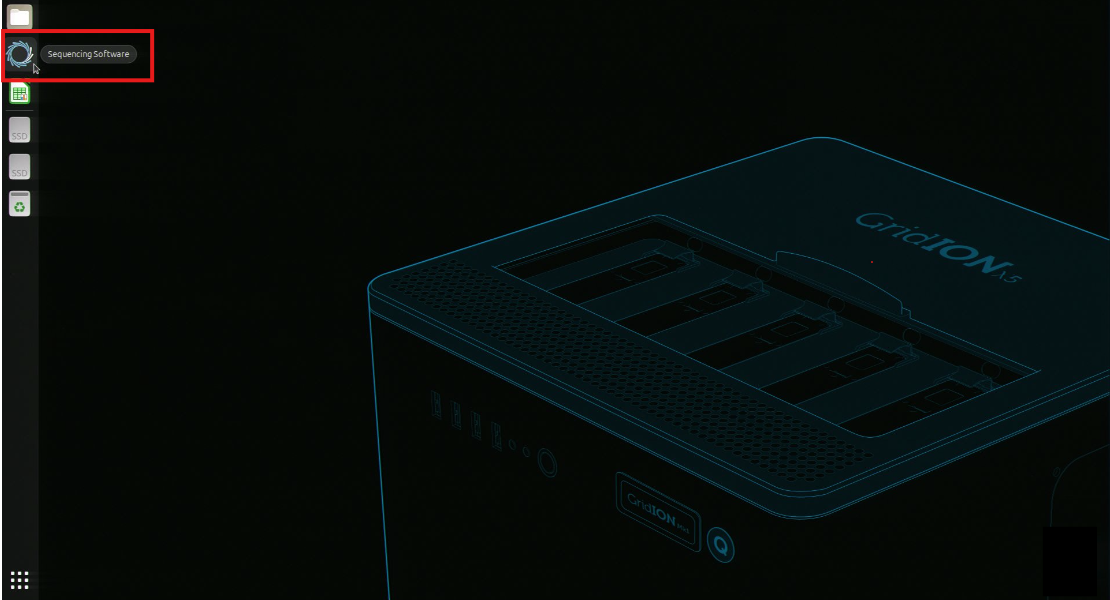
The Sequencing Software will start and you will be taken to the Position overview page, displaying the connected flow cells or CTCs.
9. Changing the encryption passphrase
The encryption passphrase is entered to decrypt the device’s hard drive. You will need to do this every time you start up your Q-Line GridION. We recommend changing the encryption passphrase when setting up your Q-Line GridION and using a different passphrase per device if you have multiple devices. Ensure that the encryption passphrase is safely retained.
Note: An account with IT administrator permissions is required to complete the actions in this section.
Open a Terminal window and enter the following command:
sudo /opt/ont/platform/bin/encrypted_drive_change_passphrase --check-quality yes
Note: If this is the first time setting up, you can use the default GridION user account.
Enter your account password.
Enter your current encryption passphrase.
By default, the passphrase is 'nanopore'.
Enter your new encryption passphrase.
Confirm the new encryption passphrase.
Ensure that the encryption passphrase is safely retained.
You will need to enter the encryption passphrase every time the device starts up.
10. Connecting to a network with a static IP address
Note: An account with any permission level can be used to complete the actions in this section.
Connect an Ethernet cable between the device and a network RJ45 wall outlet.
Click the Show Apps button in the Ubuntu sidebar, and open Settings.
In the sidebar, select Network.
Open the Network Options for your connected network by clicking the cog icon next to the active network connection.
Select the tab for either IPv4 or IPv6 as required for your network connection.
Select the manual option and enter the static IP details in the fields below.
11. Position check
We advise you to run a position check to ensure your Q-Line GridION functions as expected. If an Instrument Performance Verification (IPV) and Operational Qualification (OQ) process has already been conducted, running a position check is not necessary.
Note: An account with any permission level can be used to complete the actions in this section.
In the Sequencing Software, click System, and then click Device information.
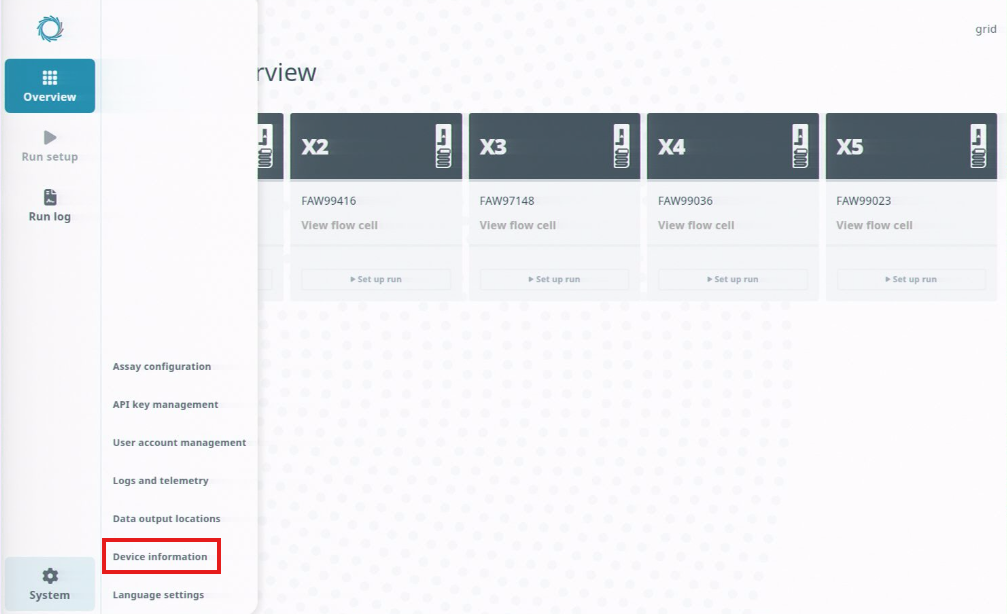
Insert your Configuration Test Cells (CTCs) into all five flow cell positions by sliding the CTCs under the clip. The LEDs on all positions will turn green when the CTCs are recognised.
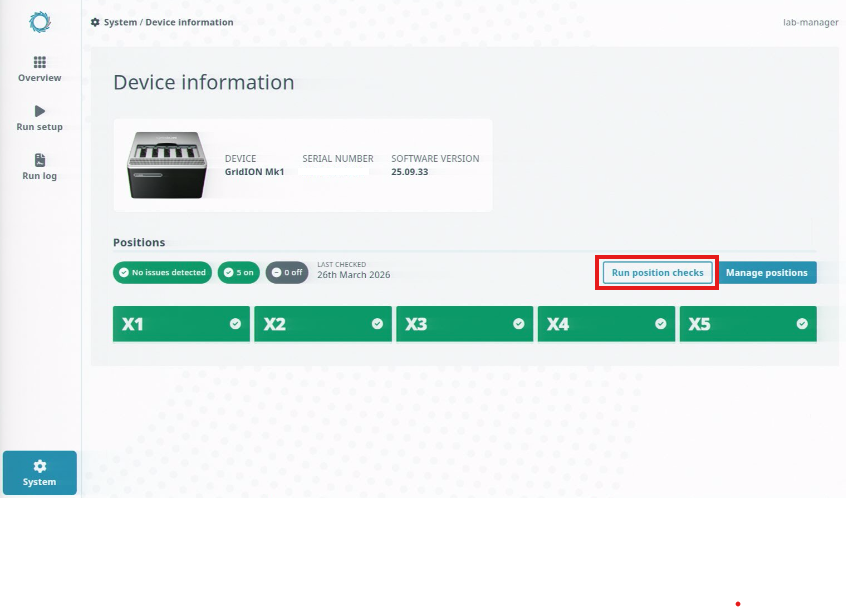
Click Run Position check.
Click Start check.
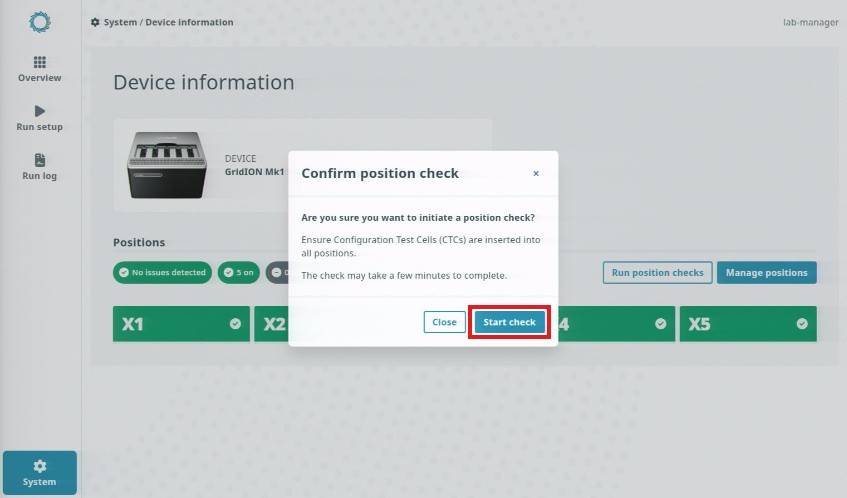
It is important that you do not have any assays running when you perform a position check since this will prevent the position check from starting.
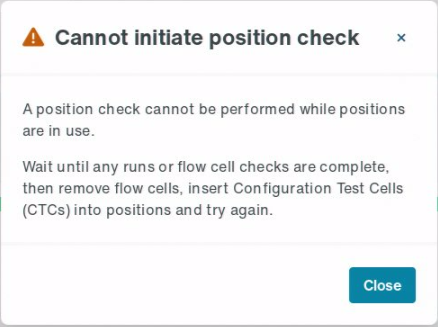
If the position check fails, swap the failed position’s CTC with a CTC that has passed the position check. Then repeat the Position check by clicking Run position check.
Note: If the position check fails again, contact a member of Technical Support via Live Support within the Nanopore Community or support@nanoporetech.com.
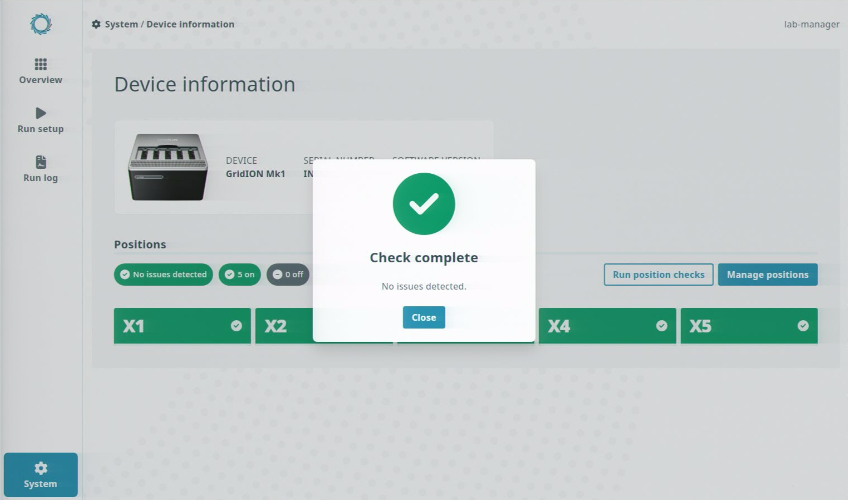
Once the check has been completed and passed, you will see the screen below stating that the check is complete and no issues have been detected.
12. Creating a user account
Note: An account with IT administrator or Laboratory manager permissions is required to access user account settings. These accounts can only create and assign permissions to accounts at the same or lower permission levels.
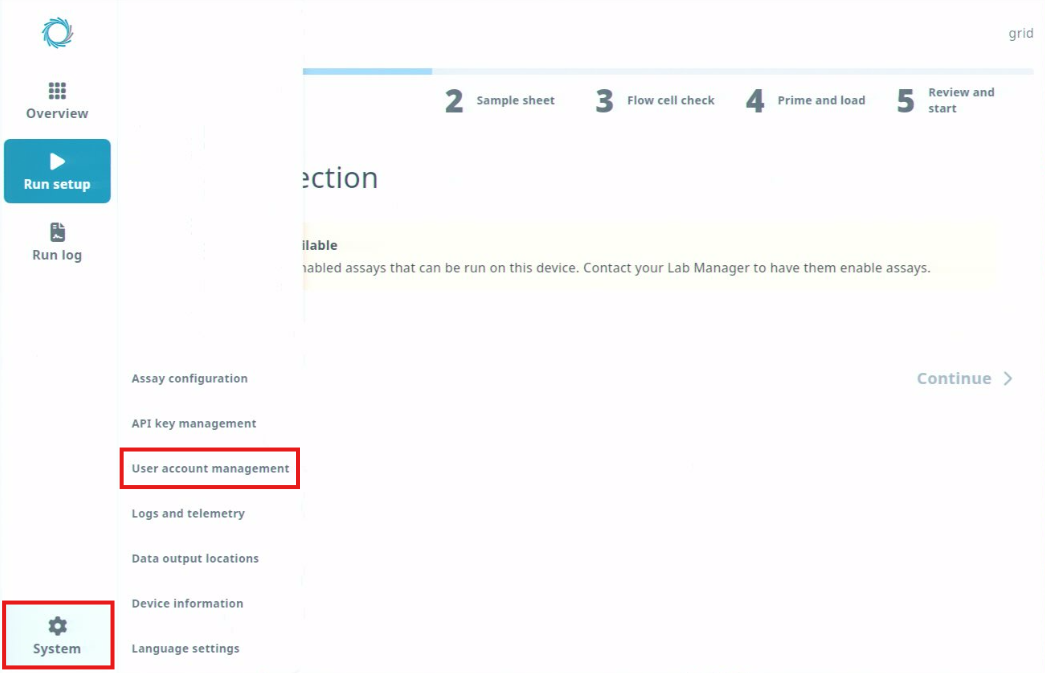
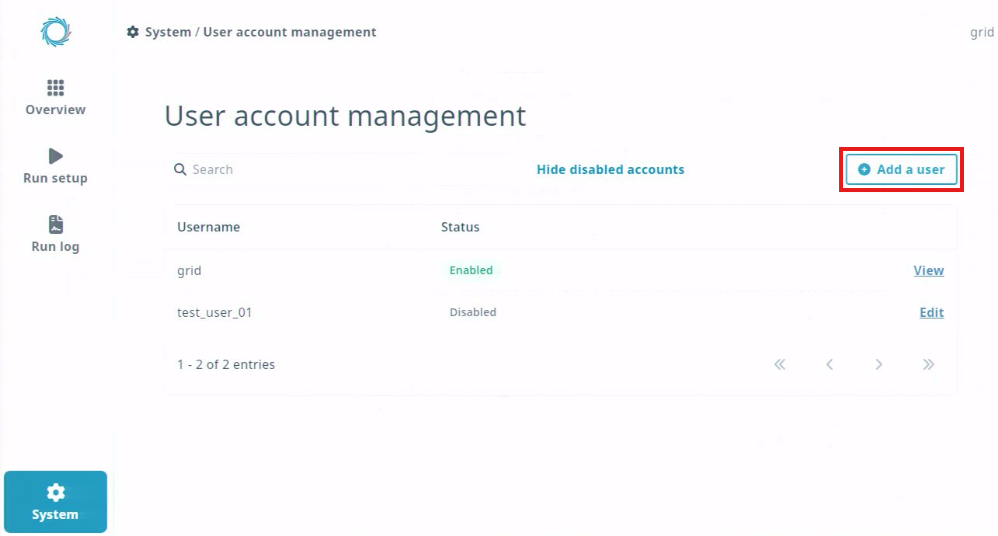
Open the System menu and click User account management.
On the User account management page, review the list of existing user accounts.
The Status column will show one of three possible statuses for each account:
- Enabled – account is active
- Disabled – account is inactive but can be re-enabled
- Locked out – account temporarily inaccessible (e.g., after failed login attempts)
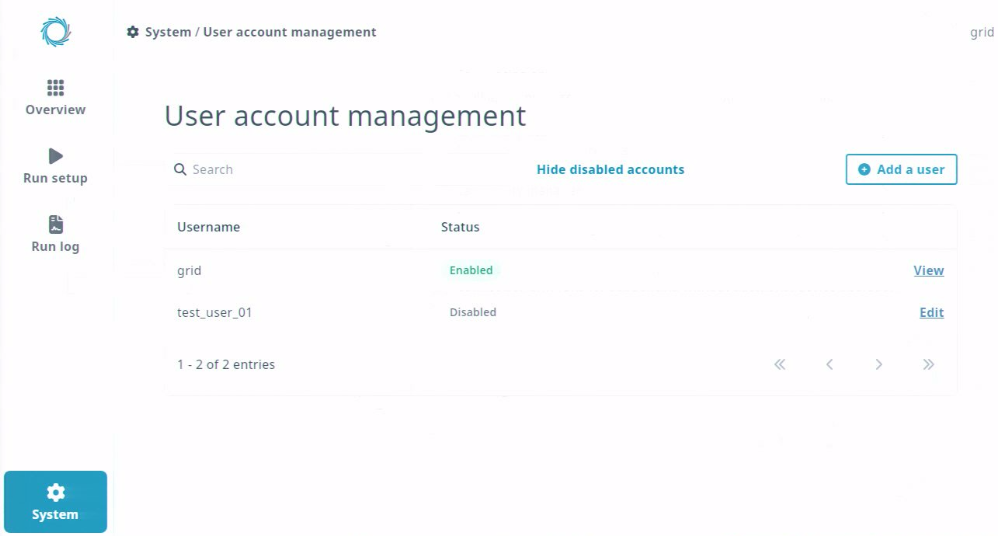
To add a new account, click Add a user.
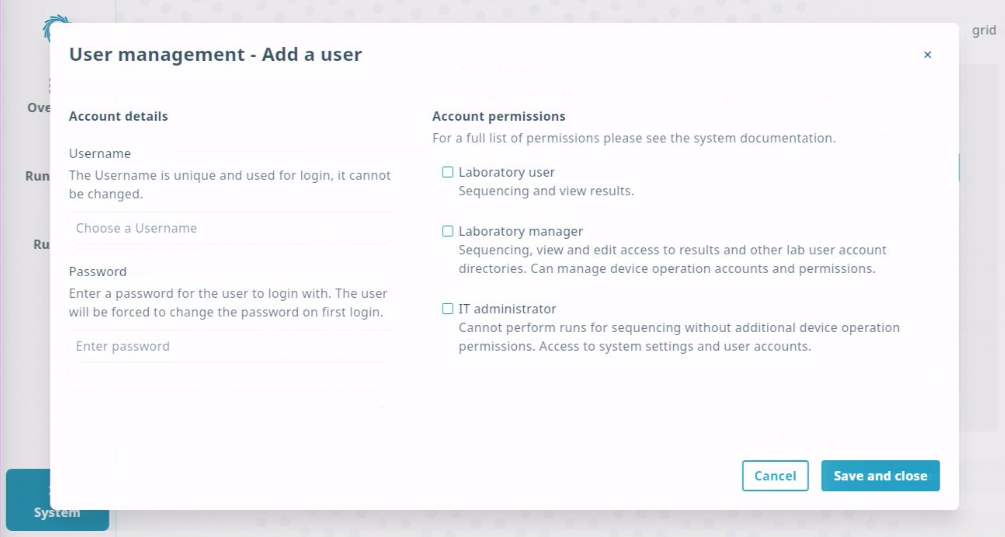
On the Add a user page, enter a username and password and select account permissions.
Note: Only IT administrator accounts can assign IT administrator permissions to another account.
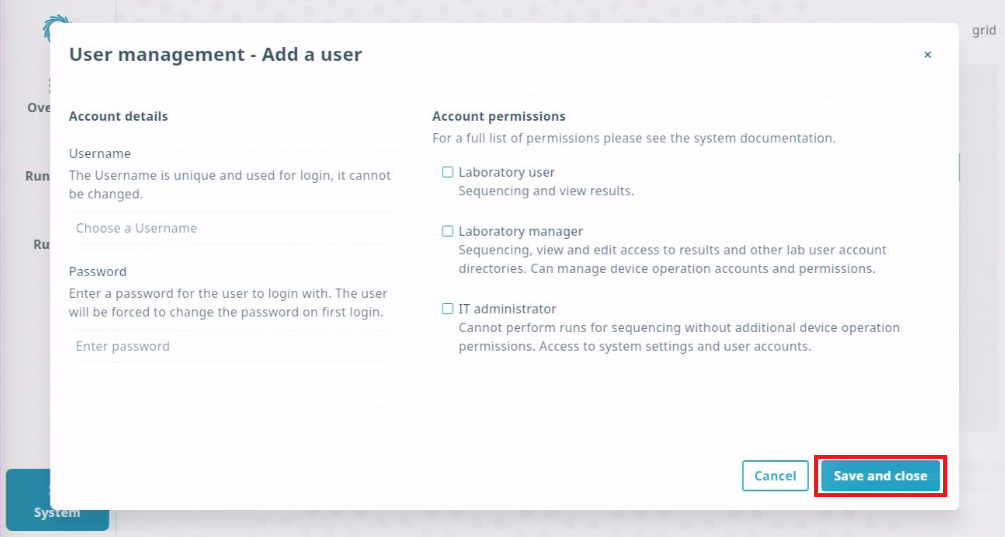
Once all details are complete, click Save and close.
If any errors are shown, resolve them before proceeding.
If you are setting up an account for another user, make a note of the username and password and provide these details to the user. They will be required to enter these details to access their account, and will be required to change their password as part of their first login.
13. Editing existing user accounts
Note: An account with IT administrator or Laboratory manager permissions is required to access user account settings. These accounts can only create and assign permissions to accounts at the same or lower permission levels.
Open the System menu and click User account management.
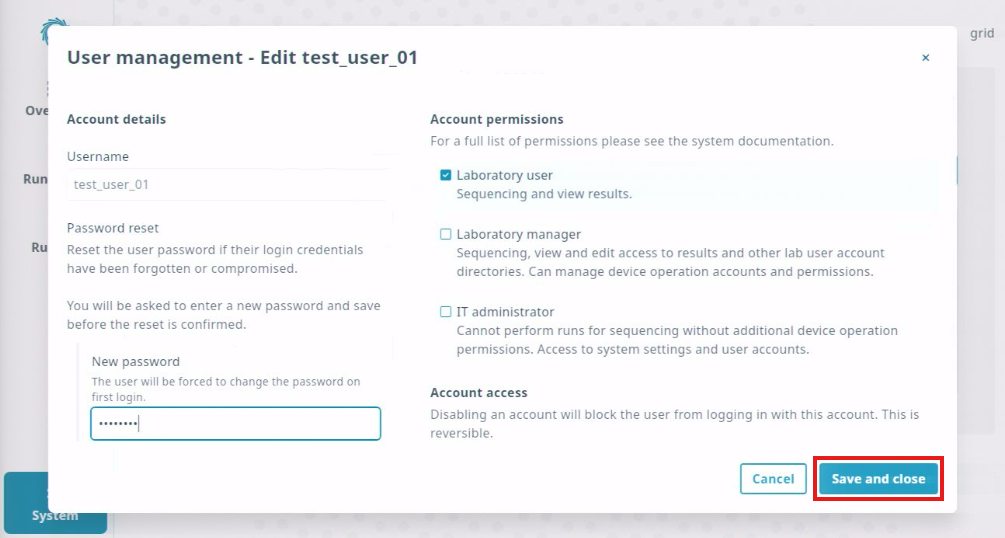
Click Edit on the right side of the row of the account you would like to edit.
From this page it is possible to reset the user password, modify account permissions, and to disable or enable account access.
Note: Only IT administrator accounts can assign IT administrator permissions to another account.
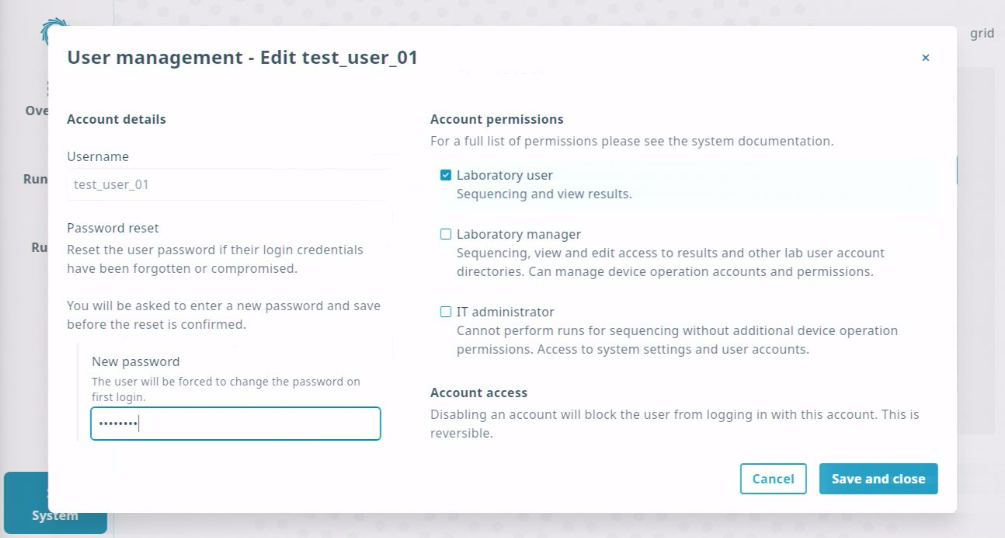
When changes have been completed, click Save and close to return to the User account management page.
If the user whose account permissions are being changed has the Sequencing Software open, they will need to close and reopen the software for the changes to take effect.
14. Active Directory and LDAP integration
Note: An account with IT administrator permissions and access to your organisation’s directory service (typically provided by your IT department) are required to complete the actions in this section.
Joining an LDAP or Active Directory domain
You may only join one domain at any given time; the Q-Line GridION does not support multiple domains.
The tool /opt/ont/platform/bin/ont-platform-security-ad is used to connect (join) the system to an Active Directory (AD) or a Lightweight Directory Access Protocol (LDAP) domain. After the join is complete, domain accounts will be recognised by the platform, although logins using domain accounts are not enabled by default.
To join a system to a domain, you need to know the domain name, a domain administrator account and password. Depending on site requirements, you should know what type of user ID mapping will be used, if and how Windows SIDs from the domain are translated into Unix uid/gids, and whether all domain logins are allowed.
By default, no domain users will be able to log in until explicitly allowed. If you want to permit login access for all domain accounts, this must be specified when joining the domain. If you do not permit access for all domain users, you can allow individual domain accounts later.
Note: If the integration with Active Directory fails, reconnect to the domain again using the following instructions.
Verifying the platform configuration
Connecting to an LDAP or AD domain can lead to errors due to configuration errors. The main items to check are:
- Time synchronisation is configured and active.
- DNS (Domain Name System) is configured and using an AD/LDAP domain server.
- The username used for the connection has domain administration rights.
These configurations account for most of the problems encountered when joining a domain.
To ease the process, ont-platform-security-ad --join will perform configuration checks automatically upon a join attempt. If the join fails, execute these checks manually.
Check the time synchronisation.
The system clock must be synchronised with the same source as is used by the domain controllers. If the system clock deviates by more than five minutes from that of the domain controllers, all domain authentications will fail, domain accounts will no longer be usable, and all domain users will be locked out of the system.
To check that time synchronisation is working, open a Terminal and enter the following command:
timedatectl
If the time synchronisation works properly, the System clock synchronized status in the output should read yes .
Example output:
Local time:                Wed 2023-06-21 08:46:54 UTC
Universal time:            Wed 2023-06-21 08:46:54 UTC
RTC time:                  Wed 2023-06-21 08:46:54
Time zone:                 Etc/UTC (UTC, +0000)
System clock synchronized: yes
NTP service:               active
RTC in local TZ:           no
Check the DNS.
The system must be configured as a DNS client and using DNS servers that are also AD/LDAP domain controllers. If you have chosen to separate AD and DNS functions for security and performance reasons, the DNS domain must contain standardised entries for AD/LDAP servers.
a. Establish your AD domain name. If you are using the same name for DNS and AD, the AD domain name can be found in /etc/resolv.conf. Open a Terminal and enter the following command:
egrep '^(domain|search)' /etc/resolv.conf
Example output (in this example, the local domain name is example.local ):
search example.local
       ^^^^^^^^^^^^
b. After establishing the domain name, test the DNS configuration by running the following command:
resolvectl -t SRV query _ldap._tcp.example.local
If the test is successful, a list of AD servers will be returned for this domain:
_ldap._tcp.example.local IN SRV 0 100 389 ghjnycad01.example.local -- link: eno1
_ldap._tcp.example.local IN SRV 0 100 389 ondddsad01.example.local -- link: eno1
_ldap._tcp.example.local IN SRV 0 100 389 avytenad01.example.local -- link: eno1
_ldap._tcp.example.local IN SRV 0 100 389 krnfglad00.example.local -- link: eno1
_ldap._tcp.example.local IN SRV 0 100 389 FJWOXFAD12.example.local -- link: eno1
_ldap._tcp.example.local IN SRV 0 100 389 okdhdlad01.example.local -- link: eno1
_ldap._tcp.example.local IN SRV 0 100 389 ondnsywd10.example.local -- link: eno1
_ldap._tcp.example.local IN SRV 0 100 389 ntsjsywn01.example.local -- link: eno1
_ldap._tcp.example.local IN SRV 0 100 389 mdunxfad13.example.local -- link: eno1
_ldap._tcp.example.local IN SRV 0 100 389 KLGSHAAD00.example.local -- link: eno1
_ldap._tcp.example.local IN SRV 0 100 389 uivcinad01.example.local -- link: eno1
_ldap._tcp.example.local IN SRV 0 100 389 KOJWINAD00.example.local -- link: eno1
_ldap._tcp.example.local IN SRV 0 100 389 pwnsfoad01.example.local -- link: eno1
The failed test below indicates that the current DNS configuration is not correct for AD/LDAP. Joining the domain will not be possible until this is resolved:
_ldap._tcp.oxfordnan0labs.local: resolve call failed: '_ldap._tcp.example.local' not found
Check that the user has domain administration rights.
Connecting any system to an AD or LDAP domain requires privileged access. Within AD, such a user must be a member of the group 'Domain Admins'.
Checking group membership must be done on a system that is already connected to the domain. This can be achieved by using either a Windows AD controller (GUI), a Windows AD client using PowerShell, or a Linux AD client using ldapsearch , as outlined below.
The examples below were taken from a functioning domain and the username 'john' (John.Smith@example.local) is used throughout.
Using a Windows AD controller (GUI)
This process requires domain admin rights and login access to a domain controller.
a. Log into an AD controller.
b. From the Start menu, navigate to Windows Administrative Tools and select Active Directory Users and Computers (ADUC).
c. Within ADUC, find the user account to be checked and right-click Properties to display the account properties. In the properties windows, select the Member Of tab. The user account should be a member of the group ‘Domain Admins’.
Using a Windows AD client using PowerShell
Using this method requires a domain login to a Windows client.
a. Obtain a PowerShell prompt and issue the command net user john /domain. Look for 'Domain Users' within 'Global Group memberships'.
PS C:\Users\andrew> net user john /domain
User name                    john
Full Name                    John Smith
...
Local Group Memberships      *Administrators
Global Group memberships     *Group Policy Creator *Domain Users
                             *Enterprise Admins    *Domain Admins
                             *Schema Admins
b. Obtain a list of members of the 'Domain Admins' group via the PowerShell CmdLet 'Get-ADGroup' to check that the expected users have been added as members:
PS C:\Users\john> Get-ADGroup -Identity "Domain Admins" -Properties Members
DistinguishedName : CN=Domain Admins,CN=Users,DC=galaxy,DC=local
GroupCategory     : Security
GroupScope        : Global
Members           : {CN=Jane Doe,OU=IT,OU=Galaxy Users,DC=galaxy,DC=local, CN=John  Smith,OU=IT,OU=Galaxy Users,DC=galaxy,DC=local, CN=Administrator,CN=Users,DC=galaxy,DC=local}
Name              : Domain Admins
ObjectClass       : group
ObjectGUID        : 7aca97e1-3d76-4267-b63d-039098178fe9
SamAccountName    : Domain Admins
SID               : S-1-5-21-3271649479-1020880420-2291191405-512
Using a Linux AD client using ldapsearch
After logging into a Linux system already joined to the domain and using a domain authenticated account, it is possible to view the membership of the "Domain Admins" group using ldapsearch. This is a two-step process.
a. Find the name of a domain controller. There are various methods you can use for this. The example below illustrates a generic method which should work on any Unix/Linux platform, and uses the AD domain name example.local.
resolvectl -t SRV query _ldap._tcp.example.local
_ldap._tcp.example.local IN SRV 0 100 389 arthur.example.local -- link: enp1s0
b. Use ldapsearch. From the output above, one AD server is called arthur.example.local. Use this name in the LDAP URI (-H option ):
/usr/bin/ldapsearch -o ldif-wrap=no -Y GSSAPI -H ldap://arthur.example.local -b "dc=EXAMPLE,dc=LOCAL" "(sAMAccountName=Domain Admins)"
...
# Domain Admins, Users, example.local
dn: CN=Domain Admins,CN=Users,DC=galaxy,DC=local
objectClass: top
objectClass: group
cn: Domain Admins
description: Designated administrators of the domain
     member: CN=John Smith,OU=IT,OU=Galaxy Users,DC=galaxy,DC=local
     member: CN=Jane Doe,OU=IT,OU=Galaxy Users,DC=galaxy,DC=local
     member: CN=Administrator,CN=Users,DC=galaxy,DC=local
...
Join the domain.
To join the platform to an AD or LDAP domain without any advanced options, run the tool with just the domain name and, optionally, the name of the user account with domain administrator privileges. You will be prompted to enter the account password. The username must be provided in the command.
To join the domain example.local using the domain account john.smith , use this command:
sudo /opt/ont/platform/bin/ont-platform-security-ad --join example.local --username john.smith
You will see an output similar to the one below. Enter your password when prompted:
Attempting to join domain example.local with username john.smith
Password for john.smith:
SUCCESS! This system is now a member of the domain example.local
After running this command successfully, domain user accounts will be recognised by the system, but login access will not be permitted. Login access may be granted via the tool opt-platform-security-users (see next step).
For more details about the domain connection, use the --test option. To enable additional diagnostic messages, use --debug {1...9}.
To verify other accounts, modify this command accordingly, e.g.,
getent passwd <domain user>\\<domain>
You will see an output similar to the one below:
jane.doe:*:2823263:165863:Jane Doe:/home/jane.doe:/usr/bin/bash
Note: A reboot is required after joining a domain.
Permit a specific user to log in.
Enter the following command:
sudo /opt/ont/platform/bin/ont-platform-security-users --permit-ad-user john.smith
Permit all members of a domain group login access.
Enter the following command:
sudo /opt/ont/platform/bin/ont-platform-security-users --permit-ad-group ‘UnixUsers’
Add a user (local or domain) to the Laboratory manager or IT administrator group.
Enter the following command to add to the Laboratory manager group:
sudo /opt/ont/platform/bin/ont-platform-security-users --add-labmgr john.smith
Enter the following command to add to the IT administrator group:
sudo /opt/ont/platform/bin/ont-platform-security-users --add-itadmin john.smith
Advanced use cases
The following advanced use cases are considered here:
- User ID mapping strategy differs from the default.
- The platform joins the domain within an OU inside the domain and not at the top level. All domain logins are permitted after joining the domain.
Using POSIX/RFC2307 user IDs
To use POSIX user attributes from the domain, in step 4 use the option --id-mapping-strategy POSIX
sudo /opt/ont/platform/bin/ont-platform-security-ad --join example.local --username john.smith --id-mapping-strategy POSIX
You will see an output similar to the one below. Enter your password when prompted:
Attempting to join domain example.local with username john.smith
Password for john.smith:
SUCCESS! This system is now a member of the domain example.local
To join the platform to a specific organisational unit (OU):
To join to a specific OU within the domain, use the --ou option. Note that the order in which OU hierarchy is specified is bottom-to-top, i.e. specify the OU with the lowest level first, highest last.
For example, if the system should be added to the 'Research' OU within ‘Computer’ and the OU hierarchy is DOMAIN -> Computers -> Research, the OU argument should look like this:
--ou "OU=Research,OU=Computers"
Quote marks are essential if any of the OU names contain spaces.
Example command:
sudo /opt/ont/platform/bin/ont-platform-security-ad --join example.local --username john.smith --ou "OU=Research,OU=Computers"
You will see an output similar to the one below. Enter your password when prompted:
Attempting to join domain example.local with username 'john.smith'
Password for john.smith:
SUCCESS! This system is now a member of the domain example.local
Synchronising groups with an AD or LDAP
This section will describe how to synchronise your AD or LDAP groups with the user account groups on the Q-Line GridION, including the native ont_it_admin , ont_lab_manager, and ont_lab_user groups.
Synchronisation can be carried out using either sync, which can add or remove users, or add which will only add users.
addcauses users in the AD group to be added to the Unix group. In this mode, if a user is removed from the AD group they will not be removed from the local group.syncmaintains complete synchronisation between an AD and local group.
For example, users in the AD group will be added to the local group when they first appear and will be removed from the local group when they are removed from the AD group.
To use the feature, create a configuration file in /opt/ont/etc/ont-platform-security-group-sync.conf. For each group you want to sync, the configuration file should include a line in the format: <AD Group name or Group ID>:<the group name on the machine>:<either sync or add>
An example of the text from a configuration file is given below:
# Active directory group name:local group name:sync|add
Nanopore_Lab_User:ont_lab_user:sync
Nanopore_Lab_Manager:ont_lab_manager:sync
Nanopore_Lab_users:ont_it_admin:sync
Note: Only AD Groups without spaces are allowed. If your desired group has a space, use the Group ID instead. The AD and Local Group names must be different.
Once the configuration file is ready, run sudo /opt/ont/platform/sbin/ont-platform-security-group-sync to activate the synchronisation. To ensure that the correctly mapped group appears for your user, run: groups <Your AD Username>
15. Networking requirements
The network parameters for your Q-Line GridION must be suited to your local network. The device should only be connected to a secure network.
Note: Your IT department should complete these instructions to configure your network, and will require an account with IT administrator permissions.
The Q-Line GridION uses a 1 x 1 Gbps copper interface to connect to your local infrastructure. This interface has a single port. By default, the IP address is configured to DHCP. However, static IPs are configurable. This connection will be used for:
- Sending telemetry* information to Oxford Nanopore Technologies.
- Receiving critical software updates to the device (optional; must be initiated manually).
- Streaming biological sequence data to your local storage infrastructure.
You will need 1 Gbps Ethernet cable on your device to connect to your Ethernet port, your device and your Local Access Network (LAN).
* The Sequencing Software collects telemetry information during sequencing runs per the Terms and Conditions to allow monitoring of device performance and enable remote troubleshooting. Telemetry contains metadata about the settings and conditions of a sequencing run. Nothing specific about the genomic content of individual reads is included—only generic information, such as sequence length and Q score, is logged. Some of this information comes from free-form text entry fields, therefore no personally identifiable information should be included.
Configure your network.
If you want to connect your GridION to a network, use the search function from the desktop and search for 'network'.
Validate the IP address.
You can check connectivity by running:
sudo ont-check-connectivity
If this fails, you may need to adjust your internet/firewall rules. As a minimum, you will need outbound access to: HTTPS/ports 80 and 443 to 52.17.110.146, 52.31.111.95, 79.125.100.3 (outbound-only access) or DNS rule for ping.oxfordnanoportal.com. This will provide a connection to the Oxford Nanopore Technologies telemetry service.
To receive updates to the sequencing software and the Linux Operating System you will need access to the following:
- cdn.oxfordnanoportal.com
- *.ubuntu.com
- *.nvidia.com
Note: Updates can be delivered offline. Your technical support representative can also supply updates via physical media if required.
Changing the device name (hostname)
If the device name (hostname) is changed, a mismatch between the new device name and the entry recorded in /etc/hosts may cause an internal service (Slurm) to fail to start correctly on the next reboot. To correct the /etc/hosts configuration and restore normal operation, run the following command: sudo /opt/ont/platform/bin/ont-update-hosts-file
16. Enabling and configuring the firewall
Note: An account with IT administrator permissions is required to complete the actions in this section.
The tool ont-platform-security-firewall is used to start, stop, enable, disable, and configure the firewall.
By default the firewall is enabled and SSH is disabled. When SSH service is allowed, all other ports are disabled.
Individual services may be enabled and disabled by using their service name or port number. In addition to the service names defined in /etc/services , the tool recognises the name "samba" which, when used, will enable or disable all the ports required by Samba: 137/udp ,138/udp ,139/tcp , 445/tcp. All rules apply to both IPv4 and IPv6.
Usage examples
Enable the firewall with the currently defined set of services allowed:
sudo /opt/ont/platform/bin/ont-platform-security-firewall --enable
Disable the firewall with currently defined set of services allowed:
sudo /opt/ont/platform/bin/ont-platform-security-firewall --disable
Deny incoming SSH connections:
sudo /opt/ont/platform/bin/ont-platform-security-firewall --deny ssh
Allow incoming traffic on port #123, as if for an NTP server:
sudo /opt/ont/platform/bin/ont-platform-security-firewall --allow 123
Allow ports required by Samba, as if for a Samba server:
sudo /opt/ont/platform/bin/ont-platform-security-firewall --allow samba
Disable the firewall:
sudo /opt/ont/platform/bin/ont-platform-security-firewall --disable Configuring syslog
Show the current status of the firewall, including configured and allowed services:
sudo /opt/ont/platform/bin/ont-platform-security-firewall --status
Output:
\--- Configuration options:
ENABLE: YES
DEFAULT\_SERVICES: ssh
ALLOWED\_SERVICES: ssh
\--- Current firewall status:
Status: active
Logging: on (low)
Default: deny (incoming), allow (outgoing), deny (routed)
New profiles: skip
To                         Action      From
\--                         ------      ----
22/tcp                     ALLOW IN    Anywhere
22/tcp (v6)                ALLOW IN    Anywhere (v6)
Configuration is unchanged, no action taken.
17. Updating the timezone and setting a local NTP server
These are optional procedures to be carried out as required.
Note: An account with IT administrator permissions is required to complete the actions in this section.
To update the timezone:
- Find the correct timezone name by typing the command:
sudo timedatectl list-timezones
- Change the timezone using the following commands:
sudo su -
Timezone="Europe/London"
timedatectl set-timezone $Timezone
systemctl restart systemd-timesyncd
To set a local NTP server:
Note: this requires NTP/port 123 access if using an external internet time server.
- Enter the following commands:
sudo su -
printf "[Time]\nNTP=ntp.ubuntu.com\nFallbackNTP=pool.ntp.org\n" | tee /etc/systemd/timesyncd.conf
timedatectl set-ntp false
timedatectl set-ntp true
systemctl restart systemd-timesyncd.service
hwclock --systohc
timedatectl set-local-rtc 0
- You can check that the process has worked by typing:
timedatectl status
Note: it may take several minutes to sync with the NTP server.
18. Configuring USB mounting settings
Note: IT administrator permissions are required to modify the USB device mounting settings.
Removable USB storage devices can be used to transfer data to and from the Q-Line GridION. Do not insert unknown USB devices into the device.
By default, the system will detect inserted USB storage devices and will require the user's account password to mount them. Refer to the Q-Line GridION user guide for instructions on mounting a USB device with the default settings. An account with any permission level can be used to mount an inserted USB storage device.
The following commands can be entered in a Terminal window to modify the USB mounting settings. IT administrator permissions are required to make these changes.
To prevent USB devices being visible in the system file browser or mounting automatically:
sudo /opt/ont/platform/bin/ont-platform-security-usb-disks --disable
To automatically mount any inserted USB devices:
sudo /opt/ont/platform/bin/ont-platform-security-usb-disks --enable
To reset to the default settings (requiring password entry to mount a USB device):
sudo /opt/ont/platform/bin/ont-platform-security-usb-disks --prompt
19. Setting up a data output location
Note: An account with IT administrator permissions is required to complete the actions in this section.
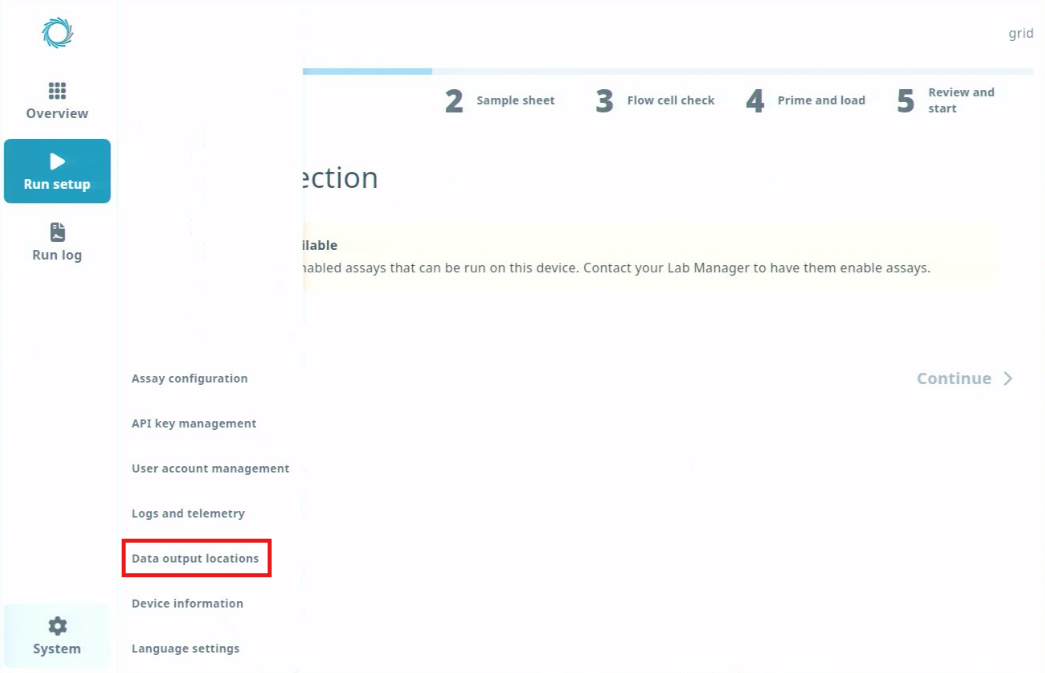
Open the System menu and click Data output locations.
This page shows any configured offload locations, with details of space used and available. 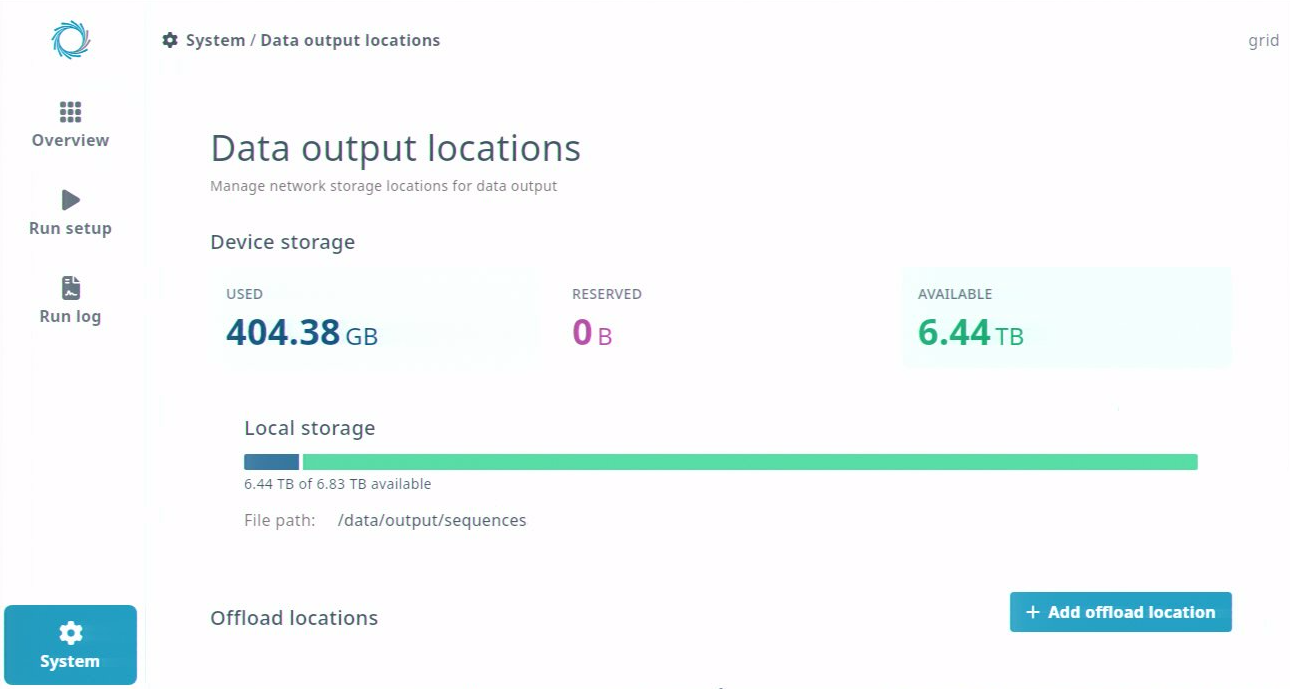
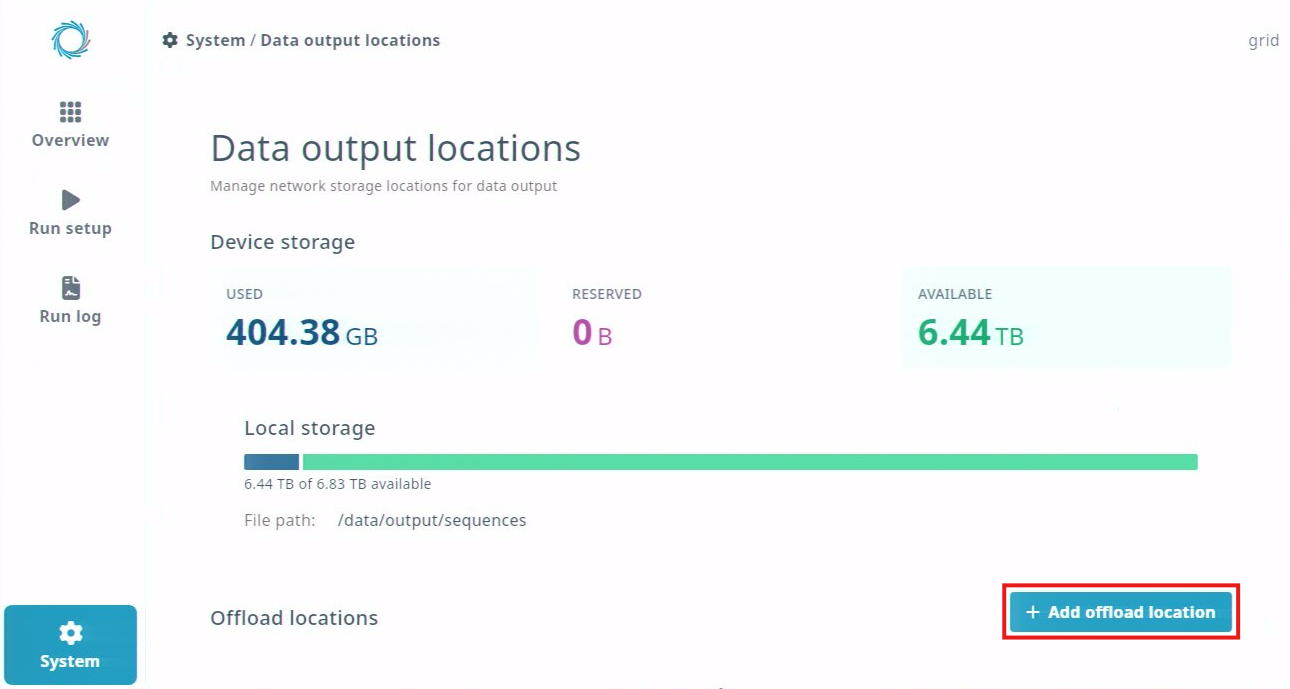
To add a new offload location, click Add offload location.
Select the storage type: Samba, NFS, or S3 bucket.
The fields shown will change depending on the storage type chosen. 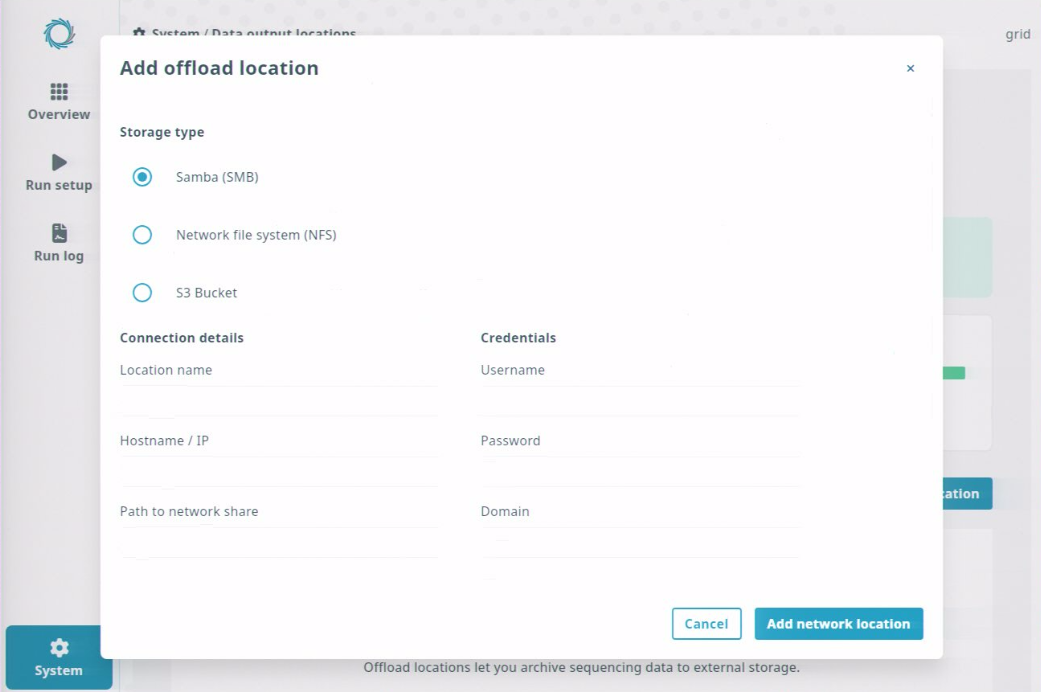
Location name is used for display in the Sequencing Software. All other fields are for configuration against the remote location.
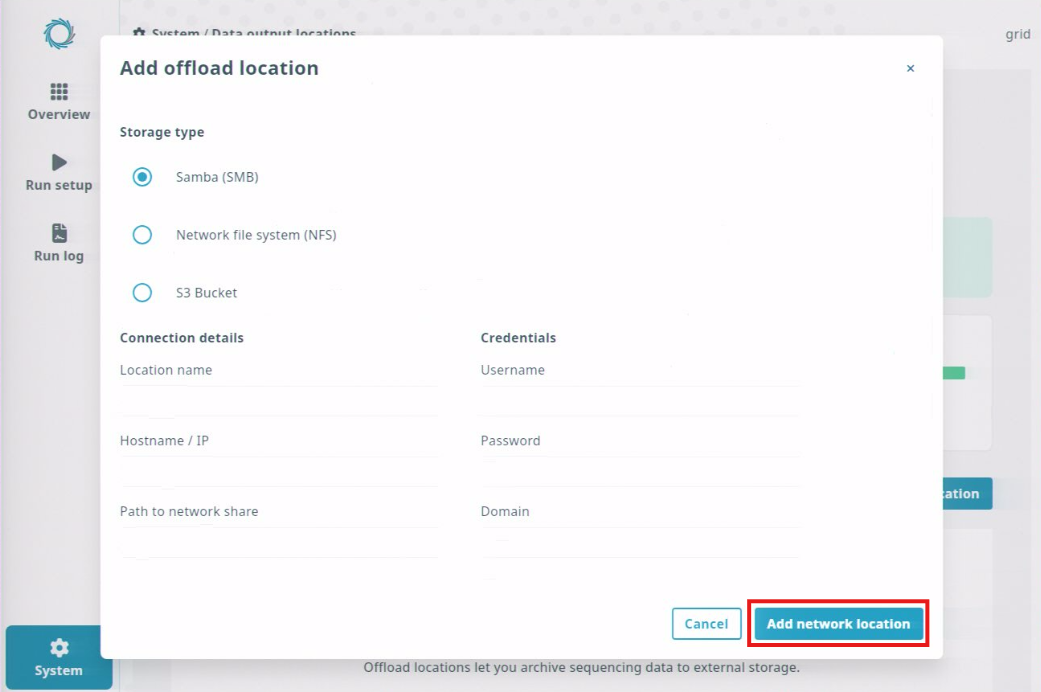
When all required fields are completed, click Add network location.
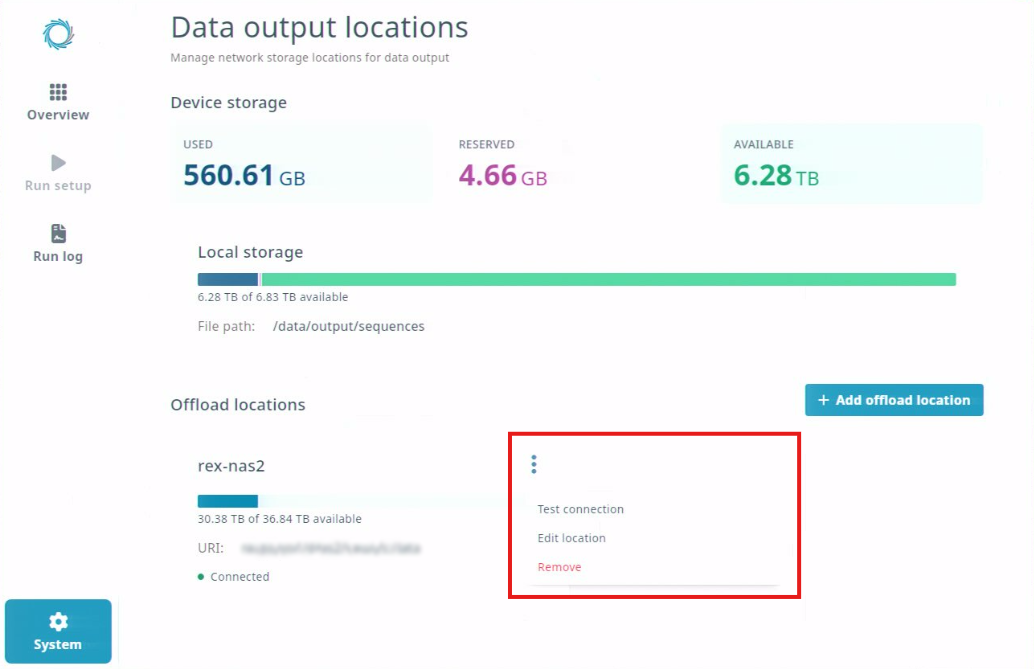
Manage existing offload locations from the item card menu.
Each offload location is represented by a card in the offload locations panel. Click the three dots in the top left of a card to see available options:
- Test connection – Opens a modal with Testing connection…. The result will be either Connection successful or Connection failed.
- Edit location – Opens a screen similar to Add Location, showing fields for the chosen storage type.
- Remove – Opens a confirmation modal. Removing a location will not delete any stored data. You cannot remove a location if assays are currently assigned to it. First, reassign those assays to another location before retrying.
To change the output location for an assay, navigate to the Assay configuration page by clicking on System, then clicking Assay configuration.

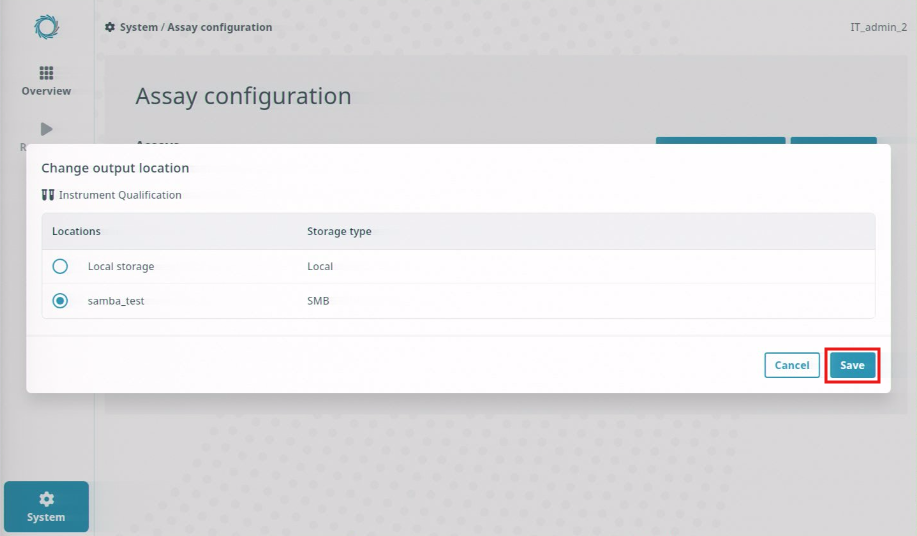
Click the three dots next to the assay you would like to configure, and then click Change output location.
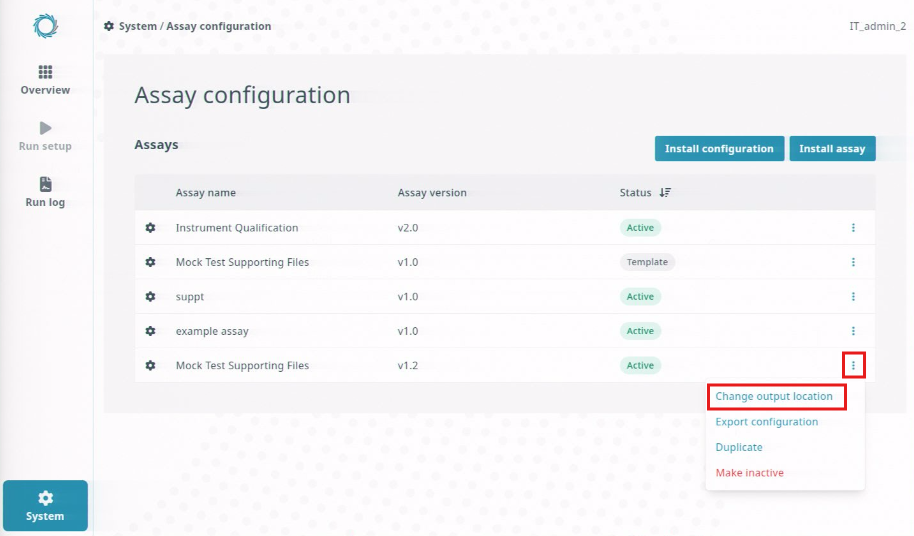
At the Change output location window, select the new output location and click Save.
20. Monitoring offload progress during a run
Note: An account with any permission level can be used to complete the actions in this section.
If data offload has been configured, the Run log screen will include an Offload status panel. This will indicate if the offload is active, or will report any issues. If there is a temporary loss of connection to the offload location, the status will be displayed as Reconnecting and there will be an option to stop the offload.
Ongoing offloads can be reviewed in the Overview screen.
A bar at the top of the screen indicates if data offload is in progress. New experiments can still be started while offload from a previous run continues.
21. Configuring the device for LIMS integration
Note: An account with IT administrator permissions is required to complete the actions in this section.
The Sequencing Software REST API
You can integrate your LIMS with your Q-Line GridION through the Sequencing Software’s REST API. The API serves as a secure communication channel (middleware) between the device and the LIMS. It provides the following features:
- Passing sample details from the LIMS to the Sequencing Software
- Passing supporting files from the LIMS to the Sequencing Software
- Monitoring runs from the LIMS
- Transfer of results to the LIMS
Before you can connect your LIMS to your device, follow the instructions below to enable the device’s LIMS interface so that the device can communicate with the LIMS. This is disabled by default for security. It is important to note that this process ensures the device is visible to the LIMS but does not represent a complete LIMS integration, which should be handled separately by the IT department of your institution.
Enabling the device to integrate with the LIMS requires you to:
- Generate an API key in the Sequencing Software.
- Edit a configuration file to include the Sequencing Software API key and any client API keys needed for the LIMS to connect to the Sequencing Software.
- Start the REST API service.
From there, the LIMS can be configured to the REST API for device integration in the LIMS. Once your LIMS and GridION are integrated, you can streamline your workflow further by printing the Library ID as an optical barcode and using this to select your sample sheet during run setup.
Configuring the device for LIMS integration
To enable your LIMS interface for a given device, complete the following steps.
Open the terminal and run the command:
sudo systemctl enable nanoxint
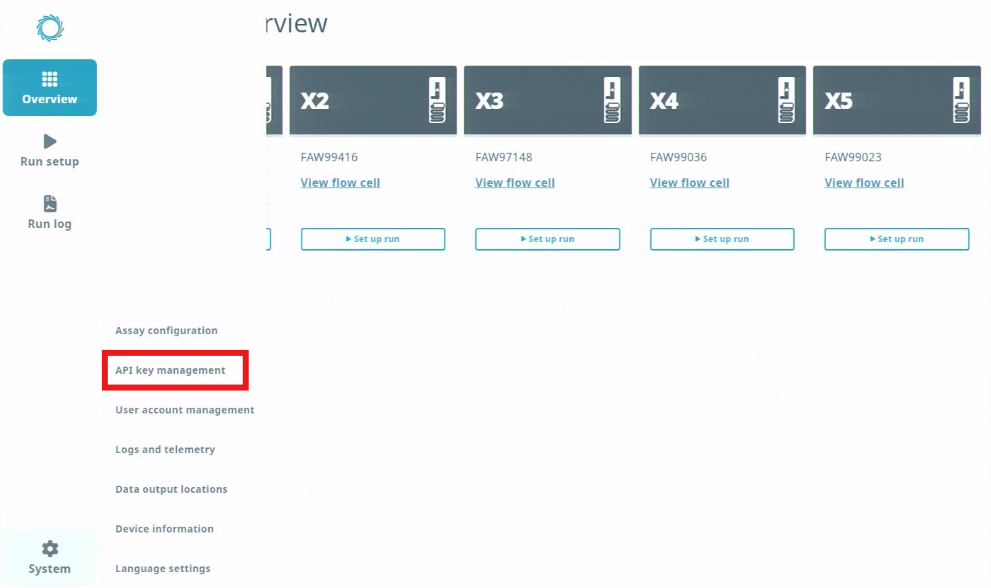
In the Sequencing Software, open the System menu and click API key management.
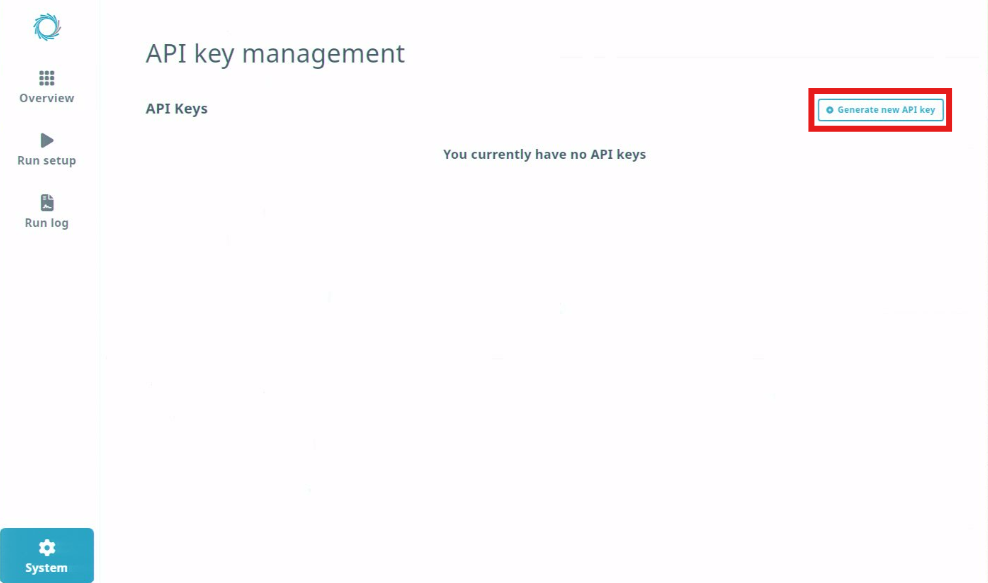
Click Generate new API key.
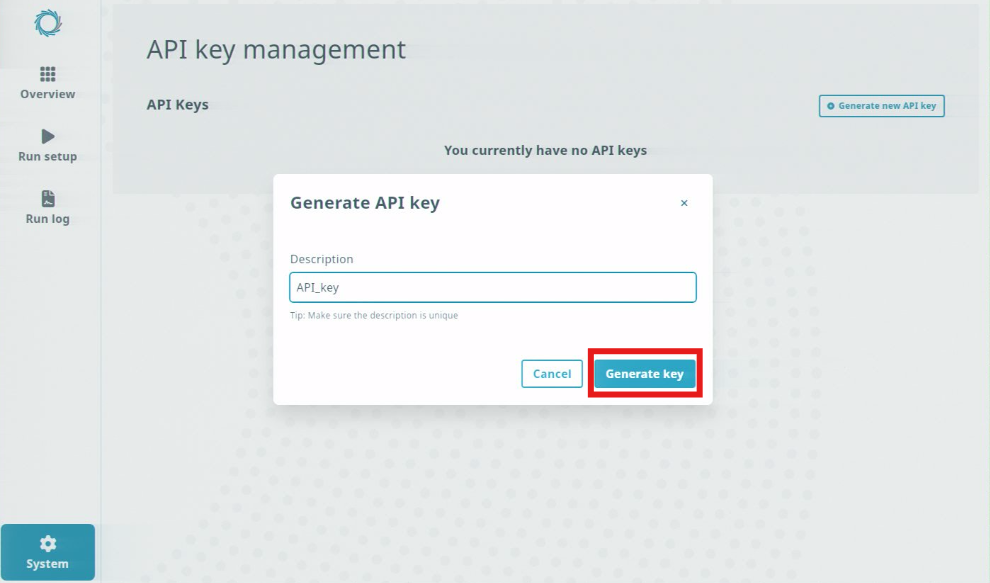
Enter your new API key description and click Generate key.
Copy your API key and either use it immediately or save it somewhere safe. The key will not be displayed again, although you will be able to generate new ones.
Edit the config file /home/nanoxint/nanoxint.conf with any text editor (this requires root permissions).
With the file open, paste the API key from the previous step as shown below:
MINKNOW_API_CLIENT_CERTIFICATE_CHAIN=/run/secrets/ssl_certificate_chain
MINKNOW_API_CLIENT_KEY=/run/secrets/ssl_certificate_key
DEVICE_CONFIG='{
  "g1": {
    "type": "dx",
    "host": "<hostname>",
    "port": 6789,
    "api_key":"PASTE-API-KEY-HERE"
  },
}'
CLIENT_CONFIG='{"lims_1":{"api_key":"SET-YOUR-NANOXINT-CLIENT-API-KEY-HERE"}}
where <hostname> is either localhost or the hostname of your device, depending on your IT configuration.
In the same file, configure any client API keys that the LIMS will use (last line in the example output above). Use a key that is secure as per your institution’s security/IT policies. This client key will be used by LIMS or other external systems to communicate to the LIMS interface.
Restart your LIMS interface by running the command:
sudo systemctl restart nanoxint
To check that it has started up properly, run the command:
sudo systemctl status nanoxint
The output should look similar to the following image (note that nanoxint is both loaded and active (running)):

Integrate the device to the LIMS.
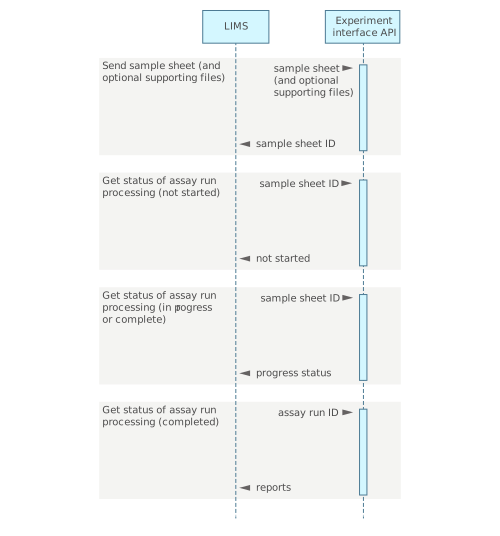
When you have enabled the LIMS interface, use the available endpoints to link to your LIMS as shown in the diagram at the end of this section. The documentation on available endpoints can be accessed through a web browser at https://<hostname>/nanoxint/docs. The hostname is the name of the Q-Line GridION on the local network if DNS routing is set up.
We recommend that you conduct an Instrument Performance Verification (IPV) and Operational Qualification (OQ) process once the LIMS has been set up to ensure the connection functions correctly and the LIMS can send valid sample sheets to the device.
Overview of the flow of information in a LIMS integration
a. The LIMS sends sample details for a library as a sequencing software-compatible sample sheet to the REST API. Supporting files for analysis the run can also be uploaded using the REST API. The sample sheet is then made available during run setup. The API returns a unique sample sheet ID to the LIMS that can be used to track the library.
b. Using the sample sheet ID, the LIMS queries the REST API to determine the status of that library. If a run has started, the API will return a unique run ID.
c. The run ID can be used to query the REST API for the status of that run from time to time. If it is still in progress, information will be provided about the whole run and individual samples.
d. When the run completes, results can be acquired using the run ID. Results are available in reports as HTML and sometimes also PDF or directly as structured JSON data.
22. Deleting data
Note: An account with IT administrator or Laboratory Manager permissions is required to complete the actions in this section.
In a Terminal window, run Nautilus by entering the following command:
nautilus admin:/
When prompted, enter your user password.
Nautilus will launch with administrator privileges, allowing you to move or delete the data from /output.
23. Importing an assay definition file
Note: An account with IT administrator or Laboratory Manager permissions is required to complete the actions in this section.
Sequencing on the Q-Line GridION is performed in the context of assays. The system groups together the stages of a complete assay that are performed on the device – sequencing and analysis of sequencing data – so that you can start the process and allow the device to complete it without further interaction. The system’s representation of an assay includes configuration for sequencing and any bioinformatics workflow that is needed. The configuration file for an assay can be exported and, if necessary, edited as a .toml file.
In the Sequencing Software, open the System menu, then click Assay configuration.
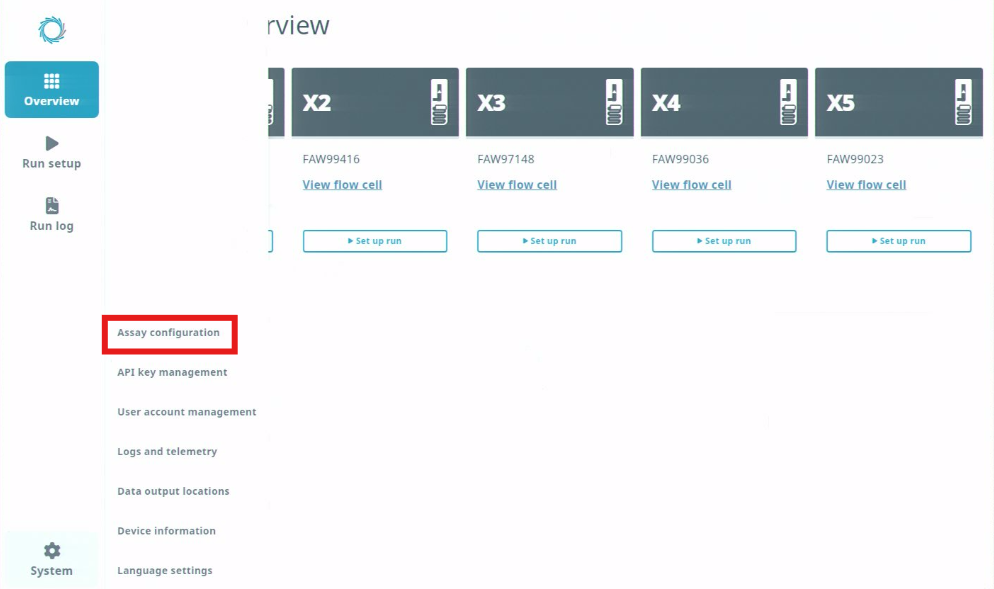
Click Install configuration or Install assay.
Install configuration accepts .toml files. Install assay accepts .assay files. 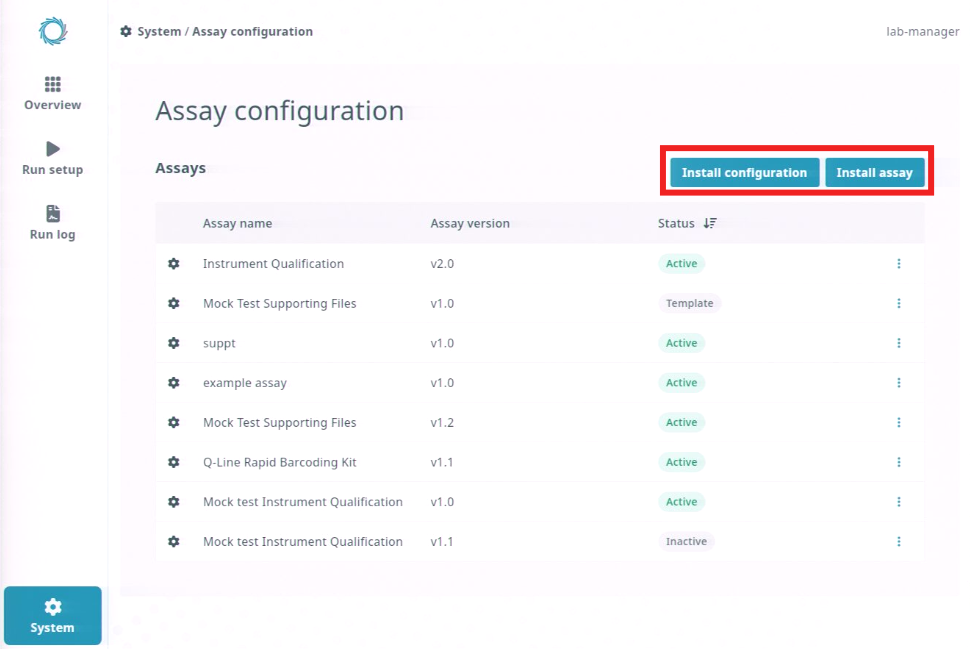
Click inside the window to enter the file browser and locate your file in the file browser. Double-click your saved file to open it.
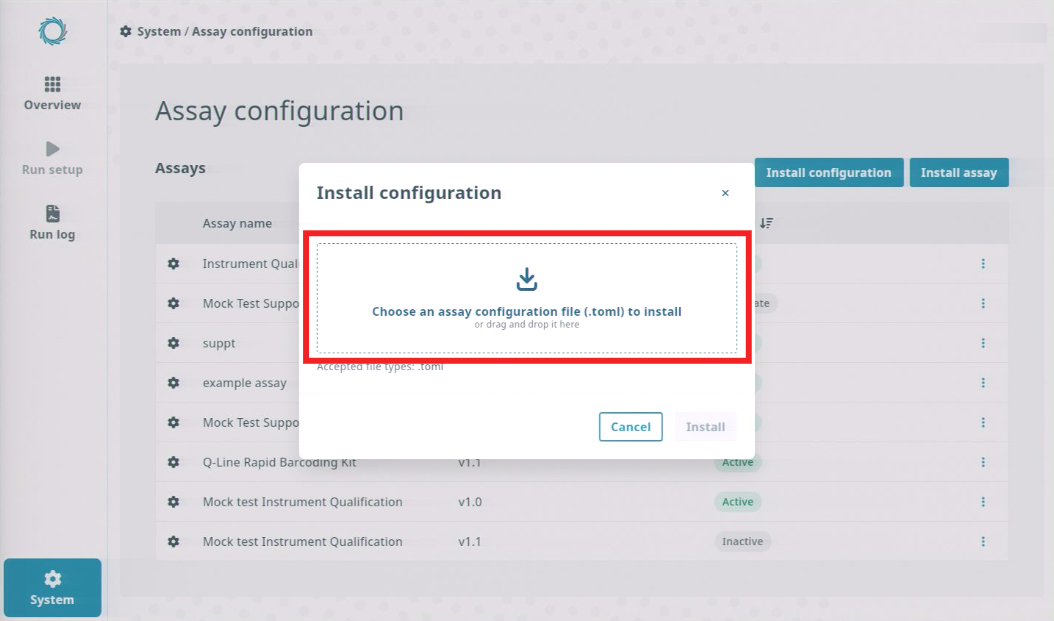 Files can also be dragged and dropped into the software window.
The type of supporting file that is accepted will be indicated at the bottom of the window.
Click Install.
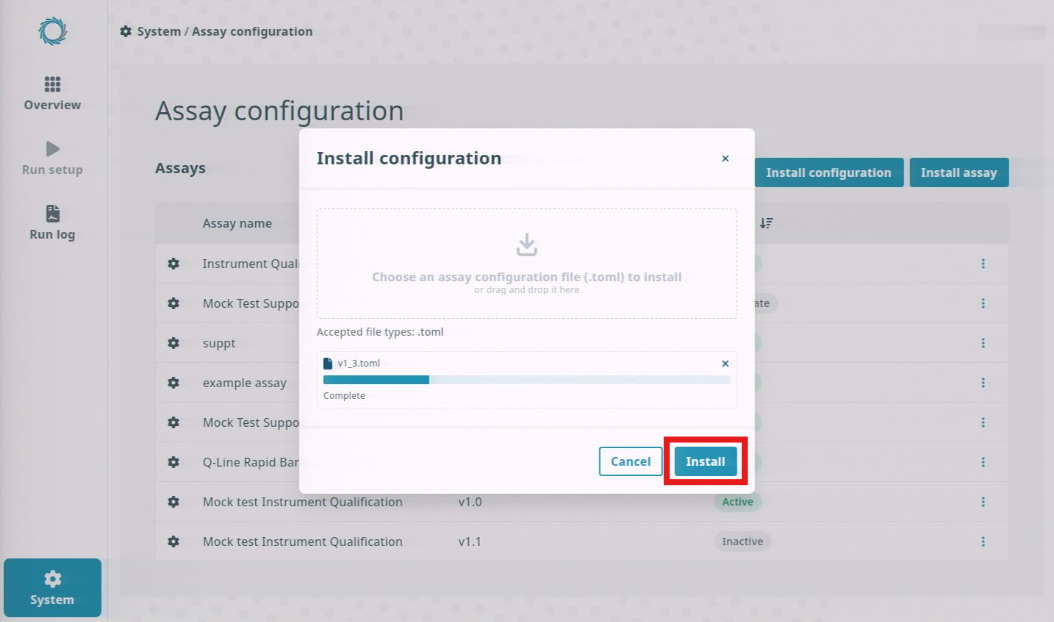
Note: If the assay definition file is incorrectly filled out, the Sequencing Software will fail to install the assay and will list the errors to correct.
Check that your assay is present in the list with the correct version.
Check that your assay status is set to Active. If it is Inactive, click the three dots and then click Make active.
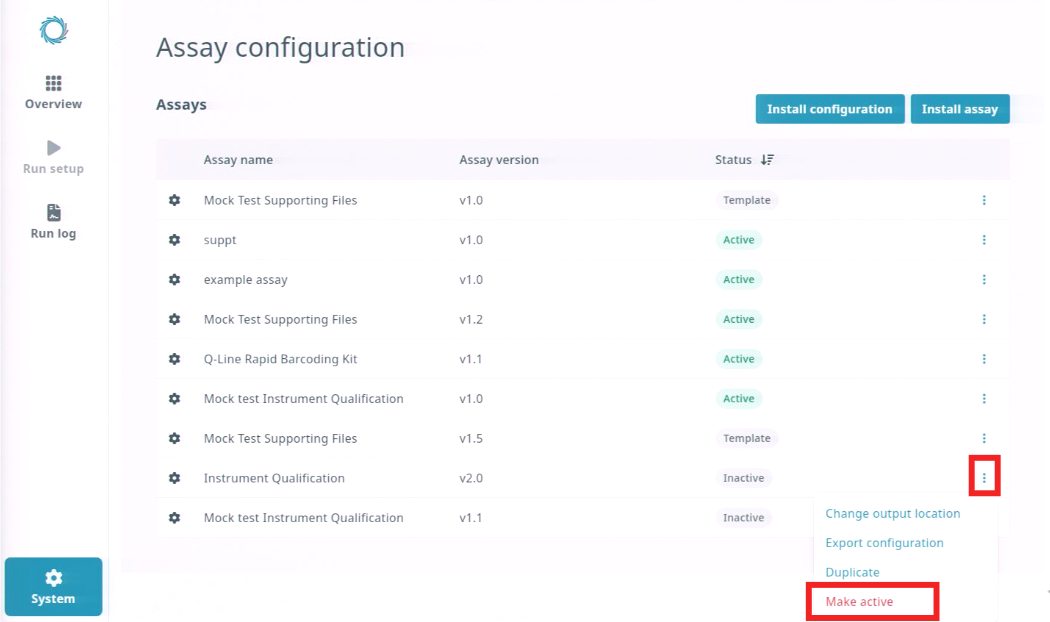
After proceeding to sequencing tests of the new assay, you will be able to decide whether to leave it as Active or make it Inactive.
If applicable, set any older versions of the assay to Inactive.
Your assay should now be selectable from the Assay Selection screen for all users.
Note: Switching assays from Active to Inactive is the archiving system of the SequencingSoftware; it is not possible to delete assays.
24. Hiding an assay from run set up
Note: An account with IT administrator or Laboratory manager permissions is required to complete the actions in this section.
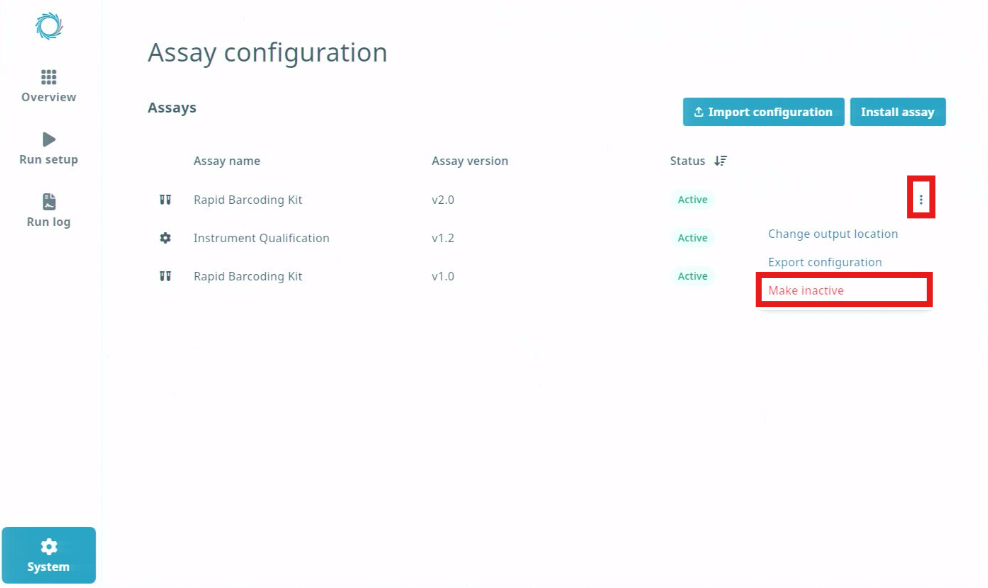
In the Sequencing Software, open the System menu and click and click Assay configuration.
Click the three dots on the right side of the row of the assay you would like to make inactive, and in the menu click Make inactive.
25. Managing supporting files
Note: An account with IT administrator or Laboratory manager permissions is required to complete the actions in this section.
Some assays may require you to provide supporting files. These can be alignment references, BED files, configuration files for an analysis workflow, or another type of file required for bioinformatic analysis. Depending on the assay, you may need to reference them in the sample sheet. On other occasions, the file might be stable across multiple runs and you will need to assign the file to an assay by creating a duplicate of that assay.
Instructions for importing supporting files can be found in the Q-Line GridION user guide.
To delete supporting files that are no longer required, follow the instructions below.
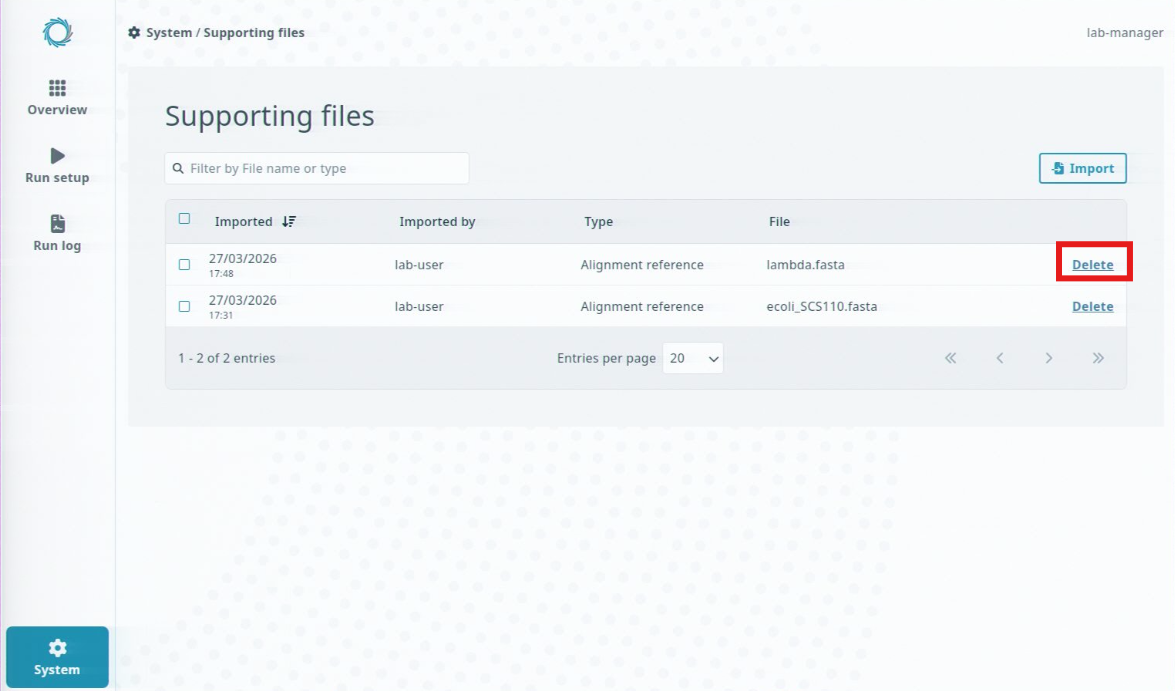
In the Sequencing Software, click System, then click Supporting files.
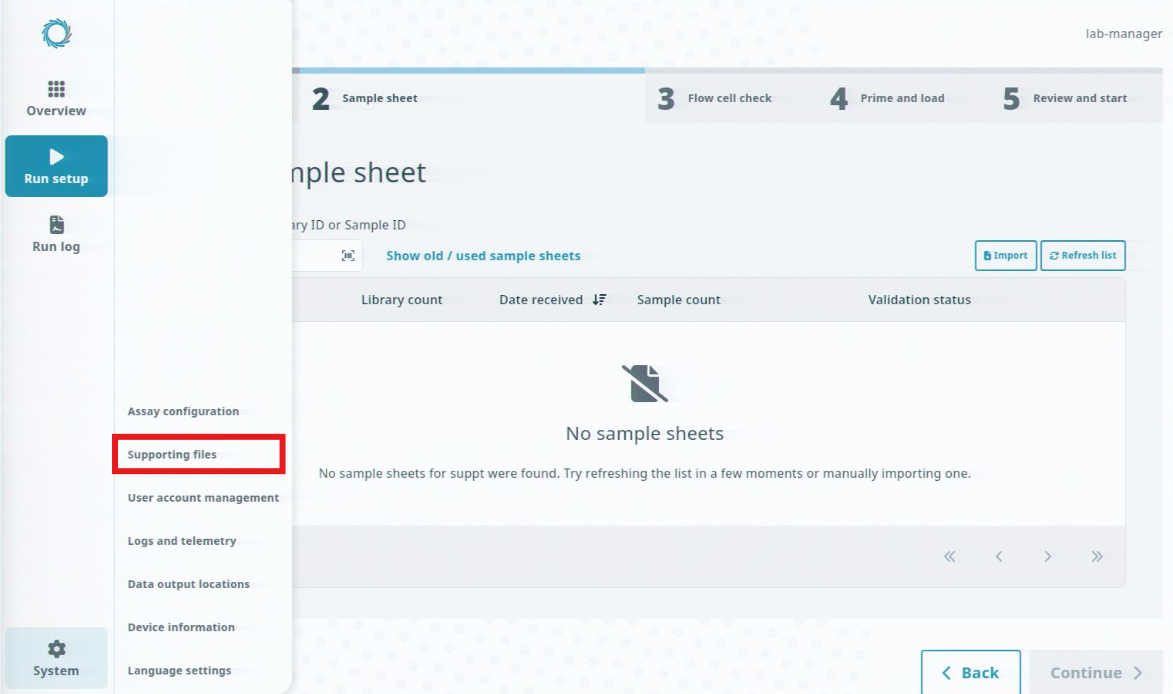
Locate the supporting file you wish to delete, and click Delete on the right side of the window.
26. Using a new supporting file for an existing assay
Note: An account with IT administrator or Laboratory manager permissions is required to complete the actions in this section.
When permanent changes to an assay are required, use this process. For temporary changes, it is recommended to modify the sample sheet instead.
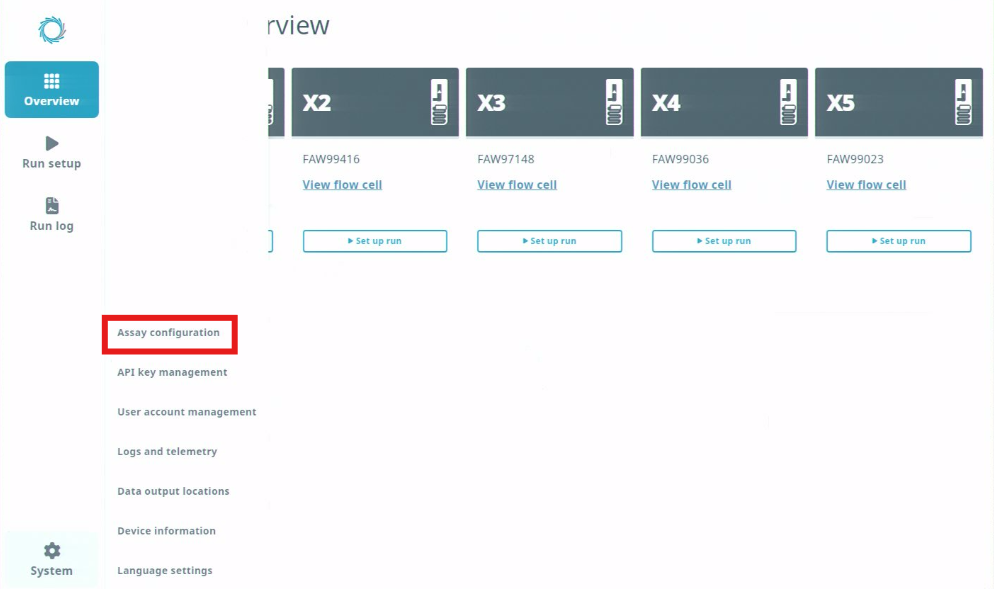
In the Sequencing Software, click System, then click Assay configuration.
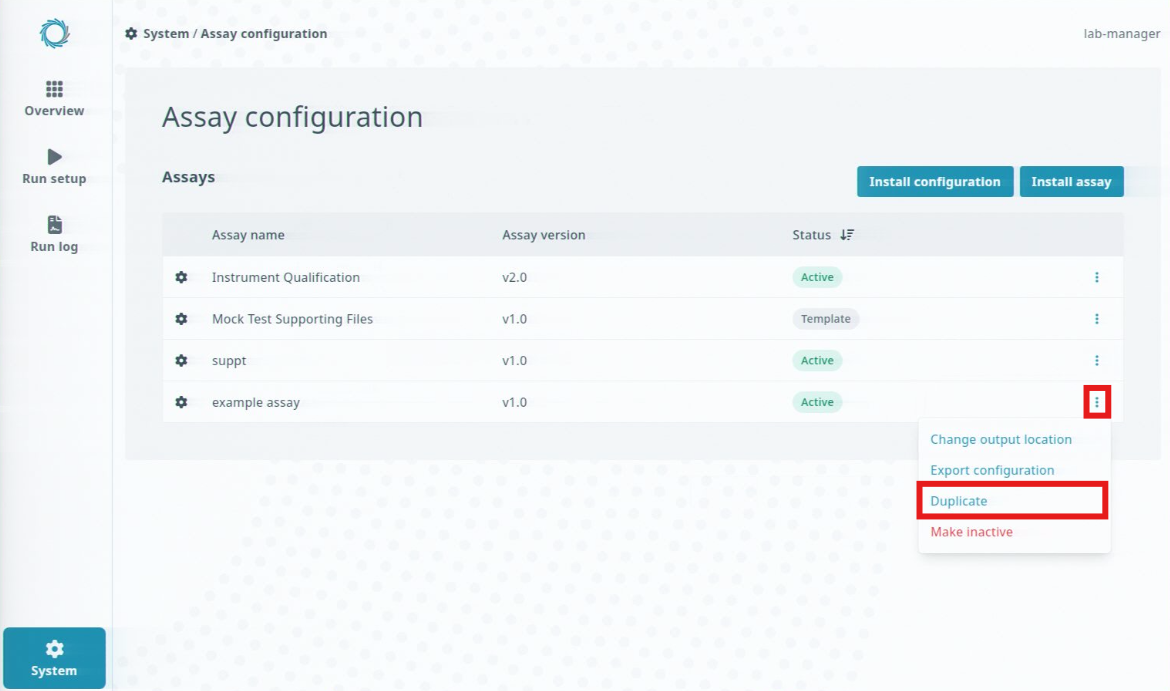
From the list of available assay files, click the three dots next to the assay you want to use, and then click Duplicate.
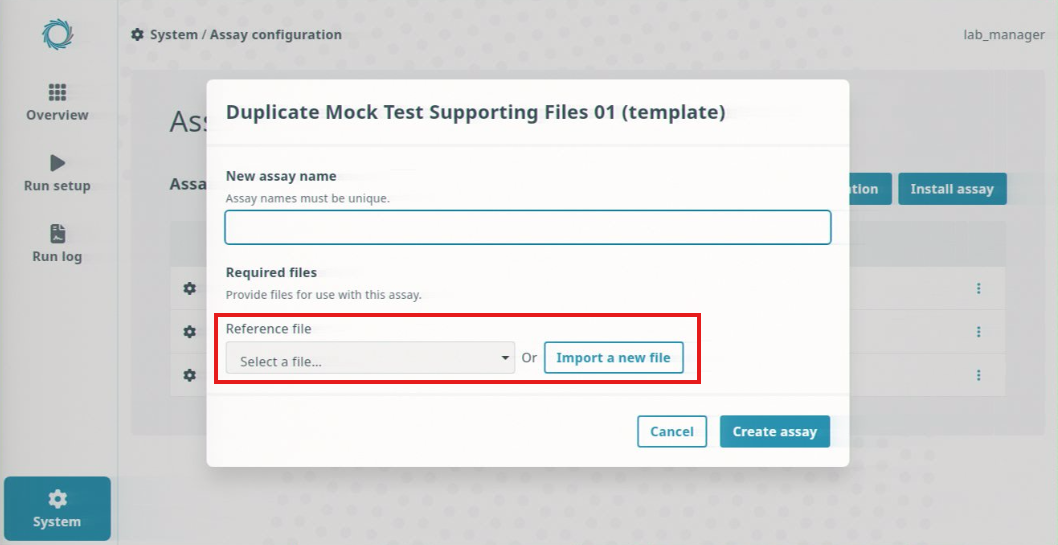
Enter a new assay name.
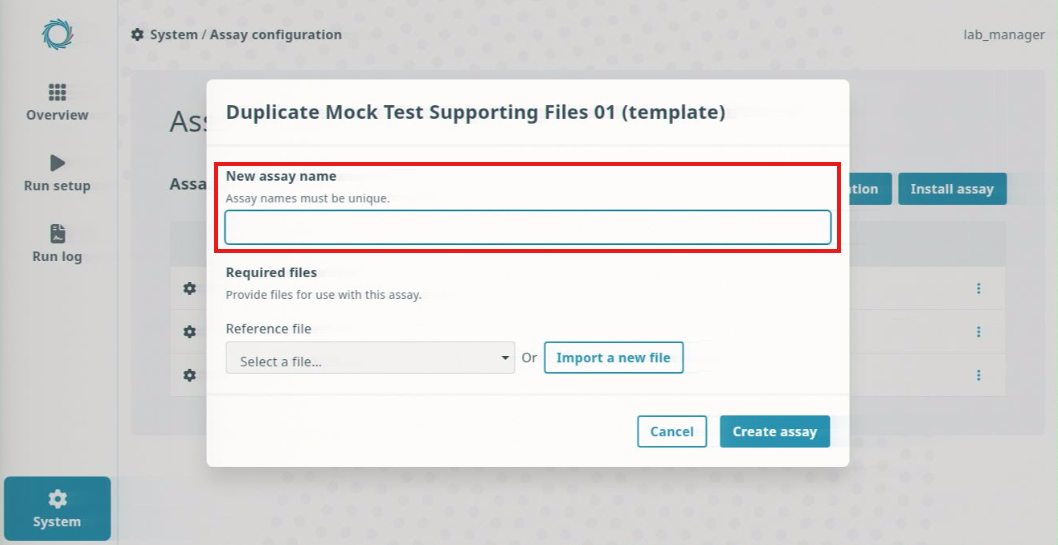
Select files for use with the assay from the drop-down menu, or click Import a new file.
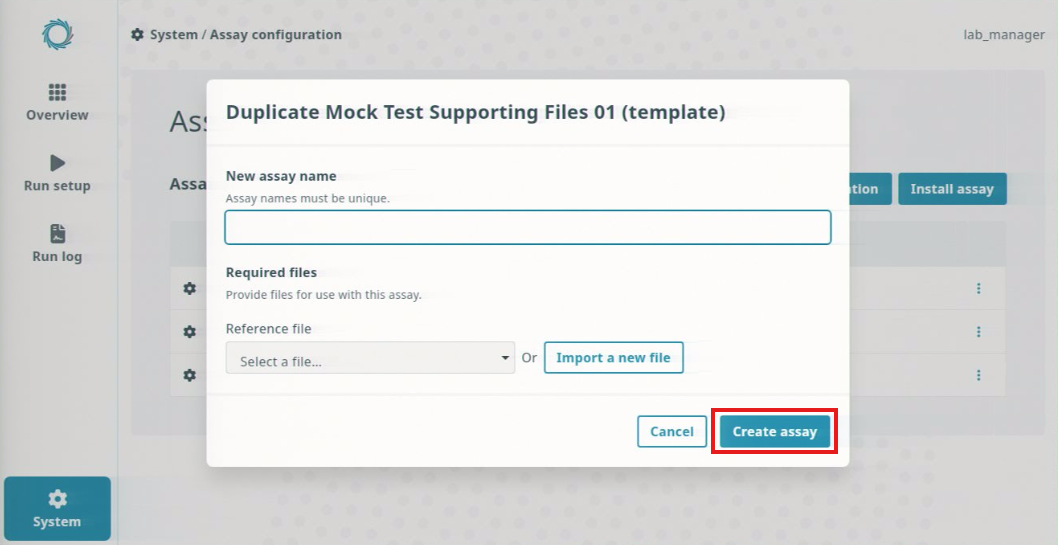
Click Create assay.
27. Installing system updates
Note: An account with IT administrator permissions is required to complete the actions in this section.
Sequencing Software updates
The Q-Line GridION is not intended to have regular updates. When updates are available, installation instructions will be provided by your technical support representative, or the installation may be performed during an on-site visit. After installing an update, you may need to perform an Instrument Performance Verification (IPV) and any additional procedures necessary to revalidate the system. Release notes provided with each update will help you decide the extent of revalidation required.
System updates
You may want to perform regular updates to the operating system of the device. The following command will update the system without affecting the Sequencing Software itself:
sudo /opt/ont/mooneye/bin/ont-mooneye-software-update --os
The frequency with which you perform operating system updates should be decided by your IT department.
28. Checking software version number
Note: An account with any permission level can be used to complete the actions in this section.
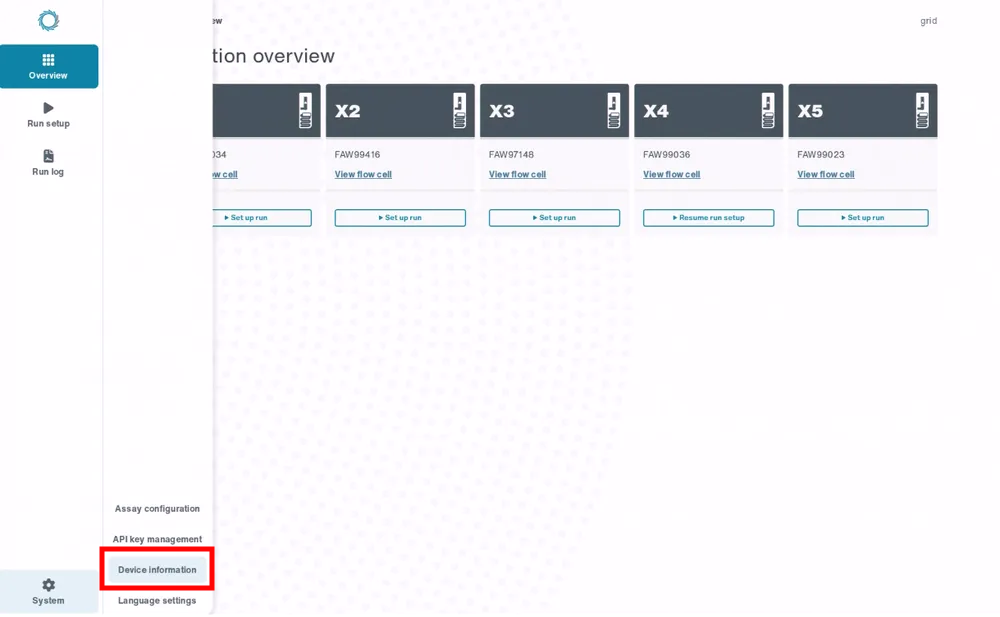
Open the System menu and click Device information.
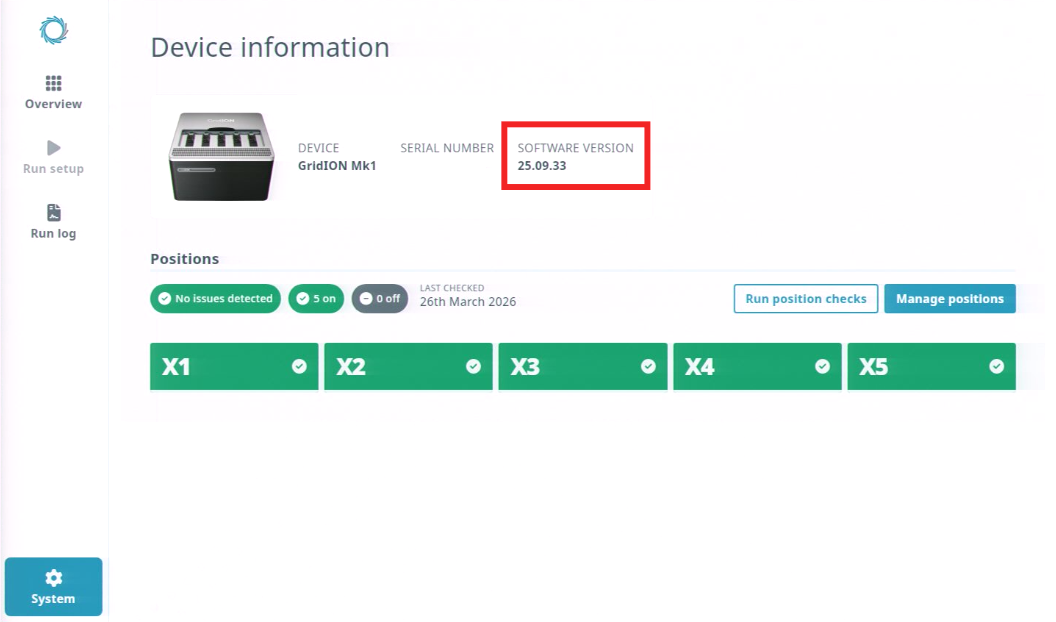
The software version will be displayed.
29. Configuring auto-lockout and unlocking accounts
Note: An account with IT administrator permissions is required to complete the actions in this section.
Auto-lockout
The following Terminal commands can be used to configure auto-lockout. The tool ont-platform-security-auto-lockout enables, configures, and disables automatic account lockout on failed logins. It may also be used to reset user accounts that have been locked due to too many failed login attempts.
Configurable options include setting the number of failed attempts after which an account will be locked and a time period after which a locked account will be automatically unlocked.
By default, any accounts locked by auto-lockout will be re-enabled at system boot time. This behaviour can be changed using the configuration option:
--reset-on-boot NO
Note: IT administrator accounts are never locked out.
Usage examples:
Enable auto-lockout after three failed attempts:
sudo /opt/ont/platform/bin/ont-platform-security-auto-lockout --enable --deny-count 3
Enable auto-lockout after five attempts and prevent re-enabling at reboot time:
sudo /opt/ont/platform/bin/ont-platform-security-auto-lockout --enable --deny-count 5 --reset-on-boot NO
Reset failure counters for the user ID ‘john’. This will permit this user to log in again if the account had been locked as a result of too many login failures:
sudo /opt/ont/platform/bin/ont-platform-security-auto-lockout --reset john
Disable auto-lockout:
sudo /opt/ont/platform/bin/ont-platform-security-auto-lockout --disable
Display the status of auto-lockout:
sudo /opt/ont/platform/bin/ont-platform-security-auto-lockout --status
Unlocking accounts
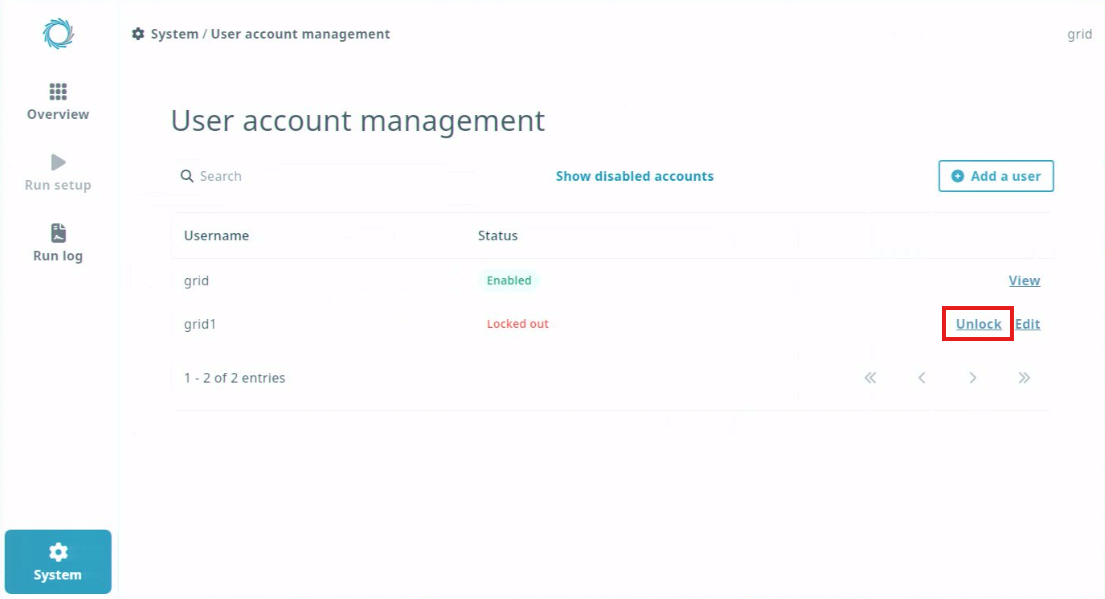
To unlock a locked user account, navigate to the User account management page and locate the locked account from the list. Click Unlock on the account you would like to unlock.
30. The Linux Audit system
Note: An account with IT administrator permissions is required to complete the actions in this section.
The Linux Audit system provides a framework to track security-sensitive information by recording events and mapping them to users as they occur. These events are recorded locally and can be sent, as they occur, to remote log destinations using syslog RFC 5424: The Syslog Protocol
Auditing is enabled by default on the Q-Line GridION.
Audit does not provide additional security to the platform; rather, it can be used to discover violations of its security policies.
The following events are explicitly recorded:
- All processes started by any logged-in user
- All file deletions, renames, ownership, permissions and attribute changes
- All commands run with elevated privileges
- Hostname changes
- System clock changes
- The kernel module loads and unloads
- All user logins and privilege level changes
- Configuration changes related to user identities and elevated privileges (
sudo) - Configuration changes related to user login access and the recording of logins
- Changes to attributes (a.k.a. permissions and ownerships) and writes to the files in the following directories:
- /opt/ont/minknow
- /opt/ont/gourami
- /opt/ont/gourami-local-auth
- /opt/ont/guppy
- /opt/ont/mooneye
- /opt/ont/nanoxint
- /opt/ont/platform
- /opt/ont/reception
Note: Audit log procedures should be performed by your IT department.
Enable, disable and configure the Linux audit subsystem
The tool ont-platform-security-audit is used to enable, disable and configure auditing.
Important: While Linux Audit is enabled at the time of installation, it will not log to syslog until enabled by this tool.
After being enabled, Audit will log to its own log file (/var/log/audit/audit.log ) and to syslog. Syslog may be configured to send audit and other messages to a remote syslog server using the Oxford Nanopore Technologies tool ont-platform-security-syslog.
Usage examples:
Enable auditing and lock the setting to enabled. The lock means that audit will remain active until it is disabled
Note: A reboot is required after disabling the audit tool.
sudo /opt/ont/platform/bin/ont-platform-security-audit --enable --lock
Unlock the audit and disable it on the next boot. For the change to take effect, reboot the system after this.
sudo /opt/ont/platform/bin/ont-platform-security-audit --disable --unlock
Display the current status of the audit subsystem:
sudo /opt/ont/platform/bin/ont-platform-security-audit --status
Configuring Syslog to a remote server
Syslog is a widely used standard for message logging. It is used for various tasks, including system management and security auditing. On the GridION, syslog is implemented via the subsystem rsyslogd and configured using the tool ont-platform-security-syslog. Syslog is enabled by default and stores messages locally in the file /var/log/syslog.
For effective system management and auditing, we recommend that syslog messages be sent to a remote syslog server to store them and to apply additional filtering and monitoring. This remote store is considered an essential security measure within many organisations.
Syslog is enabled during system installation and can be configured to send logs to a remote syslog server, as outlined in the examples below. The remote server must have been configured to receive these messages, and the network between the two must be capable of propagating the messages. The transport protocol (UDP/TCP) can be configured, and the port number can be specified. By default, port #514 and TCP transport protocol will be used.
Usage examples:
To configure syslog to send messages to the remote server 192.168.1.10:
sudo /opt/ont/platform/bin/ont-platform-security-syslog --enable --server 192.168.1.10
To configure syslog to send messages to the remote server 192.168.1.10 using the UDP and on port number #765:
sudo /opt/ont/platform/bin/ont-platform-security-syslog --enable --server 192.168.1.10 --protocol udp --port 765
To configure syslog to send messages to the remote server 192.168.1.10 and to schedule the cronjob to run six times per hour:
sudo /opt/ont/platform/bin/ont-platform-security-syslog --enable --server 192.168.1.10 --cronjob 6
To disable syslog sending to the current remote server:
sudo /opt/ont/platform/bin/ont-platform-security-syslog --disable
To disable the scheduled cronjob:
sudo /opt/ont/platform/bin/ont-platform-security-syslog --cronjob 0
31. Viewing audit reports
Audit reports can be generated to show a record of system and user activity over a defined time period, including events such as sequencing runs, user logins, software updates, and hardware checks. The system events which are recorded are outlined in a table at the end of this section. You may require audit reports when investigating security incidents, monitoring system usage, or demonstrating regulatory compliance.
Recorded system events are retained for a minimum of 3 months. To retain a record for longer periods, export and archive audit reports as required.
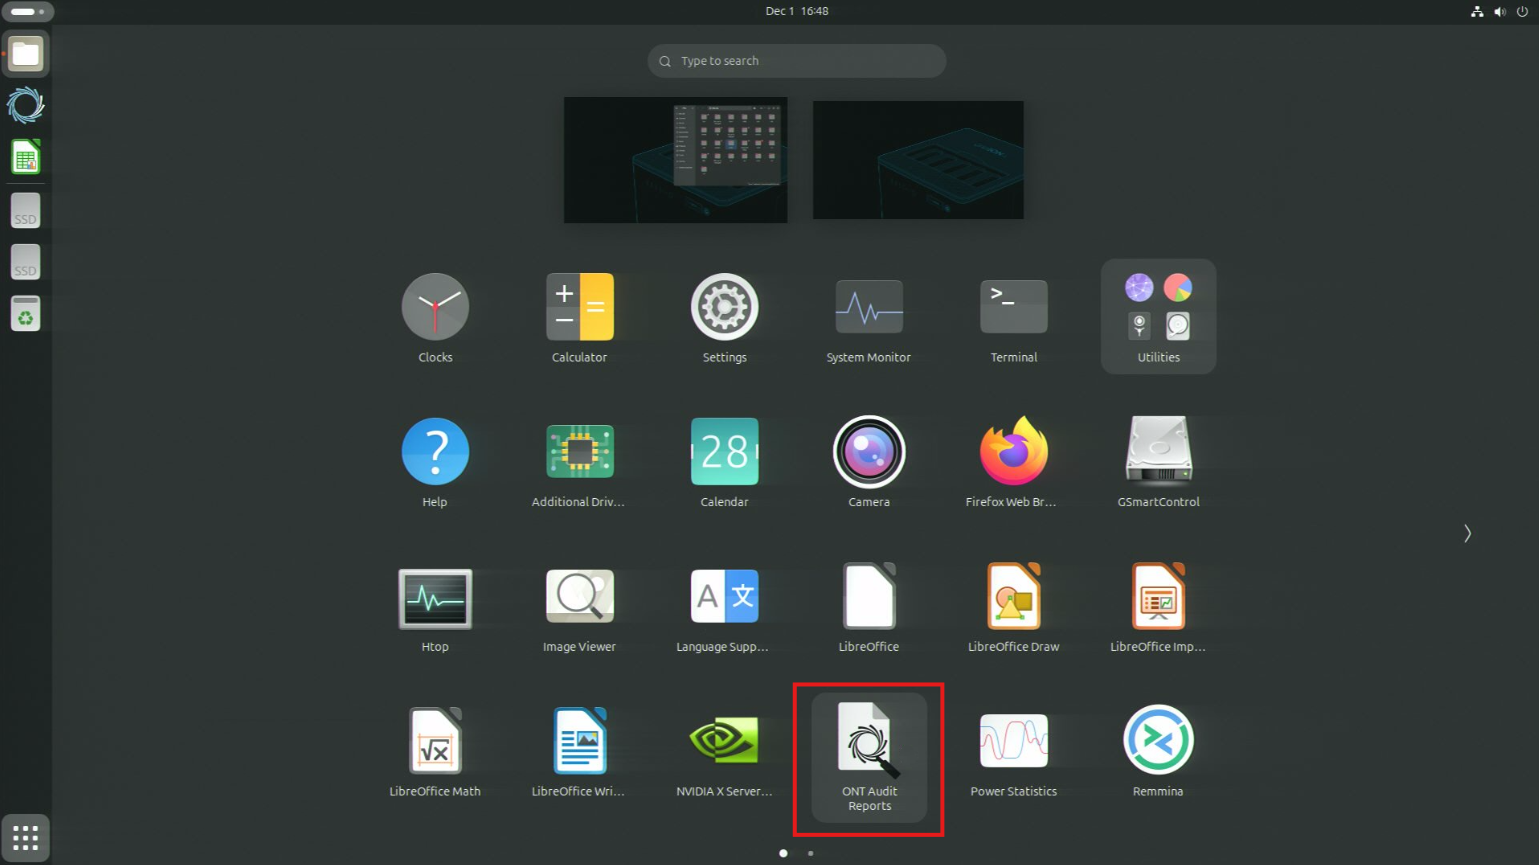
Open the ONT Audit Reports application.
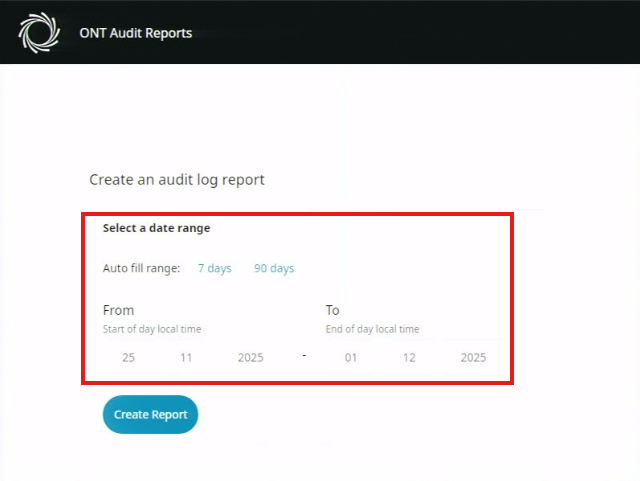
Select a date range.
Click Create report.
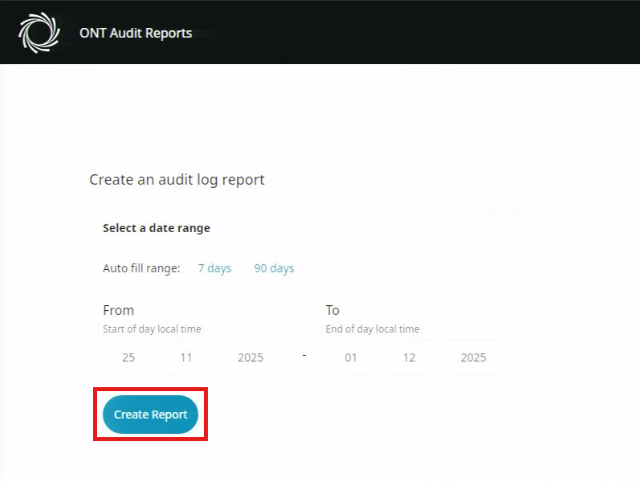
The report will show system events recorded during the specified range. To save a copy, click Export to PDF.
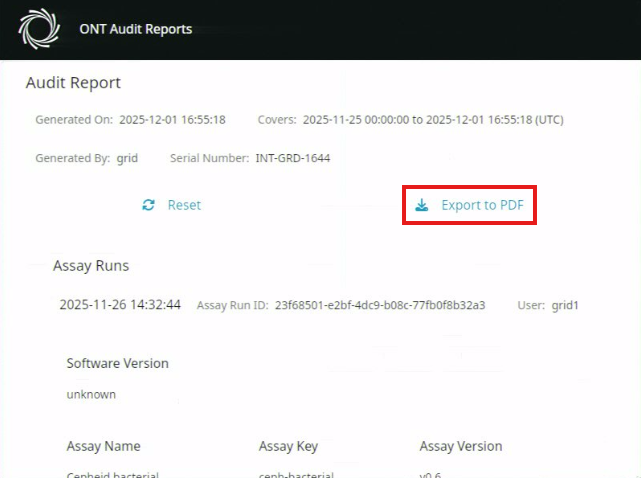
When you are finished, close the program or click Reset to start again.
Table of events
The table below outlines the system events recorded in the audit reports.
| Event | Description |
|---|---|
| Start run setup | Initial set up of starting a run |
| Assays started | An assay has been started |
| Assays cancelled | A user has manually stopped an in-progress assay |
| Assays failed | An assay has failed to complete successfully (the results of a completed analysis workflow are not relevant) |
| Assays completed | An assay has completed successfully (with no errors, the results of a workflow are not relevant) |
| Assay paused | An assay has been paused |
| Assay resumed | An assay has been resumed |
| Flow cell checks | A flow cell check has been initiated or cancelled with associated data to all be grouped under one event group "Flow cell checks" |
| Assay installed | An assay has been added |
| Assay activated | An assay has been activated |
| Assay deactivated | An assay has been deactivated |
| Offload location | An offload location has been either added, edited or removed |
| Assay offload location added / removed | Offload Location being Added / Removed |
| Role / permissions assigned | The permissions of a user have been assigned |
| Role / permissions modified | The permissions of a user have been changed |
| Hardware check | A hardware check has been completed or failed will be captured under this event type |
| Sample sheet imported | A sample sheet has been imported |
| Sequencing report generated | A sequencing report has been generated |
| Analysis complete | An analysis has been completed and the save location path |
| Analysis failed | An analysis has not completed successfully |
| Offload finished | Data offload has completed with a status of failed / success / cancelled (only cancelled will provide a user ID) |
| Software update success | Software has been updated successfully |
| Software update failed | Software has not been updated successfully |
| Device start-up | The device has been started up |
| Device shutdown | The device has been shut down |
| User account creation | A user account has been created |
| Audit report generation | The audit report has been generated |
| Audit report exported | The audit report has been downloaded or exported |
| System clock changes | The system time has been changed |
| File system mounted | A device has been mounted |
| User locked out | A user has been locked out due to too many failed attempts to log in |
| User log in | A user has successfully logged in |
| User log in failed | A user has failed to log in due to using an incorrect password |
| User password reset | A user's password has been reset by an administrator (recording both administrator and user whose password has been reset) |
| Sudo events | Any commands that run with sudo |
32. GridION security
Encryption is supported via LUKS (v1 and 2) for local drives. Please note that drive encryption only protect data at rest.
For network drives to access the platform, both NFS and SMB (via Samba) protocols are supported. Data encryption on data transfers is only supported in SMB3. NFSv3 does not provide encryption on data transfer, whereas encryption for authentication requests is standard for SMB protocol versions 2 upwards. We recommend that SMB version 1 be disabled. NFS supports authentication encryption in NFSv3 with GSS and in NFSv4.
System updates are normally via ISO images supplied by Oxford Nanopore Technologies. Online updates for individual and batch updates of Linux are available, though these may introduce compatibility issues for the installed version of the Sequencing Software. For those cautious of security, automatic system package updates can be set up, with the understanding that there may occasionally be compatibility issues with the installed Sequencing Software version.
Ensuring the device is secure from both an operational and data privacy perspective is the responsibility of the organisation using the device. We recommend that users refer to applicable standards (e.g. ISO27001:2022 or IEC 80001-1 Edition 1.0 2010-10 or IEC 81001-5-1 Edition 1.0 2021-12) and use relevant technologies and policies (such as hardware firewall, anti-malware software, limiting internet use on the device, and disabling all ports and services to the sequencer which are not defined in this document) to provide risk controls suitable to their organisation. Data backup, restoration and business continuity protocols are the responsibility of the organisation using the device. We can provide an industry standard MDS2 form to enable users to be fully briefed on the security profile of the device. Anti-malware software should be installed on the device, and internet use should be limited.
33. Configuring an assay definition file for your own assay
Note: An account with Laboratory Manager permissions is required to complete the actions in this section. Support from your Oxford Nanopore representative is required to configure a custom assay.
The Sequencing Software uses assay definition files to run each chemistry and assay type. The files provide the software with values for key sequencing parameters. If you have designed your assay on Q-line products and want to run it in a production environment, adjustments may be required to match your configuration.
You can only export, edit, and re-import assay definition files using an account with Laboratory manager permissions.
To add a new supporting file (such as an alignment reference that is used every run) to an existing assay, refer to the instructions in the Managing supporting files section.
To customise an assay, contact your Oxford Nanopore Technologies representative for support.
Note: You should test your custom assay definition file to ensure it works before proceeding to scale or use high-value samples.
34. Exporting logs and telemetry
Note: An account with IT administrator or Laboratory manager permissions is required to complete the actions in this section.
When troubleshooting, technical support may ask you to share logs or telemetry. These can be exported from the Sequencing Software.
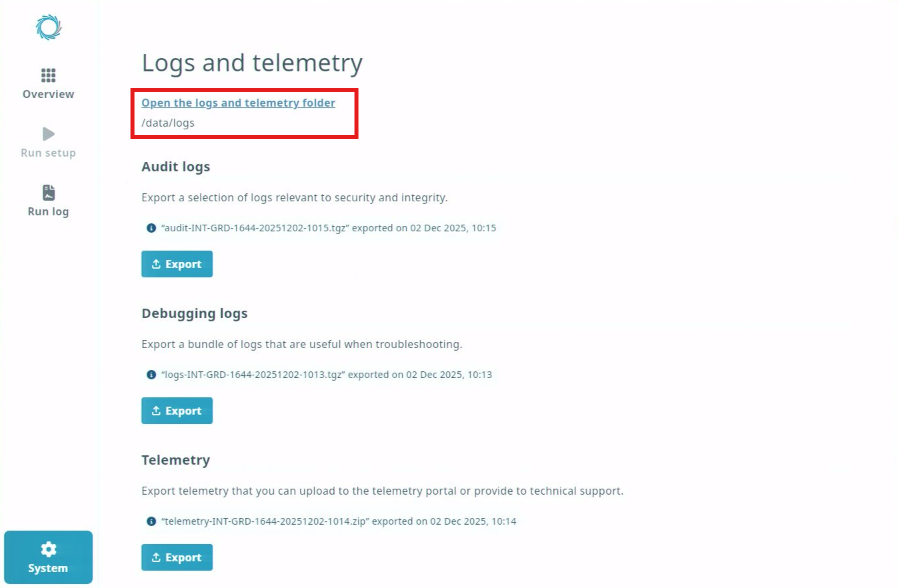
Open the System menu and click Logs and telemetry
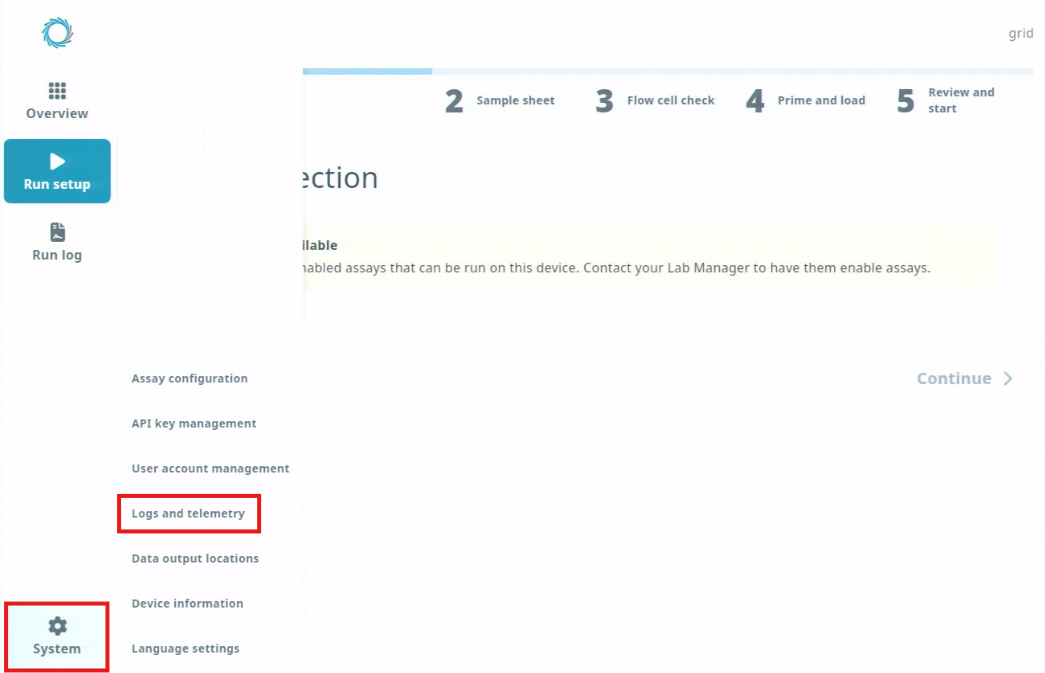
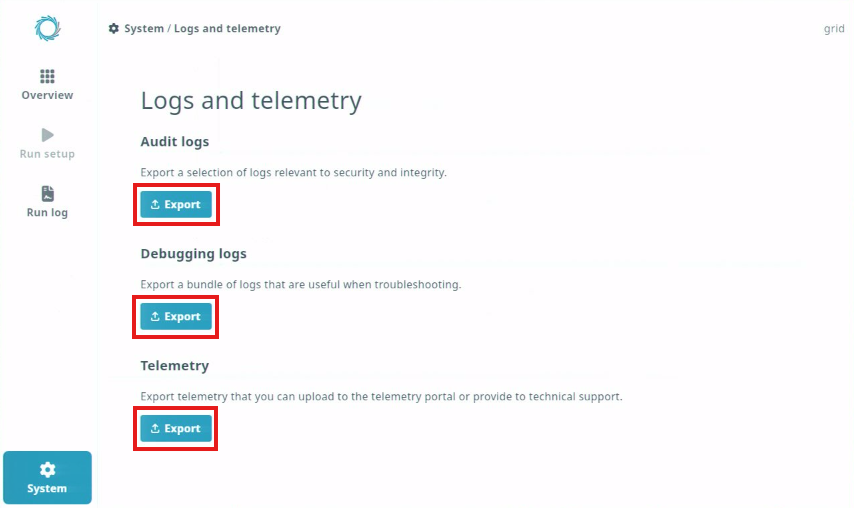
From the Logs and telemetry page, you can export Audit logs, Debugging logs, and Telemetry. Click the Export button for the required item.
The files will be exported to /data/logs. When complete, the software will indicate the name of the exported file and the time and date it was exported.
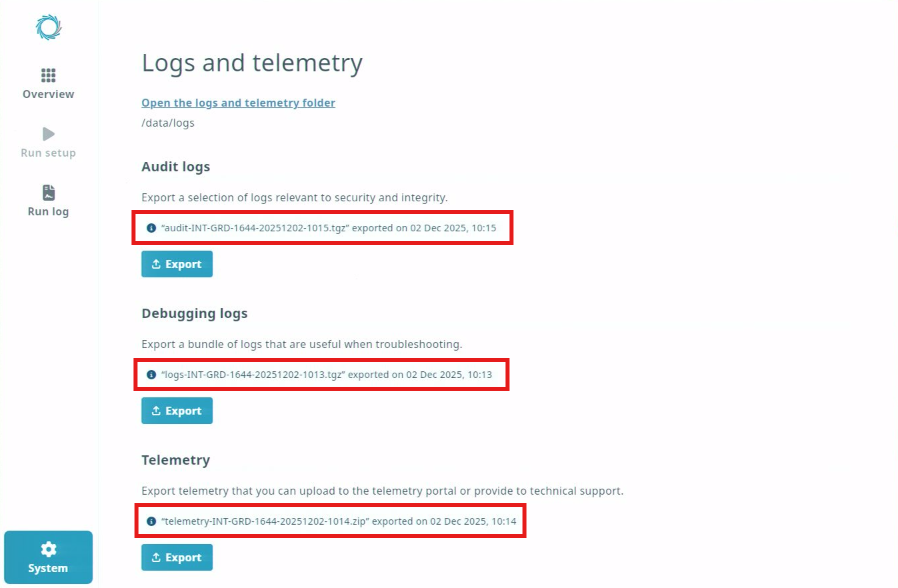
Navigate to the file location by clicking Open the logs and telemetry folder.
Audit logs and Debugging logs are exported in .tgz format. Telemetry is exported in .zip format.