ElysION MinION user guide (ELM_9232_v1_revA_26Aug2026)


Protocol
V ELM_9232_v1_revA_26Aug2026
FOR RESEARCH USE ONLY.
Contents
Overview
Device hardware and use
- 3. Reference: Correct cable plan of the ElysION
- 4. Reference: Correct cable plan of the compute control unit
- 5. Power on the ElysION device
- 6. Power on the compute control unit
- 7. Power off the devices
Software interface and use
- 8. Start the user interface and initialise
- 9. Check data storage capacity ahead of starting a run
- 10. Choose an assay to run
- 11. Guide to setting the sequencing run variables
- 12. Inserting a flow cell onto the ElysION device and performing a flow cell check
- 13. Guide to writing a sample sheet
- 14. Guide to running automated sample normalisation
- 15. Guide to running QC checks and manual sample normalisation
- 16. Guide to configuring a custom method
- 17. Accessing the sequencing data
- 18. Accessing the analysis output data
- 19. Labware sourcing and usage
- 20. System configuration
Device maintenance
Troubleshooting/FAQs
- 24. How to collect logging data for troubleshooting support
- 25. The ElysION device does not switch on
- 26. The compute control unit does not switch on
- 27. Data offload from the device to long-term storage takes too long
- 28. The automated method has not completed the library preparation
- 29. The automated method has not completed the anticipated sequencing
- 30. The automated method has not completed the anticipated analysis workflow
1. Device Information
ElysION™
The ElysION™ is a fully automated sample-to-answer sequencing solution with three integrated MinION™ Mk1D devices and onboard computing. It is designed to bring streamlined genomics into the lab by offering a range of end-to-end sequencing workflows for a broad field of research applications.
The ElysION is a combined liquid handling and sequencing device that is intended for use in a laboratory setting for the preparation and sequencing of nanopore libraries from a range of input materials.
This device is for research use only.
Current supported Oxford Nanopore workflows:
- Rapid barcode sequencing
- Native barcode sequencing
- Nanopore-only Microbial Isolate Sequencing Solution (NO-MISS)
- Microbial amplicon barcode sequencing for 16S and ITS
- Rapid PCR barcode sequencing
- Metagenomics
Current supported Oxford Nanopore kits:
- Rapid Barcoding Kit 96 V14 (SQK-RBK114.96)
- Native Barcoding Kit 96 V14 (SQK-NBD114.96)
- Rapid PCR Barcoding Kit 24 V14 (SQK-RPB114.24)
- Microbial Amplicon Barcoding Kit 24 V14 (SQK-MAB114.24)
- Flow Cell Wash Kit (EXP-WSH004)
- Flow Cell Wash Kit XL (EXP-WSH004-XL)
Current supported flow cells:
- MinION/GridION Flow Cells R10.4.1 (FLO-MIN114)
2. What's in the box
Package includes:
- 1x ElysION Sample Preparation Device
- 1x ElysION Integration Kit - MinION
- 1x ElysION Control Unit - MinION
- 3x MinION Mk1D sequencing devices
- 3x MinION/GridION Flow Cells R10.4.1 (FLO-MIN114)
- 1x Rapid Barcoding Kit 96 V14 (SQK-RBK114.96)
- 1x Software Licence and Device Warranty (12 months)
Also included:
- Installation of instrument and software
- Installation qualification
- On-site training
3. Reference: Correct cable plan of the ElysION
Attach the cables and peripherals to the ports shown in the diagram. The USB-C port can be used to connect an adapter to plug in USB Type A cables.
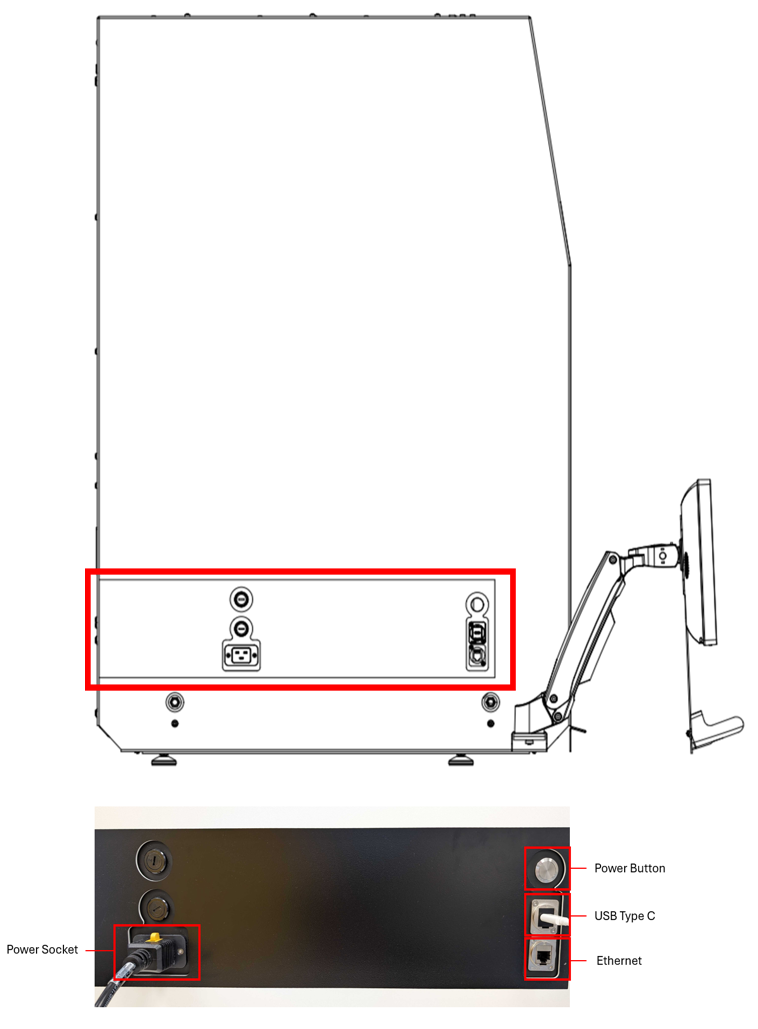
Plug the ElysION power cable into a wall socket, then plug the power cable into the ElysION.
To connect a USB type A keyboard/mouse or hard drive, connect a USB-C to USB-A multi adapter into the USB-C port.
We recommend doing this for the accurate editing of sample sheets.
4. Reference: Correct cable plan of the compute control unit
Attach the cables and peripherals to the ports shown in the image.
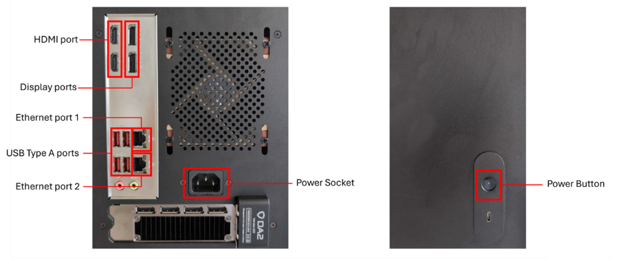
Connect a keyboard and mouse to the USB type A ports.
Connect the USB hub (provided with the device) to a USB A port.
Connect the MinION Mk1D devices to the USB hub.
Connect the computer to the internet with an ethernet cable connection to ethernet port 1.
Connect the computer to the ElysION with an ethernet cable connection to ethernet port 2.
Connect a display port cable between the computer and a monitor screen.
Connect the power cable to the computer, then plug it into a wall power socket.
5. Power on the ElysION device
Switch on the ElysION by pressing the power button. The central light above the ElysION device door should switch on.
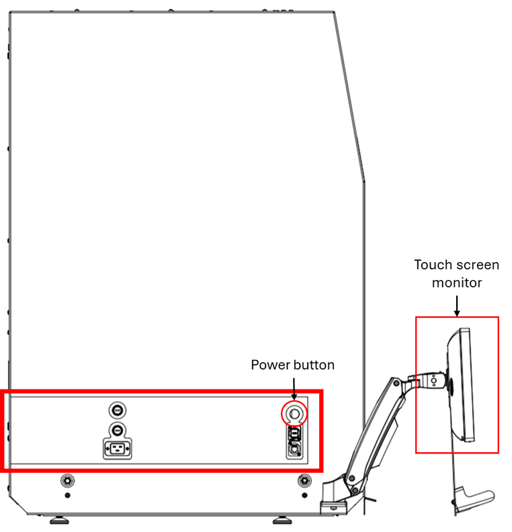
The touch screen monitor attached to the ElysION will automatically power on.
If the touch screen monitor does not automatically switch on, press the monitor power button on the right-hand side of the underside of the monitor.
The Background Services (BotQL) will automatically start during power on.
6. Power on the compute control unit
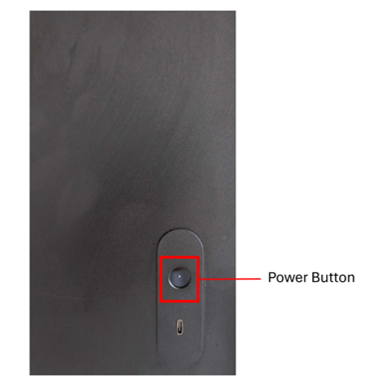
Turn on the compute control unit by pressing the power button.
7. Power off the devices
Power off the ElysION.
You can turn off the ElysION by pressing the Start icon at the bottom of the Windows menu on the touch screen monitor and then selecting Shut down.
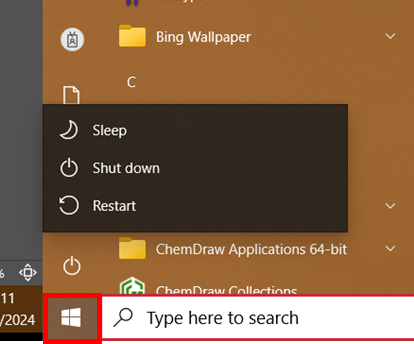
The backup option for powering off the ElysION is to press and hold the ElysION power button for five seconds.
Power off the compute control unit.
Turn off the compute control unit by selecting the power button in the top right corner and then selecting Power off.
8. Start the user interface and initialise
Before initialising the instrument, perform all daily maintenance steps and ensure that the worktable has been cleared of any labware or reagents and there are no obstructions.
If you are unsure if the instrument is ready to initialise, contact your customer support representative and include the device serial numbers in the description of your issue.
Select the 'ElysION' application from the desktop of the ElysION touch screen monitor.
Wait for the Liquid handler and MinION to connect to the compute control unit software.
Once connected, the Liquid handler section will show Initialisation required and the MinION section will show the MinION Mk1D devices connected, as shown in the image below.
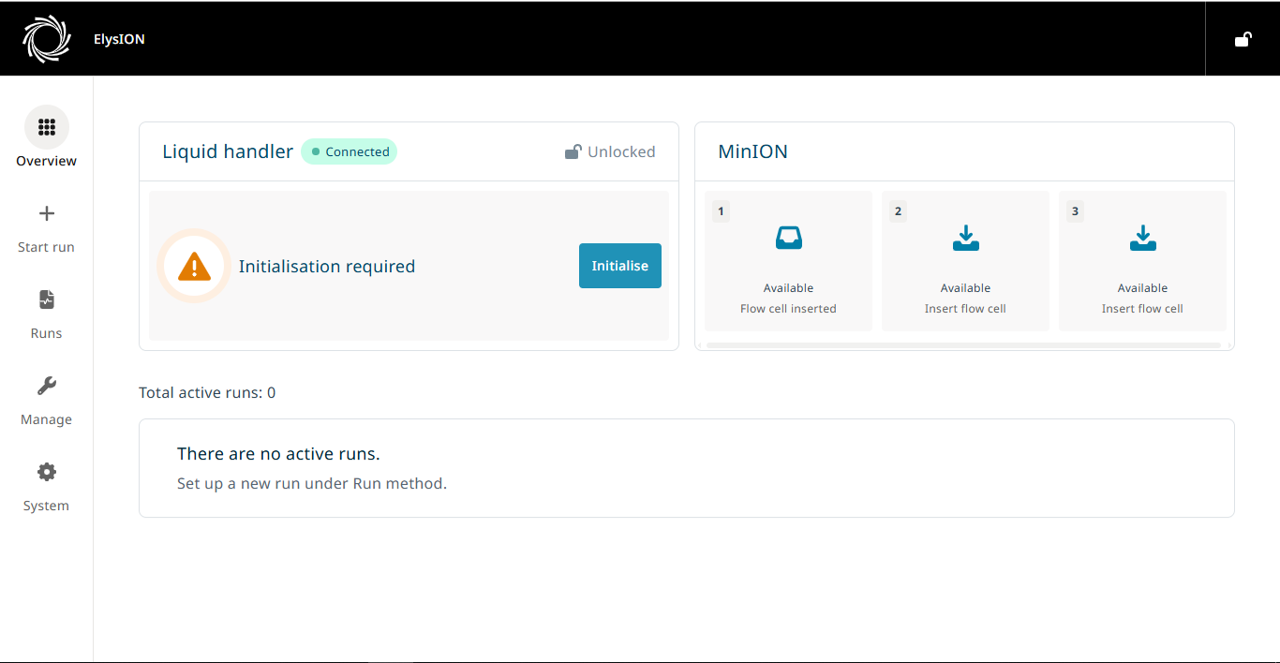
Ensure the worktable of the ElysION is cleared. Close the device door and press 'Initialise'.
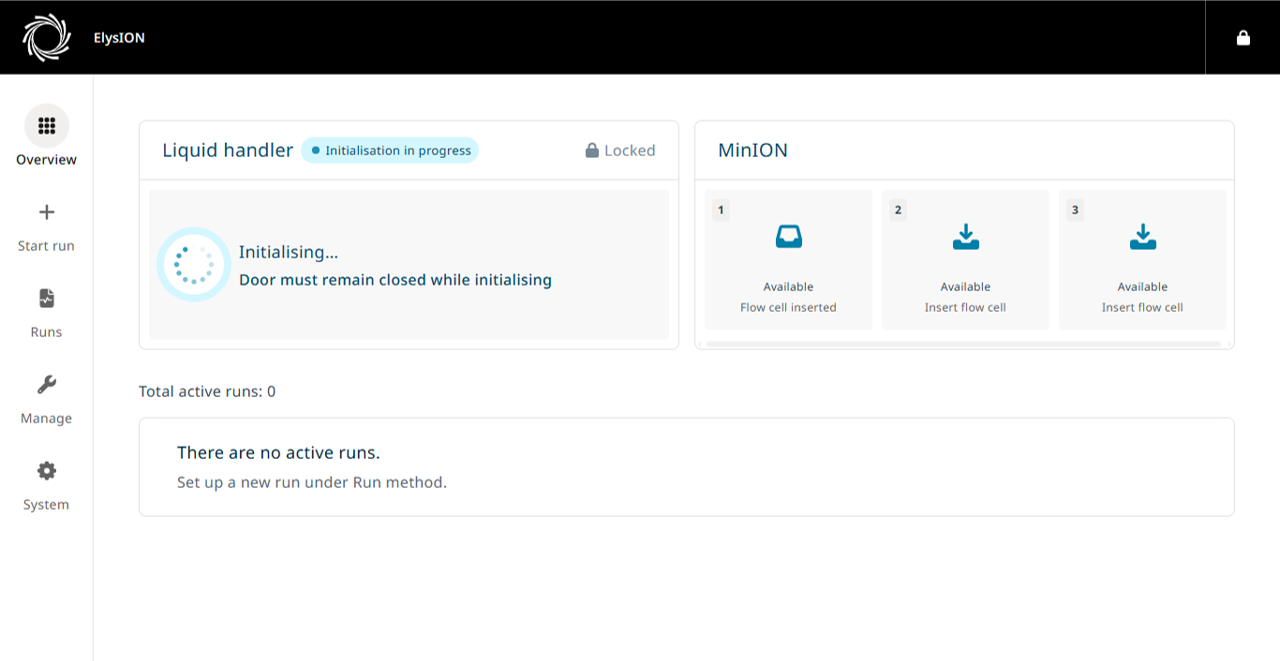
When the initialisation has completed, the Liquid handler will show as Available.
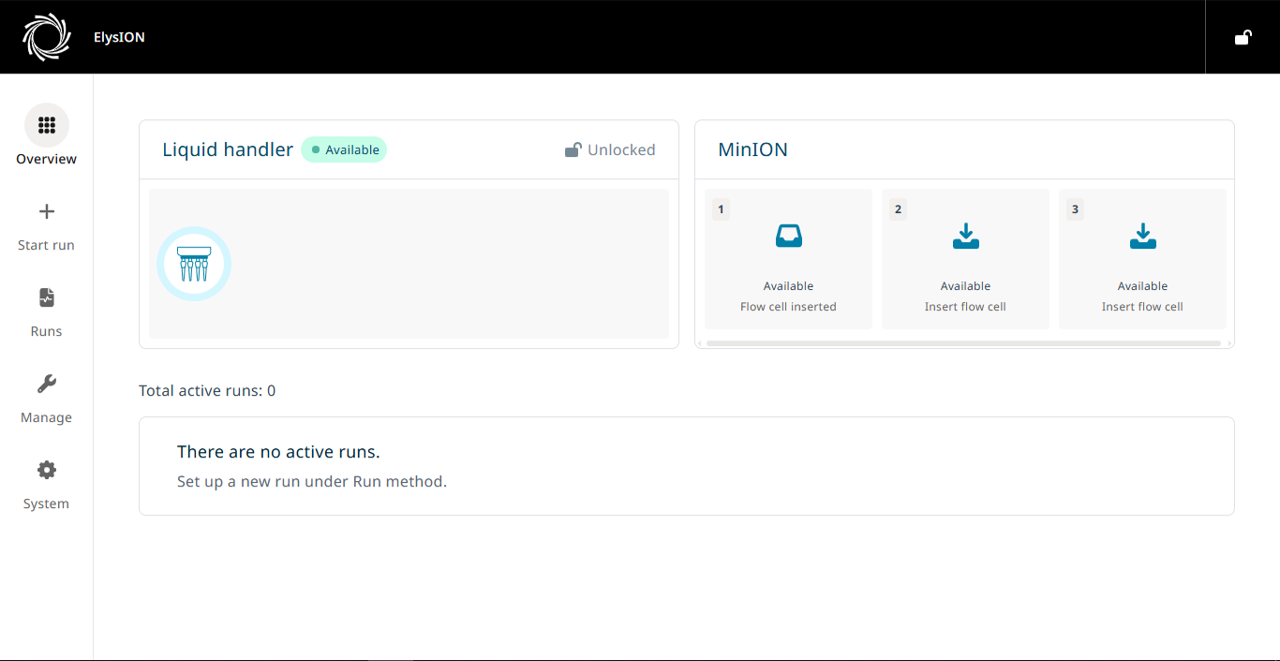
Once initialisation has successfully completed, you will be able to run an automated method.
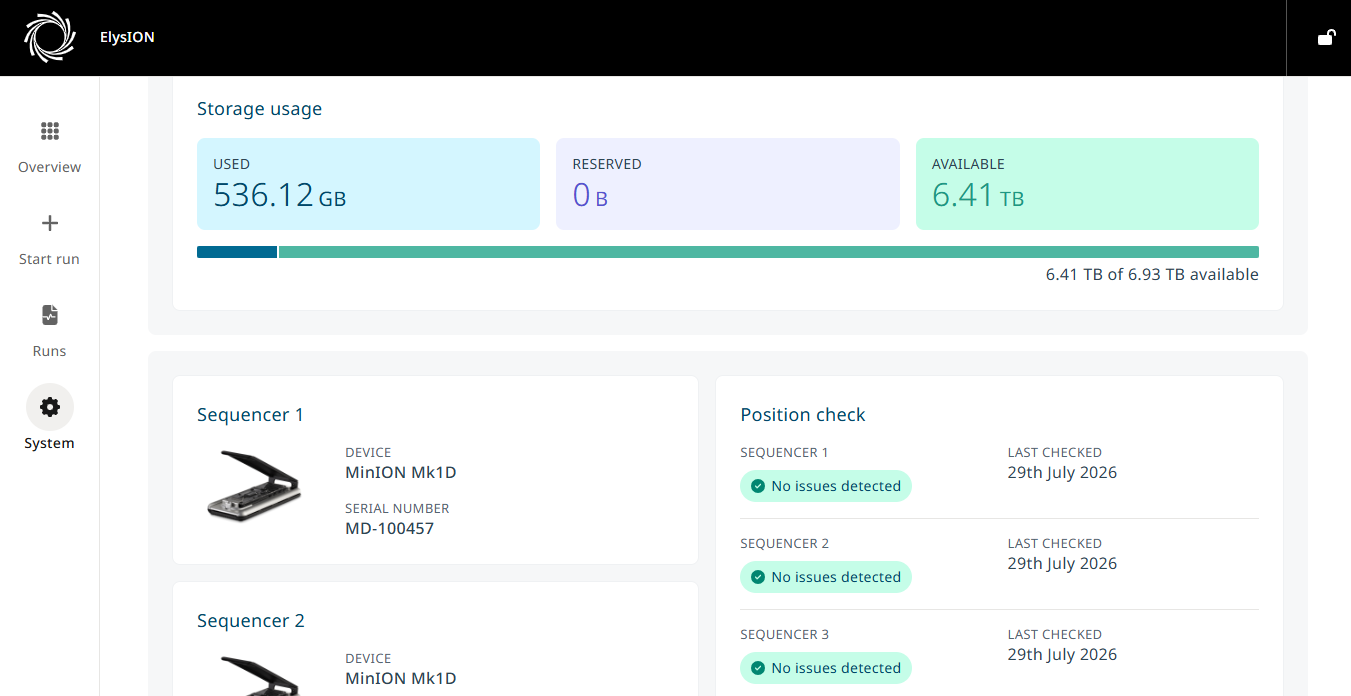
9. Check data storage capacity ahead of starting a run
Select 'System', and 'Device information'.
Ensure there is sufficient storage space for your planned assay run.
10. Choose an assay to run
Through the ElysION UI select the 'Start run' tab on the left side of the window.
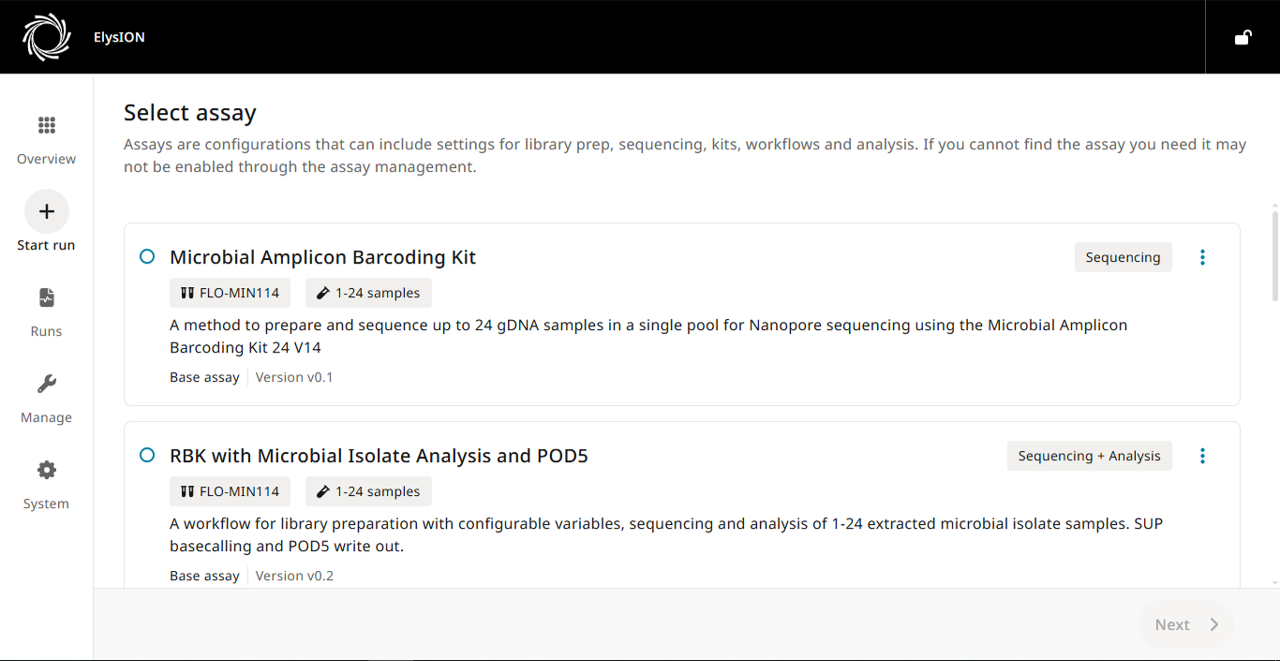
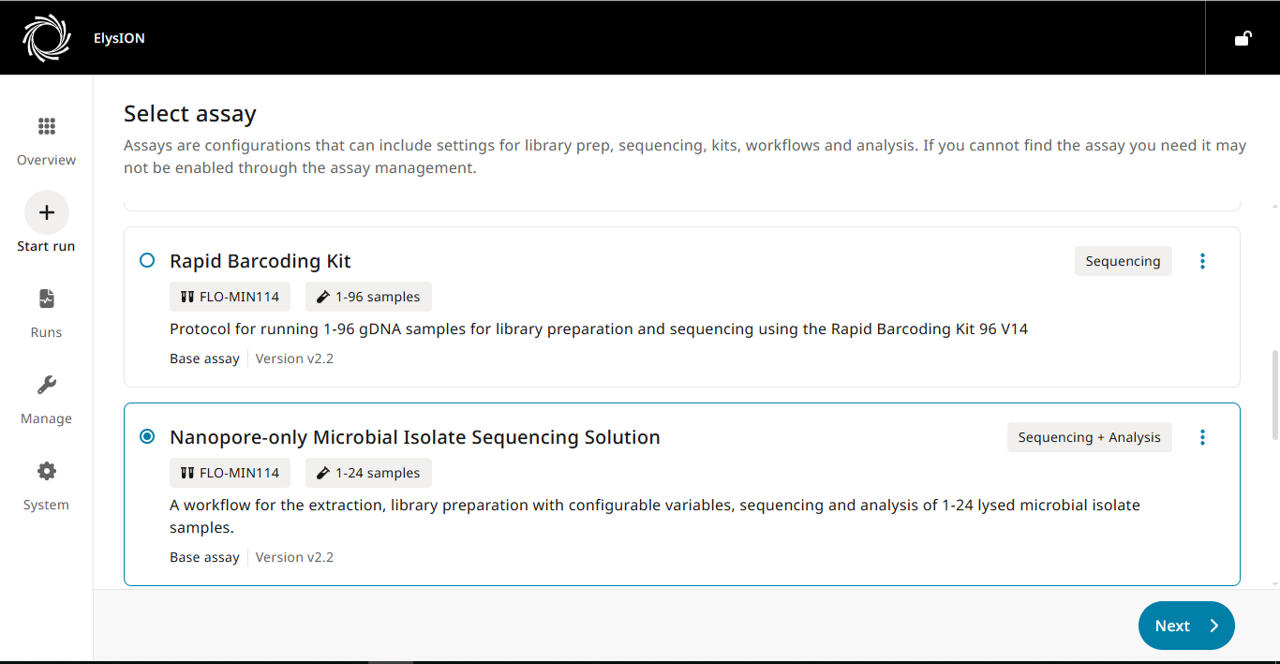
Select an assay from the list of available assays. Then press 'Next' at the bottom right corner of the screen.
Refer to the specific protocols for further instructions on preparing your workflow.
11. Guide to setting the sequencing run variables
Types of sequencing run variables
During the preparation of the device and ahead of starting a run, there are four sequencing run variables that can be set for the Run plan.
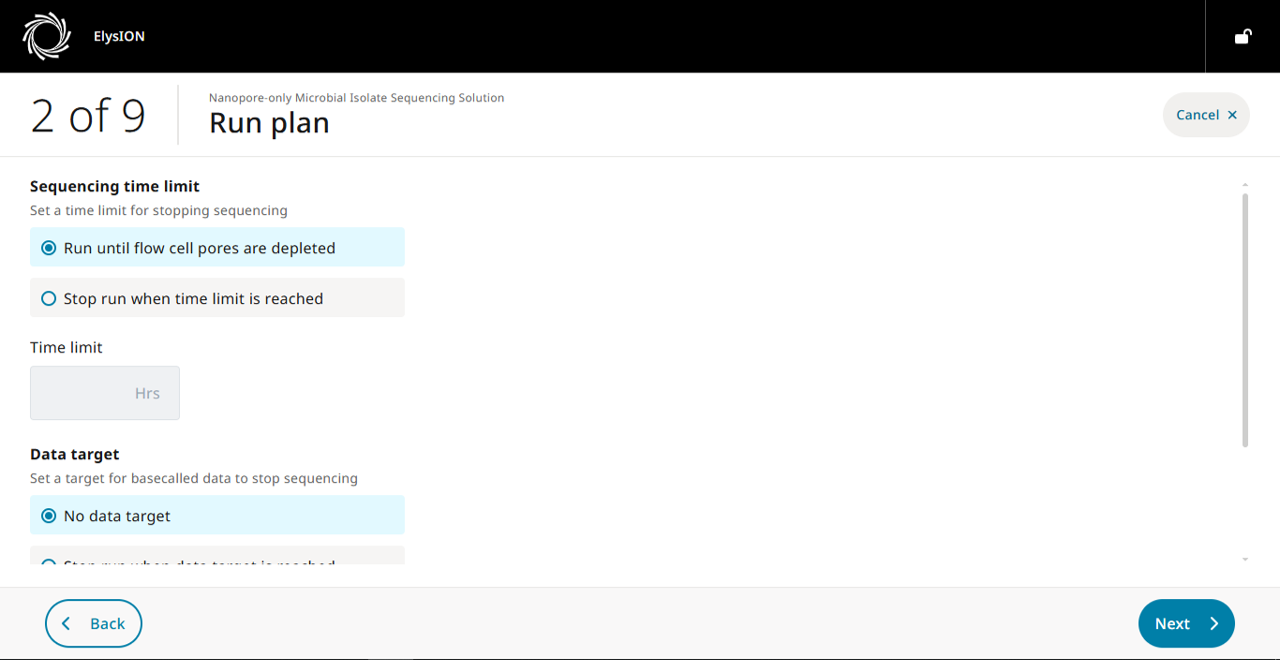
(A) Sequencing time limit
This variable gives you the option to set the maximum length of time (in hours) the instrument will sequence for or the option to run until the flow cell pores are depleted (5% of total pore count). When either the time limit has been reached or the pores have been depleted, the instrument will stop sequencing and proceed to the next step in the workflow.
(B) Data target
This variable allows you to set a maximum sequencing data output (in Gbases). Once this data target has been achieved, the instrument will stop sequencing and proceed to the next step in the workflow. Alternatively, where no data target is set, sequencing will stop according to the set 'Sequencing time limit' variable.
Note: Sequencing will stop when either the set sequencing time limit or set data target has been met. For example, if the sequencing time limit is set to 72 hours and the data target is set to 20 Gbases, and sequencing produces 20 Gbases in 48 hours, sequencing will stop before the 72 hours time limit.
(C) Flow cell flush/wash
This variable allows you to decide what happens to the flow cell once sequencing has completed. Flushing prepares the flow cell for return to Oxford Nanopore for recycling. Washing cleans the flow cell to allow multiple use of the same flow cell.
Note: Flush/Wash choices will require different reagents to be used. Washing will require an additional Oxford Nanopore Flow Cell Wash Kit (EXP-WSH004) or Flow Cell Wash Kit XL (EXP-WSH004-XL).
(D) POD5 write out
This variable is an optional toggle feature in the UI which allows you to turn on or off the write out to a POD5 file format.
12. Inserting a flow cell onto the ElysION device and performing a flow cell check
Select the MinION Mk1D position that you wish to load and insert a MinION/GridION Flow Cell into the correct location on the deck as shown on the on-screen display.
You may check three flow cells simultaneously on the ElysION deck if you wish to set up interleaving runs. However, any unused flow cells should be returned to the fridge after checking, until required for the subsequent library preparation.
Note: Refer to the specific protocols on how to set up interleaving runs.
Remove the MinION Mk1D flow cell cover.
Insert a MinION/GridION Flow Cell with all ports closed into the MinION Mk1D.
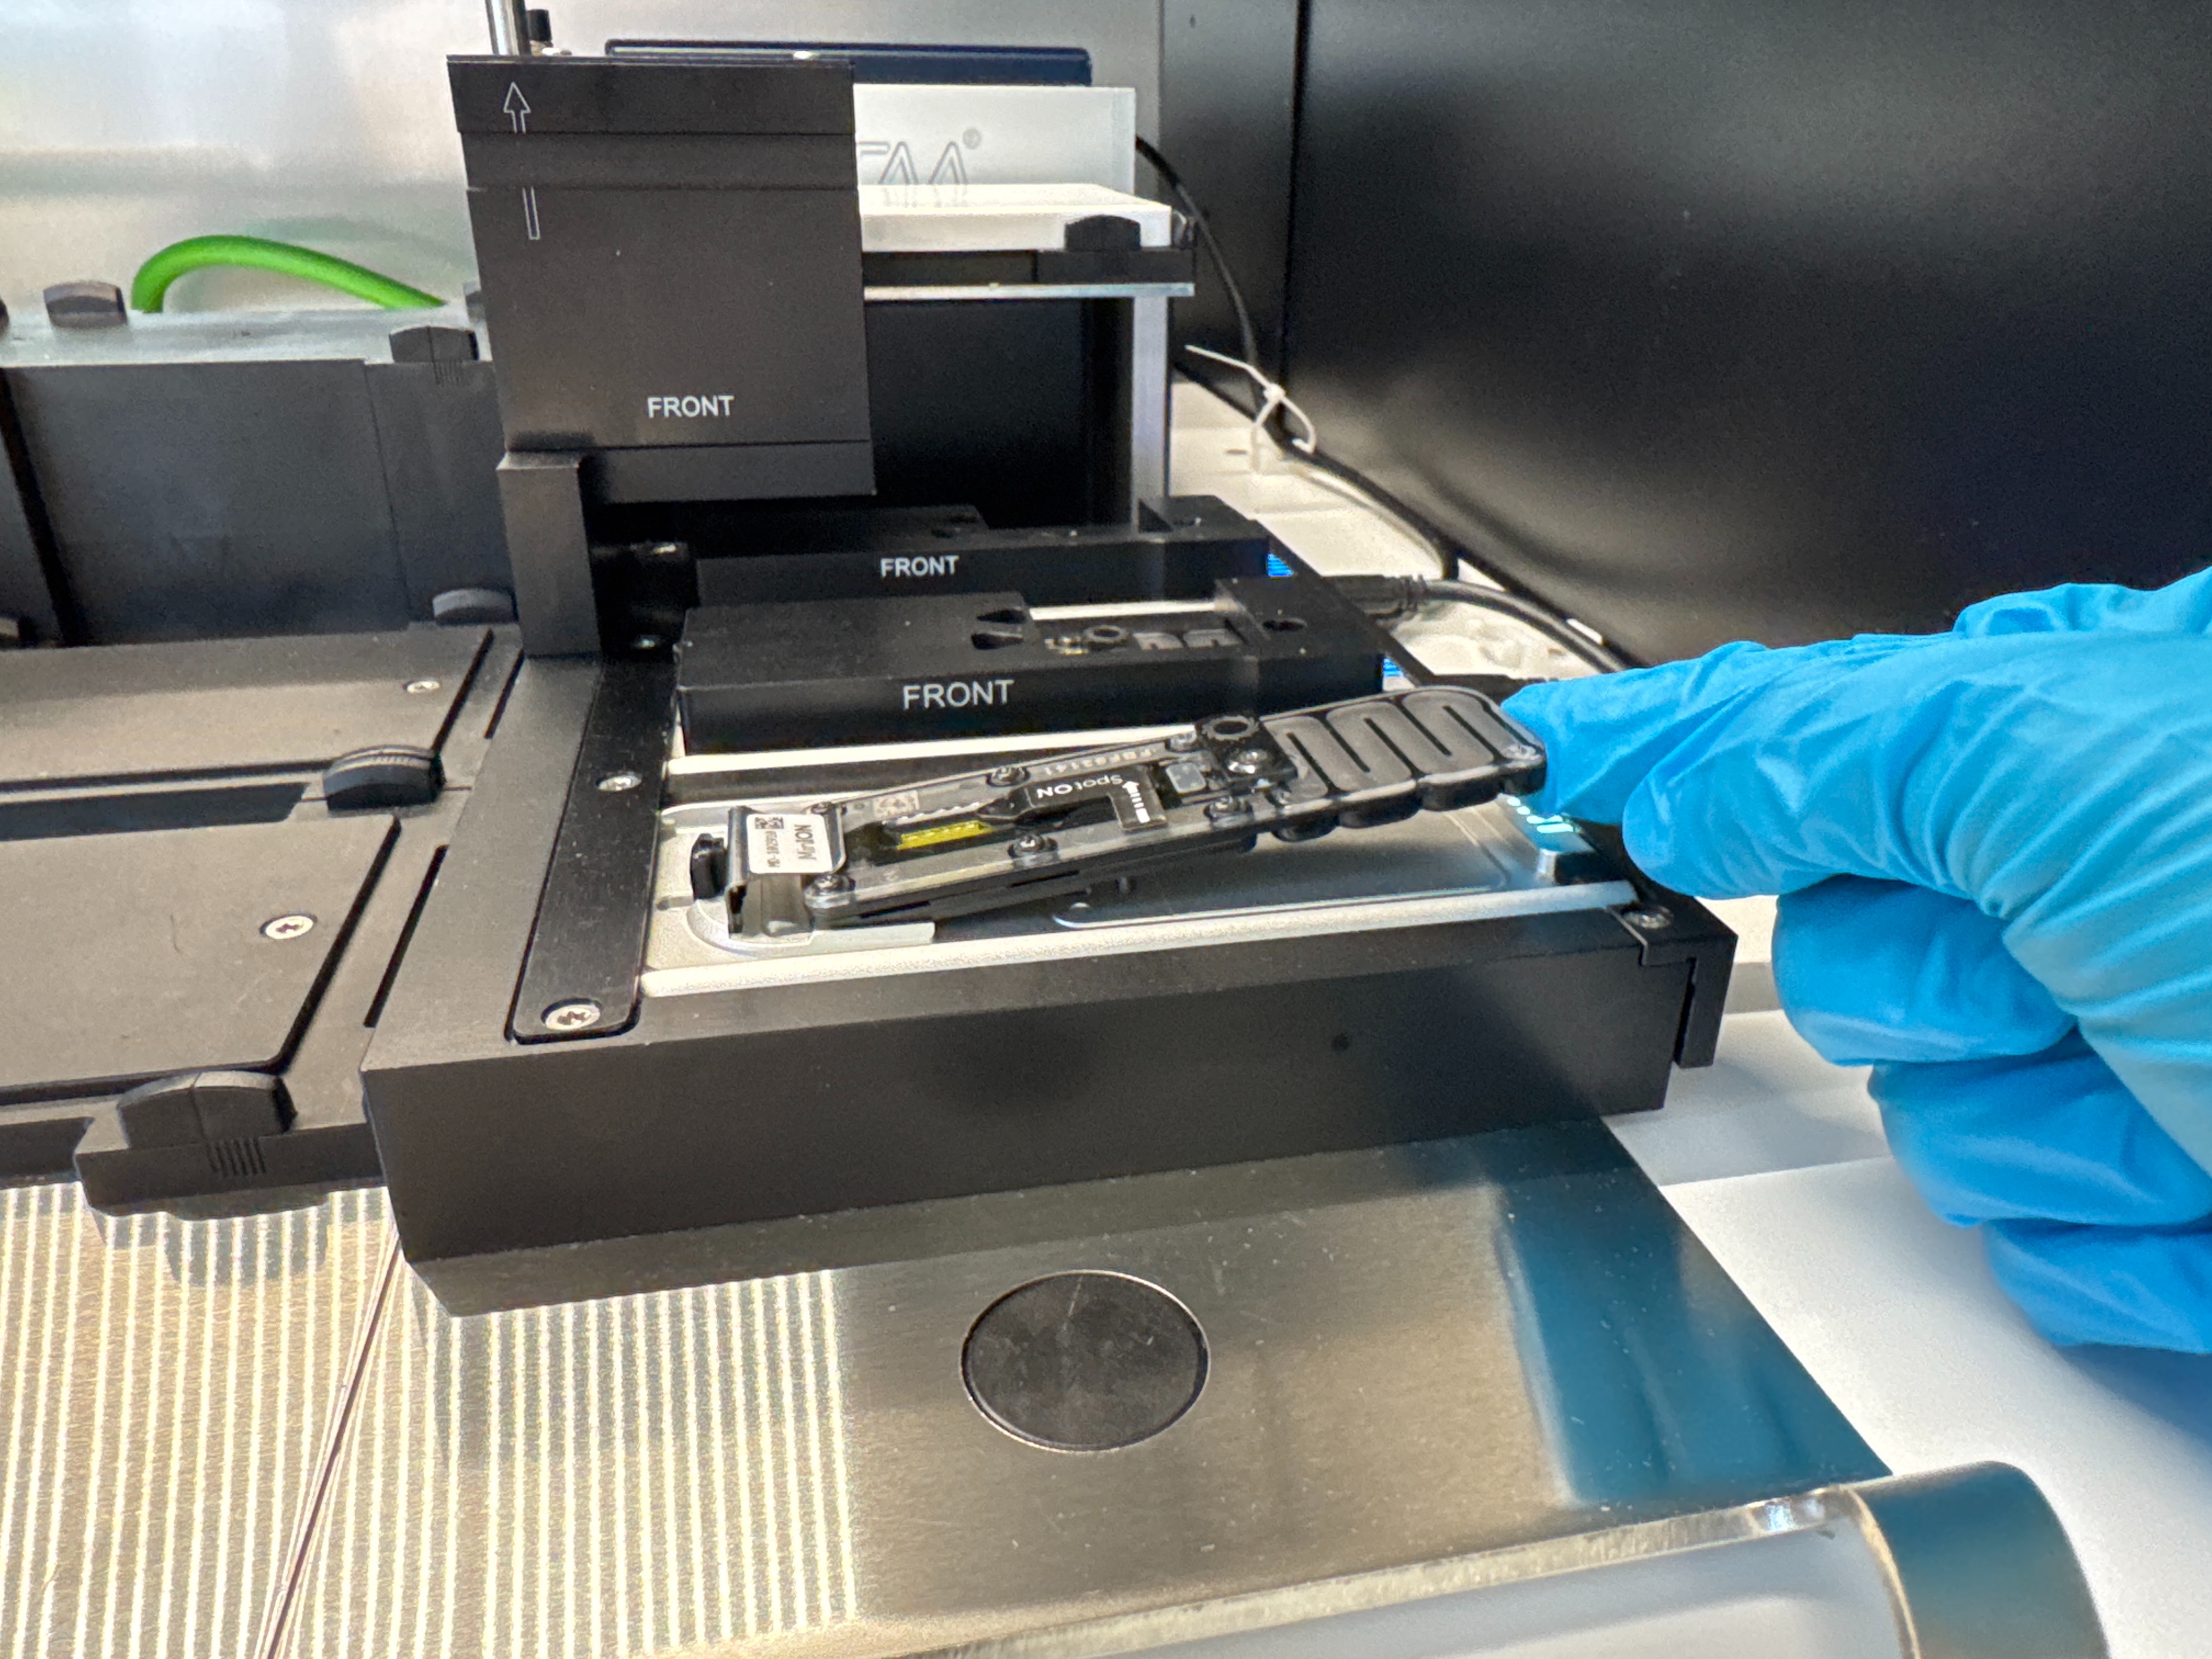
Press the flow cell down firmly into position.
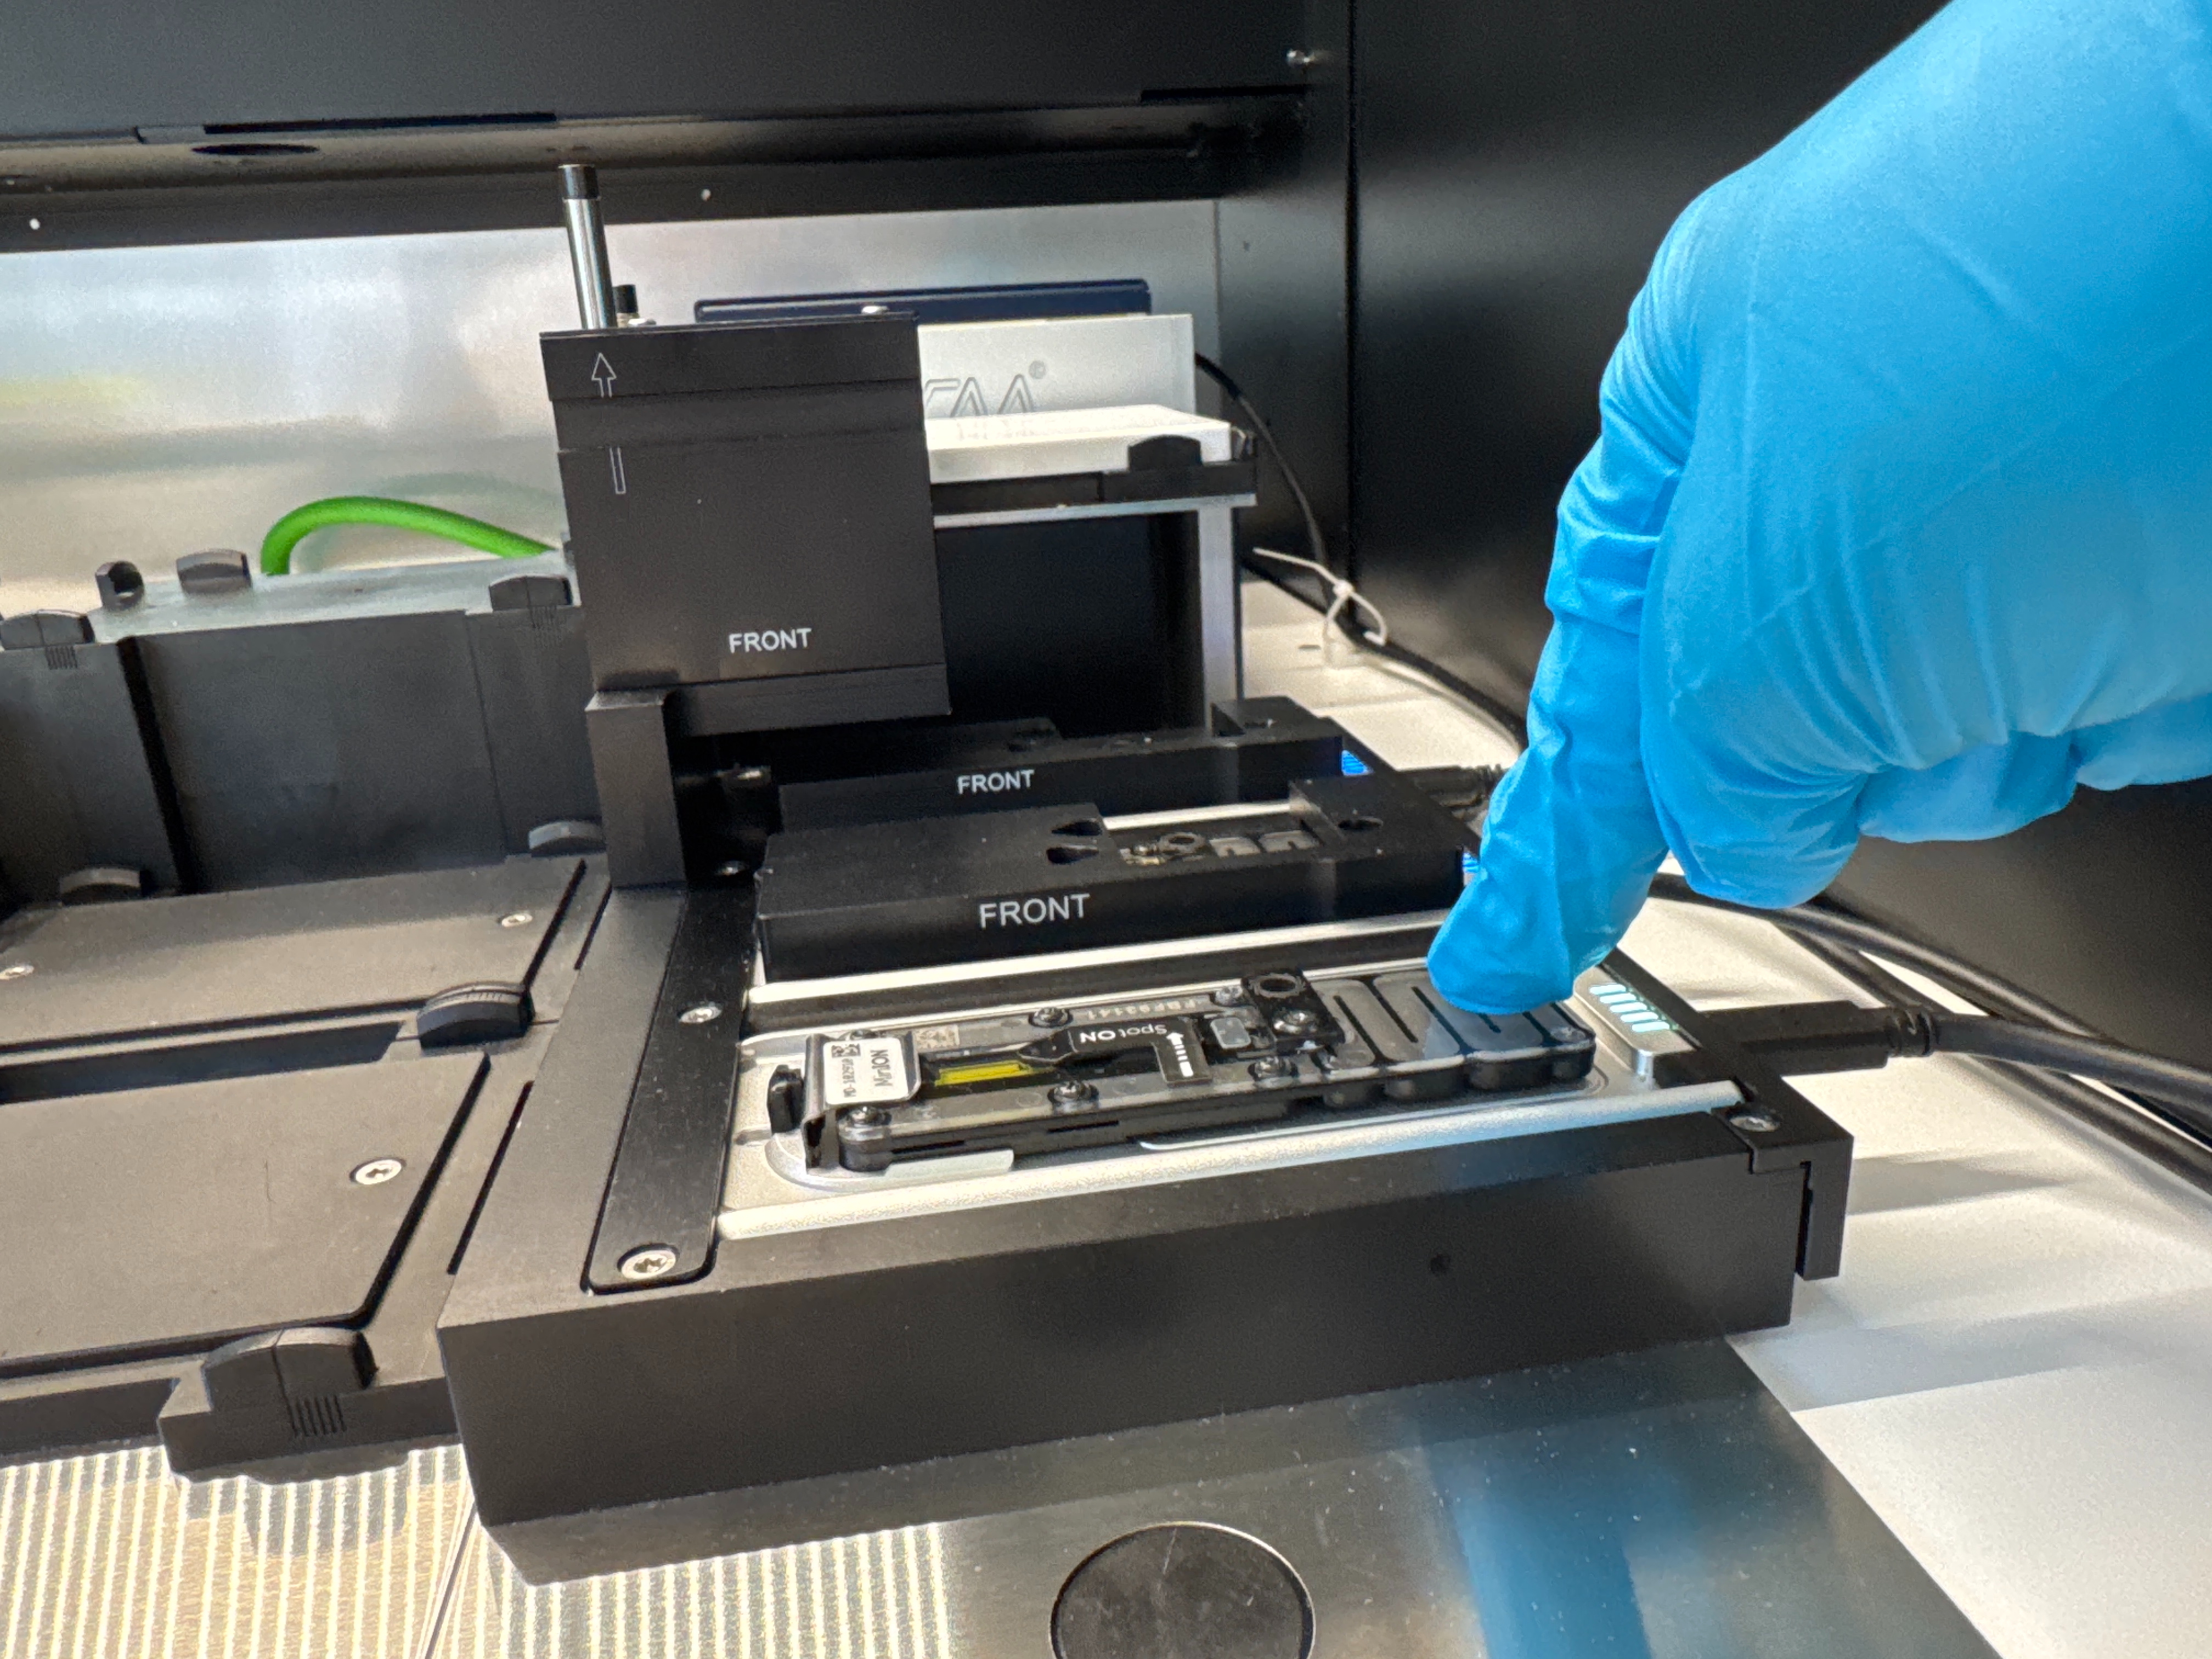
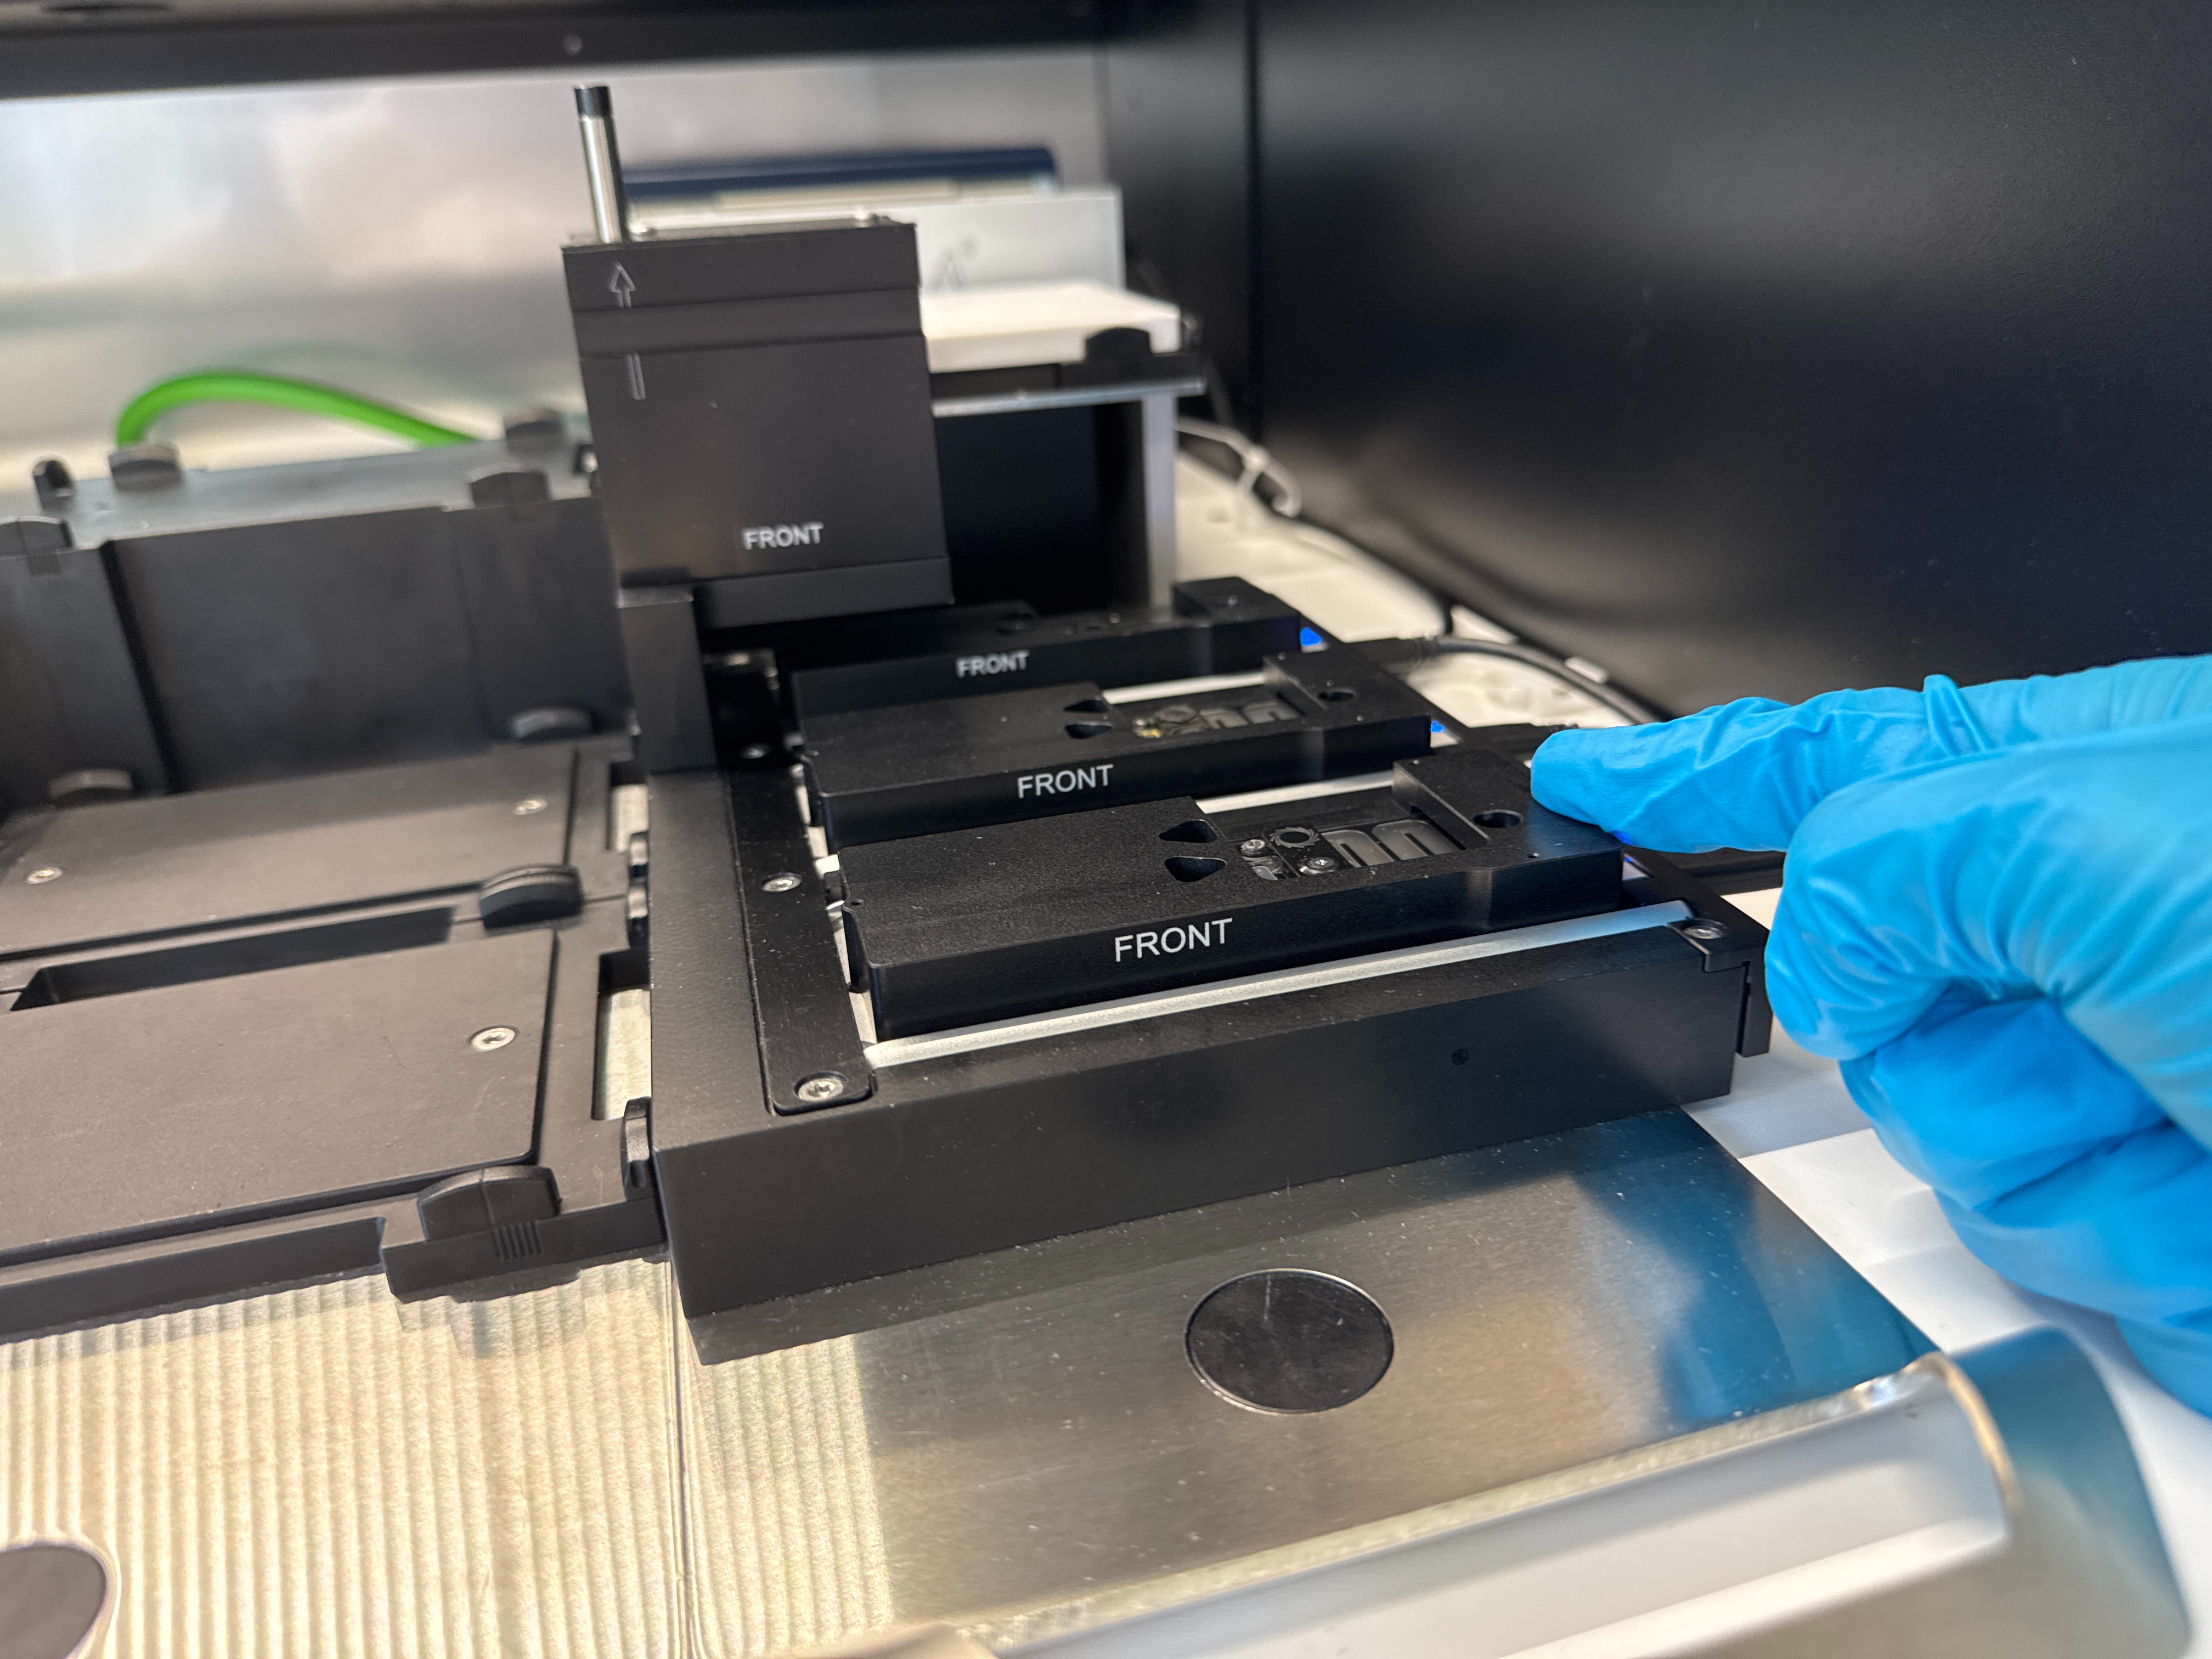
Replace the MinION Mk1D flow cell cover.
Select the flow cells for checking and then select 'Run checks'.
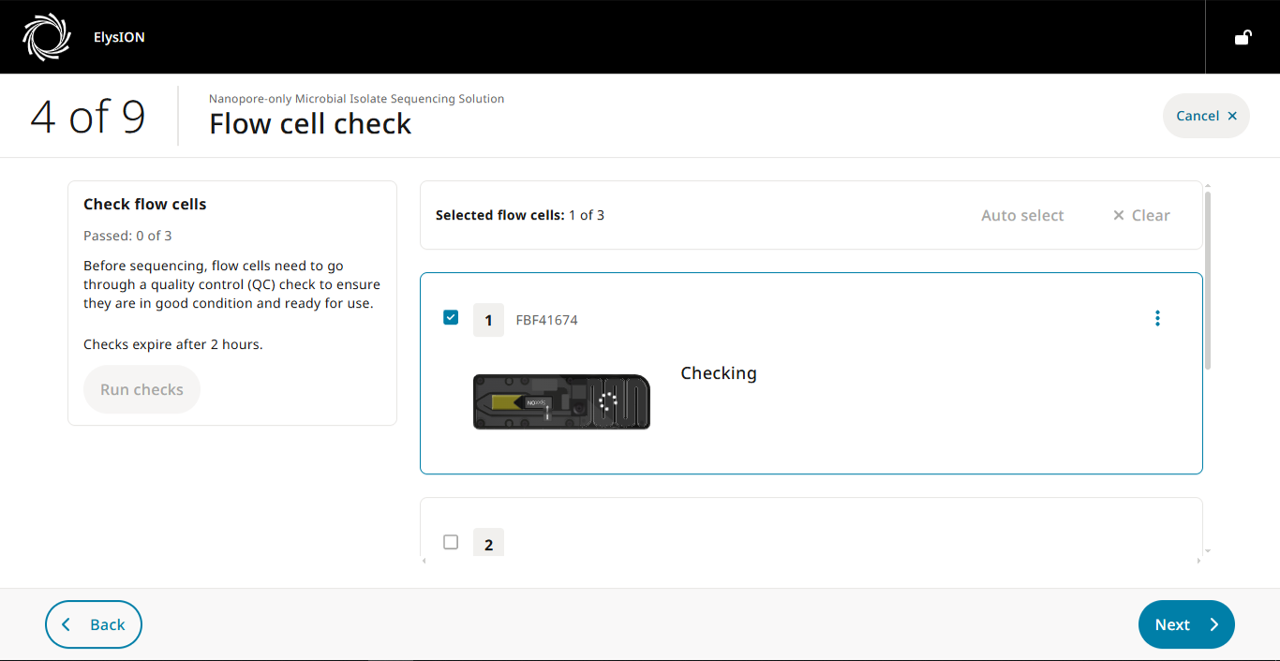
When the flow cell check has completed, you will be informed if the flow cell is ready for a sequencing run.
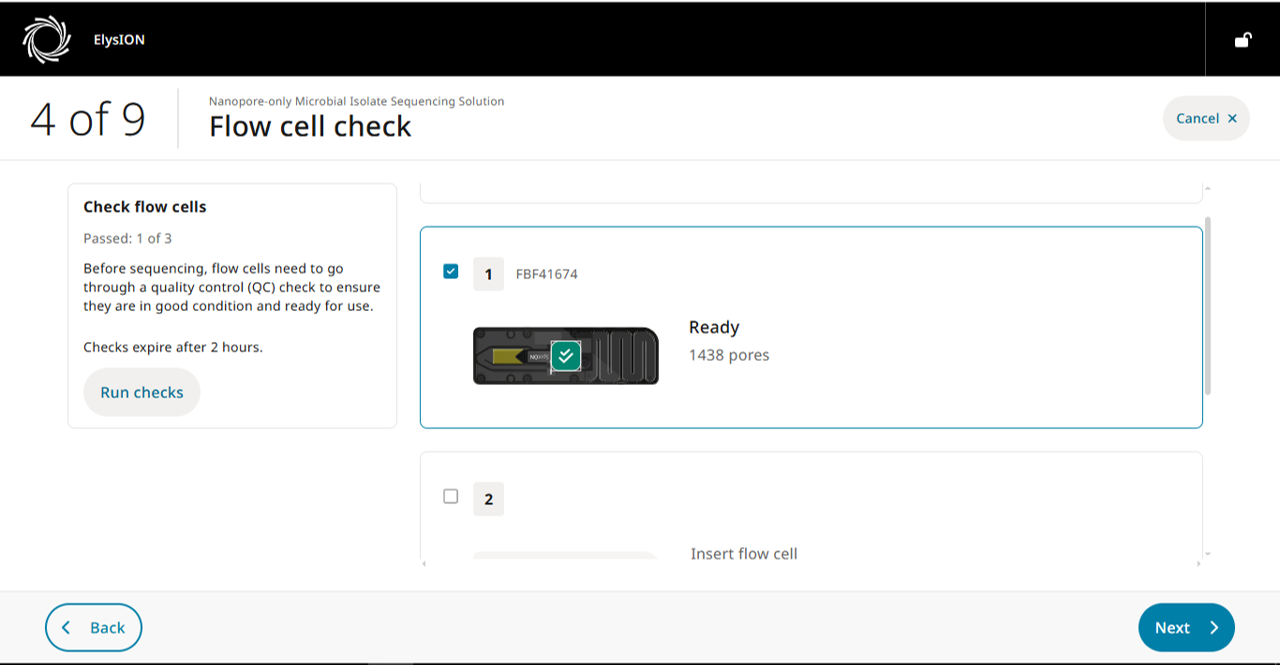
Note: If your flow cell does not reach the required number of pores for your run, insert a new flow cell and repeat the flow cell check before proceeding with the run setup.
13. Guide to writing a sample sheet
Writing a sample sheet to perform a workflow
All ElysION workflows require a sample sheet in order to perform a workflow. The sample sheet performs several functions:
- Instructs the instrument on how many samples to process.
- Instructs the instrument if normalisation is required and the volumes of sample to take forward.
- Instructs the instrument on which barcodes to attach to samples and to include in sequencing and analysis.
Sample sheets contain unique parameter values required for the specific workflow being run. You can alter the parameters to ensure correct preparation of samples. If sample sheet parameters do not match the workflow assay or are in the incorrect format, the sample sheet will be rejected.
To avoid issues when writing a new sample sheet, we recommend that you always design a new sample sheet from the template provided by Oxford Nanopore.
Values which must not be altered on the sample sheet (highlighted in pink): 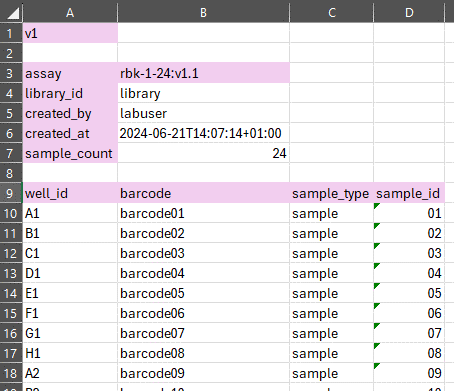
Values which can be altered on the sample sheet (highlighted in green): 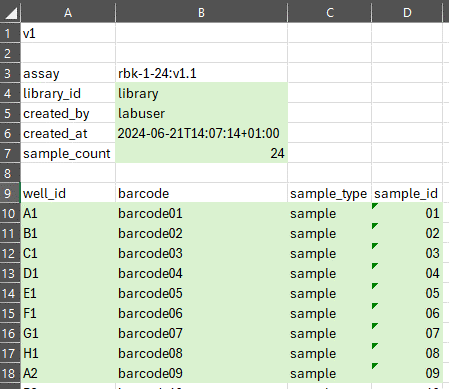
Rules of editing values on the sample sheet:
- library_id: Any text to identify one library from another in a human readable format.
- created_by: Any text to identify the user who wrote the sample sheet in a human readable format.
- created_at: The time stamp that the sample sheet file was created. This must be in the ISO 8601 format.
ISO 8601 formatting:
- 2024-06-21: The date (Year-Month-Day).
- T: The separator between the date and time (standard in ISO 8601).
- 14:07:14: The time in 24-hour format (Hours:Minutes:Seconds).
- +01:00: The time zone offset from UTC (in this case, it is 1 hour ahead of UTC).
sample_count: The exact number of samples being processed by the instrument given as an integer value. This value must be within the range possible for the workflow being prepared (see workflow specific documentation).
well_id: The id of the wells that the samples start in. This must always start at A1 and continue in a column wise list, with no gaps. The total number of well ids listed in the sample sheet must be equal to the sample count value also provided.
Examples of correct and incorrect well_id configurations are shown in the Table below:
| Correct well_id configuration | Incorrect well_id configuration |
|---|---|
| A1, B1, C1, D1, E1, F1, G1, H1, A2 and sample count = 9 | B1, C1, D1, E1, F1, G1, H1, A2, B2 (A1 missing) |
| A1, B1, C1, D1, F1, G1, H1, A2, B2 (E1 missing) | |
| A1, A2, A3, A4, A5, A6, A7, A8 (Row format) | |
| A1, B1, C1, D1, E1, F1, G1, H1 and sample count = 9 (only 8 samples listed) |
barcode: This list of barcode ids specifies which barcode from Oxford Nanopore barcode plate is delivered to each sample (as specified in the well_id column). The first barcode can be taken from any position in the barcode plate however, all subsequent barcodes must follow in a sequential order. The total number of barcode ids must match the total number of samples provided. Each barcode can only be used once and must be formatted as a two-digit number.
Examples of correct and incorrect barcode configurations are shown in the Table below:
| Correct barcode configuration | Incorrect barcode configuration |
|---|---|
| barcode01, barcode02, barcode03, barcode04, barcode05, barcode06 and sample count = 6 | barcode03, barcode04, barcode05, barcode06, barcode01, barcode02 (not sequential) |
| barcode06, barcode07, barcode08, barcode09, barcode10, barcode11, and sample count = 6 | barcode01, barcode02, barcode03, barcode04, barcode05, barcode08 (not sequential) |
| barcode08, barcode09, barcode010, barcode11, barcode12, barcode13 (barcode010 has 3 digits) | |
| barcode01, barcode02, barcode03, barcode04, barcode05, barcode06 and sample count = 8 (only 6 samples listed) |
sample_type: The sample type flag which is used during post-basecalling analysis. Defaults as 'sample' if post-basecalling analysis is not required. If you plan to do analysis, see the workflow specific documentation for further instructions.
barcode_set: The barcode set identifies the specific set of barcodes to be used for the library preparation where there are 3 sets of 24 barcodes in a 96 well plate for the sequencing kit (i.e. Rapid PCR Barcoding Kit 24 V14 (SQK-RPB114.24) and Microbial Amplicon Barcoding Kit 24 V14 (SQK-MAB114.24)). To select the first set of barcodes from the 96 well plate (columns 01 to 03) for your library preparation, enter set01 under the barcode_set column for your sample. For the second set of barcodes (columns 05 to 07), enter set02, or for the third set of barcodes (columns 09 to 11), enter set03.
See example sample sheet below:
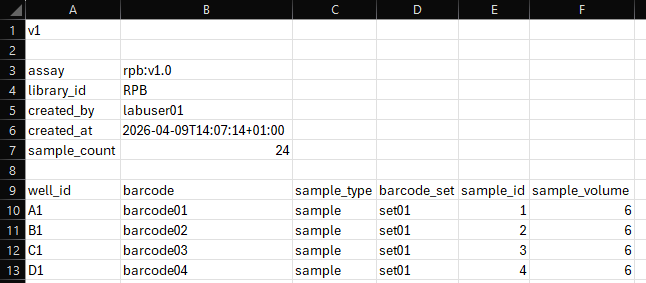
The first barcode can be taken from any of the 3 barcode sets in the 96 well plate however, all subsequent barcodes must follow in a sequential order as shown in the Table below:
| well_id | barcode | barcode_set |
|---|---|---|
| A1 | barcode24 | set01 |
| B1 | barcode01 | set02 |
| C1 | barcode02 | set02 |
sample_id: The sample id is user-defined and can be used to track a sample from input to results.
14. Guide to running automated sample normalisation
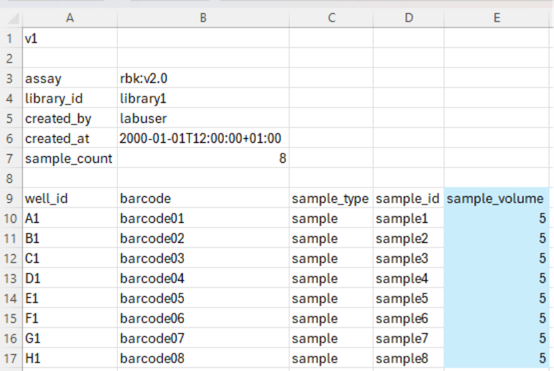
To include automated sample normalisation, an additional column named sample_volume must be added to the sample sheet as follows.
sample_volume: The sample volume flag indicates that automated sample normalisation is to be implemented and should be added to the right of the sample_id flag. Rows underneath must contain the volume of sample to be transferred to each well of the PCR plate (in µl). This volume will be automatically normalised to the required input volume using nuclease-free water (NFW).
If the sample_volume column is absent, no automated sample normalisation will be implemented.
Sample volumes will be specific to each workflow therefore, we recommend that you check the specific protocol for this information.
In the example below, 5 µl of sample will be transferred from the sample plate to the PCR plate and normalised to the required sample volume taken forward with NFW (e.g. 30 µl for RBK using gDNA or 27 µl for RBK using amplicons).
15. Guide to running QC checks and manual sample normalisation
There is an option to perform QC checks and manual sample normalisation during the automated library preparation.
In order to do this, the Pause for QC variable has to be turned on when configuring a custom method (see section 16 below). Enabling this feature will instruct the ElysION to automatically pause for QC checks and manual sample normalisation to be performed.
Refer to the specific protocols for more information about this variable and how to normalise your samples.
16. Guide to configuring a custom method
If you wish to alter the default variables for your assay, follow the instructions below.
Select the 'System' tab on the bottom left of the screen, then select ‘Method configurator’.
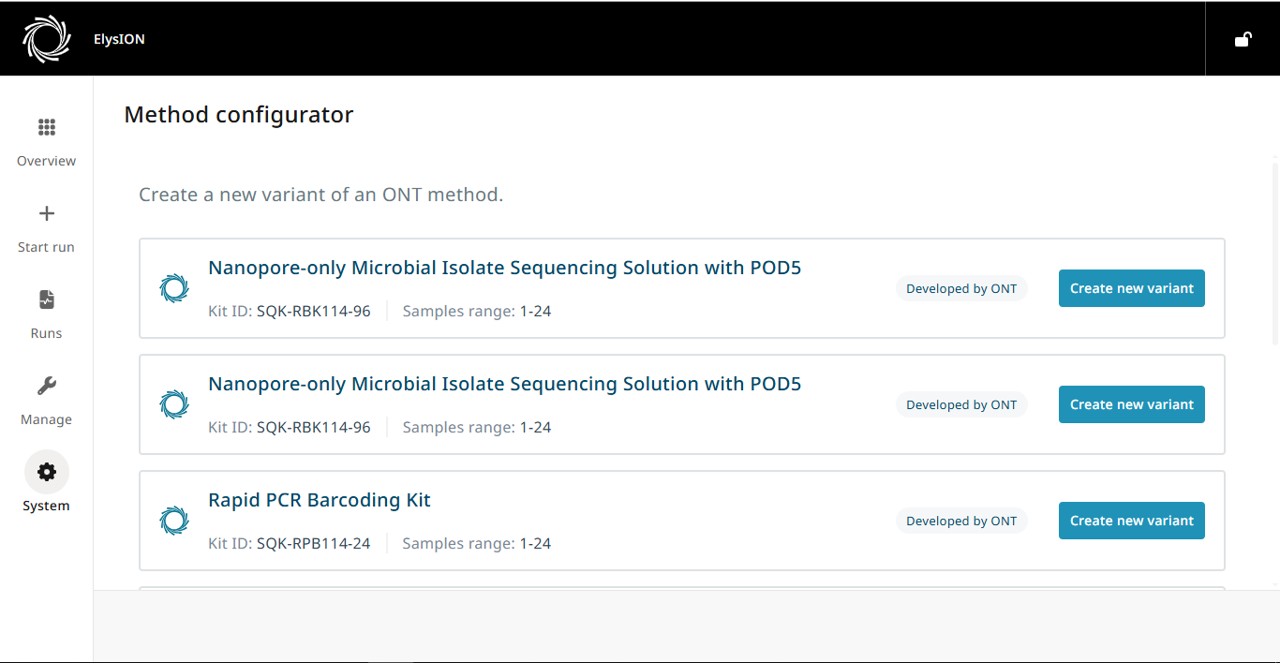
Select ‘Create new variant’ for the relevant method that you wish to modify.
Review each variable for the specific method and edit as required.
Refer to the specific protocols for more detail on each variable.
- Select the variable for editing.
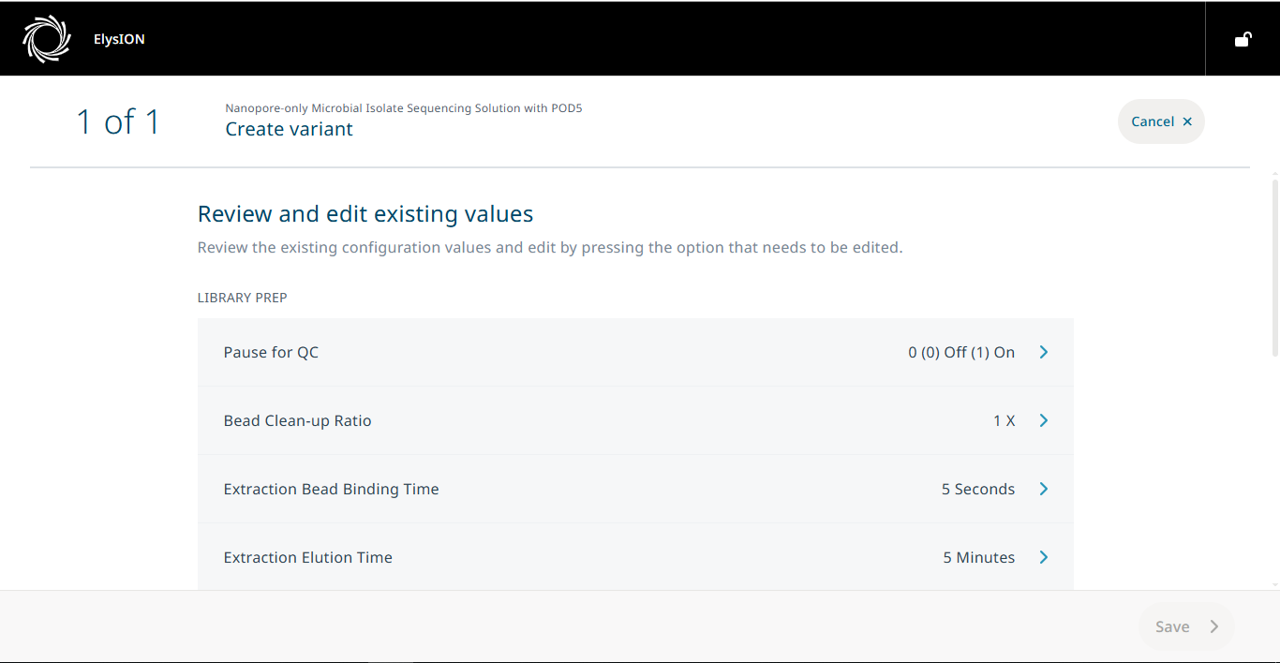
- Add the desired value within the specified range and press Confirm.
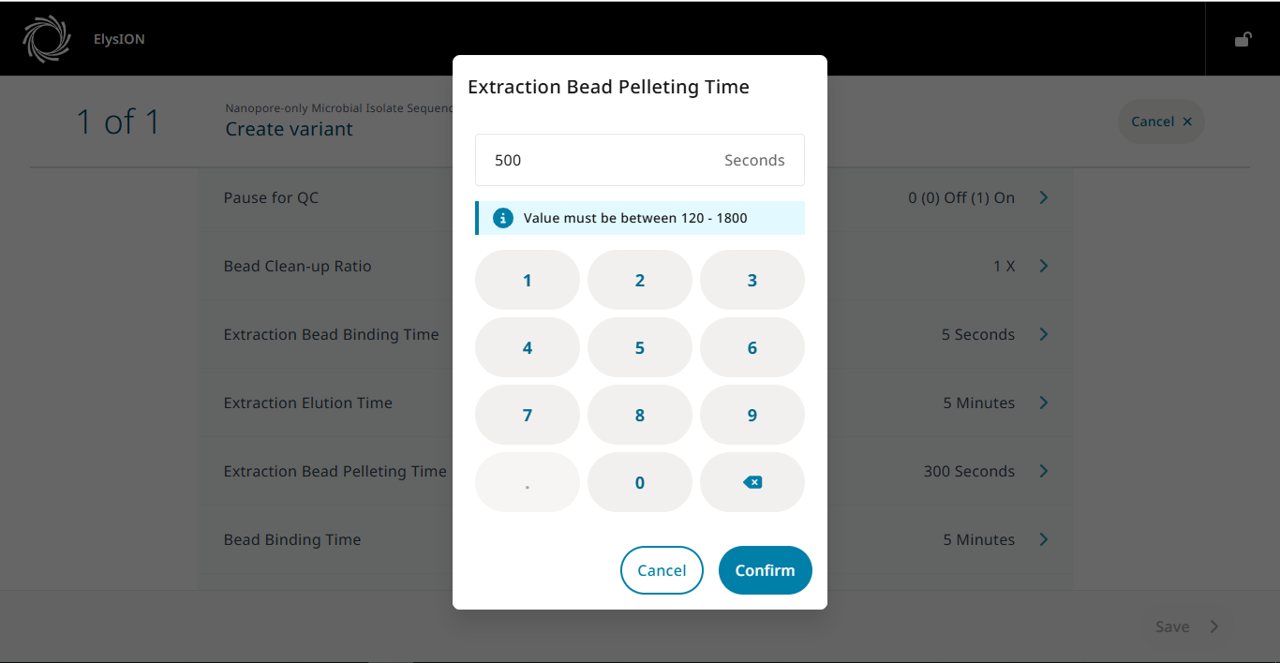
Once the changes have been saved, the custom method will be assigned a version number (e.g. NBD_1-48 v.1) which can be selected from the main method page.
17. Accessing the sequencing data
Log in on the compute control unit monitor (separate from the ElysION touch screen monitor).
On the left-hand side of the screen, open the 'File manager' application.
Navigate to the 'data' folder.
Open 'output', then 'sequences', then 'no_group', then 'no_sample'.
- This folder will display all the available sequencing run data within subfolders with the naming convention: 'YYYYMMDD_HHMM_sequencing device ID_Flow Cell ID_XXXXXXXX'.
We recommend that you copy all sequencing data to a long-term data storage system regularly to prevent the compute unit storage from becoming full.
18. Accessing the analysis output data
Log in on the compute control unit monitor (separate from the ElysION touch screen monitor).
On the left-hand side of the screen, open the 'File manager' application.
Navigate to the 'data' folder.
Open '.reception', then 'instances' (ensure that the file manager settings have been set to display hidden folders).
This folder will display all the available analysis pipeline data within subfolders, e.g. 'wf-bacterial-genomes_01J6HWYJM7QSJDWV1SHVZEHSMZ'.
To identify the pipeline output which corresponds to an automated run, refer to the date edited on the right-hand side of the file manager screen.
Note: the date that a folder is edited/written as shown in the file manager will not be the same date as the start of the automated library prep. Analysis will start once sequencing has finished. Therefore, the date-time written will depend on the date the automated prep was started and the length of time the sequencing was performed.
We recommend that you copy all analysis data to a long-term data storage system regularly to prevent the compute unit storage from becoming full.
19. Labware sourcing and usage
The Table below describes the list of labware compatible with the ElysION device.
| Labware | Recommended supplier | Product code |
|---|---|---|
| Hard-Shell® 96-Well PCR Plates, low profile, thin wall, skirted | Bio-Rad™ | HSP9611 |
| Nunc™ 96 Well Polypropylene 2 ml DeepWell Plate | Thermo Scientific | 95040452 |
| 1000 µL Disposable Tips - Filtered, Pure, Single Stack | Tecan | 30057817 |
| 200 µL Disposable Tips - Filtered, Pure, Single Stack | Tecan | 30057815 |
| 50 µL Disposable Tips - Filtered, Pure, Single Stack | Tecan | 30057813 |
| 10 µL Disposable Tips - Filtered, Pure, Single Stack | Tecan | 30104974 |
| LiHa empty Disposable Tip Box Small | Tecan | 30058506 |
| LiHa empty Disposable Tip Box Large | Tecan | 30058507 |
| Waste bin | Tecan | 30185747 |
| Reservoir Plate | Porvair | 390015 |
| Azenta PCR Plate Lid | Azenta | 4ti-0291 |
| Screw cap micro tube 2 ml, sterile | Sarstedt | 72.694.006 |
| Screw cap micro tube 0.5 ml, sterile | Sarstedt | 72.785.005 |
20. System configuration
Changing the system password
Note: The instructions below will apply for your username.
Open command line on the Linux compute.
Type:
sudo passwd username
- This will prompt you to enter your current password on the first attempt.
Enter a new UNIX password: Type new password and press enter.Re-enter the new UNIX password: Type new password again and press enter.passwd: Password successfully changed
Changing the system username
- We do not recommend the changing of usernames.
21. Cleaning the device
Maintenance and decontamination procedures
For full details on the maintenance and decontamination procedures, refer to the ElysION Operating manual provided with your device.
Using chemical agents
The device should be cleaned with any of the listed agents and dried with a lint-free cloth. Use of any other chemical agents than those listed below or listed in the full ElysION Operating manual may cause damage to the instrument or risk injury to you.
| Cleaning agent | Specification |
|---|---|
| DI water | Distilled or deionized water |
| Alcohol | 70% ethanol or 100% isopropanol (2‑propanol) |
| Weak detergent | Liqui-Nox |
| Disinfectant | Bacillol plus, Bomix, Lysetol FF |
| System liquid | Distilled or deionized water |
| Base | 0.025 to 0.25 mol/l sodium hydroxide |
| Bleach | 6% sodium hypochlorite |
| RNase AwayTM decontamination reagent | Alkali hydroxide <0.1% |
22. UV light disinfection
Select 'System' in the bottom left corner of the ElysION software on the touch screen monitor, then 'Maintenance'.
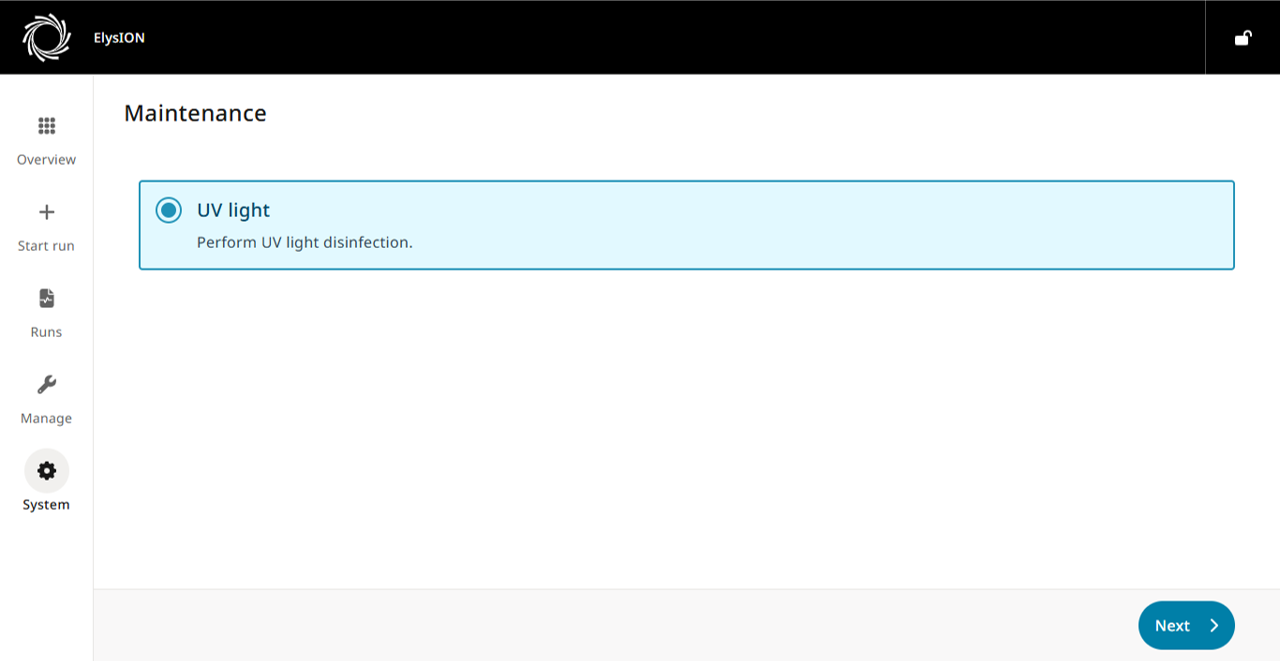
Select 'UV light' from Maintenance.
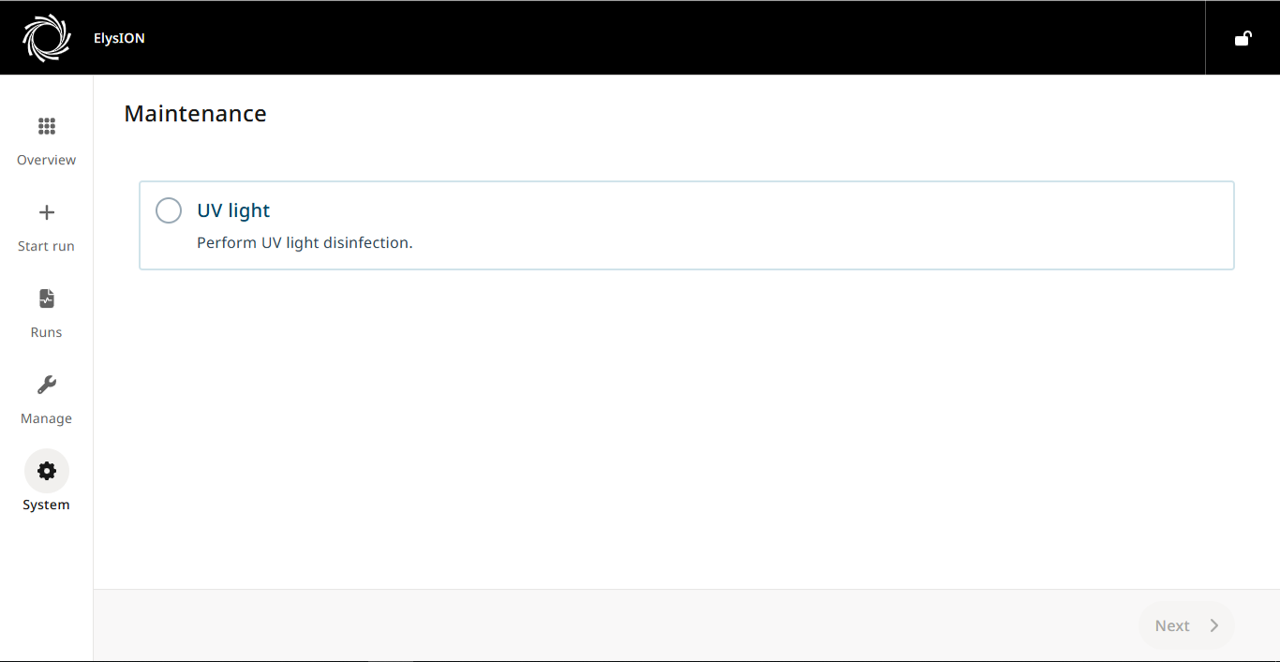
Then press Next to continue.
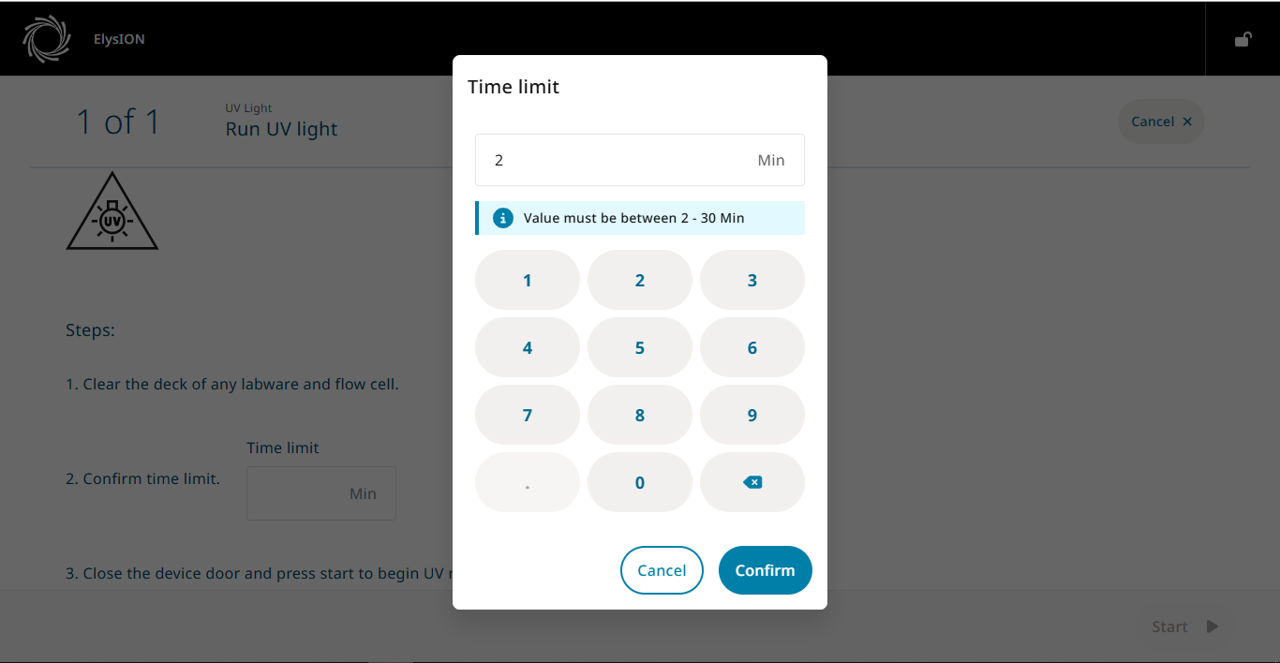
Define the length of time for the UV disinfection.
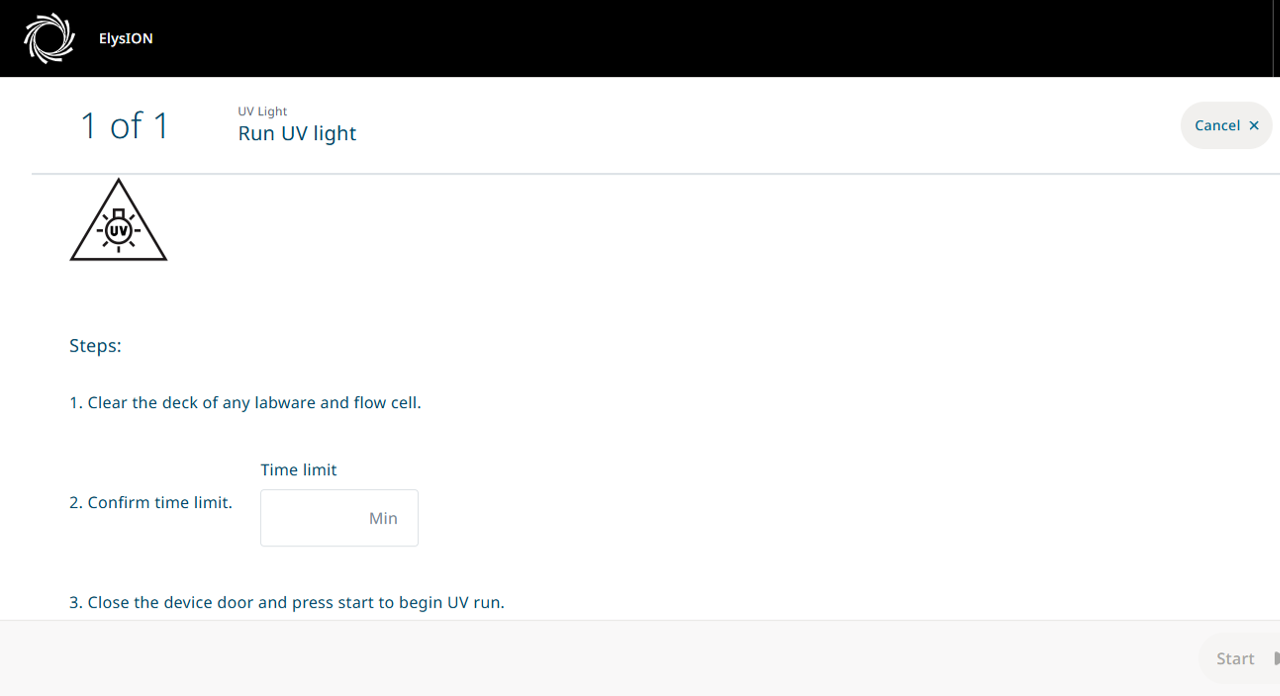
- Enter the time limit (in minutes) for the UV disinfection.
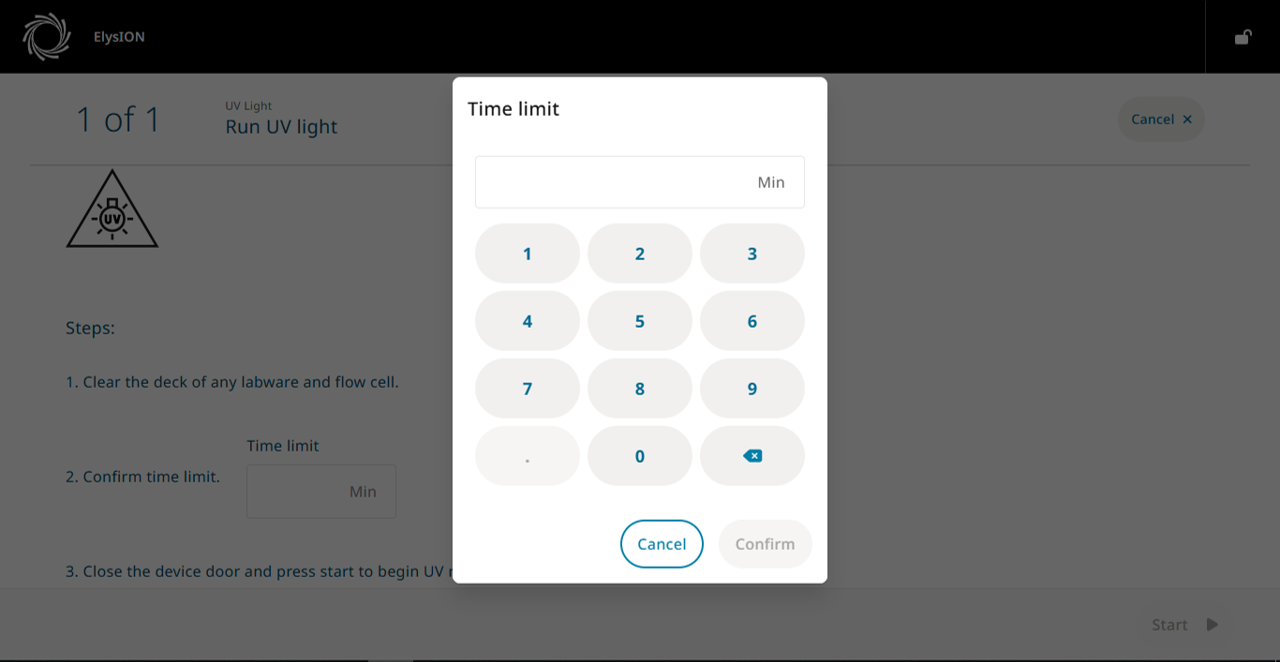
- Then press Confirm.
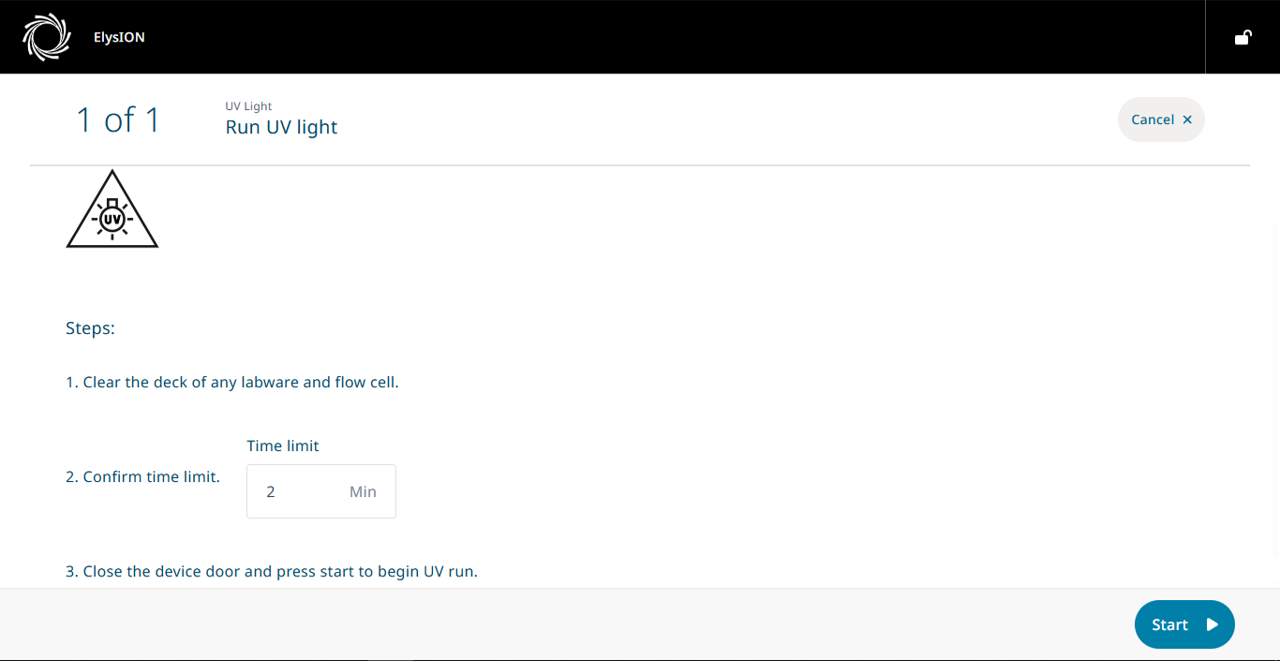
Close the ElysION door and press 'Start' for the UV disinfection to commence.
A cautionary message that the UV disinfection is running will appear with a time remaining report.
23. Maintenance schedule
ElysION maintenance schedule
Refer to the ElysION Operating manual included with your ElysION device for details of the maintenance schedule.
Daily maintenance
- Empty both waste containers.
- Either decontaminate or replace with new waste containers.
Weekly maintenance
Clean the following with 70% ethanol:
- Waste drawer
- DiTi drop station
- ElysION robot touch screen monitor
Monthly, quarterly, bi-annual, quinquennial maintenance
Refer to the ElysION Operating manual for more information.
24. How to collect logging data for troubleshooting support
Windows
- On the touch screen monitor, click the Export Logs application from the desktop.

- Copy the generated logging snapshot to a USB drive.
Linux
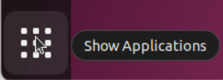
- Open Show Applications in the bottom left corner.
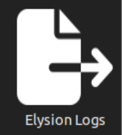
- Select the Elysion Logs application.
Enter the compute password.
Copy the generated logging snapshot to a USB drive.
Serial numbers
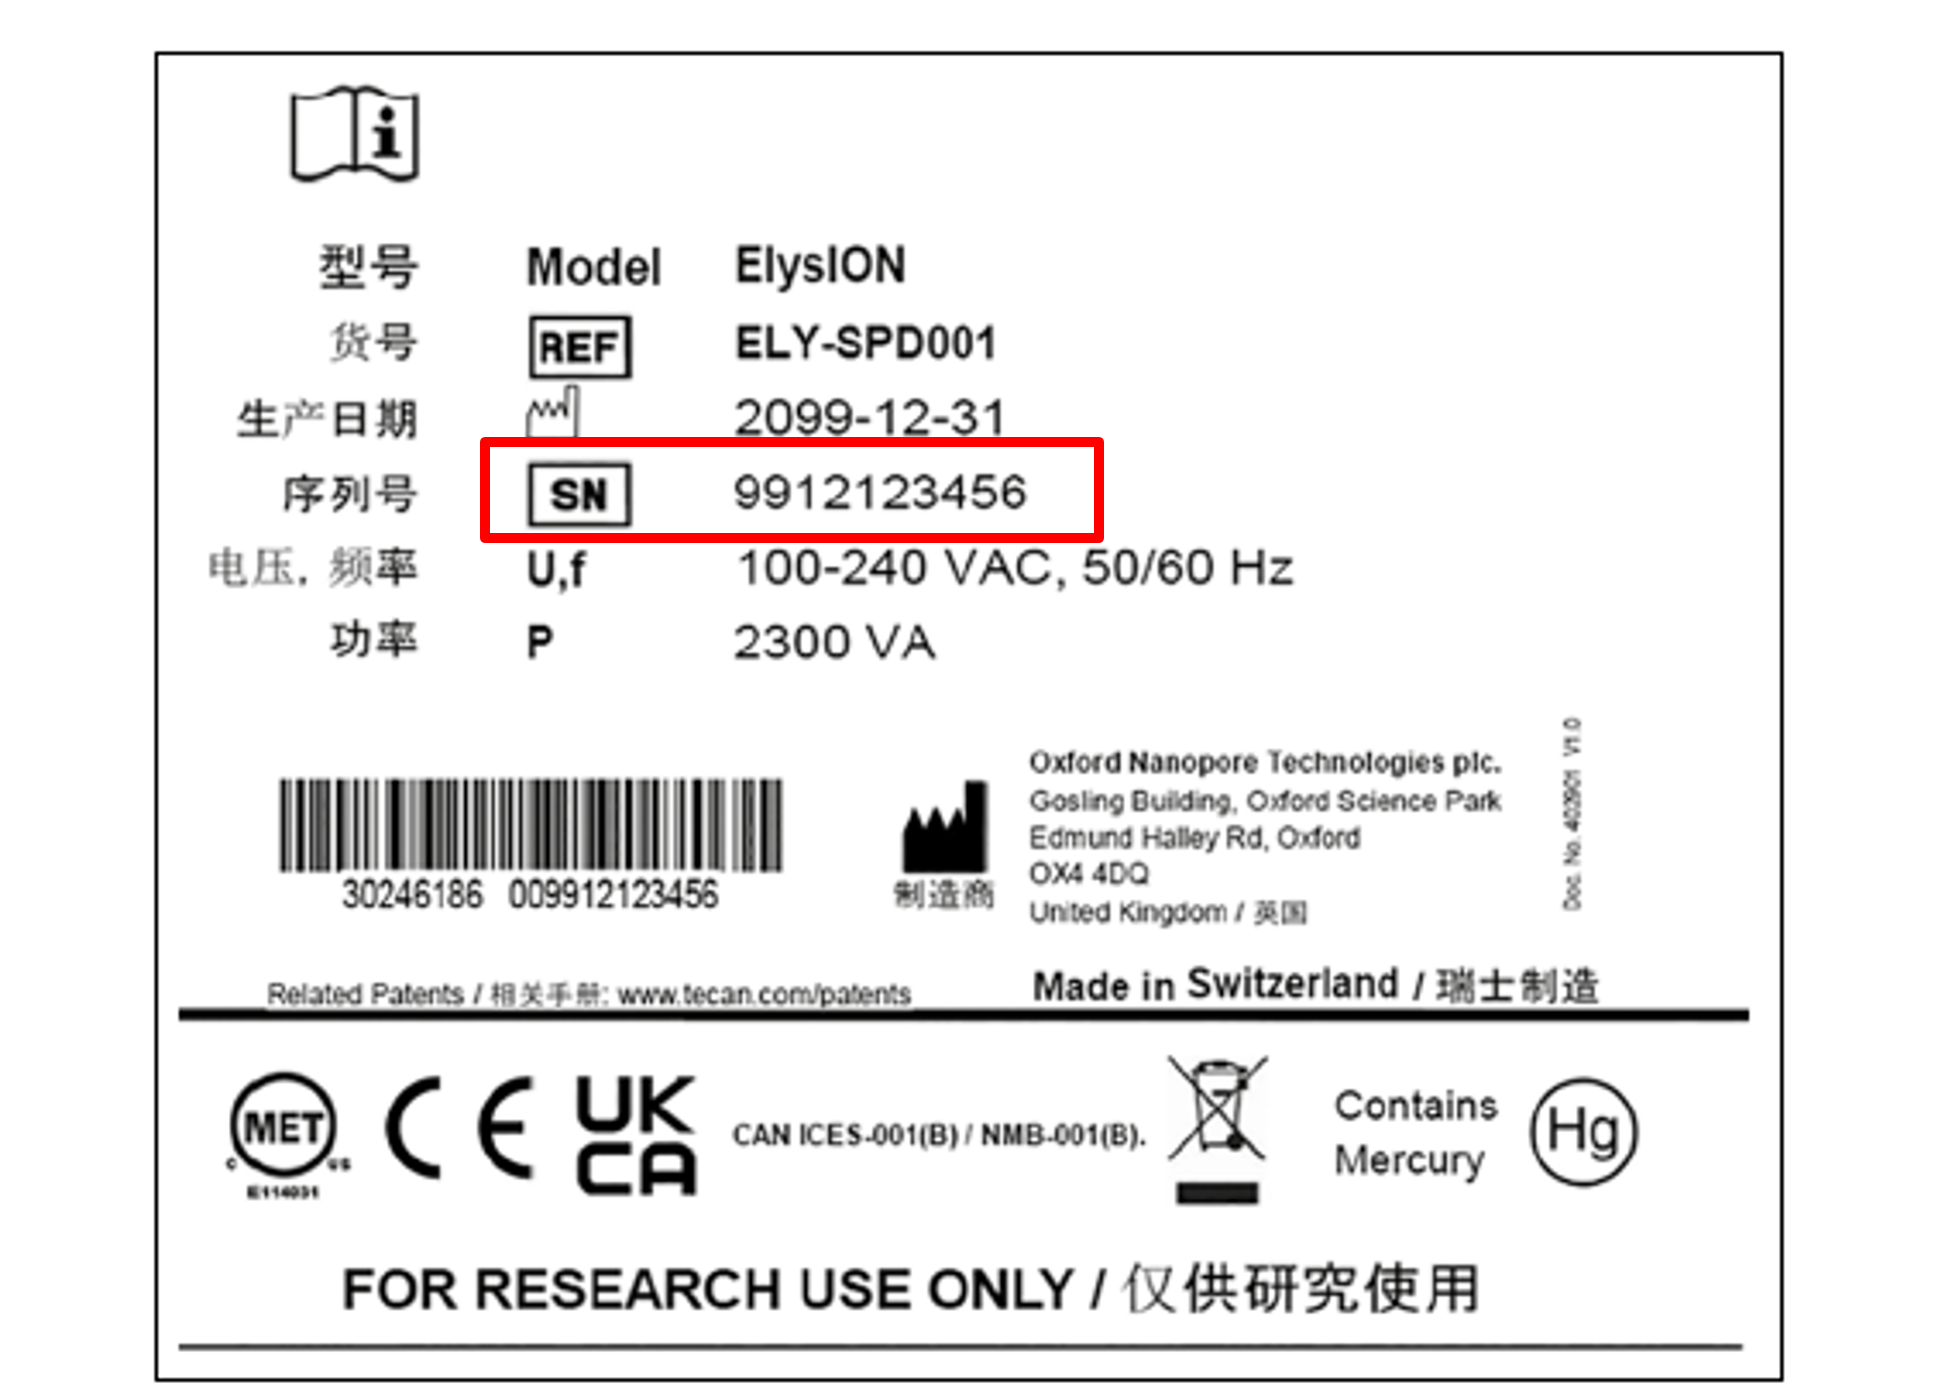
ElysION liquid handler
- The serial number for the ElysION liquid handler is found on the rear panel of the device, as highlighted in the image below:
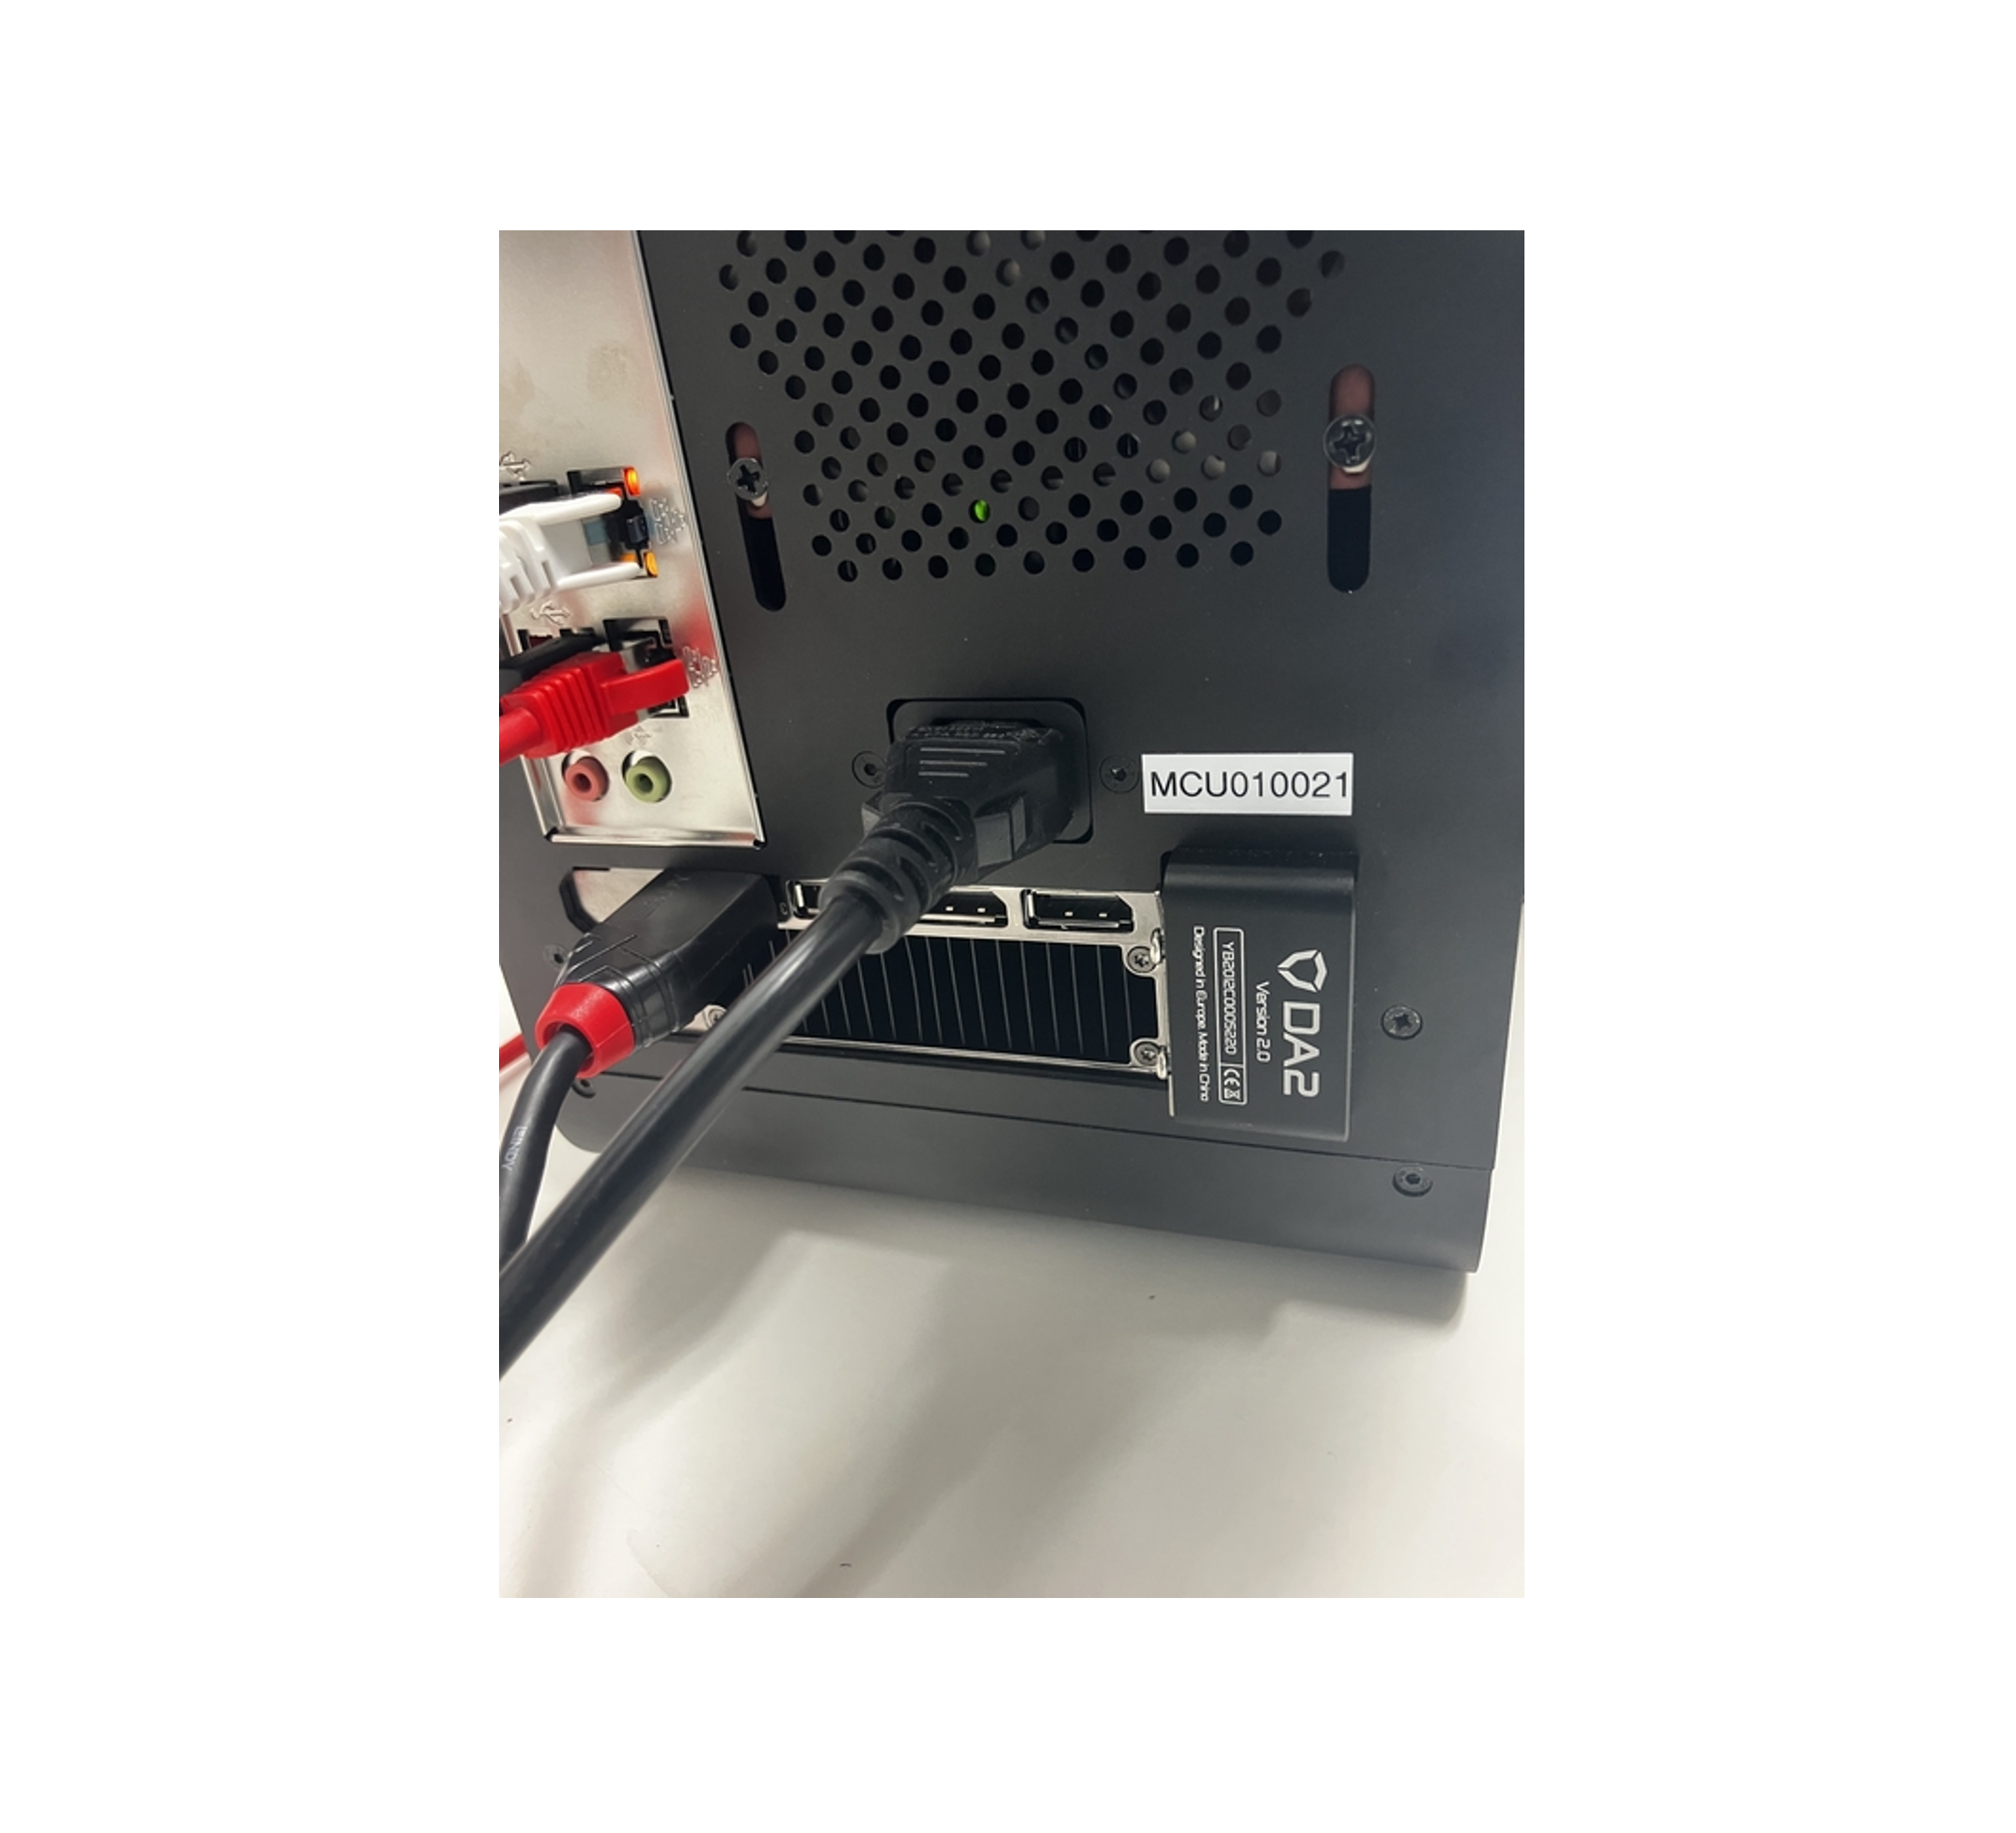
Compute control unit
- The serial number for the compute control unit can be found on the rear side of the unit, as shown in the image below:
Reporting issues
Report issues to Nanopore Support with the serial numbers for both the liquid handler and compute unit and the logging snapshots from both the Windows and Linux computes attached.
25. The ElysION device does not switch on
Check that the ElysION touch screen monitor is switched on by pressing the monitor power button on the bottom right-hand side of the underside of the monitor.
Check that all power cables are attached correctly and are connected to a mains supply.
Press and hold the ElysION power button for three seconds.
26. The compute control unit does not switch on
Check that all power cables are attached correctly and are connected to a mains supply.
Press and hold the power button of the compute control unit for three seconds.
- If the device does not switch on, contact your customer support representative and include the device serial numbers in the description of your issue.
27. Data offload from the device to long-term storage takes too long
Contact your customer support representative.
Oxford Nanopore can provide support to connect your instrument to an internal network to allow automated data offload from the ElysION device to your long-term storage.
28. The automated method has not completed the library preparation
- Contact your customer support representative and include the device serial numbers in the description of your issue and attach copies of your logging data.
29. The automated method has not completed the anticipated sequencing
- Contact your customer support representative and include the device serial numbers in the description of your issue and attach copies of your logging data.
30. The automated method has not completed the anticipated analysis workflow
- Contact your customer support representative and include the device serial numbers in the description of your issue and attach copies of your logging data.