Rapid barcoding DNA V14 – automated ElysION MinION (SQK-RBK114.96) (RBEM_9235_v114_revA_26Aug2026)


Protocol
Rapid barcoding DNA V14 – automated ElysION MinION (SQK-RBK114.96) V RBEM_9235_v114_revA_26Aug2026
This is an automated rapid barcoding method using the ElysION™ device with a MinION™ setup, outlining library preparation and sequencing.
This protocol:
- Is an automated method using the ElysION device
- Uses genomic or amplicon DNA
- Enables multiplexing of up to 96 samples
- Includes DNA fragmentation
- Is optimised for speed and high multiplexing
- Is compatible with R10.4.1 flow cells
For Research Use Only
FOR RESEARCH USE ONLY.
Contents
Introduction to the protocol
Sample sheet generation
Automated library preparation and sequencing
Troubleshooting
Descripción general
This is an automated rapid barcoding method using the ElysION™ device with a MinION™ setup, outlining library preparation and sequencing.
This protocol:
- Is an automated method using the ElysION device
- Uses genomic or amplicon DNA
- Enables multiplexing of up to 96 samples
- Includes DNA fragmentation
- Is optimised for speed and high multiplexing
- Is compatible with R10.4.1 flow cells
For Research Use Only
1. Overview of the protocol
Introduction to the automated rapid barcoding DNA protocol using ElysION with a MinION sequencing setup
The ElysION automated Rapid Barcoding Kit 96 V14 (SQK-RBK114.96) workflow is optimised for simplicity and speed to automatically prepare and sequence between 1 and 96 purified DNA samples. The workflow is PCR-free, removing the PCR bias and retains information about base modifications, which can be analysed using tools developed in the Nanopore Community. This protocol is compatible with both genomic and amplicon DNA as input. If PCR amplicons are used, no base modifications will be retained.
Note: This kit is able to generate high sequencing accuracies of over 99% (Q20+) but has been optimised for speed and simplicity with fragmented DNA. If you wish to maintain DNA input length for optimal assembly and modifications, we recommend using our Native Barcoding Kit 96 V14 (SQK-NBD114.96).
Due to the simple nature of the workflow and the fact that little sample manipulation is required (e.g. minimal pipetting steps and one clean-up step), long reads can be achieved with this kit, despite the required transposase fragmentation. However, in order for long reads to be observed in sequencing, long fragments need to be present in the initial sample input.
Steps in the sequencing workflow:
Prepare for your experiment
You will need to:
- Ensure your ElysION device is installed with the required hardware and software package for this workflow.
- Ensure you have your sequencing kit, the correct equipment and third-party reagents.
- Check your flow cell during the ElysION run setup to ensure it has sufficient pores for a good sequencing run.
Automated library preparation, sequencing, and analysis
The Table below is an overview of the steps automated by the ElysION device.
| Library preparation step | Process |
|---|---|
| DNA barcoding | Tagmentation of the DNA using the Rapid Barcoding Kit V14. |
| Sample pooling and clean-up | Pooling of barcoded libraries and AMPure XP Bead clean-up. |
| Adapter ligation | Attachment of the sequencing adapters to the DNA ends. |
| Priming and loading the flow cell | Prime the flow cell and load the prepared library for sequencing. |
| Sequencing | The sequencing run uses the MinKNOW software, which will collect raw data to basecall and demultiplex the barcoded reads. |
| Data analysis (optional) | Once sequencing is complete, there are a number of downstream analysis options for your data, available through EPI2ME. |
| Flow cell wash or flush | Wash the flow cell using the Flow Cell Wash Kit (EXP-WSH004) for reuse or flush the flow cell for return to Oxford Nanopore for recycling. |
Compatibility of this protocol
This protocol should only be used in combination with:
- Rapid Barcoding Kit 96 V14 (SQK-RBK114.96)
- R10.4.1 flow cells (FLO-MIN114)
- Flow Cell Wash Kit (EXP-WSH004)
- Flow Cell Priming Kit V14 (EXP-FLP004)
- Sequencing Auxiliary Vials V14 (EXP-AUX003)
- Rapid Adapter Auxiliary V14 (EXP-RAA114)
- ElysION device with MinION integration
2. Equipment and consumables
Material
- 350 ng genomic or amplicon DNA in 35 µl per sample (concentration: 10 ng/µl) in a Hard-Shell® 96-Well PCR Plate, low profile, thin wall, skirted, red/clear (Bio-Rad™, HSP9611)
- Rapid Barcoding Kit 96 V14 (SQK-RBK114.96)
- Kit Flow Cell Wash (EXP-WSH004)
Consumibles
- MinION/GridION Flow Cell (FLO-MIN114)
- Hard-Shell® 96-Well PCR Plates, low profile, thin wall, skirted, red/clear (Bio-Rad™, HSP9611)
- Thermo Scientific™ Nunc™ 96 Well 2 ml Polypropylene DeepWell Plate (Thermo Scientific, cat # 95040452)
- Reservoir Plate (Porvair, 390015)
- Azenta PCR Plate Lid (Azenta, 4ti-0291)
- Screw cap micro tube 2 ml, sterile (Sarstedt™, 72.694.006)
- Screw cap micro tube 0.5 ml, sterile (Sarstedt™, 72.785.005)
- Seroalbúmina bovina (BSA) (50 mg/ml) (p. ej., Invitrogen™ UltraPure™ BSA 50 mg/ml, AM2616)
- Etanol al 80 % recién preparado con agua sin nucleasas
- Agua sin nucleasas (p.ej. Thermo Scientific, AM9937)
- Tubos Eppendorf DNA LoBind de 1,5 ml
- 1000 µL Disposable Tips - Filtered, Pure, Single Stack (Tecan, 30057817)
- 200 µL Disposable Tips - Filtered, Pure, Single Stack (Tecan, 30057815)
- 50 µL Disposable Tips - Filtered, Pure, Single Stack (Tecan, 30057813)
- 10 µL Disposable Tips - Filtered, Pure, Single Stack (Tecan, 30104974)
- LiHa empty Disposable Tip Box Small (Tecan, 30058506)
- LiHa empty Disposable Tip Box Large (Tecan, 30058507)
- Waste bin (Tecan, 30185747)
Instrumental
- ElysION device with MinION integration
- Microcentrífuga
- Mezclador vórtex
- Centrifugadora de microplacas
- Pipeta multicanal y puntas
- Pipeta y puntas P1000
- Pipeta y puntas P200
- Pipeta y puntas P100
- Pipeta y puntas P20
- Pipeta y puntas P2
- Cubeta con hielo
Equipo opcional
- Fluorímetro Qubit™ (o equivalente)
For this protocol, 350 ng of genomic or amplicon DNA is required per sample as input.
The starting concentration of your gDNA or amplicon samples should be:
- 10 ng/µl in 35 µl of volume
Note: The output and sequencing read length of extracted DNA may vary depending on sample quality and species. Ensure you are using high-quality sample inputs.
Sample type method variables: gDNA or amplicon
This method is used for gDNA samples by default. There is an option to select the amplicon sample input variable.
Method variables
Refer to the ElysION MinION user guide for more details.
If you wish to alter the default variables for your assay, select the System tab on the bottom left of the screen, then Method configurator. Then select the method that you wish to modify.
The variables for the Rapid Barcoding protocol are detailed below:
| Variable name | Default parameter | Parameter range/options | Description |
|---|---|---|---|
| gDNA or Amplicon Preparation | 0 = gDNA | 0 = gDNA 1= Amplicon | Allows you to select the sample type for the prep. |
| Fragmentation Time - Step 1 (unit = seconds) | 120 s | Min = 60 s Max = 240 s | Allows you to adjust the length of the 30°C hold on the On-Deck Thermal Cycler (ODTC) during the fragmentation reaction. |
| Fragmentation Time - Step 2 (unit = seconds) | 120 s | Min = 60 s Max = 240 s | Allows you to adjust the length of the 80°C hold on the ODTC during the fragmentation reaction. |
| AMPure XP Bead Clean-up Ratio | 1.0X | 0.4X, 0.6X, 0.8X, 1.0X, 1.2X | Allows you to adjust the ratio of AXP bead volume to sample volume during the clean-up step. For example, for the default value of 1.0, 100 μl of beads will be added to 100 μl of pooled samples. For a value of 0.6, 60 μl of beads will be added to 100 μl of pooled samples. |
| Bead Binding Time (unit = minutes) | 5 min | Min = 2 min Max = 30 min | Allows you to adjust the length of time the AXP-pool mix is incubated on the shaker. |
| Bead Elution Time (unit = minutes) | 15 min | Min = 2 min Max = 30 min | Allows you to adjust the length of time the beads are left to elute before pelleting. |
| Pause for QC pre Flow Cell Loading | 0 = off | 0 = off 1 = on | Enabling this feature will instruct the ElysION to pause prior to the final eluate collection, allowing sample normalisation to a desired concentration, before automated flow cell loading. |
Recommendation for the "Pause for QC" variable when enabled is provided at the end of section 4, "ElysION run setup".
Input DNA
How to QC your input DNA
It is important that the input DNA meets the quantity and quality requirements. Using too little or too much DNA, or DNA of poor quality (e.g. highly fragmented or containing RNA or chemical contaminants) can affect your library preparation.
For instructions on how to perform quality control of your DNA sample, read the Input DNA/RNA QC protocol.
Chemical contaminants
Depending on how the DNA is extracted from the raw sample, certain chemical contaminants may remain in the purified DNA, which can affect library preparation efficiency and sequencing quality. Read more about contaminants on the Contaminants page of the Community.
Check your flow cell
The number of pores in your flow cell will be checked by the ElysION device at the start of your assay. MinION/GridION Flow Cells should be checked within 12 weeks of purchasing.
Oxford Nanopore will replace any unused flow cell with fewer than the number of pores listed in the Table below, when the result is reported within two days of performing the flow cell check, and when the storage recommendations have been followed. To do the flow cell check, follow the instructions on the ElysION on-screen display.
| Flow cell | Minimum number of active pores covered by warranty |
|---|---|
| MinION/GridION Flow Cell | 800 |
Third-party reagents
We have validated and recommend the use of all the third-party reagents used in this protocol. Alternatives have not been tested by Oxford Nanopore.
For all third-party reagents, we recommend following the manufacturer's instructions to prepare the reagents for use.
The Rapid Adapter (RA) used in this kit and protocol is not interchangeable with other sequencing adapters.
Rapid Barcoding Kit 96 V14 (SQK-RBK114.96) contents
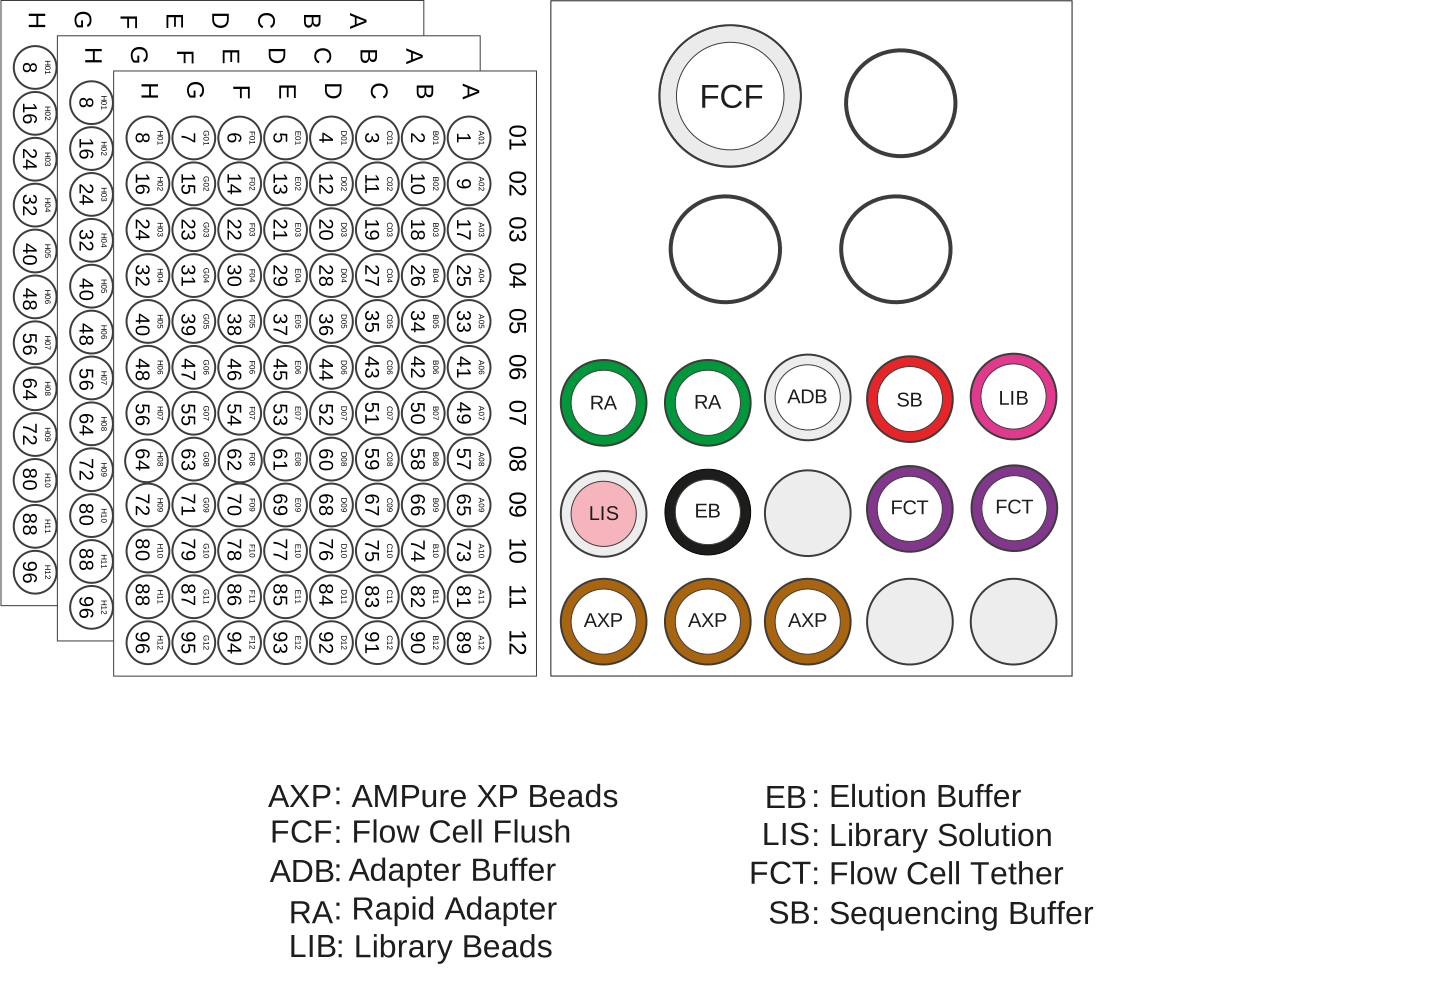
| Name | Acronym | Cap colour | No. of vials | Fill volume per vial (µl) |
|---|---|---|---|---|
| Rapid Adapter | RA | Green | 2 | 15 |
| Adapter Buffer | ADB | Clear | 1 | 100 |
| AMPure XP Beads | AXP | Amber | 3 | 1,200 |
| Elution Buffer | EB | Black | 1 | 1,500 |
| Sequencing Buffer | SB | Red | 1 | 1,700 |
| Library Beads | LIB | Pink | 1 | 1,800 |
| Library Solution | LIS | White cap, pink label | 1 | 1,800 |
| Flow Cell Flush | FCF | Clear | 1 | 15,500 |
| Flow Cell Tether | FCT | Purple | 2 | 200 |
| Rapid Barcodes | RB01-96 | - | 3 plates | 8 µl per well |
This product contains AMPure XP reagent manufactured by Beckman Coulter Inc. and can be stored at -20°C with the kit, without detriment to reagent stability.
3. ElysION RBK114 sample sheet setup
Sample sheet information
The sample sheet assigns a barcode to each sample, allowing you to pick a range from the 96-well plate, and for a sample ID to be tracked from input to results.
For more information on setting up a sample sheet, refer to the ElysION MinION user guide.
Set up your sample sheet as a CSV file with the following information:
| Required field | User input | Definition / field info |
|---|---|---|
| v1 | Version field, no input required outside of field | |
| assay | rbk:vX.x | Assay ID and version |
| library_id | User-defined | Identification for the DNA library |
| created_by | User-defined | Identification of operator setting up sample sheet |
| created_at | User-defined | Date and time of creation. Follow the format outlined in the ElysION MinION user guide. |
| sample_count | User-defined | Number of samples processed in run (1 to 96 samples) |
| well_id | A1-H12 | Positions in 96-well plate being used (1 to 96 samples). Samples must start from position A1 in the 96-well plate and run consecutively column-wise. |
| barcode | barcode01-barcode96 | Rapid barcodes from SQK-RBK114.96 being used in library preparation. Up to 96 barcodes are available in the sequencing kit. These should be used sequentially (e.g. Barcodes 01-96, Barcodes 01-24, or Barcodes 50-60). |
| sample_type | User-defined | Description or characteristics of sample input |
| sample_id | User-defined from LIMS system (lims-sampleid-12345) | Identification for each sample input (e.g. from LIMS system) |
| sample_volume | User-defined | Input sample volume to be automatically normalised by the robot to the required input volume using nuclease-free water. |
Below is an example of a sample sheet CSV file:
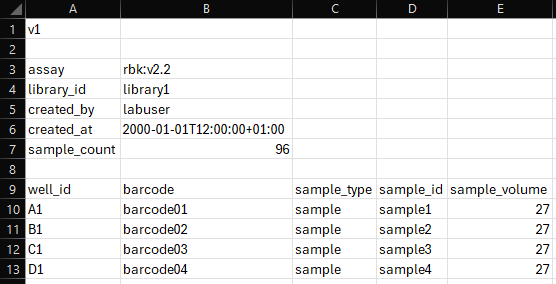
4. ElysION run setup
The automated library preparation and sequencing method using the ElysION device can be followed using the on-screen display on the device.
Ensure you have all the correct hardware components, software packages and workflows installed to carry out this method.
For more information on the device and the processes, refer to the ElysION MinION user guide.
Thaw the kit components at room temperature, spin down briefly using a microfuge and mix by pipetting as indicated in the Table below:
| Reagent | 1. Thaw at room temperature | 2. Briefly spin down | 3. Mix well by pipetting |
|---|---|---|---|
| Rapid Barcode Plate (RB01-96) | Not frozen | ✓ | - |
| Rapid Adapter (RA) | Not frozen | ✓ | ✓ |
| AMPure XP Beads (AXP) | ✓ | ✓ | Mix by pipetting or vortexing immediately before use |
| Elution Buffer (EB) | ✓ | ✓ | ✓ |
| Adapter Buffer (ADB) | ✓ | ✓ | Mix by vortexing |
| Flow Cell Flush (FCF) | ✓ | ✓ | ✓ |
| Flow Cell Tether (FCT) | ✓ | ✓ | ✓ |
| Sequencing Buffer (SB) | ✓ | ✓ | ✓ |
| Library Beads (LIB) | ✓ | ✓ | Mix by pipetting or vortexing immediately before use |
| Bovine Serum Albumin (BSA) | ✓ | ✓ | ✓ |
| Wash Mix (WMX) | Not frozen | ✓ | ✓ |
| Wash Diluent (DIL) | ✓ | ✓ | Mix by vortexing |
| Storage Buffer (S) | ✓ | ✓ | Mix by vortexing |
The wells of the barcoding plate are intended for single use only. Ensure your barcode well is sealed before use. Do not reuse the barcode wells.
Switch on the ElysION device and its computer following the user guide.
The Background Services application (BotQL) should start up automatically in the background when starting up the device.
Ensure the Background Services application is running.
If the UI is unable to connect to the instrument, open the Services application using the Windows search bar. Scroll down to the BotQL application which should show as running. If the application is not running, press Start. To restart the application, press Restart. Wait a few seconds before reopening the UI.
Open the ElysION UI application and wait for a few seconds for the UI to connect to the liquid handler.
Ensure the ElysION deck is clear of any labware before performing automated checks.
Failure to ensure the deck is clear can lead to errors in checks or damage to the equipment.
Close the door to the robot and select "Initialise" on the display.
Note: The ElysION device will perform automated checks.
Allow the initialisation checks to complete before proceeding with the library preparation method.
Select "Run method" on the on-screen display.
Select the method “Rapid Barcoding Kit” on the on-screen display.
Click Next to proceed.
Select the MinION Mk1D position that you wish to load and insert a MinION/GridION Flow Cell into the correct location on the deck as shown on the on-screen display.
Instructions for inserting a flow cell onto the ElysION device can be found in the ElysION MinION user guide.
Select "Run checks" on the on-screen display.
You may check three flow cells simultaneously on the ElysION deck if you wish to set up interleaving runs. However, any unused flow cells should be returned to the fridge after checking, until required for the subsequent library preparation.
Refer to the end of this section for interleaving run setup.
Note: If your flow cell does not reach the required number of pores for your run, insert a new flow cell and repeat the flow cell check before proceeding with the run setup.
Select "Import" on the on-screen display to upload your sample sheet.
Once completed, click Next to proceed.
Prepare the reagents in accordance with the reagent preparation page on the on-screen display.
Once completed, click Next to proceed.
Once your flow cell check has successfully completed, set up your sequencing run conditions on the on-screen display:
Select the sequencing time limit, or to stop run when the flow cell pores are depleted.
Select a data target.
Select whether to perform:
- A flow cell flush to return the used flow cell to Oxford Nanopore.
- Or a flow cell wash using the Flow Cell Wash Kit (EXP-WSH004) to reuse your flow cell.
Select whether write out to a POD5 file format is turned on or off.
Note: Reagent volumes and guidance for flow cell wash or flush will be given on the deck loading page. If you would like to perform a flow cell wash for reuse, we recommend thawing the wash reagents at the same time as the library preparation reagents.
For more information on the run conditions, refer to the ElysION MinION user guide.
Reagents and consumables requirements
Consider the following when preparing and loading your reagents and consumables into the ElysION device to mitigate risk of workflow failure and equipment damage:
Correct consumables are used with each reagent.
Spin down all samples and reagents, making sure they do not contain bubbles.
Tip boxes are inserted correctly into the nest positions and sit flat against the deck.
Plates are flat in their deck position and sit within the barriers on the deck, and tubes are fully inserted into the rack.
Set up the ElysION deck according to the deck layout outlined in the UI of the on-screen display.
The position of the tip boxes and reagents will change depending on the sample count and run setup. Follow the instructions on the on-screen display correctly for your run.
Insert two empty waste bins into the disposable waste drawer below the deck.
Close the door of the ElysION device.
Click "Begin run" to start the automated library preparation and sequencing.
Pause for QC pre Flow Cell Loading
If "Pause for QC pre Flow Cell Loading" is enabled via the Method configurator during the run setup, the robot will automatically pause prior to the final eluate collection, with the next step shown as "Pause for QC".
Pause for QC pre Flow Cell Loading
To quantify your samples pre flow cell loading, we recommend the following:
Quantify 1 µl of eluted sample using a Qubit fluorometer to ensure that DNA has been retained post clean-up. The eluted sample is present in well A1 of the DeepWell plate (DWP) in position B1 on the deck.
If you choose to adjust the concentration, make up 17.6 µl of eluate in well A1 of a new DWP using Elution Buffer (EB). Then spin down the plate to ensure the sample does not contain bubbles and place the plate in position B1 on the deck.
If not adjusting the concentration, return the DWP to position B1 on the deck.
To resume library preparation, press Continue on the on-screen display if using the 'Overview' page, or press Resume if using the 'Run Details' page.
Interleaving run setup
Once the first library preparation has completed and started sequencing, to set up a second run, select a new "Run Method" in the UI. Follow the on-screen instructions to unload any reagents and consumables that are not required from the deck and complete the deck setup for the new run.
Once the run is finished, unload the labware according to the deck clearing instructions, empty the bins, and discard or store in the freezer any unused reagents.
5. Issues during the automated library preparation
ElysION device troubleshooting
For commonly encountered issues, refer to the ElysION MinION user guide.
For in-depth troubleshooting, refer to the ElysION Operating manual provided with your device.
For additional customer support, contact the Oxford Nanopore support channel (support@nanoporetech.com).