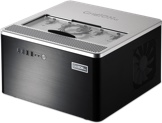
Q-Line Rapid Barcoding Kit 96 V14 (Q-SQK-RBK114.96) (Q_RBK114.96_RevB_13Aug2026)


GridION: Protocol
V Q_RBK114.96_RevB_13Aug2026
FOR RESEARCH USE ONLY.
NOT FOR USE IN DIAGNOSTIC PROCEDURES.
Contents
Introduction
Library preparation
1. Overview of the protocol
This kit is recommended for users who:
- Want to multiplex samples to reduce price per sample
- Need a PCR-free method of multiplexing to preserve additional information such as base modifications
- Require a short preparation time
- Have limited access to laboratory equipment
This protocol describes how to carry out rapid barcoding of genomic, plasmid, or amplicon DNA using the Q-Line Rapid Barcoding Kit 96 V14 (Q-SQK-RBK114.96). There are 96 unique barcodes, allowing the user to pool up to 96 different samples in one sequencing experiment.
Workflow
The DNA input undergoes a transposase step to fragment the samples while attaching rapid barcodes to the ends simultaneously. The samples are then pooled and a bead clean-up performed to remove any excess transposases in the reaction. The sequencing adapters are then attached to the barcodes and the library can be sequenced.
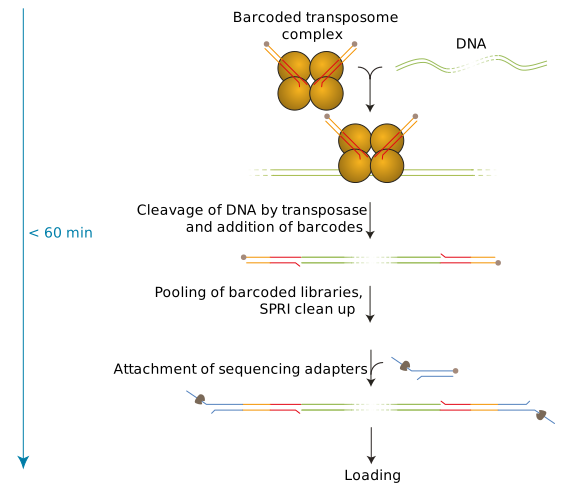
Steps in the sequencing workflow:
Prepare for your experiment
You will need to:
- Extract your DNA and check its length, quantity, and purity. The quality checks performed on input samples are essential to ensure experimental success.
- Ensure you have the Q-Line Rapid Barcoding Kit 96 V14, the correct equipment, and third-party reagents.
Library preparation
You will need to:
- Tagment your DNA using the Rapid Barcodes in the kit; this simultaneously attaches a pair of barcodes to the fragments.
- Pool the barcoded samples.
- Attach sequencing adapters supplied in the kit to the DNA ends.
- Prime the flow cell and load your DNA library into the flow cell.
Sequencing and analysis
You will need to start an assay using the Sequencing Software, which will collect raw data from the device and convert it into basecalled reads.
Compatibility of this protocol
This protocol should only be used in combination with:
- Q-Line Rapid Barcoding Kit 96 V14 (Q-SQK-RBK114.96)
- Q-Line GridION
- Q-Line MinION Flow Cell R10 (Q-FLO-MIN114)
Considerations for use
Warnings
- Follow Good Laboratory Practice in relation to personal safety, including but not limited to the use of personal protective equipment when handling the samples and test reagents. Refer to Safety Data Sheets provided with the product for specific safety requirements.
- Take care to prevent the reagents from contacting your skin, eyes, and mucous membranes.
- If contact occurs, immediately wash the affected area with soap and water. Thoroughly wash hands after handling samples and test reagents.
- In the event of a serious incident, contact the Manufacturer of the device. The user may also wish to contact the competent authority of the Member State in which the device was used.
- The Q-Line GridION as supplied provides only raw sequence data, which requires validated downstream analysis and the inclusion of assay-specific controls.
- Using the Q-Line GridION outside of the intended use is not recommended and is at the user’s risk.
Precautions
- Refer to local or WHO health and safety guidance for handling samples containing hazard group (HG)/BioSafety Level (BSL) 3 organisms.
- Decontaminate surfaces with 0.5% sodium hypochlorite (bleach) diluted with deionised or purified water.
- Prevent contamination of reagents by following standard contamination prevention procedures including but not limited to the use of personal protective equipment and using filter pipette tips for handling DNA.
- Reagents must be stored under the indicated storage conditions before and after use.
- Waste should be disposed of in accordance with local waste disposal regulations.
- Do not mix different lots of reagents.
- We recommend using DNase-free pipette tips.
- Never reuse the consumables intended for single use (for example, tips, gloves, and test tubes).
- When using a pipette, use correct volumes and adhere to manufacturer’s instructions. The use of multichannel pipettes is recommended where possible. Mouth pipettes must not be used.
- Do not use the reagents if the package is damaged or reagent tubes are leaking (reagents may be compromised, leading to an incorrect result). Please contact technical support.
- Do not use reagents after their expiration date.
- Do not use the flow cell if the package is damaged or the flow cell is leaking as the flow cell may be compromised, leading to an incorrect result. If leakage occurs, refer to the Flow Cell Safety Data Sheet for handling guidance, and contact technical support.
- Following recalibration, flow cells should be used within 7 days.
- After use, the flow cell must be prepared for return and disposal as described in the Q-Line GridION user guide.
Sequencing performance specifications
| Library description | Sequencing run time | Accuracy | Data output |
|---|---|---|---|
| 48 kb fragment - 96 samples | 24 hours | ~99.3% modal single-read accuracy | ~8.1 Gb / >50 Mb per sample |
| 1 kb amplicon - 24 samples | 24 hours | ~99.4% modal single-read accuracy | >50 Mb per sample |
Statistics are representative of average observed performance in verification tests. Output per sample represents the minimum average output. Values vary depending on sample quality, library preparation method, flow cell type, and basecalling model. Values provided assume high-quality samples that are prepared following our optimised protocols.
2. Equipment and consumables
Material
- 200 ng high molecular weight genomic DNA, or 50 ng high molecular weight plasmid or amplicon DNA per sample
- Q-Line Rapid Barcoding Kit 96 V14 (Q-SQK-RBK114.96)
Consumibles
- Q-Line MinION Flow Cell R10 (Q-FLO-MIN114)
- Qubit™ dsDNA HS Assay Kit (ThermoFisher, Q32851)
- Bovine Serum Albumin (BSA)
- Etanol al 80 % recién preparado con agua sin nucleasas
- Agua sin nucleasas (p.ej. Thermo Scientific, AM9937)
- Qubit Assay Tubes (e.g. ThermoFisher Q32856 or equivalent)
- Placa de PCR Eppendorf twin.tec® LoBind de 96 pocillos, con semifaldón y sellado térmico (Eppendorf™, 0030129504)
- Tubos Eppendorf DNA LoBind de 2 ml
- Tubos Eppendorf DNA LoBind de 1,5 ml
- Tubos de PCR de pared fina, 0,2 ml
Instrumental
- Q-Line GridION (Q-GRD-MK1)
- Q-Line MinION Flow Cell R10 Light Shield
- Microcentrífuga
- Temporizador
- Termociclador
- Gradilla magnética, apta para tubos Eppendorf de 1,5 ml
- Hula mixer (mezclador de rotación suave)
- Mezclador vórtex
- Cubeta con hielo
- Qubit fluorometer (or equivalent)
- Pipeta y puntas P1000
- Pipeta y puntas P200
- Pipeta y puntas P100
- Pipeta y puntas P20
- Pipeta y puntas P10
- Pipeta y puntas P2
- Pipeta multicanal y puntas
Cantidad de muestra inicial de ADN
Cómo realizar un control de calidad del ADN de la muestra inicial
Es importante que la muestra de ADN cumpla con los requisitos de cantidad y calidad. Usar demasiado ADN, poco o de mala calidad (p. ej., que esté muy fragmentado, que contenga ARN o contaminantes químicos), puede afectar a la preparación de la biblioteca.
Para realizar un control de calidad en la muestra de ADN, consulte el protocolo Input DNA/ RNA QC
Contaminantes químicos
Dependiendo de cómo se extraiga el ADN de la muestra cruda, ciertos contaminantes químicos pueden permanecer en el ADN purificado, lo cual afecta la eficacia de la preparación de la biblioteca y la calidad de la secuenciación. Encontrará más información sobre contaminantes en la página Contaminants de la comunidad Nanopore.
Q-Line Rapid Barcoding Kit 96 (Q-SQK-RBK114.96) contents
| Name | Abbreviation | Cap colour | Quantity | Minimum fill volume per container (µl) |
|---|---|---|---|---|
| AMPure XP Beads | AXP | Amber | 3 | 1,000 |
| Elution Buffer | EB | Black | 1 | 720 |
| Rapid Adapter | RA | Green | 2 | 9 |
| Adapter Buffer | ADB | Clear | 1 | 42 |
| Library Beads | LIB | Pink | 1 | 306 |
| Sequencing Buffer | SB | Red | 1 | 450 |
| Flow Cell Flush | FCF | N/A | 1 | 14,040 |
| Flow Cell Tether | FCT | Purple | 2 | 180 |
| 96 Rapid Barcodes | RB01–RB96 | N/A | 3 | 1.5 per well |
Note: The AMPure XP reagent manufactured by Beckman Coulter, Inc. can be stored at –20°C with the kit without detriment to reagent stability.
3. Computer requirements and software
Q-Line GridION IT requirements
The Q-Line GridION device contains all the hardware required to control up to five sequencing experiments simultaneously and acquire the data. The device is further enhanced with high-performance GPU technology for real-time basecalling. Read more in the Q-Line GridION configuration guide.
The Sequencing Software
The Sequencing Software controls the GridION, collects sequencing data in real-time and processes it into basecalled reads. The software can also demultiplex reads by barcode, and basecall/demultiplex data after a sequencing run has completed. You will be using the Sequencing Software for every assay you run.
For instructions on how to run the Sequencing Software on the GridION, please refer to the Q-Line GridION user guide.
4. Library preparation
Material
- 200 ng high molecular weight genomic DNA, or 50 ng high molecular weight plasmid or amplicon DNA per sample
- Rapid Barcode Plate (RB01-96)
- Microesferas AMPure XP (AXP)
- Elution Buffer (EB)
Consumibles
- Agua sin nucleasas (p.ej. Thermo Scientific, AM9937)
- Etanol al 80 % recién preparado con agua sin nucleasas
- 0.2 ml thin-walled PCR tubes or 0.2 ml 96-well PCR plate
- Tubos Eppendorf DNA LoBind de 1,5 ml
- Tubos Eppendorf DNA LoBind de 2 ml
- Kit Qubit 1x dsDNA HS (ThermoFisher, Q33230)
- Qubit Assay Tubes (e.g. ThermoFisher Q32856 or equivalent)
Instrumental
- Termociclador
- Hula mixer (mezclador de rotación suave)
- Gradilla magnética, apta para tubos Eppendorf de 1,5 ml
- Cubeta con hielo
- Microcentrífuga
- Mezclador vórtex
- Pipeta y puntas P1000
- Pipeta y puntas P200
- Pipeta y puntas P100
- Pipeta y puntas P20
- Pipeta y puntas P10
- Pipeta y puntas P2
- Pipeta multicanal y puntas
- Qubit fluorometer (or equivalent)
Thaw all reagents at room temperature, briefly spin down and mix each reagent using the appropriate method shown in the table below, and then store on ice:
| Reagent | 1. Thaw at room temperature | 2. Briefly spin down | 3. Mix well by pipetting or vortexing |
|---|---|---|---|
| Rapid Barcode Plate | Not frozen | ✓ | Pipette |
| Rapid Adapter (RA) | Not frozen | ✓ | Pipette |
| Adapter Buffer (ADB) | ✓ | ✓ | Pipette |
| AMPure XP Beads (AXP) | ✓ | ✓ | Pipette or vortex |
| Elution Buffer (EB) | ✓ | ✓ | Pipette |
| Sequencing Buffer (SB) | ✓ | ✓ | Vortex |
| Library Beads (LIB) | ✓ | ✓ | Pipette or vortex immediately before use |
| Flow Cell Flush (FCF) | ✓ | ✓ | Vortex |
| Flow Cell Tether (FCT) | ✓ | ✓ | Pipette |
Los pocillos con los códigos de barras de la placa están diseñados para utilizarse una sola vez. Compruebe que estén sellados antes de utilizarlos y no los reutilice una vez perforados o abiertos.
In individual 0.2 ml thin-walled PCR tubes or wells of a 96-well PCR plate, prepare your DNA sample as follows:
- Transfer the appropriate mass of input DNA into the tube, according to the sample type shown in the table below:
Sample type Input quantity per sample (ng) High molecular weight gDNA 200 Amplicon/plasmid 50 - Adjust volume to 9 µl with nuclease-free water
- Mix by pipetting 10–15 times
- Spin down briefly in a microfuge or plate spinner
Add 1 µl unique Rapid Barcode to each sample, using a multichannel pipette where possible.
Note: Ensure the sample information and the corresponding barcode number are recorded to be included in the sample sheet for sequencing.
Mix the contents of each tube by pipetting 10 times.
Spin down briefly in a microfuge or plate spinner.
Incubate the tubes or plate in the thermal cycler at 30°C for 2 minutes and then at 80°C for 2 minutes.
Place the tubes or plate on ice to cool.
Spin down the tubes or plate to collect the liquid at the bottom.
Pool all barcoded samples in a clean, appropriately labelled, 2 ml Eppendorf DNA LoBind tube, noting the total volume.
Resuspend the AMPure XP Beads (AXP) by vortexing until fully resuspended.
Add an equal volume of resuspended AMPure XP Beads (AXP) to the entire pooled barcoded sample and mix by flicking the tube 10 times.
Incubate on a hula mixer for 10 minutes at room temperature (18°C to 23°C).
During this incubation stage, prepare at least 4 ml of fresh 80% ethanol in nuclease-free water.
Once the 10-minute incubation is complete, briefly spin down the library.
Pellet on a magnetic separation rack for 5 minutes (or until the beads have visibly pelleted).
Keep the tube on the magnet and pipette off the supernatant.
Keeping the tube on the magnet, wash the beads with 2 ml of freshly prepared 80% ethanol without disturbing the pellet.
This can be achieved using a 1000 µl pipette twice.
Remove 2 ml of ethanol using a pipette and discard.
This can be achieved using a 1000 µl pipette twice.
Repeat the previous two steps.
Briefly spin down and place the tube back on the magnet.
Pipette off any residual ethanol. Allow to dry for 30 seconds, but do not dry the pellet to the point of cracking.
Remove the tube from the magnetic rack and resuspend the pellet in Elution Buffer (EB).
- If using gDNA: resuspend in 15 µl EB per 24 barcodes used, as shown in the table below.
| For 1–24 barcoded samples | For 25–48 barcoded samples | For 49–72 barcoded samples | For 73–96 barcoded samples | |
|---|---|---|---|---|
| Volume of EB (µl) | 15 | 30 | 45 | 60 |
- If using amplicon or plasmid: resuspend in 15 µl EB.
After the addition of EB, mix by flicking the tube until the pellet is fully suspended in buffer.
Incubate the library for 10 minutes at room temperature (18°C to 23°C).
Spin down and pellet the beads on a magnet until the eluate is clear and colourless.
Transfer the full volume of eluate into a clean 1.5 ml Eppendorf DNA LoBind tube.
Quantify 1 µl of eluted sample using a Qubit fluorometer.
Recovery quantities can vary between different inputs and library preparations and should be evaluated for your individual use case. However, we always recommend taking forward the full volume of DNA library for the best sequencing results.
Transfer 11 µl of the sample into a clean 1.5 ml Eppendorf DNA LoBind tube, ensuring the tube is appropriately labelled.
Note: If not loading immediately, the library can be stored at 2°C to 8°C for up to one week.
5. Priming and loading
Material
- Rapid Adapter (RA)
- Adapter Buffer (ADB)
- Sequencing Buffer (SB)
- Library Beads (LIB)
- Flow Cell Tether (FCT)
- Flow Cell Flush (FCF)
Consumibles
- Q-Line MinION Flow Cell R10 (Q-FLO-MIN114)
- Bovine Serum Albumin (BSA)
- Tubos Eppendorf DNA LoBind de 1,5 ml
Instrumental
- Q-Line GridION (Q-GRD-MK1)
- Q-Line MinION Flow Cell R10 Light Shield
- Termociclador
- Hula mixer (mezclador de rotación suave)
- Gradilla magnética, apta para tubos Eppendorf de 1,5 ml
- Cubeta con hielo
- Microcentrífuga
- Mezclador vórtex
- Pipeta y puntas P1000
- Pipeta y puntas P200
- Pipeta y puntas P100
- Pipeta y puntas P20
- Pipeta y puntas P10
- Pipeta y puntas P2
Priming and loading a flow cell
We recommend that all new users watch the 'Priming and loading your flow cell' video before your first run.
Note: This protocol describes the process of starting a sequencing run using the default Q-SQK-RBK114.96 assay supplied with Q-Line GridION. For more information on setting up a sequencing run, see the Q-Line GridION user guide. For more information on configuring an assay definition file for your own assay, see the Q-Line GridION configuration guide. Ensure you select the correct assay for your experiment.
Slide open the Q-Line GridION lid.
Insert the required number of Q-Line MinION Flow Cells.
Insert the flow cell into the device under the clip.
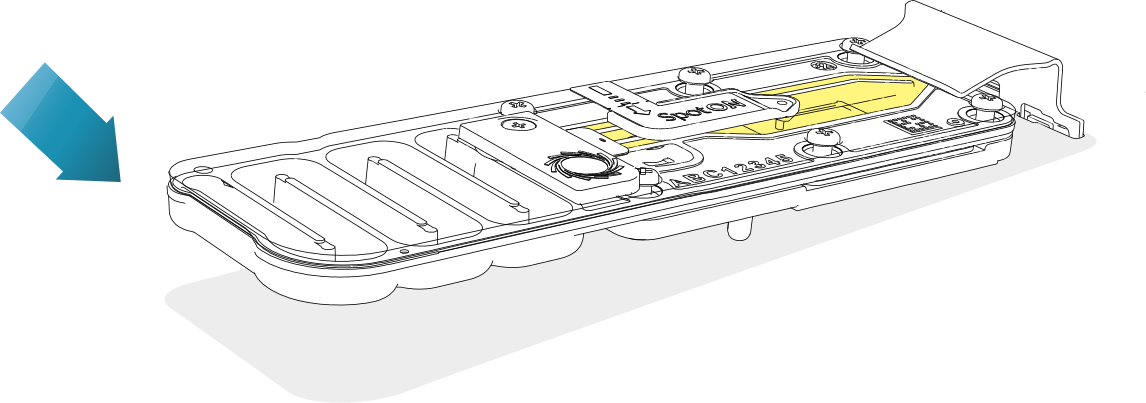
Press down firmly to ensure correct thermal and electrical contact. 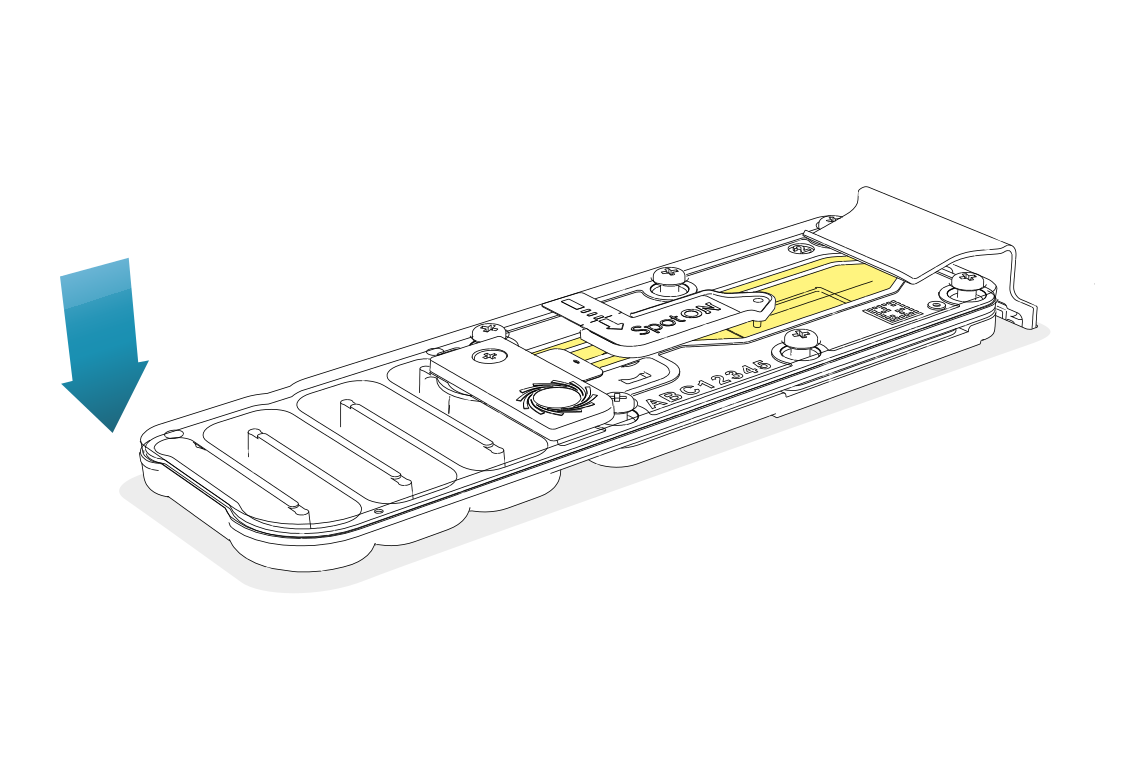
Open the Sequencing Software and navigate to the Run setup page.
Select the Q-SQK-RBK114.96 assay and click Continue.
Import and/or select the correct sample sheet for your sequencing assay run, and then click Continue.
For instructions on how to prepare and import a sample sheet, please refer to the Q-Line GridION user guide.
Run a flow cell check on the required number of compatible flow cells.
Ensure the flow cells have passed the flow cell check before proceeding.
If a flow cell fails the flow cell check, remove and reinsert the flow cell before running the flow cell check again.
If a flow cell fails a second flow cell check, replace the flow cell.
When the flow cell check has completed, click Continue.
Ensure the library IDs shown by the Sequencing Software match those you are about to prepare.
Gently mix the Rapid Adapter (RA) by pipetting 10 times, and spin down.
Mix the Adapter Buffer (ADB) by vortexing, and spin down.
In a fresh 1.5 ml Eppendorf DNA LoBind tube, dilute the Rapid Adapter (RA) as follows:
| Reagent | Volume (µl) |
|---|---|
| Rapid Adapter (RA) | 1.5 |
| Adapter Buffer (ADB) | 3.5 |
| Total | 5 |
Mix the diluted Rapid Adapter (RA + ADB) by pipetting, and spin down.
Add 1 µl of the diluted Rapid Adapter (RA + ADB) to 11 µl of DNA library (prepared in Section 4) for each library required for your sequencing assay run.
Mix tube(s) gently by flicking, and then spin down.
Incubate the reaction(s) for 5 minutes at room temperature (18°C to 23°C).
Note: The prepared library is used for loading onto the flow cell. Store the library on ice or at 4°C until ready to load.
Prepare the flow cell priming mix for each flow cell in a fresh 1.5 ml Eppendorf DNA LoBind tube using the reagents shown in the table below:
| Reagent | Volume (µl) |
|---|---|
| Flow Cell Flush (FCF) | 1,170 |
| Flow Cell Tether (FCT) | 30 |
| Bovine Serum Albumin (BSA) | 5 |
| Total | 1,205 |
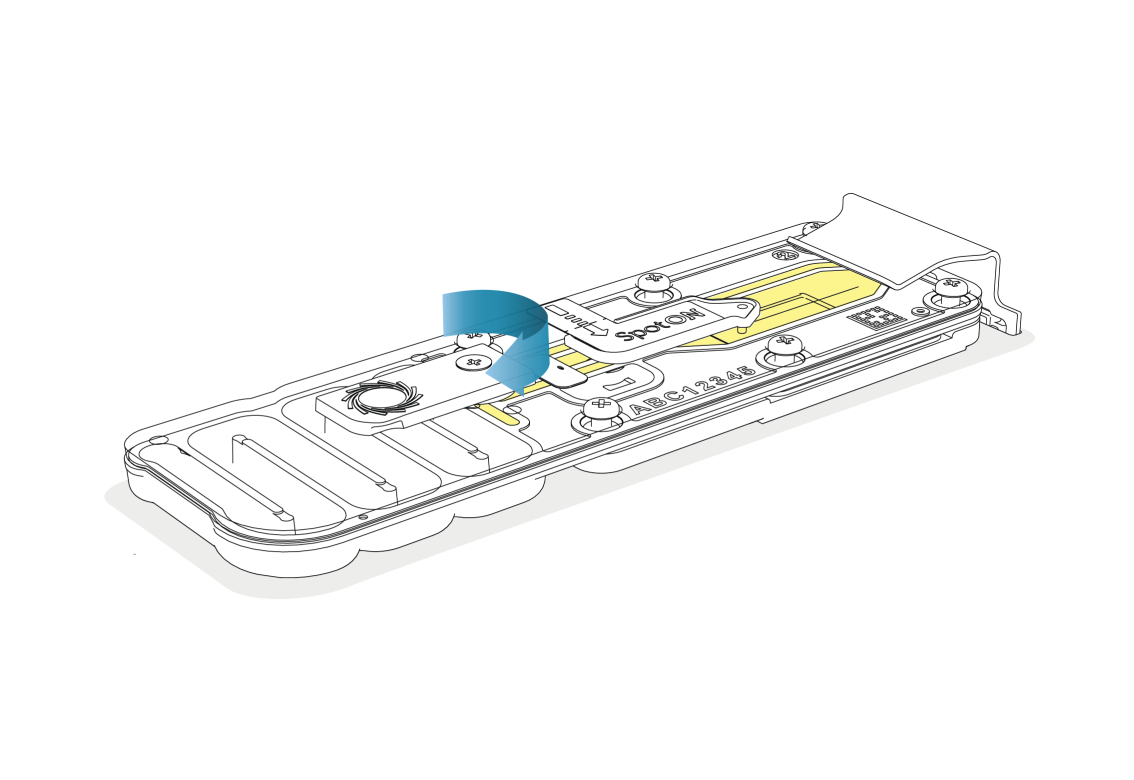
Slide the flow cell priming port cover clockwise to open the priming port.
Note: The priming port cover is located next to the waste channel.
Take care when drawing back buffer from the flow cell.
Do not remove more than 20–30 µl, and make sure that the array of pores is covered by buffer at all times. Introducing air bubbles into the array can irreversibly damage pores.
After opening the priming port, remove any potential air bubbles under the cover by performing the following steps:
- Set a P1000 pipette to 200 µl.
- Carefully insert the tip into the priming port, holding the pipette perpendicular to the flow cell.
- Turn the wheel until the dial shows 220–230 µl to draw back 20–30 µl, or until you can see a small volume of buffer entering the pipette tip.
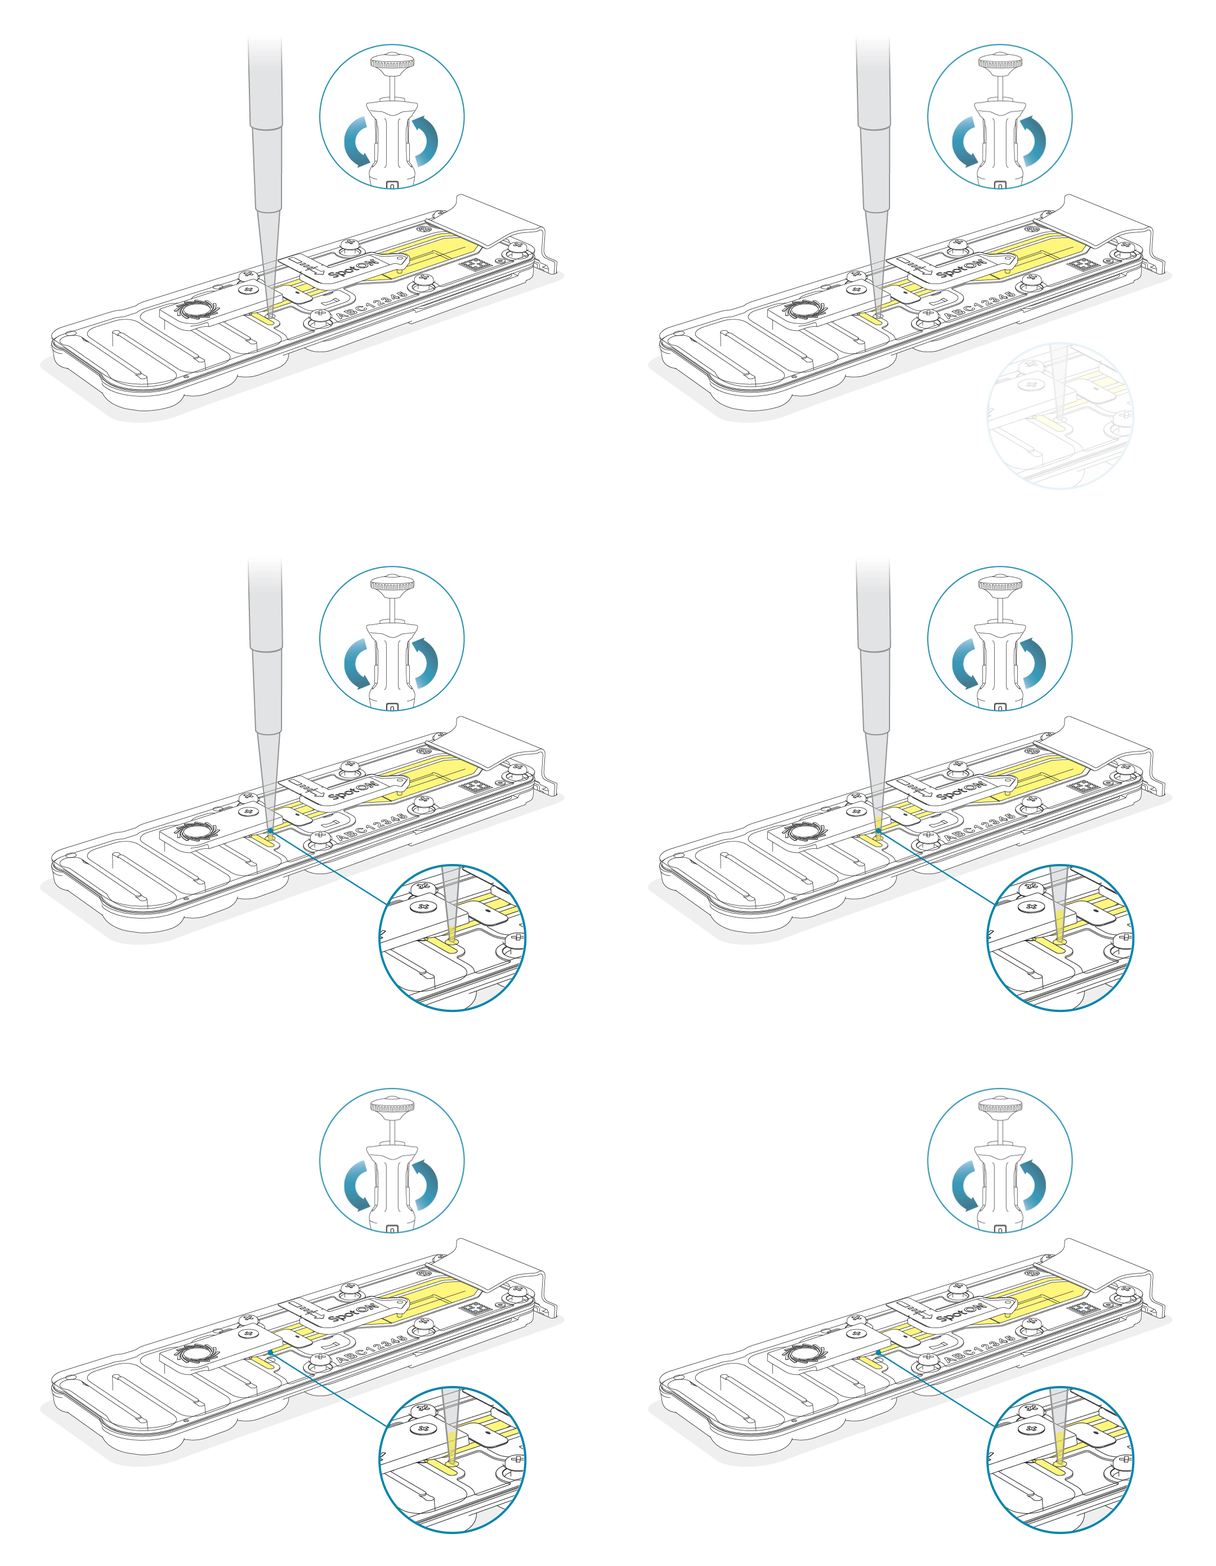
Note: Visually check that there is continuous buffer from the priming port across the sensor array.
Load 800 µl of the priming mix into the flow cell via the priming port, avoiding the introduction of air bubbles.
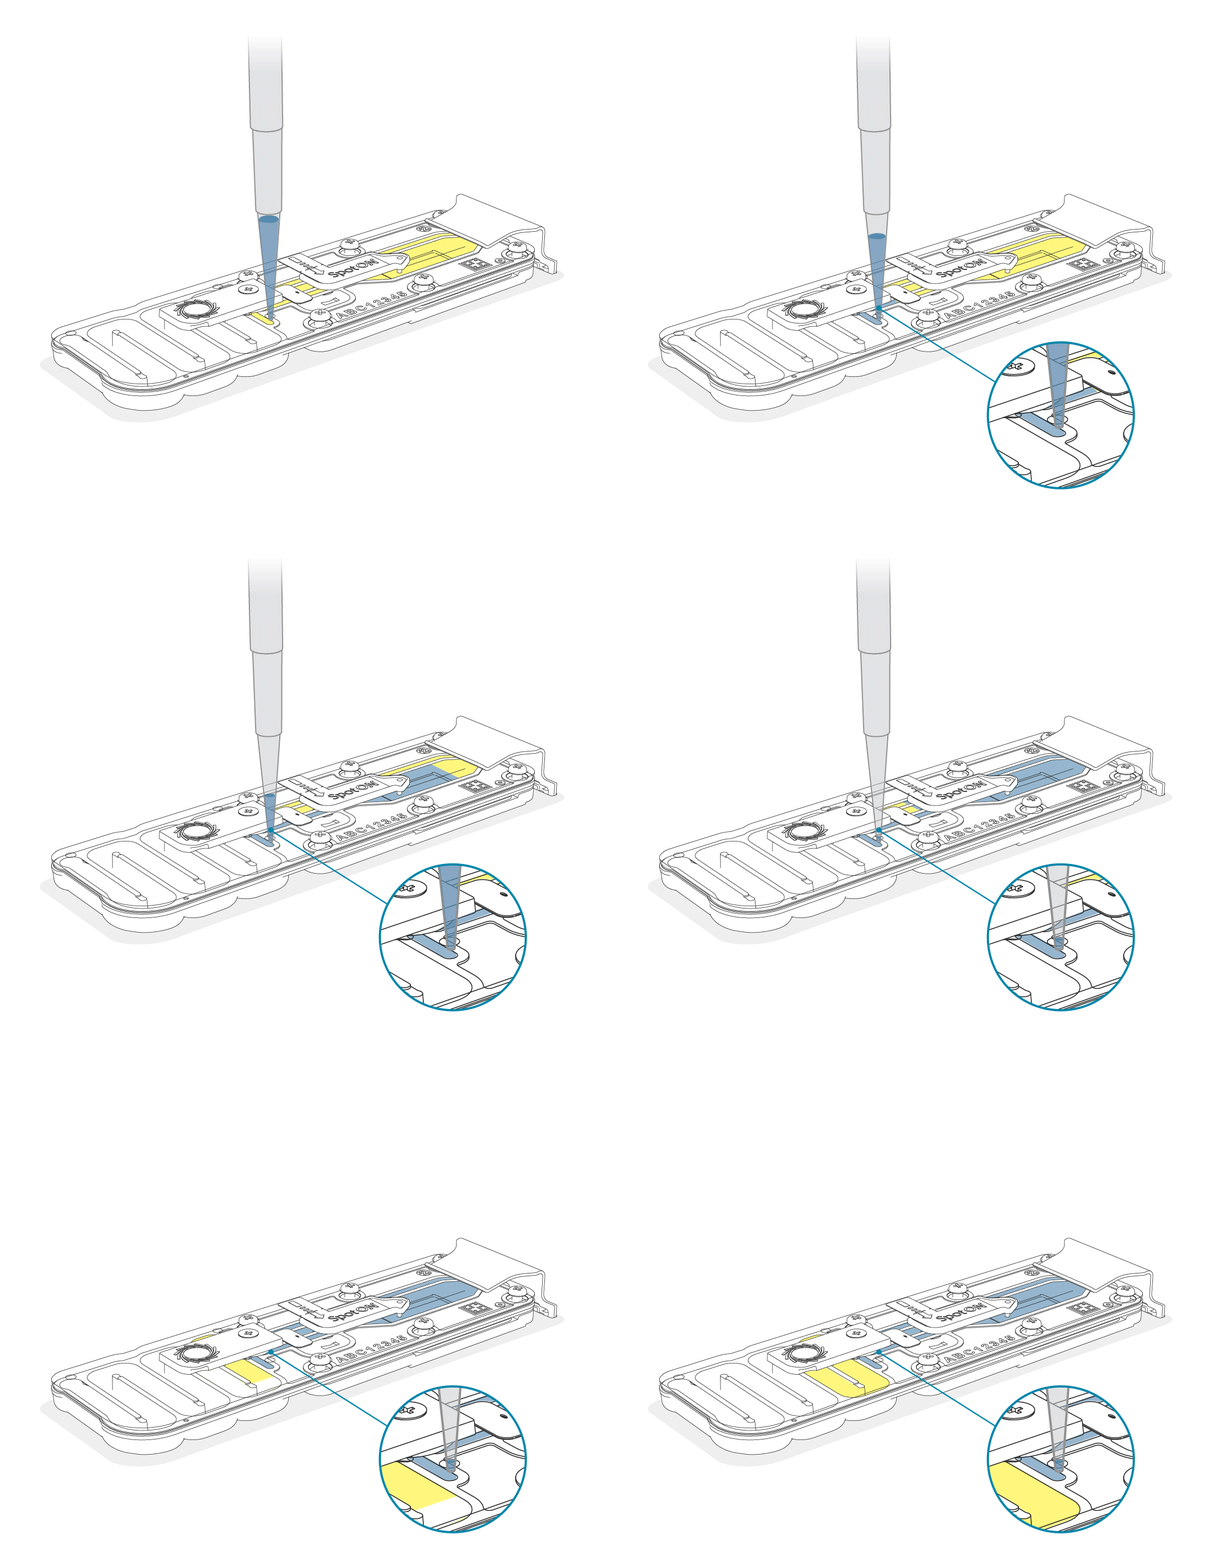
Leave the flow cell to incubate for 5 minutes.
During this time, prepare each library for loading by combining the reagents using the volumes in the table shown below:
| Reagent | Volume (µl) |
|---|---|
| Adapted library (from Priming and Loading step 15) | 12 |
| Sequencing Buffer (SB) | 37.5 |
| Library Beads (LIB) mixed immediately before use | 25.5 |
| Total | 75 |
Once the 5-minute incubation is complete, gently lift the SpotON sample port cover to make the SpotON sample port accessible.
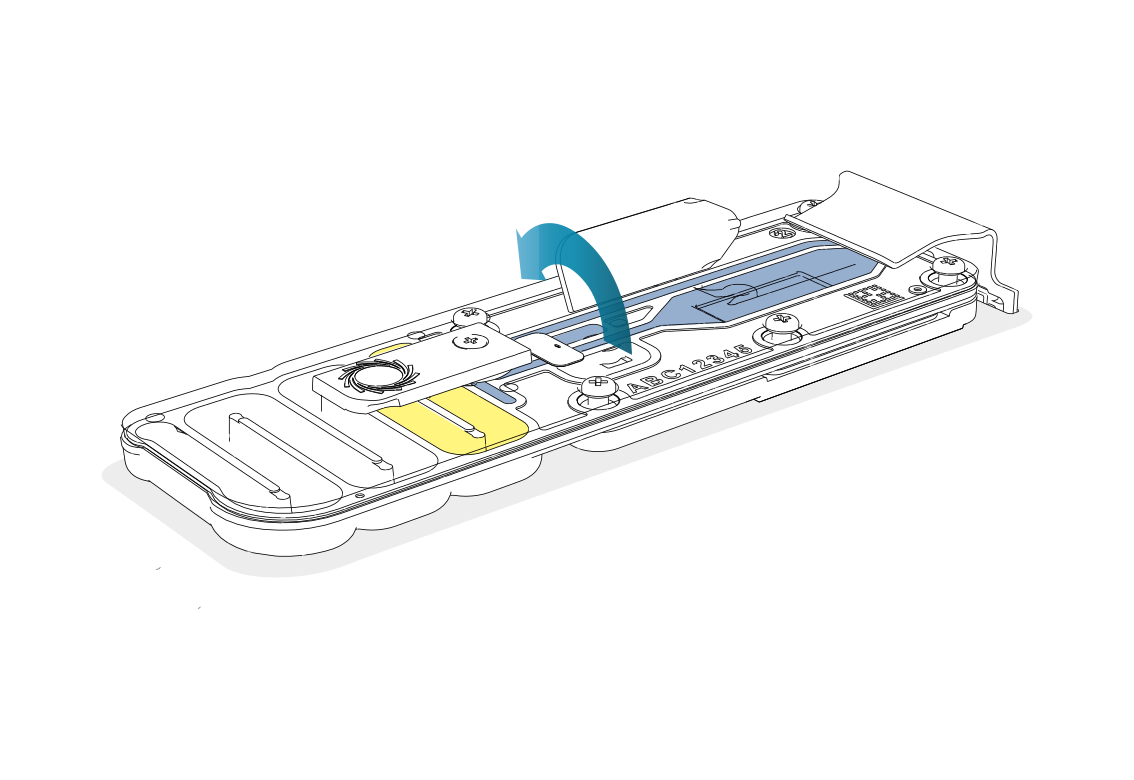
Load 200 µl of the priming mix into the flow cell priming port (not the SpotON sample port), avoiding the introduction of air bubbles.
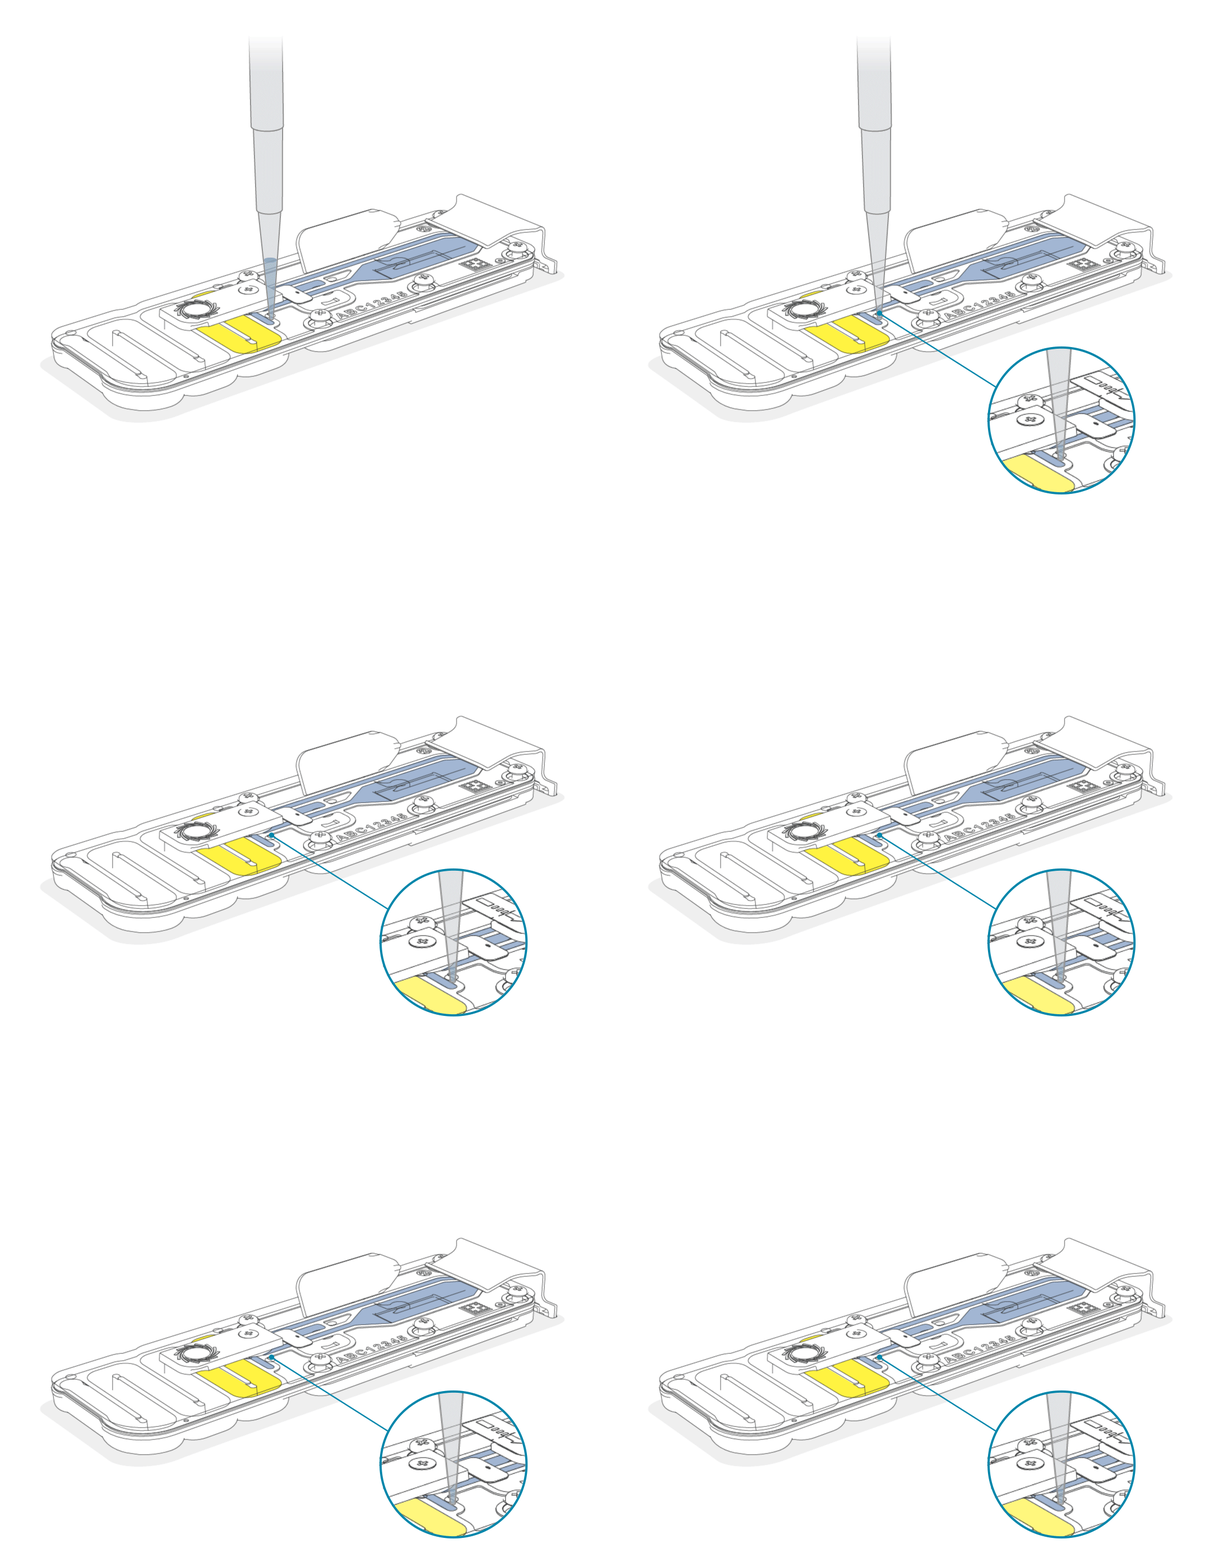
Note: A small volume of priming mix may be visible as a meniscus over the SpotON sample port. Take care not to allow priming mix to spill over the top of the flow cell. The liquid will wick back in through the port once pressure from the pipette is no longer applied.
Mix each prepared library gently by pipetting up and down just prior to loading.
Pay careful attention to the Sequencing Software to ensure that the correct library is loaded onto the correct flow cell.
The Sequencing Software assigns libraries (based on the sample sheet column “library_id”) to flow cells automatically. The libraries must be loaded onto the correct flow cell to ensure that data is correctly attributed to the sample.
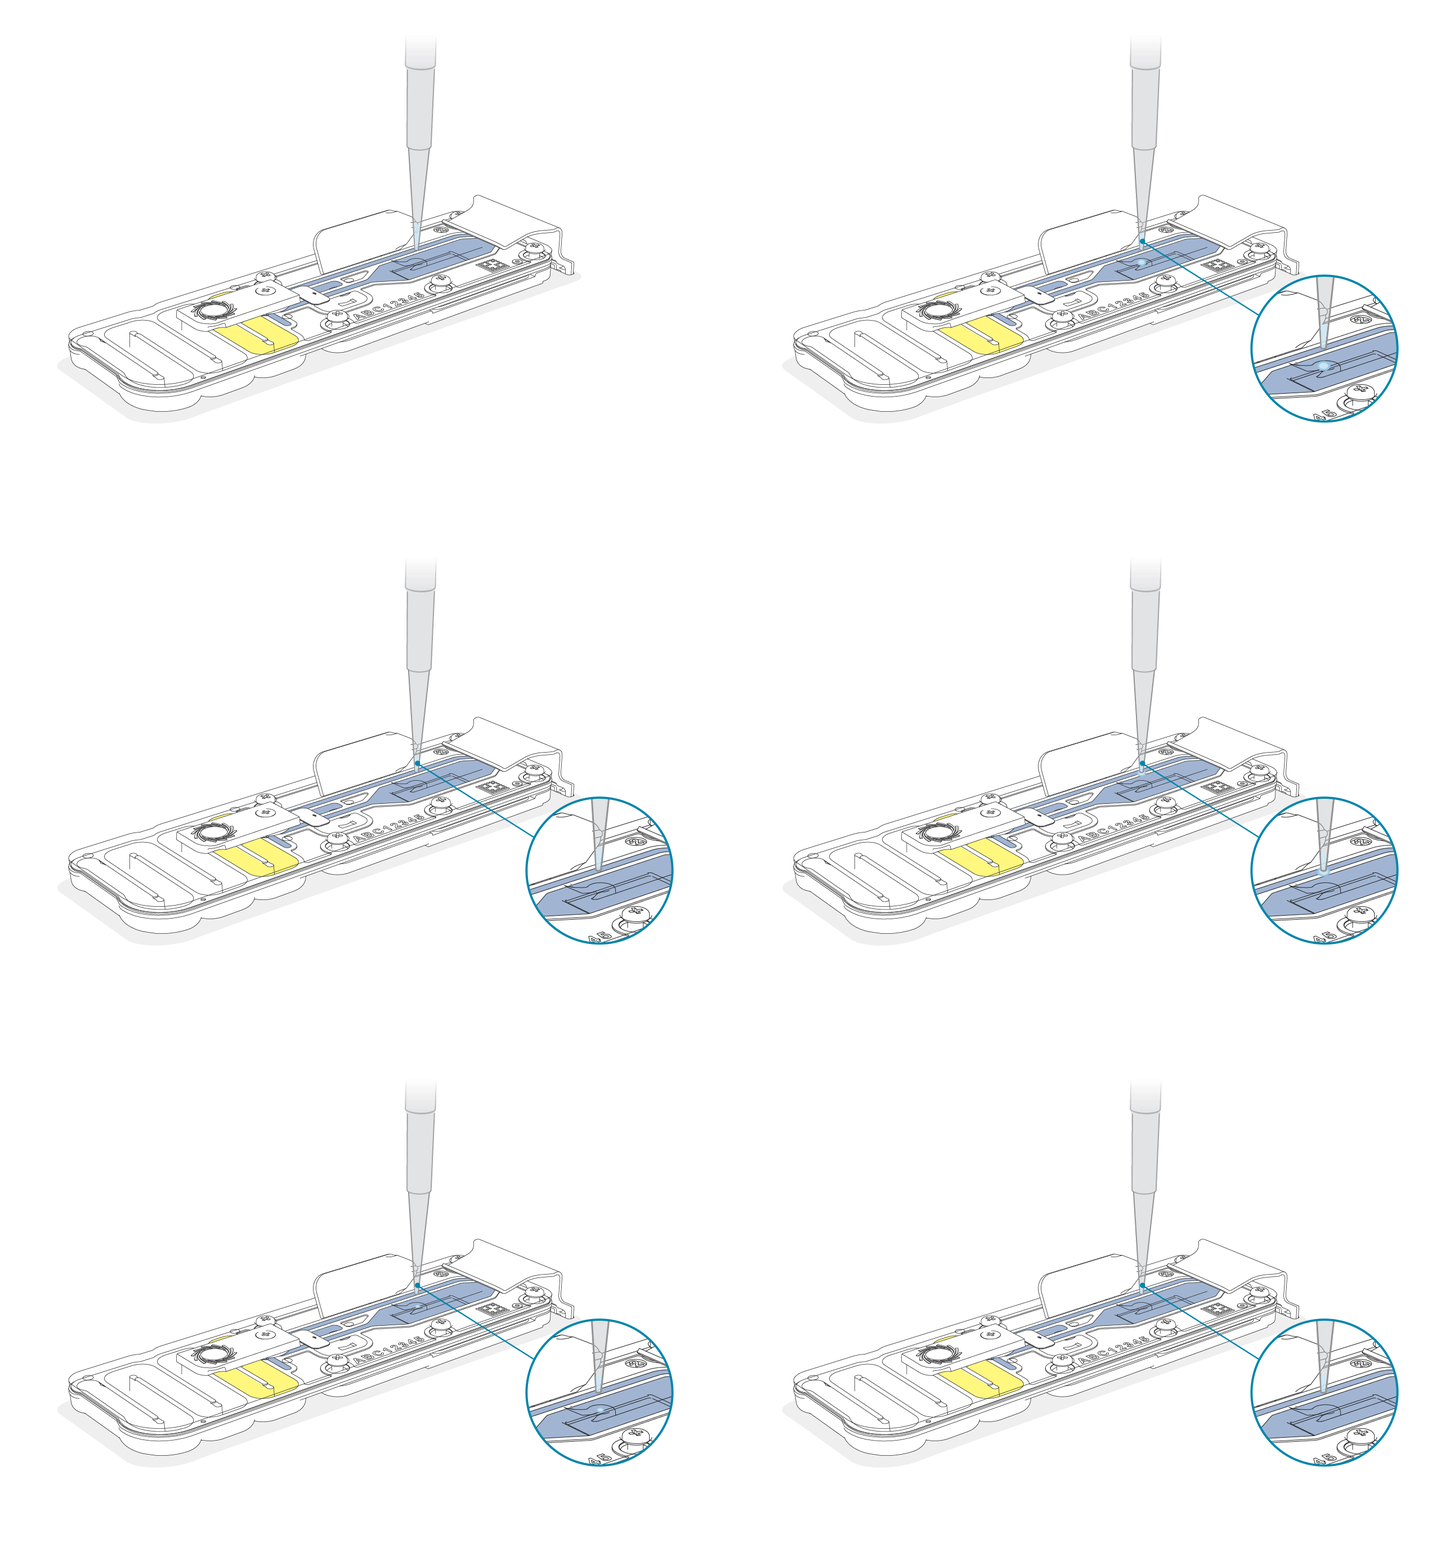
Add 75 µl of the prepared library to the flow cell via the SpotON sample port in a dropwise fashion. Ensure each drop flows into the port before adding the next.
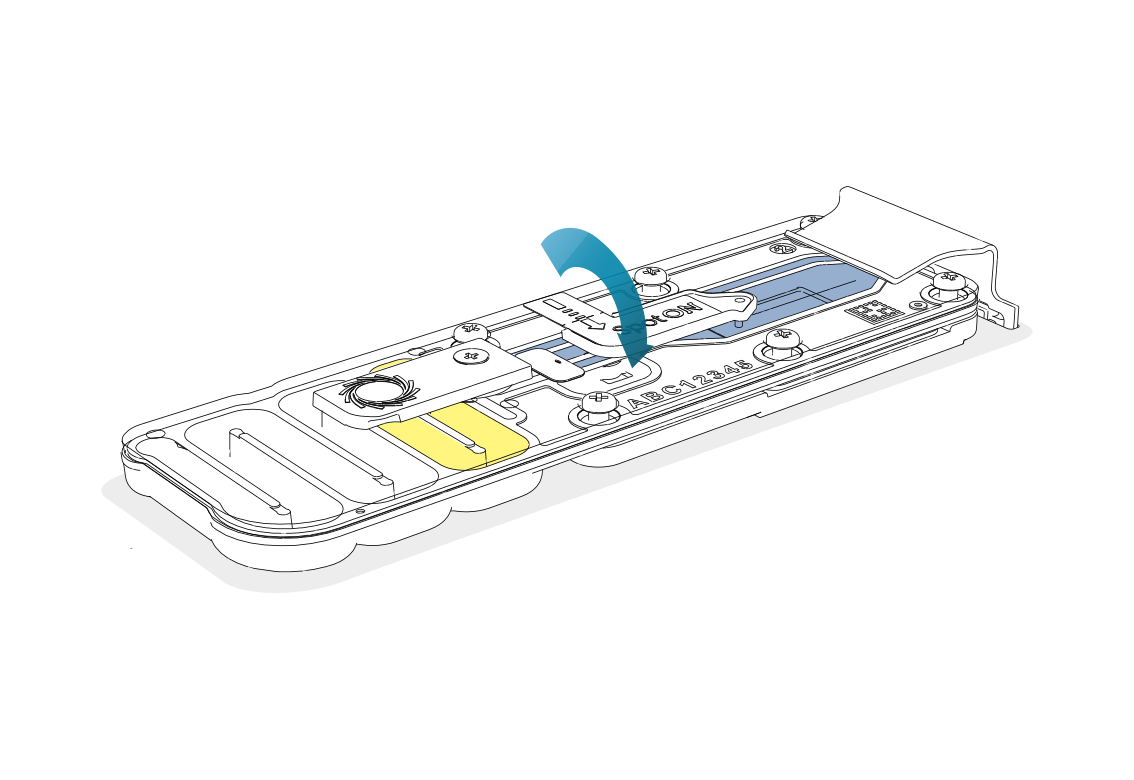
Gently replace the SpotON sample port cover, making sure the bung enters the SpotON port.
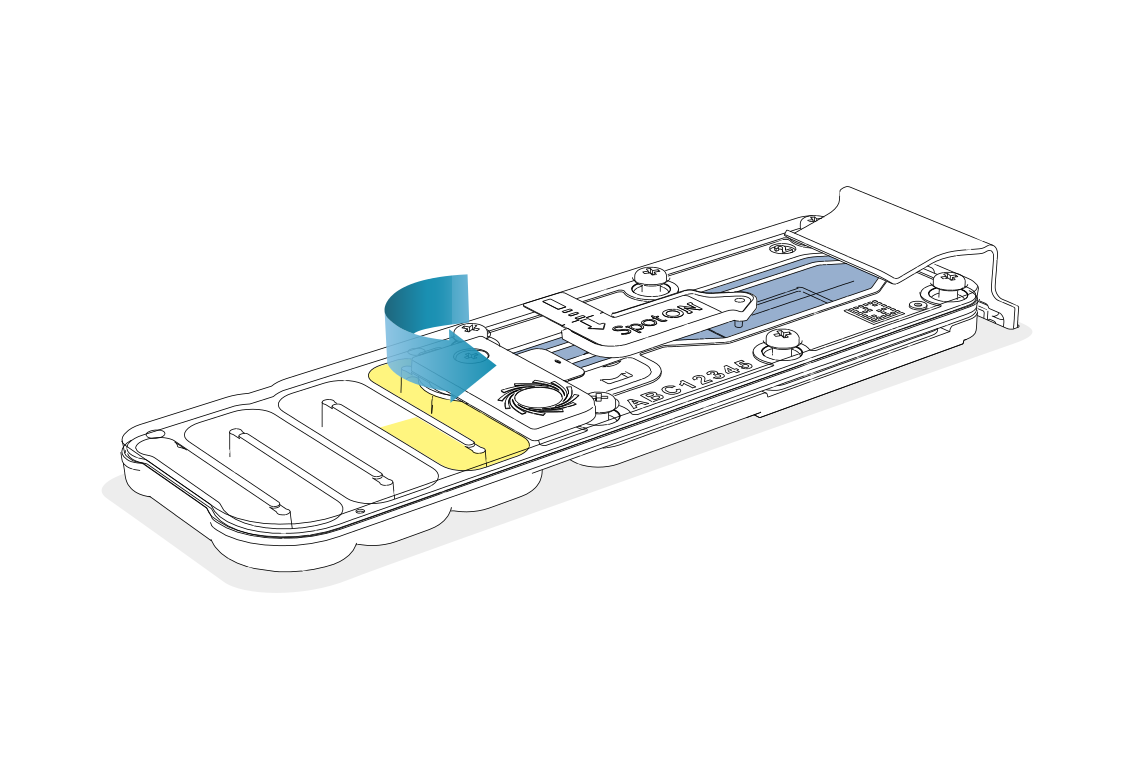
Close the priming port.
Attach the light shield (supplied with the flow cell).
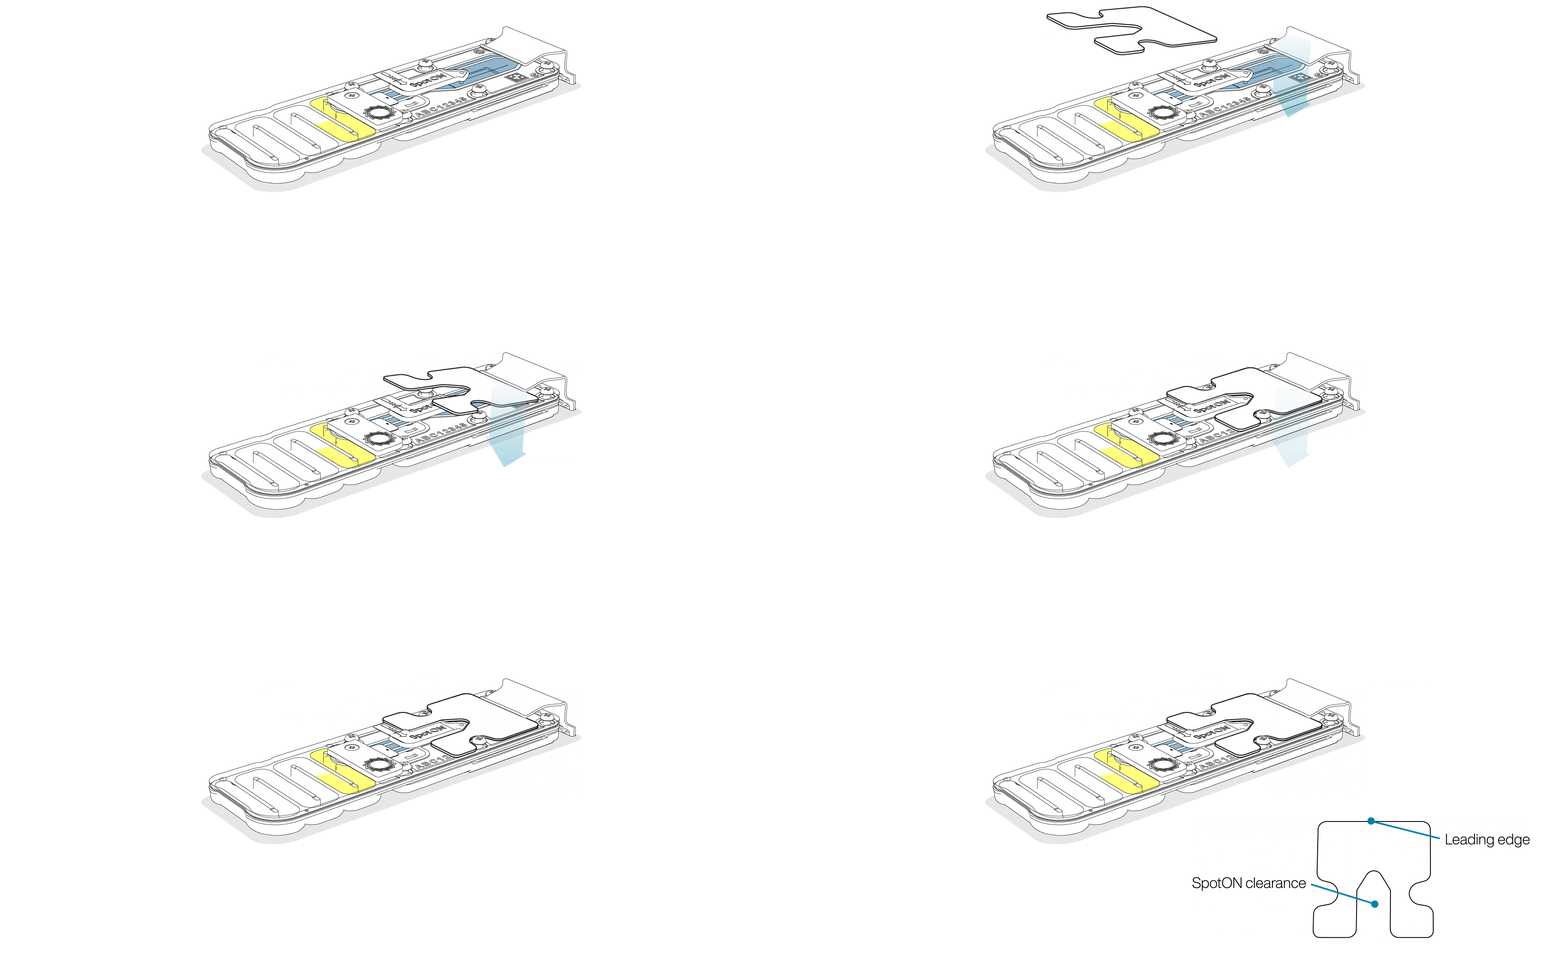
Close the lid of the Q-Line GridION, and click Continue in the Sequencing Software.
Review the details in the Sequencing Software and, if ready, click Run assay.
Note: A prompt will appear in the bottom right corner stating that the run has started. If you did not mean to start it, click Undo within 30 seconds, and the run will not start.
For further information
Refer to the Setting up a run section of the Q-Line GridION user guide.
For technical support
Contact Oxford Nanopore Technologies technical support at: support@nanoporetech.com
Last updated: 8/20/2026
Opciones de documento